.jpg.b9265433dc8c3b550370b1d0e4e4d2fc.jpg)
MarkJ
-
Posts
4,771 -
Joined
-
Last visited
Content Type
Profiles
Forums
Events
Gallery
Everything posted by MarkJ
-
.jpg.b9265433dc8c3b550370b1d0e4e4d2fc.thumb.jpg.915f5b46e3c9402eeaa6972073121c87.jpg) Thanks, David. She is done and sitting with the others comfortably on the shelf with the middle eye level spot until the next build is done. I just started the next one so that will be a long time from now. Finished photos are in the nascar under glass section. The decals were not that old but homemade which makes them a bear to get lined up just right. thanks again for your comments about the build.
Thanks, David. She is done and sitting with the others comfortably on the shelf with the middle eye level spot until the next build is done. I just started the next one so that will be a long time from now. Finished photos are in the nascar under glass section. The decals were not that old but homemade which makes them a bear to get lined up just right. thanks again for your comments about the build. -
Man am I ever late to the party. So glad to see that your back in the saddle, Pierre and you're working your usual magic again. Can't wait for the next update,
-
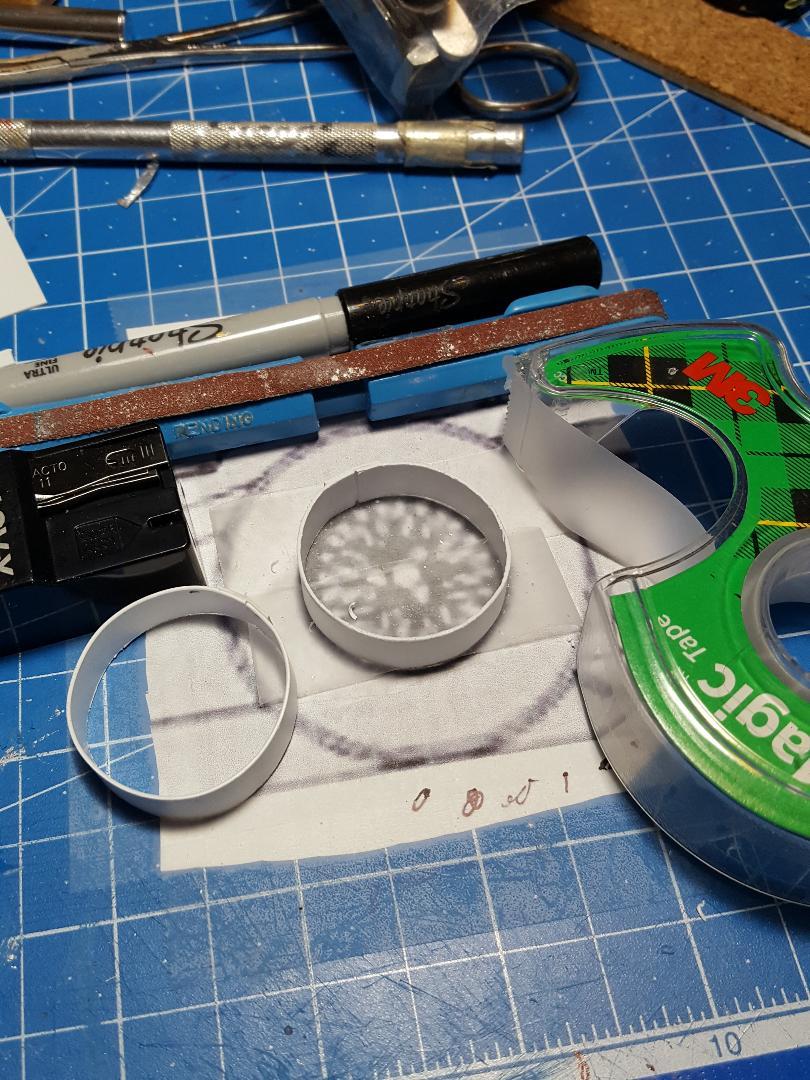
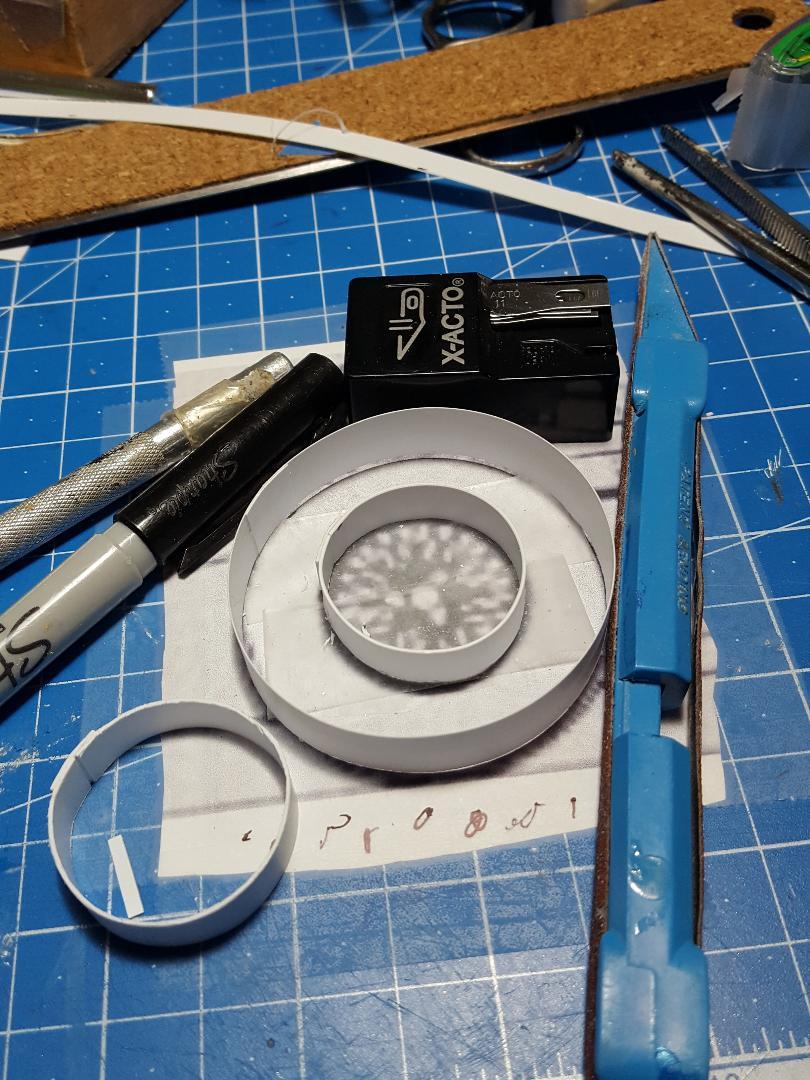
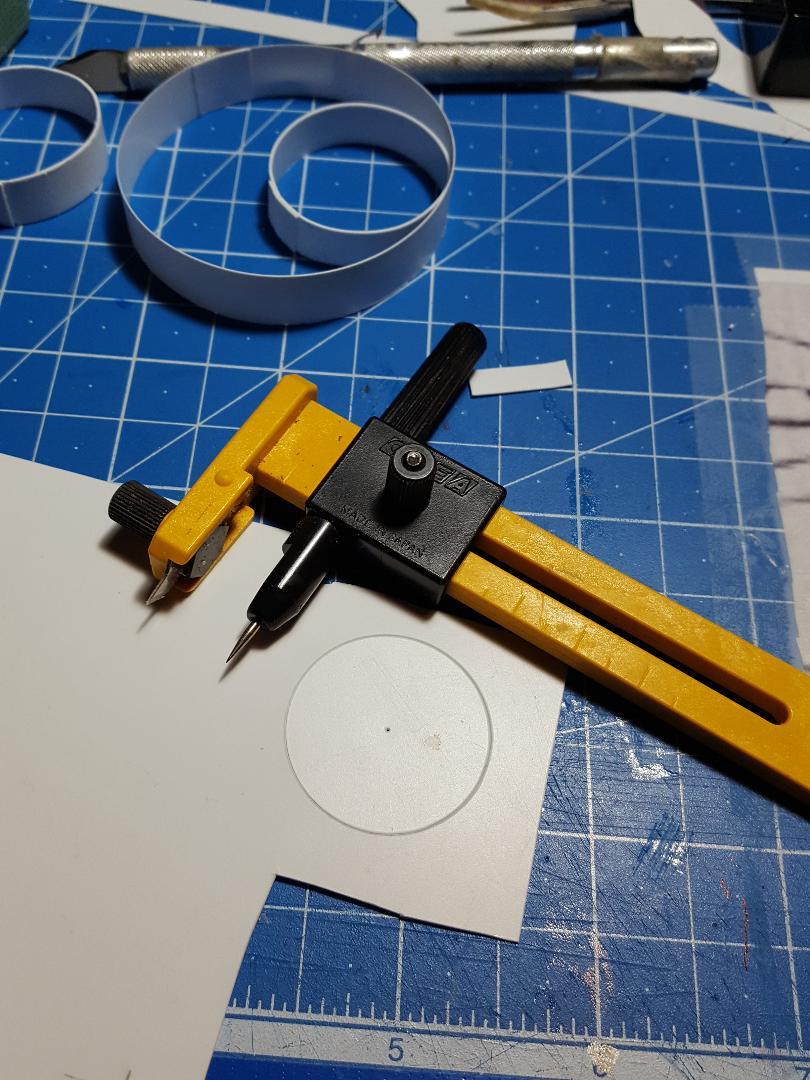
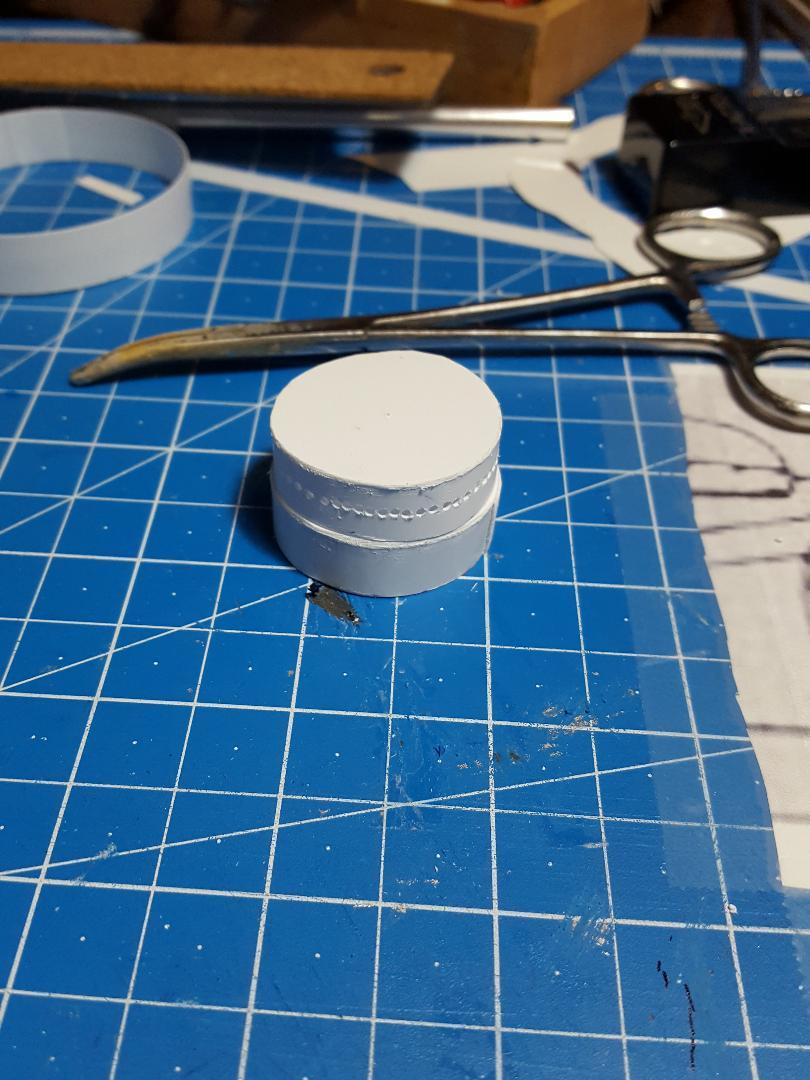
I decided to try to build a model with no kit and only using styrene and household products. First one to guess what it is gets nothing but the satisfaction of figuring it out first. I first searched for a kit and could find nothing, and I don't want to purchase a 3d printer or even learn how to use it. I will use 2d schematics and hope that they are correct and ref photos. I will make it 1/12 scale or very close to it, but it doesn't really matter. I chose this scale because making stuff is always easier if its bigger and the finished model should be about 13.5 inches long so it will fit in a 15-inch-long clear plastic display case. I will try to build the tires and wheels first and if I cannot for some reason I will give up on this idea and go to my stash and pick out a kit to build. Without the tires and wheels the body, engine, and other things won't be necessary. Wip pictures will be your clues to what it is and no "well I think it might be this type of car". The guesses have to include year model and full name of the vehicle. Now that you have got off the floor scoffing at my idea check out the first clues below.

-
Thank you, Ken. I appreciate the kind words about the build. Your flawless work is very inspiring and enjoyable to view.
-
Absolutely right, Bruce. There's really not that much going on under the hood on these vintage cars. But to get the correct look it takes a lot of time and effort. It's really all about the paint and decals on these babies. Thanks for visiting the wip and making the supportive comments you do about the builds.
-
Thank you, Jim. I appreciate your kind words about the build.
-
Rolls-Royce No Chemicals, No Paint, No Harmful Glues
MarkJ replied to Anglia105E's topic in WIP: Model Cars
So true. I could not agree with you more. Mark J -
Rolls-Royce No Chemicals, No Paint, No Harmful Glues
MarkJ replied to Anglia105E's topic in WIP: Model Cars
David, I believe you have figured this out very well and like you said just a tiny bit of touch up is all that remains to be done on the wheels. Mark J -
Thanks, Yoshimi. I am a big fan of your work and use your wips as well for reference material. Your recent number 21 Fairlane was very helpful in doing this build. Thanks for your kind words about the build.
-
Thanks, Larry. I appreciate your reply.
-
I totally agree with you Edgar. That is one heck of a resume for sure. Thanks for dropping by and sharing that with us.
-
You picked a great one in Mario. I'd say he's top 5 on the all-time driver list. Thanks for stopping by, Steve.
-
Thank you Michael. I really appreciate you weighing in on the build. That's the best part of modeling. The feeling of community it gives all of us.
-
Thanks, Donato. another one of my wip group who always had a way of keeping my interest in the build going. I really appreciate it sir.
-
Thank you, Michael. Your comment is very gratifying.
-
Thank you so much Kevin for being there just about every day checking in on the build. It's much appreciated. Actually, most of the detail is hidden inside the 3 shut windows so to see what there actually is, you would have to check out the wip. Thanks again for your thoughts on the build.
-
Thanks, Tony. I'm with you on the hood shut at this time in my building capabilities. Shelfer is the way to go for me now and glad I can still somewhat do that. You did notice the term Bucket list I assume. Thanks again for the kind words about the build.
-
That's the point. They were complied with, and Mario still won the race. There are plenty of drivers who I don't think deserve the accolades they received like Jimmy Johnson , Mark Martin and the Busch brothers . Everybody has their own opinions. Thanks again for weighing in on the build.
-
Thank you so much, Steve for your constant attention to the build. I really appreciated you always checking in and giving support when I was almost ready to throw it in the box and work on it later. Luckily, I have always finished every build I have started. Hopefully that can continue.
-
Thanks, Scott. I'm glad you enjoyed the journey as well as the final outcome. Looking forward to the next build which will be completely different.
-
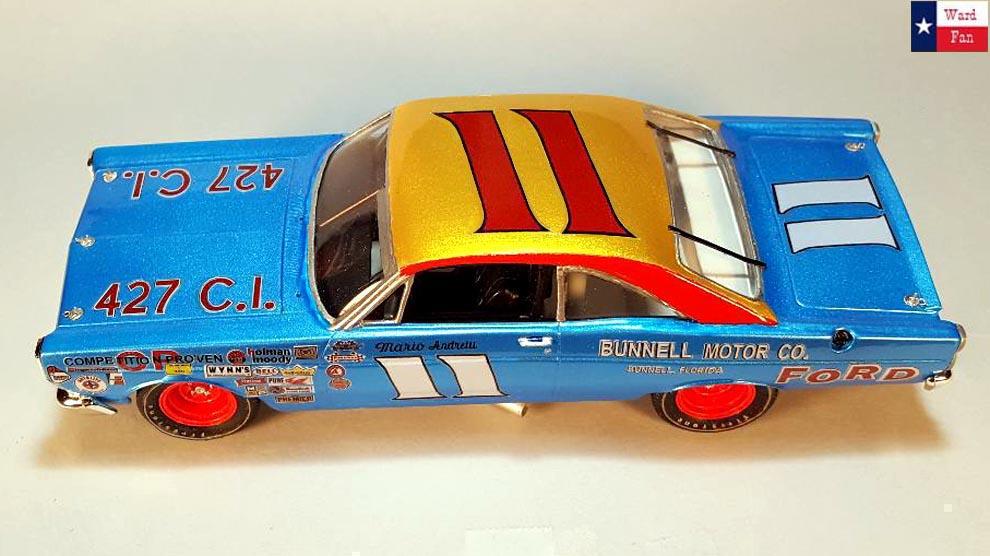
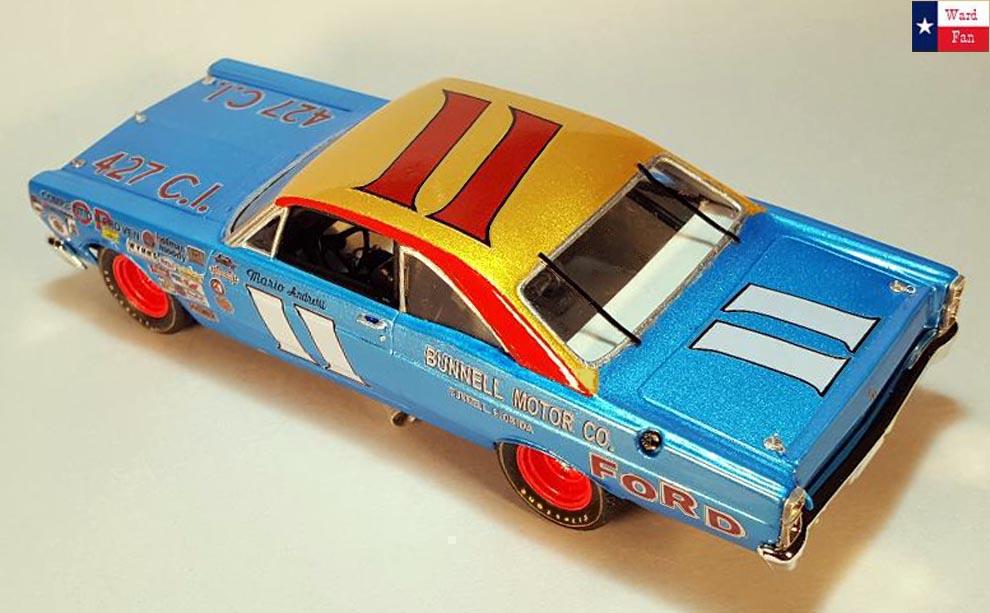
Thank you so much Pierre for your thoughts on the build. Actually, the accounts of the race I read mentioned that he started out with a lesser engine then Lorenzen's in practice which some how he got them to replace with one supposedly just as good just before the race. The thing that makes his win so special was that the car had a terrible push in it that they could not adjust out of it. Mario was able to fight through it and actually catch and pass Lorenzen. He was held up in the pits till Lorenzen got the lead back, but Mario was able to run him down again and pass him for the win. Thank you again for the kind words about the build.
-
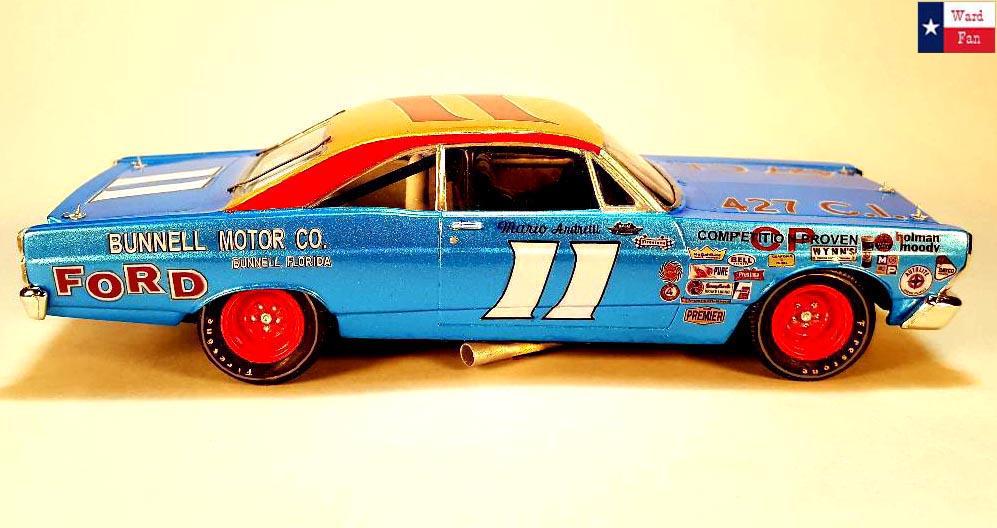
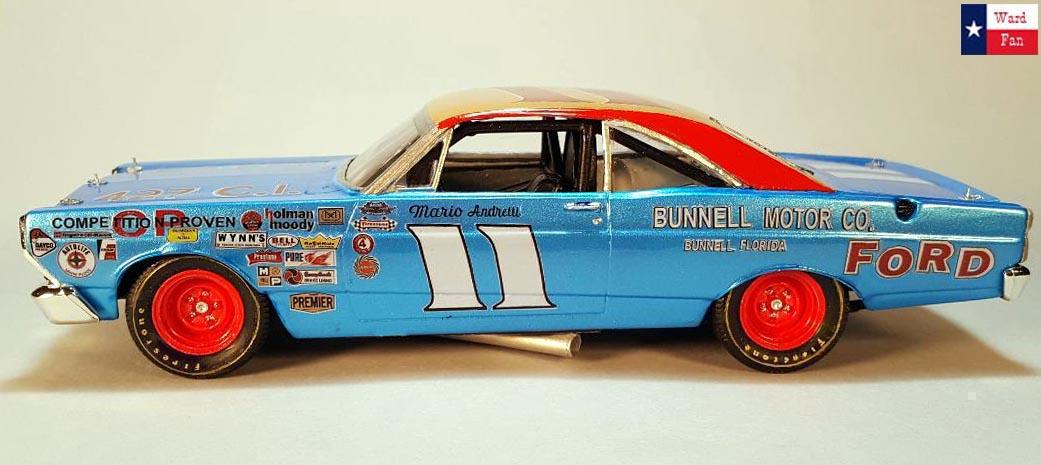
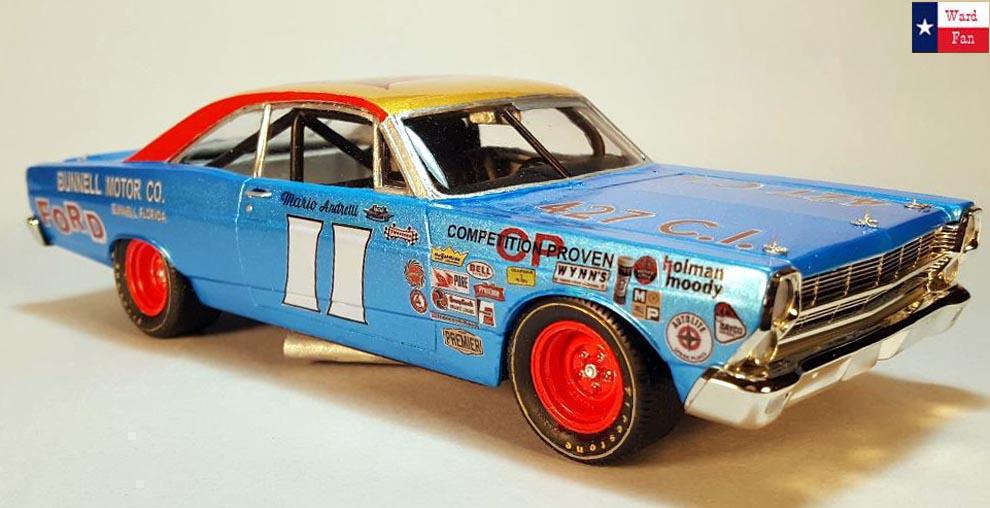
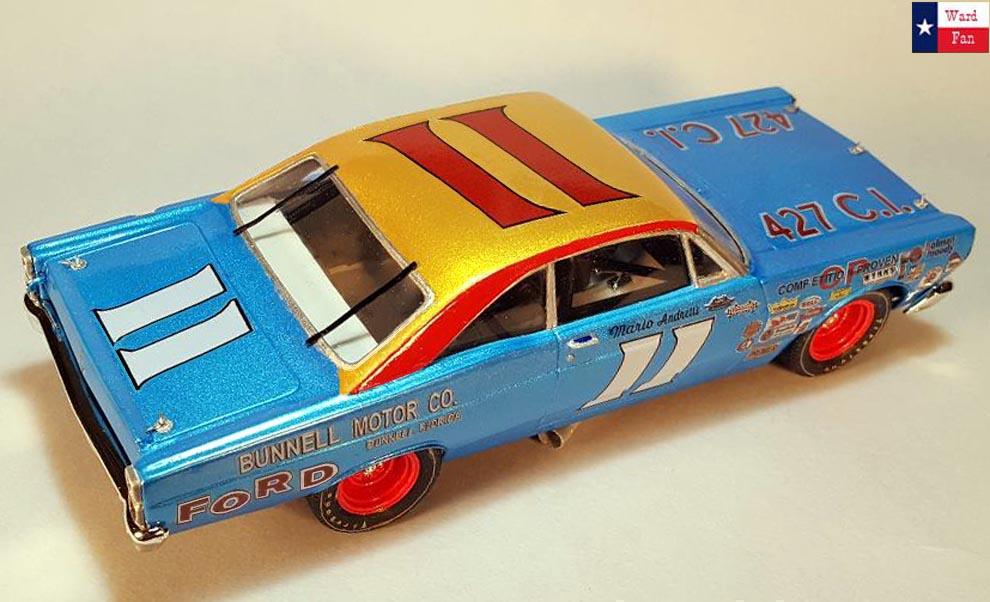
Michael, actually he is the only driver to win the Daytona 500, The Indy 500 and the formula 1 championship in 1978. That's some pretty good notoriety, His win at the Daytona 500 came in a field filler car with the same engine as his teammate Fred Lorenzen but the car handled terribly. It had a bad push in it that they could not adjust out of it, but his driving skill allowed him to catch and pass Lorenzen. Then on the final pitstop his crew held him in the pits until Lorenzen got out first, but he was able to catch Lorenzen for the win. I actually watched this race live on closed circuit T.V. back in 1967 in downtown Houston at a venue set up like a movie theatre with folding chairs. I was 16 years old at the time and my 19-year-old friend Chuck Clark borrowed his parents 1965 Ford LTD that we rode 25 miles from our homes south of Houston in the tiny city of Seabrook to attend. I did the same thing to watch the Indy 500 in 1966. There was no instant replays and it was black and white television, but it was the only way to see live racing back then. Thank you for your kind words about my build.
-
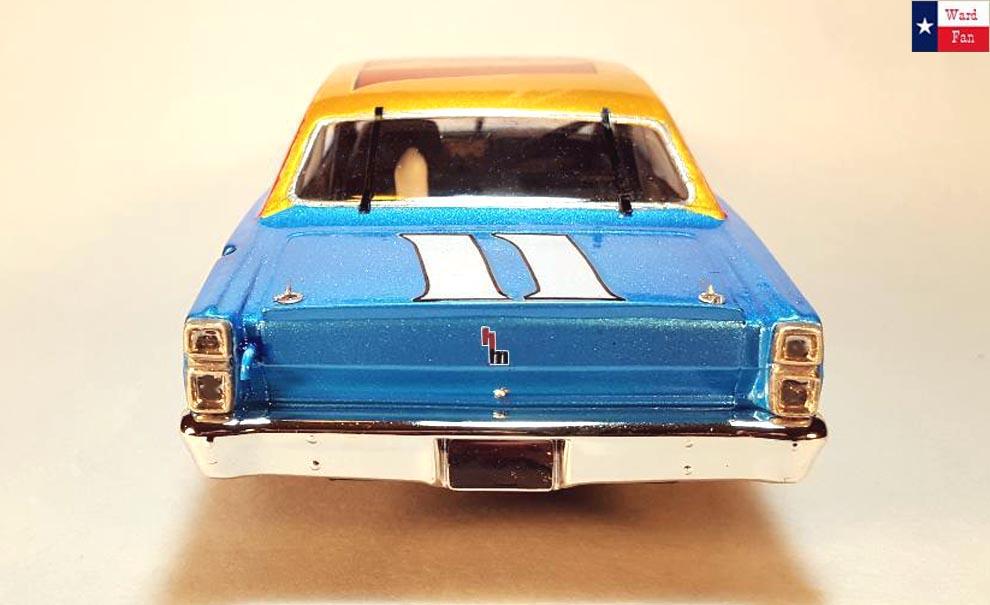
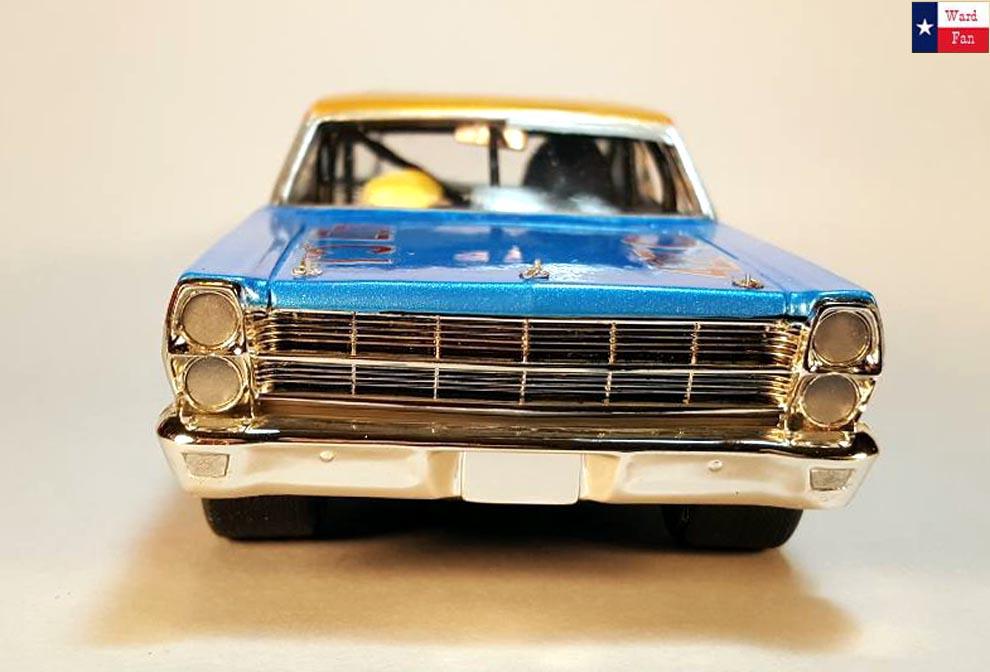
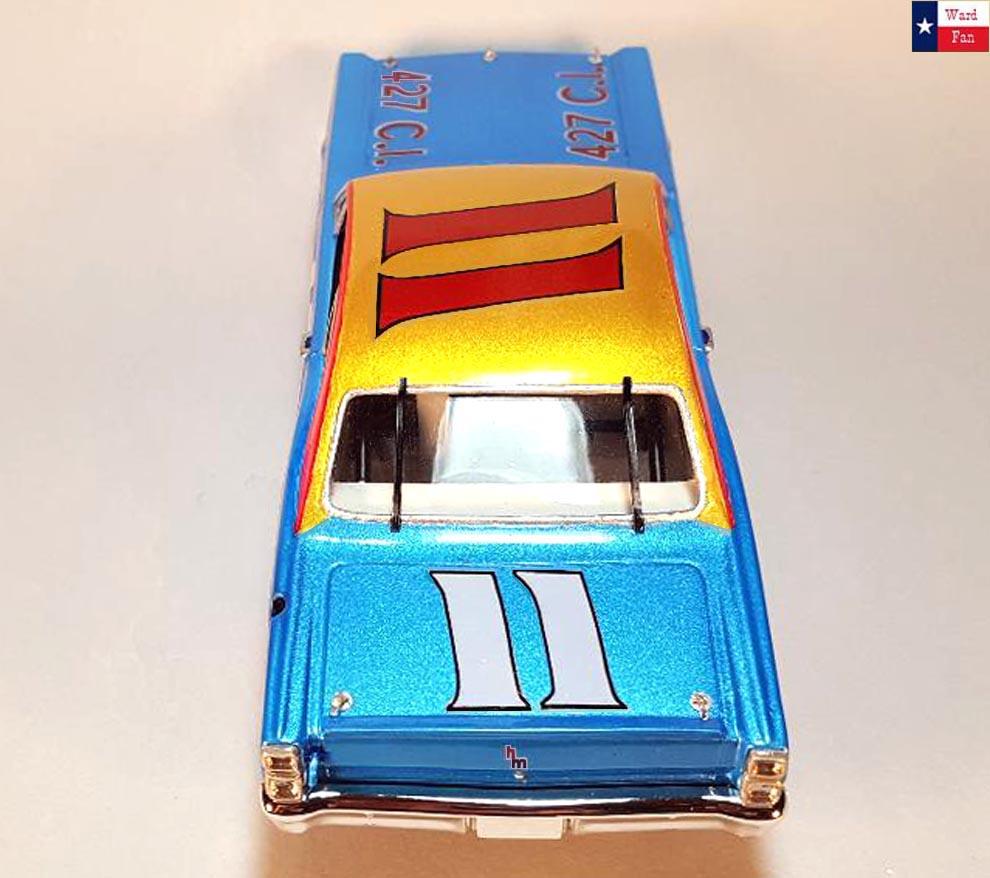
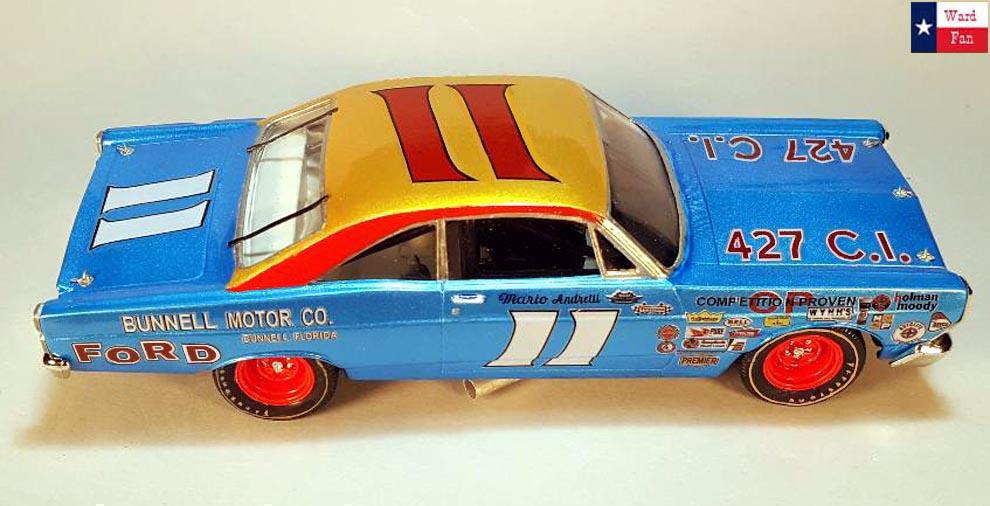
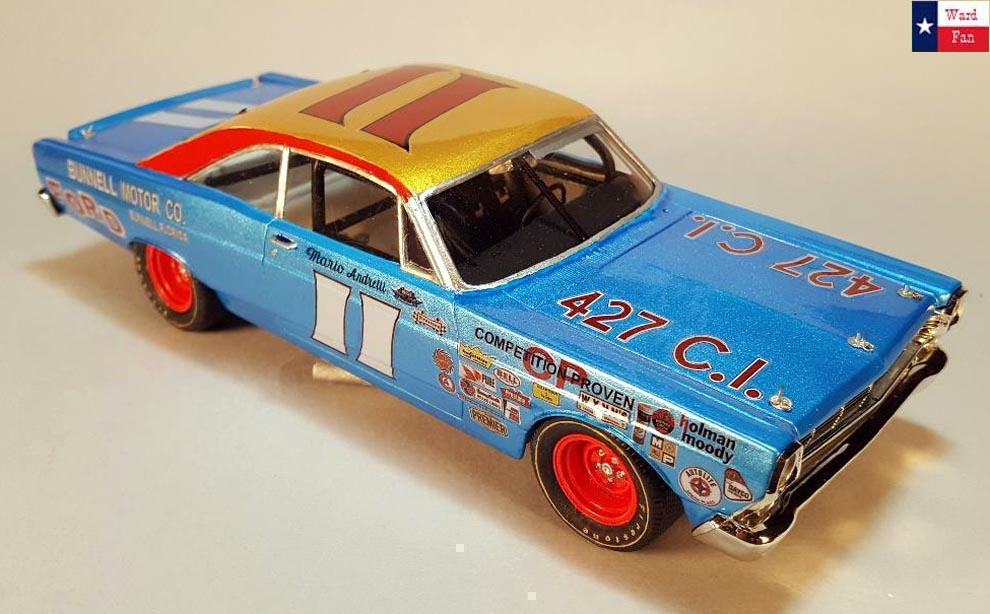
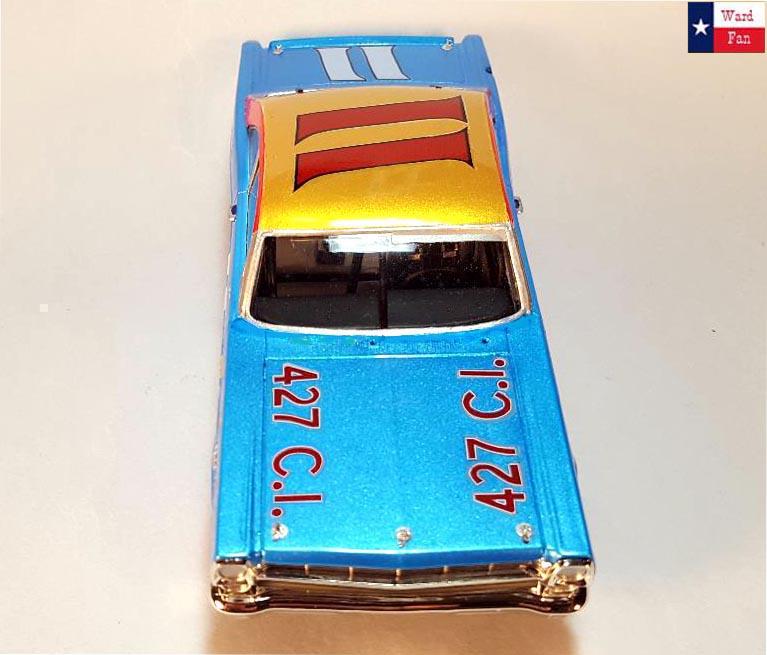
Finally finished. It's over in the under-glass section of Nascar. Look at the pictures from a distance and they will look better. The decals are lacking a lot in quality, but I think they are correct for the day of the race.
-
Finally finished one of my bucket list models I have wanted to do for a long time. I have been putting it off for years because there were no good decals made to represent this car. The only drawback is I had to make my own and the final quality of the build is lacking in that respect but at least the images on the build are correct for that day when Mario won the race. Also, I knew making the front suspension would have been an exorbitant amount of work to get it right, so I finally decided that if I wanted to build this car the hood with have to be glued shut. I'm just glad it's finally done.
- 32 replies
-
- 11
-

-

-
Rolls-Royce No Chemicals, No Paint, No Harmful Glues
MarkJ replied to Anglia105E's topic in WIP: Model Cars
David, I would show you what I mean but my work area has been temporarily removed from the table I work at. I would use one of my many wheel covers in my stash that would look as close to the wheel cover you are working with. i'm sure you have a solution, and it will turn out perfectly fine. Mark J