.jpg.b9265433dc8c3b550370b1d0e4e4d2fc.jpg)
MarkJ
-
Posts
4,769 -
Joined
-
Last visited
Content Type
Profiles
Forums
Events
Gallery
Everything posted by MarkJ
-
.jpg.b9265433dc8c3b550370b1d0e4e4d2fc.thumb.jpg.915f5b46e3c9402eeaa6972073121c87.jpg)
Rolls-Royce No Chemicals, No Paint, No Harmful Glues
MarkJ replied to Anglia105E's topic in WIP: Model Cars
I believe you predicted the antenna doing exactly what it did. No problem. Your fix sounds like a good one. Mark J. -
Maserati A6GCS Spyder
MarkJ replied to absmiami's topic in WIP: Other Racing: Road Racing, Land Speed Racers
Man, Andrew. those seats are fabuloso. Never seen anything quite like that before. No way you could have duplicated that with any kind of paint. Awesome job. -
Thanks for dropping by, Jim to share such a very fine comment. I really appreciate it.
-
Kevin, they just had a piece of aluminum that just filled in the gap between the end of the bumper to the body. Looks like it might have been riveted in place.
-
She's sitting on 4 wheels and tires, and the grille/front bumper and rear bumper are installed. All that is left is the exhaust, hood and trunk pins, headlight and park light covers windshield reinforcement brackets and rear bumper flairs to keep the rear bumper from turning into a parachute. I may not do the flairs if they have a chance of ruining the paint on the rear fenders. The only other thing is the grille screen that this car had but I think it will diminish the look of the whole model. The grille is a very good-looking grille. I blacked it out for more realism. Hate a real toyish chromey looking grille. After all that stuff I can do a final check of the body for cleanliness and apply the decals and then what use to be called future to seal my own decals that have a tendency to peel off with age if not sealed. Can't wait to get her done. Started on it July 30th, so that's about 3 and a half months.
-
Rolls-Royce No Chemicals, No Paint, No Harmful Glues
MarkJ replied to Anglia105E's topic in WIP: Model Cars
David, Looks good again. Did you say it had fallen off? Mark J -
Making all the little bits and pieces that go on the car. Debating whether to do the rear bumper flairs. Might end up messing up the rear fenders.

-
Thanks, Kevin. Maybe someday Hob lob will sell them. I don't do Amazon.
-
Thanks, Kevin. Where do you purchase them from? I've never seen that product before.
-
Hope you are okay.
-
Maserati A6GCS Spyder
MarkJ replied to absmiami's topic in WIP: Other Racing: Road Racing, Land Speed Racers
Very clean and impressive work as always, Andrew. -
Rolls-Royce No Chemicals, No Paint, No Harmful Glues
MarkJ replied to Anglia105E's topic in WIP: Model Cars
My wife actually supports my hobby. It kind of lets her know my brain is still somewhat working if I can build these little cars somewhat well. I'm not just sitting in my recliner staring at the television all day or just staring out into space with really nothing on my mind. That she is glad for so she's a big fan of my work and always interested when I show her positive progress on a build. -
Excellent builds, John. And welcome to the board. For the life of me I can't remember who drove the #1 uno Buick. Please refresh my memory.
-
Rolls-Royce No Chemicals, No Paint, No Harmful Glues
MarkJ replied to Anglia105E's topic in WIP: Model Cars
David, you are making solid progress on the build. Much better than I am. I can't seem to get an inside mirror installed without dropping it or messing it up in some way. Hopefully I get it installed today. -
Man, Andy. You won the lottery on that Cougar. That thing looks right off the showroom, and you practically stole it for what you probably paid for it. Some people have all the luck.
-
Rolls-Royce No Chemicals, No Paint, No Harmful Glues
MarkJ replied to Anglia105E's topic in WIP: Model Cars
David, your walnut on the dash and table looks spot on. So, did I hear you say the left table would be in the open mode ready to eat off of? That's a good idea to display the tables both ways. Mark J. -
Revell chromed the altered tailights. Sadly, when I handle them even with cotton gloves they lose their mirror like shine. That's the trouble with Revell chrome. Maybe you have to wait a week for it to completely cure before handling whatever you use it on. Or maybe I should have put some Tamiya clear on them to seal them first. Have to try that next time.
-
Rolls-Royce No Chemicals, No Paint, No Harmful Glues
MarkJ replied to Anglia105E's topic in WIP: Model Cars
David, I've been thinking about your mirrors, but I think I'm a little too late, but I think a very smooth piece of clear plastic with the chrome being applied to the back of it where the chrome color shows through the clear plastic would have made for a more reflective mirror. But I'm sure the ones you do will turn out great. Also, you did a fine job on those table handles. Mark J. -
Rolls-Royce No Chemicals, No Paint, No Harmful Glues
MarkJ replied to Anglia105E's topic in WIP: Model Cars
David, wouldn't it be cool if you could find real mirror material to put there for your vanity mirrors. Hard as I try, I can't think of any kind of packaging or anything that exists that you could use for that. But it sure would be neat if you could. Mark J. -
Rolls-Royce No Chemicals, No Paint, No Harmful Glues
MarkJ replied to Anglia105E's topic in WIP: Model Cars
David, I think there might be some kind of telepathy going on here. You never know. Mark J. -
Rolls-Royce No Chemicals, No Paint, No Harmful Glues
MarkJ replied to Anglia105E's topic in WIP: Model Cars
David, if that pin continues to come off of the hood after super gluing you could drill a hole where the pin was and replace it with a metal pin kind of like the same thing that was an option with the roof antenna. Just a thought. Mark J. -
Thanks, Donato and I totally agree with you about the old man stuff. I accept the accusation completely. As I have heard many times, It's tough to get old, but I guess we have no choice. LOL.
-
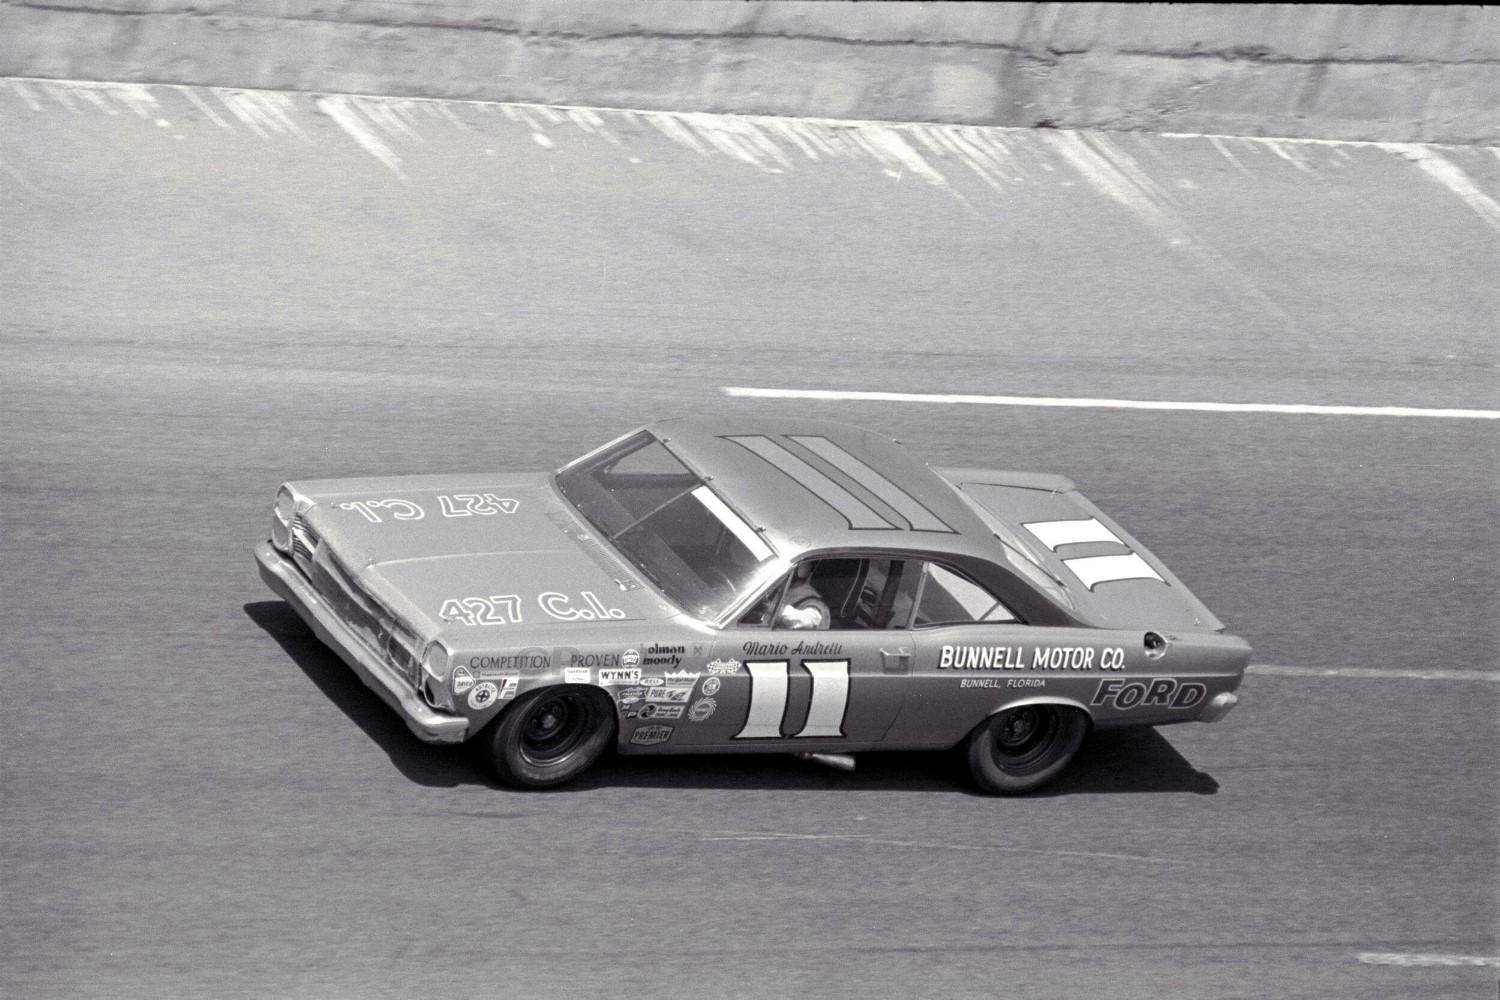
Actually, Steve. The driver's window stayed open, but it was the only one. And I think they only did it at Daytona. You can see Marios elbow sticking out a little as he rests it on the top of the door in the photo below.
-
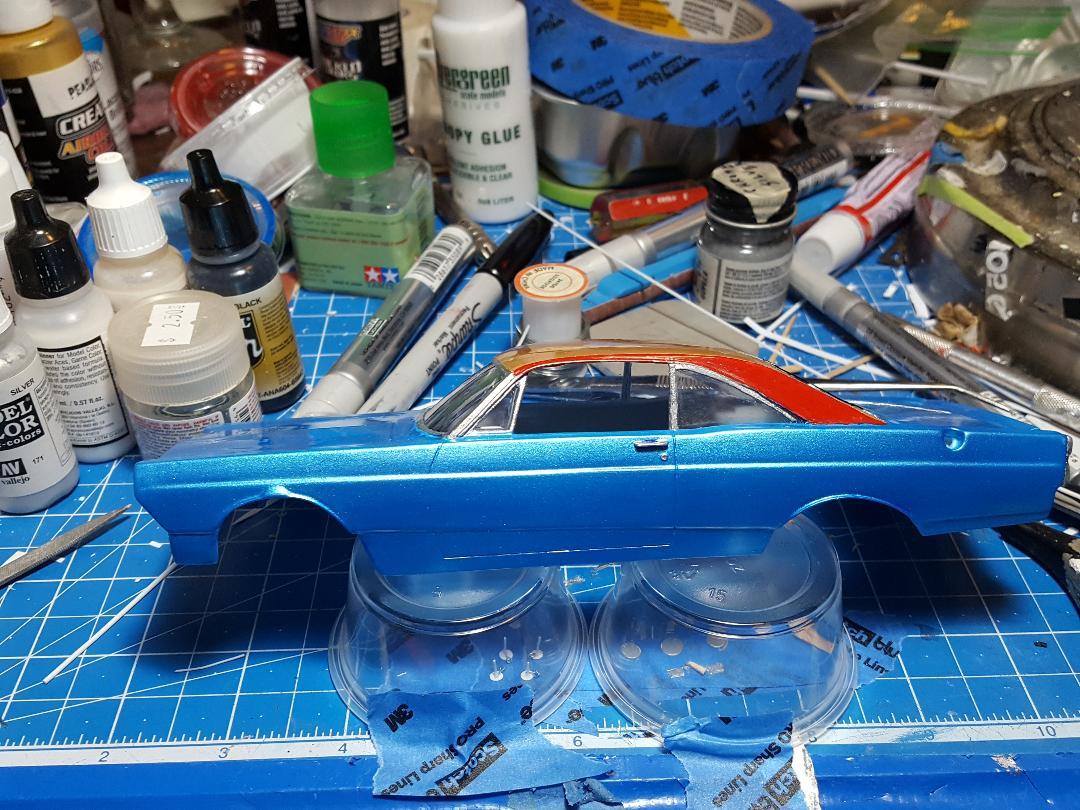
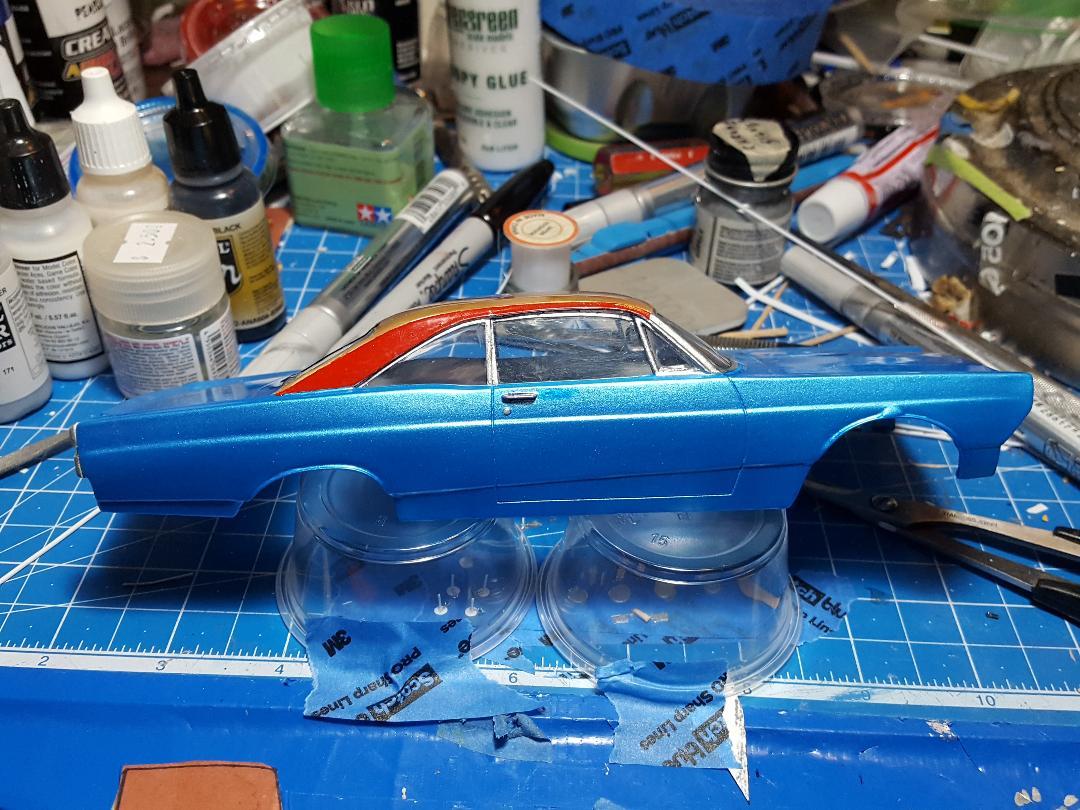
Cutting very thin strips of .010 sheet styrene . Painting them first with my silver paint pen and then gluing them in place with canopy glue. It's not going to be fun or easy, and I will try not to make a mess with the glue. not looking forward to it.
-
Bocar XP5 - a 3D print
MarkJ replied to kensar's topic in Other Racing: Road Racing, Salt Flat Racers
Ken, whenever somebody makes his own kit, it becomes very interesting.