.jpg.b9265433dc8c3b550370b1d0e4e4d2fc.jpg)
MarkJ
-
Posts
4,693 -
Joined
-
Last visited
Content Type
Profiles
Forums
Events
Gallery
Everything posted by MarkJ
-
.jpg.b9265433dc8c3b550370b1d0e4e4d2fc.thumb.jpg.915f5b46e3c9402eeaa6972073121c87.jpg)
1963 Super Torque Ford
MarkJ replied to MarkJ's topic in WIP: Stock Cars (NASCAR, Super Stock, Late Model, etc.)
Thanks Scott. Hoping to primer it soon. -
Some more awesome detailing going on here. Loving the scoops and other additions to the body that really add a lot of appeal to the viewer of the build. A lot of people will not realize the kit you are using is the one they are seeing. That's true advanced modeling right here.
-
1963 Super Torque Ford
MarkJ replied to MarkJ's topic in WIP: Stock Cars (NASCAR, Super Stock, Late Model, etc.)
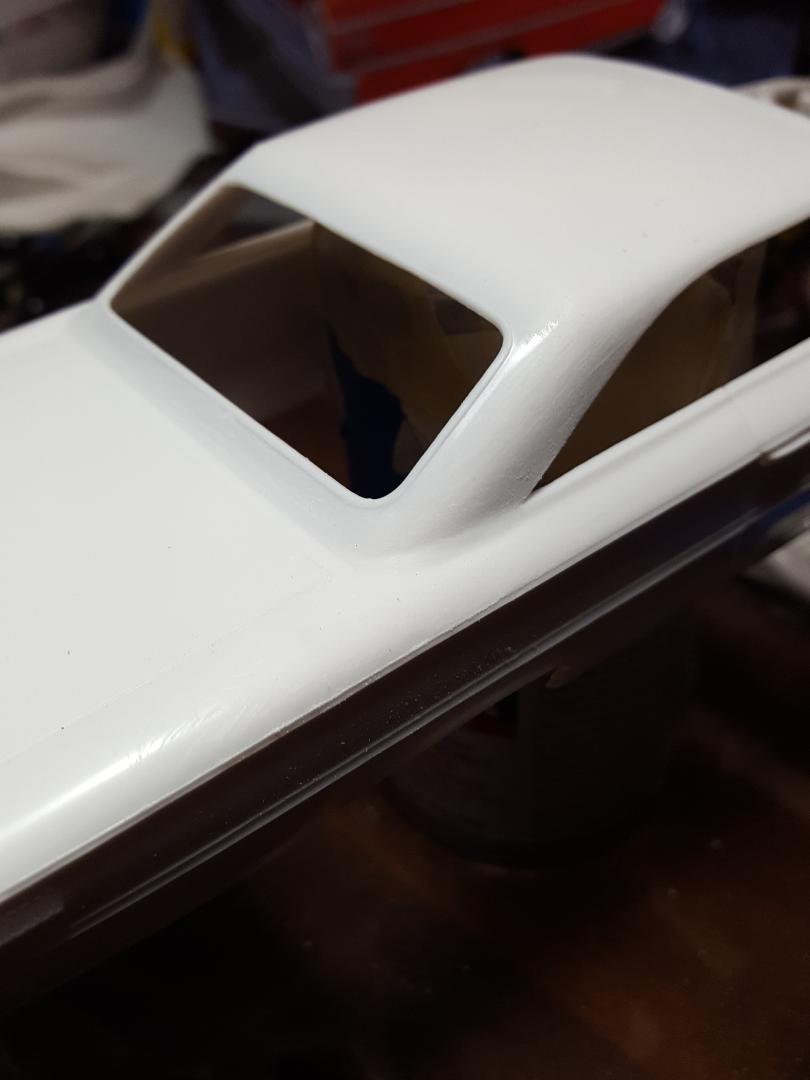
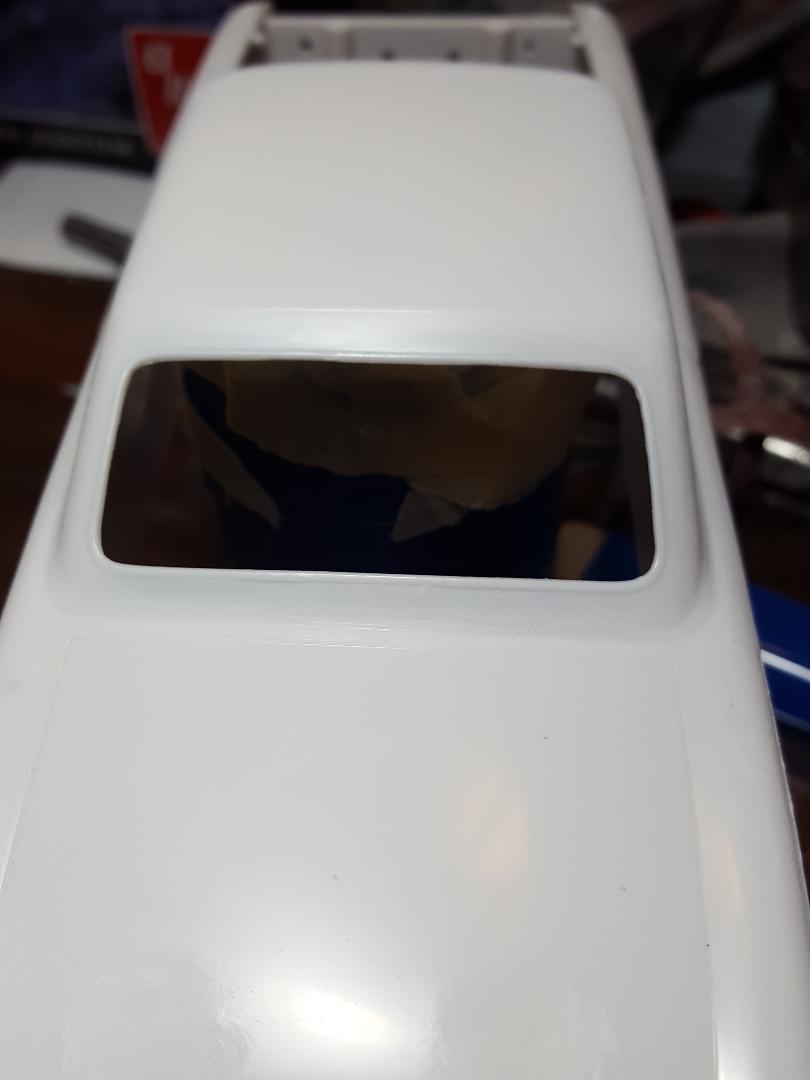
There was just a hint of a line at the tops of the fender voids so I added just a touch of putty to take care of that. i finished the wiper areas so all I need is a complete body sanding with 4000,6000 and 8000 polishing pads and then I will white primer it.
-
Wow, Pierre. Removing that wiper blade was a feat of magic. And then adding the windshield mount that runs through the tops of the doors was awesome too. Really improves the overall look of the model and makes it one of a kind. Always look forward to your updates to see what you have cooked up for us to be amazed by. This is going to really be special when completed. Like all of your other builds.
-
1963 Super Torque Ford
MarkJ replied to MarkJ's topic in WIP: Stock Cars (NASCAR, Super Stock, Late Model, etc.)
Thanks, Jason and Pierre. It's been fun so far. -
1963 Super Torque Ford
MarkJ replied to MarkJ's topic in WIP: Stock Cars (NASCAR, Super Stock, Late Model, etc.)
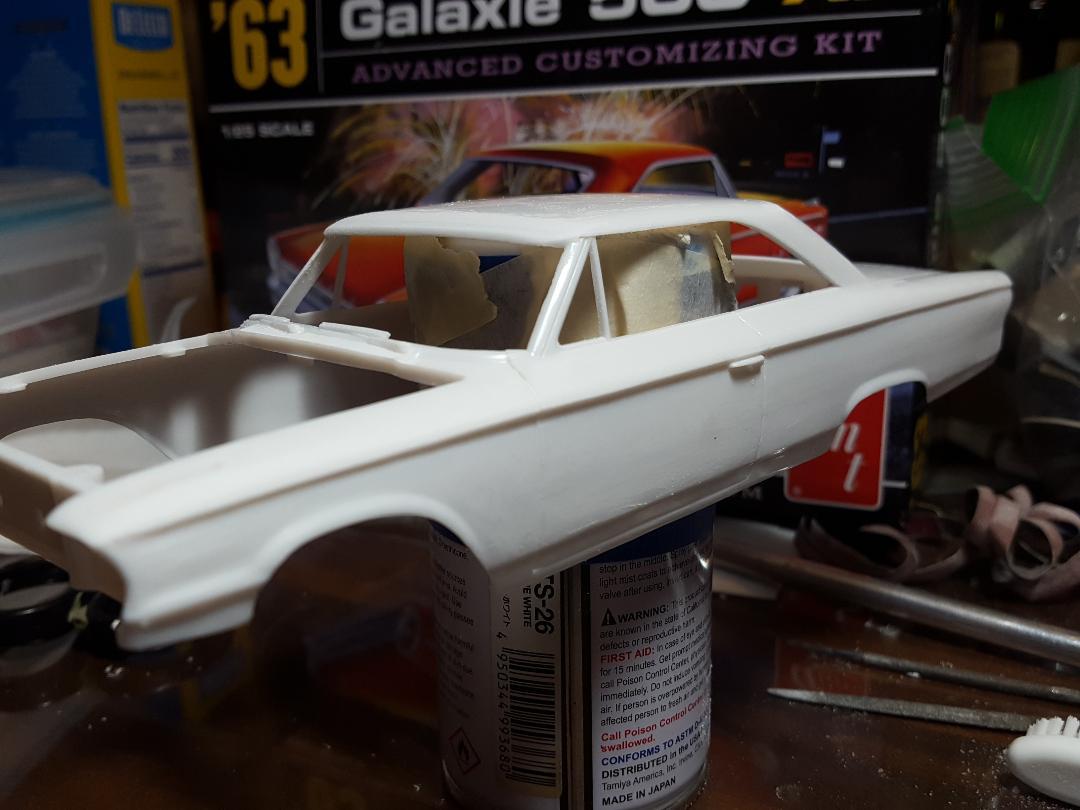
Got the rear panel installed so I can paint it with the rest of the body. I will add the bumper and taillights at the end. Got the top of the front fender voids mostly done and started on the wiper blade removal. Won't be long before I can prime and paint the body.
-
1963 Super Torque Ford
MarkJ replied to MarkJ's topic in WIP: Stock Cars (NASCAR, Super Stock, Late Model, etc.)
More work on the rear panel and I messed it up, so nothing new there.
-
1963 Super Torque Ford
MarkJ replied to MarkJ's topic in WIP: Stock Cars (NASCAR, Super Stock, Late Model, etc.)
Håkan , as Led Zeppelin would say, "Ramble on". I enjoy reading everyone who takes the time to visit this thread and share ideas. I just know that we are lucky to have this kit and even luckier that it was reissued a couple of years ago or I would not be building it now. I'm also glad they reissued the 64 Ford recently even though it is basically a snap kit, and it was actually sold in Walmart, if you can believe that. Please feel free to drop by and share in the conversation. I usually don't have that many people doing that. -
1963 Super Torque Ford
MarkJ replied to MarkJ's topic in WIP: Stock Cars (NASCAR, Super Stock, Late Model, etc.)
Håkan, come on now. I'll be lucky to get these pieces back on the model in any sort of accuracy and not damaging the chrome too much on the bumper and tailights. You're expecting way too much accuracy out of me that just isn't there anymore, if it ever was. Below is a build I did in 2017 that has the same modifications done to it except that there won't be any painted covers over the taillights on this one. They were stock taillights on this car.
-
1963 Super Torque Ford
MarkJ replied to MarkJ's topic in WIP: Stock Cars (NASCAR, Super Stock, Late Model, etc.)
Started working on the rear panel between the taillights. I need to dechrome it and make it smooth sheet metal instead of having the ornate stainless or chrome panel that comes on the car. I will retain the tailights . They were still on the car even late into the season.
-
Oh good, Pierre. I found the w.i.p. I guess the silver car will come later. Looking forward to watching this one come together.
-
1963 Super Torque Ford
MarkJ replied to MarkJ's topic in WIP: Stock Cars (NASCAR, Super Stock, Late Model, etc.)
So true, Pierre, So true. -
1963 Super Torque Ford
MarkJ replied to MarkJ's topic in WIP: Stock Cars (NASCAR, Super Stock, Late Model, etc.)
Thanks, Bob. I'm pretty stoked about working on this one. This is what I consider fun modeling. the last two next gen Camaros I built were more like aggravation and just wanted to get them done. -
1963 Super Torque Ford
MarkJ replied to MarkJ's topic in WIP: Stock Cars (NASCAR, Super Stock, Late Model, etc.)
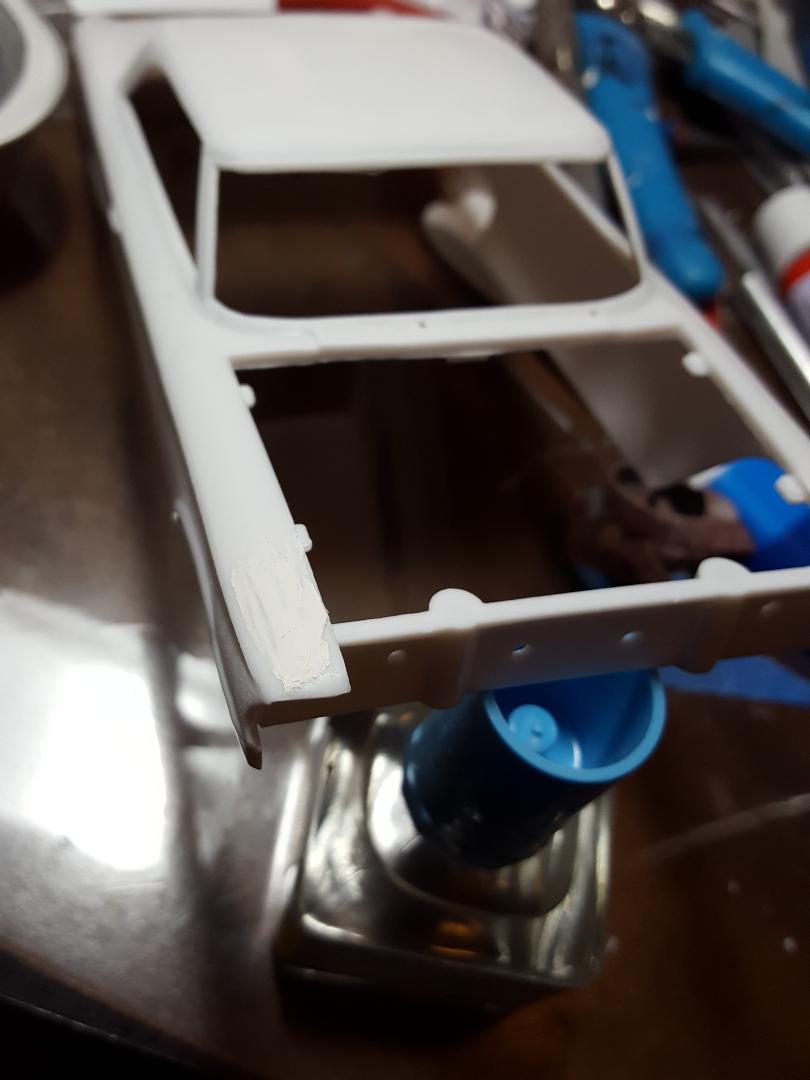
The right side of the body is pretty much finished, and I added some rods to the voids in the top of the fenders that I will smooth to fill them in with plastic instead of putty. I reworked the upper windshield weatherstrip to make it look like the chrome moldings are gone. I still need to remove the wiper blades and rework the panel that goes between the taillights. This car actually had the chrome taillights even at the end of the season, but the chrome or aluminum panel between them was gone.
-
Ford GT40 1966 Le Mans winner
MarkJ replied to Pierre Rivard's topic in Other Racing: Road Racing, Salt Flat Racers
I'm going to write down your percentages in my model log book so I dont forget them. I am eager to try the higher thinner percentages knowing that it has to let the paint flow out more getting rid of the brush marks. I will eventually have to get the quick shine stuff but I think my future bottle will out live me. -
Ford GT40 1966 Le Mans winner
MarkJ replied to Pierre Rivard's topic in Other Racing: Road Racing, Salt Flat Racers
Wow, Pierre. Another superb build with excellent brush painted black finish which is not easy to do no matter how it is applied. You definitely have the process down and I will continue to try and get it right. I think the key is in polishing the primer and clear only. Thanks for posting this most enjoyable build to view. Somehow I missed the w.i.p. if there was one. -
1963 Super Torque Ford
MarkJ replied to MarkJ's topic in WIP: Stock Cars (NASCAR, Super Stock, Late Model, etc.)
Yes, Pierre. On a light purple one a few years back. ? But I don't remember the front windshield moulding at the top being as thick as this one is. I'm really looking forward to the pearl white paint job I'm going to do on this one with a brush, if I can ever get the body ready, that is. The postman cometh and bringth me gifts. Thank you so much. I really appreciate it and will return the favor for sure. -
1963 Super Torque Ford
MarkJ replied to MarkJ's topic in WIP: Stock Cars (NASCAR, Super Stock, Late Model, etc.)
Thanks, John and Hakan. The only good ref pics I could get for this model were screen shots from a YouTube video of the race the car was in. They were not that clear because of the quality of the video, but I think I will be 90 percent accurate on the livery for this car. I have already done builds of two other cars that were in the race I am speaking of. There is one more car from that race I might want to do but I need to think on it for a while longer. It was one of those milestone races that hangs around in my memory bank. -
1963 Super Torque Ford
MarkJ replied to MarkJ's topic in WIP: Stock Cars (NASCAR, Super Stock, Late Model, etc.)
Cool to have a real one, Hakan. The hardest moulding to remove is the one at the base of the roof in the rear by the trunk. got the left side finished
-
Salvino's JR - '71 Petty Plymouth
MarkJ replied to TooOld's topic in WIP: Stock Cars (NASCAR, Super Stock, Late Model, etc.)
Bob, I totally agree with you on the use of the ts-23. To me, it is the the closest to Petty electric blue. Just my humble opinion. -
Salvino's JR - '71 Petty Plymouth
MarkJ replied to TooOld's topic in WIP: Stock Cars (NASCAR, Super Stock, Late Model, etc.)
Your work with aluminum is adding such a huge addition to the model. This is truly going to be a one of a kind build to be proud of. -
1963 Super Torque Ford
MarkJ replied to MarkJ's topic in WIP: Stock Cars (NASCAR, Super Stock, Late Model, etc.)
Thanks, Gerald and Bob. I have always wanted to do this driver in a 63 Ford and somehow never got around to it. -
1963 Super Torque Ford
MarkJ replied to MarkJ's topic in WIP: Stock Cars (NASCAR, Super Stock, Late Model, etc.)
Got the left quarter panel mostly done. I find its better to complete a section before moving on to the next section instead of hitting all the moldings at the same time. Keeps me from getting overwhelmed.
-
1963 Super Torque Ford
MarkJ replied to MarkJ's topic in WIP: Stock Cars (NASCAR, Super Stock, Late Model, etc.)
Thanks, Jason. I will be going the one kit way with this model, so I will be removing the molded in exhaust and not worrying about actually having a real chassis. It will be more a shelfer than what you are doing using the 60-ford kit with yours. Really looking forward to seeing yours. do you have a wip going on with it? -
1963 Super Torque Ford
MarkJ replied to MarkJ's topic in WIP: Stock Cars (NASCAR, Super Stock, Late Model, etc.)
Thanks, Jim. Yes, it was a pretty dominate year for the Super Torque Fords. Chevy got out before they really got started and the Plymouths and Dodges were still 1 year away from the hemi and were pretty underpowered. Pontiac which had been dominate in 62 were heavier and had not increased their power and most of their drivers had switched to the Ford.