
.jpg.b9265433dc8c3b550370b1d0e4e4d2fc.jpg)
MarkJ
-
Posts
4,698 -
Joined
-
Last visited
Content Type
Profiles
Forums
Events
Gallery
Everything posted by MarkJ
-
.jpg.b9265433dc8c3b550370b1d0e4e4d2fc.thumb.jpg.915f5b46e3c9402eeaa6972073121c87.jpg)
1963 Super Torque Ford
MarkJ replied to MarkJ's topic in WIP: Stock Cars (NASCAR, Super Stock, Late Model, etc.)
Yes, I have also found that createx paint, which is what I have to use on the body because Vallejo doesn't make a pearlized white, is much thinner paint than Vallejo, so the 60/40 ratio does not work. It actually makes the paint to thin. I'm using a 20/80 thinner to paint ratio with the createx, and using distilled water. -
if you see this Billy, I missed the original posting back in 2006. I must say, excellent build even though I'm way late to the game.
-
1963 Super Torque Ford
MarkJ replied to MarkJ's topic in WIP: Stock Cars (NASCAR, Super Stock, Late Model, etc.)
Put that last coat of clear on the body. Will wait a couple of days to polish it with Novus2. I hope to start on the interior tomorrow.
-
Salvino's JR - '71 Petty Plymouth
MarkJ replied to TooOld's topic in WIP: Stock Cars (NASCAR, Super Stock, Late Model, etc.)
Thanks, Bob. I know exactly what you are talking about. I might even have one. -
Wow, some more really cool modeling going on here.
-
Salvino's JR - '71 Petty Plymouth
MarkJ replied to TooOld's topic in WIP: Stock Cars (NASCAR, Super Stock, Late Model, etc.)
Bob, where did you say you sourced the aluminum sheet you use for your detailing? I would really like to use it on my current build. -
1963 Super Torque Ford
MarkJ replied to MarkJ's topic in WIP: Stock Cars (NASCAR, Super Stock, Late Model, etc.)
Haven't worked on the build in a while. Been helping my wife with a project she has that needs 19 pictures, some from 50 years ago, edited and made into 4x6's. Went back to the build which I had messed the hood up, by using thinner instead of distilled water to put another coat of pearl white on. Learned a lesson on that one. Createx paint does not like its own thinner when brush painting with it. Need to remember to just stick with distilled water. It does like its own clear top coat but I used distilled water with it and won't even bother to use the thinner, which they call reducer. -
1963 Super Torque Ford
MarkJ replied to MarkJ's topic in WIP: Stock Cars (NASCAR, Super Stock, Late Model, etc.)
Sounds good. I will be watching for your final build pictures here and at Randy's -
All I can say is WOW, Pierre. Those belts are some really next step modeling going on. Looks very realistic.
-
1963 Super Torque Ford
MarkJ replied to MarkJ's topic in WIP: Stock Cars (NASCAR, Super Stock, Late Model, etc.)
Herbert, yes that is correct. I mix up 12 drops thinner to 8 drops paint mixed in a pallet just to make sure I have enough to do the whole body with one good coat. I use Vallejo white acrylic primer. It is thinned at 25% or like 1 drop thinner to 4 drops primer. I find that distilled water works the best as a thinner for acrylic paint that is brushed on. JMHO. Do you have any in progress pictures of you build. I would like to see how you are doing the half chassis. I also plan to do a 66 Fairlane. -
I'm sure seeing a lot of reflection in the real car photo, and you can only get mirror like reflections from a glossy paint job. JMHO. Glad the headlight buckets are black. I think that will improve the overall look of the build.
-
Try as I might, I cannot see any strokes in that paint. It already looks awesome before you're even done. And glossy or not for the real car, I would go as glossy as you can on this build. I cannot believe a real Ferrari did not have magnificent paint coming out of the factory.
-
1963 Super Torque Ford
MarkJ replied to MarkJ's topic in WIP: Stock Cars (NASCAR, Super Stock, Late Model, etc.)
Thanks guys. I think I will try Jason's idea because it seems a lot easier, and I really don't like putty. It's weird because the emblems on the front fender did not ghost at all. -
1963 Super Torque Ford
MarkJ replied to MarkJ's topic in WIP: Stock Cars (NASCAR, Super Stock, Late Model, etc.)
Thanks, Bob. This paint is supposed to be airbrushed but I never quite mastered that craft. I would have either had a runny mess or an orange peel special if I had try to use one on this model. Luckily Pierre has come up with a process of brush painting that makes even a clutz like me come up with half acceptable results. It's all in the thinning and the moving the paint around till it looks just right and then to know when to stop working and let it dry. One thing for sure with this method you will never get orange peel and you should not ever get a run. -
1963 Super Torque Ford
MarkJ replied to MarkJ's topic in WIP: Stock Cars (NASCAR, Super Stock, Late Model, etc.)
Thanks, Pierre. I used your formula of 60/40 percent thinner to paint for the pearl and it went on pretty well. The createx does seem to dry a bit slower and I did not have their thinner so I used distilled water. That mixture allowed me to move the paint around with the brush to remove any ridges or heavy spots before it would start to dry helping to remove any brush indentations. from my research on this paint it seems to be more developed to be used on fabric than hard plastic. -
1963 Super Torque Ford
MarkJ replied to MarkJ's topic in WIP: Stock Cars (NASCAR, Super Stock, Late Model, etc.)
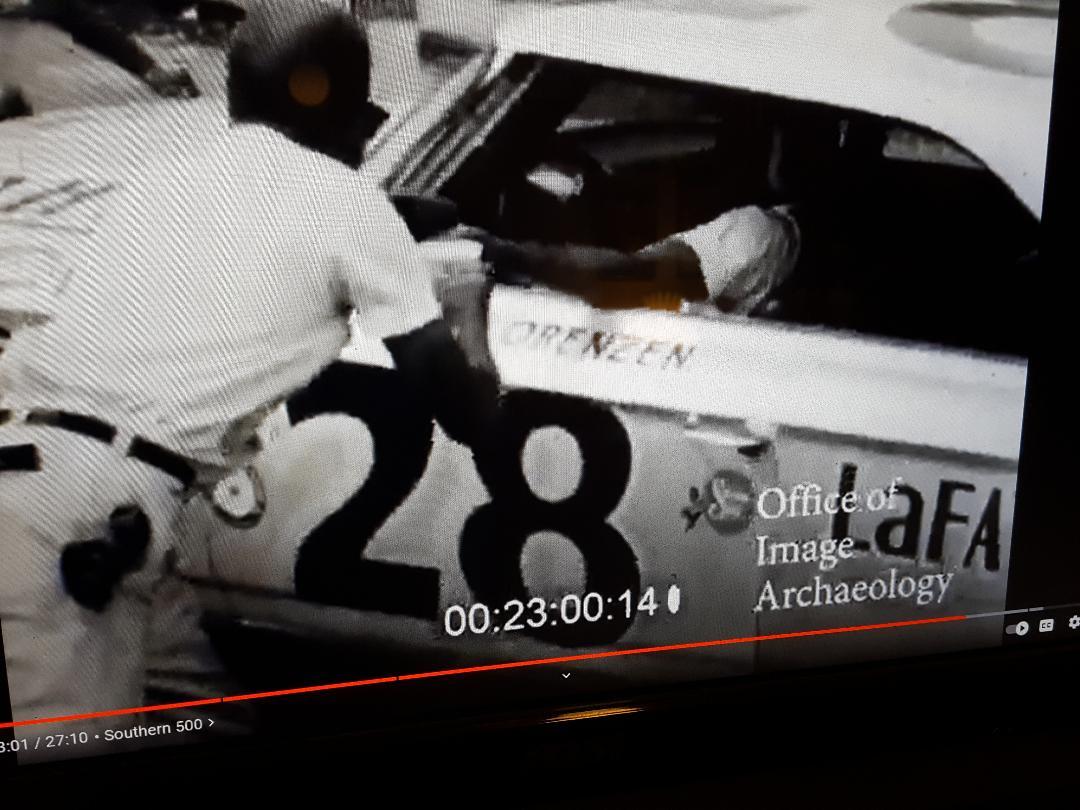
I have one semi good shot of the real car at the Southern 500 from a grainy YouTube video capture, and you can see the white outline around the sponsor decal on the quarter panel. There are not a lot of color photos of this car anywhere that I could find. If the car was not a darker color than white you would not see this white outline. In previous races the outline color was a light blue. For this car it was white. Also the micro precision decal is white in the center, and it stands out as white also. Thats the decal next to the crewman's belt.
-
1963 Super Torque Ford
MarkJ replied to MarkJ's topic in WIP: Stock Cars (NASCAR, Super Stock, Late Model, etc.)
Under brighter lighting, my model should look something like this when finished.
-
1963 Super Torque Ford
MarkJ replied to MarkJ's topic in WIP: Stock Cars (NASCAR, Super Stock, Late Model, etc.)
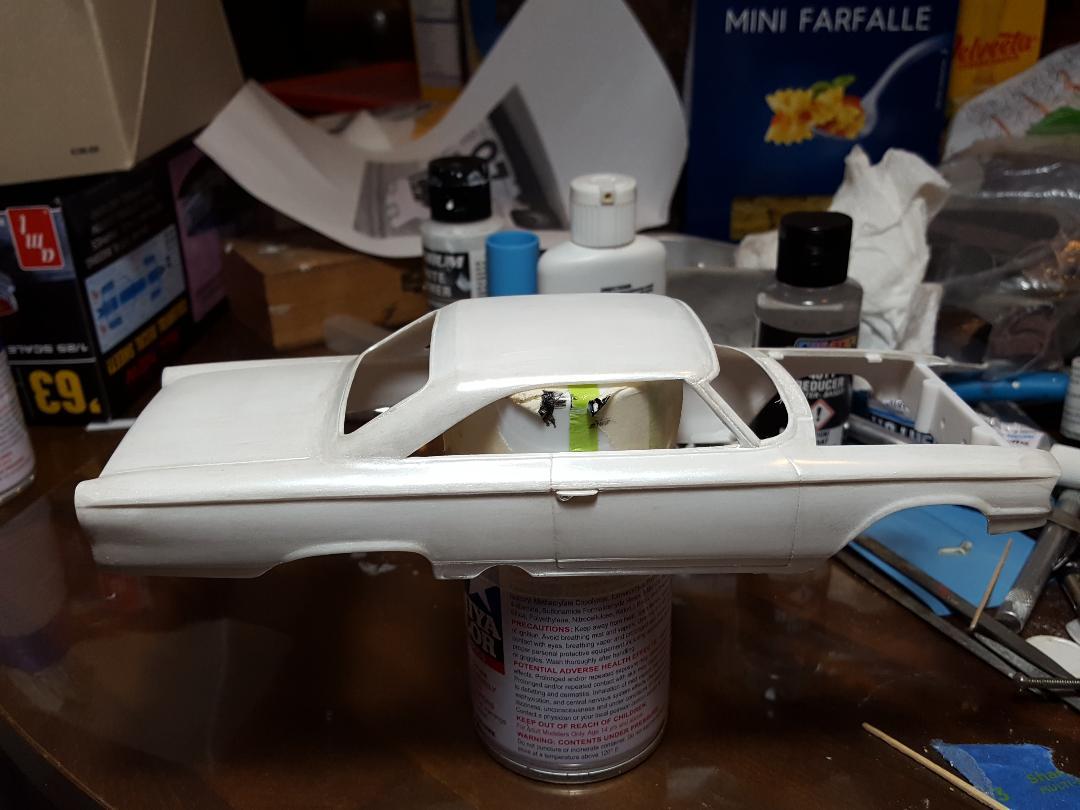
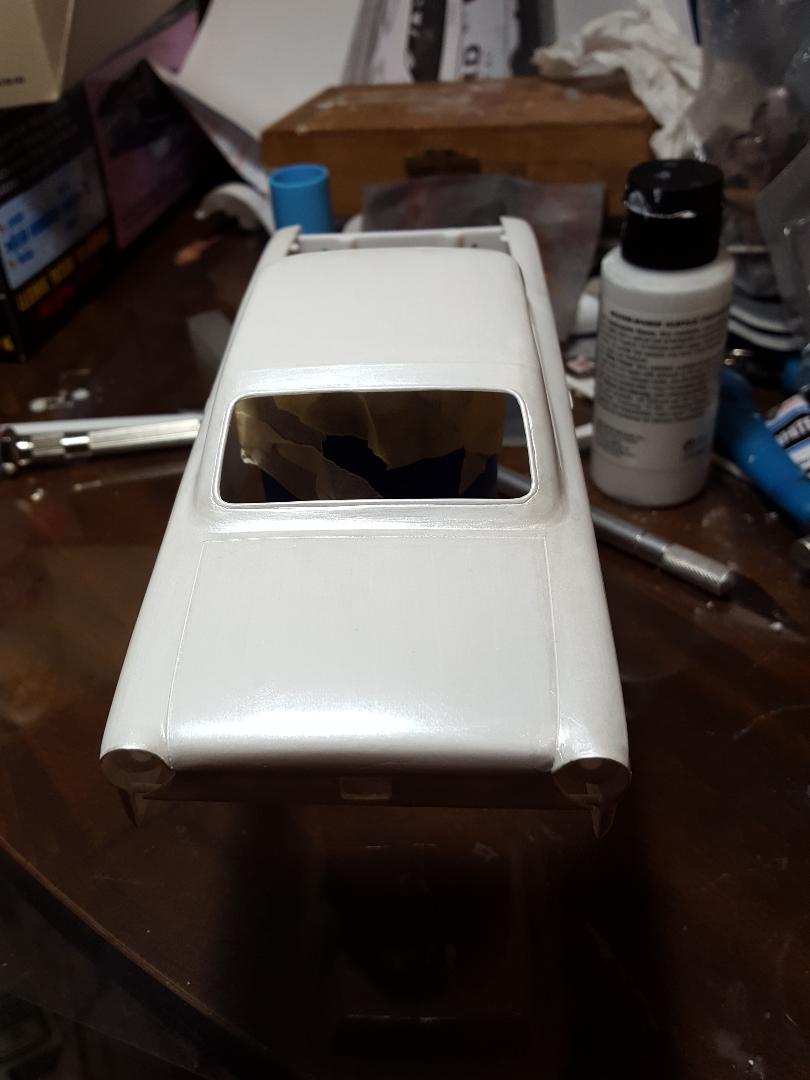
I got the pearl white on and it actually looks like a very light gray with tiny sparkles in it which is what it is supposed to look like. I will need to re do the front of the hood where I thought I removed the ford letters. After I put on the paint they ghosted back through. I will need to re sand them re prime and re paint that part of the hood. I will then wait a couple of days to clear it so I can polish the clear. Eventually I will future it after the decals are installed.
-
1963 Super Torque Ford
MarkJ replied to MarkJ's topic in WIP: Stock Cars (NASCAR, Super Stock, Late Model, etc.)
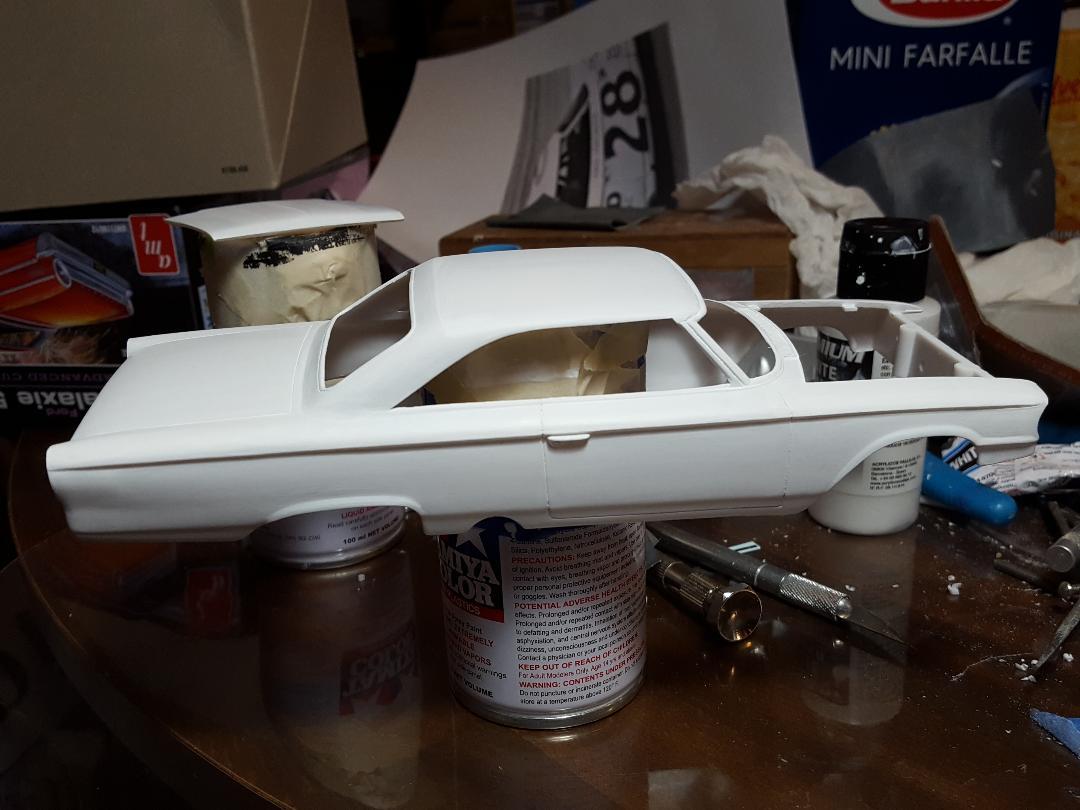
I Put the half holes in the body for the exhaust and added a third coat of primer. I'm pretty sure I can go on to the paint now.
-
Looks perfect to me, Pierre. It's good to know that Vallejo makes a more red , red. The 2 I have seem too light a shade to me . The only trouble will be finding that air Ferrari red. I doubt if Hob Lob sells it.
-
1963 Super Torque Ford
MarkJ replied to MarkJ's topic in WIP: Stock Cars (NASCAR, Super Stock, Late Model, etc.)
I googled pearlized paint and got this. Much like a metallic auto paint finish, pearlescent paint is generally standard auto paint, but instead of adding metal powder, microscopic ceramic particles are added instead. -
1963 Super Torque Ford
MarkJ replied to MarkJ's topic in WIP: Stock Cars (NASCAR, Super Stock, Late Model, etc.)
I forgot to put the holes in the body for the exhaust, so I will need to do that next. -
1963 Super Torque Ford
MarkJ replied to MarkJ's topic in WIP: Stock Cars (NASCAR, Super Stock, Late Model, etc.)
Pierre, I'm feeling pretty good about the outcome so I'm going straight to the Ford body I have primed. Thinning the primer 25 % with distilled water made it go on so much better this time than my last build. I've put on the second coat seen below and decide if I need a third coat after I sand it with some 4000 and 8,000 grit cloth.
-
1963 Super Torque Ford
MarkJ replied to MarkJ's topic in WIP: Stock Cars (NASCAR, Super Stock, Late Model, etc.)
Here is the paint I will be using; I will thin it at 60% with distilled water like Pierre recommends and put it on with a brush using light coats till hopefully I get what I'm looking for. It looks really good in the artist paint pallet so I'm hoping I have the ability to get it on the model correctly.
-
1963 Super Torque Ford
MarkJ replied to MarkJ's topic in WIP: Stock Cars (NASCAR, Super Stock, Late Model, etc.)
I did a search on google for "did 1963 Holman and Moody fords have Pearl paint" and this popped up. I copied and pasted it below. Starting at the Southern 500, all the factory Fords got pearl paint, and Fireball also got a darker purple. He won the Southern 500 that year, his 32nd of 33 career victories


.jpg.a578d91aad5f856730da4aaf8fe2e7a2.jpg)
.jpg.fcee14bdabfcbb055af6a3dfc53c5d6c.jpg)