70 Sting
-
Posts
1,369 -
Joined
-
Last visited
Content Type
Profiles
Forums
Events
Gallery
Everything posted by 70 Sting
-
Thank you sir. And thanks for shedding some light on the wheel issue. I did a little looking around and found gaps to varying degrees on other builds as well. Still, doesn’t detract too much from a pretty cool kit. ?
-
A car that should be in everyone’s collection. Nicely done sir.
-

1970 Pontiac Firebird in Lucerne blue (1/24 Monogram/Revell)
70 Sting replied to e30lover's topic in Model Cars
Incredible work. The trim, paint and finish, wheels… wow! -
Thanks bud. I enjoyed working on this one. It certainly is a unique vehicle… like a spaceship on wheels. :^)
-
Hey @Lobo2me, no, the tire cannot be seen. As a result, I only gave it a little attention. The kit does come with an extra set of rims that match the spare.
-
Thanks for the information @espo. I agree, my rendition may be a little glossy compared to the real car.
-
You’re too kind. :^)
-
:^) Yes, it’s the Hasegawa kit. I was looking on Scalemates and was surprised to see how many manufacturers have made versions of the Stratos.
-
Thanks Dood. I think one of the best parts of this hobby is the sharing of information. Yes, it’s a Hasegawa kit (the dismembered girl figure remains in the box ?) https://www.scalemates.com/kits/hasegawa-20543-lancia-stratos-hf-stradale--1378256
-
Thanks Rich. The instructions give you the paint mix ratio . The photos above are pretty close to how the model looks in person. Internal processors in cameras don’t always reproduce colours with 100% accuracy. I am no a paint expert by any stretch of the imagination. My favourite paints to apply are AK Interactive Xtreme Metalizers because they cover beautifully with thin coats at low air pressure. The biggest drawback for me is that they are enamel based and don’t like to be messed with afterwards. Regarding Tamiya LP: I think they’re pretty great. I’ve been making the transition from their Acrylic line to Lacquer. Biggest hurdle for me is backing off with my heavy trigger finger. You could argue that their LP-5 Semi Gloss Black is the very best out there. How has your experience been with them? This is the kit: https://www.scalemates.com/kits/hasegawa-20543-lancia-stratos-hf-stradale--1378256 Cheers
-
Very sharp. Nice finish. ?
-
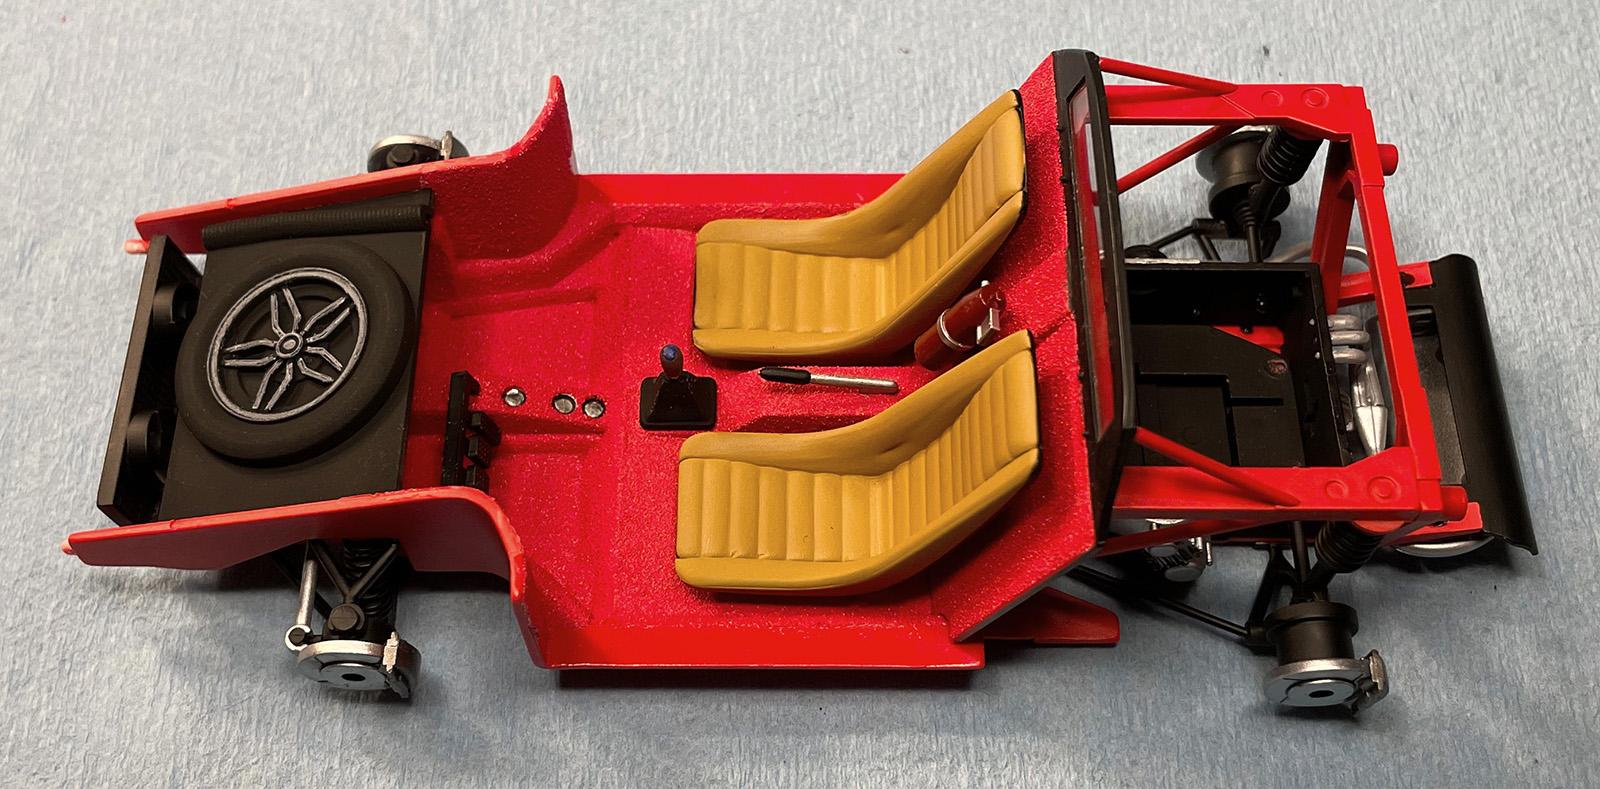
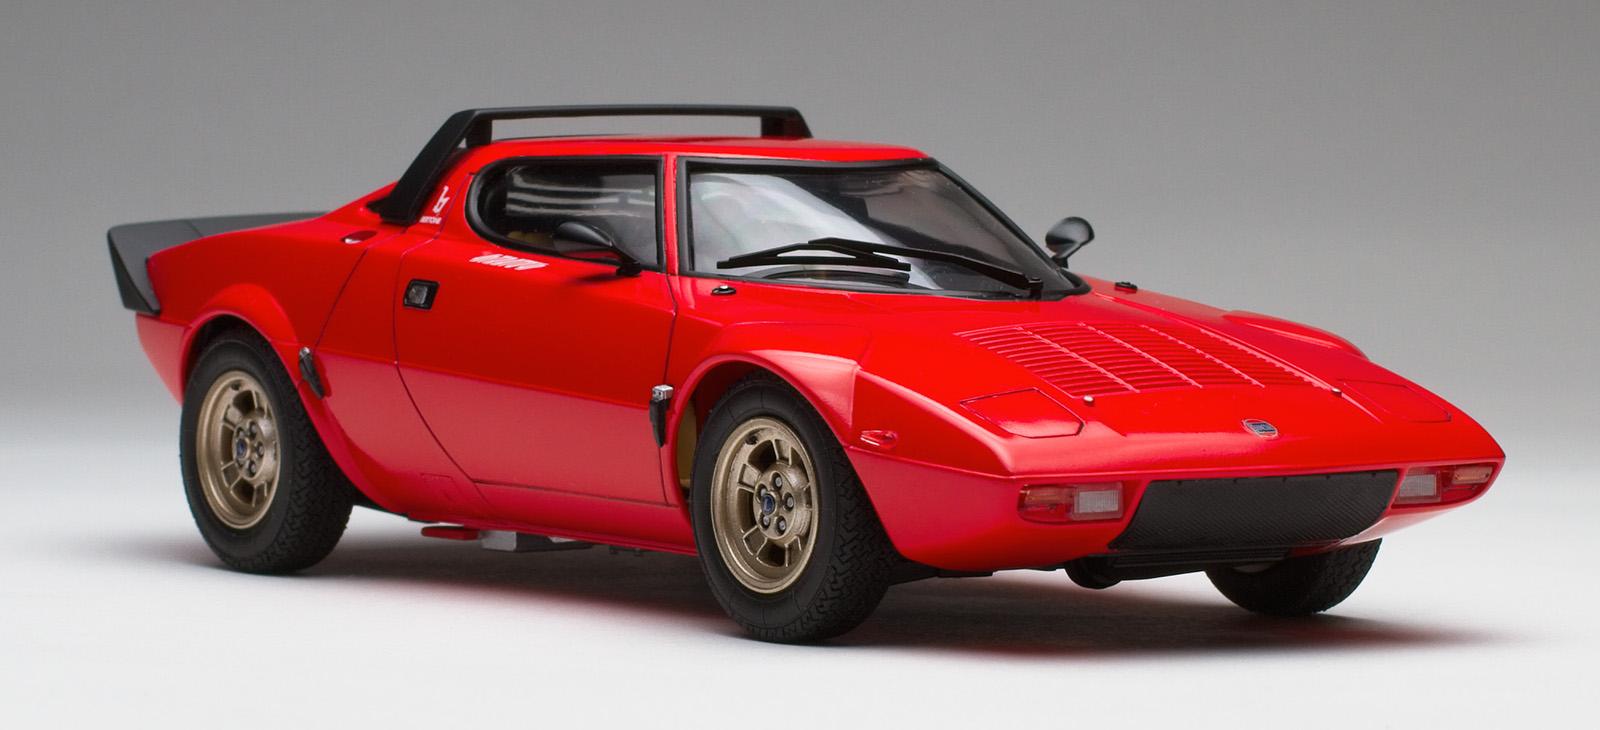
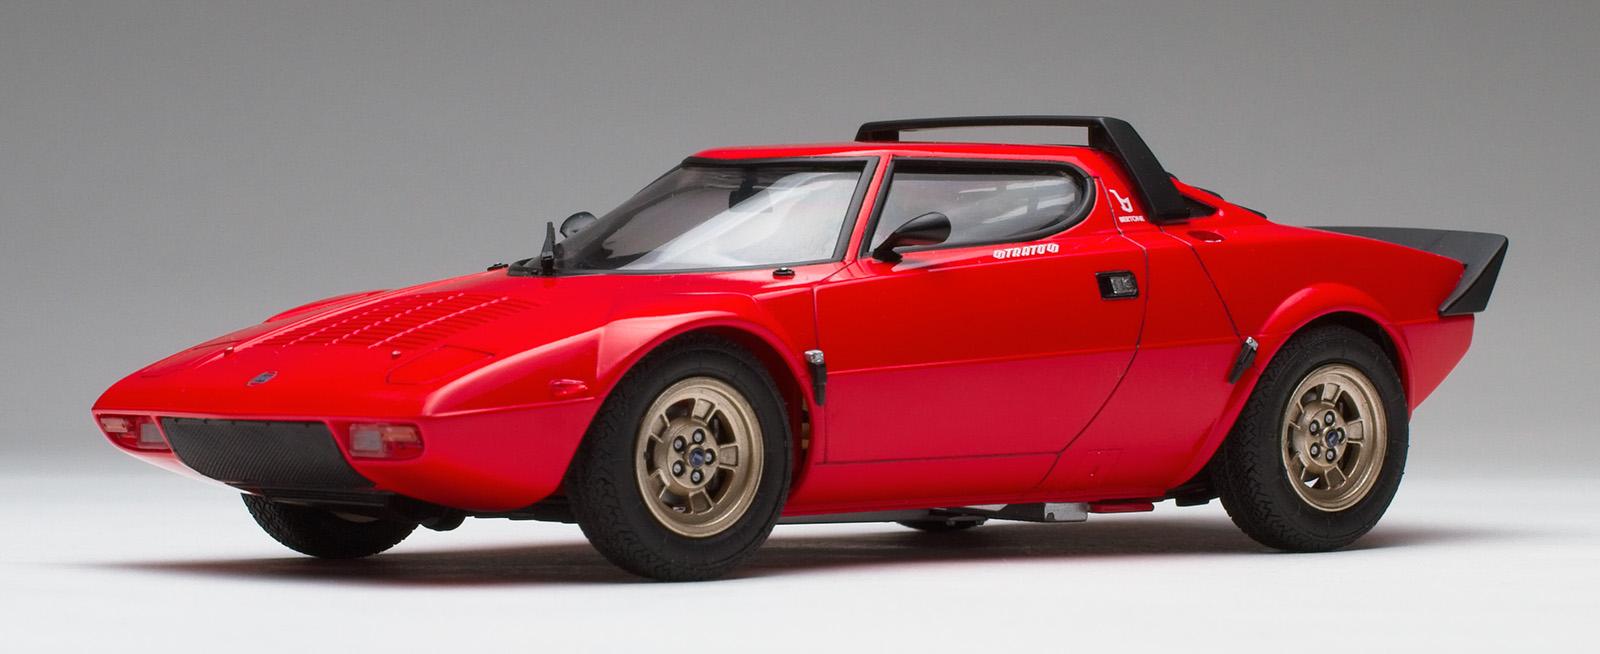
Stick a fork in it, she's done. Finished and photographed this week. The body was painted with a 50-50 mix of Tamiya LP-21 Italian Red and LP-51 Pure Orange. The interior is flat black with custom mixed tan coloured seats. The carpeting was red embossing powder but it looked kinda magenta-pink so I painted over it with LP21. The wheels are Tamiya X-31 Titanium Gold tinted with X-7 Red. What I Learned: 1. 99% of the parts fit very well including the glass. 2. Super tight fit of the body to chassis. The instructions tell you that once attached it will be very difficult to remove. The dashboard and door panels are attached to the body, not the chassis on this kit. I broke the dashboard off during final assembly. See #3 3. Black CA glue to the rescue. There is a rubber content to the glue which allows for some flexibility when parts are under strain as with this kit. 4. There are 2 mounting holes inside the front end of the body where matching pins on the chassis frame are inserted first. The rear end is attached last. You really have to pull the body sides apart to get chassis in. There didn't seem to be any obvious connection points in the rear. See #5 5. Pretty sure I got all the parts snugged down and the chassis pushed up and in all the way, however parts of the frame in front of the rear wheels stick out below the body. In fact, I'm not convinced the wheels are the correct hight or perfectly centred in the wheel wells. It remain a mystery wrapped up in an enigma. :^] Have a great weekend!

-
… and it shows!! Stunning work. That engine in incredible.
-
Totally worth all the aggravation you went through with the paint! ??
-
Exceptional work!
-
Very nice! Great engine work.
-
Looks good without the wheel flares. Weathering on the chassis looks absolutely perfect. Outdoor photos on that background look 1:1. ?
-
Very clean build. The chrome, emblems and badges look great!
-
Lovely tribute. Turned out great!
-
Lookin’ good. ? Awesome that you stuck with it! ? I’m a fan of X-22 as well, however it’s a dust magnet like Alclad Candy enamels. It takes forever to dry and feels ‘soft’ for quite a while. A few things I’ve tried over the past couple years: vacuum the room; vacuum and wipe down the booth with a damp cloth; spray-mist the air/room with water from a pump bottle to pull dust out of the air and stop it from coming up off the floor; brush off the model with Tamiya’s anti-static brush (don’t know if this really works, but why not); and to get really anal, don’t wear long sleeves.
-
Thank you @Smitty. It’s been great to reconnect with the hobby. Sure beats mindless scrolling on social media. ?
-
Perfection. Looks like a die cast.
-
Bronco finished!
70 Sting replied to BDSchindler's topic in Model Trucks: Pickups, Vans, SUVs, Light Commercial
Great looking build with a nice story behind it. -
Thanks Jonathan. I consider carpeting a ‘plus’ going forward for convertibles. Not entirely convinced it’s necessary in closed cabin vehicles where it can barely be seen. :^)