BK9300
-
Posts
1,986 -
Joined
-
Last visited
Content Type
Profiles
Forums
Events
Gallery
Everything posted by BK9300
-
Beautiful paint job - like the deck plate stripe, too. Well done!
-

Kenworth W-925 (mild custom)
BK9300 replied to Gary Chastain's topic in WIP: Model Trucks: Big Rigs and Heavy Equipment
Very impressive looking, Gary - definitely a trophy winner, in my opinion! -
Western Star 4900 FA plow truck
BK9300 replied to BK9300's topic in WIP: Model Trucks: Big Rigs and Heavy Equipment
Thanks, Daniel! Very glad that I test assembled the firewall on a temporary panel way back - sure made assembly on the real thing a lot easier -
Freightliner FLC
BK9300 replied to Jürgen M.'s topic in WIP: Model Trucks: Big Rigs and Heavy Equipment
This is looking really good, Jürgen, and the cab and hood have turned out amazing! My two cents worth say to paint the box the cab copper colour. -
Western Star 4900 FA plow truck
BK9300 replied to BK9300's topic in WIP: Model Trucks: Big Rigs and Heavy Equipment
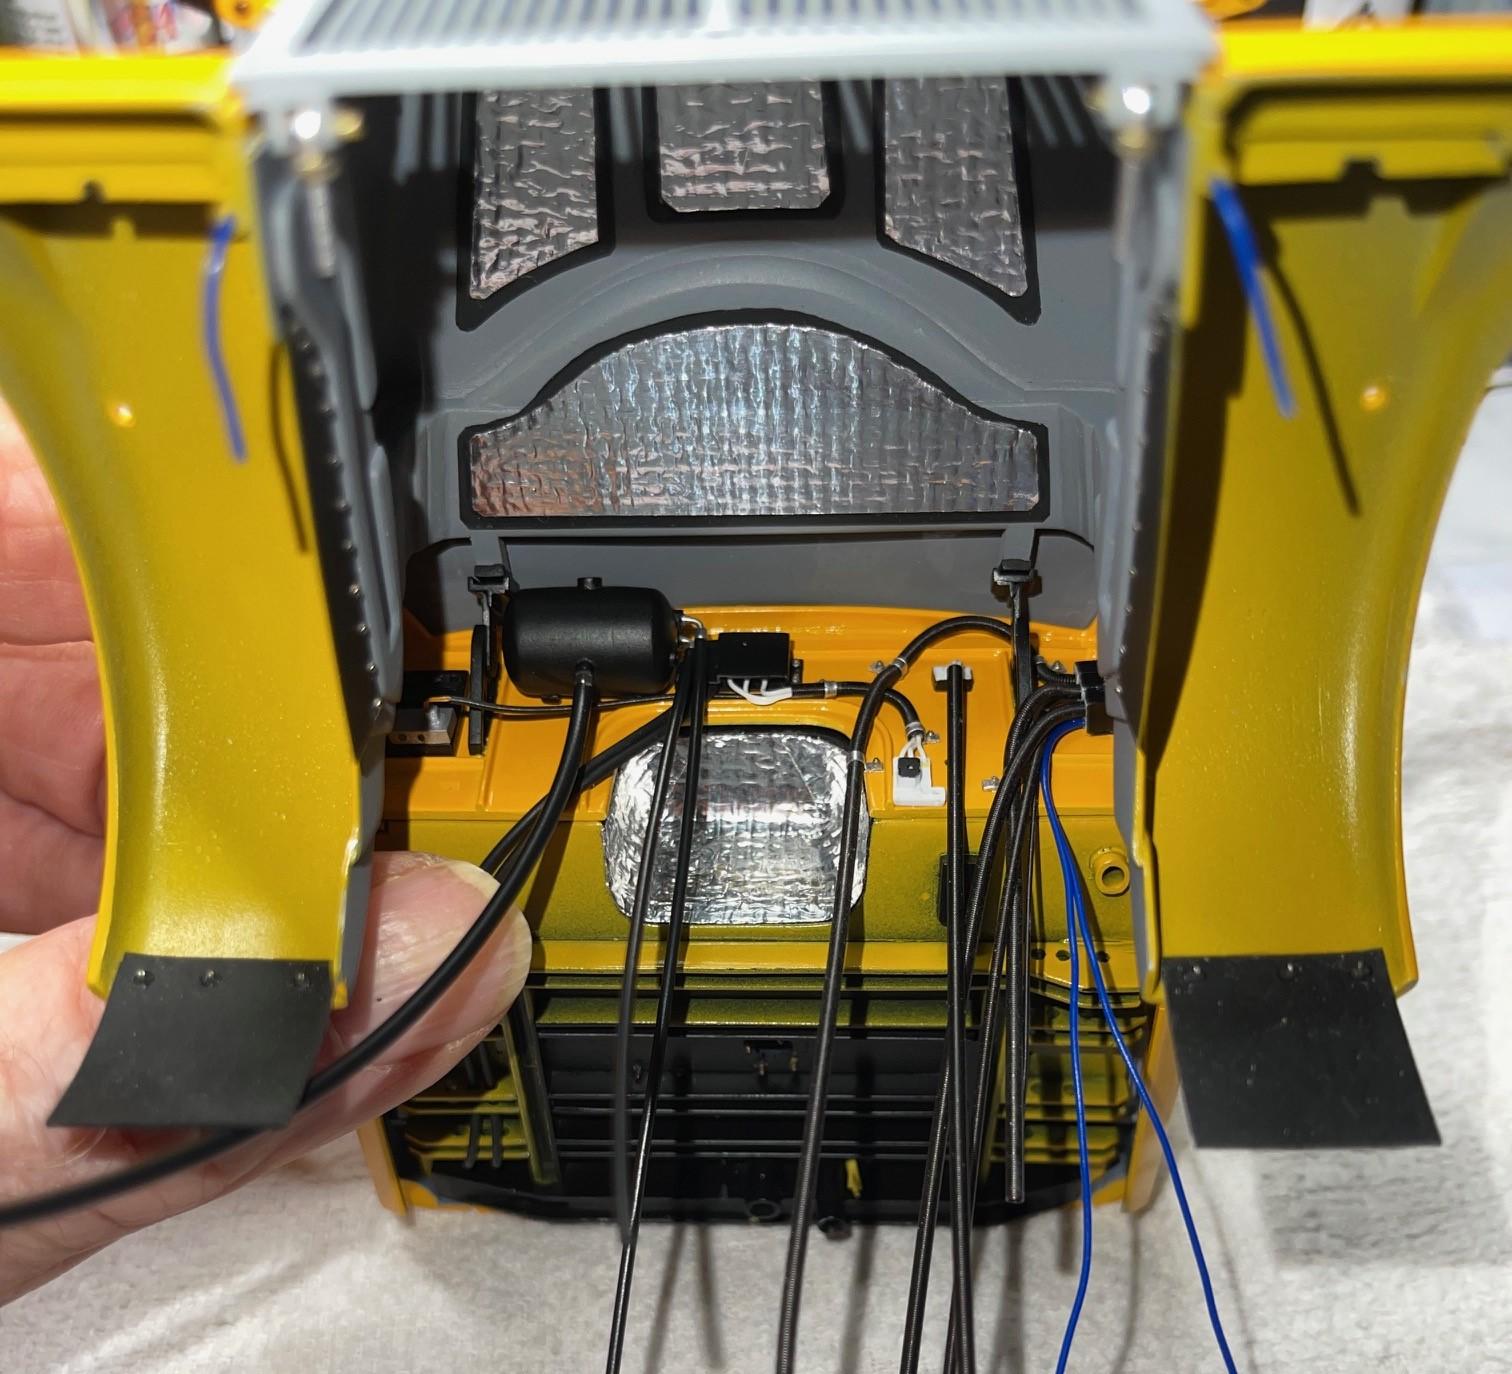
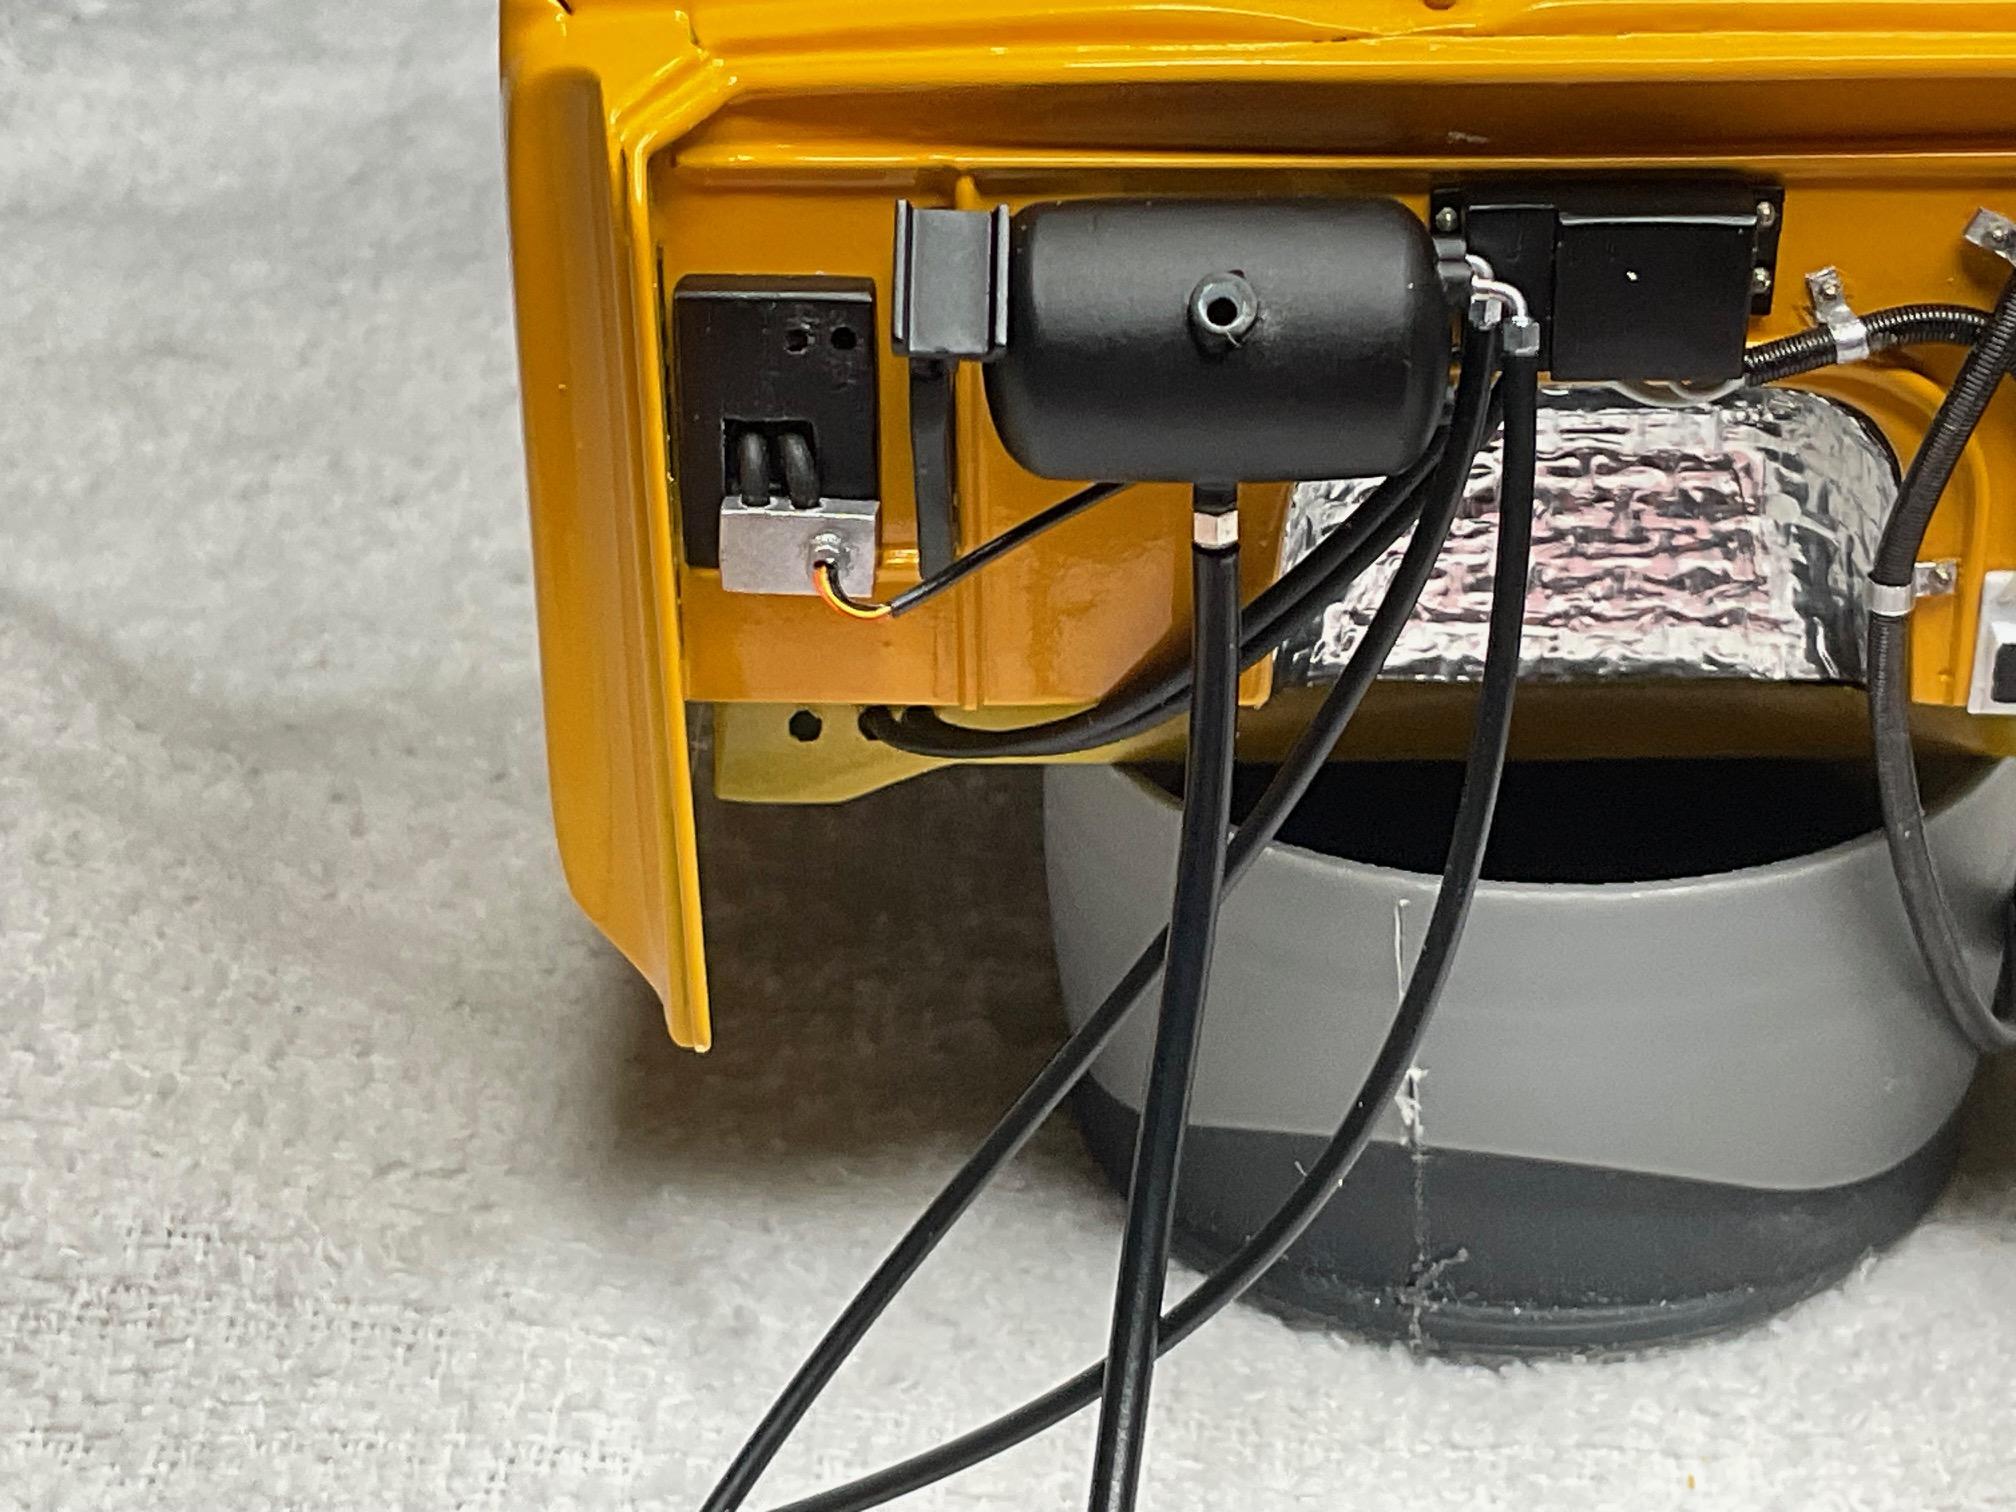
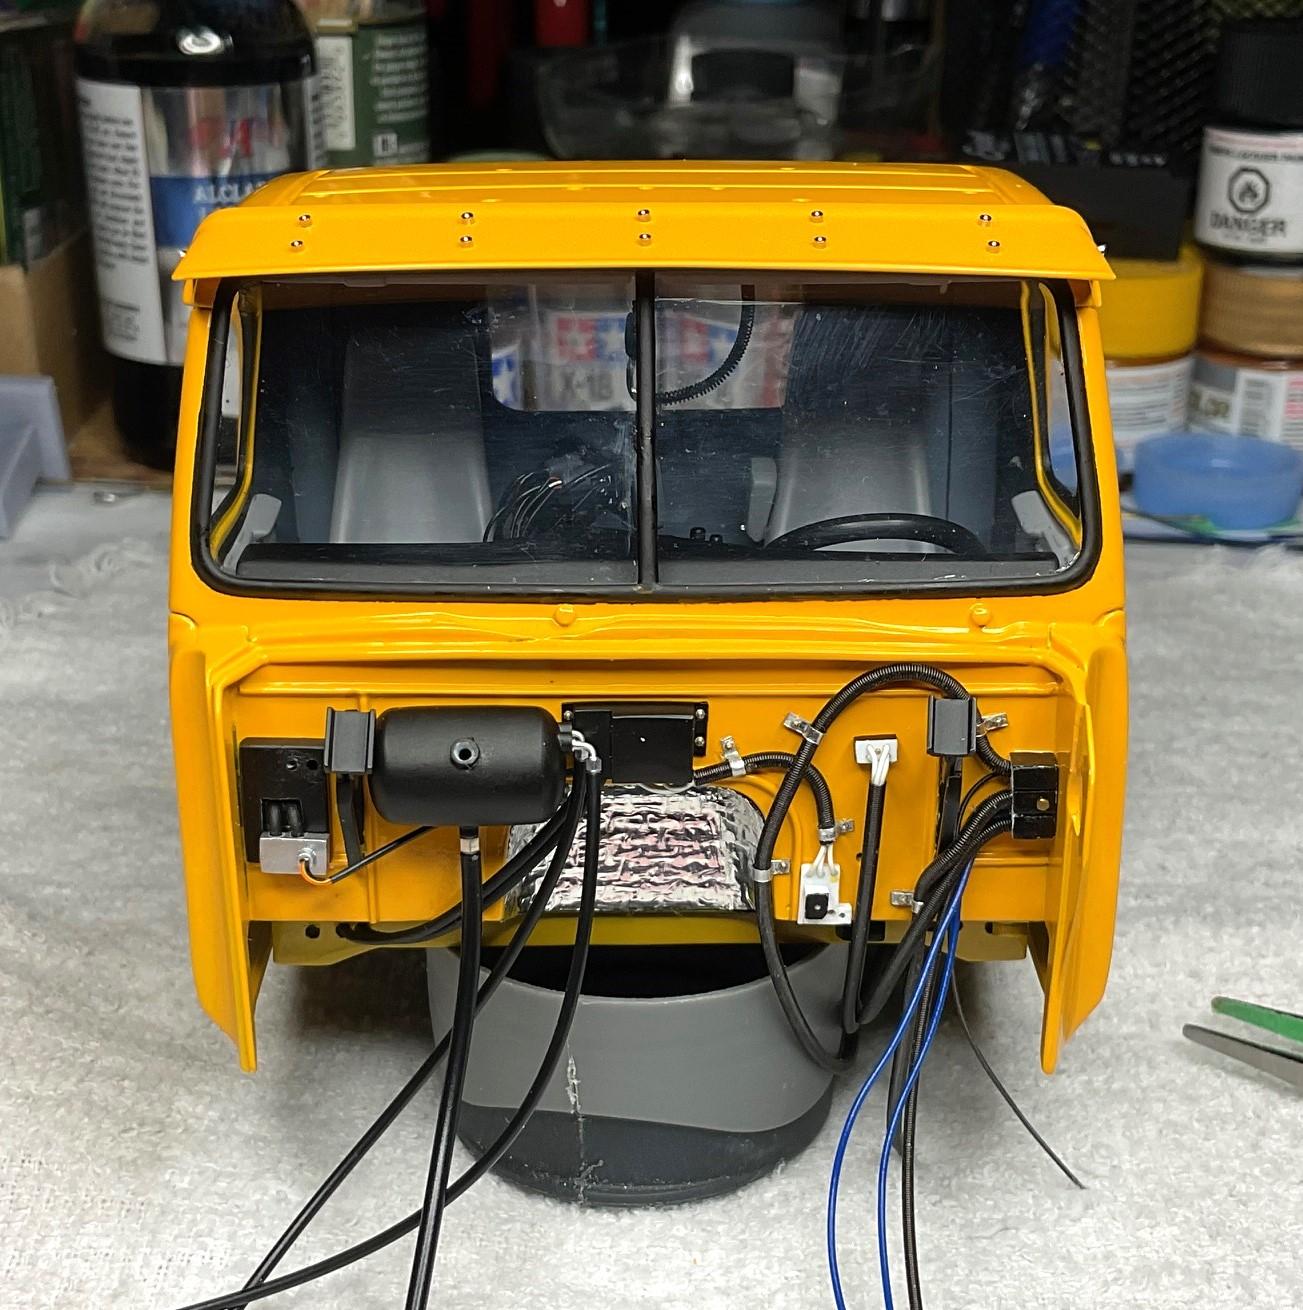
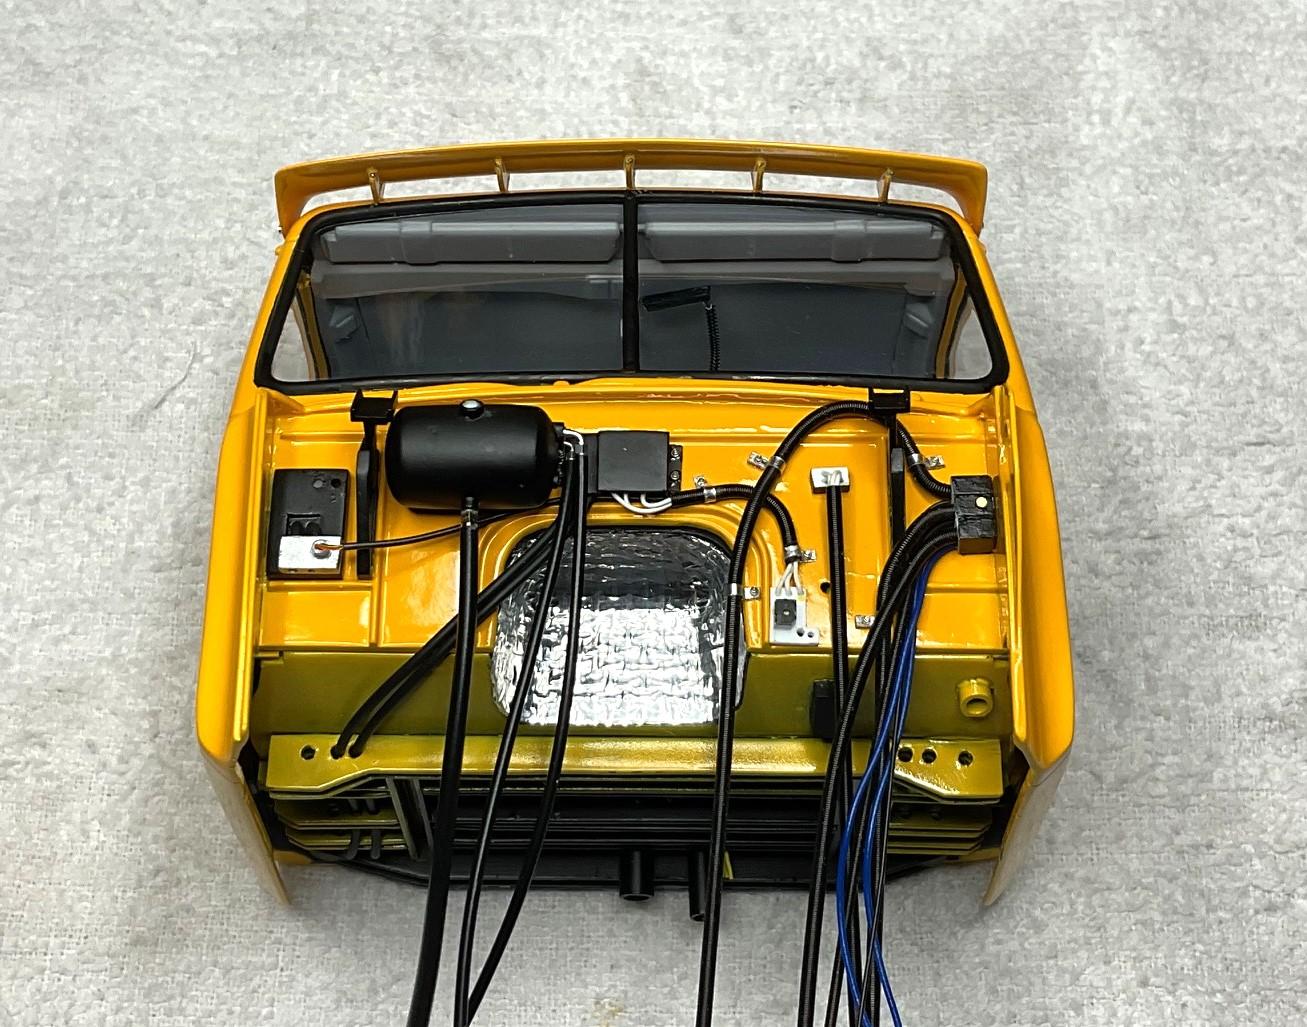
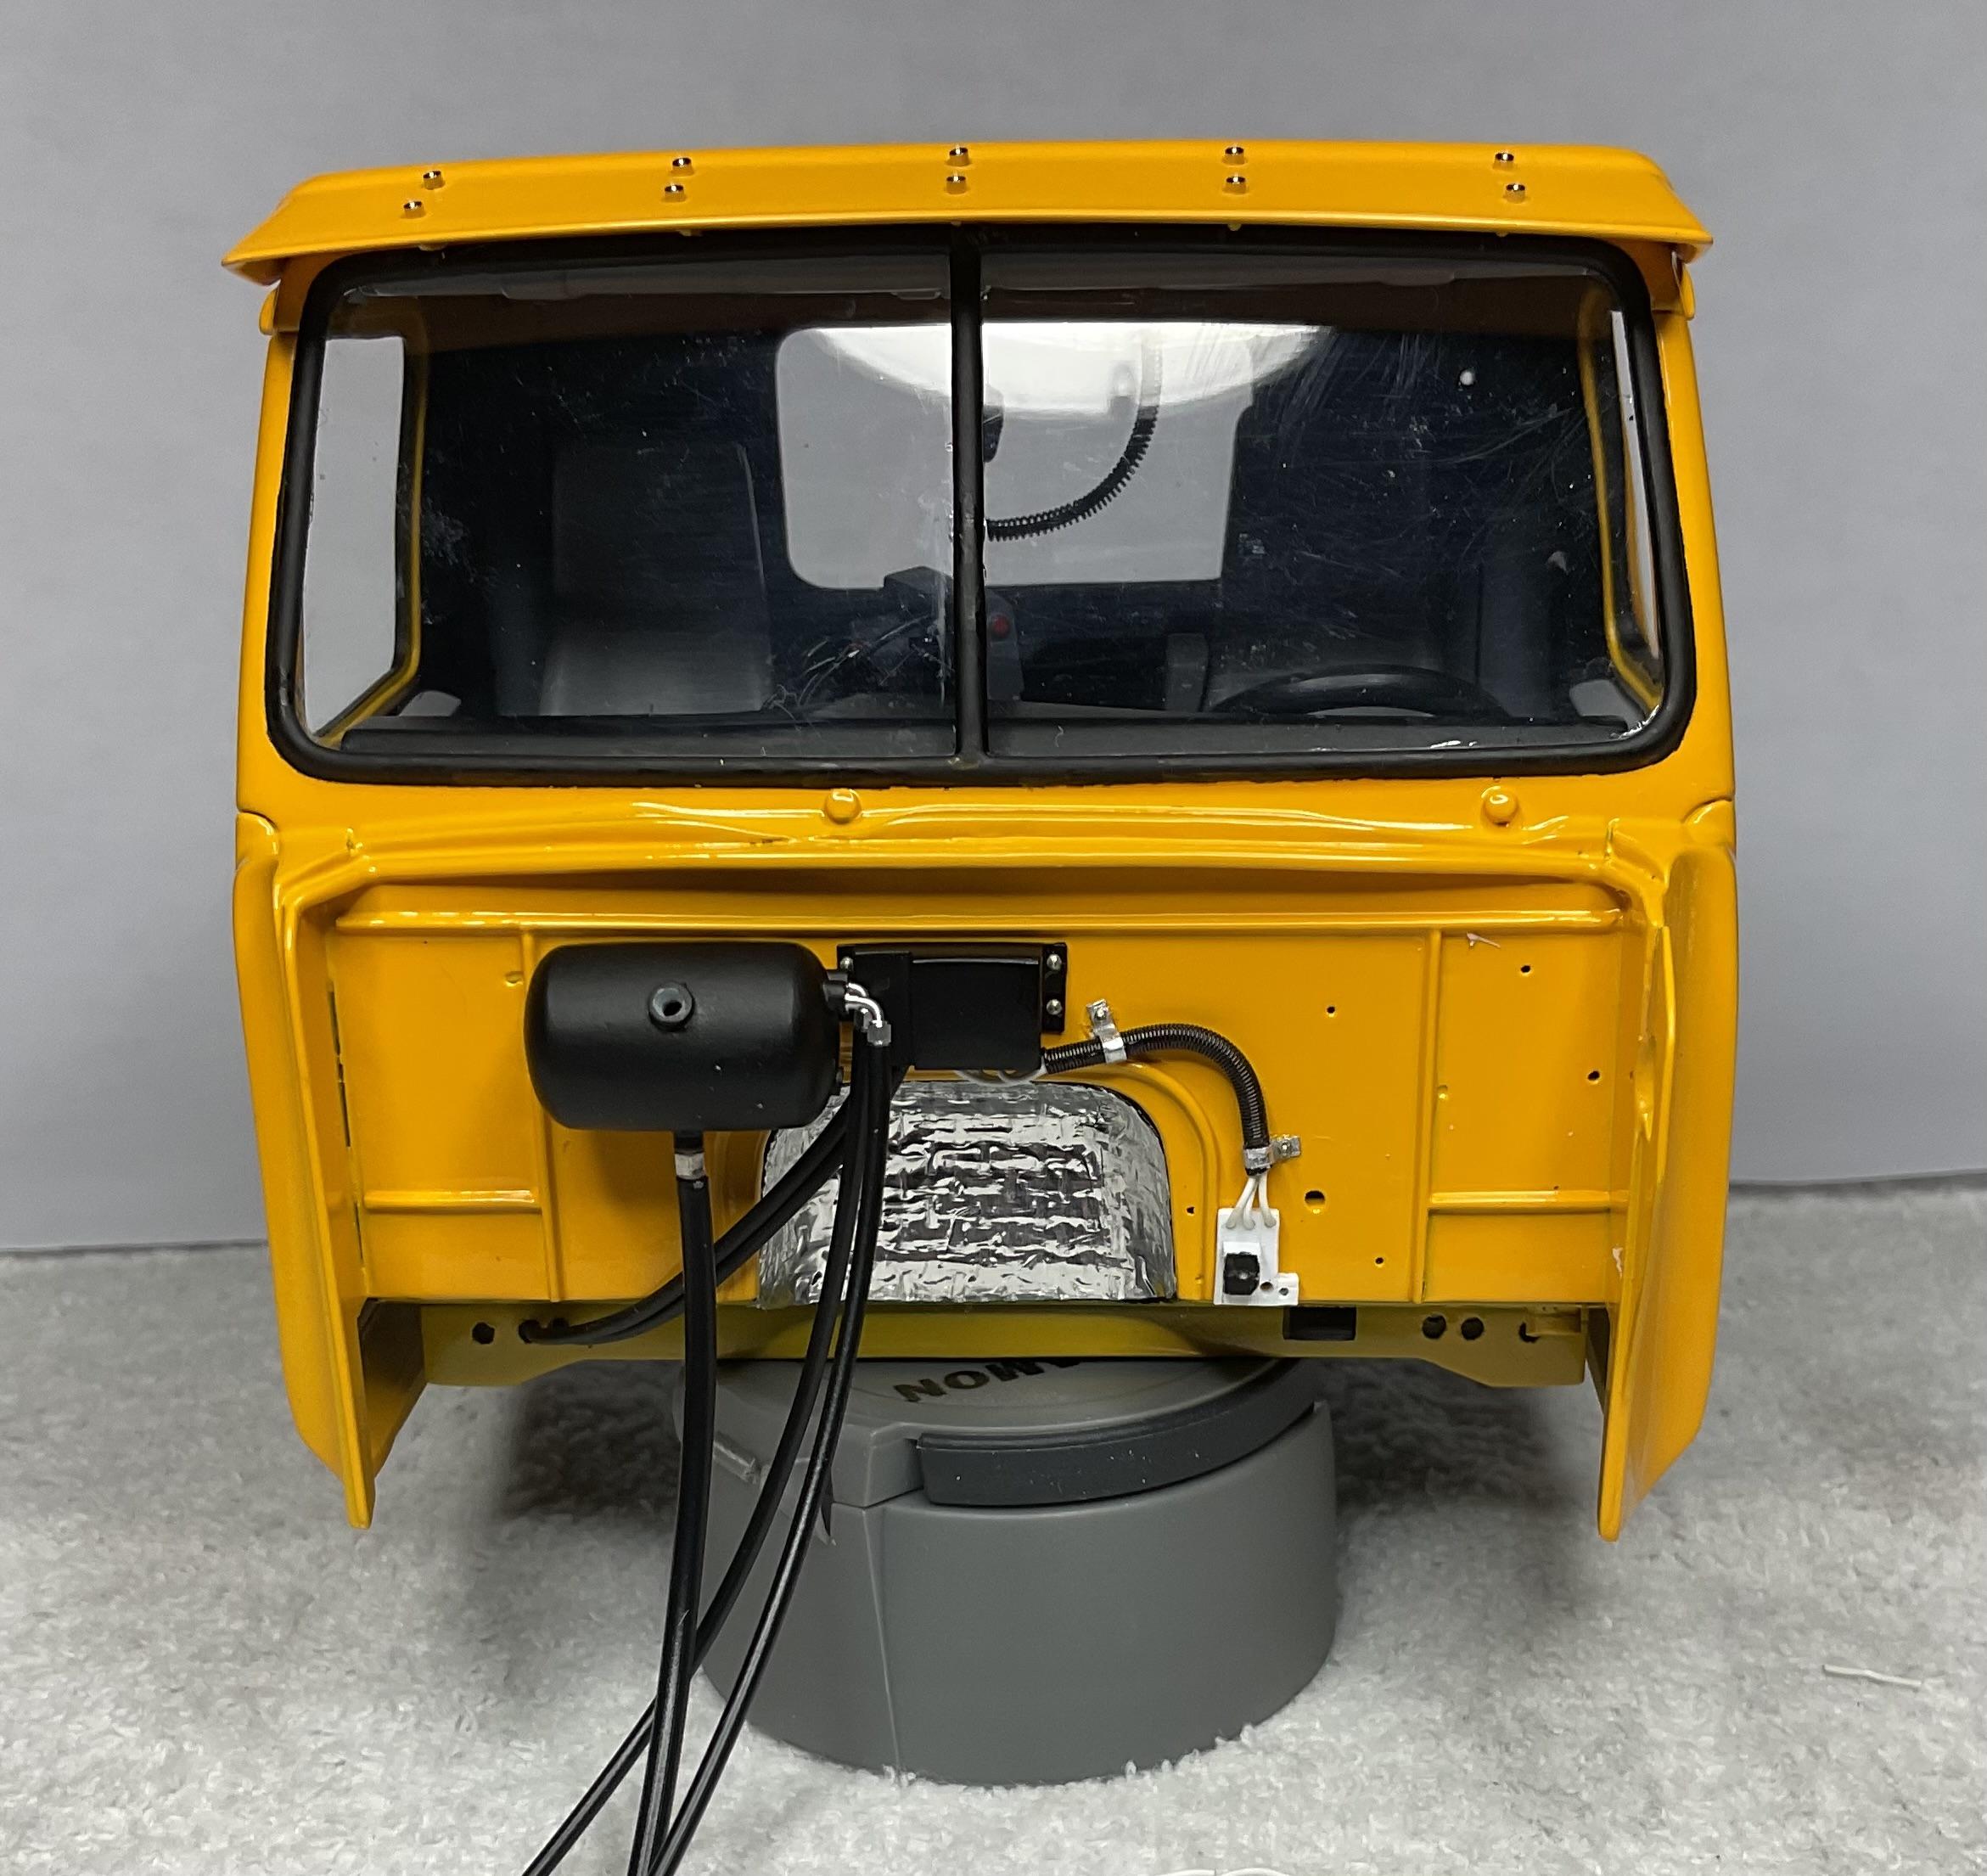
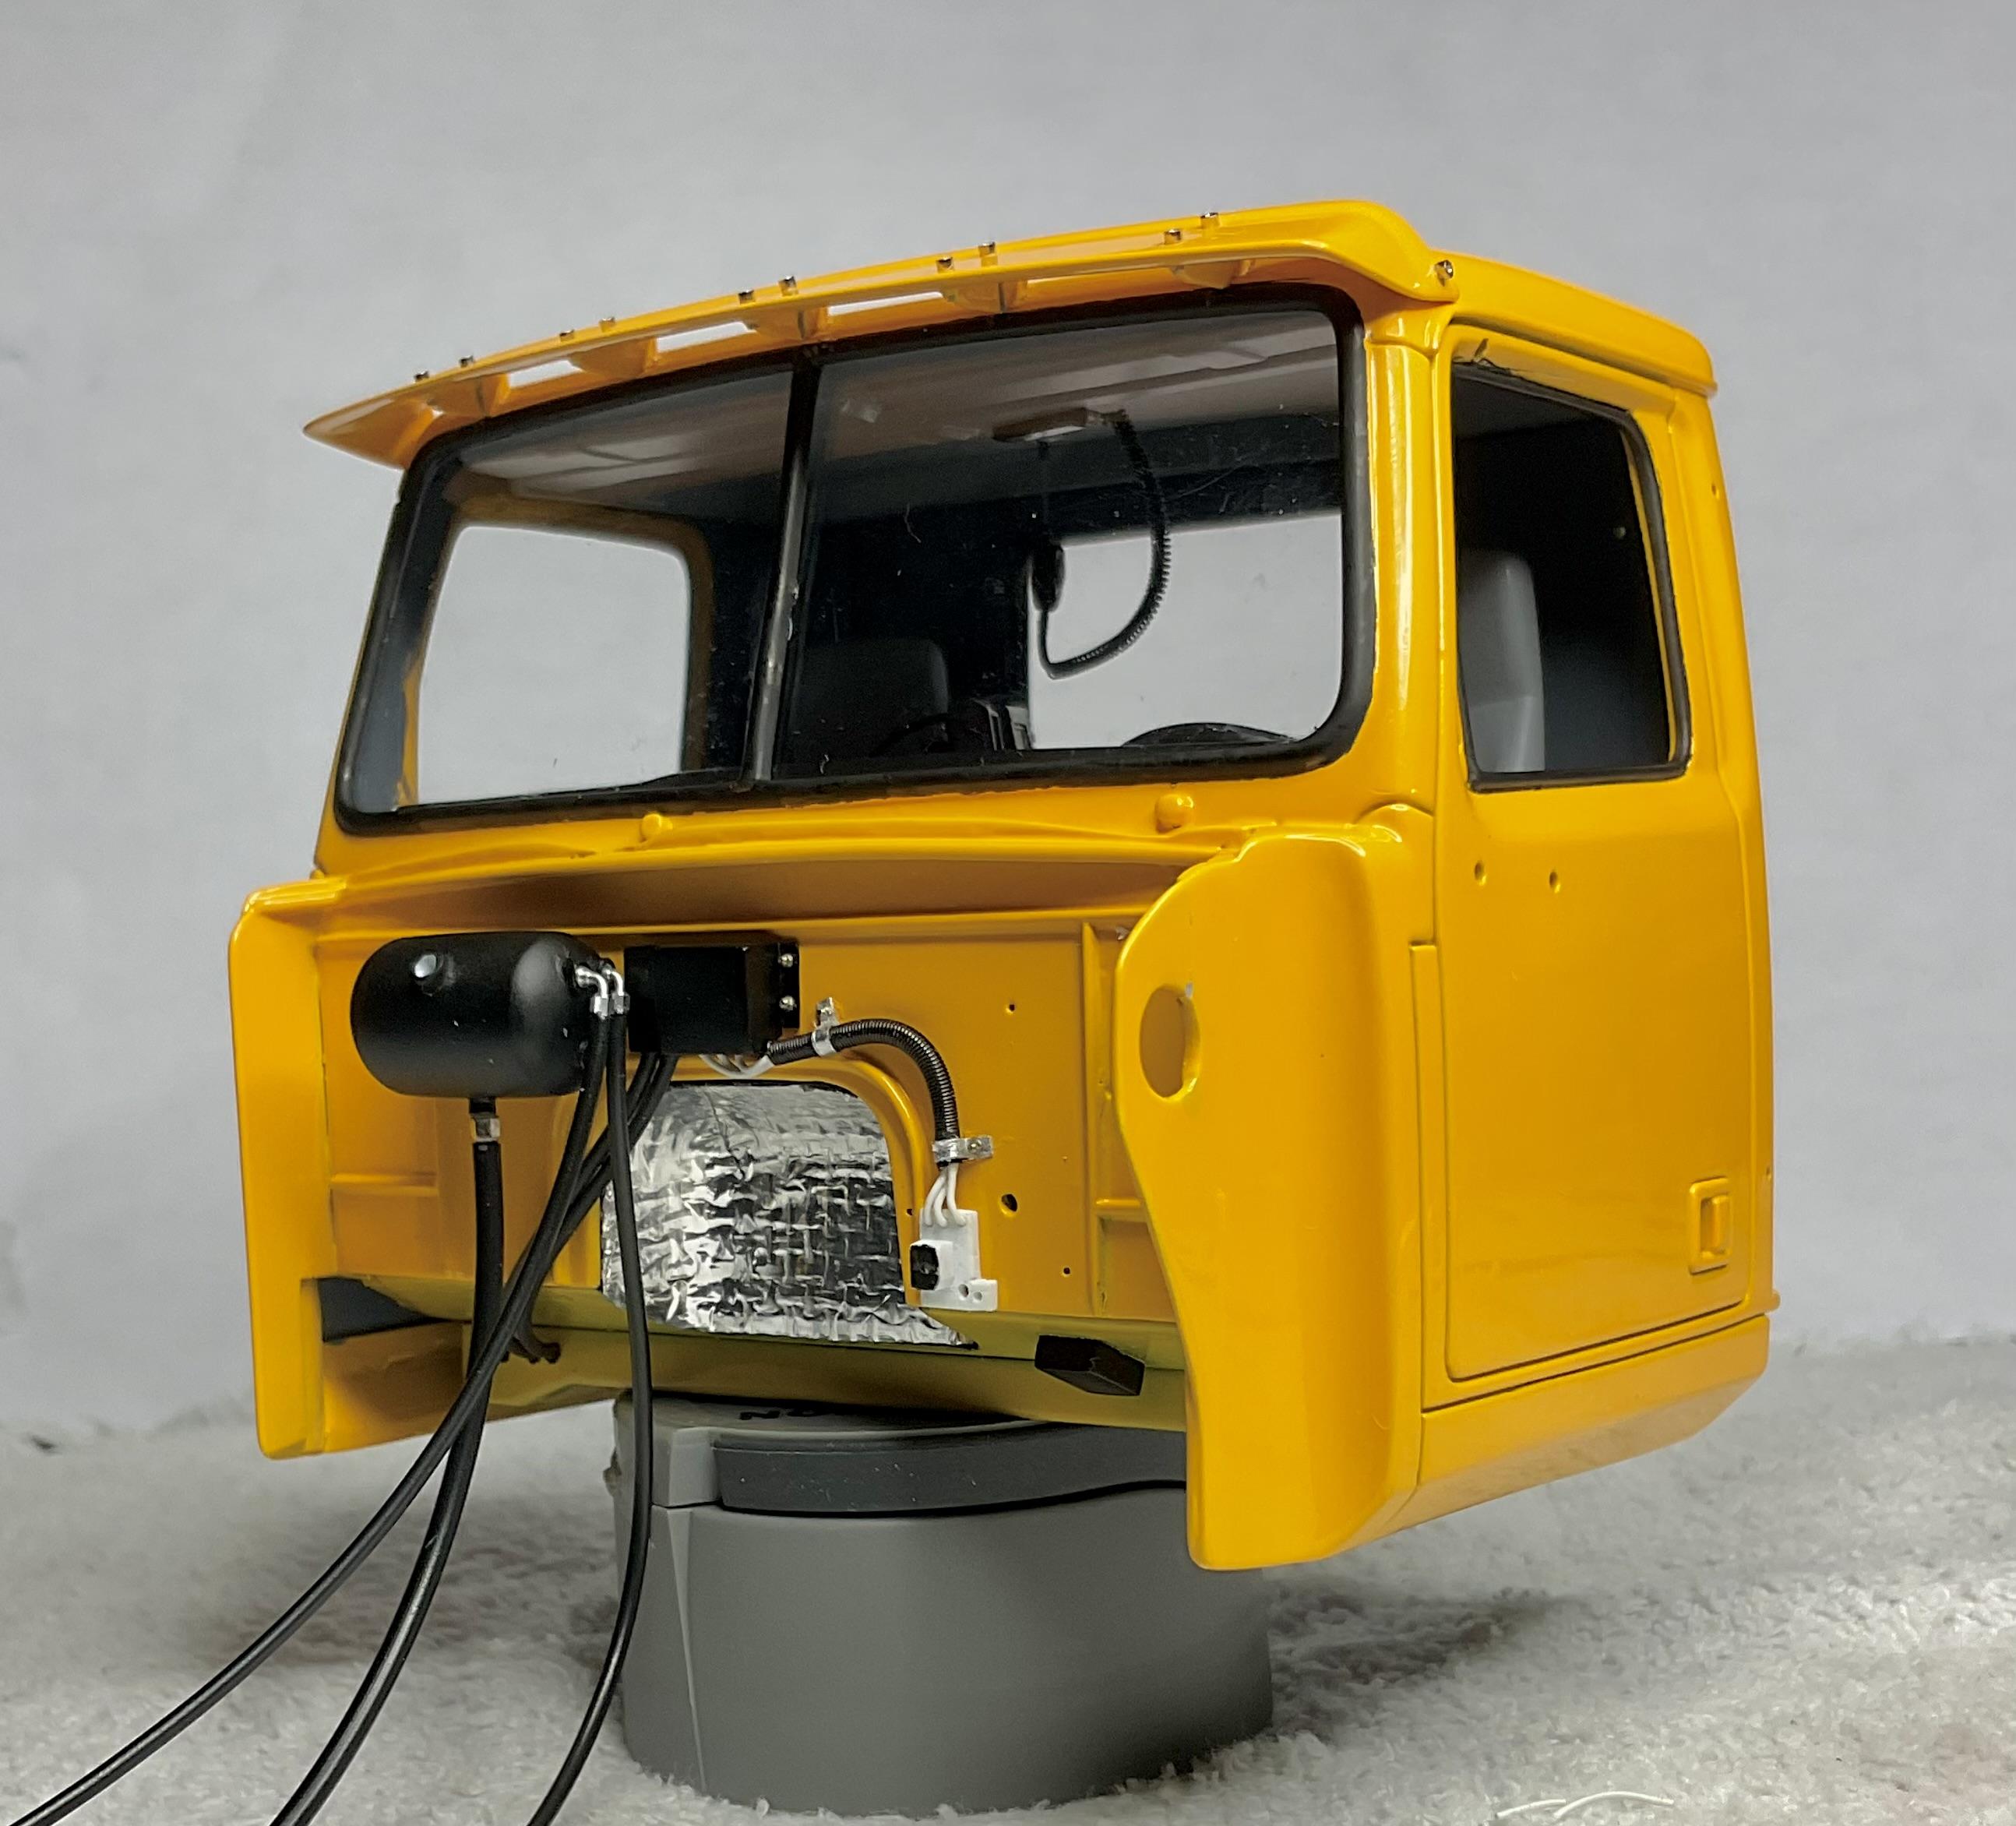
Worked most of the day today, on firewall items - making a few more loom clamps, the AC/heater manifold, and attaching the rest of the harnesses I had previously made. Don't know about you, but getting to the end of an intense day like this leaves me wondering where all the time went, so quickly. Little details sure take a long time! Made up the AC/heater manifold and wired it back to 'somewhere'! Four more fittings need to be made to hook up the AC lines to/from the receiver/dryer, and the two heater lines. Looking at the fittings on the overflow tank, I know they are not correct, but I didn't have it in me to wait for another order of parts to arrive before carrying on - Most of this was seen mounted on the temporary firewall, back in March (?), but it looks a little neater laid out on top of the painted firewall - An upright view - all the loose ends look a bit chaotic, but I do have destinations for all of them! - A final check at the end of the day - the hood is being held in place, tight to the cab and the hood support brackets on the firewall still line up with the supports on the hood - pretty happy with that! - Still some work to do on the firewall - some pass through air lines, just below the ECM and more air lines that exit the cab on the driver's side slope of the floor pan. Then need to think about getting all this on the truck!
-
Western Star 4900 FA plow truck
BK9300 replied to BK9300's topic in WIP: Model Trucks: Big Rigs and Heavy Equipment
Thanks, Scott and Jeff - I'm thinking it's all in the name - 'Model Car Magazine' - might not be any room for big rigs, yet! -
Kenworth W-925 (mild custom)
BK9300 replied to Gary Chastain's topic in WIP: Model Trucks: Big Rigs and Heavy Equipment
When the trailer is painted and the deck plates chromed, going to look awesome (looks awesome as is!) -
Freightliner FLC
BK9300 replied to Jürgen M.'s topic in WIP: Model Trucks: Big Rigs and Heavy Equipment
Jürgen, your newly printed wheels look fantastic, and even more impressive now that your truck is a 'roller'! -
Western Star 4900 FA plow truck
BK9300 replied to BK9300's topic in WIP: Model Trucks: Big Rigs and Heavy Equipment
Very kind words, indeed - much appreciated, Gary. -
Western Star 4900 FA plow truck
BK9300 replied to BK9300's topic in WIP: Model Trucks: Big Rigs and Heavy Equipment
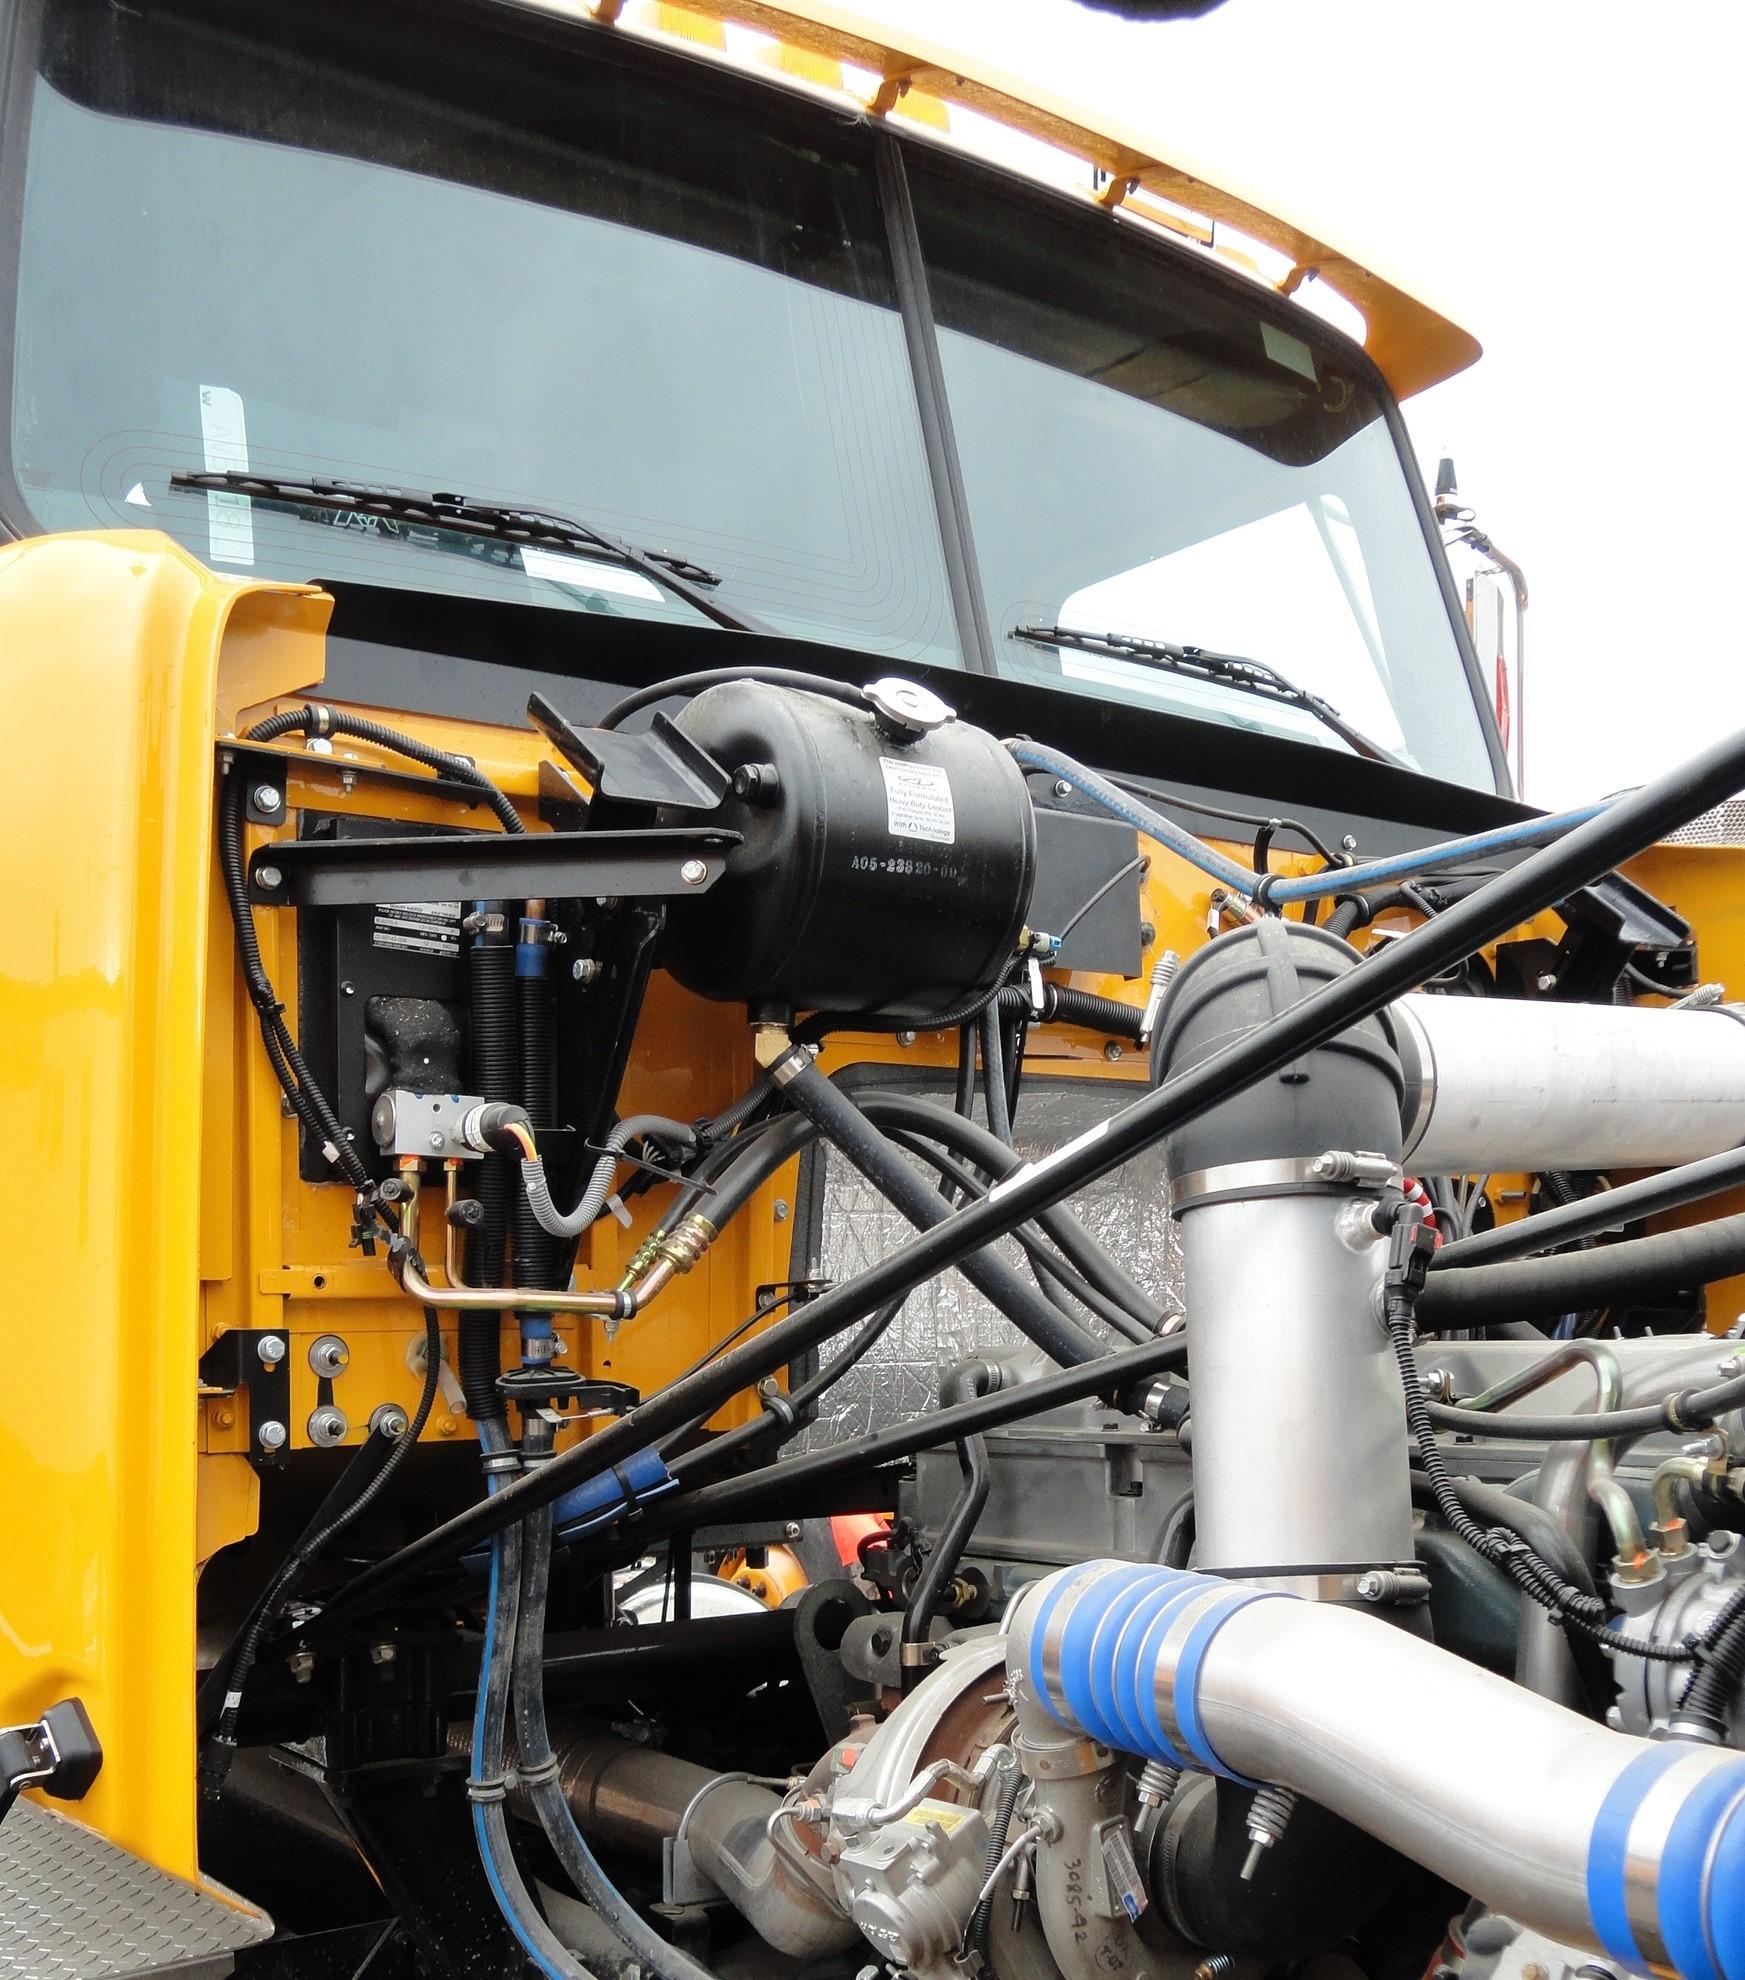
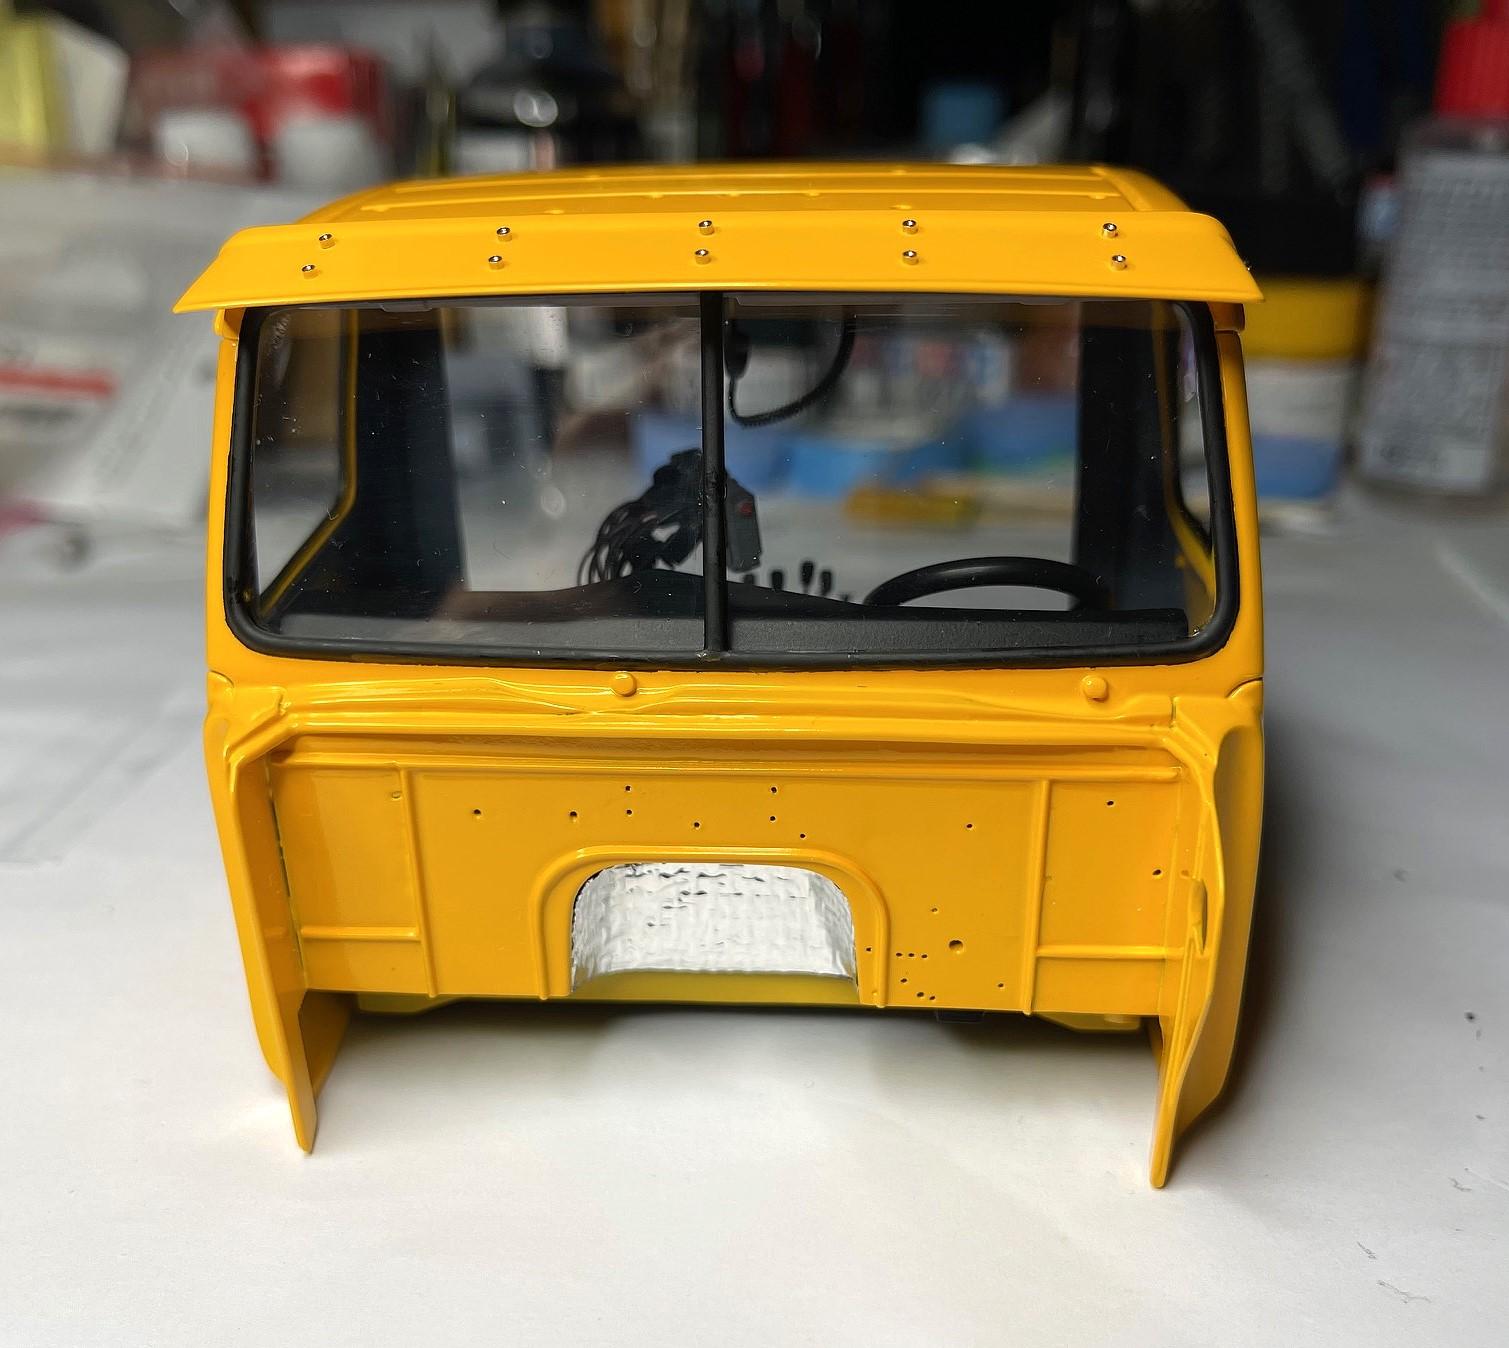
Thanks, Daniel - I appreciate the generous comments! About the insulation, I don't know what's in place for other makes of trucks, but our Western Stars from the 2000's all seemed to have them; this is a pic of inspiration truck's firewall (was new at time of pic, in 2010) -
-
Western Star 4900 FA plow truck
BK9300 replied to BK9300's topic in WIP: Model Trucks: Big Rigs and Heavy Equipment
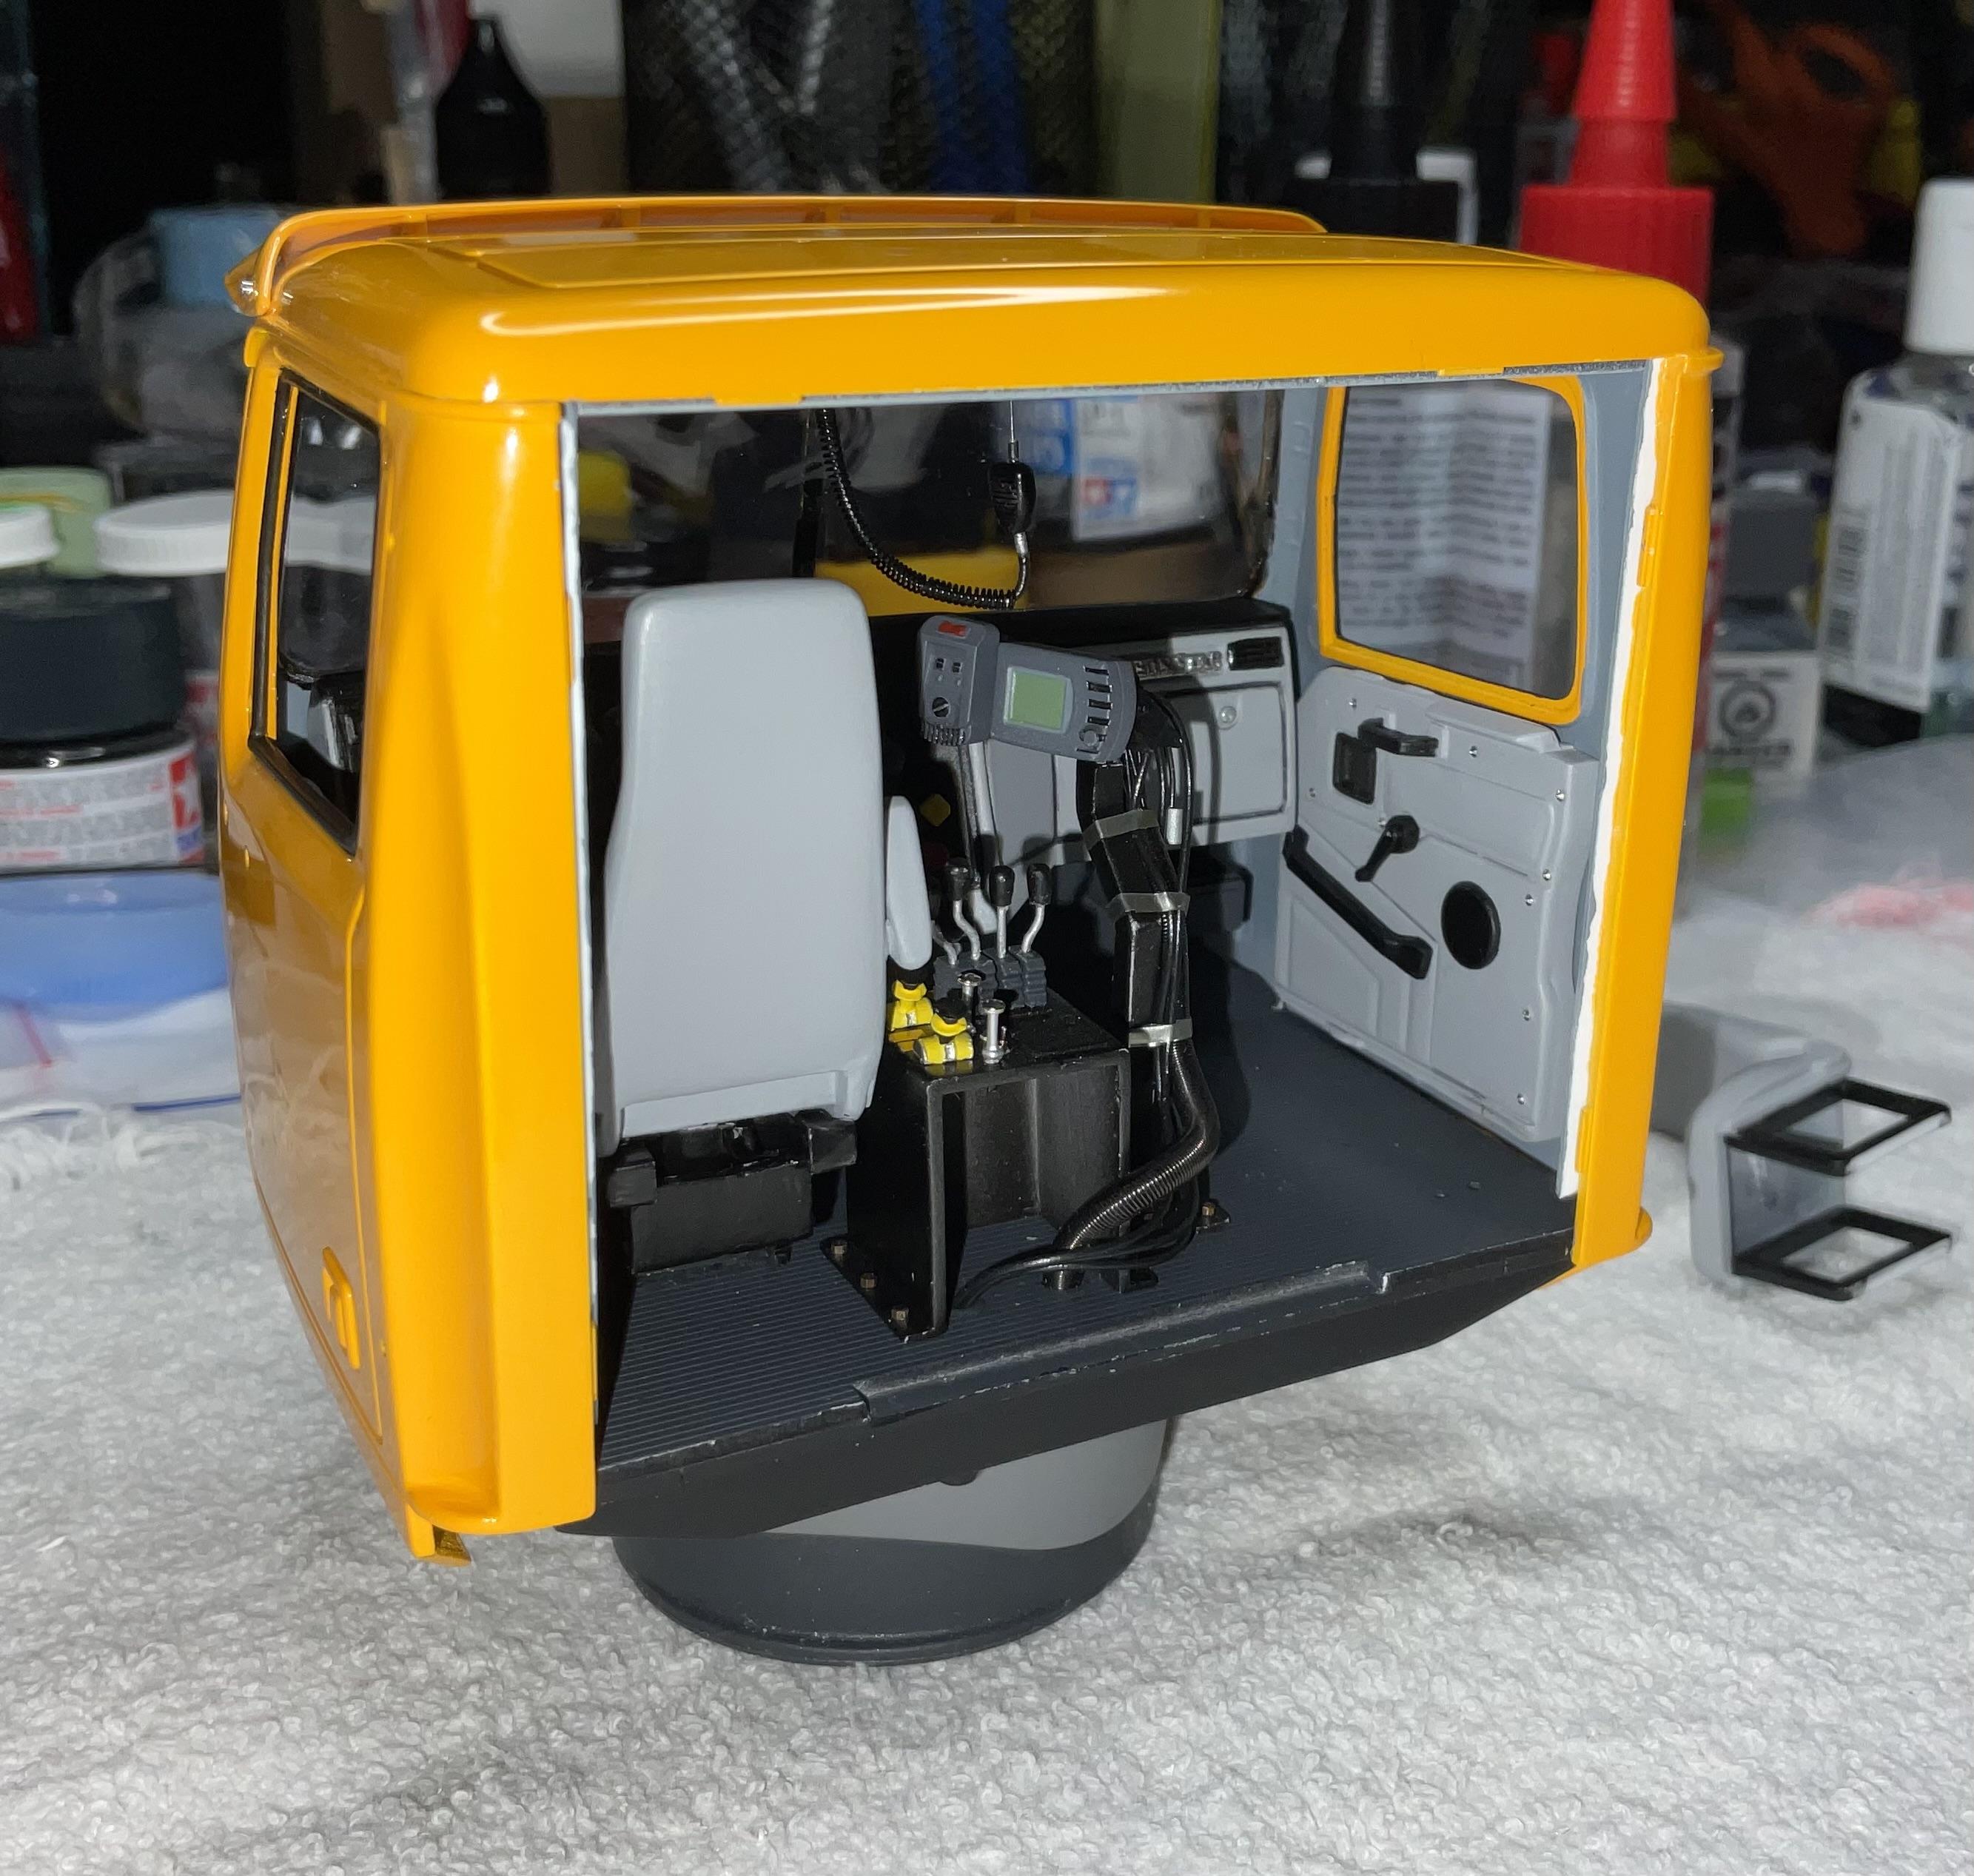
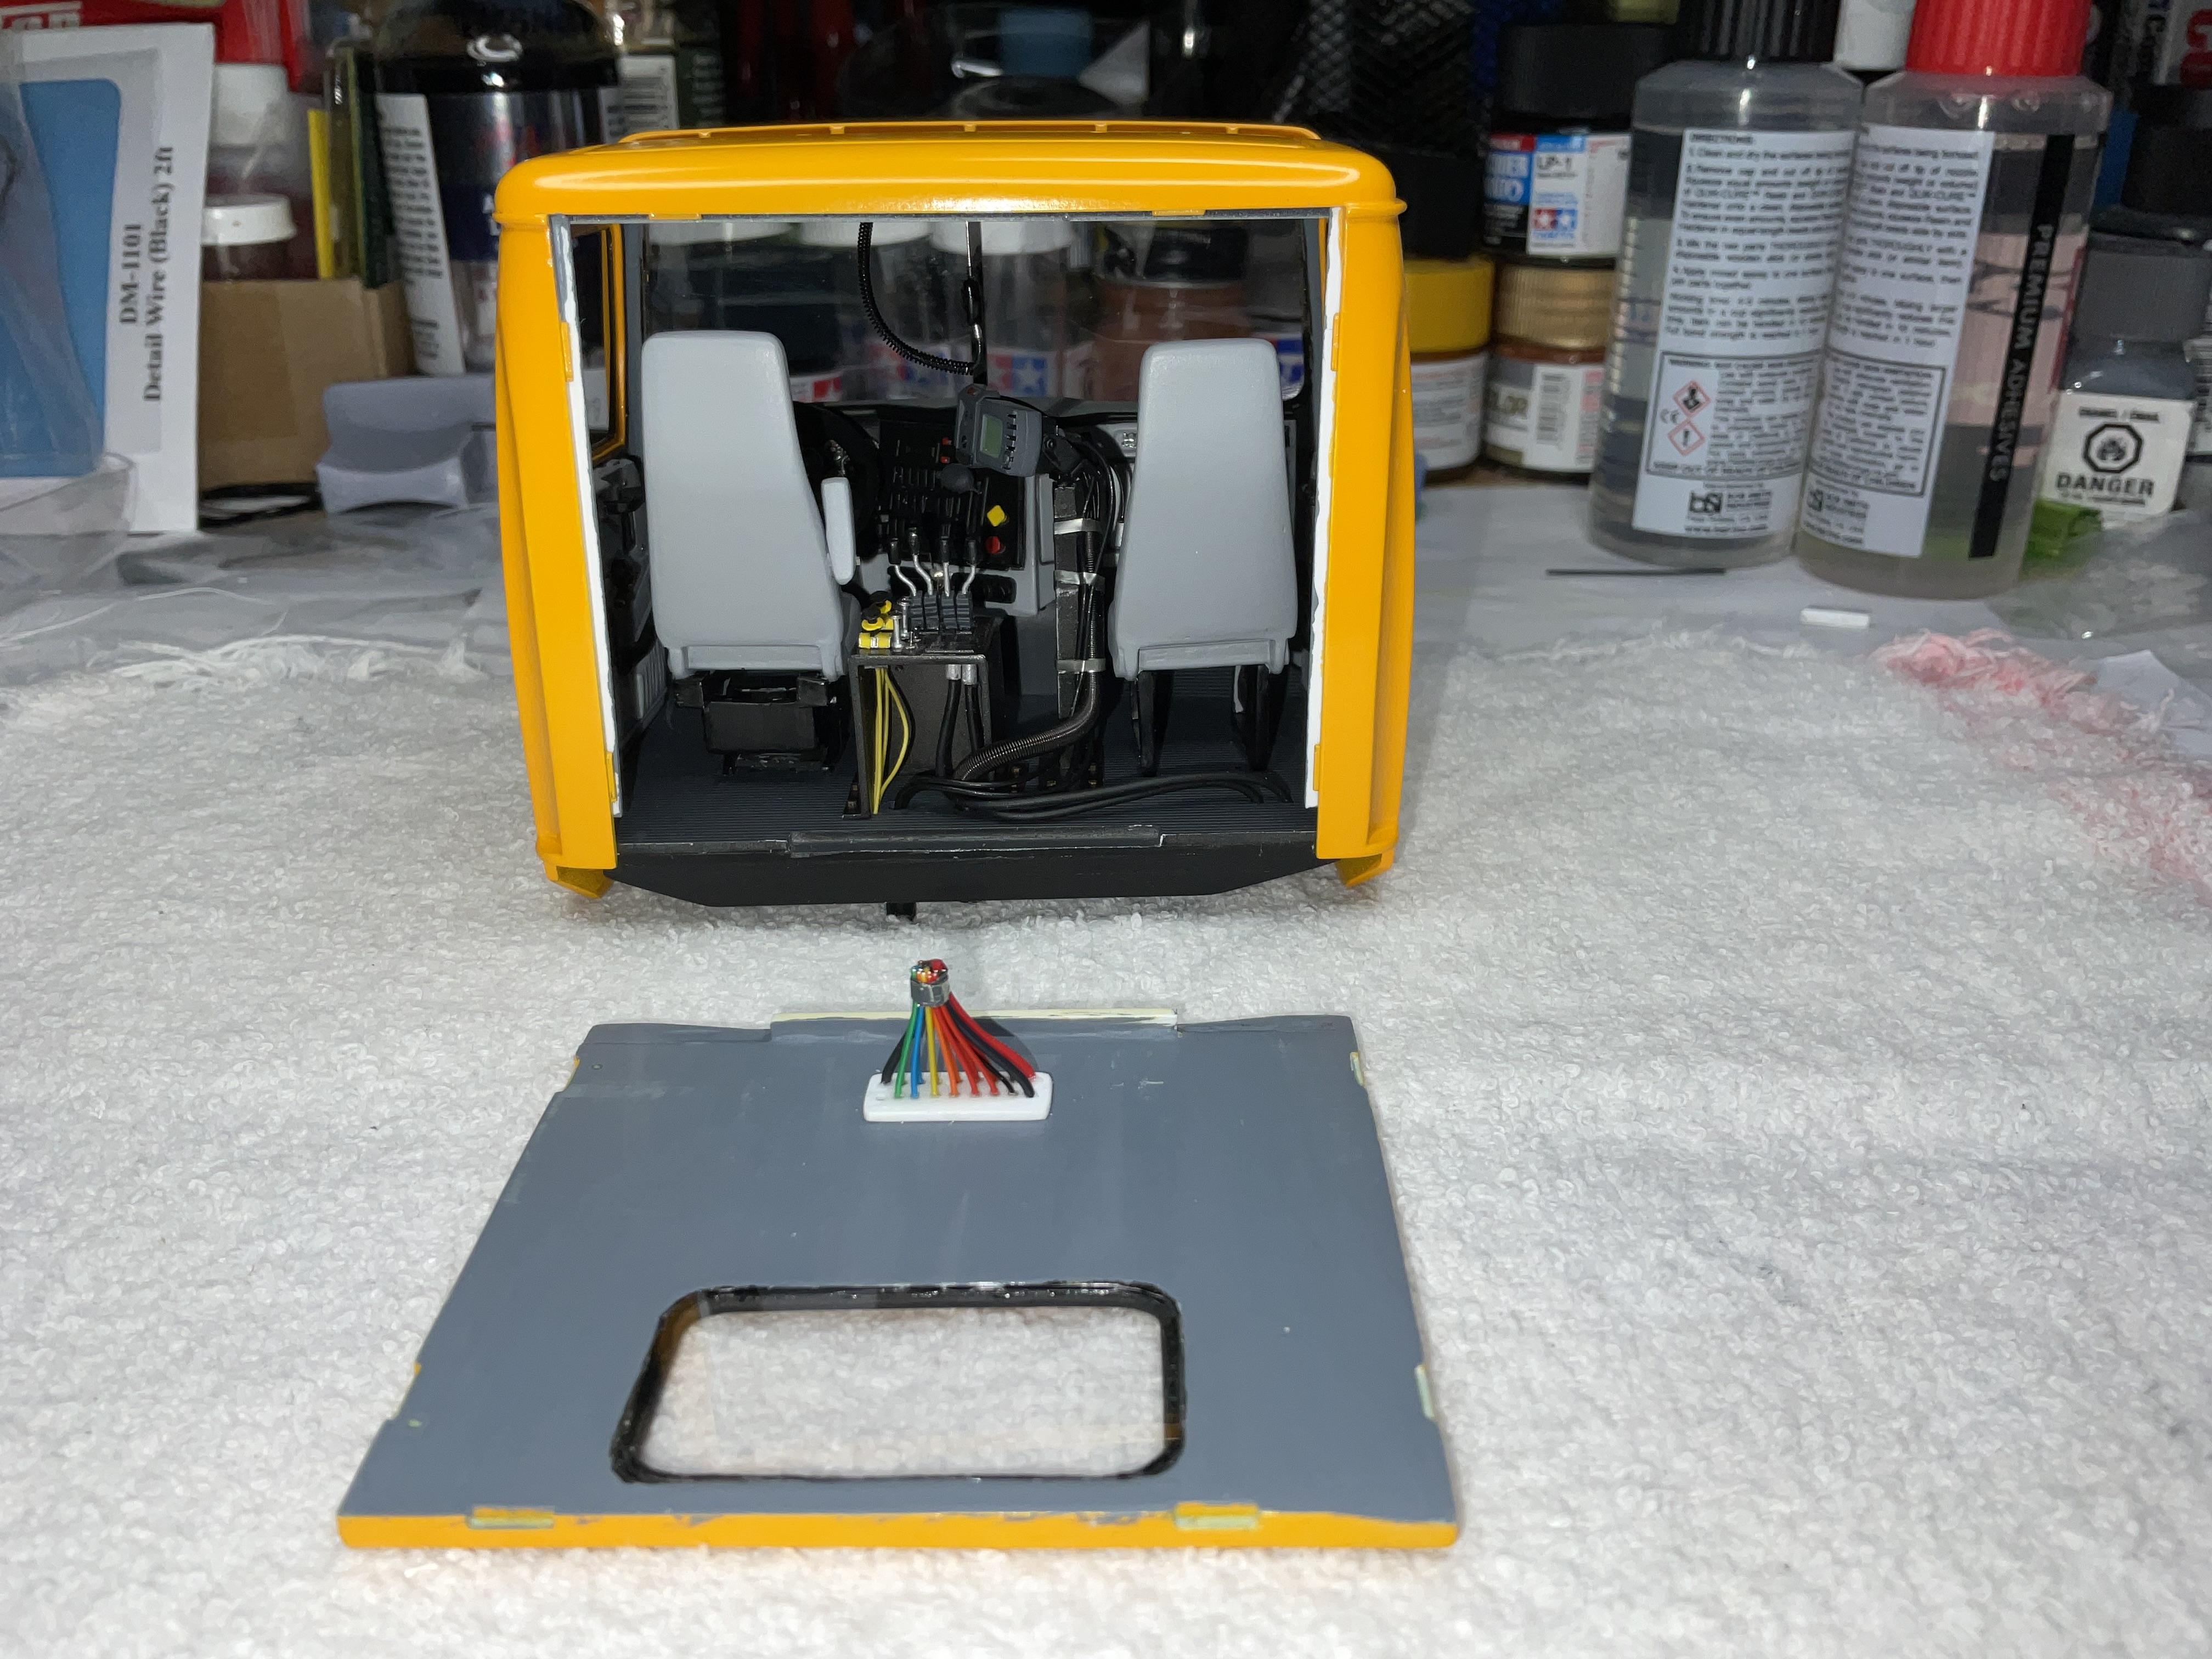
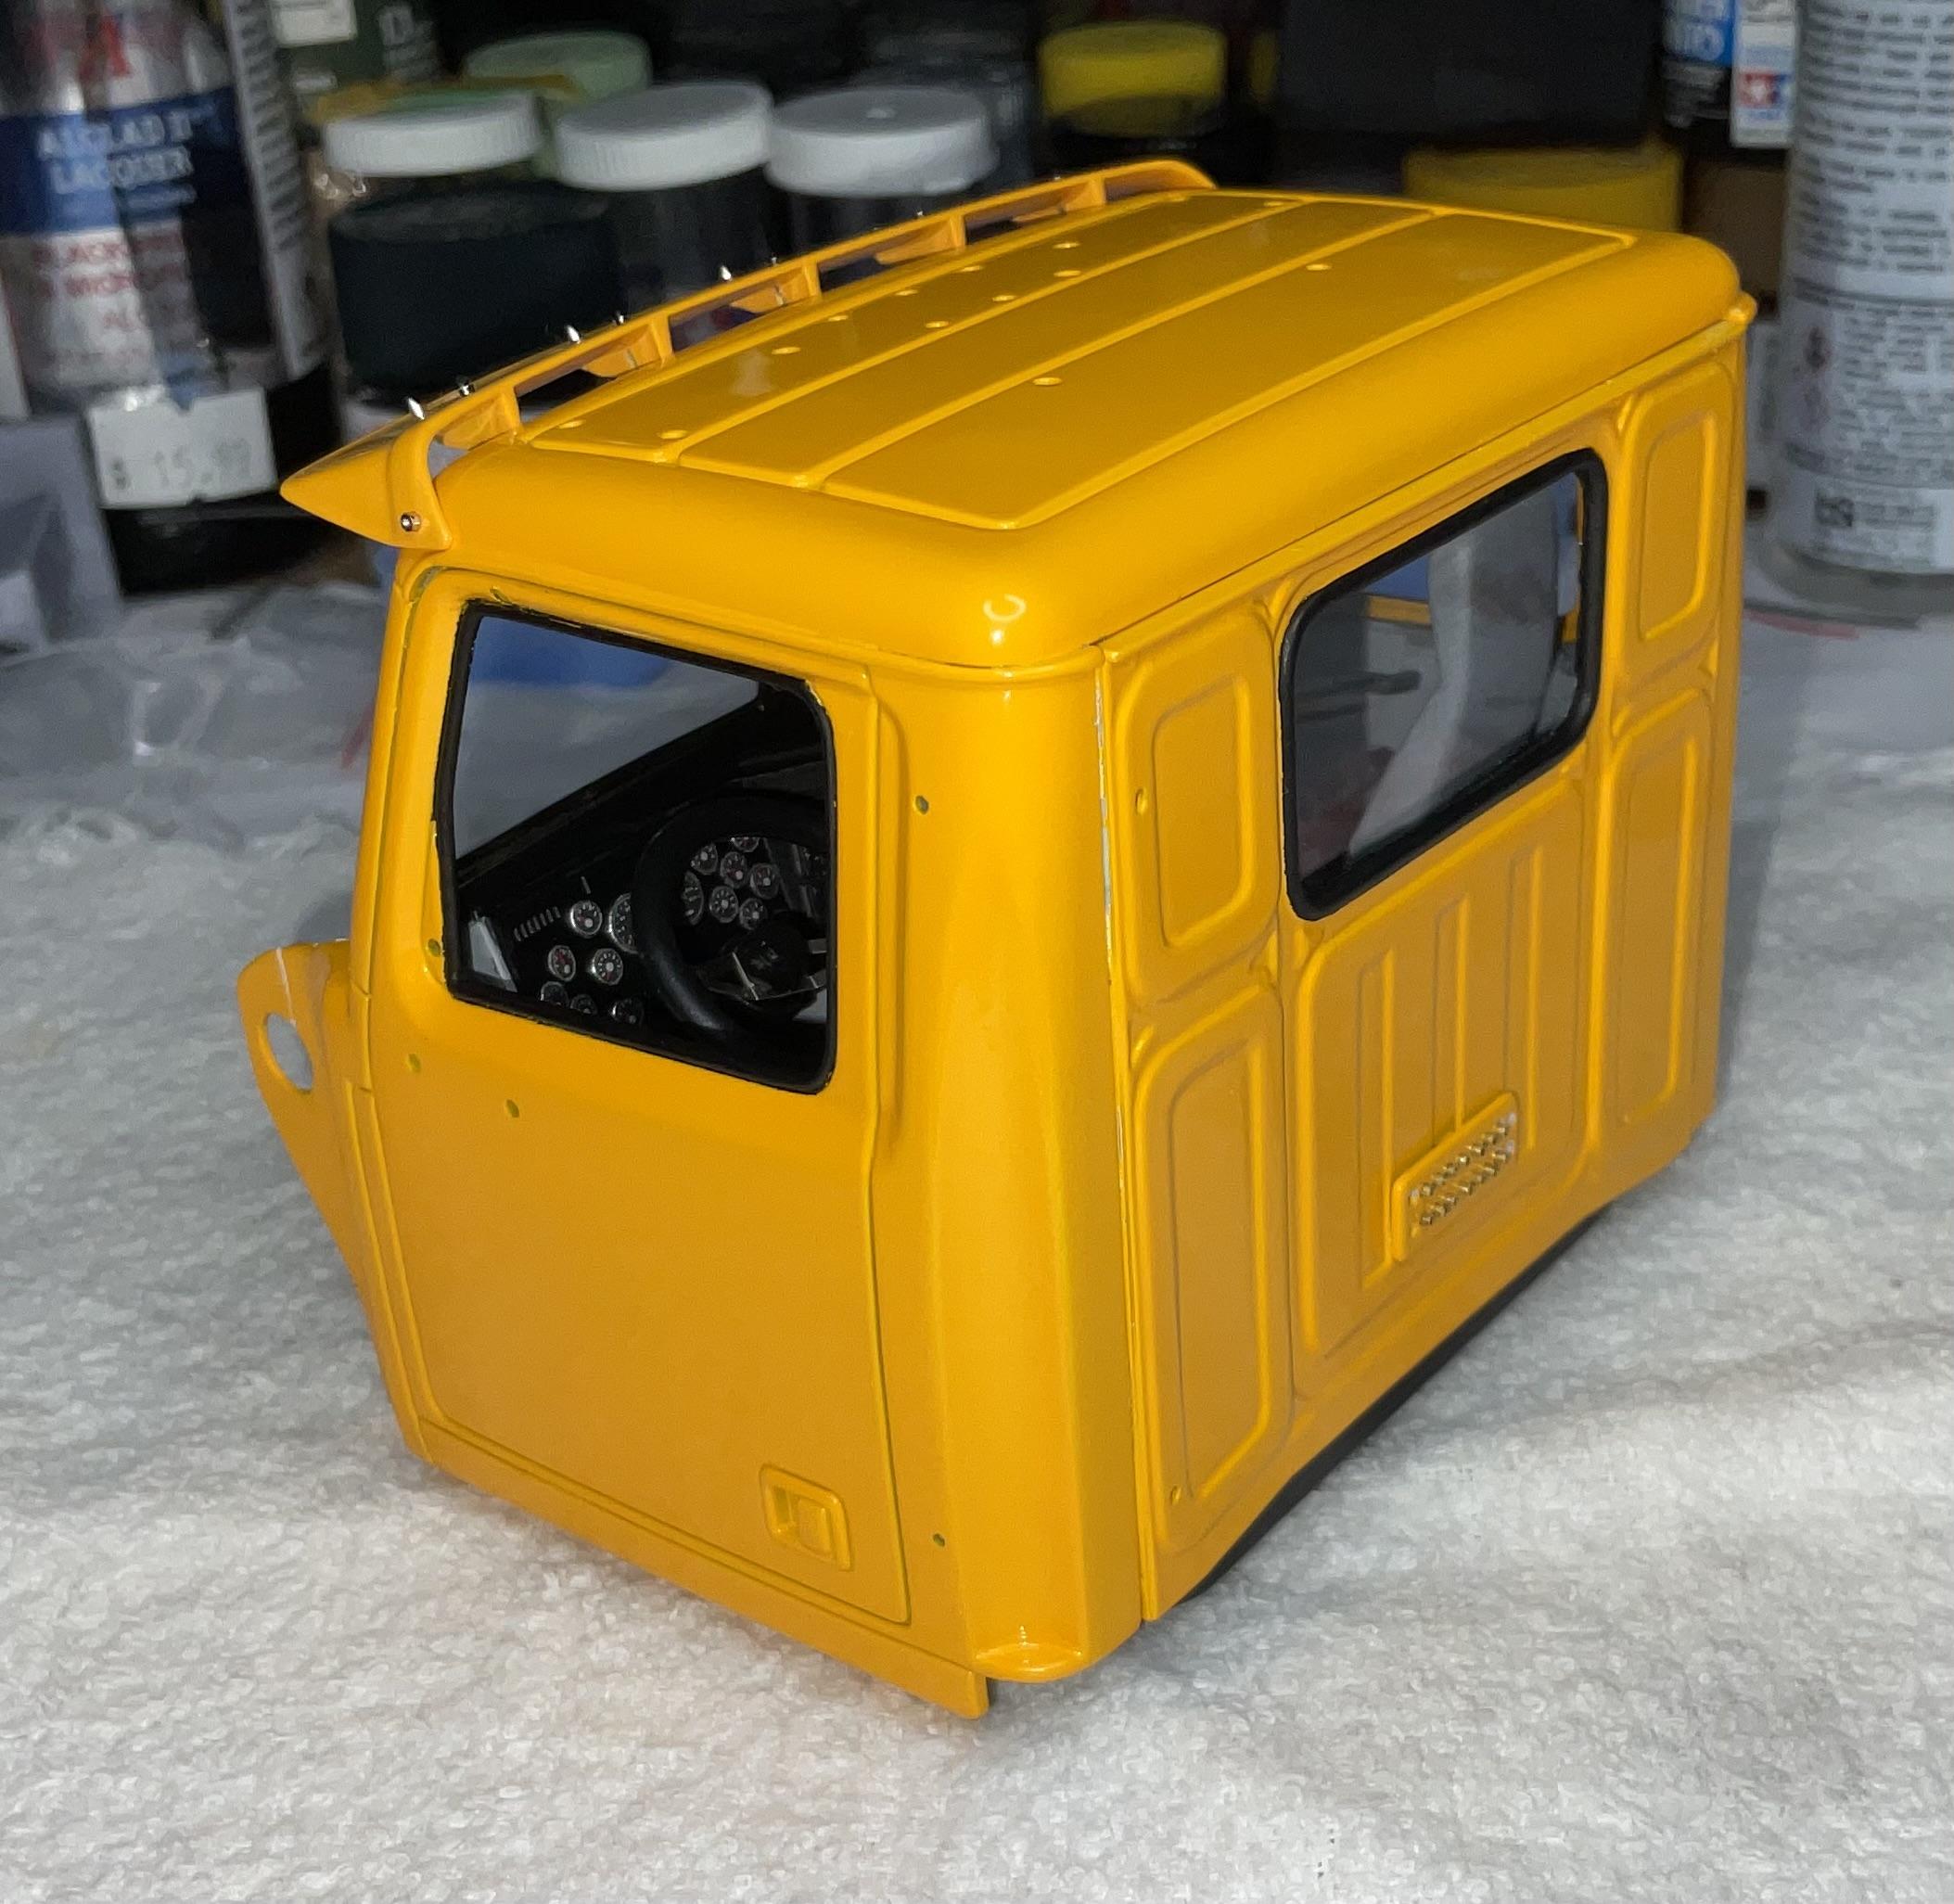
Burning the midnight (1:00am?) oil tonight. Got started this afternoon working on the cab, hoping to have door cards, seats and day cab panel on by dinner time. I did manage that, and got a start on the firewall bits, too. Adding in some down time for dinner, by the time various hoses were made, paint drilled out of mounting holes on firewall, gluing a few things in place, and running one of the wiring runs, it was midnight! Door cards and driver’s seat in place - again with the repetitive pics, but I wanted one showing the door card glued in - Ran the two supply lines for the air valves in the control tower, up from under cab - This turned out to mostly be a test to see if the CA glue would hold the plastic ‘air lines’ in place, as these won’t be visible at all when closed up - I’m using Gopher ignition wire for the lines - Day cab panel glued in place, finally! - Didn’t get away Scott free with this process - I test fit the panel half a dozen times and it always looked good, but once glue was in play, didn’t seem to fit as tight. Don’t know if the unpainted portion of the edge can be covered up ok without a big mess. And, while holding the cab in two hands, to put some pressure on panel, I cracked the opening around the air intake plenum - Lots of time for this bit of progress, but got the coolant overflow tank, the fuse box, and my version of the harness from the fuse box down to the Power Distribution Box glued in place. When cab is mounted on frame there is a red cable from the starter to attach to this box as well - Tomorrow, I want to work on installing the group of three control modules on the driver’s side of the firewall, the AC/heater manifold, the hood support brackets, and the ECM. Need to make a few more clamps to hold some of those harnesses in place. It all had a place on the test firewall, back when, so hope everything plays nice tomorrow, and I don’t break anything else!
-
Western Star 4900 FA plow truck
BK9300 replied to BK9300's topic in WIP: Model Trucks: Big Rigs and Heavy Equipment
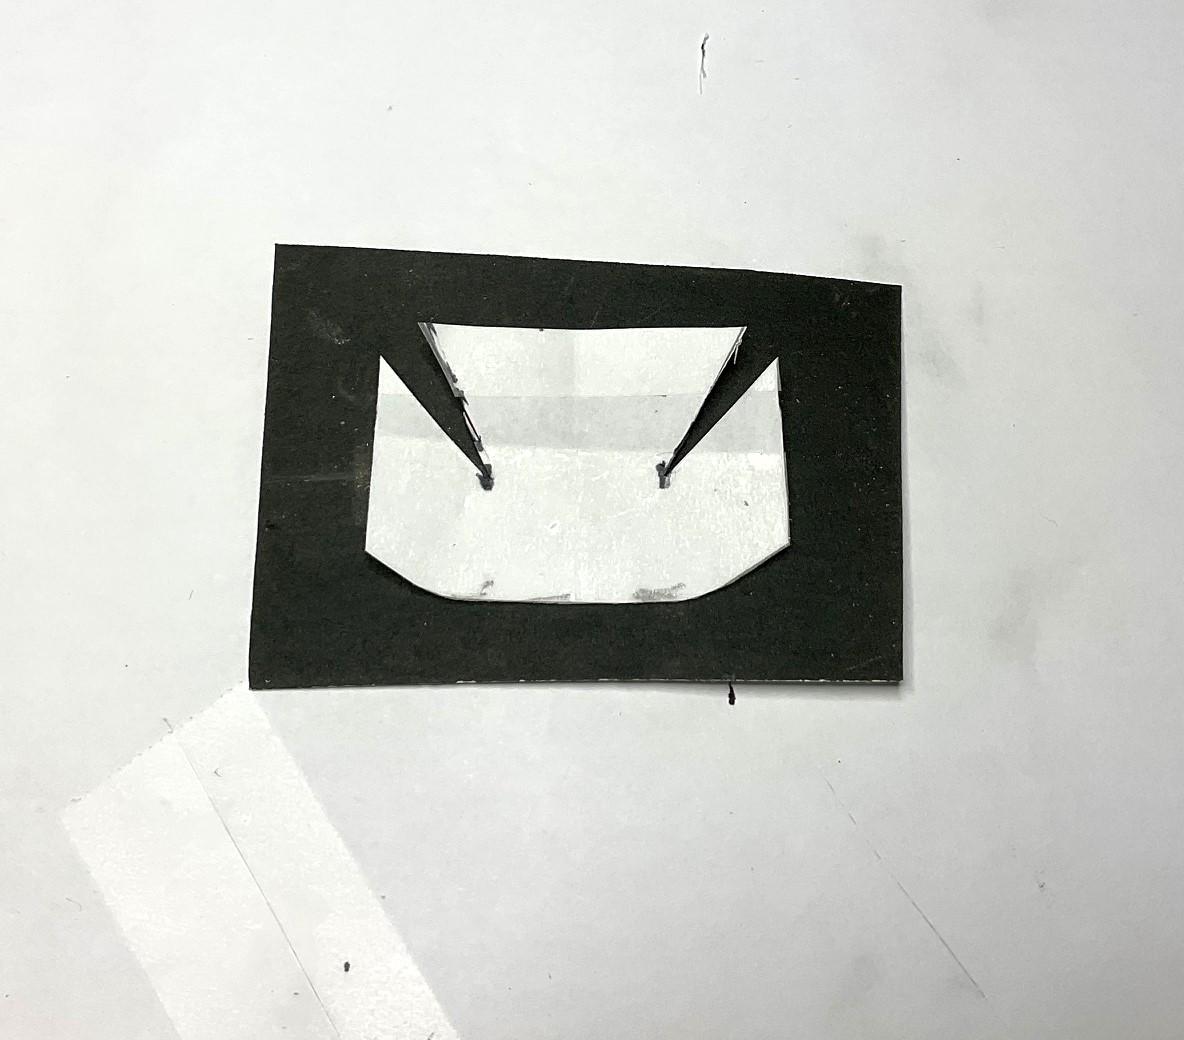
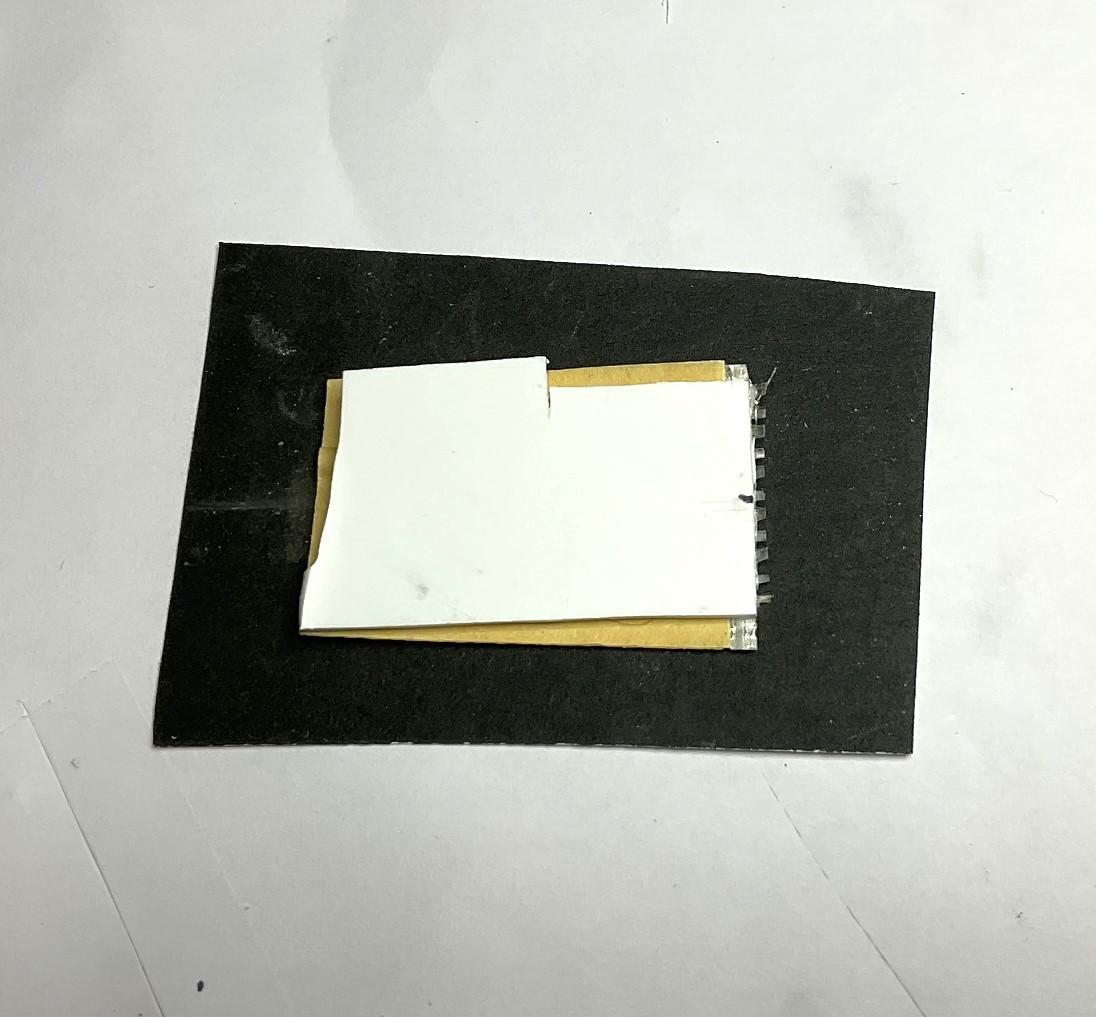
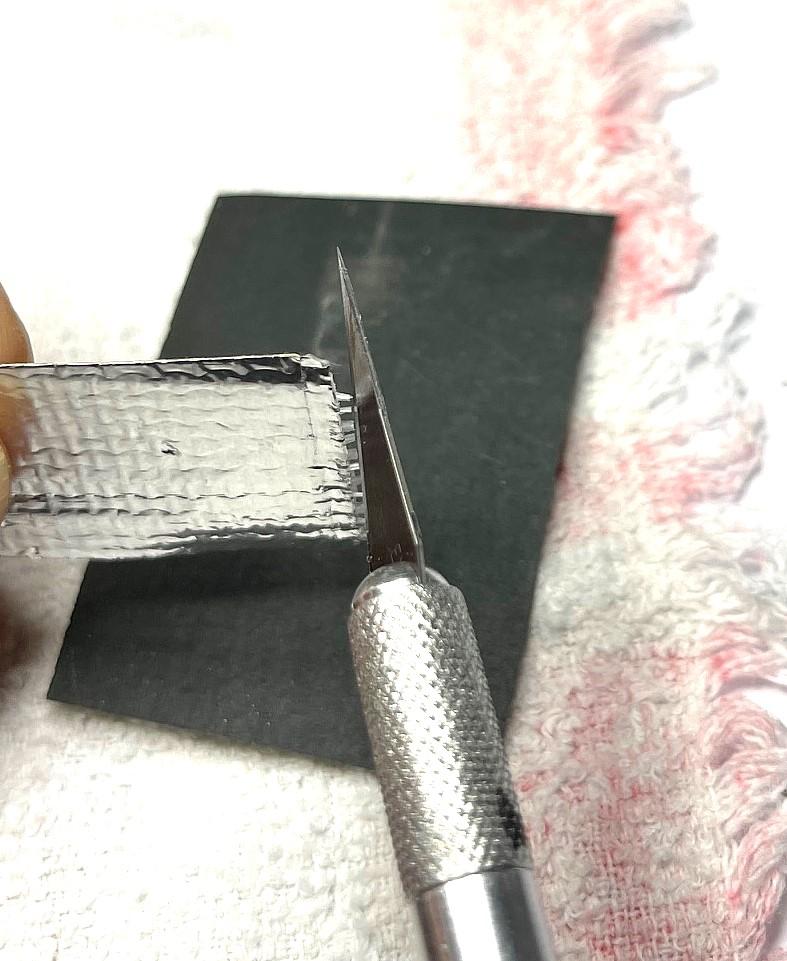
If I can save you a bit of temporary grief, if you get some of this tape, I suggest that any piece you use for the firewall insulation be cut to shape before you try and attach it. I first tried to use a piece that was slightly wider than the opening, hoping to trim it after with an X-acto blade by running the blade flat, along the outline of the opening. What I ended up with was a couple big wrinkles and a very messy cut edge. The tape has a cross hatched pattern to it that is made with tiny strands of poly? threads, and while the tape cuts nicely on a flat surface with a blade, trying to cut it like I first did left a bunch of the thread ends exposed. So, removed the tape, made a paper template and laid it in more carefully. sample of me trying to trim an over size piece of tape, against an edge of styrene - foil tape gets cut by blade, but not the threads - A couple of tries at a template for the tape ended up with this, and laying the tape in went much easier - it
-
Western Star 4900 FA plow truck
BK9300 replied to BK9300's topic in WIP: Model Trucks: Big Rigs and Heavy Equipment
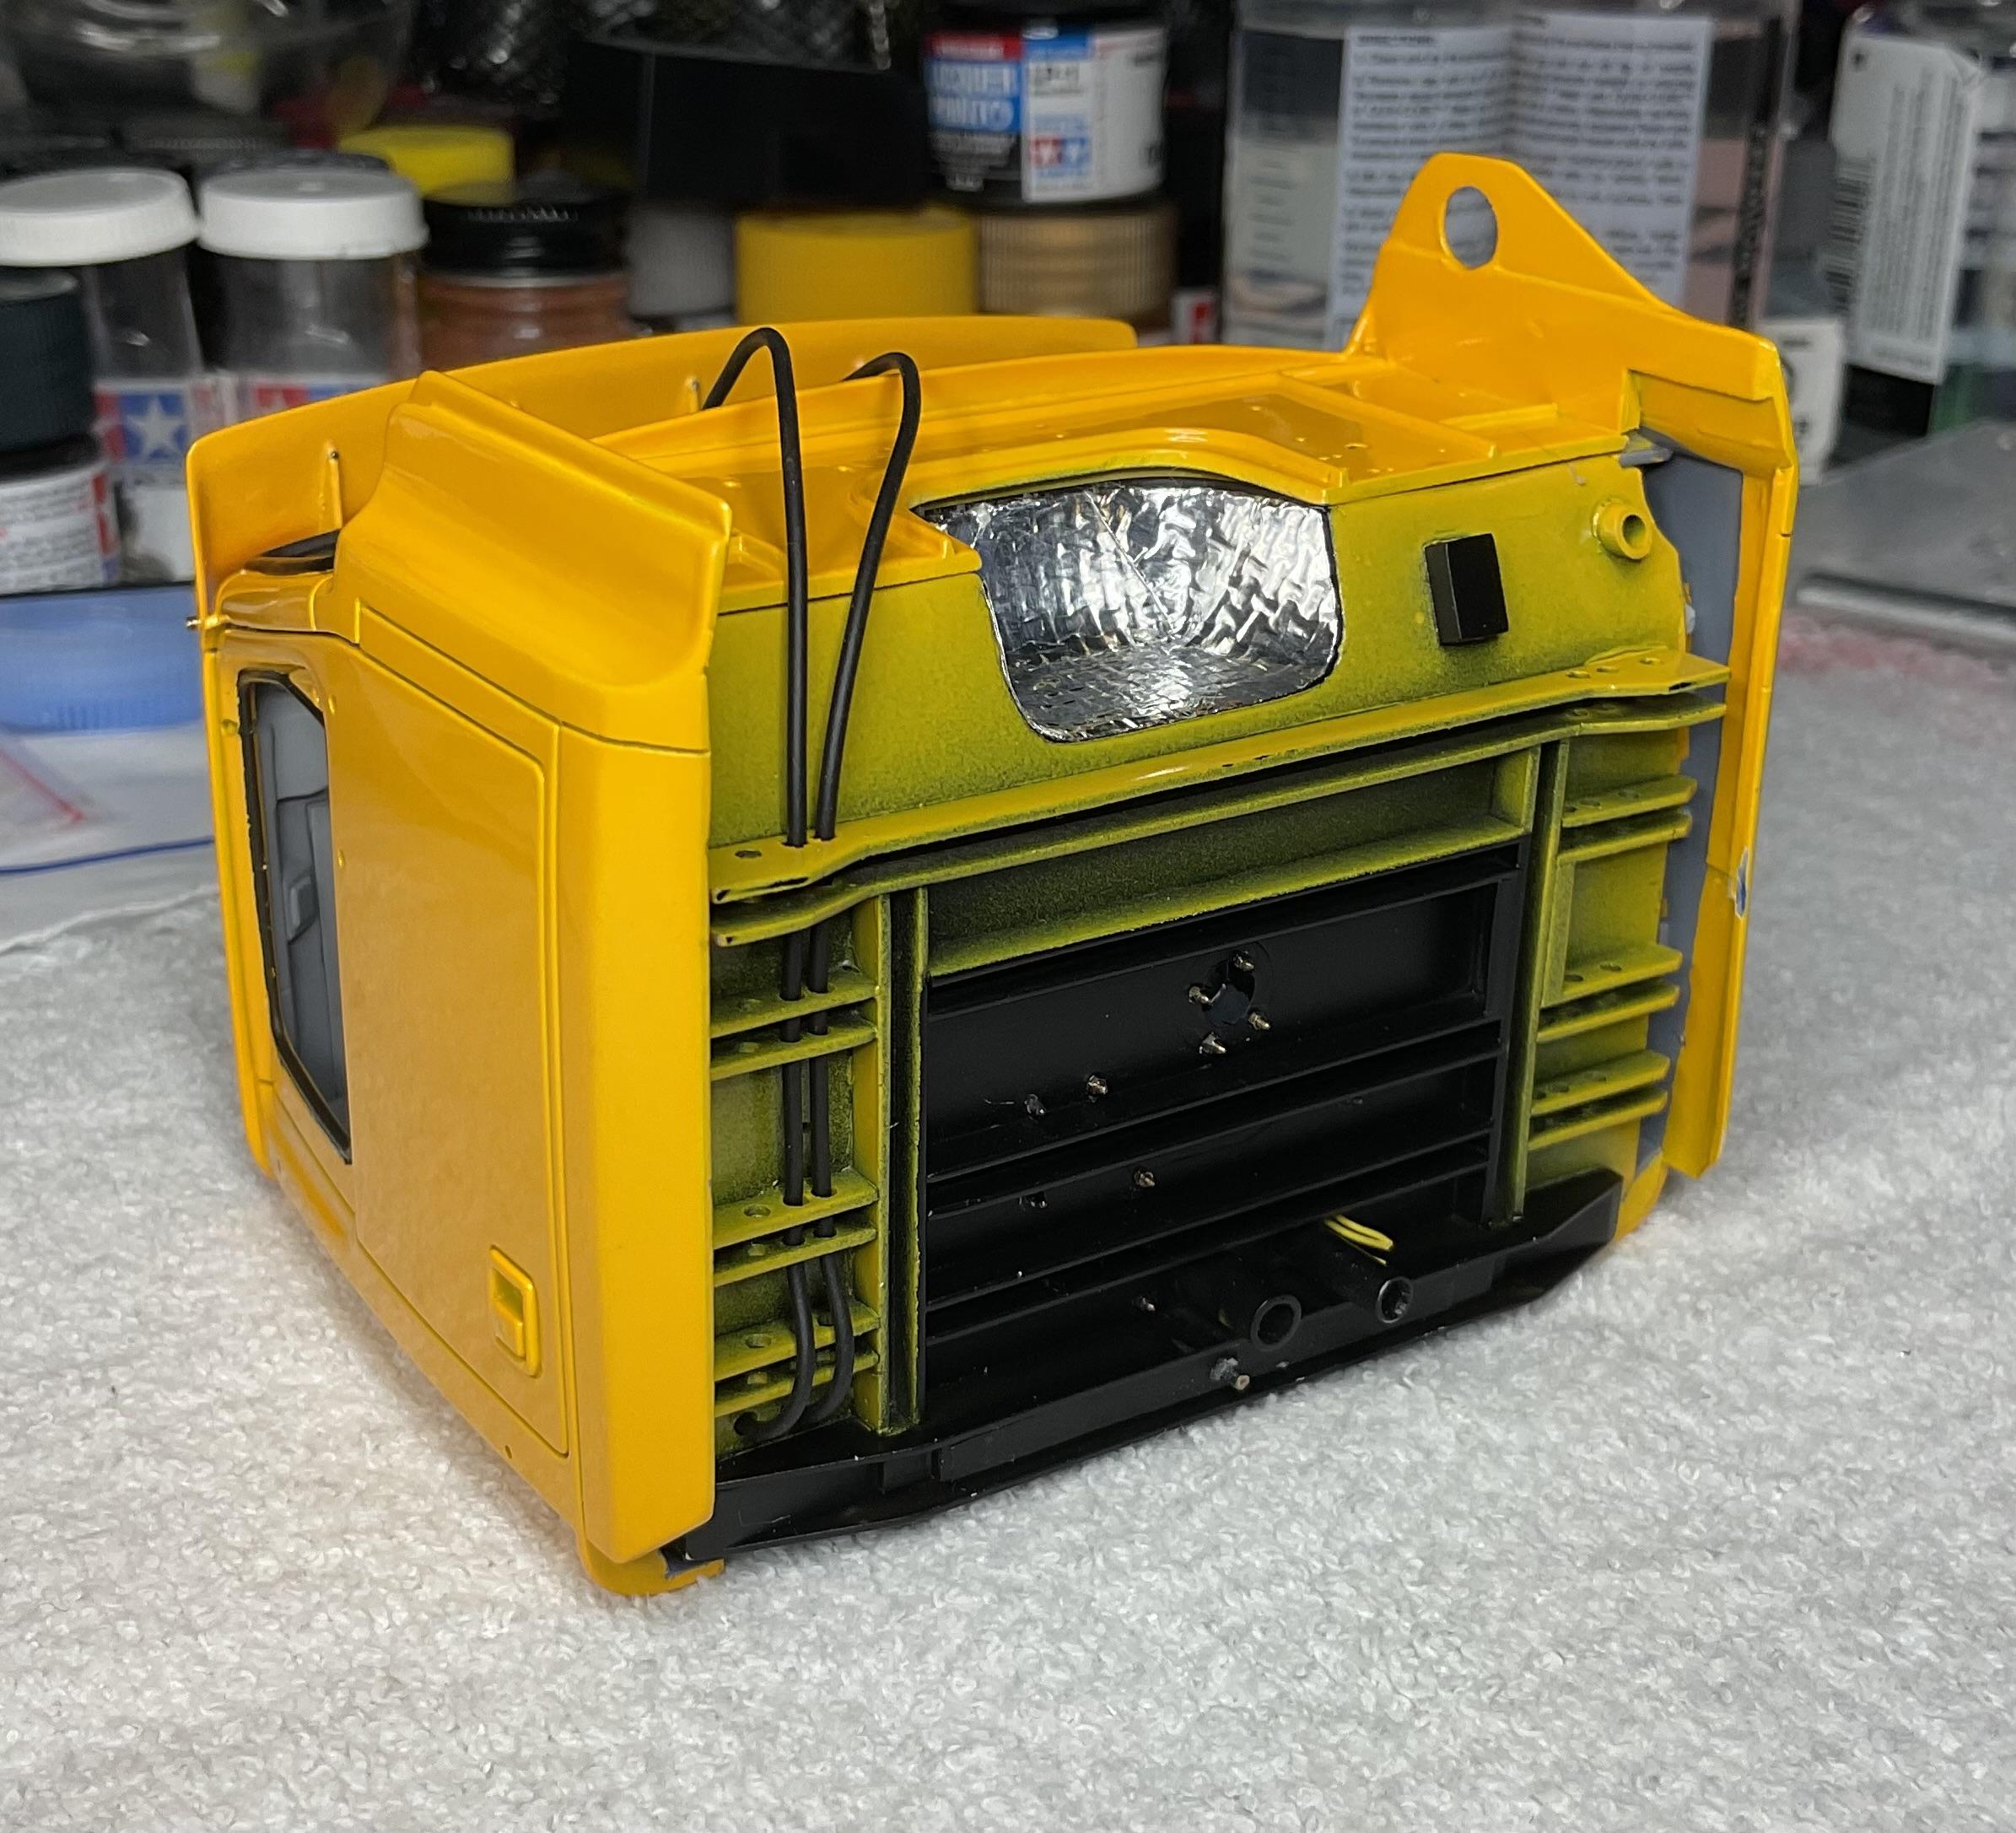
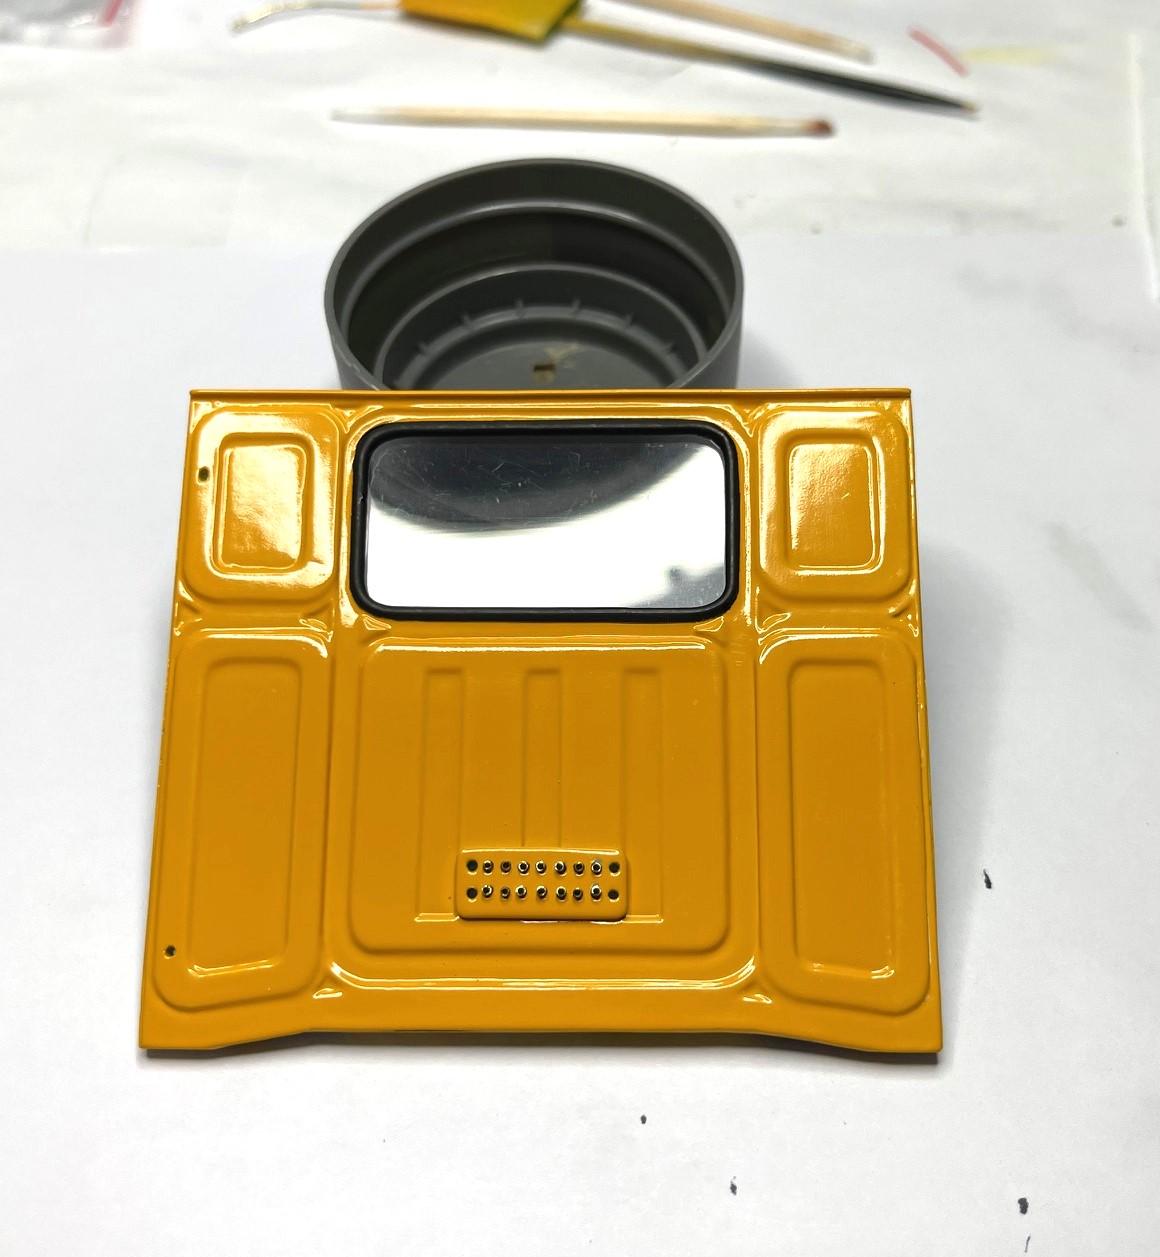
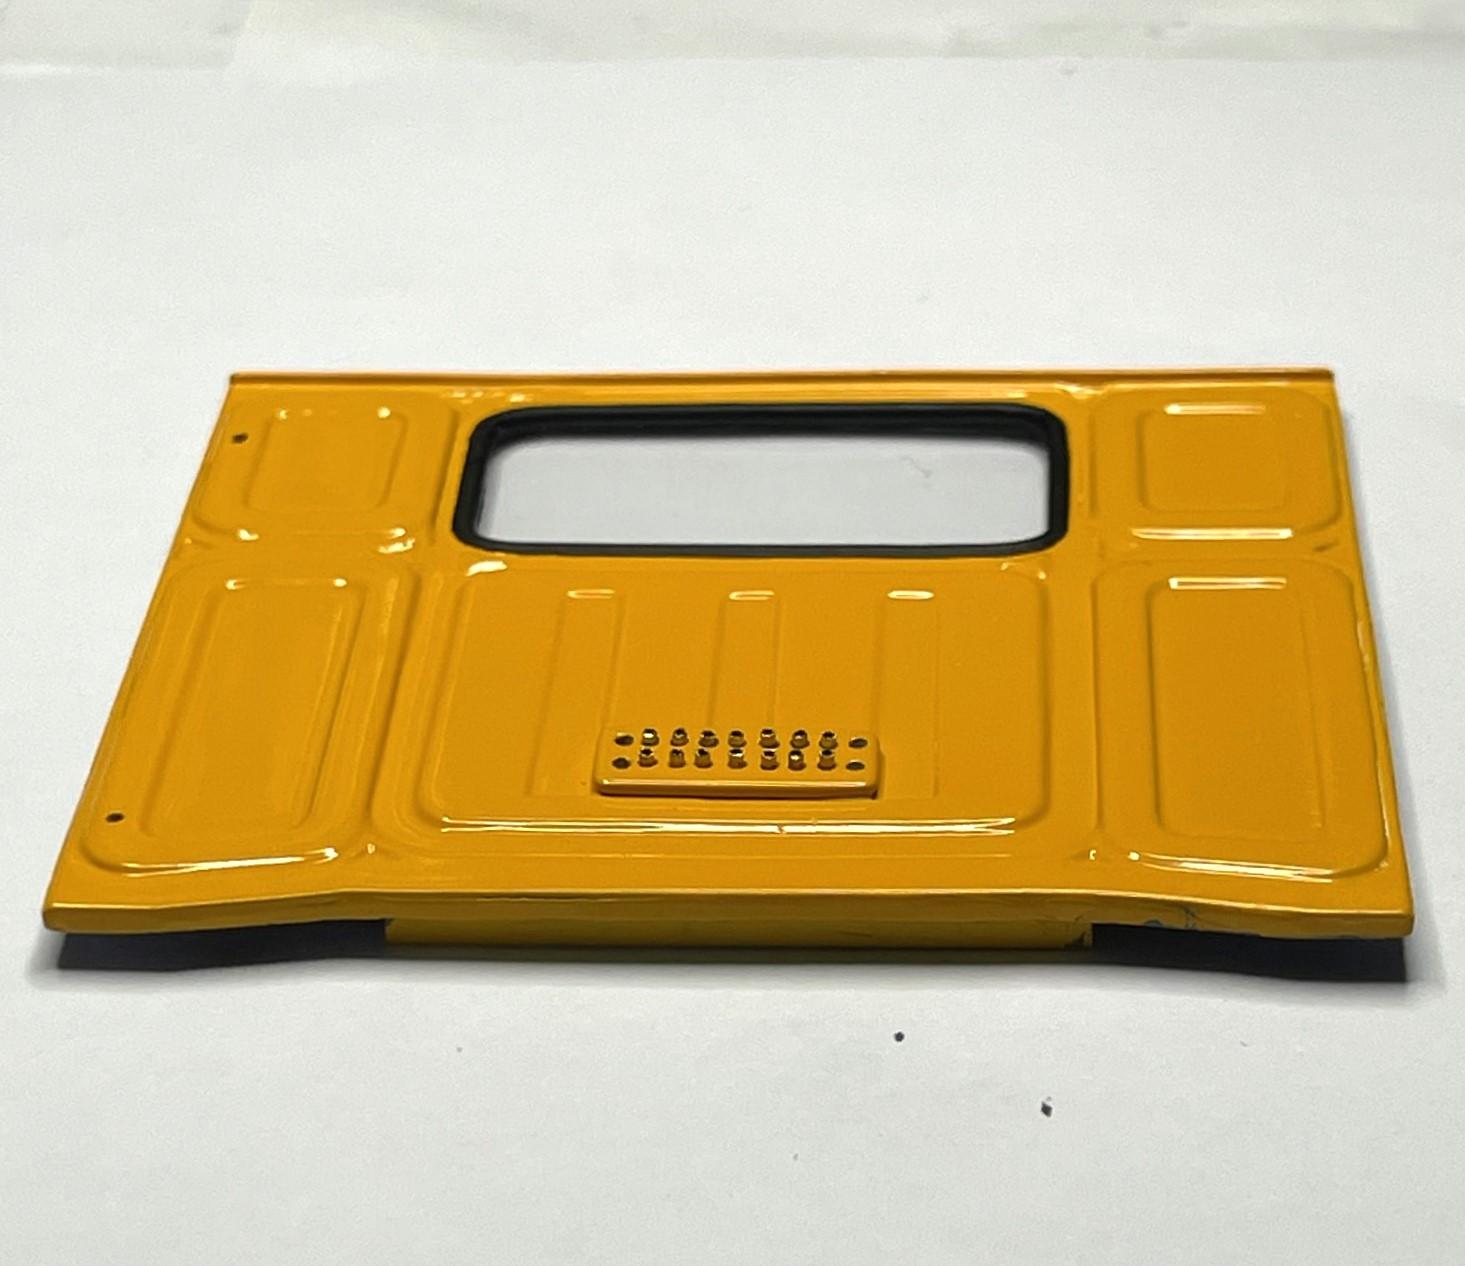
Everything can't be a milestone, but it felt like it today - got the headliner and interior 'tub'/floor pan glued inside the cab! Also spent a good bit of time making the brass fittings (basically just brass tube bits) that pass through the cab for the air lines from the control tower to the air over hydraulic valve manifold that sits beside the hydraulic tank. I used epoxy to set the headliner in place and the epoxied the front wall of the interior tub to the back of the firewall - a flange on the dog house enclosure has always been the main locator for the interior to the firewall. I didn't epoxy the back edge yet to the cab edges - that will be done when the day cab panel finally goes in. Used more of the RC heat shield tape for lining of the dog house- For some 'fittings', I cut short, brass sections from .7mm tube, all the same length, and epoxied them from the back side, locating them flush with the inside pass through plate, so each tube section was the same length on the outside - From back on page 24, this is a sample of the air lines that need to be fabricated and attached to the valve manifold - The Auslowe day cab panel didn't come with glass - I found a decent section of some thin, plastic packaging, cut a templated piece out and epoxied the rear window in place - I want to get going on the firewall attachments next - the hood supports, coolant overflow tank, fuse box, etc,. I will still need to do just a bit more work on the engine, before I can glue the cab to the cab supports. Still haven't been able to do the chrome test yet either, so that's on a wait list. Once the firewall attachments are on, and the chrome done, the cab and sander can be glued in place. Then, I will need to work with the truck on it's side (hoping not to break anything else!), to be able to run the various looms/air lines under the cab and hide their termination along either side of the frame. Some of the lines from the sander will need to be routed under the cab and up into one of the pass through tubes in the floor pan. So close - yet lots of little stuff to do!
-
formula 55 chevy
BK9300 replied to charlie libby's topic in WIP: Other Racing: Road Racing, Land Speed Racers
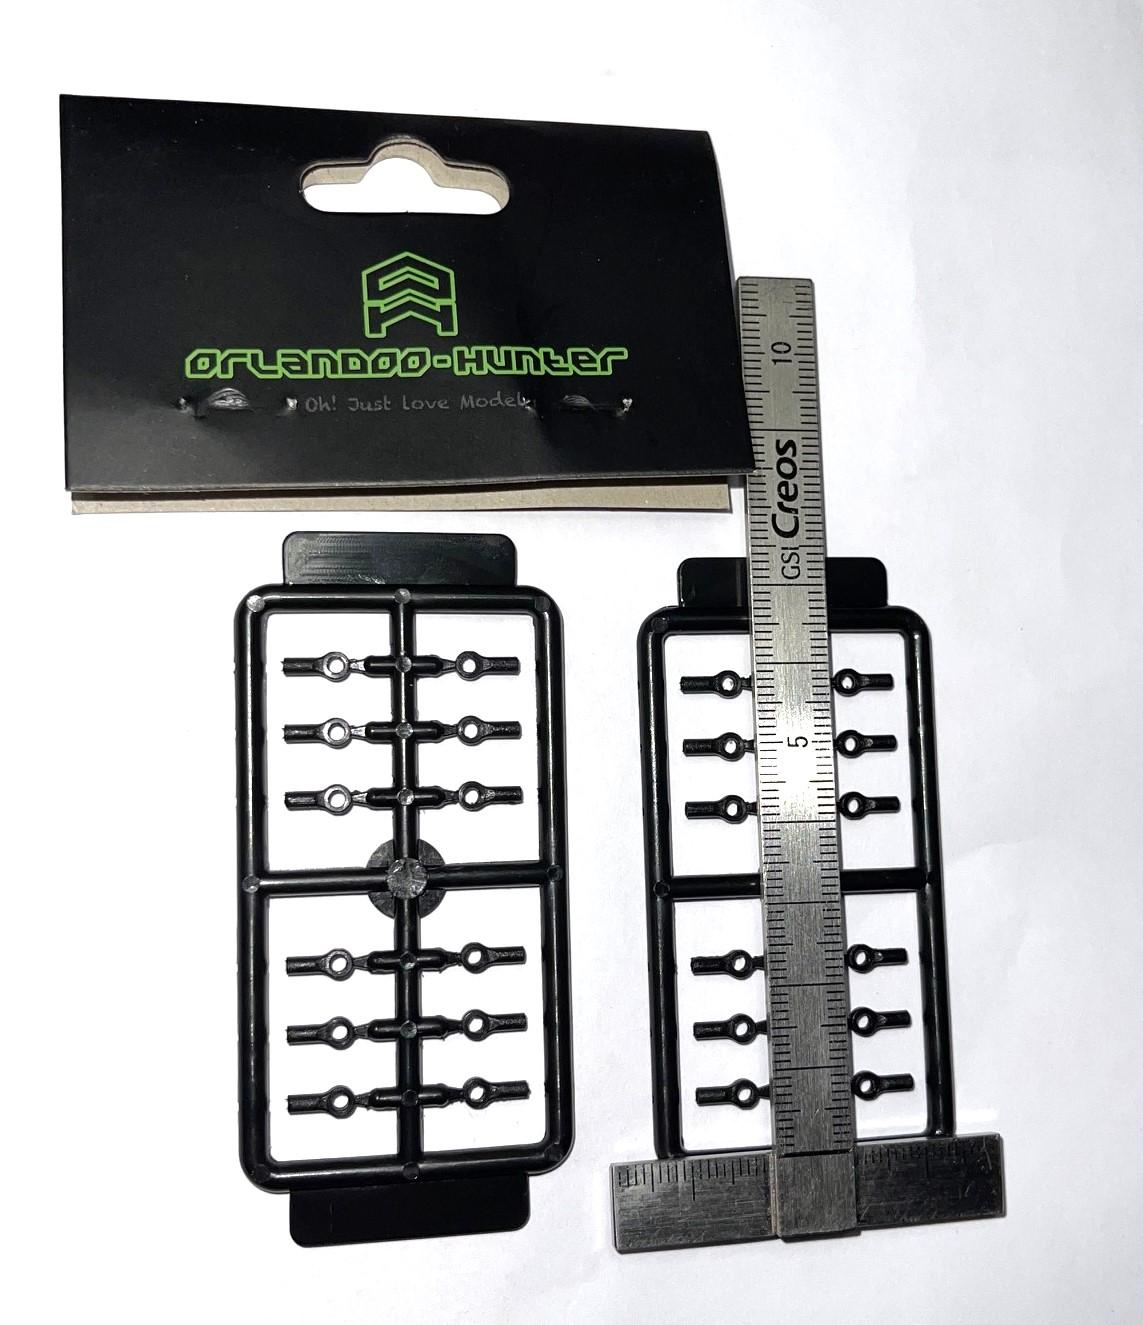
Fabulous work, Charles. Your engines must be very impressive to view 'in hand' - they look outstanding in pictures. With R&B not open at the moment, I found some black plastic, RC car tie rod ends that I am hoping to use in a big rig steering / suspension. They will need some work for what I need, and maybe these, or other RC tie rods ends, could work for you - Here's a link for them on Amazon - https://www.amazon.com/Orlandoo-Hunter-Plastic-Rod-2Pcs/dp/B0DZD7CKJM
-
Kenworth W-925 (mild custom)
BK9300 replied to Gary Chastain's topic in WIP: Model Trucks: Big Rigs and Heavy Equipment
It’s always a treat to see the loads you have for your trailers - takes the whole model build to another level of realism! -
Freightliner FLC
BK9300 replied to Jürgen M.'s topic in WIP: Model Trucks: Big Rigs and Heavy Equipment
Just checking in now, Jurgen and very glad to see you have your printed parts in hand! Going to look awesome. -
California Special
BK9300 replied to Rockford's topic in WIP: Model Trucks: Big Rigs and Heavy Equipment
Easy to see from ‘before’ pics that you’ve made a big improvement to your cab’s surface - that’s a lot of work and looking great! -
Kenworth W-925 (mild custom)
BK9300 replied to Gary Chastain's topic in WIP: Model Trucks: Big Rigs and Heavy Equipment
Looking really sturdy, Gary - will be a perfect add to your truck! In one of your earlier builds, you showed some schematics for a trailer. Did you find any similar drawings for this trailer, to help with the design? -
Western Star 4900 FA plow truck
BK9300 replied to BK9300's topic in WIP: Model Trucks: Big Rigs and Heavy Equipment
Thanks, Jürgen! Couldn't think of anything else that I could make work for the flag. You and Jeff have both suggested the chrome pens. Although I don't have any I like at the moment, I think I need to look at them for the future - for now, I going to just press on with the paint I have already and get this thing done! Good to hear from you, Daniel, and thanks. Most of it will be out of sight, unless a person looks at the build book I want to make, but everyone here will know about the details! I appreciate you checking this out, Wolf - thanks for the kind words! Based on what we've seen so far on your International, and Jeff's testimonial, really looking forward to seeing where you take it. Thanks, Gary - I need to stop 'touching' and get this project finished! Much appreciated, Jeff! Doing what I can for the details, and, thanks to that experience of yours, I've been able to add in a few things along the way, that I hadn't considered. Thanks, again! -
Wally Booth's Detroit Dodge Dealers 69 Hemi Super Bee Super Stock
BK9300 replied to Scott Eriksen's topic in Drag Racing
You turn out these awesome builds, in short order! Said it before - always like the detail you add to your engines and the carbs on this one look amazing. Is the 'Phoenix F/X' script on your tires a decal? -
Western Star 4900 FA plow truck
BK9300 replied to BK9300's topic in WIP: Model Trucks: Big Rigs and Heavy Equipment
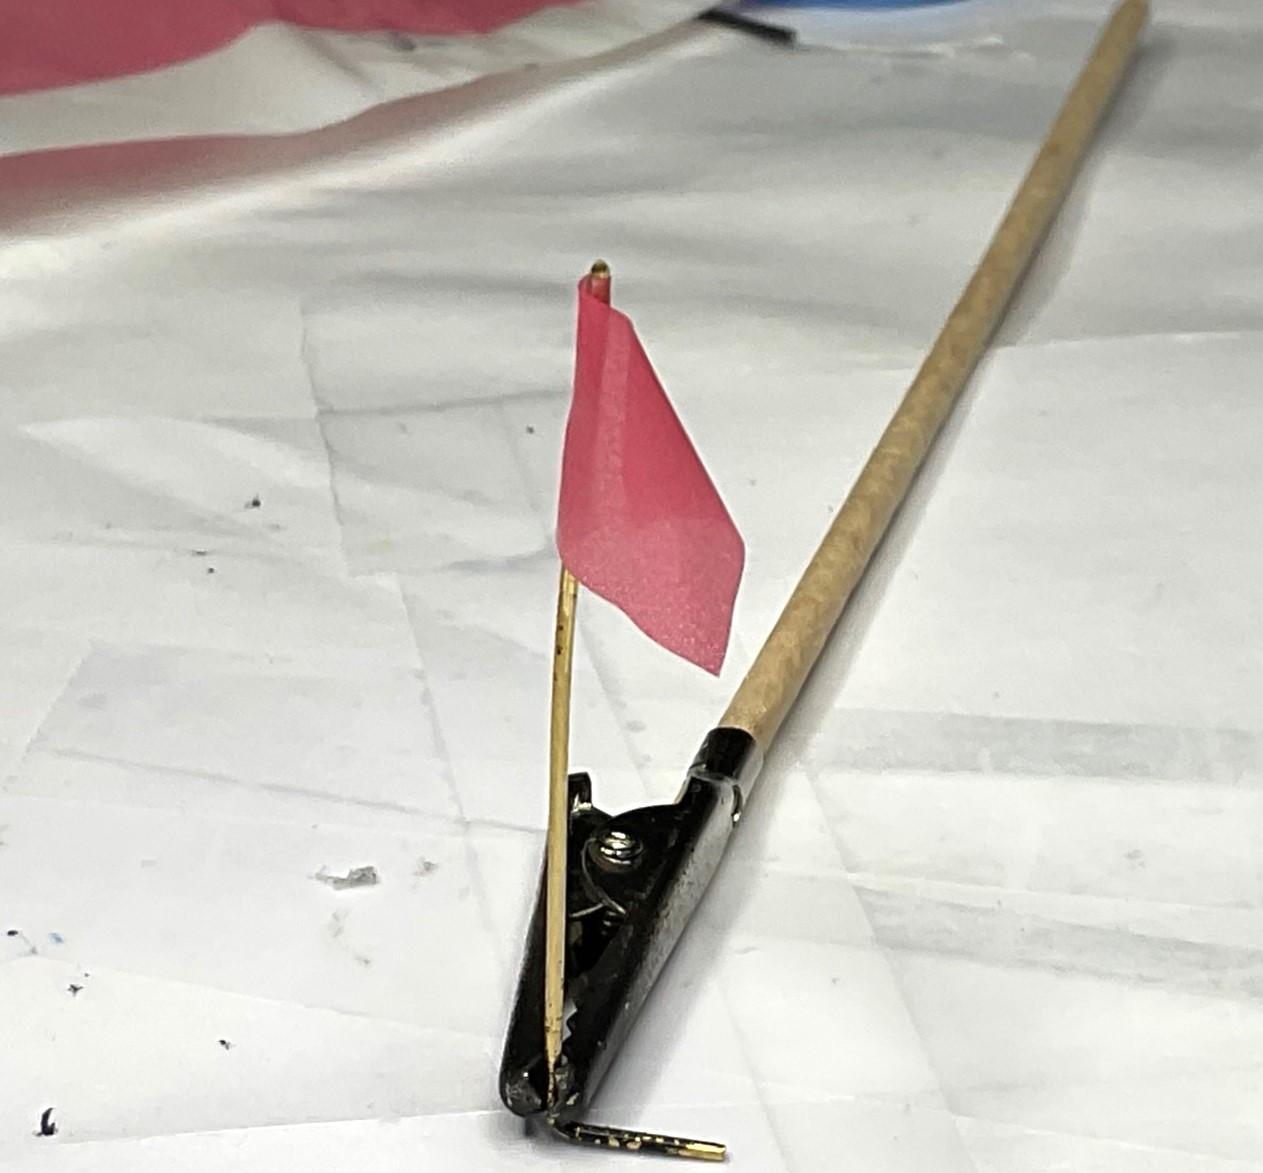
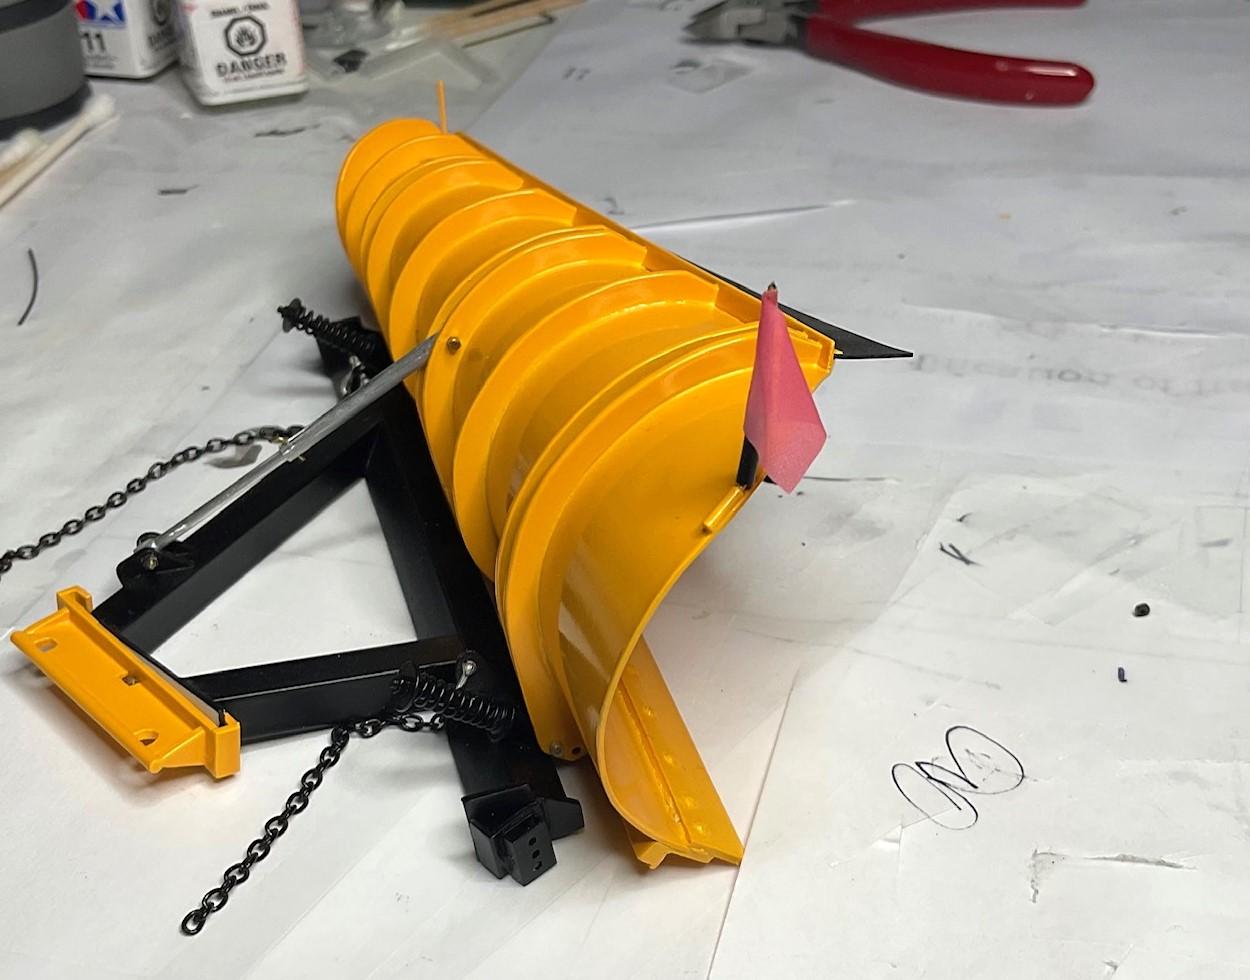
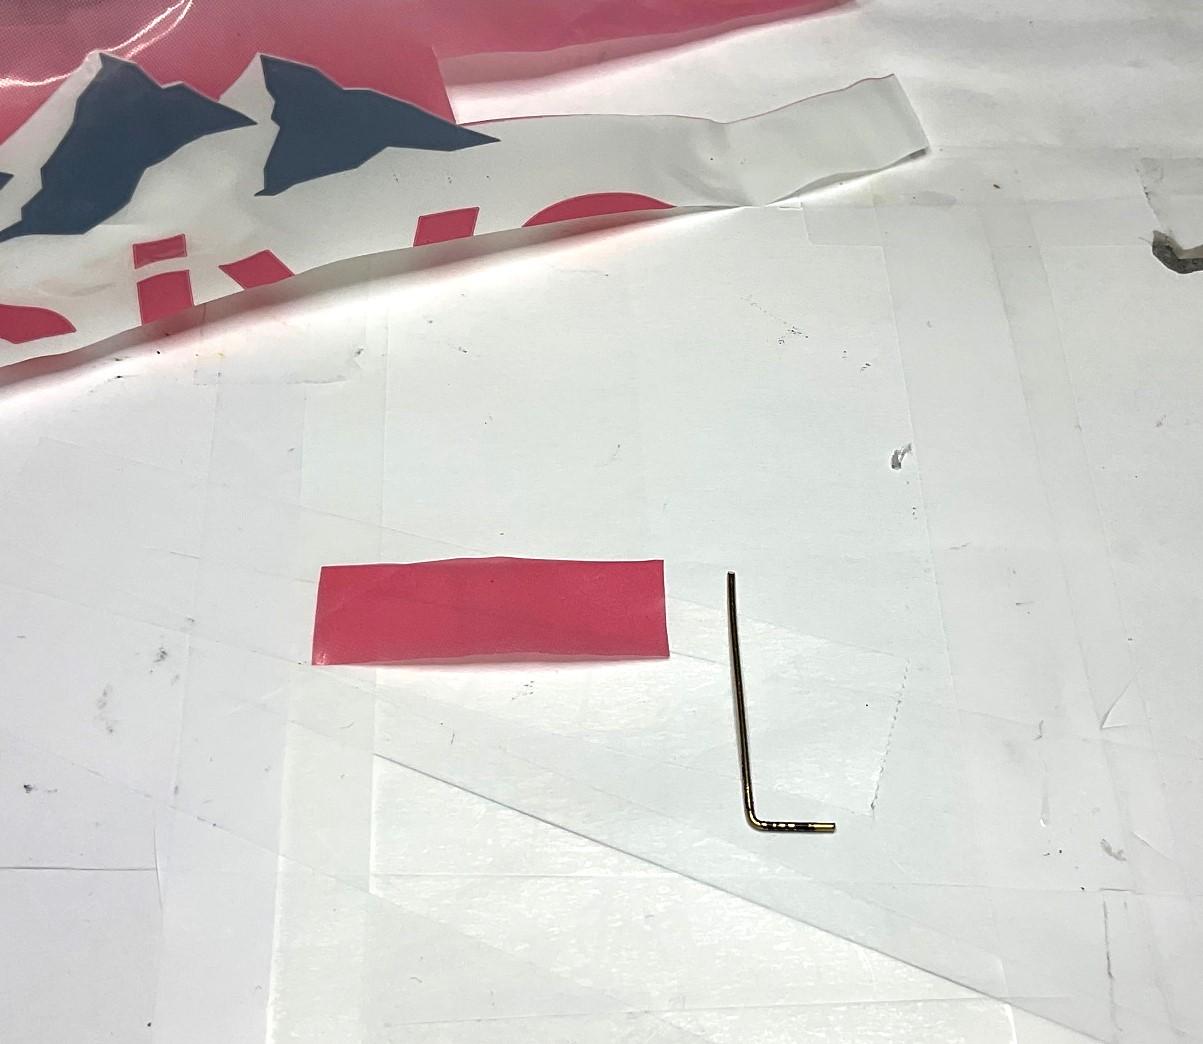
Not big progress today, just carrying on! Was raining today, too humid to spray the chrome test, so an opportunity to try something a bit different, from the 'list'. (before doing that, I did brush a coat of grey enamel on the interior of the cab and day cab panel) What I worked on today was a possible solution for the small flags that are mounted on each end of the front plow. The front plow flags I saw were made of plastic and were a bit stiff. I settled on using a piece of semi-transparent plastic film from a water bottle label. I tried to CA glue it to the brass support rod, but didn't take. Fortunately, the plastic did stick using a bit of epoxy - Once the epoxy set up, I used an old hair dryer on High setting and a bit of 'flag' shape was achieved - I have some experimenting to do, and think I can improve this initial flag, but the idea looks like it could work - With lots of rain for next few days, I might be a bit stalled, because I need to chrome the cab door handles before assembling the cab. Apparently, the Easy Chrome can be brush applied, too, so I'll have a go at part of the parts tree this afternoon and see how that goes!
-
Western Star 4900 FA plow truck
BK9300 replied to BK9300's topic in WIP: Model Trucks: Big Rigs and Heavy Equipment
Thanks, Tom - generous of you as always! Don't know what to use for a background when the time comes - have an idea, but would be a project in itself. -
WC-54 Ambulance is done
BK9300 replied to Chariots of Fire's topic in Model Trucks: Pickups, Vans, SUVs, Light Commercial
Always a fascinating amount of detail in your builds, Charles - always demands a second and third look! -
More great detail! The bongos look well used, too.
-
Western Star 4900 FA plow truck
BK9300 replied to BK9300's topic in WIP: Model Trucks: Big Rigs and Heavy Equipment
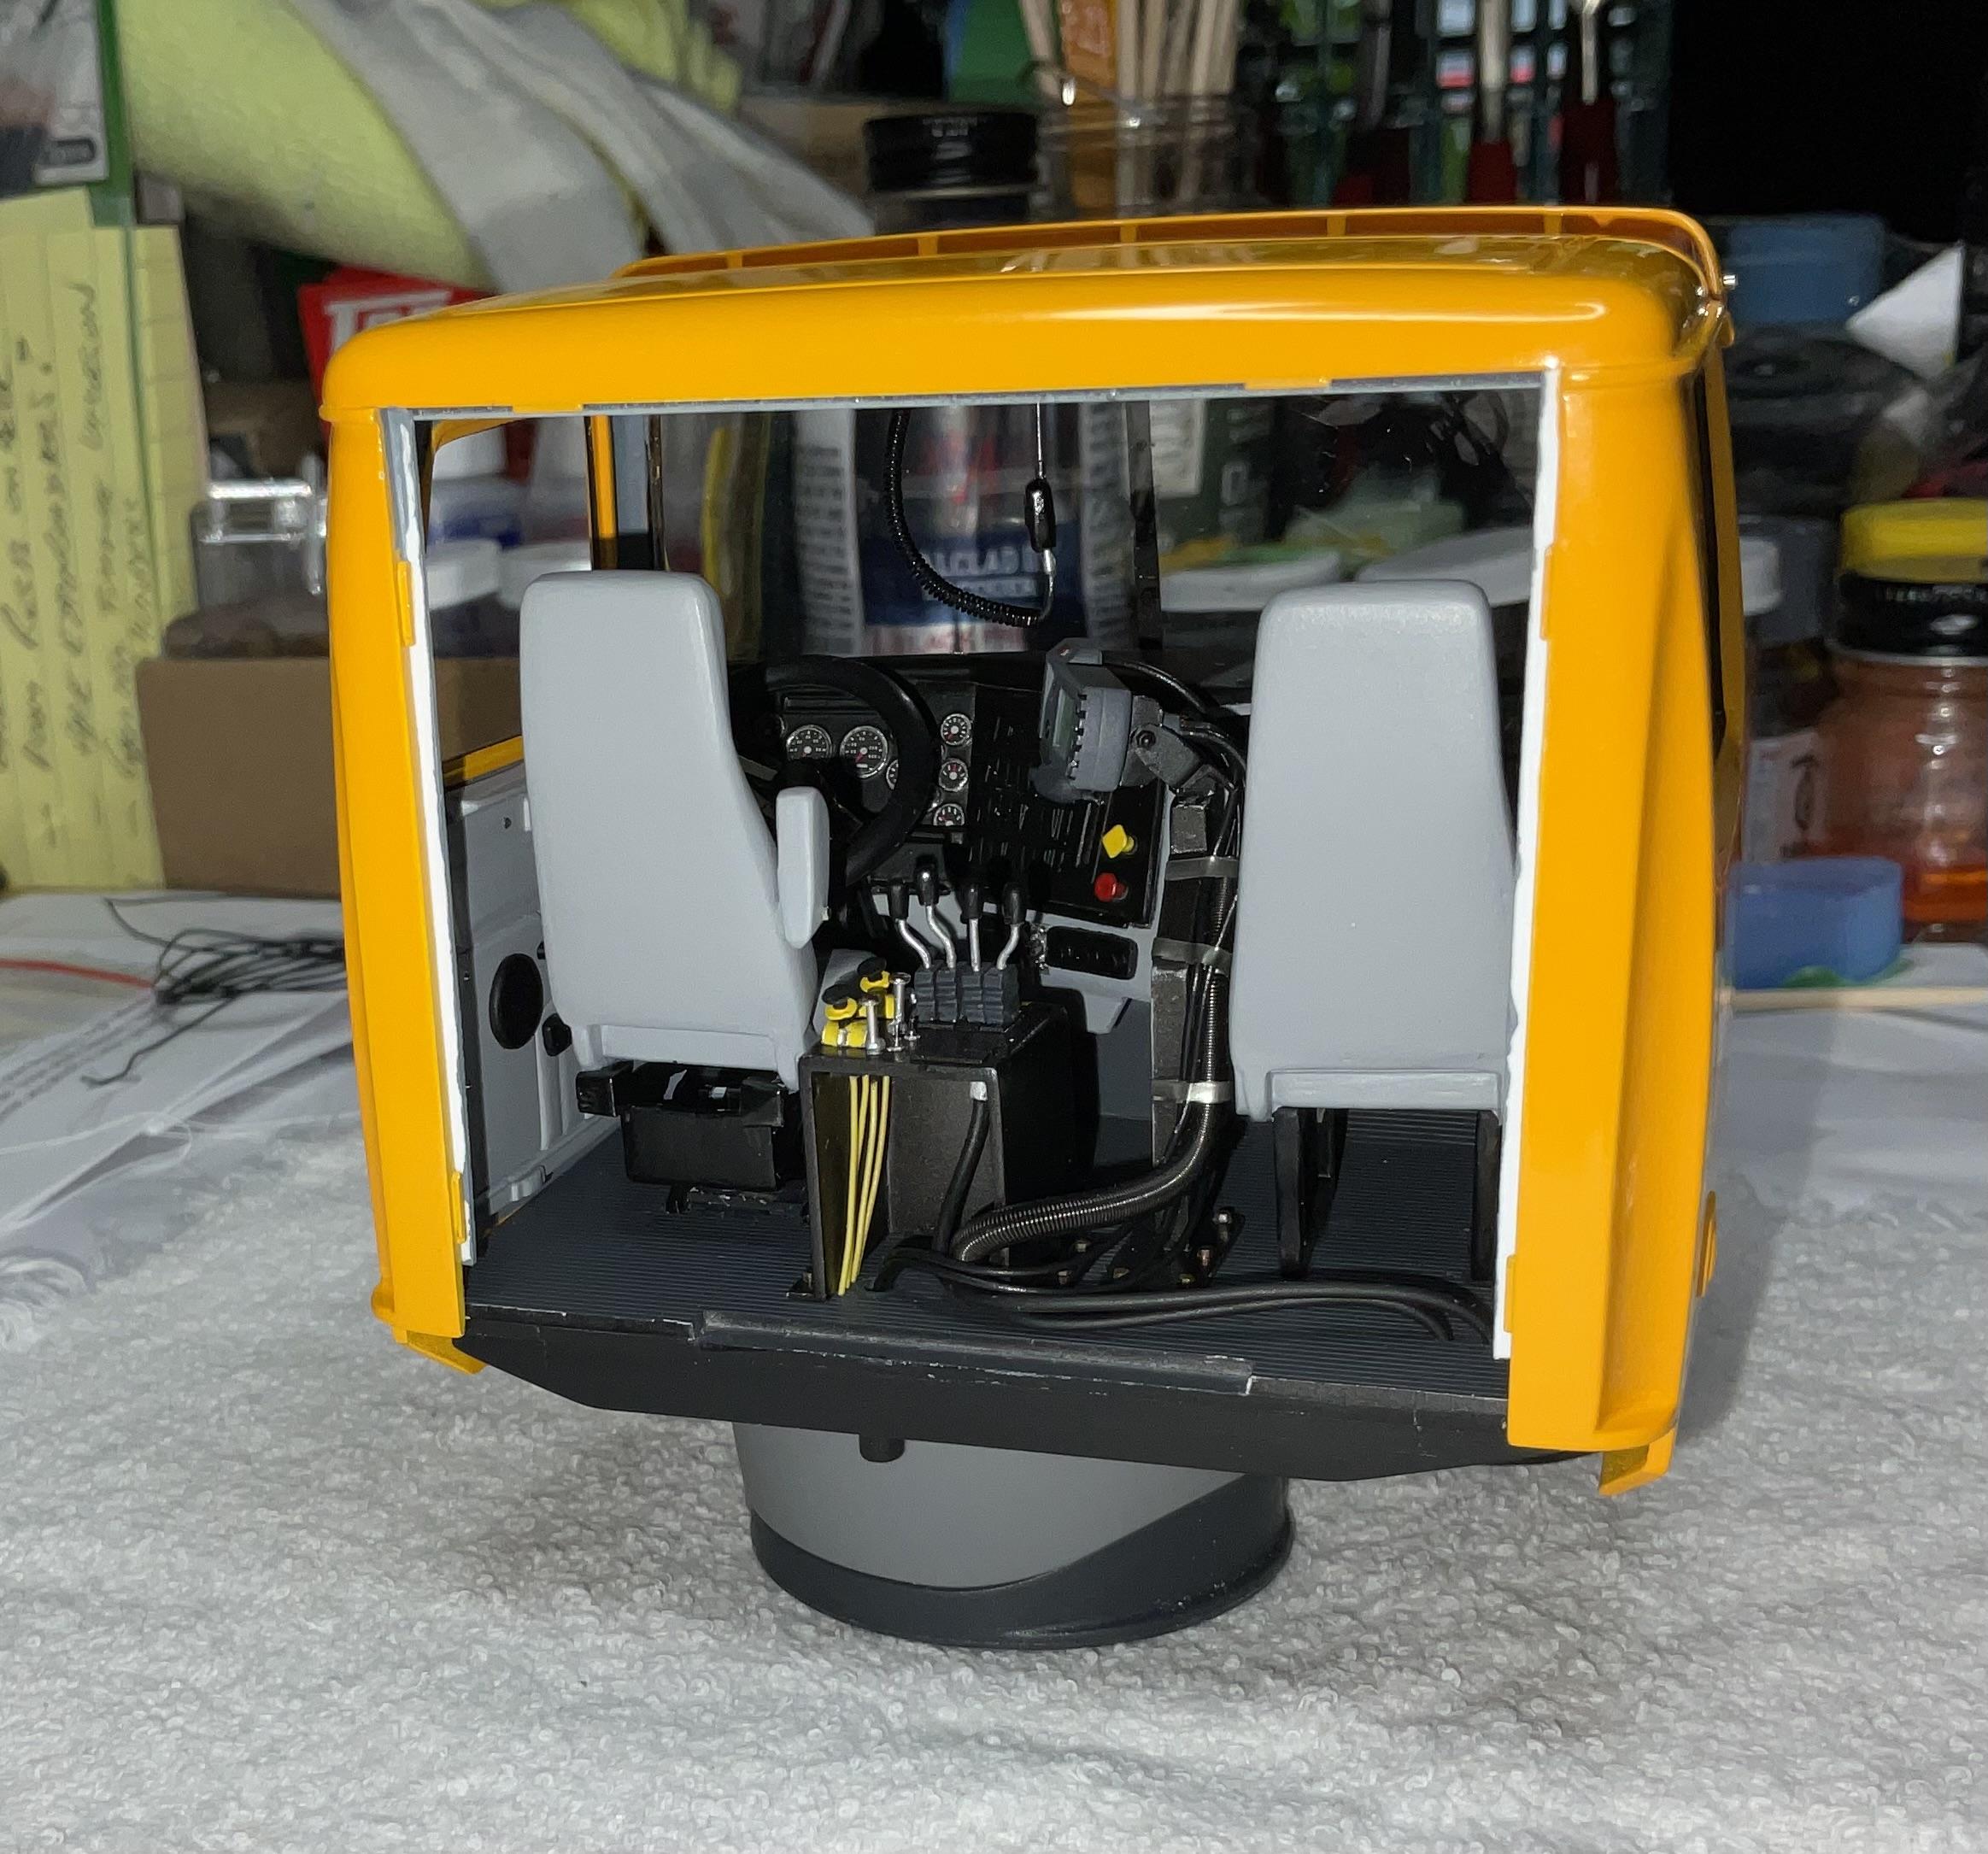
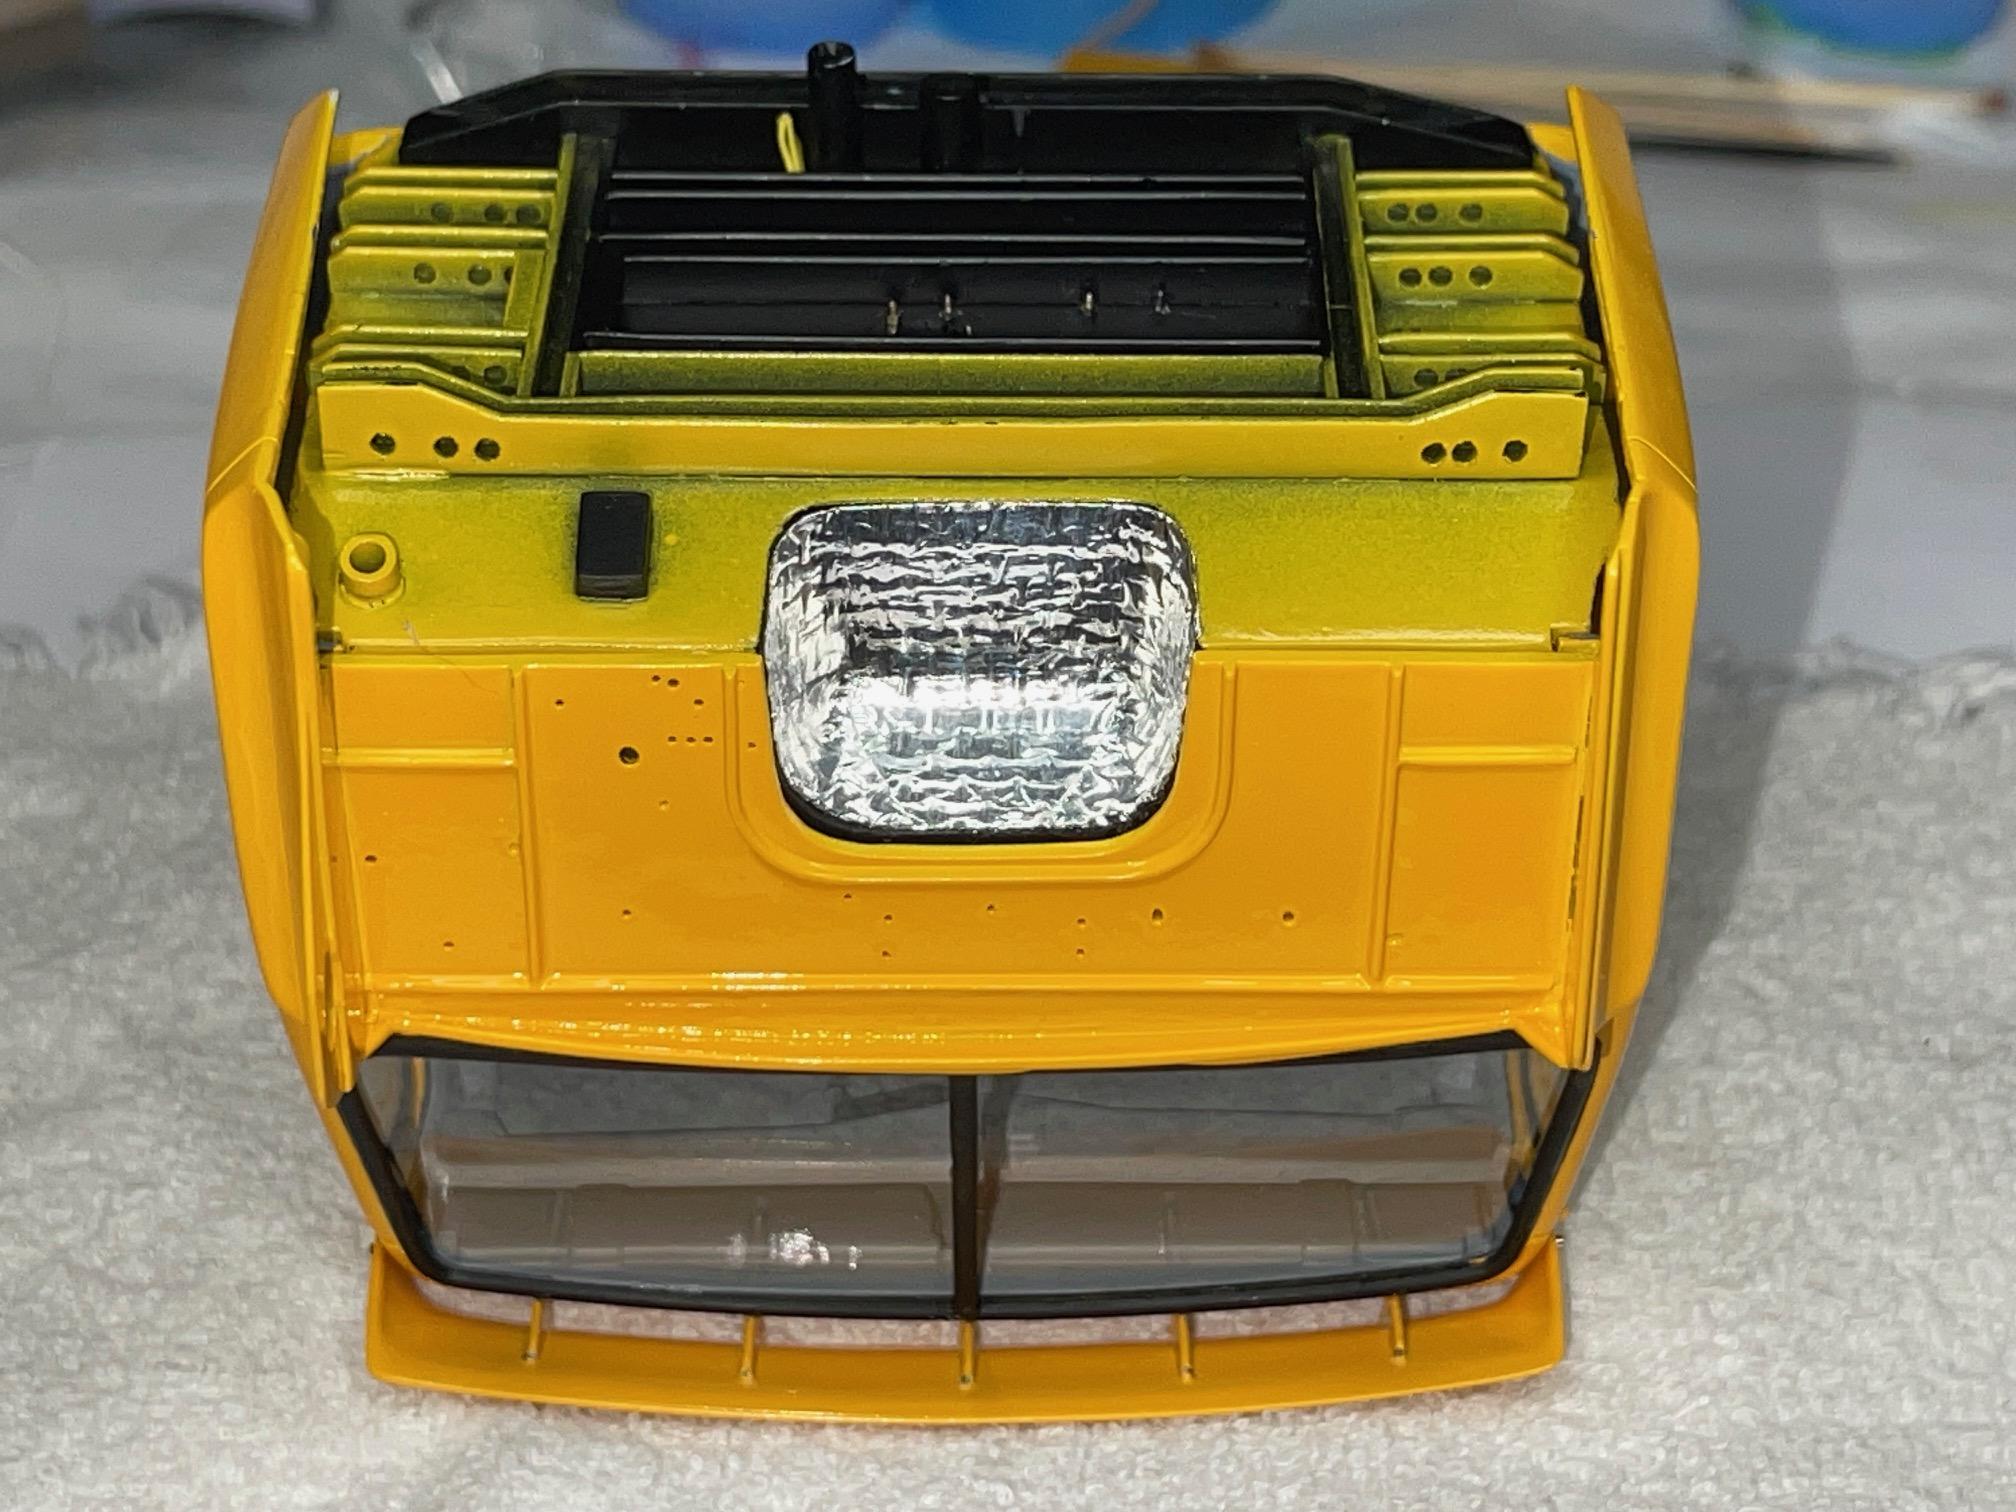
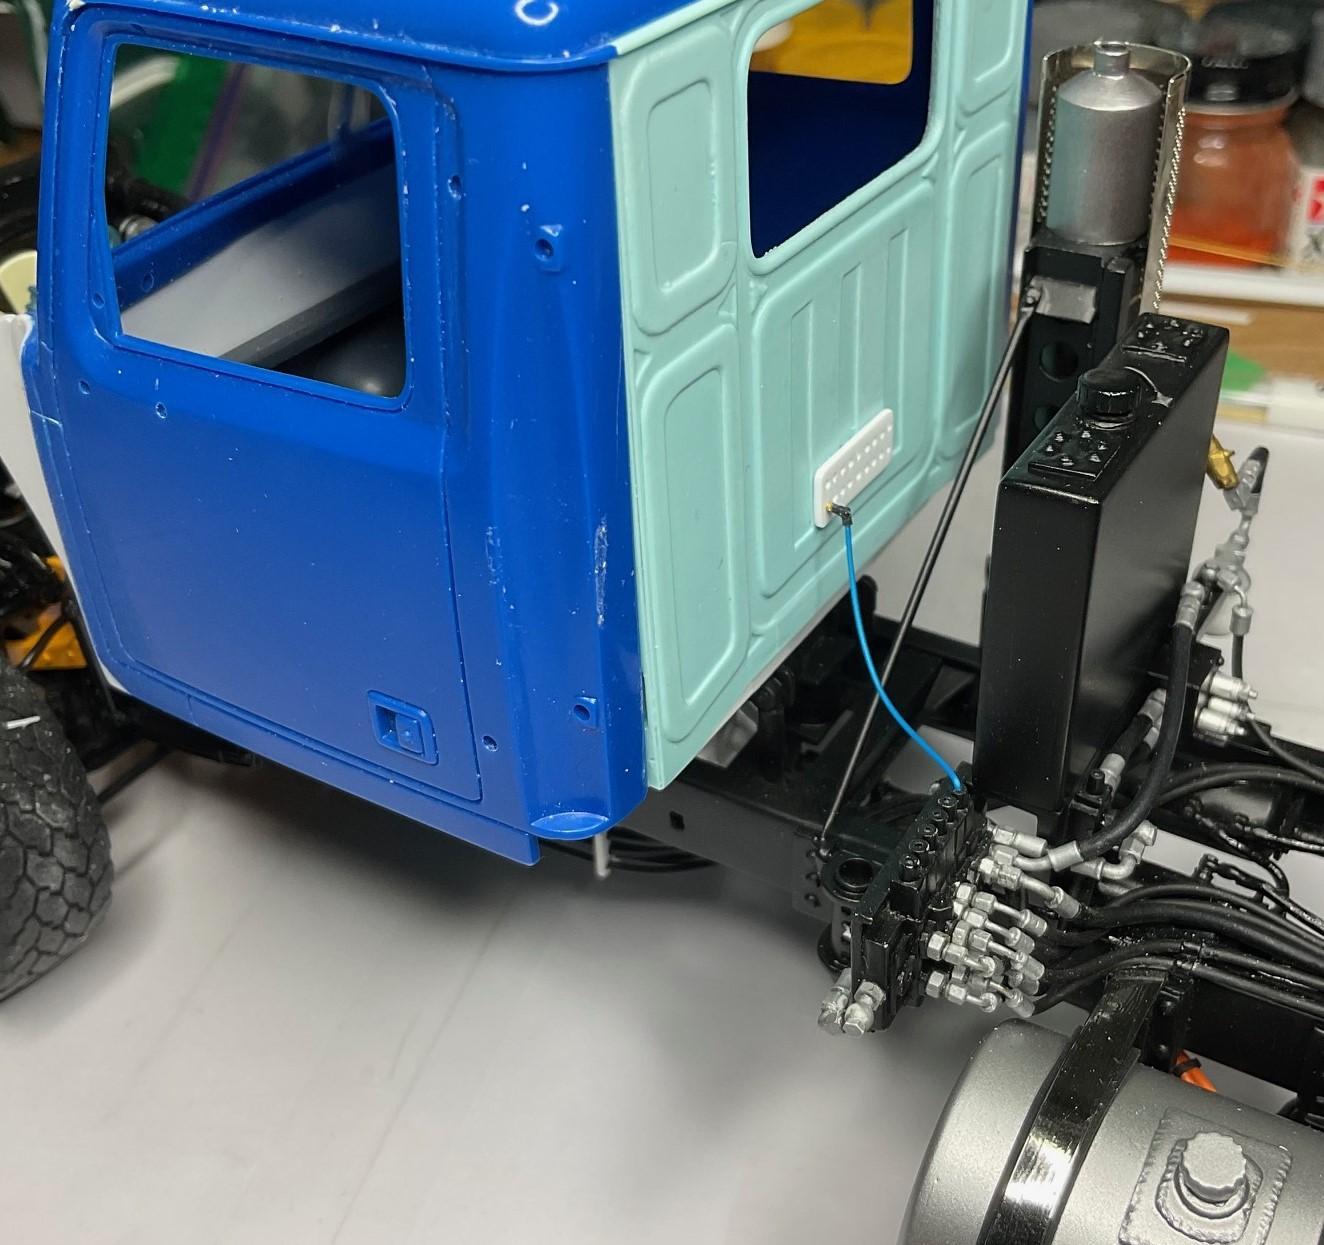
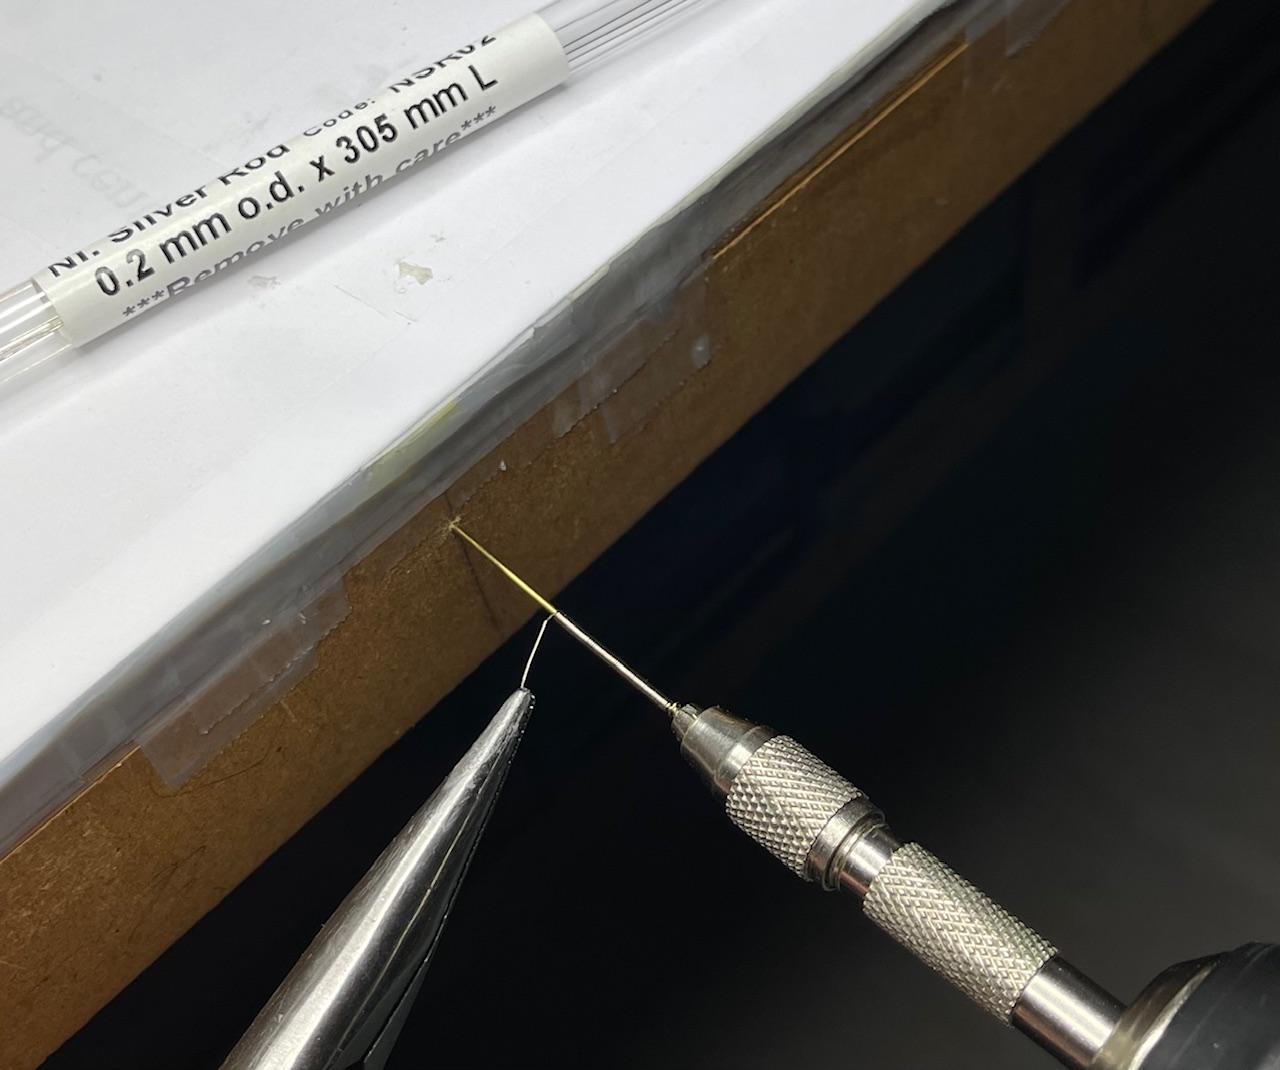
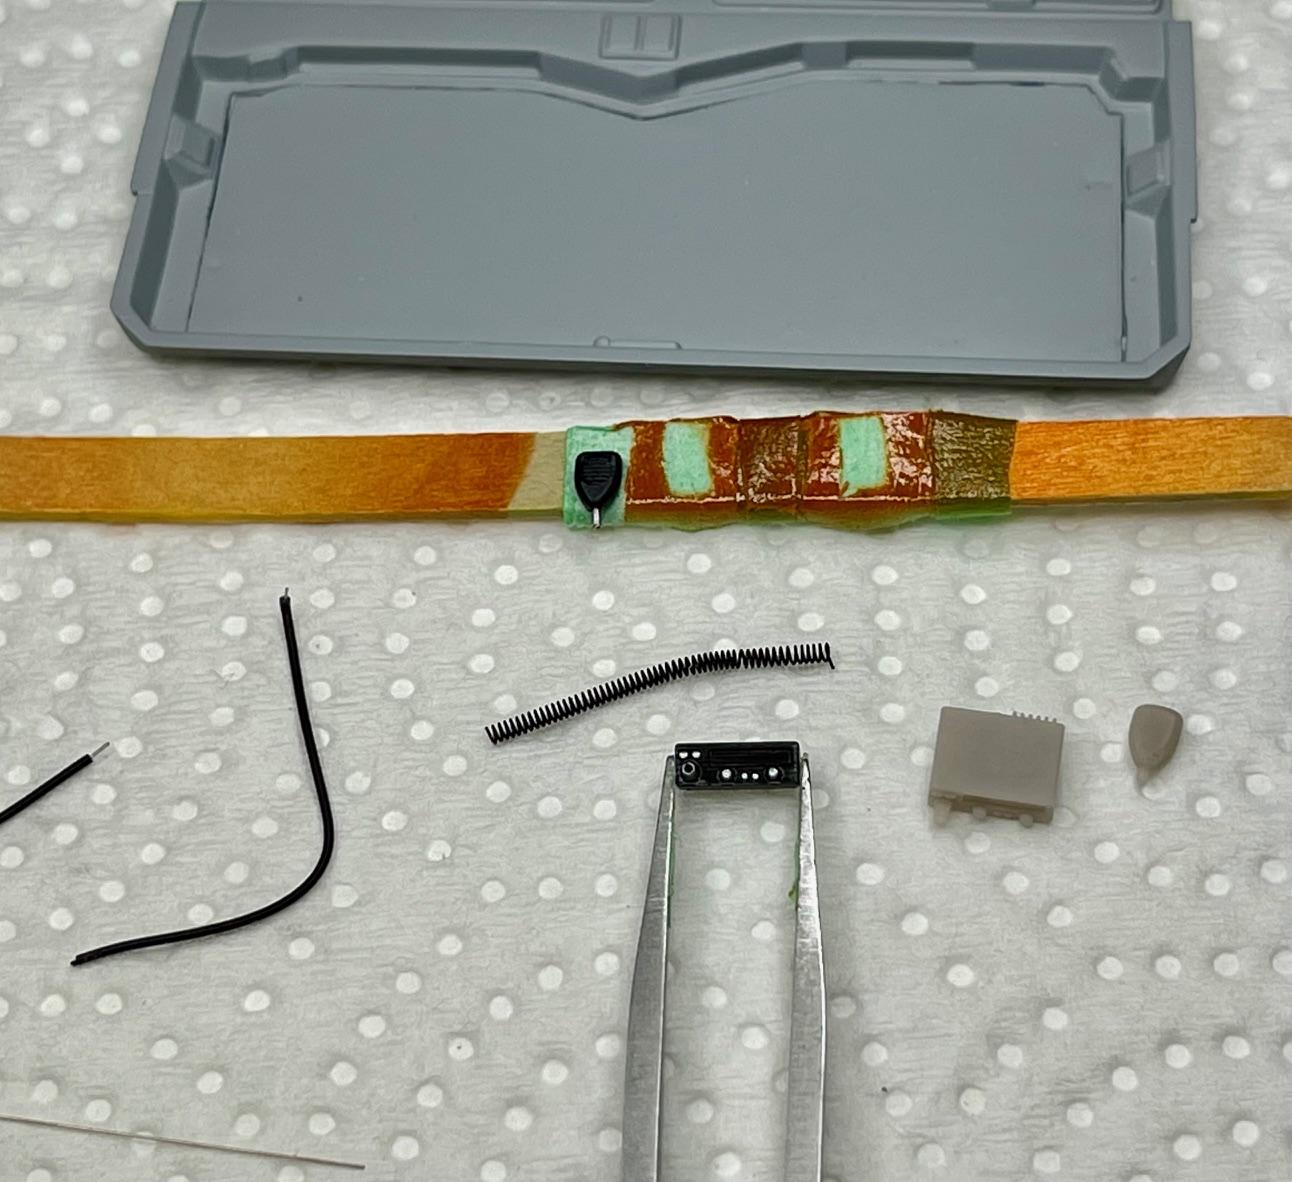
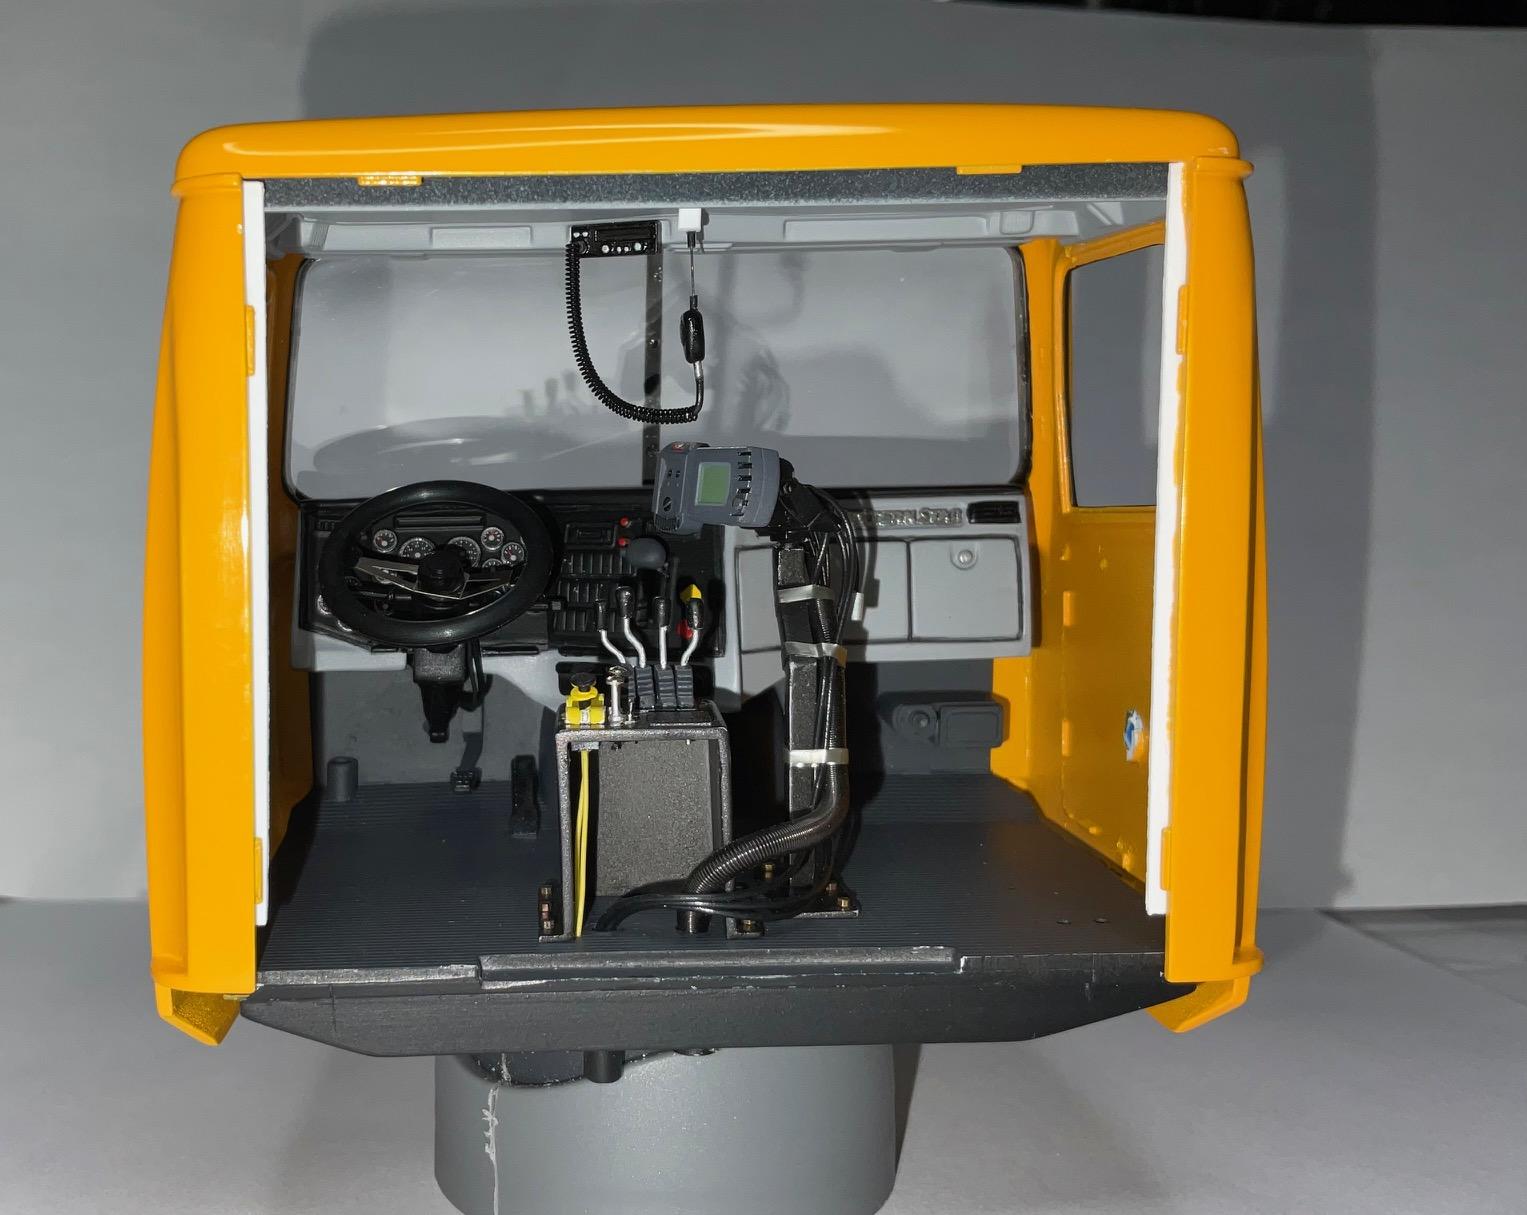
No chores today - looked like it was going to rain. I'm waiting until tomorrow morning to do the test chroming of the parts tree, so got started on a bit of a distraction. In the last bit of stuff @Bren printed for the bridge inspection truck, he included a few radios and mike sets. Not on the 'outstanding items' list, but I wanted to see if I could represent the radio in the 4900's overhead panel. I didn't have any scale appropriate wire to make the mike cord out of, so I used some thin nickel rod. Had to first chuck the nickel and a 1 mm brass rod into my pin vise then chucked the pin vise in my 3/8" variable speed drill. I drilled a small hole in the edge of my work tray for the brass rod, so I wouldn't bend it while tensioning the nickel as it wound around the brass - All the bits gathered, ready to assemble. I cut a portion of the painted radio off, to glue into the overhead cutout for the radio. The nickel coil was a bit stiff, so going to thread some black wire into the coil and shape the cord that way - My version of the mike's retractable roof cable - Best look anyone will likely get of the radio, but glad it's in there! (I also added a couple vertical flanges for the day cab panel to sit against - will make it easier to glue and look, from the inside, like panel trim) - Looking forward to the paint test tomorrow - hope it turns out well and next steps can be taken!