BK9300
-
Posts
1,986 -
Joined
-
Last visited
Content Type
Profiles
Forums
Events
Gallery
Everything posted by BK9300
-

Western Star 4900 FA plow truck
BK9300 replied to BK9300's topic in WIP: Model Trucks: Big Rigs and Heavy Equipment
Yes, some pics really show things up - I got some surprises at the beginning of this build I wasn't expecting, and still do. Thanks, Victor! -
Western Star 4900 FA plow truck
BK9300 replied to BK9300's topic in WIP: Model Trucks: Big Rigs and Heavy Equipment
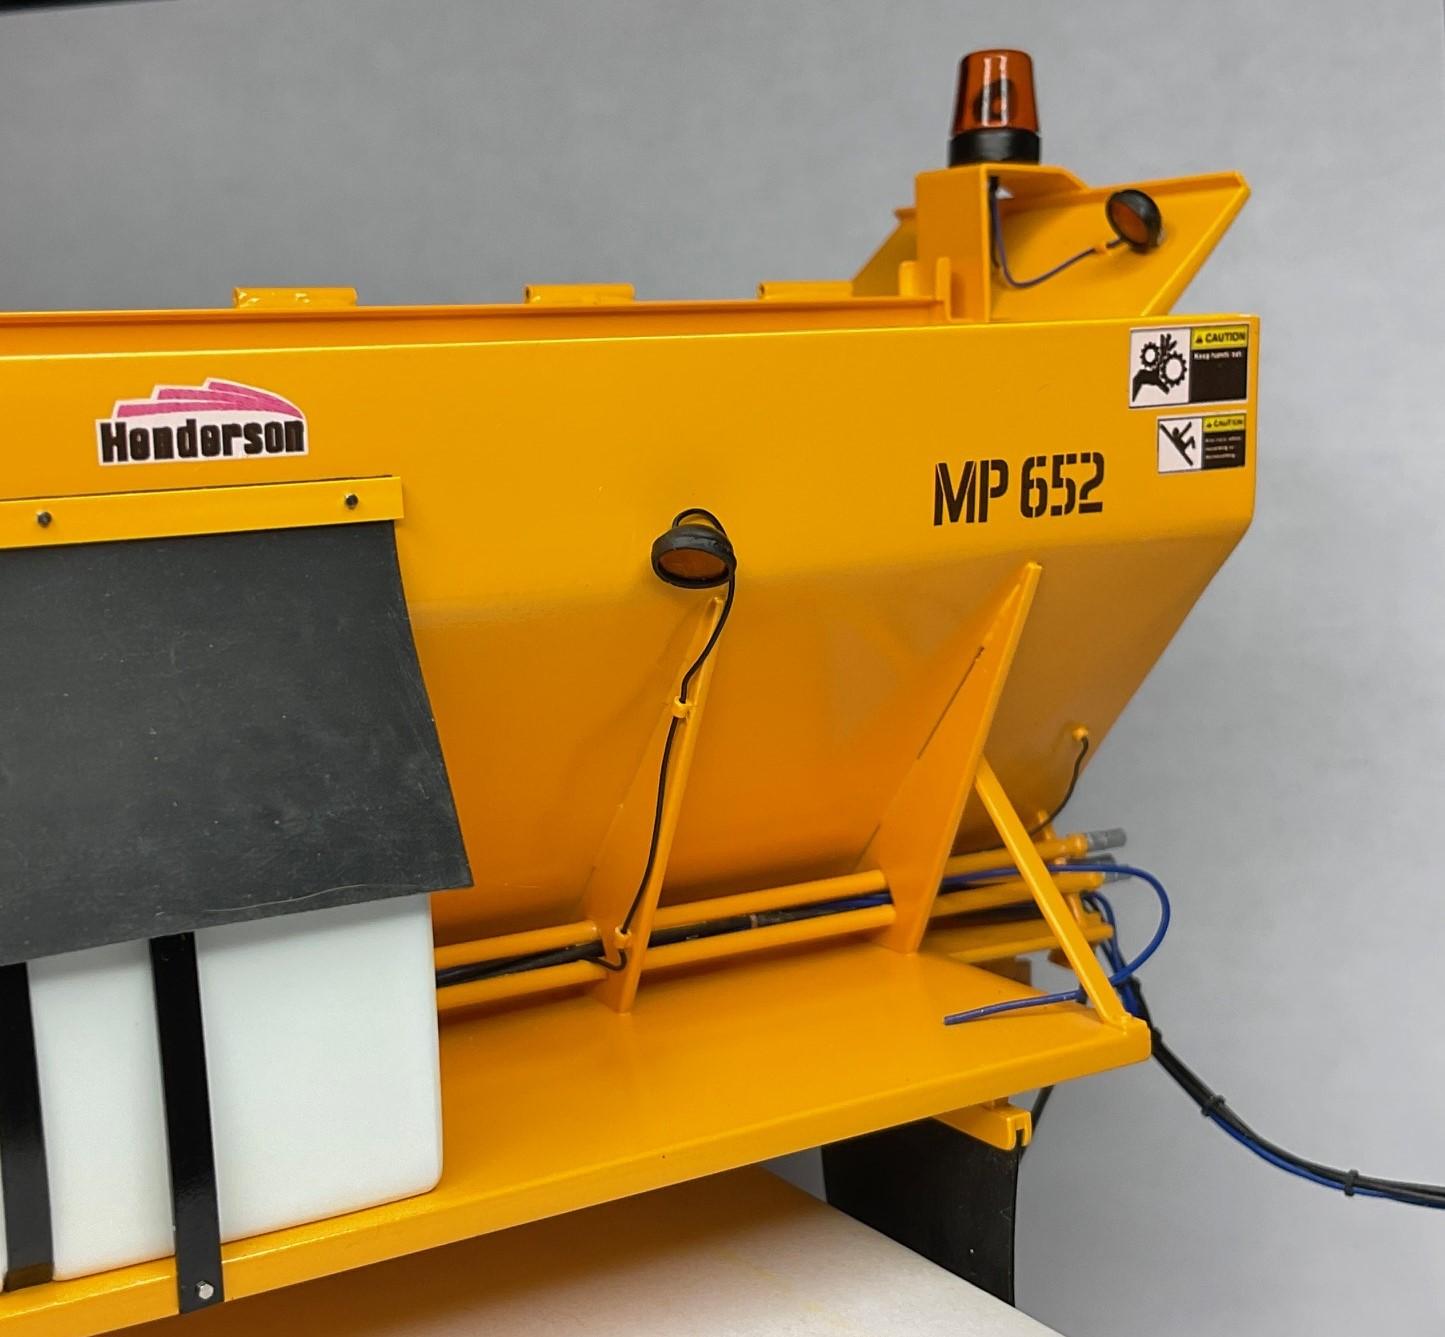
Made me laugh! I have one on each side - sander was made by Henderson Products - currently out of Manchester, Iowa -
Link-Belt HC-218 Truck Crane
BK9300 replied to redneckrigger's topic in WIP: Model Trucks: Big Rigs and Heavy Equipment
Tremendous fabrication, Tom - it’s astonishing how quickly the total number of individual parts can add up in a project like this. It takes a lot of concentration and planning to, first, identify all the parts that need to be created or sourced; second make them; finally, get them all assembled in the right order. Wonderful work! -
Western Star 4900 FA plow truck
BK9300 replied to BK9300's topic in WIP: Model Trucks: Big Rigs and Heavy Equipment
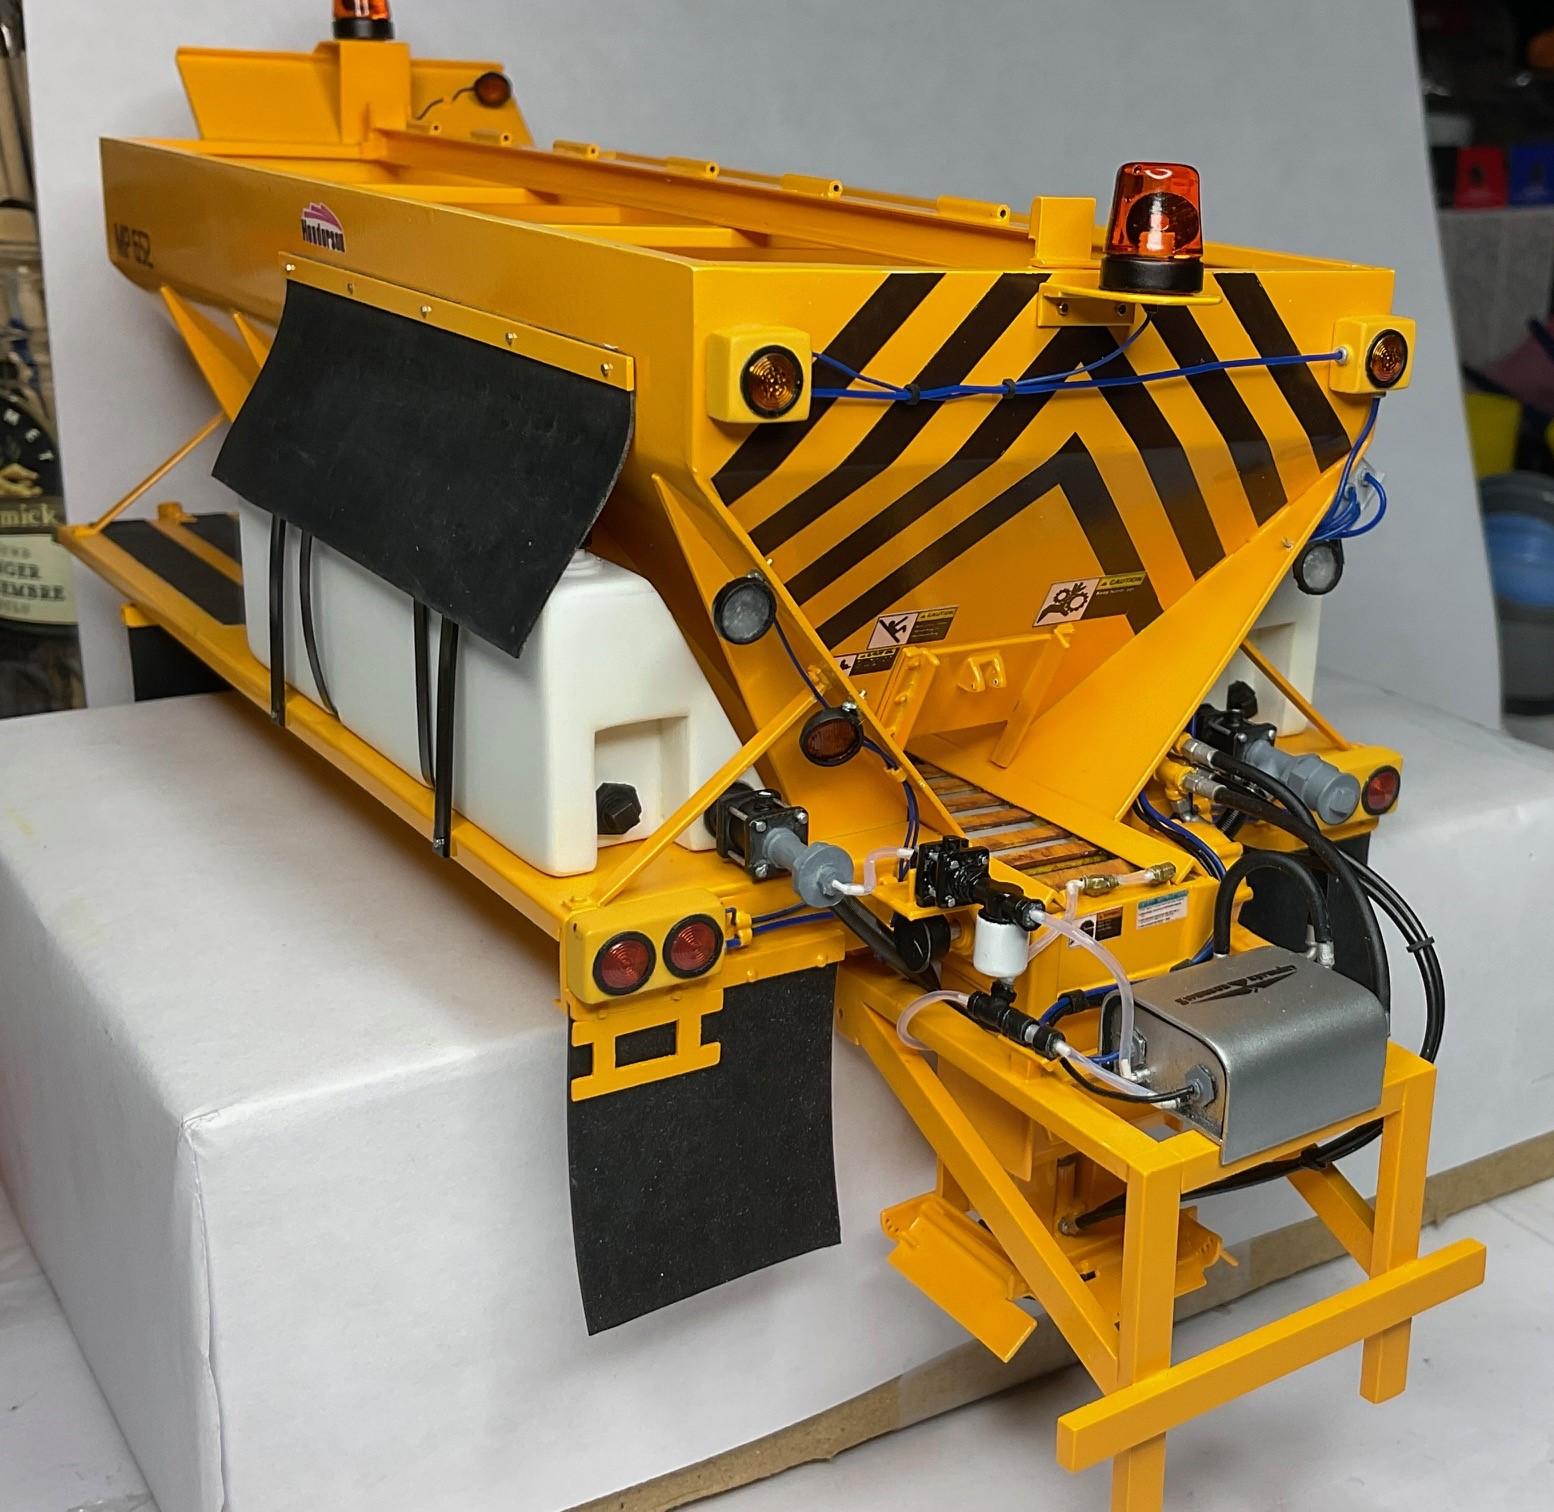
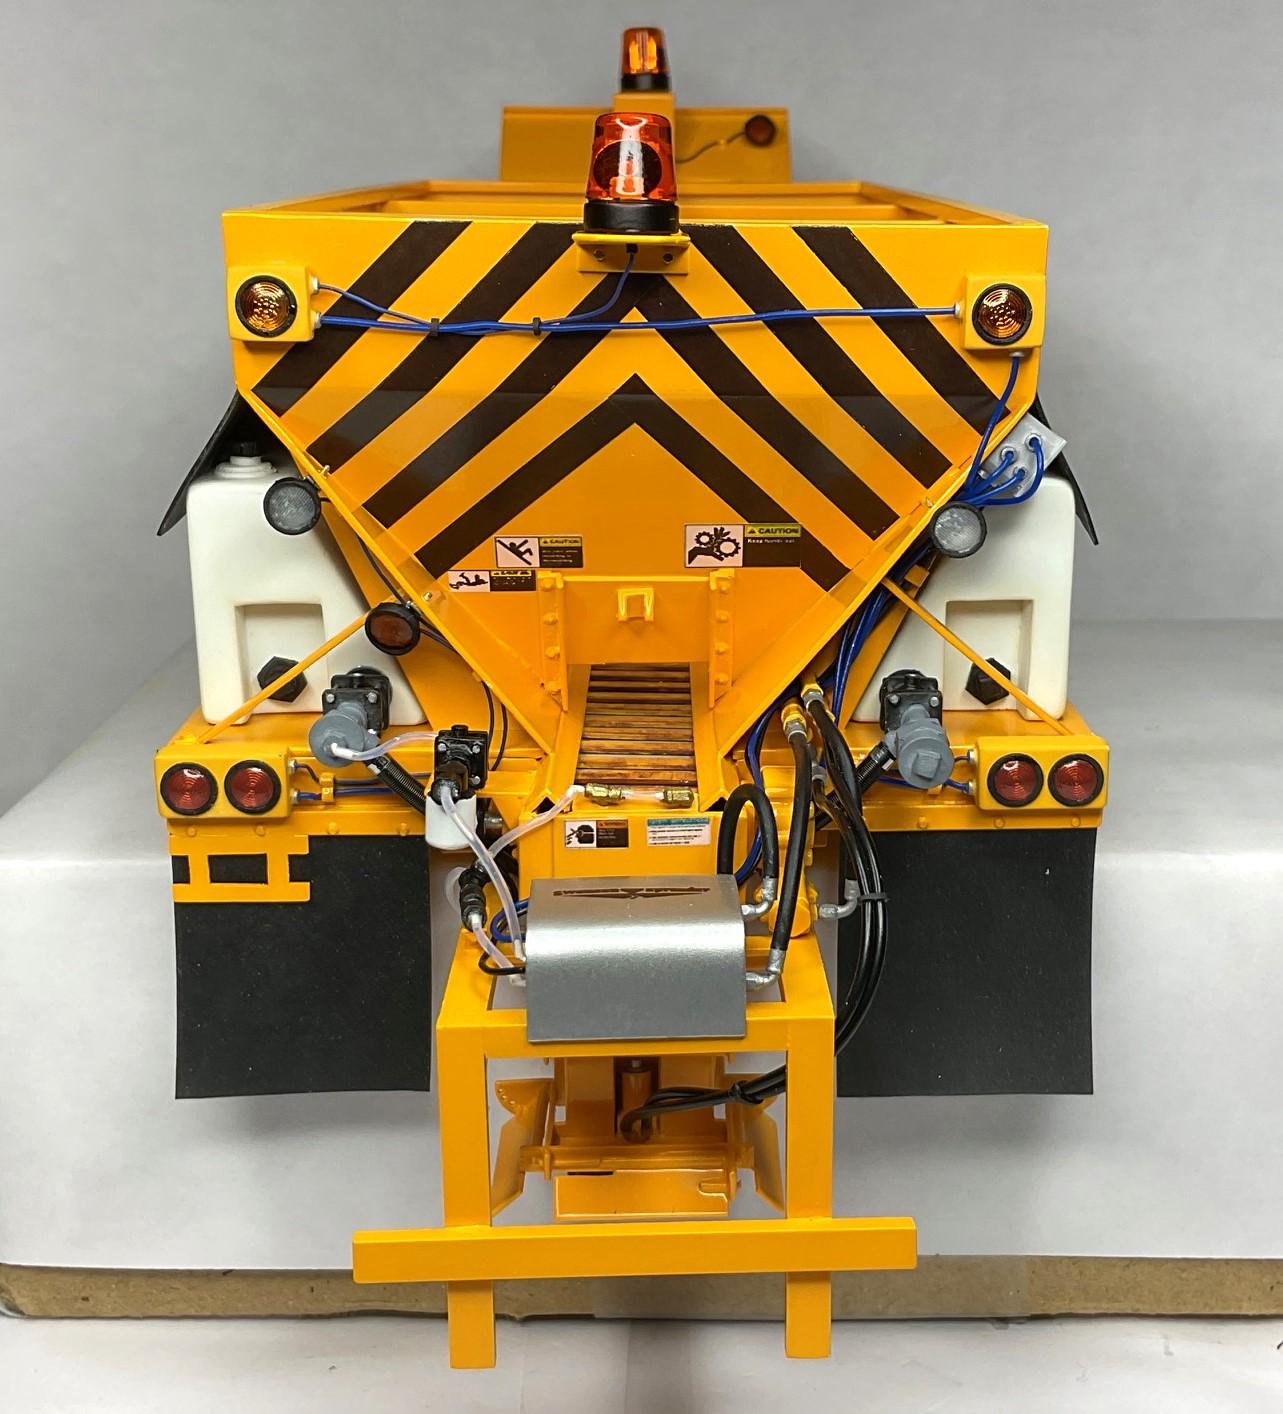
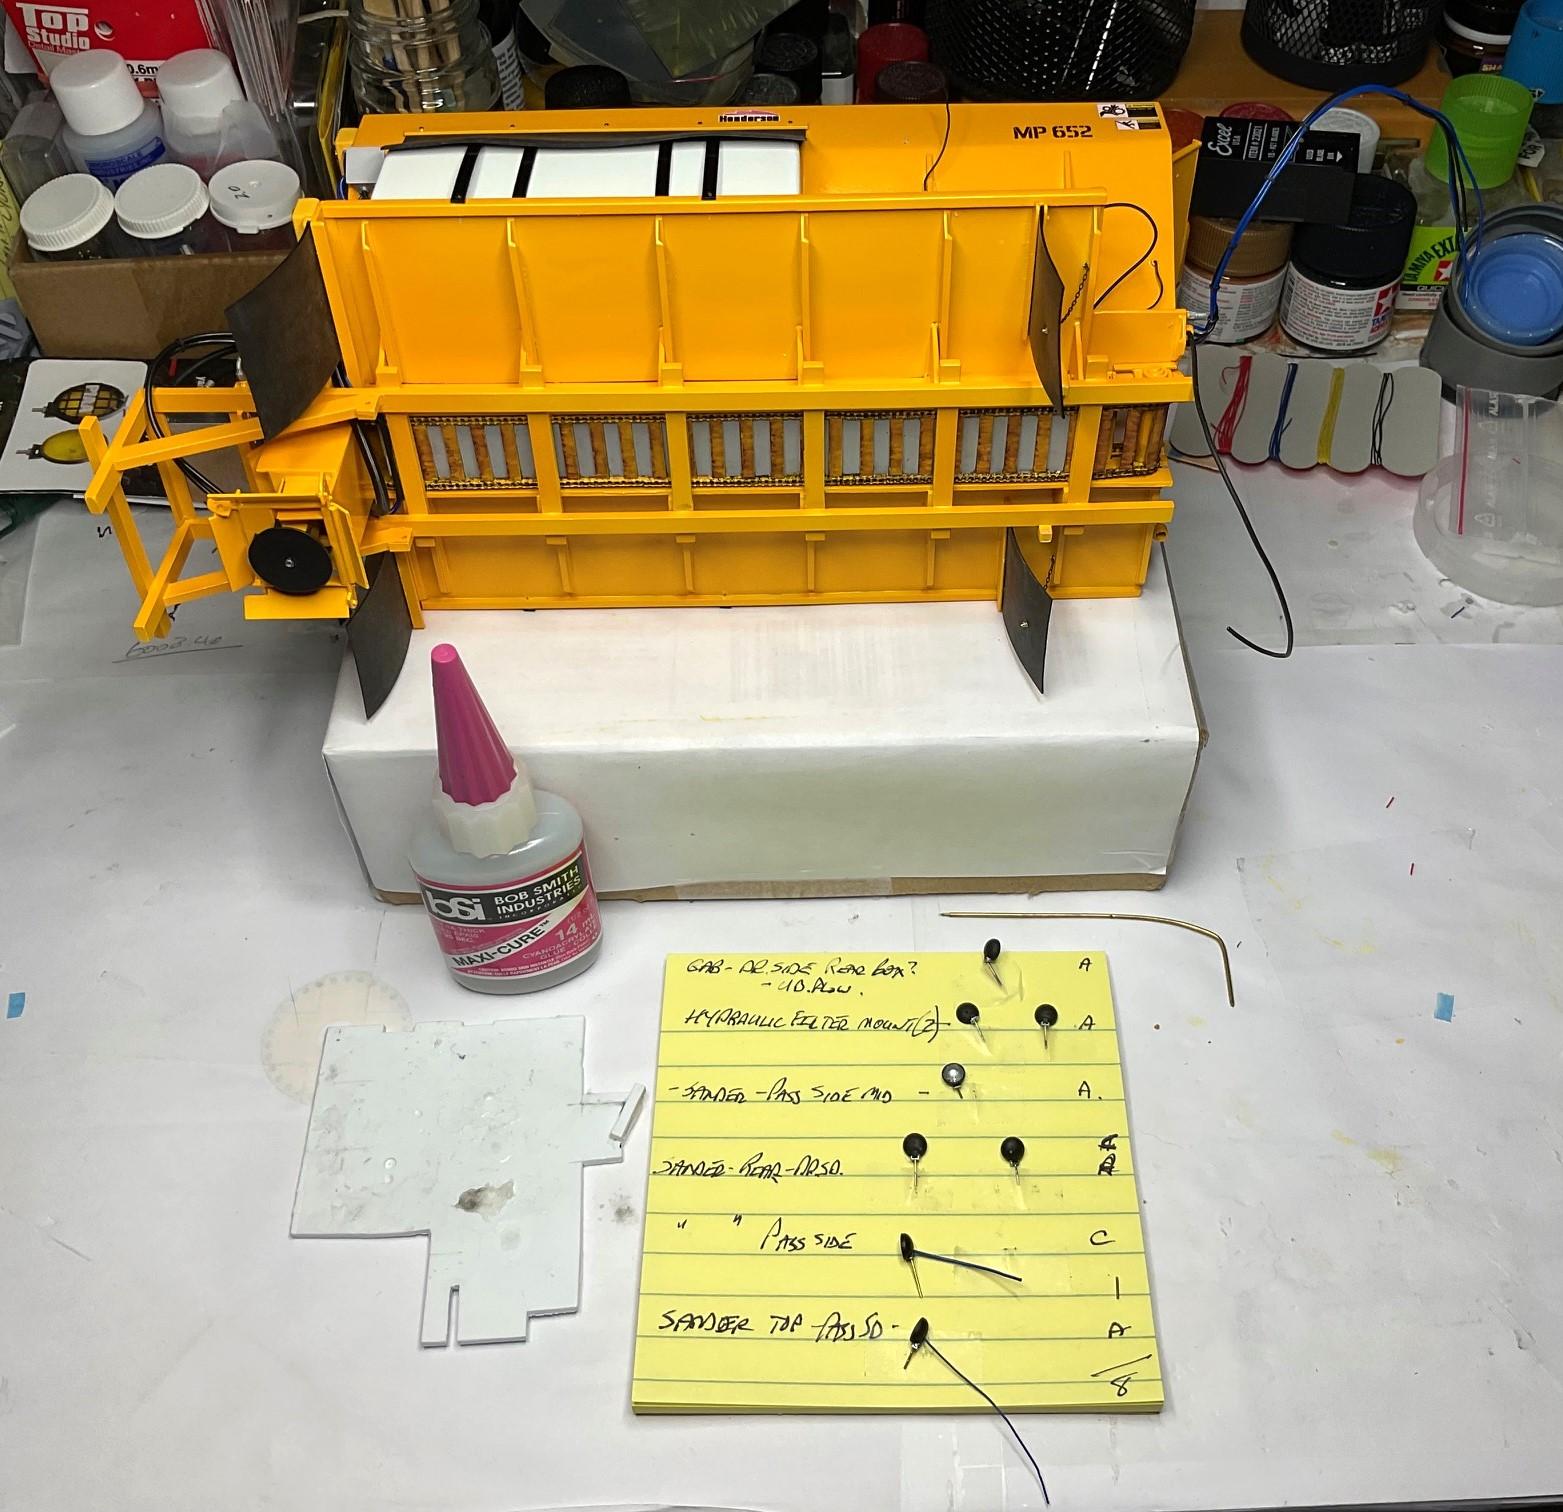
Yes, more pics of sander, but this time all the work lights and roto lights are glued in place and wired in! This is where my session started today, about 4 hours ago! - I appreciate your patience with all the pics of the sander - like I said last time, each pic gives me a chance to see 'what's what' and make any changes if need be. Should have the ladder on tomorrow, and I'll get under way with the slide gate cylinder and crank, and then the sander will be finished!
-
Western Star 4900 FA plow truck
BK9300 replied to BK9300's topic in WIP: Model Trucks: Big Rigs and Heavy Equipment
Thanks, Randy - lots of details, but looking forward to having them all finished - they take as long as some of the scratch built parts! Not to worry, Bren, and thanks for your generous comments! -
Kenworth W-925 (mild custom)
BK9300 replied to Gary Chastain's topic in WIP: Model Trucks: Big Rigs and Heavy Equipment
Revell chrome spray may not be your favourite, but it sure seems to go down well for you. The question has been asked lots in the various forums, but how long do you let it cure before any handling? Looks great! -
Kenworth Challenge Mixer
BK9300 replied to Rbray47's topic in Model Trucks: Big Rigs and Heavy Equipment
Just a terrific build, Randy! Wherever (however?) did you find/make the level indicator on your tank? Beautiful detailing all around! -
Freightliner FLC
BK9300 replied to Jürgen M.'s topic in WIP: Model Trucks: Big Rigs and Heavy Equipment
This build shows the advantage of designing your own ‘kits’ - you have a digital parts box, full of ready to go items to add to new builds. Good stuff, Jurgen! -
Western Star 4900 FA plow truck
BK9300 replied to BK9300's topic in WIP: Model Trucks: Big Rigs and Heavy Equipment
Not much gets accomplished in my bench sessions this last little while - doing lots of fussy detail painting and it takes me forever! And I seem to post lots of repetitive pics, but almost every pic shows me something to that needs more attention, to get it right. So, not much to show for the day's work, but another bit of that fussy stuff off the list. Final coat on truck visor, roto light bases painted black, and the insides of the various light housings all got a coat of Tamiya, Chrome Silver- Good thing I didn't take a video of me doing this detail painting - a bit of back and forth had to be done. Silver on the inside, then touch up flat black where the shaky hands made the silver stray, then a tiny bit of silver again, on where the black touch ups screwed up! Also got the mounting brackets on the work lights to stand out a bit, using the magnifying lamp. Roto lights were masked off and the bases sprayed - Still hope to finish off the tiny bit of work left on the sander, before returning to the cab and hood. Also need to make a semblance of that electrical/aux. air connections plate that sits on the frame behind the cab, and that a power cable to the sander will finally plug into. What I hope to model was used on some of the real trucks in the past, but had been discontinued in later model years, I am told, because there was too much salt damage to the connections. I'm choosing to do it this older way, because it will make the final connections of the sander wiring a bit easier on me!
-
Western Star 4900 FA plow truck
BK9300 replied to BK9300's topic in WIP: Model Trucks: Big Rigs and Heavy Equipment
Thanks, Steve - pretty sure a lot of credit goes to the polishing compound! Was thinking about sending one to Western Star - maybe they will give some info on their frames for my next build! Thanks, Scott. -
Kenworth Hustler garbage truck
BK9300 replied to Rbray47's topic in WIP: Model Trucks: Big Rigs and Heavy Equipment
I agree! Great scratch building and kit bashing is going to make a unique build - looking good, Randy! -
Soprano Carting Service Leach Packer
BK9300 replied to Scott Eriksen's topic in Model Trucks: Big Rigs and Heavy Equipment
Terrific job, Scott - apart from the rest of your excellent work, the slight weathering, rusting, is the icing on the cake - looks really good! -
It's obvious you have put a lot of work into this, Steven - amazing detailing!
-
Your paint polishing sure turned out well - how did you find using the Dspiae polisher around the side trim and the different profiles on the hood?
-
Terrific work on your headers, Daniel - lot to learn watching this.
-
Kenworth W-925 (mild custom)
BK9300 replied to Gary Chastain's topic in WIP: Model Trucks: Big Rigs and Heavy Equipment
Going to look sweet, Gary! -
Western Star 4900 FA plow truck
BK9300 replied to BK9300's topic in WIP: Model Trucks: Big Rigs and Heavy Equipment
I’m just glad you’re still checking in - thanks, Gary! -
Western Star 4900 FA plow truck
BK9300 replied to BK9300's topic in WIP: Model Trucks: Big Rigs and Heavy Equipment
Appreciate that, Victor! -
Kenworth W-925 (mild custom)
BK9300 replied to Gary Chastain's topic in WIP: Model Trucks: Big Rigs and Heavy Equipment
The 'lights' look great, Gary - amazing what can be found to add to a build! -
Western Star 4900 FA plow truck
BK9300 replied to BK9300's topic in WIP: Model Trucks: Big Rigs and Heavy Equipment
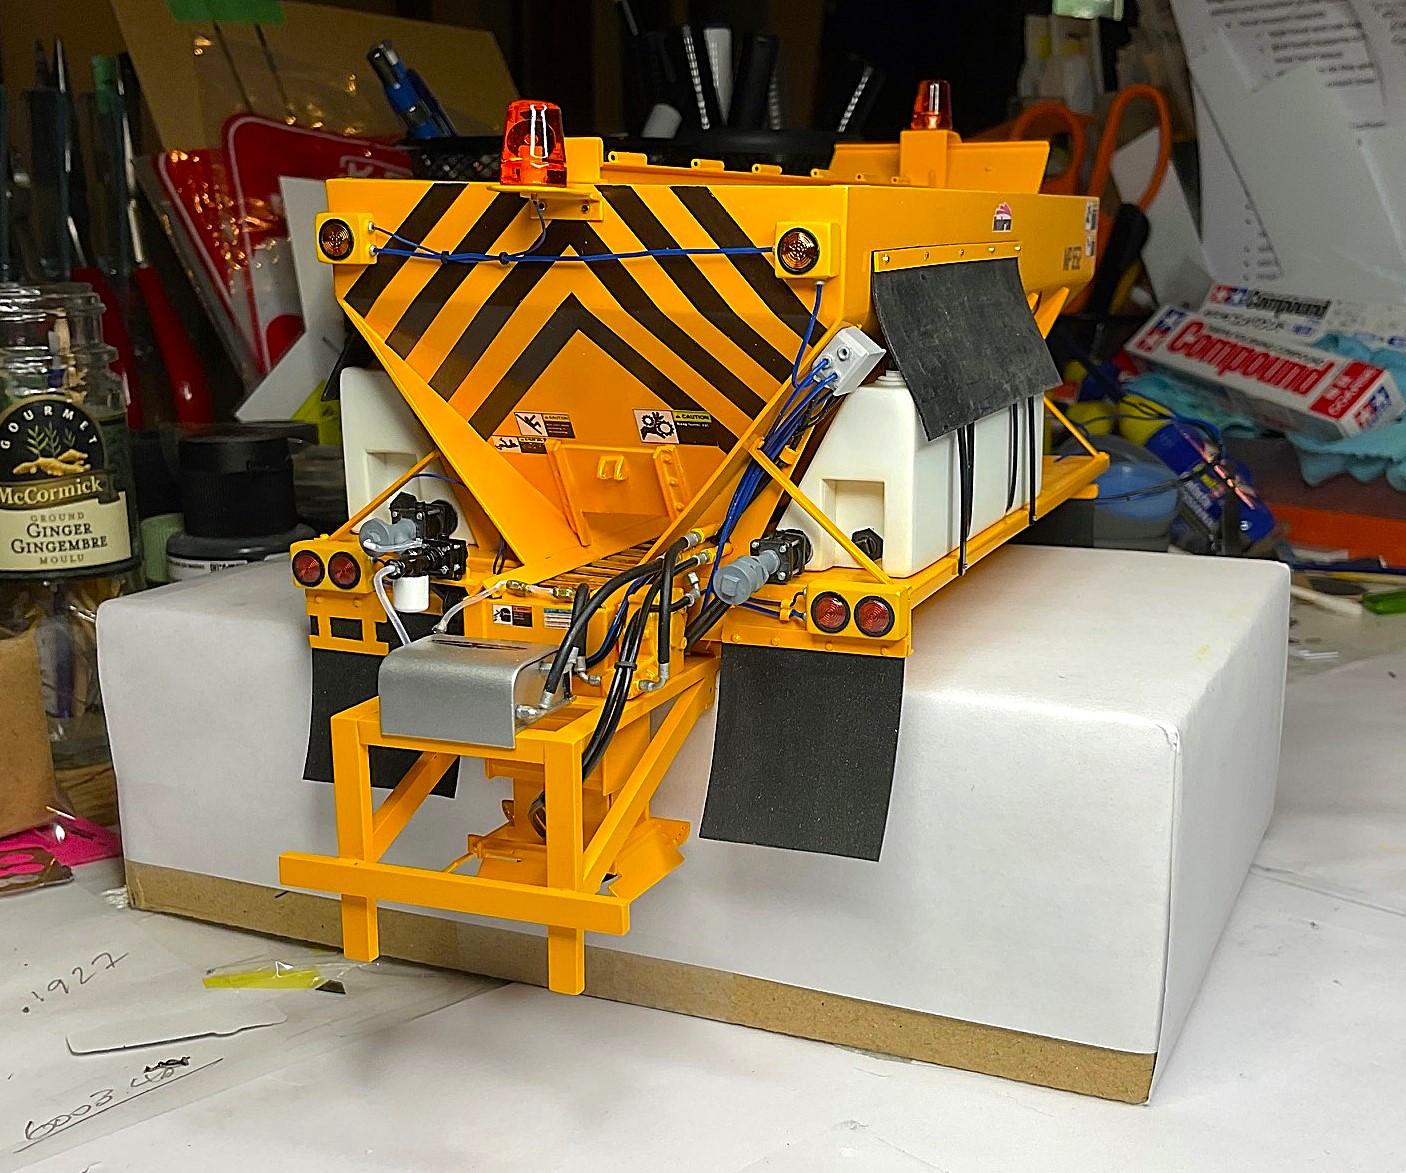
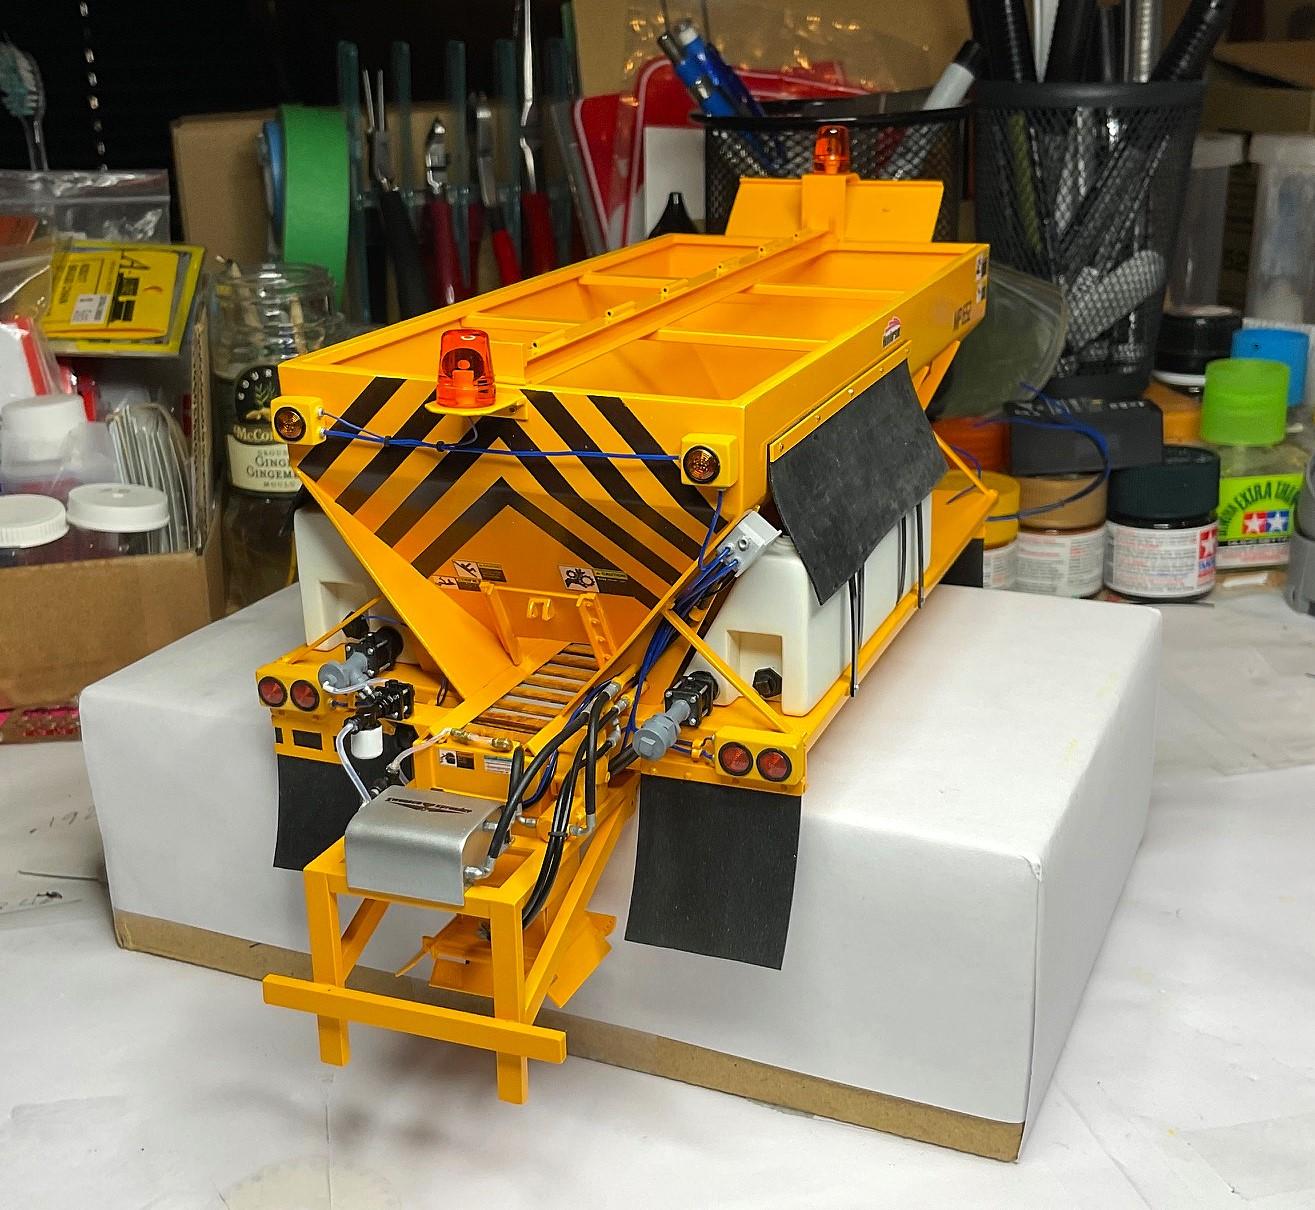
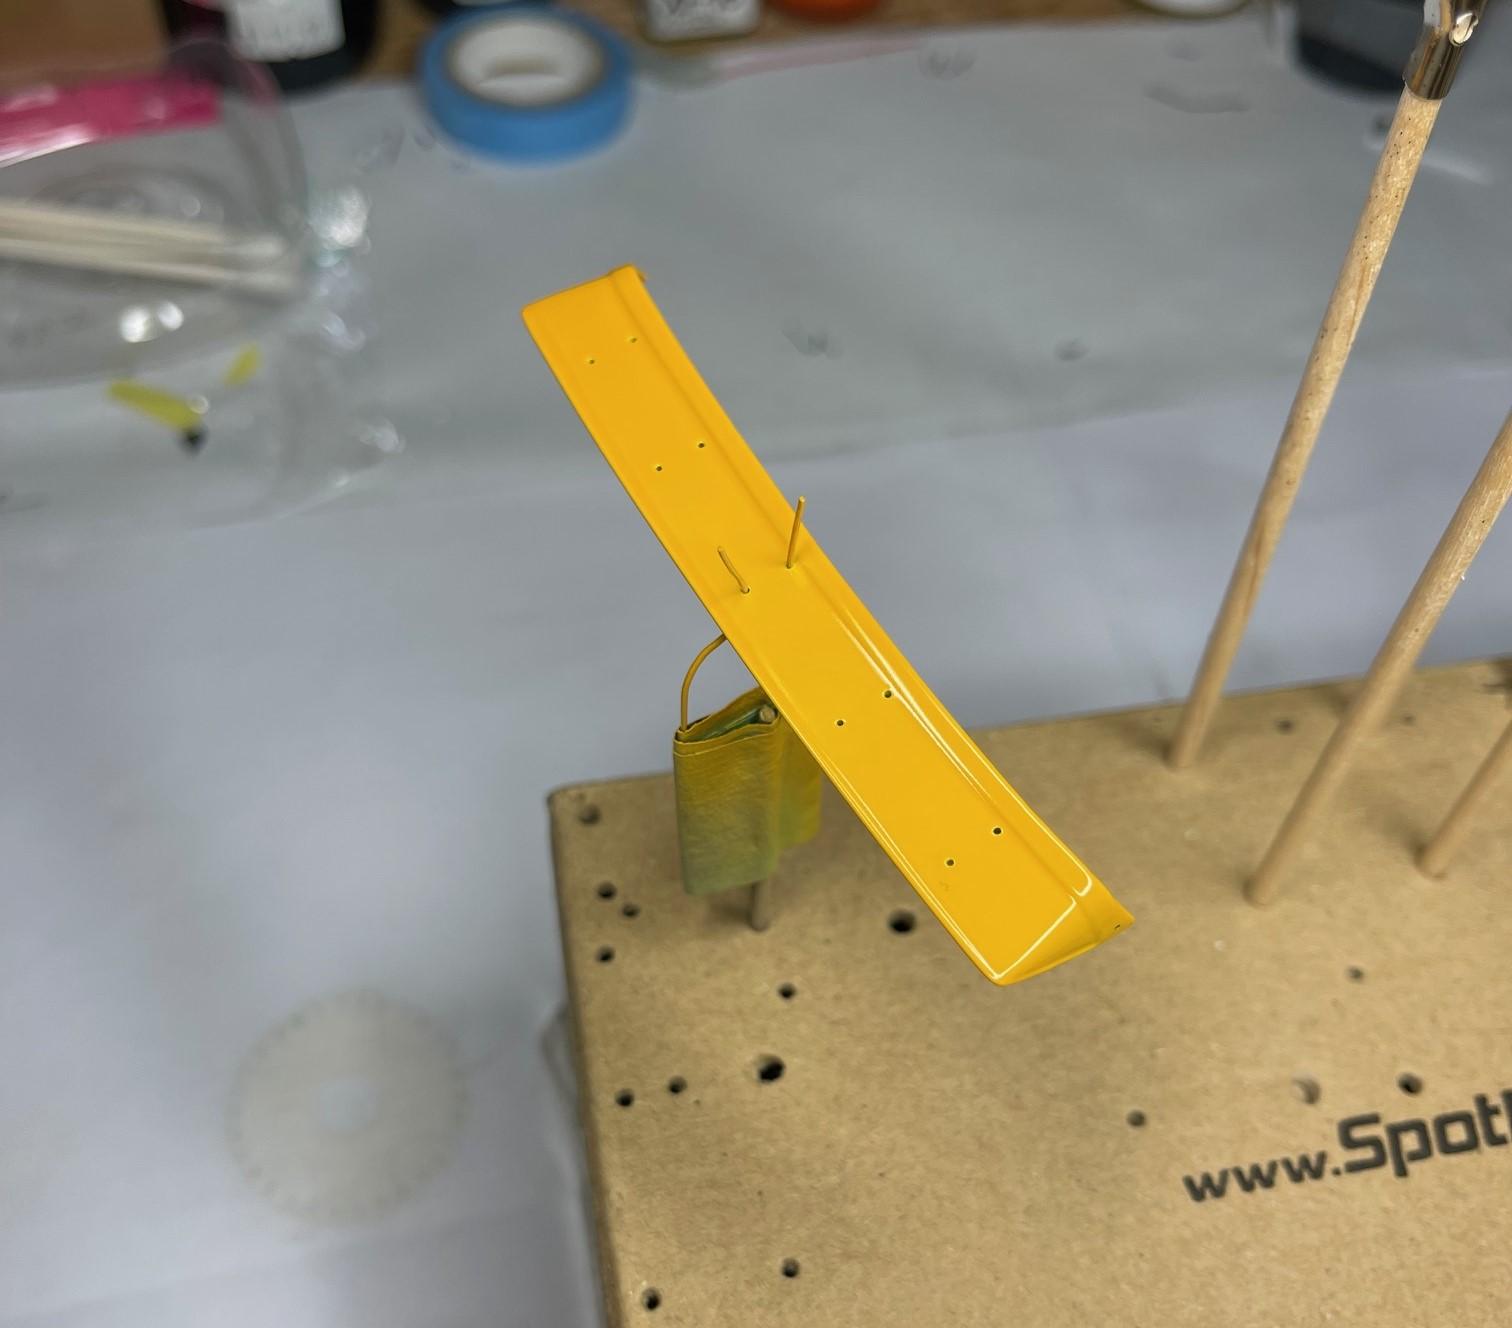
I finally got around to adding the amber, flashing lights to the upper back of the sander. Could never give you all the reasons why this took so long - I had painted them in September 2024. Pretty certain there was a bit of procrastination along the way, but I am very glad to see them in place! Also got the rear, roto light platform glued and bolted in place. I laid out the two, short wire runs between the flashers and the rear roto light, then temporarily set both roto lights in place - Rear roto light and wiring temporarily in place - still need to make circular, flat black base plates for both roto lights. Also need to make three or four more wiring grommets to support the wires between the flashers - Front roto light temporarily in place - (the grommet is needed for a wire coming back out of the roto light, to feed a work light that will be mounted near it) - Apart from tidying up the wiring and finishing the base plates for roto lights, only remaining thing to do back here are three work lights, and to make the hand crank and cylinder for opening and closing the slide gate - Had meant to continue with the sander's work lights today and just got sidetracked with the flashers and rotos. Will get back on the work lights tomorrow, hopefully!
-
Farm Floater Truck 1/24th scale
BK9300 replied to Randy D's topic in WIP: Model Trucks: Big Rigs and Heavy Equipment
I knew that MCM notification in my email meant something special would be waiting. Fabulous attention to detail, Randy - good thing your truck has a brass frame and metal suspensions. Awesome work! -
Western Star 4900 FA plow truck
BK9300 replied to BK9300's topic in WIP: Model Trucks: Big Rigs and Heavy Equipment
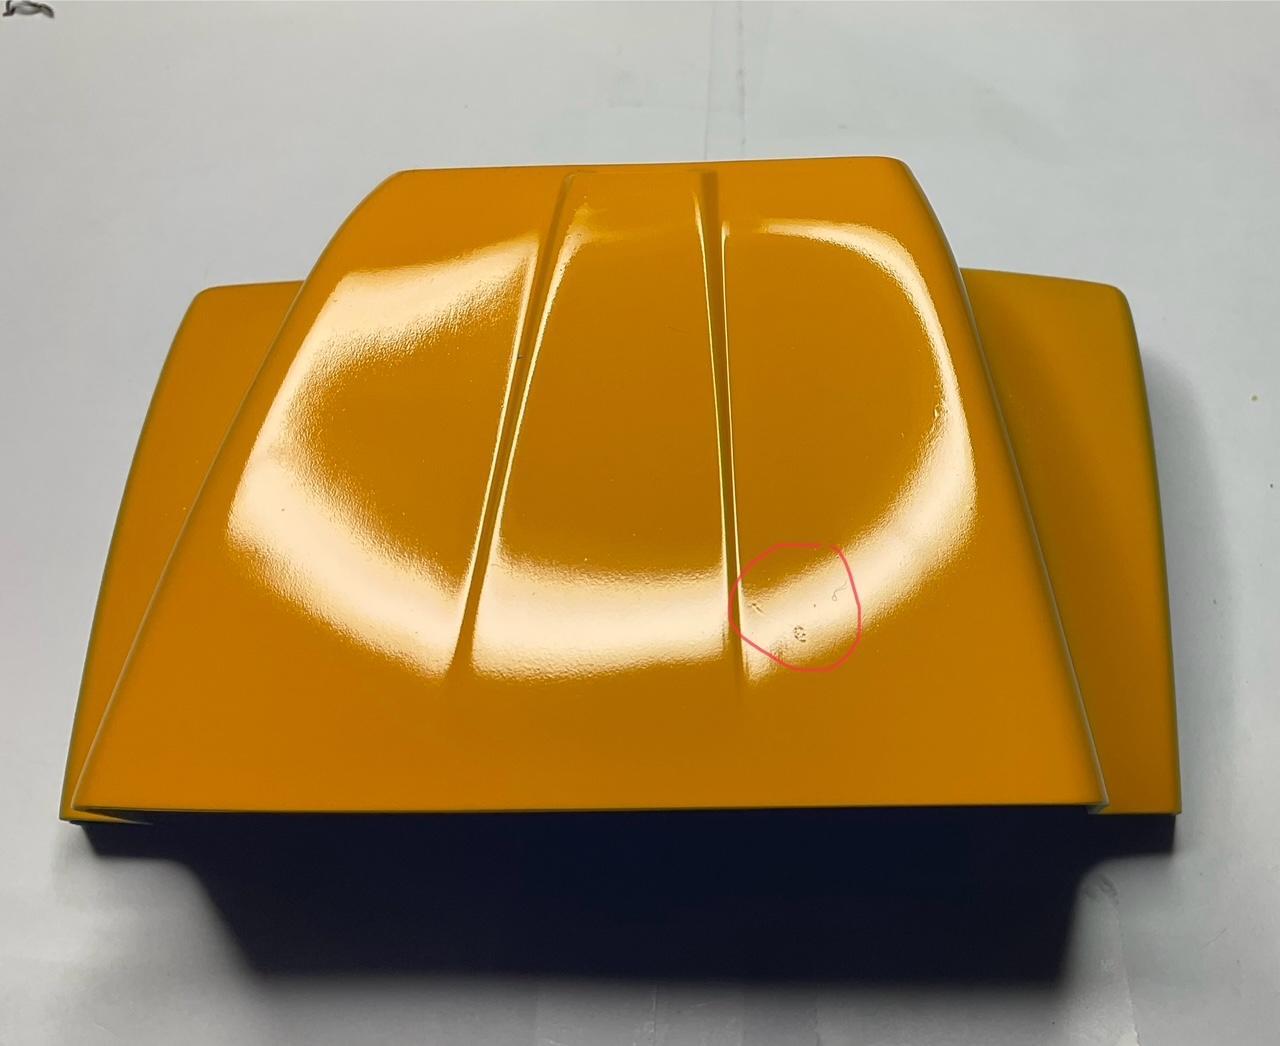
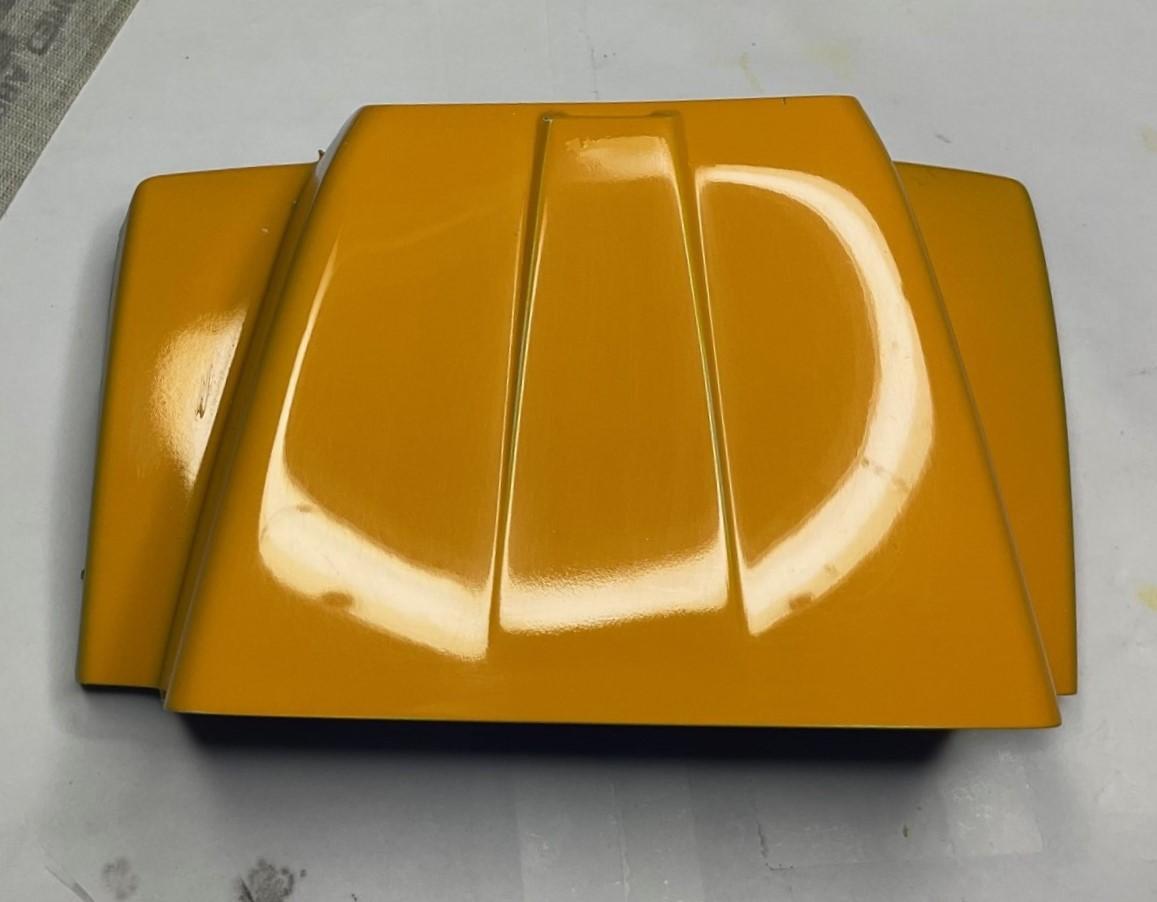
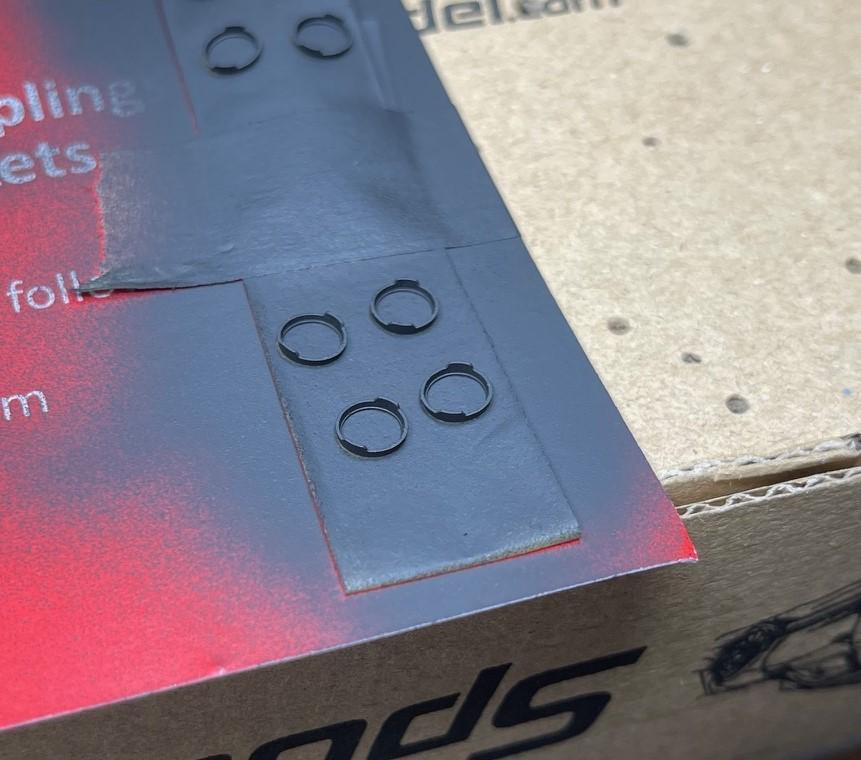
Adding to the many things I’ve tried for the first time during this build, I’m going to have a go at a better paint finish on the cab and hood, than on the sander. Plus, there a few spots on the cab and hood that were left with dust bits during the final coat. I’ve only done a bit of experimenting on the test hood’s paint, to gain a bit of practice! This is the Constellation test hood, and it had some dust on it as well (circled in red) - lots of orange peel, too - Working only on the top of the hood, I used the Micro Mesh sequence of sanding pads, 4,000 to 12,000, and finished off with the three grades of Tamiya polishing compound. The dust bits, and the orange peel, have been dealt with - I didn’t touch the center rib of the hood, so I could see what effect all of this was having. The treated areas definitely look better, but it’s clear to me I need to learn how to use the Micro Mesh pads better. There are still lots of little sanding lines evident from the reflection of the desk lamp, that the pads are designed to get rid of, if I used them right! Overall, going in the right direction - Always something to learn, it seems.
-
Western Star 4900 FA plow truck
BK9300 replied to BK9300's topic in WIP: Model Trucks: Big Rigs and Heavy Equipment
Very gracious of you, Tom - thanks! -
Well thought out ‘saves’ all around, Jim - overall, looks much improved!
-
Western Star 4900 FA plow truck
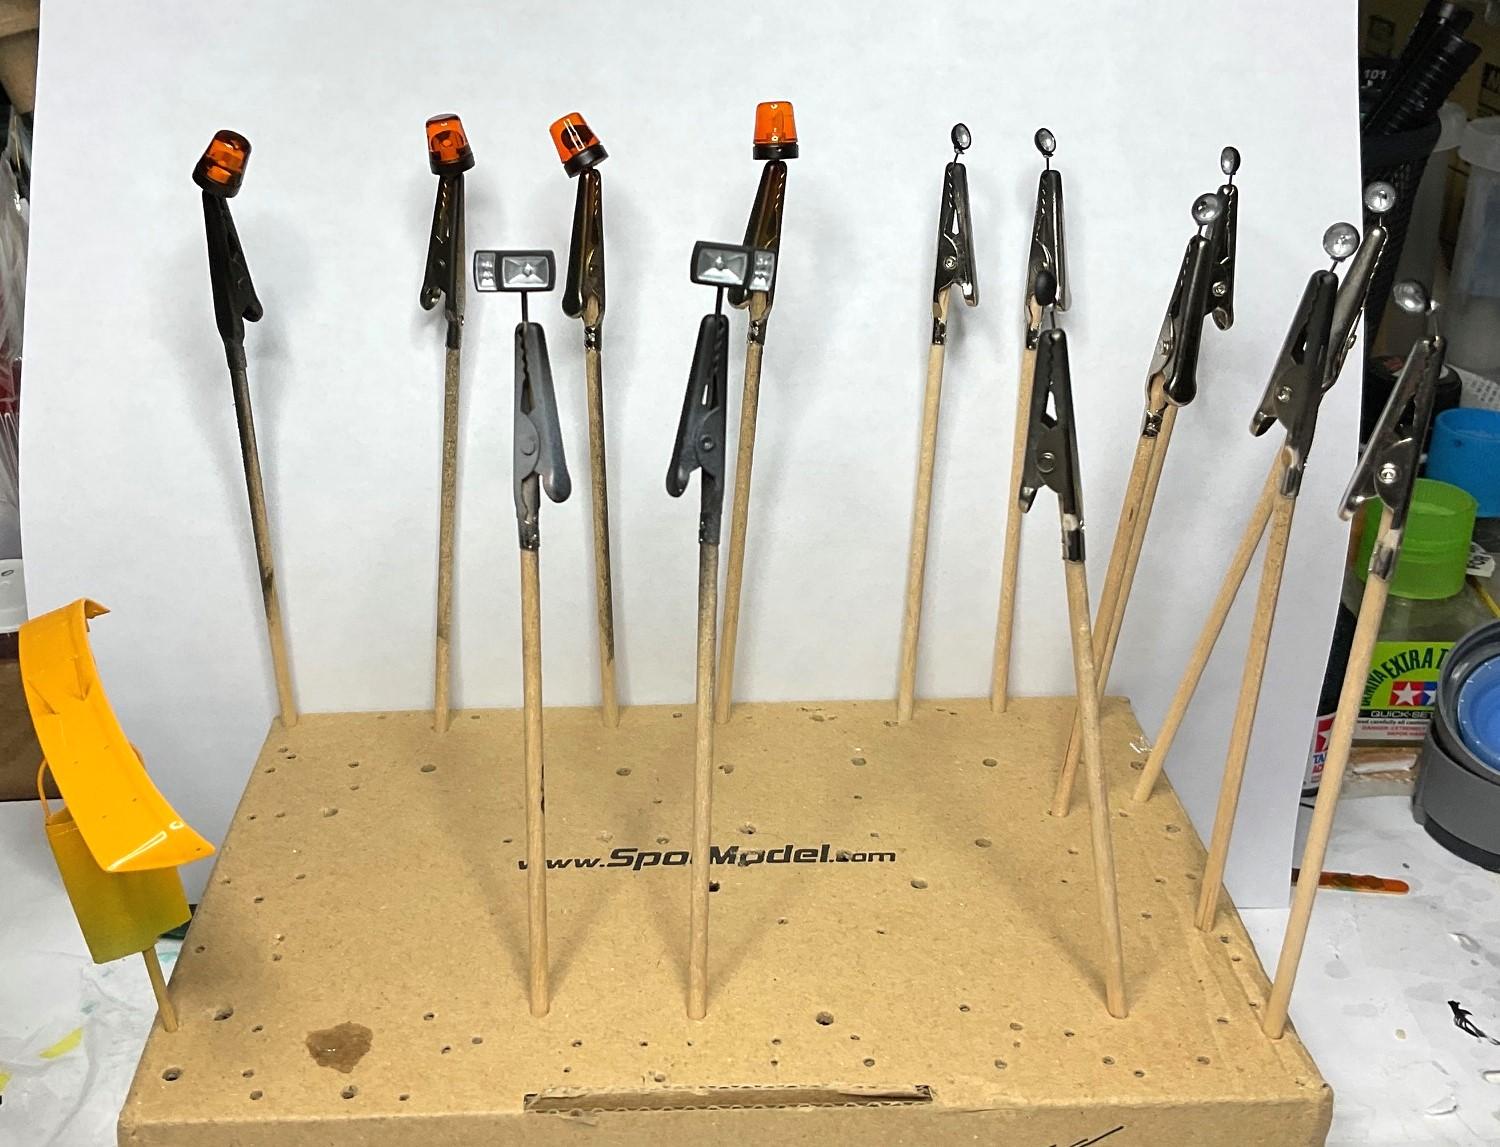
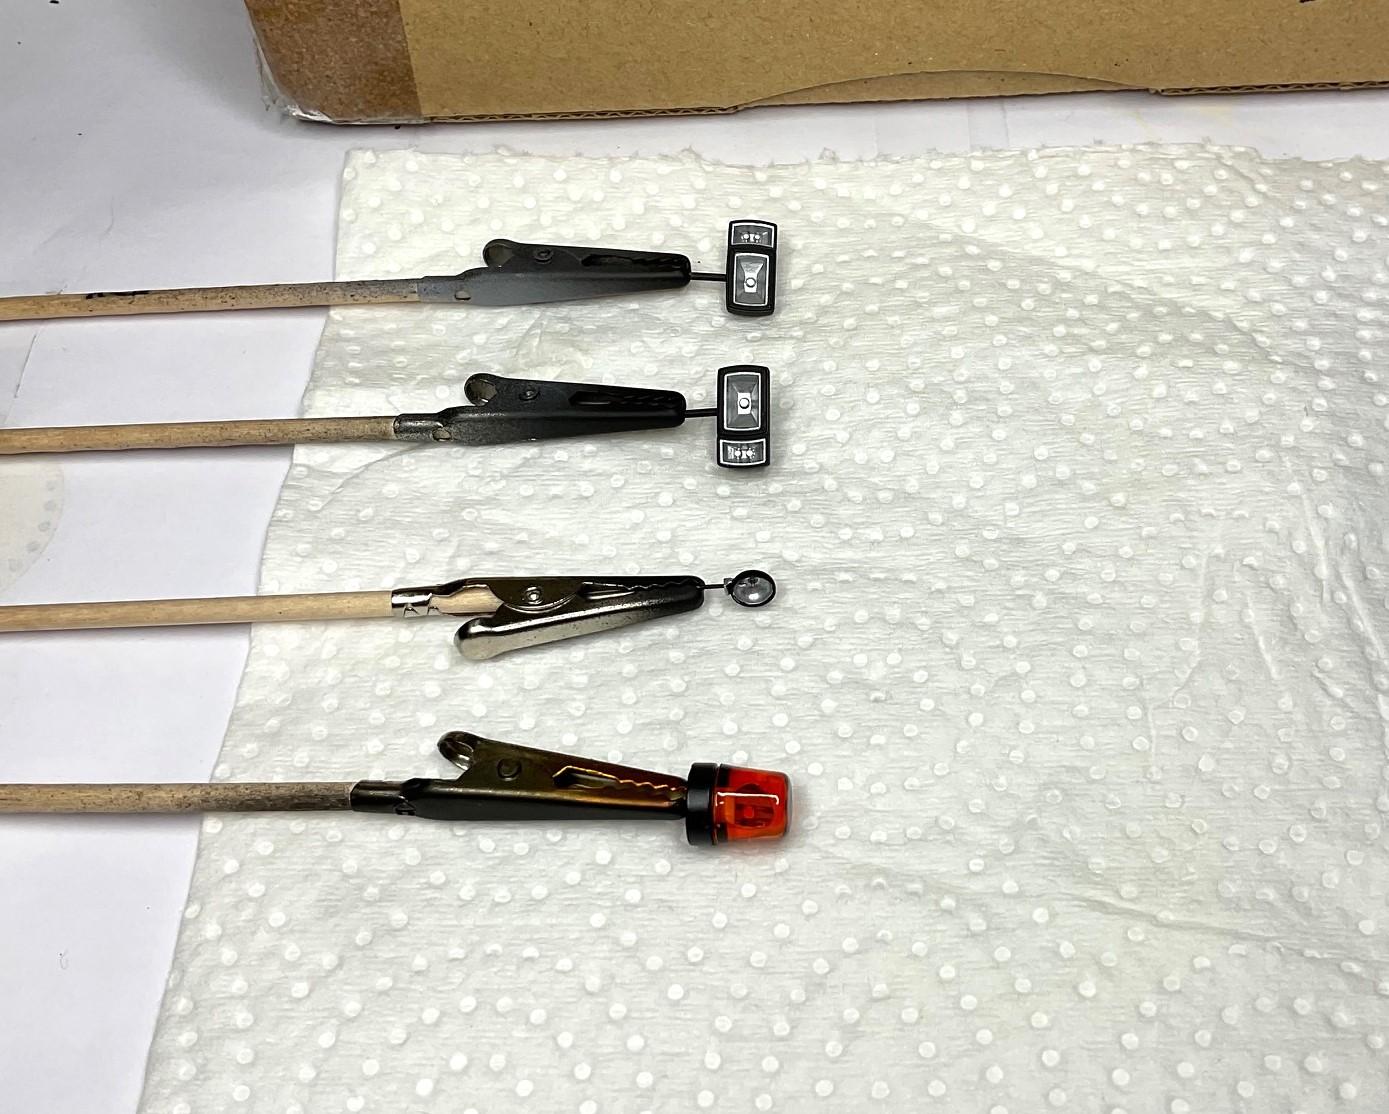
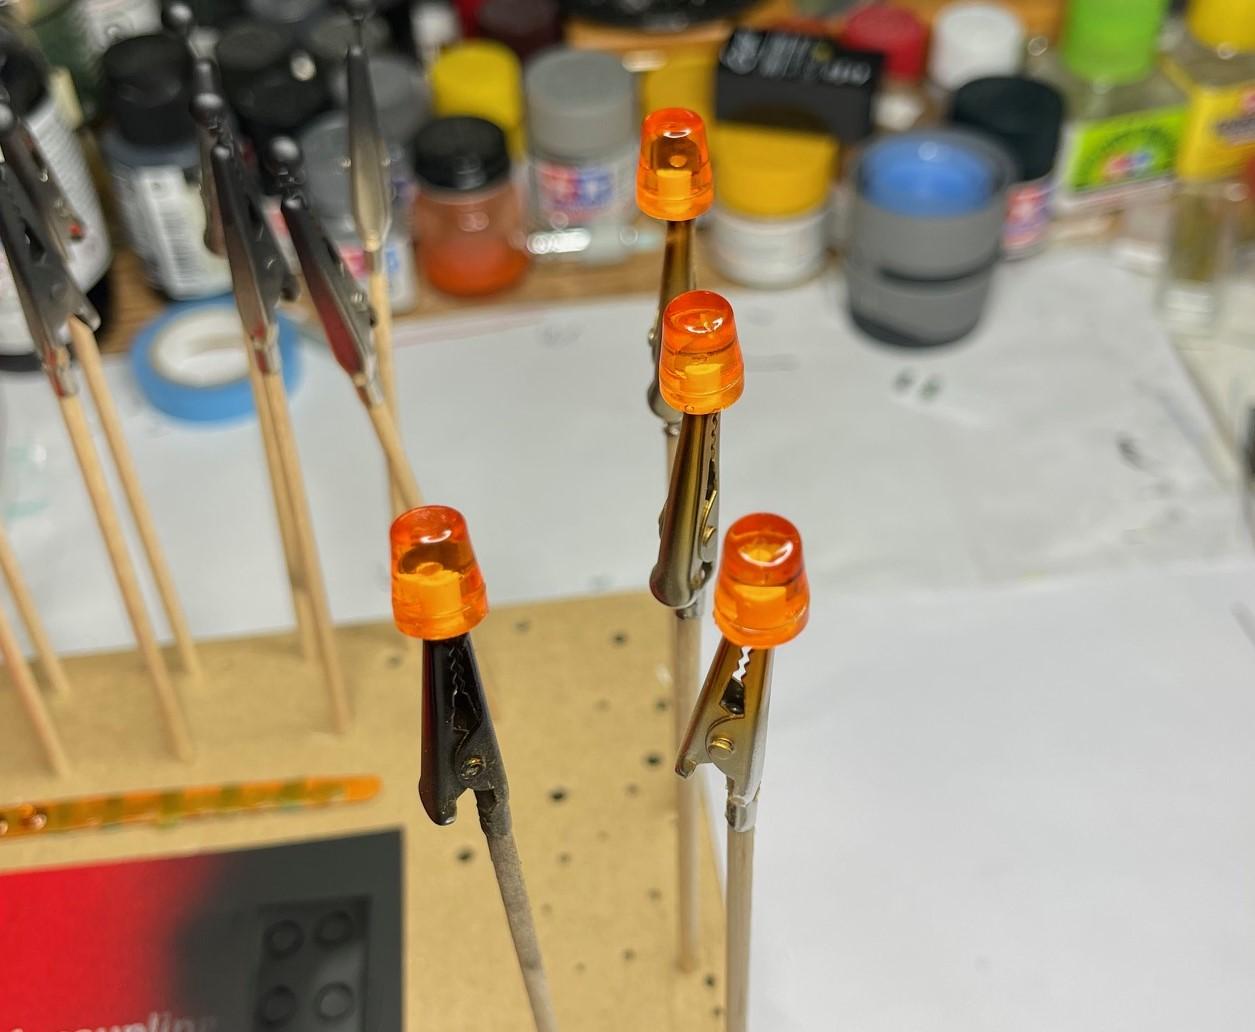
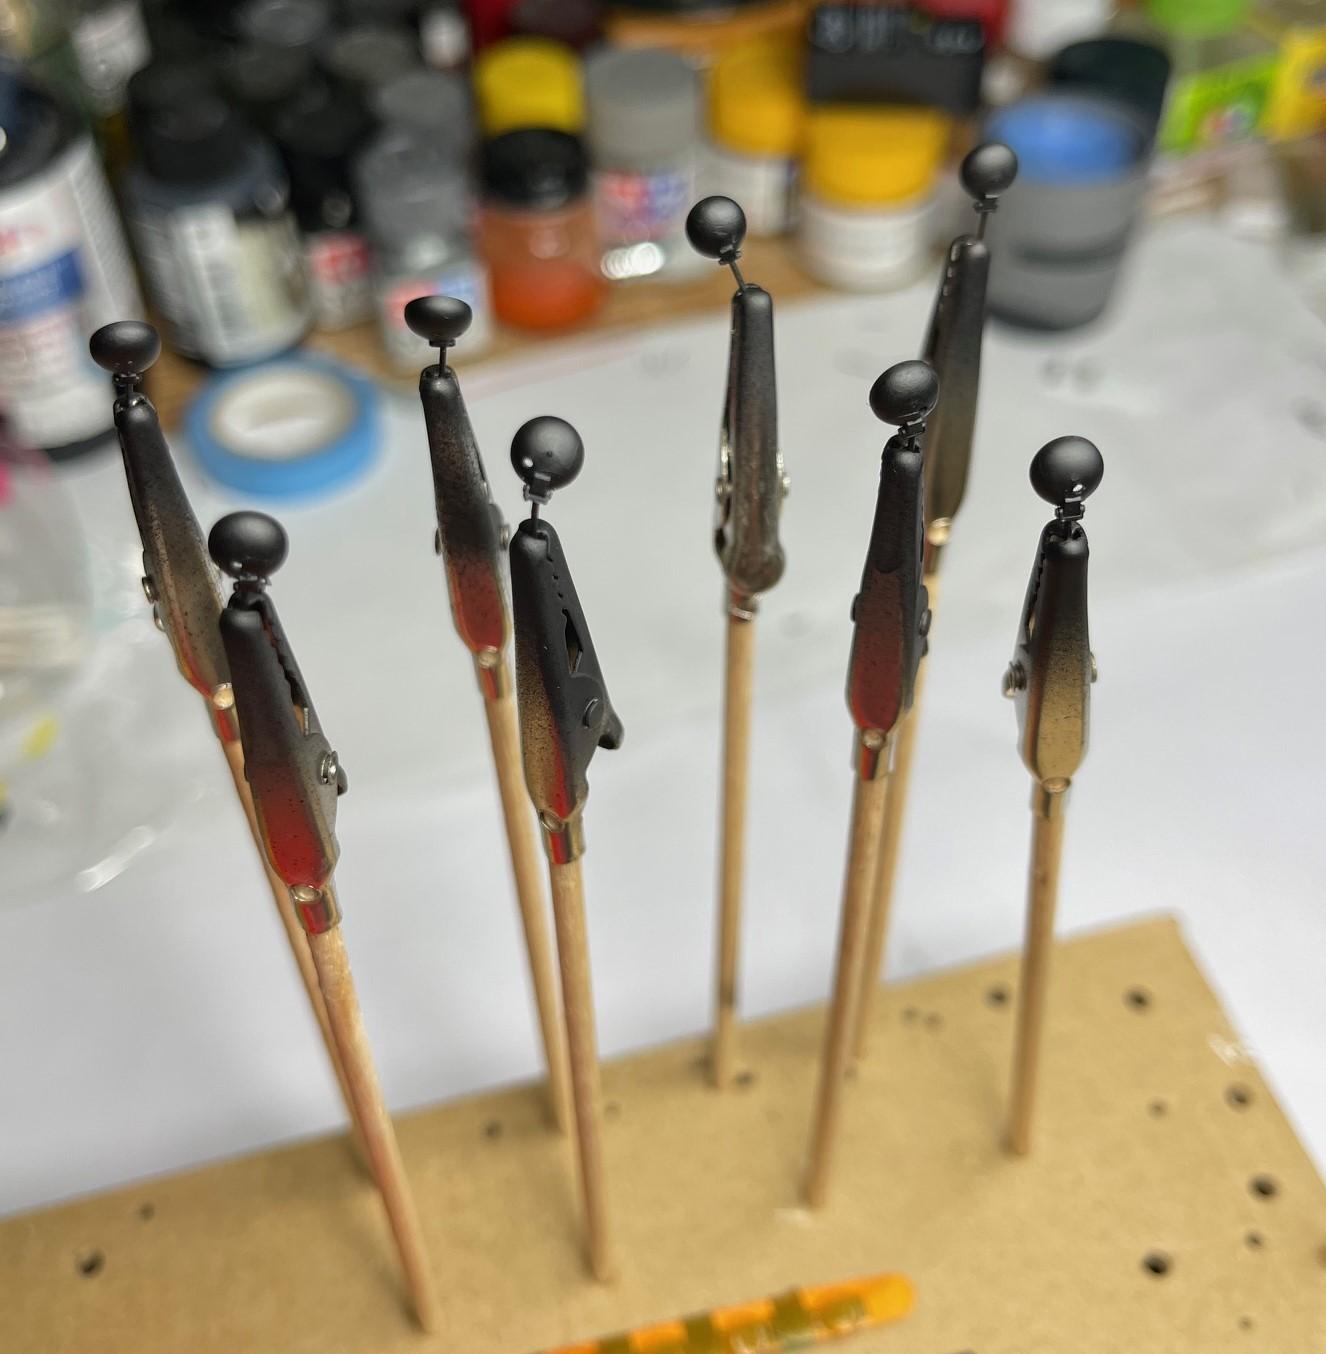
BK9300 replied to BK9300's topic in WIP: Model Trucks: Big Rigs and Heavy Equipment
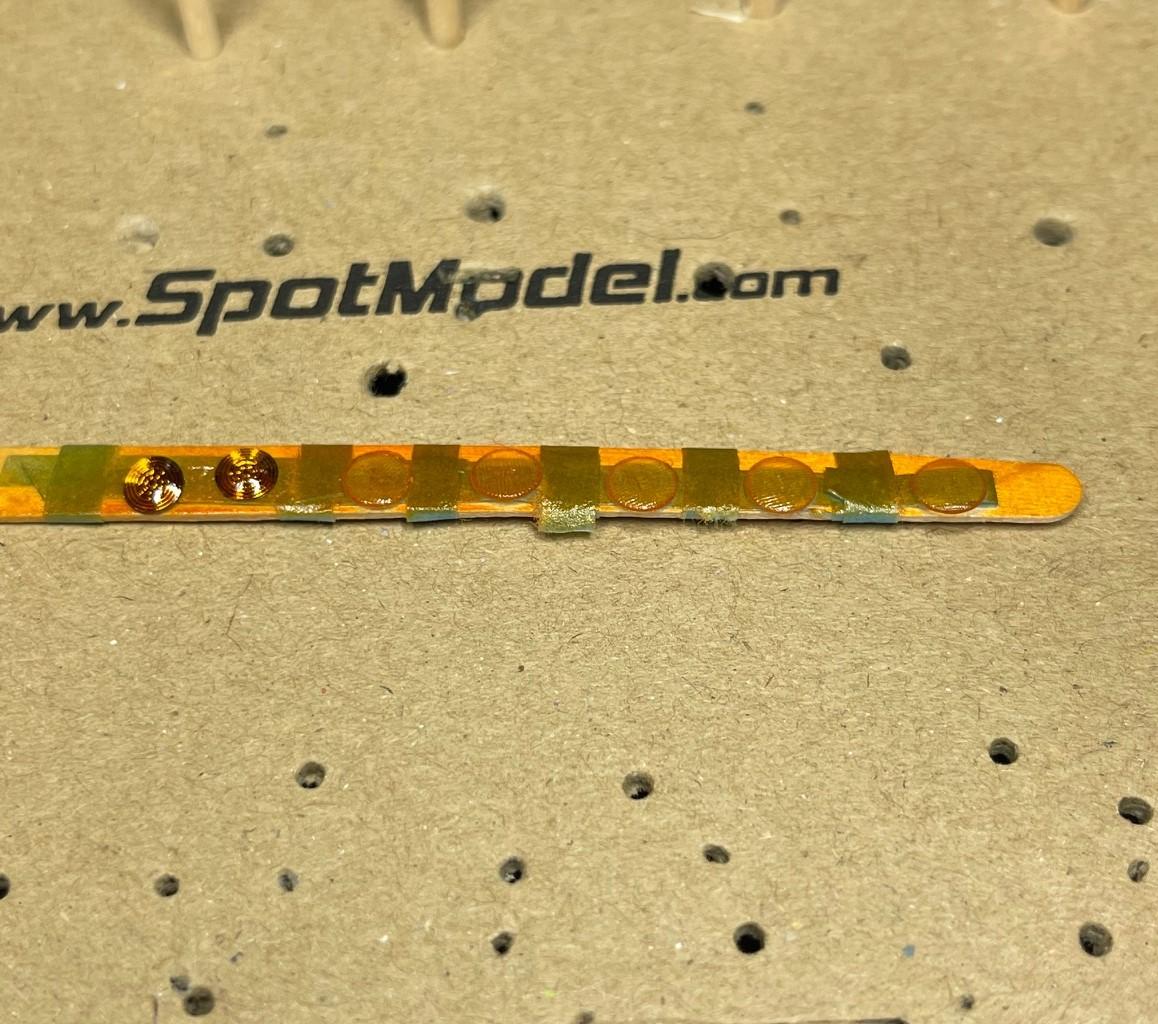
Lots of prep work this morning, for a bunch of small items that I got painted this afternoon - Got the first colour coat on the truck's visor - All the work light housings for the sander, and a few others around the plows, have been painted - all the brass pins will be trimmed shorter, come time to glue them in place. The mounting brackets still need to be detail painted aluminum - will need to concentrate, and brace the paint hand, to not make a mess of that job! The two lights for the upper flashers, and various work light lenses, painted amber - These are fittings that cover the work light lenses - didn't think I was going to use them at first, but the fittings are intended to hold the lenses in place. A couple 'dry run', test fittings showed me they will definitely make it easier to glue the lenses into the housings. ++ The yellow beacon lights from Auslowe have their first coat of amber - I think one more coat to darken a bit more should be enough. Should still be able to see the reflectors inside with one more coat - Should be able to finish the assembly of the remaining bits on the sander early this week!