BK9300
-
Posts
1,986 -
Joined
-
Last visited
Content Type
Profiles
Forums
Events
Gallery
Everything posted by BK9300
-

Holden HJ Panelvan
BK9300 replied to Cool Hand's topic in Model Trucks: Pickups, Vans, SUVs, Light Commercial
Superb build for 'Just a mediocre build for the display shelf' ! Another beautifully finished model. -
No, not a pro, just an old guy with too much time on his hands!
-
1955 Ford Panel Truck
BK9300 replied to Zippi's topic in WIP: Model Trucks: Pickups, Vans, SUVs, Light Commercial
It’s been fascinating to watch all the parts you’ve created since getting your printer up and running, and these tires/wheels look really good, too! Always seems tough to get the desired stance - will your modifications affect how the engine sits? -
The details just keep improving, Jurgen! Another fine project is just about completed.
-
T41 Bugatti sport coupe
BK9300 replied to charlie libby's topic in WIP: Other Racing: Road Racing, Land Speed Racers
Words like ‘Awe inspiring’ can sometimes seem out of place - not here, though. I would need to start my life over to try to acquire the skills you possess! This is truly magnificent. -
Western Star 4900 FA plow truck
BK9300 replied to BK9300's topic in WIP: Model Trucks: Big Rigs and Heavy Equipment
Thanks, Jeff! I’m struggling with how many work lights to add. Four are spoken for on the sander, and one (or two?) that sit on the hydraulic tank inlet filter housing, if there’s enough room. So, I have enough to do a couple backup lights off the bottom, back edge of the steps. I’ll see if I have any room left to hide wire runs for those lights - that, and being able to work with the truck on it’s side and not break anything off, are what I need to consider. Being so familiar with these trucks, you keep me on my toes! -
Western Star 4900 FA plow truck
BK9300 replied to BK9300's topic in WIP: Model Trucks: Big Rigs and Heavy Equipment
Thanks a lot, Gary, and very generous of you to say! -
Western Star 4900 FA plow truck
BK9300 replied to BK9300's topic in WIP: Model Trucks: Big Rigs and Heavy Equipment
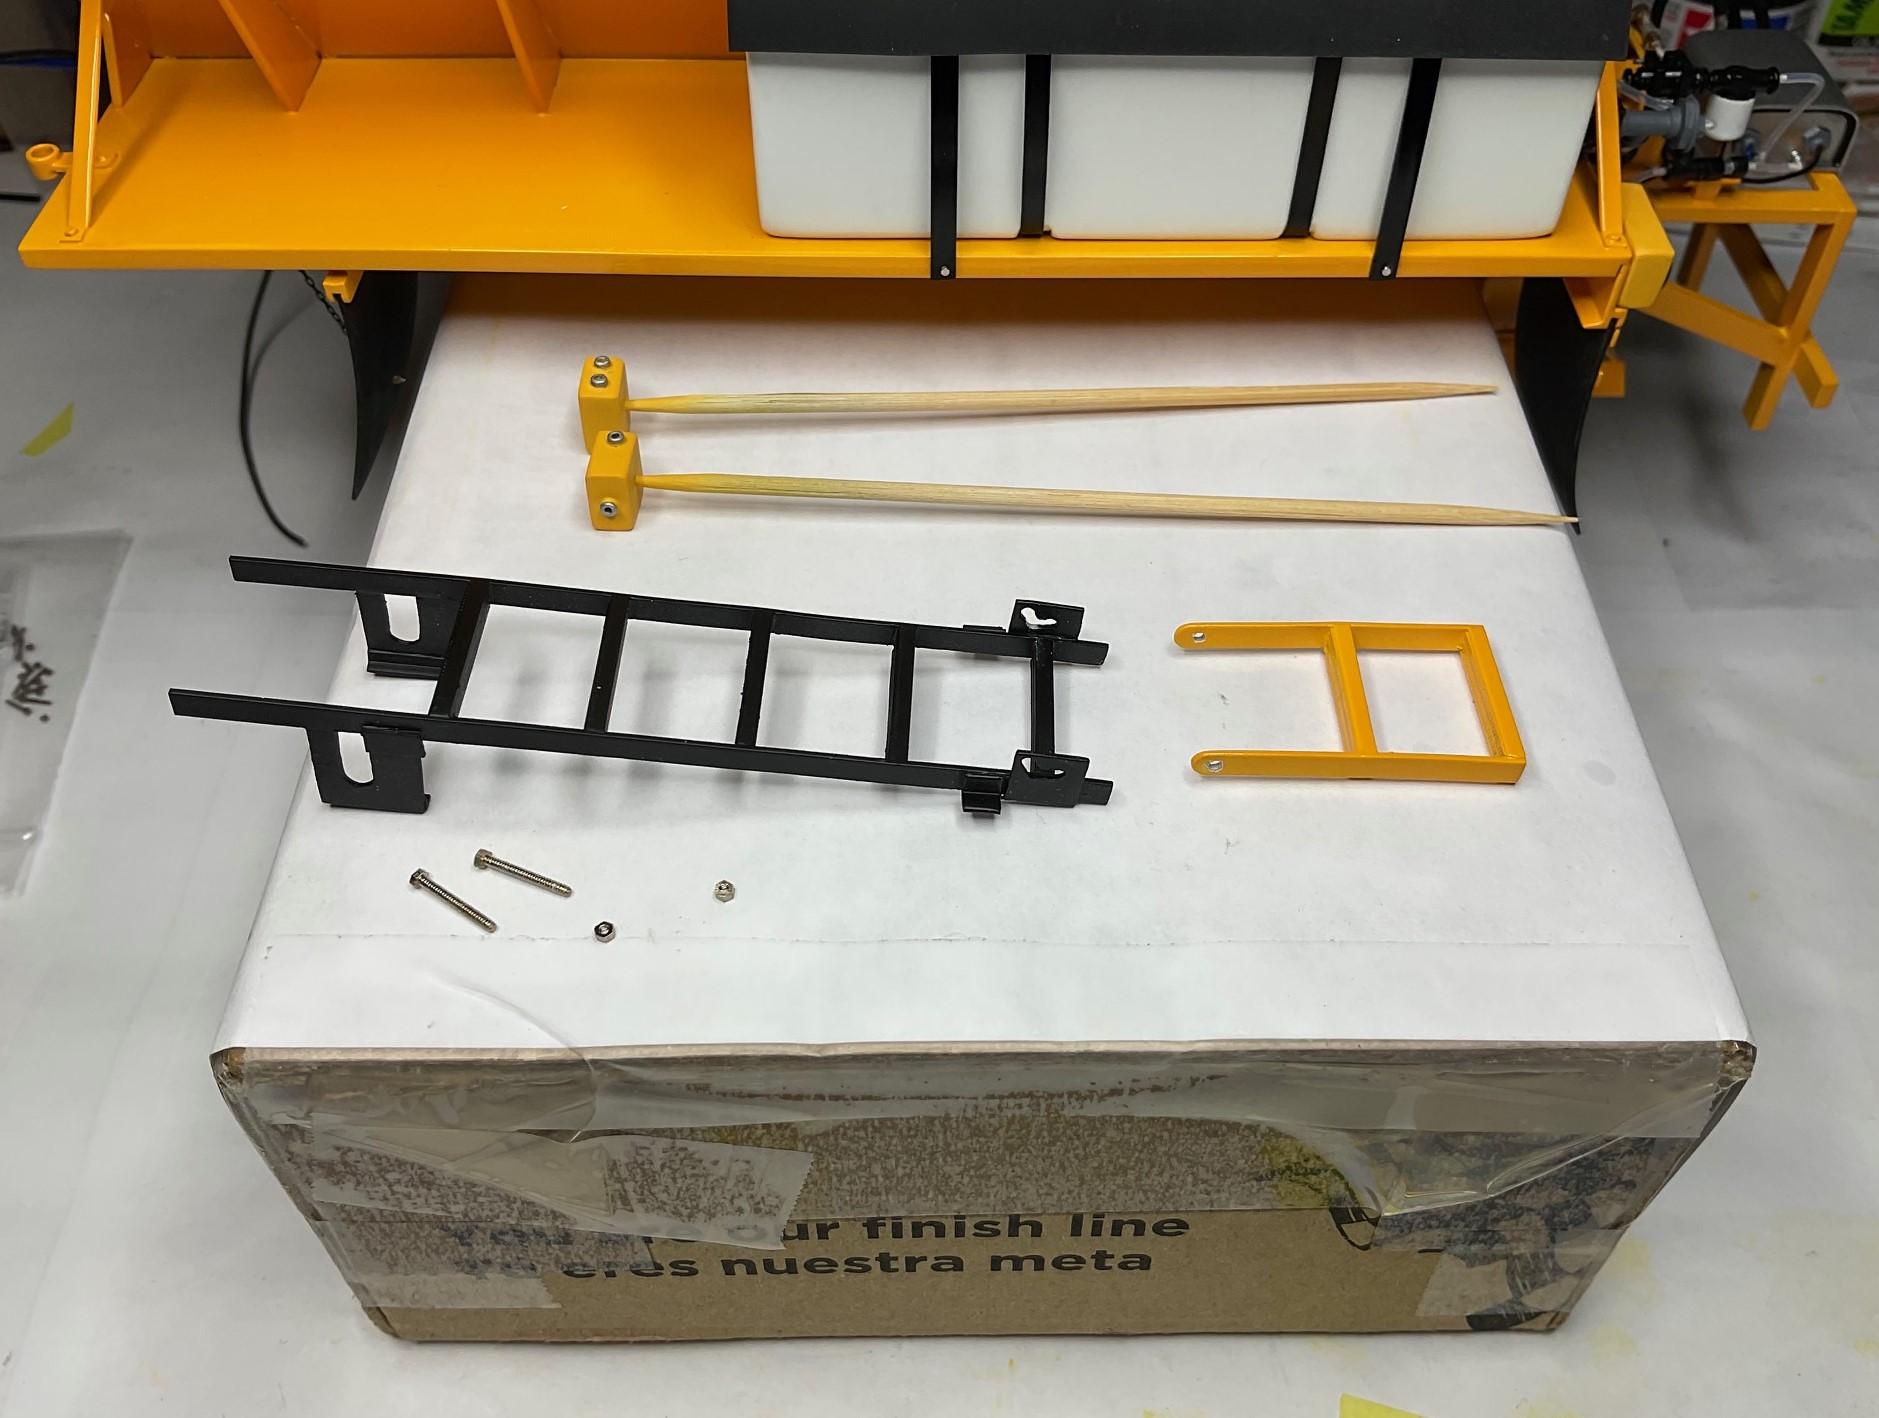
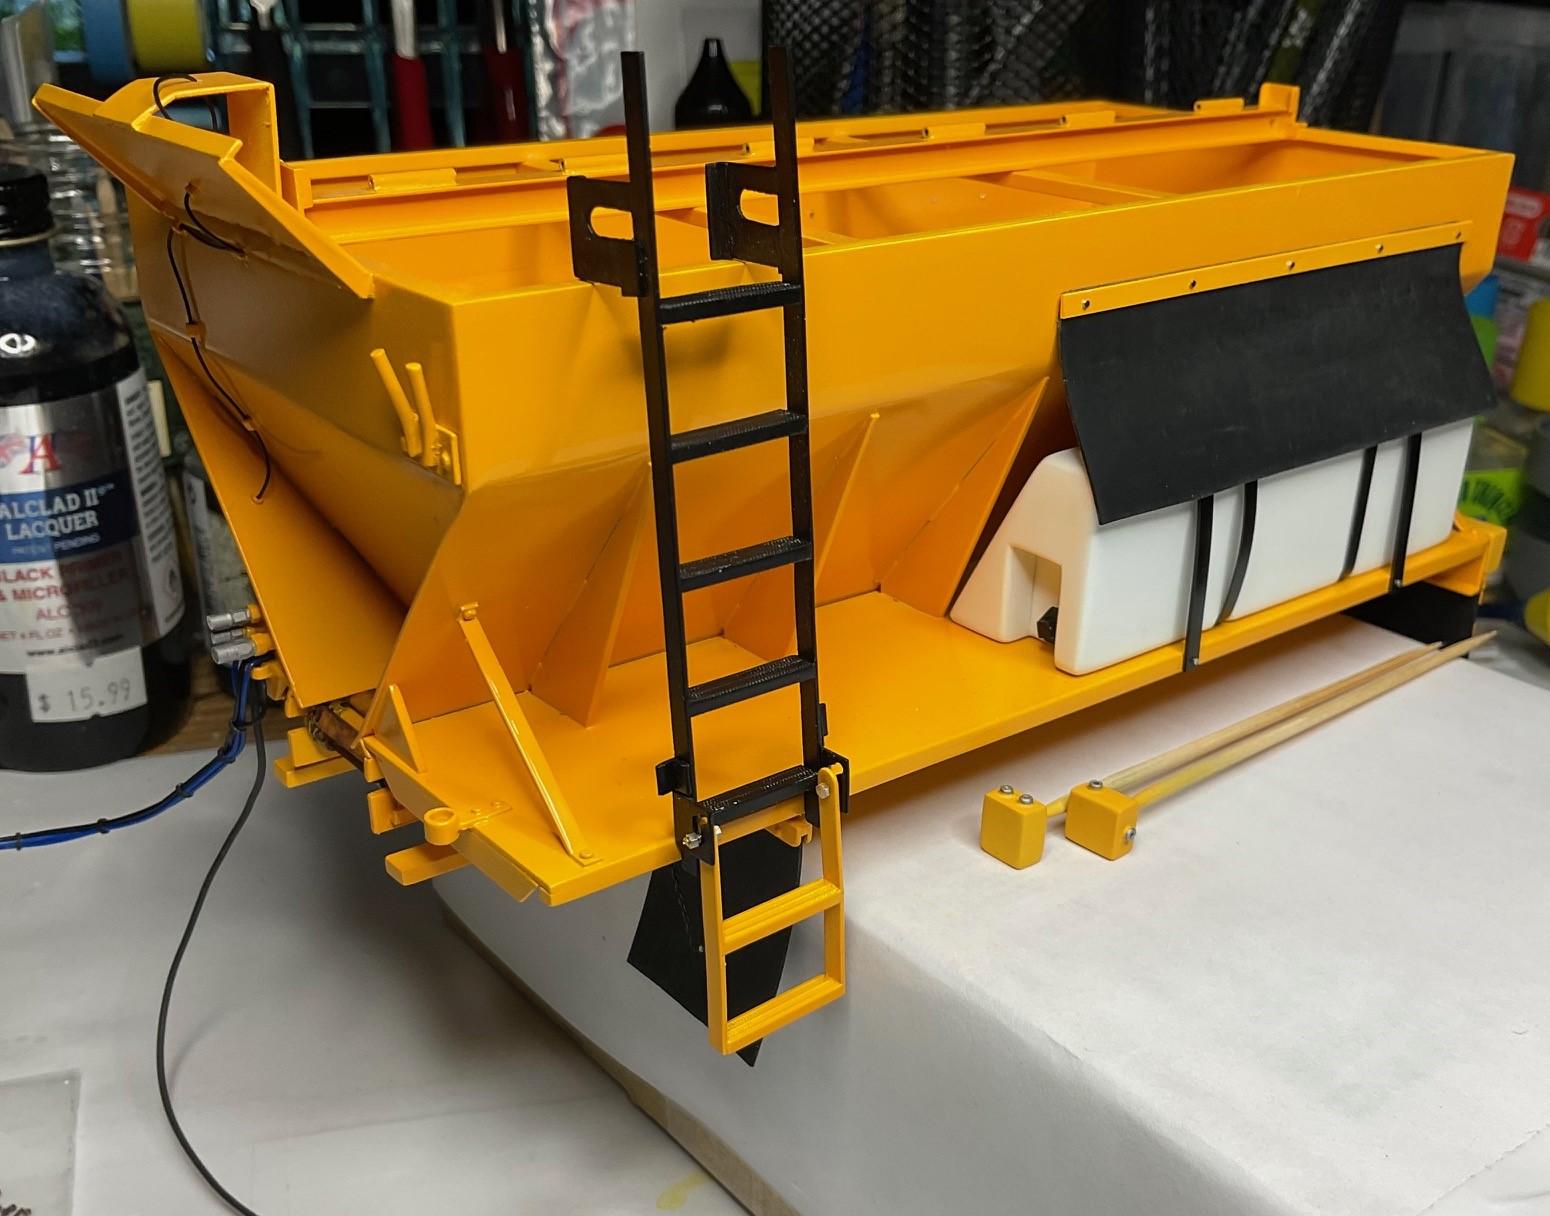
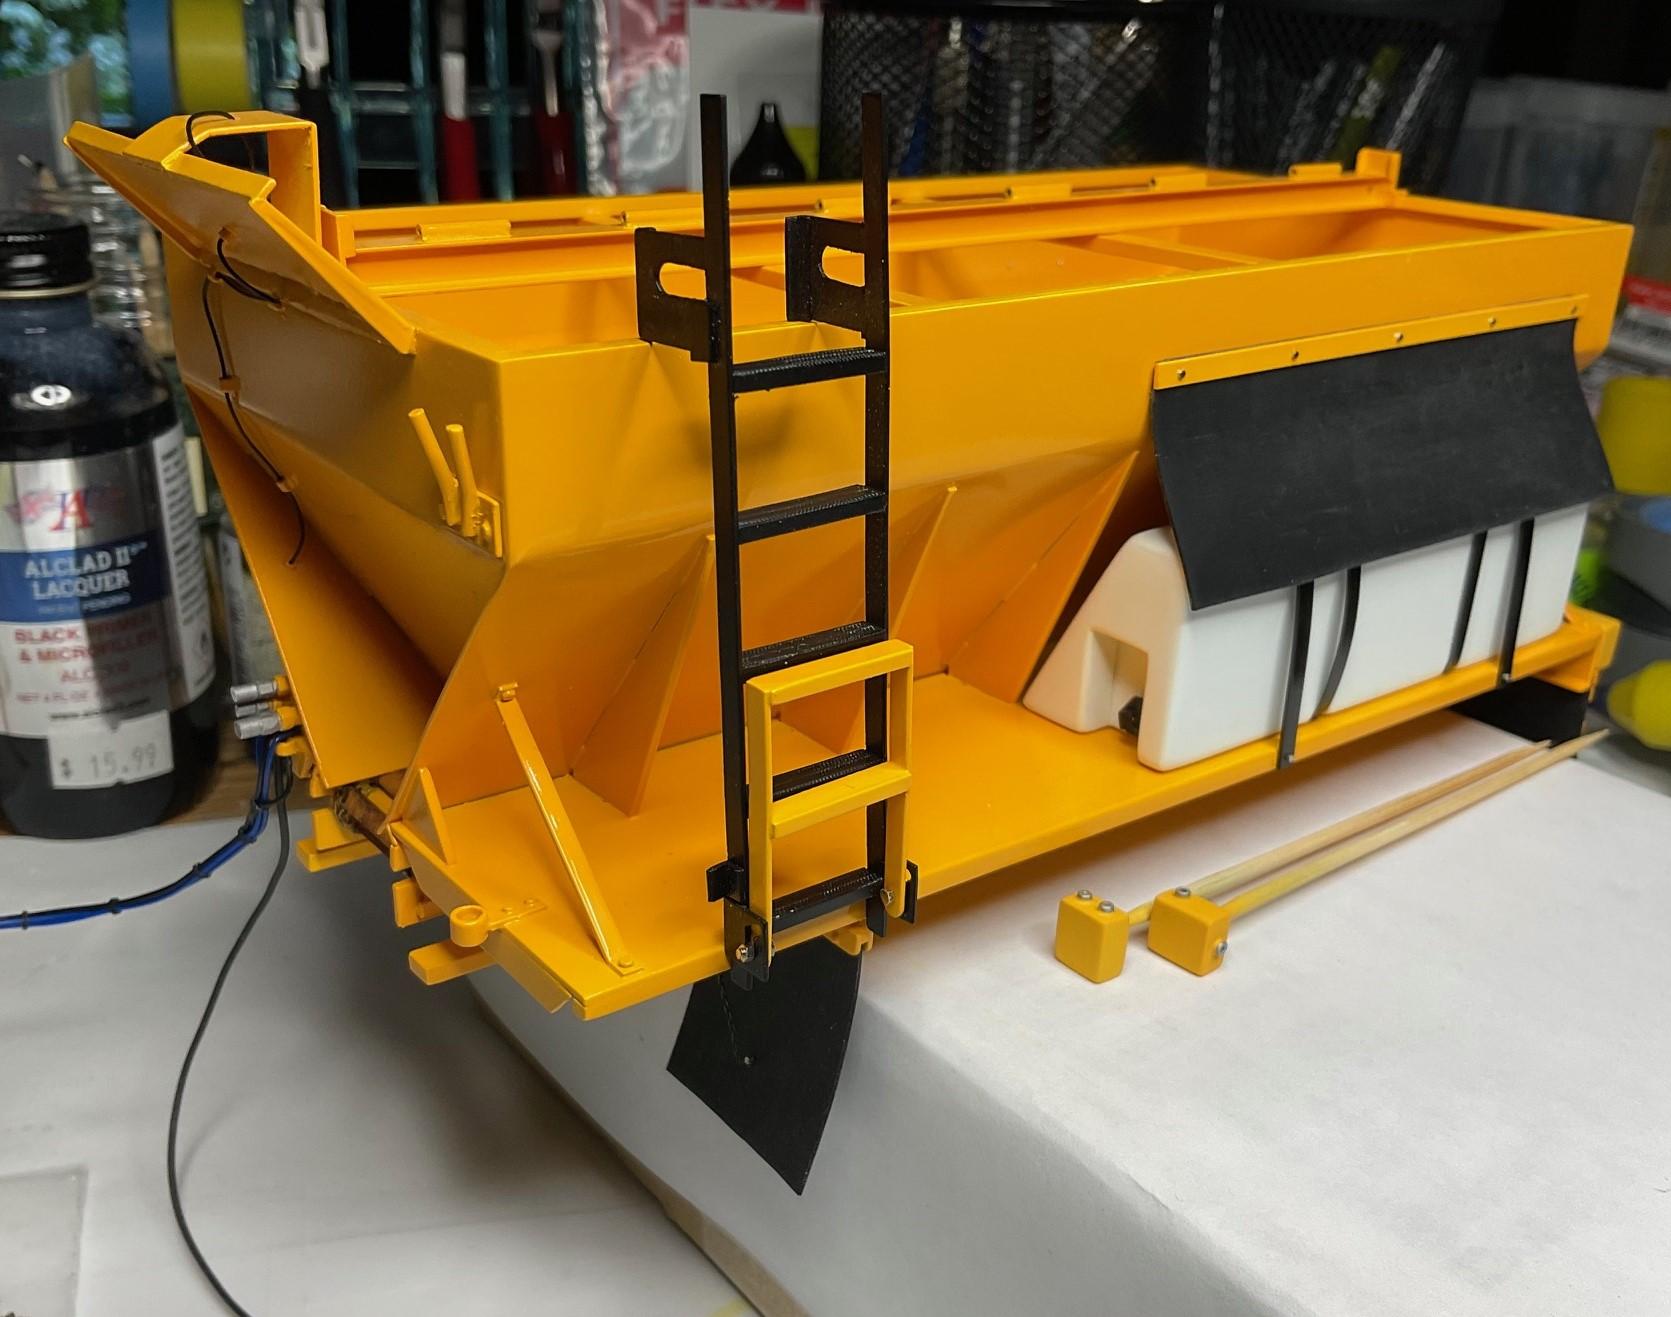
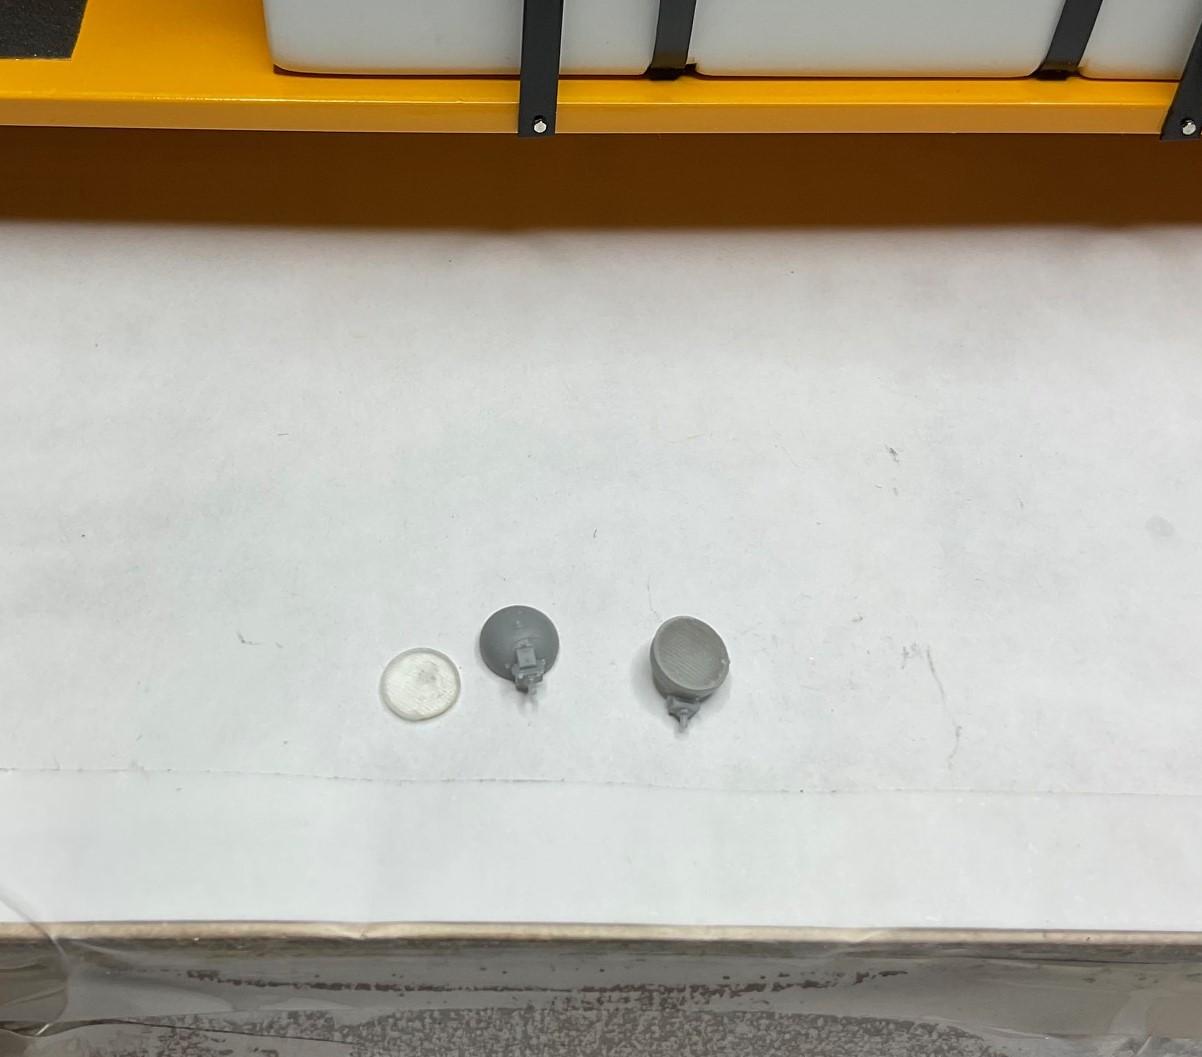
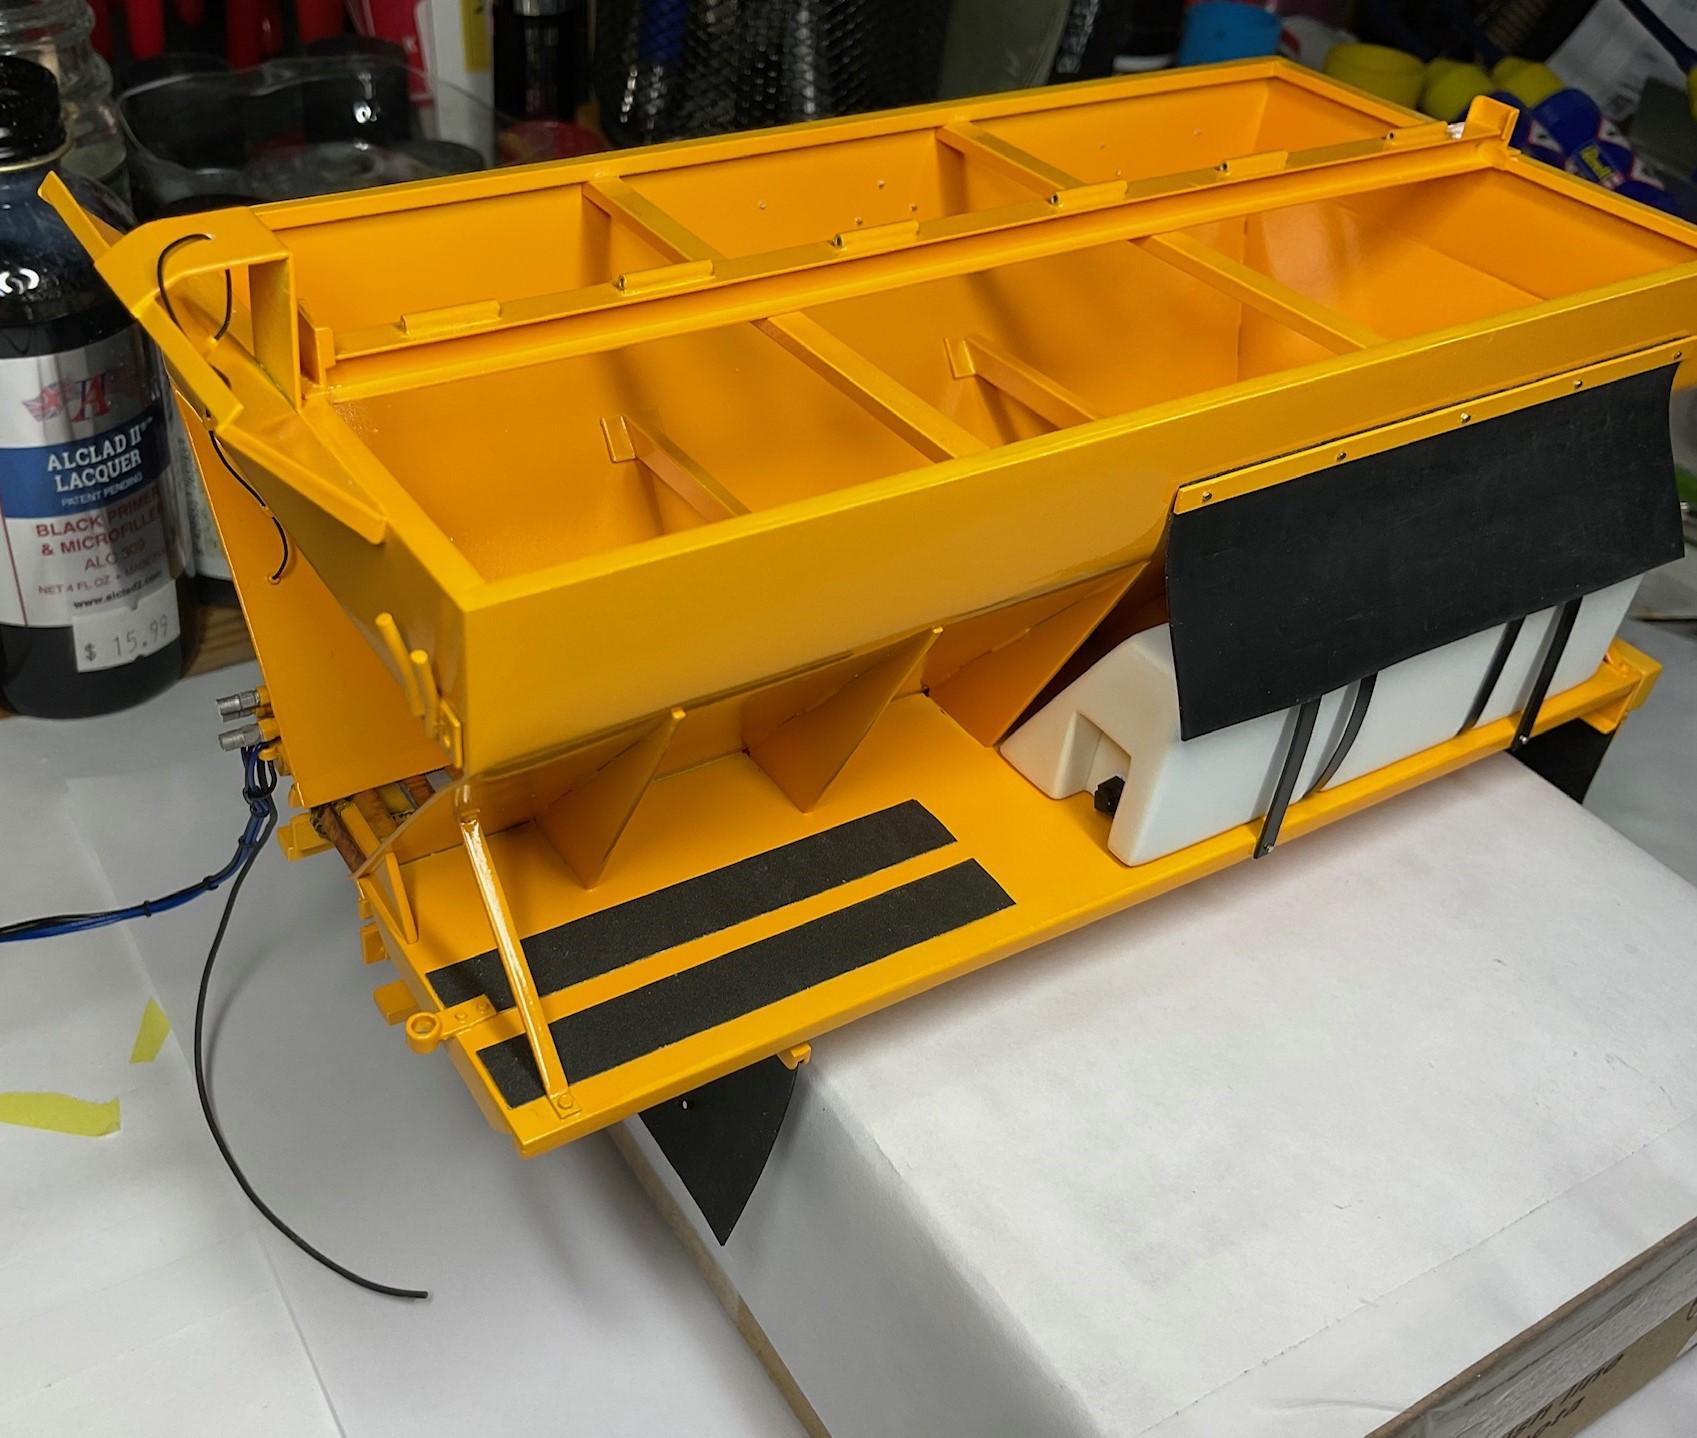
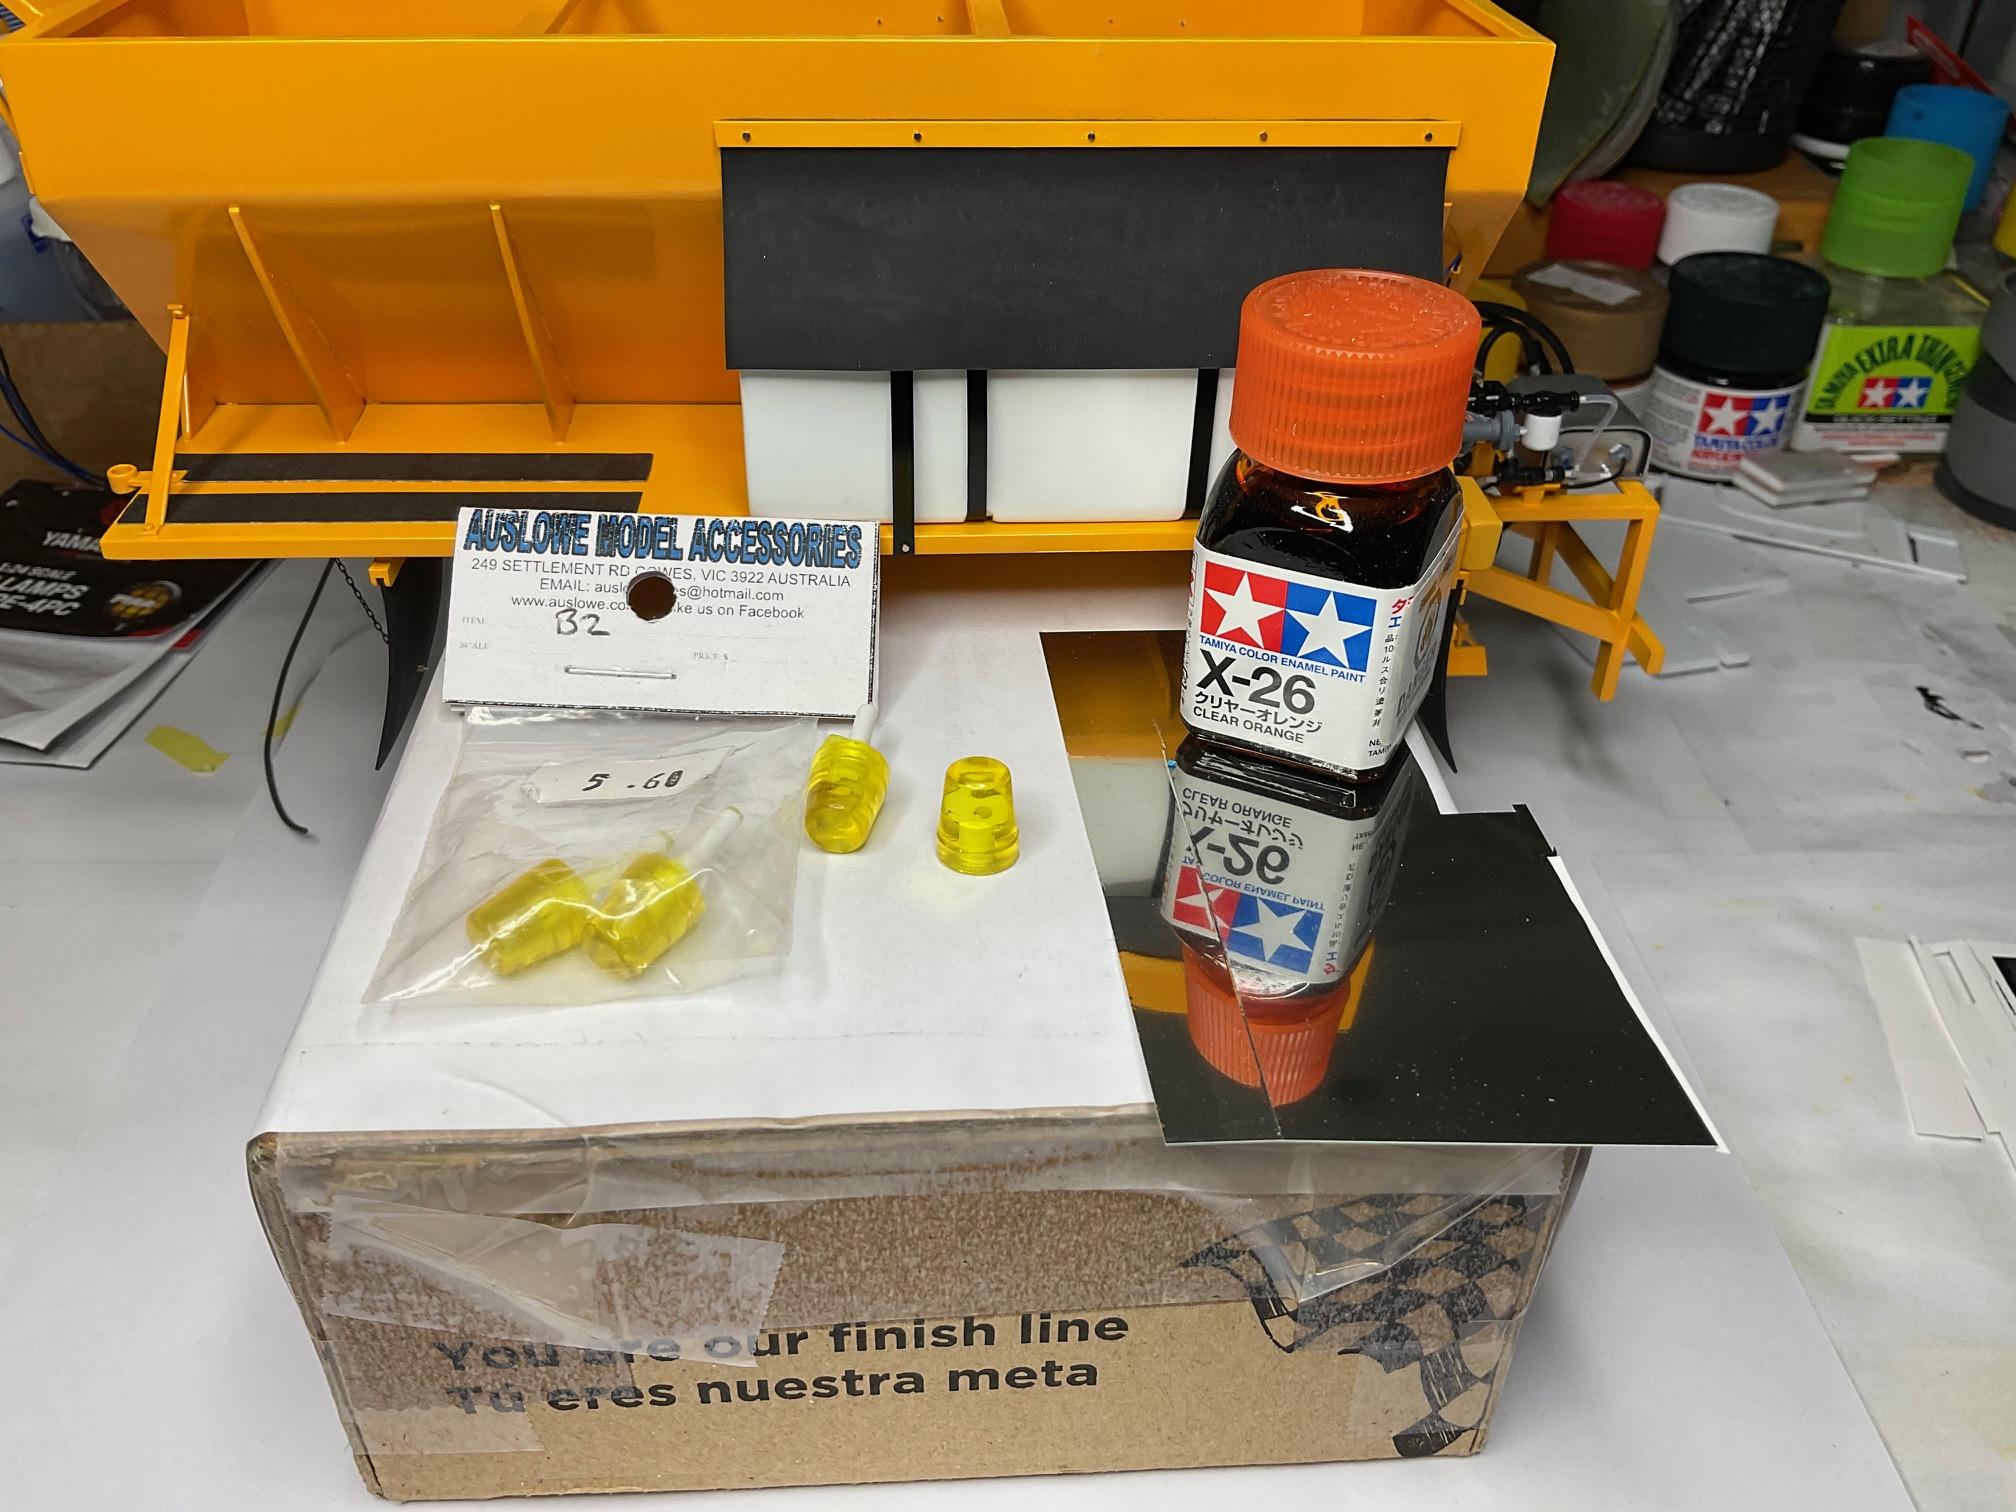
Started in on some finishing details for the sander. I got the ladder put together, but not attached to sander yet - too much handling for decals needs to happen yet, and didn't want to break anything else. Also, got the non-slip strips added to the top of the fender that the base of the ladder will attach to. Organized some parts that need to be painted - work lights and roto lights - and made a bit of plan on how to finish all these bits off, and finally finish the sander! Ladder sections and some hardware, ready to put together, after bolts are shortened (the yellow, square light housings are for the two upper, amber flashing lights at the back of the sander) - Lower, hinged section of ladder bolted in place - ladder just sitting on top edge of sander for pic - Lower section raised to travel position - real truck had a latch like I added to the battery box, to hold the lower section in place when raised, but the frame for the ladder is just too narrow for me to add a similar latch here. The slotted bracket that lets the lower section unfold also holds it in place well enough for a static model! - Non-slip strips added to top of fender - used 400 grit, automotive finishing sandpaper, with a thin strip of epoxy down the center - Some time ago, I found some 1/24 scale, PIAA fog lights (made by Yamamoto on Spot Model's web site) that should work well for the work lights - four for the sander and a couple others elsewhere on the truck. For each light, will need to remove tiny, resin pin on the base mount, and drill out for a short pin of 0.5 mm brass rod, as well as a hole for the wiring. Some lights will be clear and some will be amber - I had a hard time finding roto lights and finally settled on some from Auslowe - they will be a tiny bit tall, but they have a semblance of a rotating lamp inside. Hopefully that detail won't be lost once painted with clear orange, and I'll add a strip of chrome tape to the light's base - Will paint these lights tomorrow, start some of the decaling and get these light mounted and wired soon! More tomorrow, if all goes well.
-
Western Star 4900 FA plow truck
BK9300 replied to BK9300's topic in WIP: Model Trucks: Big Rigs and Heavy Equipment
I was very impressed with pictures my nephew was able to create - I've got my work cut out to make some that, hopefully, look as good! -
AMT Exterior Post Doubles Vans
BK9300 replied to Bren's topic in WIP: Model Trucks: Big Rigs and Heavy Equipment
Awesome to see an update, Bren! That's a lot of work to get the trailer sides straight, but will be well worth it in the end. I'm with Jeff - a tutorial on the rusting is needed! ( I know you did some explanations earlier, but sure helps to see all the steps, start to finish!) -
Western Star 4900 FA plow truck
BK9300 replied to BK9300's topic in WIP: Model Trucks: Big Rigs and Heavy Equipment
Thanks a lot, Jeff - certainly taking my time getting this finished, and seems like always more to come! -
Western Star 4900 FA plow truck
BK9300 replied to BK9300's topic in WIP: Model Trucks: Big Rigs and Heavy Equipment
Thanks, Ron - appreciate that! If I can’t get a handle on the polishing on the test hoods, just going to have to live with the bits of dust on the passenger side door. -
Western Star 4900 FA plow truck
BK9300 replied to BK9300's topic in WIP: Model Trucks: Big Rigs and Heavy Equipment
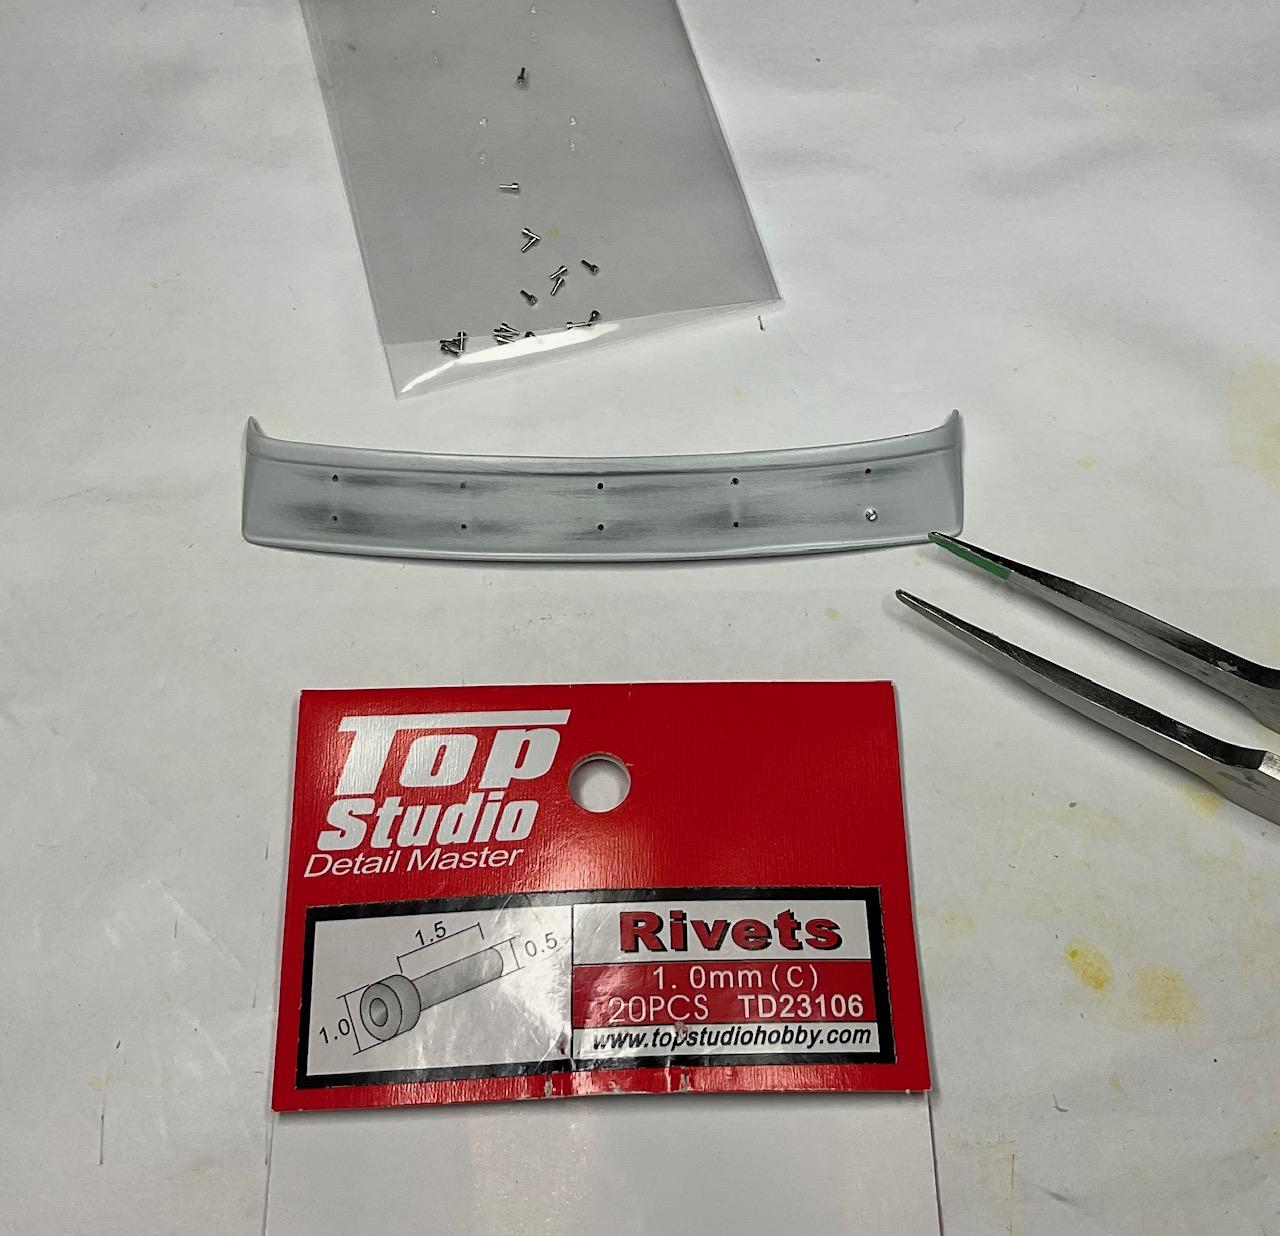
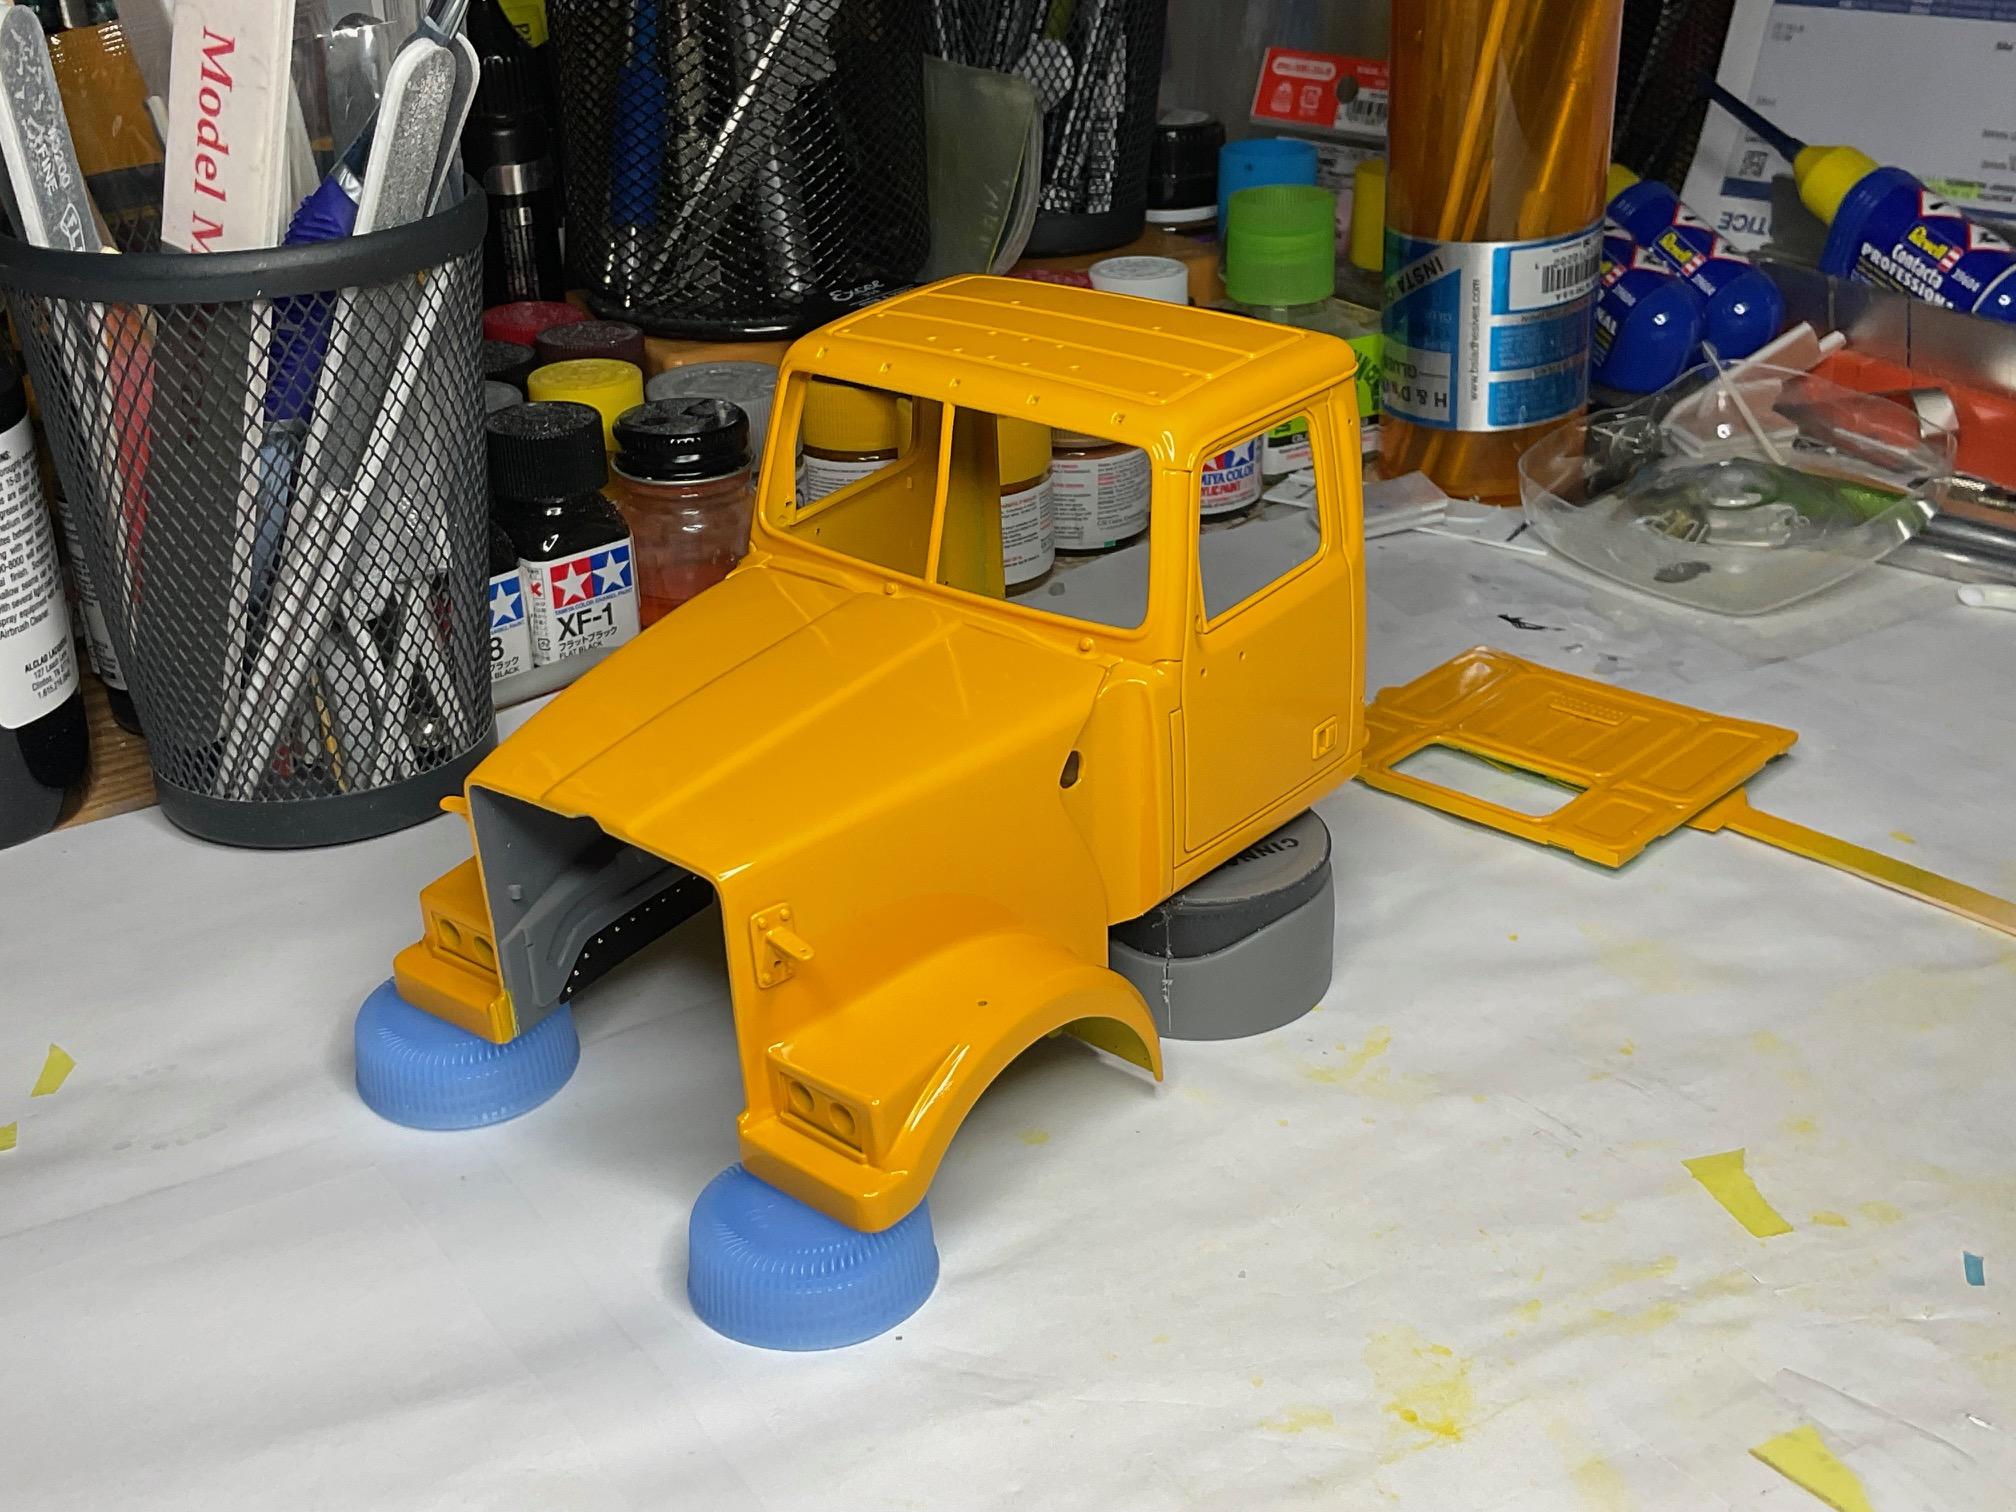
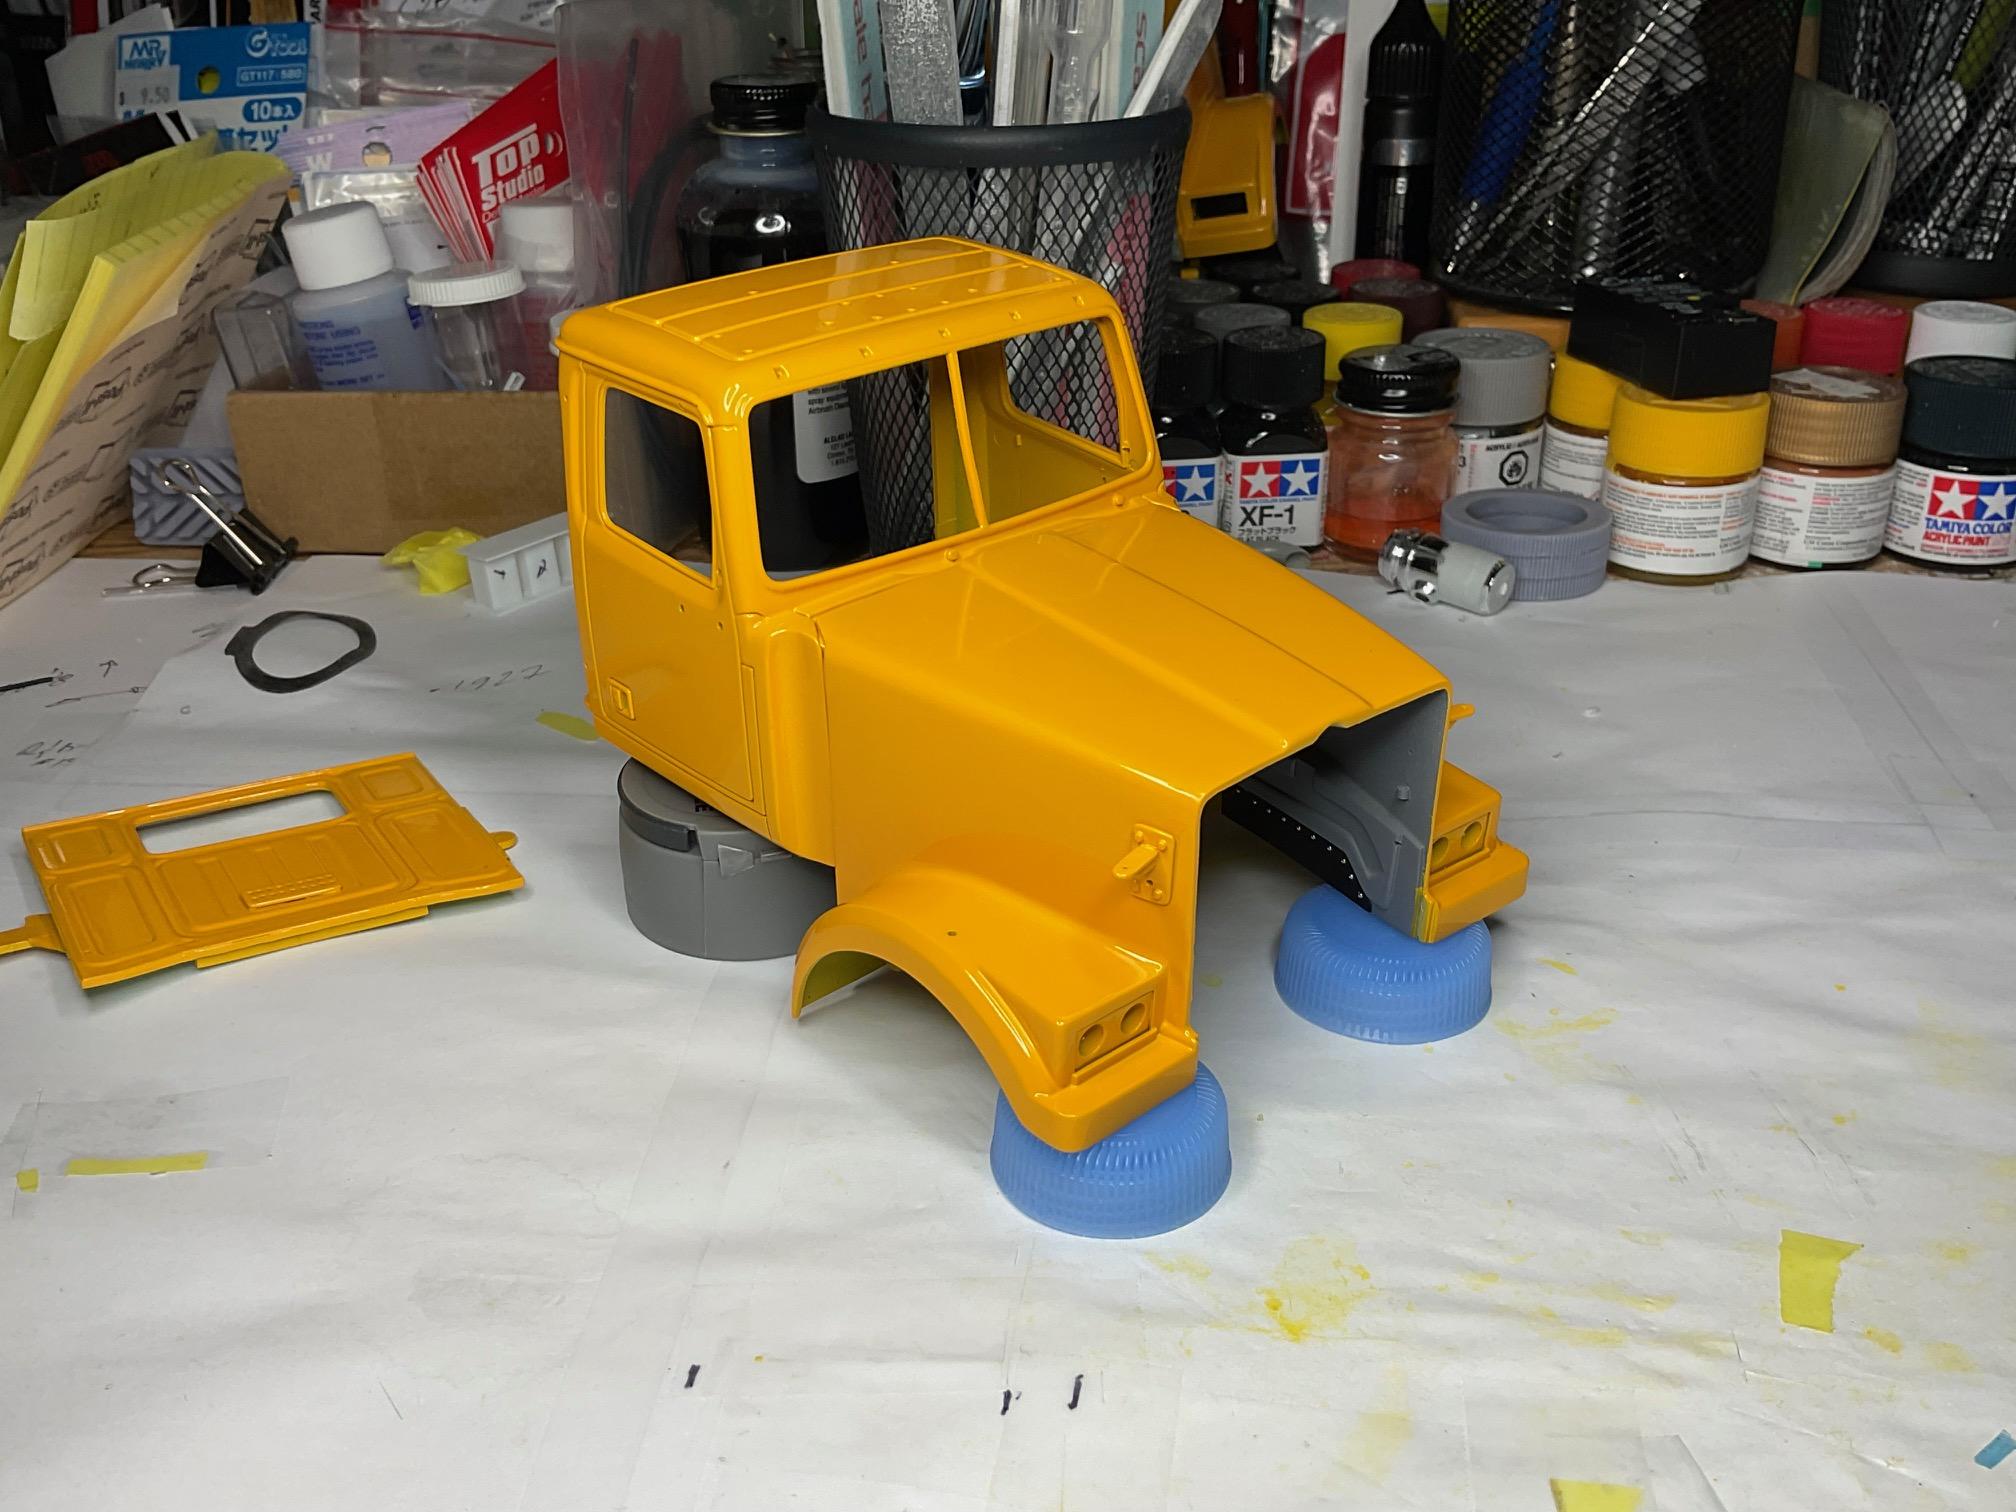
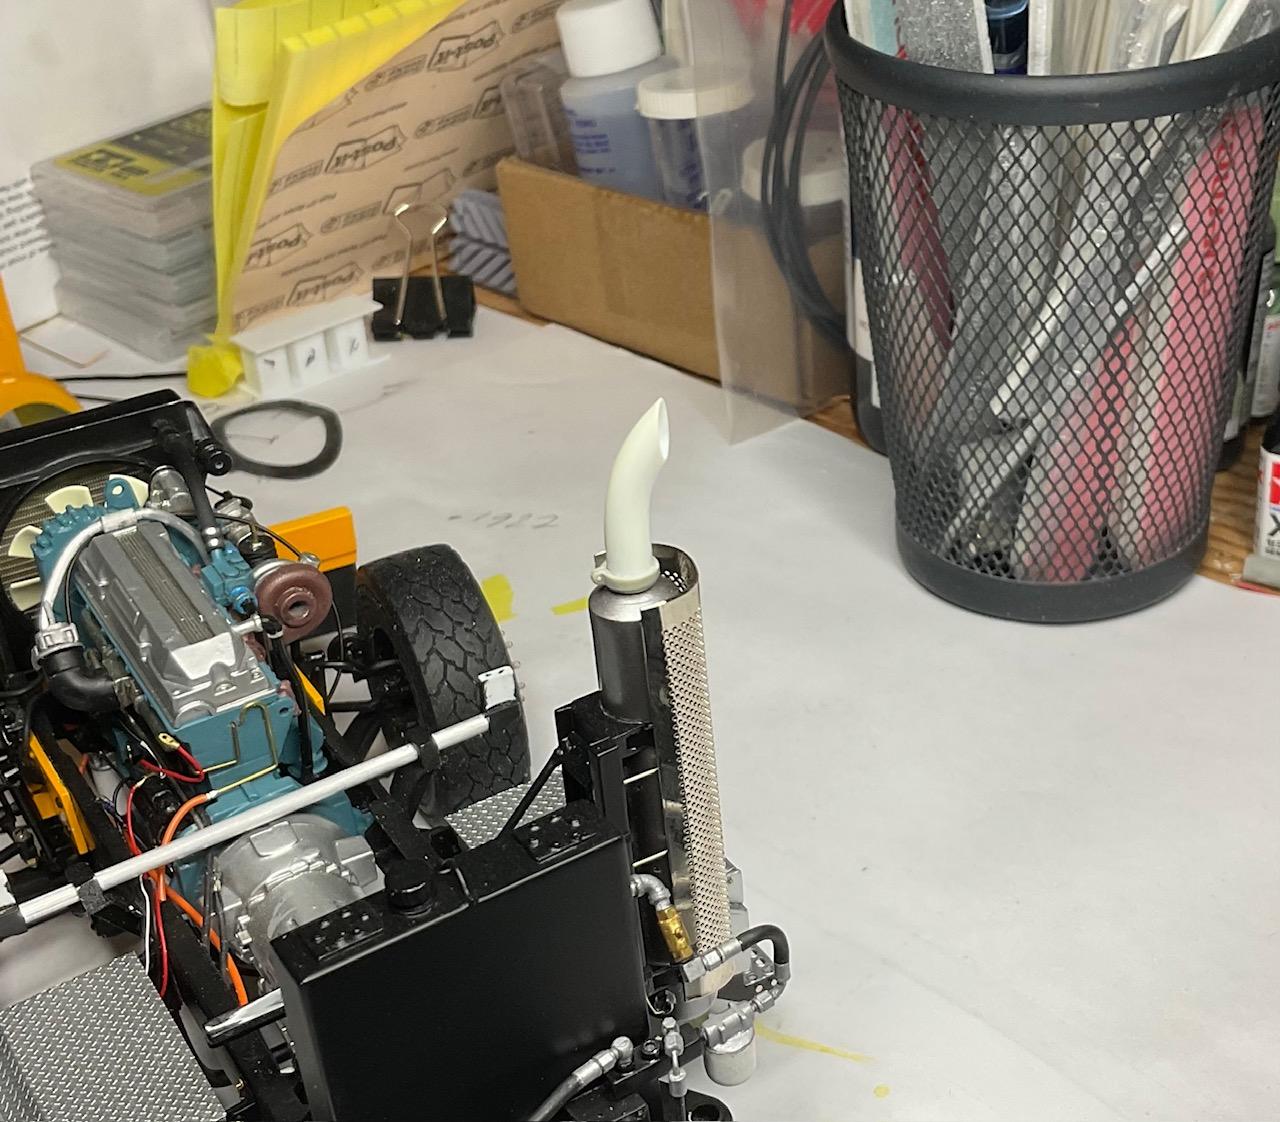
Feels like progress has been, well, there hasn't been any for just about three weeks! Was able to get a few things done and or, started today. Somewhere along the way, I forgot I needed to paint the visor for the cab, so got that underway. Also made the exhaust tip for the end of the muffler, that will be chromed along with the other cab bits. And, got the final coat of colour on the hood, cab and day cab panel. Prep work on visor - first coat of primer and then laid out, and drilled, the holes for Top Studio rivets that will 'attach' the visor to the cab brackets underneath - Another neglected (forgotten?) item was the exhaust tip - took an unused exhaust piece from an old kit, cut off the clamp, and added the clamp to the exhaust tip fashioned from styrene tubing - Finally, last coat of colour on the hood/cab/panel went on today. The paint might have been ok with the previous coat, but I thought I would sand out a couple of dust bits in the hood, one on the cab and then lay down that last coat and all would be good. No such luck - never mind the lots of care cleaning the air brush when last I used it, or rinsing out the paint bottle before filling it with filtered paint, plus running some thinner through the air brush first. Started the fan in the little paint booth, began painting the cab and almost immediately a few bits of BLAH_BLAH_BLAH_BLAH found their way onto the passenger side door. This time, the pictures are forgiving - can't really see the dust bits - but I can see them when I inspect the cab - So, using just a paint can, I put a couple coats on the two used hoods I had on the bench. After a week or so of curing, I'm going to try my hand at polishing the used hoods, before I attempt anything on the cab. Never done polishing before, so that should be interesting - In the meantime, I going to concentrate on finishing the sander - remaining lights, decals, beacons front and rear, the ladder and some other little bits, all of which are long overdue being finished. Take care!
-
You're making quick progress, Jurgen - looks good!
-
That's a really handy idea using the paint to mark your drill locations - funny what bits of knowledge stick around till needed! Going to look great, Jeff.
-
ALF Industrial Pumper
BK9300 replied to Firebuilder's topic in WIP: Model Trucks: Big Rigs and Heavy Equipment
So much detail! Looks terrific, Dom., -
Peterbilt 379 RV
BK9300 replied to vincen47's topic in WIP: Model Trucks: Big Rigs and Heavy Equipment
Great added touches - and more to come - looks like the real deal, Victor! Love the workbench stool. -
Kenworth W-925 (mild custom)
BK9300 replied to Gary Chastain's topic in WIP: Model Trucks: Big Rigs and Heavy Equipment
Another top drawer paint job, Gary! -
Mack DM600/Leach Garbage Truck
BK9300 replied to Scott Eriksen's topic in WIP: Model Trucks: Big Rigs and Heavy Equipment
Looking really good, Scott! I think I need to follow your example of cab/hood first with my next build - might make thinks a lot easier. -
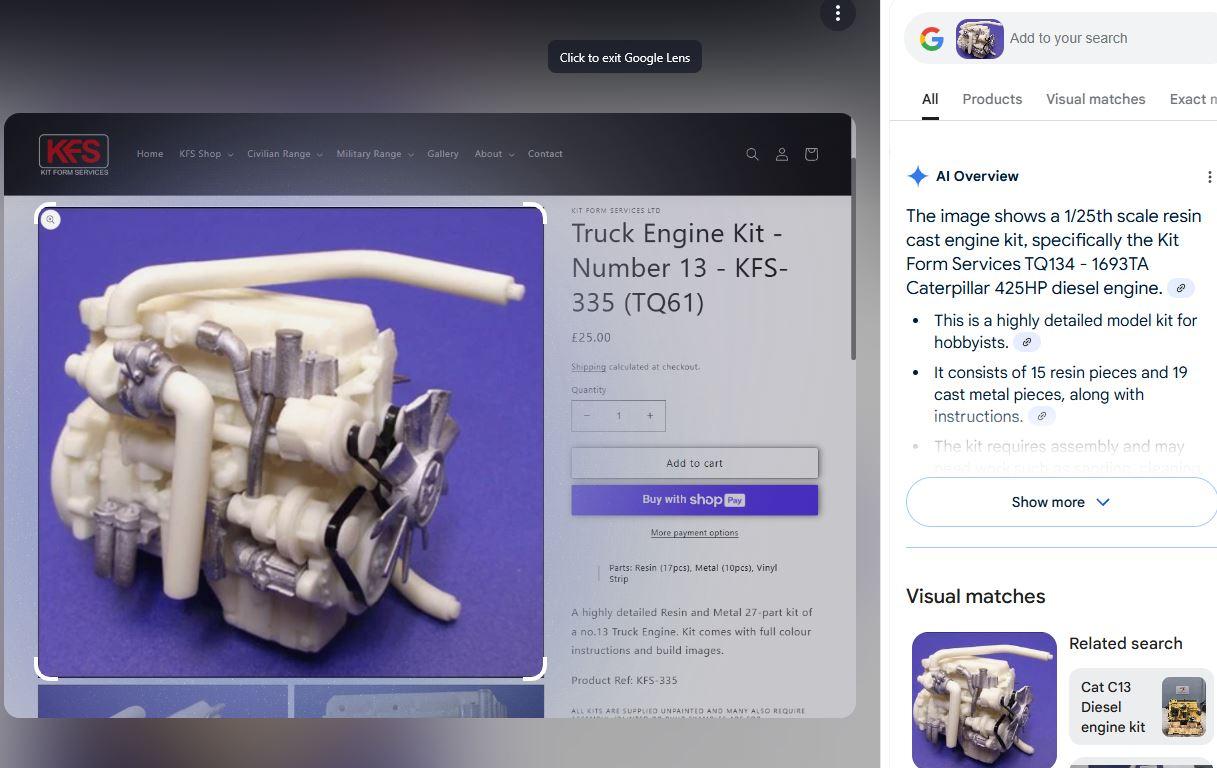
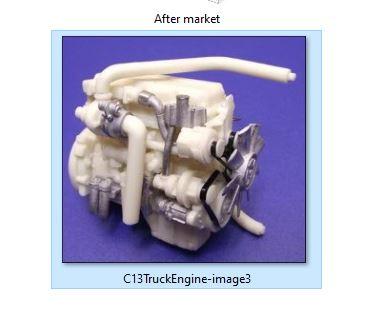
Hi Ron - could be a couple of choices - a Google picture search on KFS's engine 13, turns up this - (AI overview says it's a Caterpillar engine) I saved the first pic above, from KFS's web site and the saved file name says "C13TruckEngine-image3" (Caterpillar C13?) So, maybe a Cat engine?
-
Western Star 4900 FA plow truck
BK9300 replied to BK9300's topic in WIP: Model Trucks: Big Rigs and Heavy Equipment
I bought a bunch of drive tires from Jamie a couple years ago - best I’ve ever used - and thankfully still have some left for another build. -
I’m confident that, if the cab fits in your digital model, the printed one will fit, too! As always, you’re making good progress.
-
Saturday morning hijinks
BK9300 replied to Bren's topic in WIP: Model Trucks: Big Rigs and Heavy Equipment
Too funny - looks fresh poured, ready for the road (or work bench!) -
Western Star 4900 FA plow truck
BK9300 replied to BK9300's topic in WIP: Model Trucks: Big Rigs and Heavy Equipment
Thanks, Randy - a bit more to come, then the hood should be done! -
Peterbilt 379 RV
BK9300 replied to vincen47's topic in WIP: Model Trucks: Big Rigs and Heavy Equipment
The stacker’s interior details, and detail painting, are very realistic - an expensive, custom trailer in the works! Will your lift be posable through the back doors, or will the stacker roof be removable?