BK9300
-
Posts
1,986 -
Joined
-
Last visited
Content Type
Profiles
Forums
Events
Gallery
Everything posted by BK9300
-
 Thanks, Victor - unique for sure, and hoping to do it justice!
 -
Thanks, Jeff - glad you’re checking in on this!
-
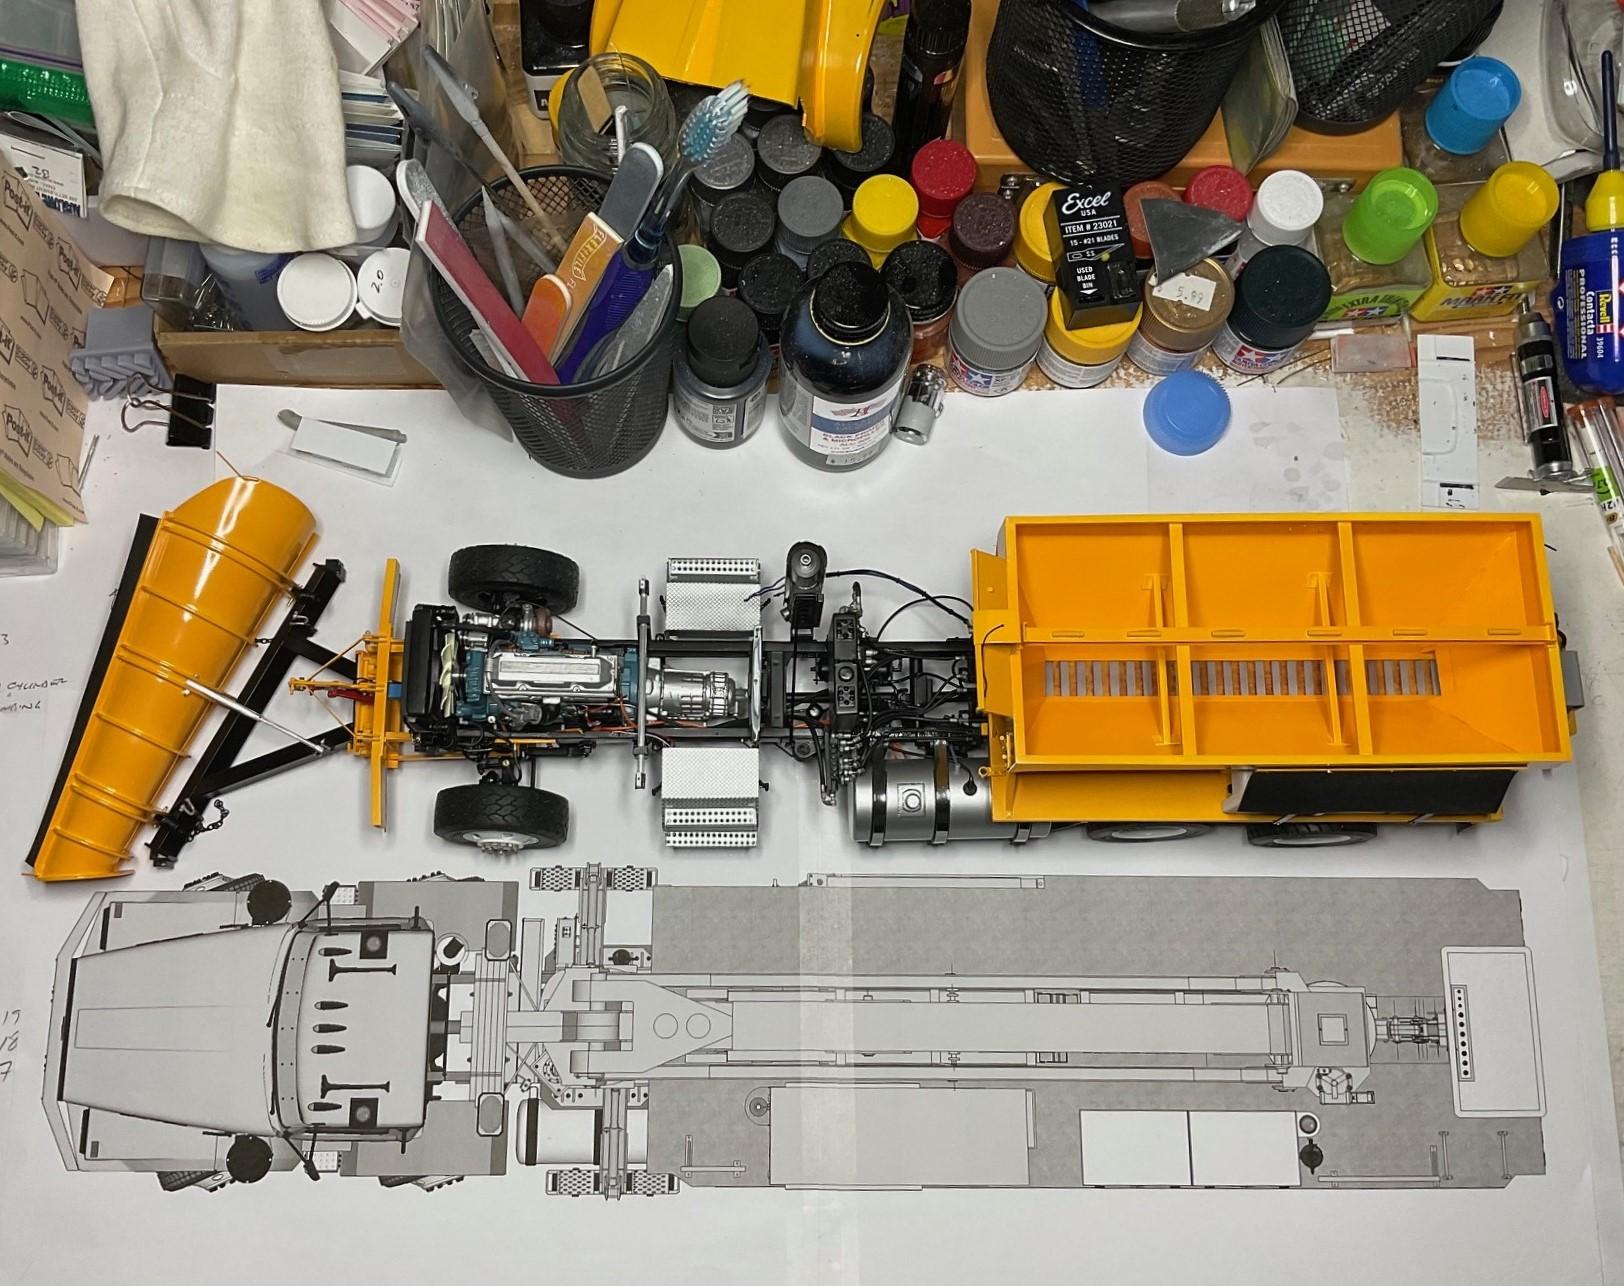
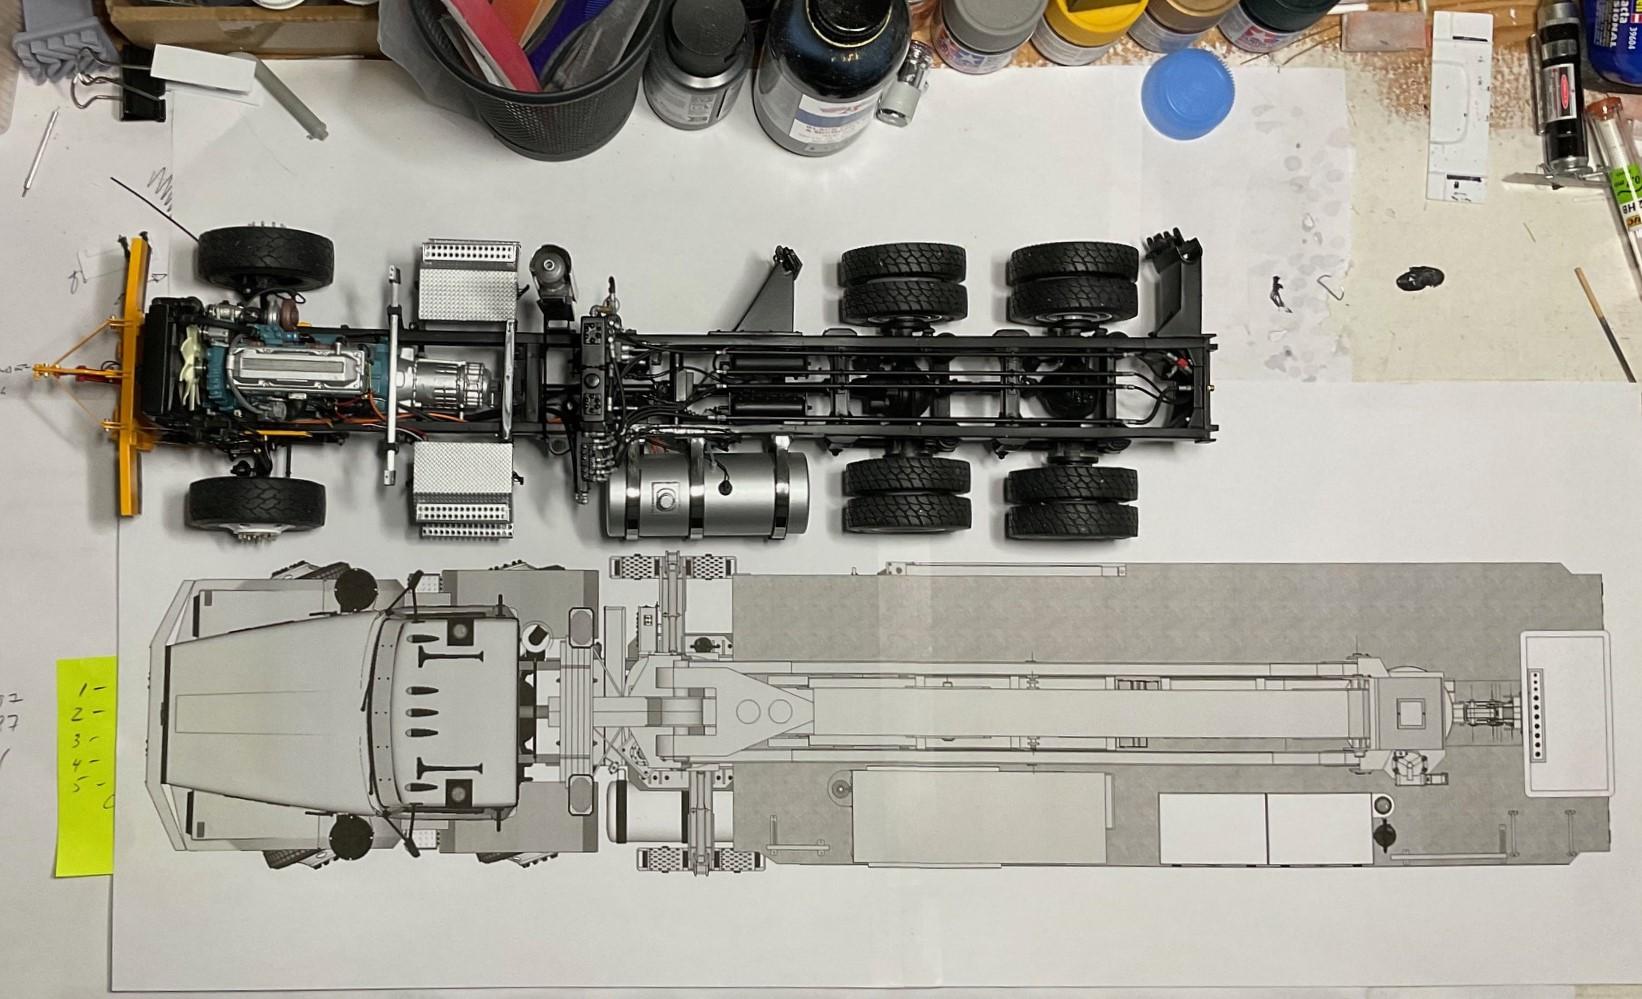
Getting my head around what this build is going to look like, I printed out some top and side, projection views of the Sketchup model. Those printouts also allowed me to compare the plow truck to the Snooper truck, just for the heck of it. It's going to be a tick over 22" long when finished - I thought this was an interesting comparison, but Jeff reminded me if I was going to do any comparisons of the Snooper to the plow truck, I had to have the plow and sander in the pic, too. All in, the plow truck will be bit longer - Too much time on my hands, with my paint booth not available for a few more days yet!

-
Thanks, Ron, and saved! I appreciate your interest in this, and I'm excited to get started, soon as I can.
-
Thanks, Dom! The boom(s) do look overwhelming at first, but they're starting to look doable after looking at them closely. I'm learning along the way, so hope all this helps you, too.
-
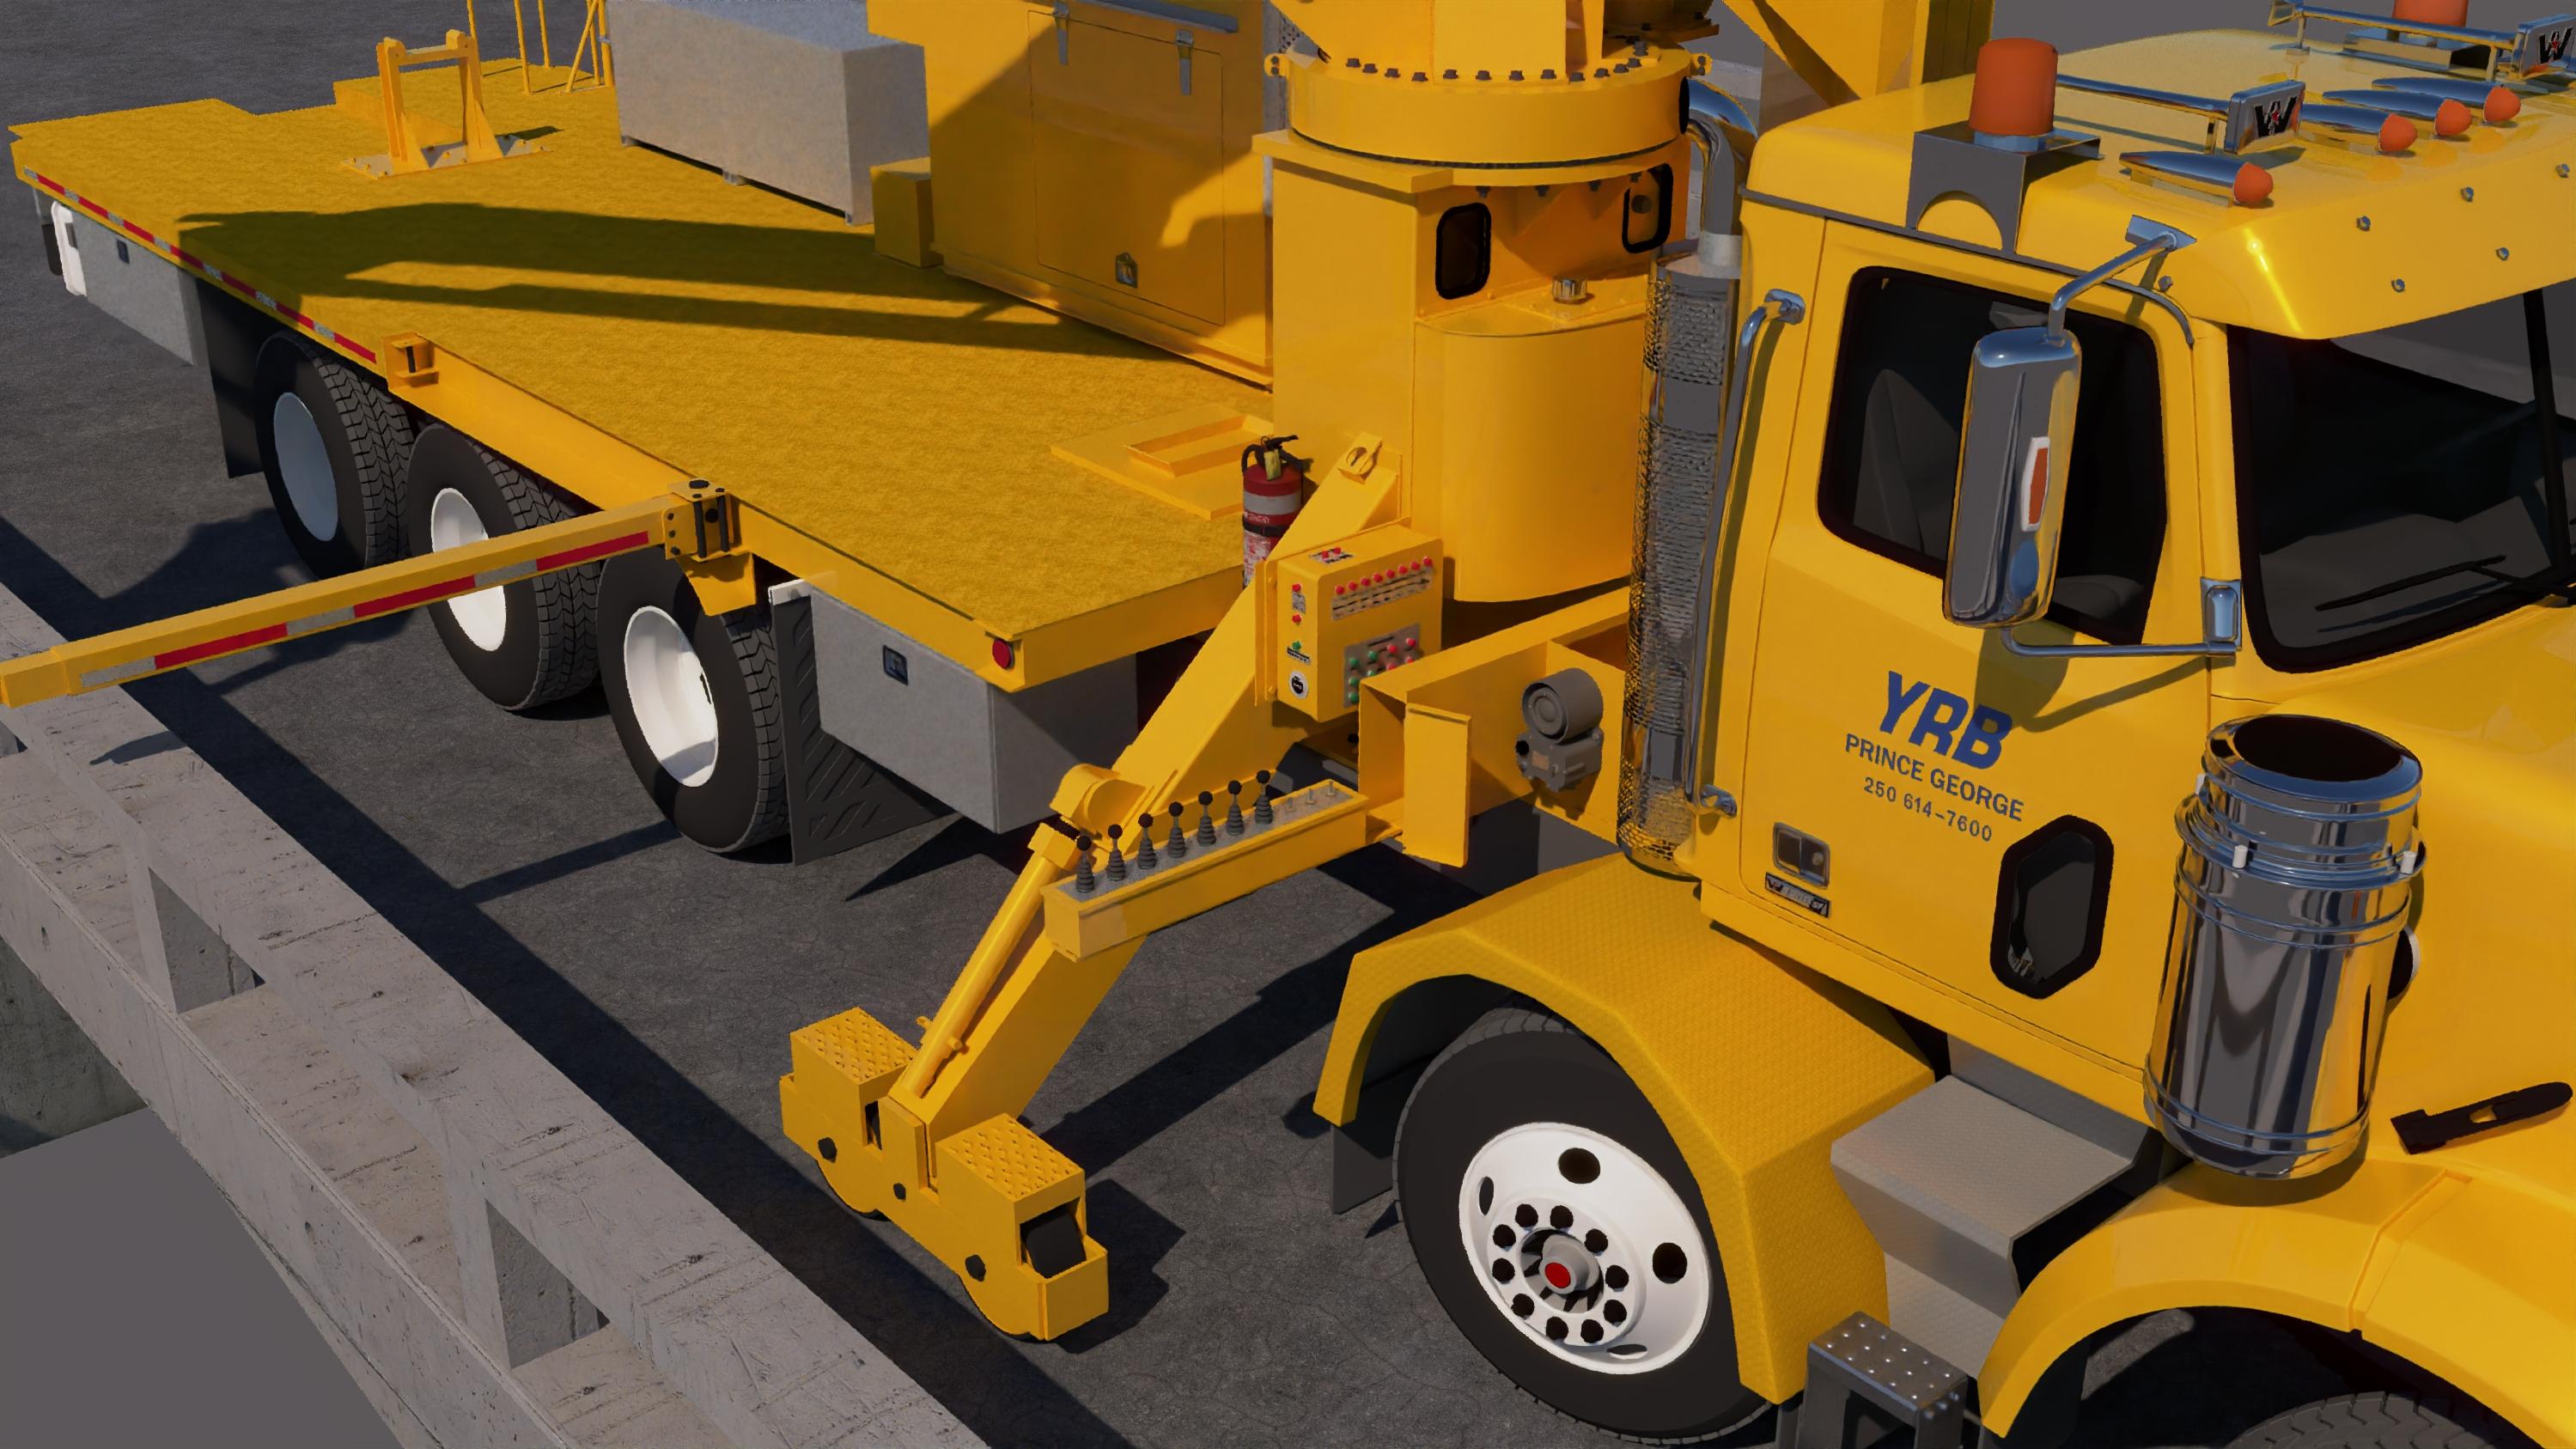
Hi again, Carl - thought a couple different views would show the counterweight and stabilizer arm/foot assembly better - Back side of main tower, showing counterweight(s) - Stabilizer arm and rolling 'foot' assembly down in working position - there is a limit switch (not shown) on the stabilizer arm that I believe is activated when the arm's locking brace is in position. In an Youtube video of an older model of Snooper, the operator says the stabilizer must be down and brace in place, before the electrical system to operate the boom(s) can be activated.
-
Glad to have you aboard for this one, too, Jeff! I know it will take a bit of time before I start, but have lots of ideas brewing for what to do first - more decisions to make! Happy that you’ll be following, Gary, and looking forward to you getting back into your builds later this summer, too! Thanks for having a look, Don!
-
Western Star 4900 FA plow truck
BK9300 replied to BK9300's topic in WIP: Model Trucks: Big Rigs and Heavy Equipment
Thanks, Jeff! Itching to get on with the last of the paint and start assembling. I appreciate that, Jürgen! -
Hey, Carl! This truck has five counterweight plates that hang off the end of the main boom support, behind the main tower. There are also stabilizer arms, one on each side, at the base of the main tower, with two wheels attached to each one. I understand that the boom cannot be operated without the stabilizer arm extended and in contact with the pavement. In two of the renders above, you can see the stabilizer arm and wheels lowered to the bridge deck. The truck can also be moved, slowly, while the stabilizer arm is in contact with the pavement. The stabilizer arm, and the counterweights keep the inspection unit balanced around the axis of the main tower. Hope that helps!
-
Awesome work on pinning the windshield! I'm thinking I shouldn't have said anything about the fender opening. Maybe a set of scale, 33" Mickey Thompson, Sportsman Pro's for the rear? Then again, not sure you should be listening to any suggestions from me!
-
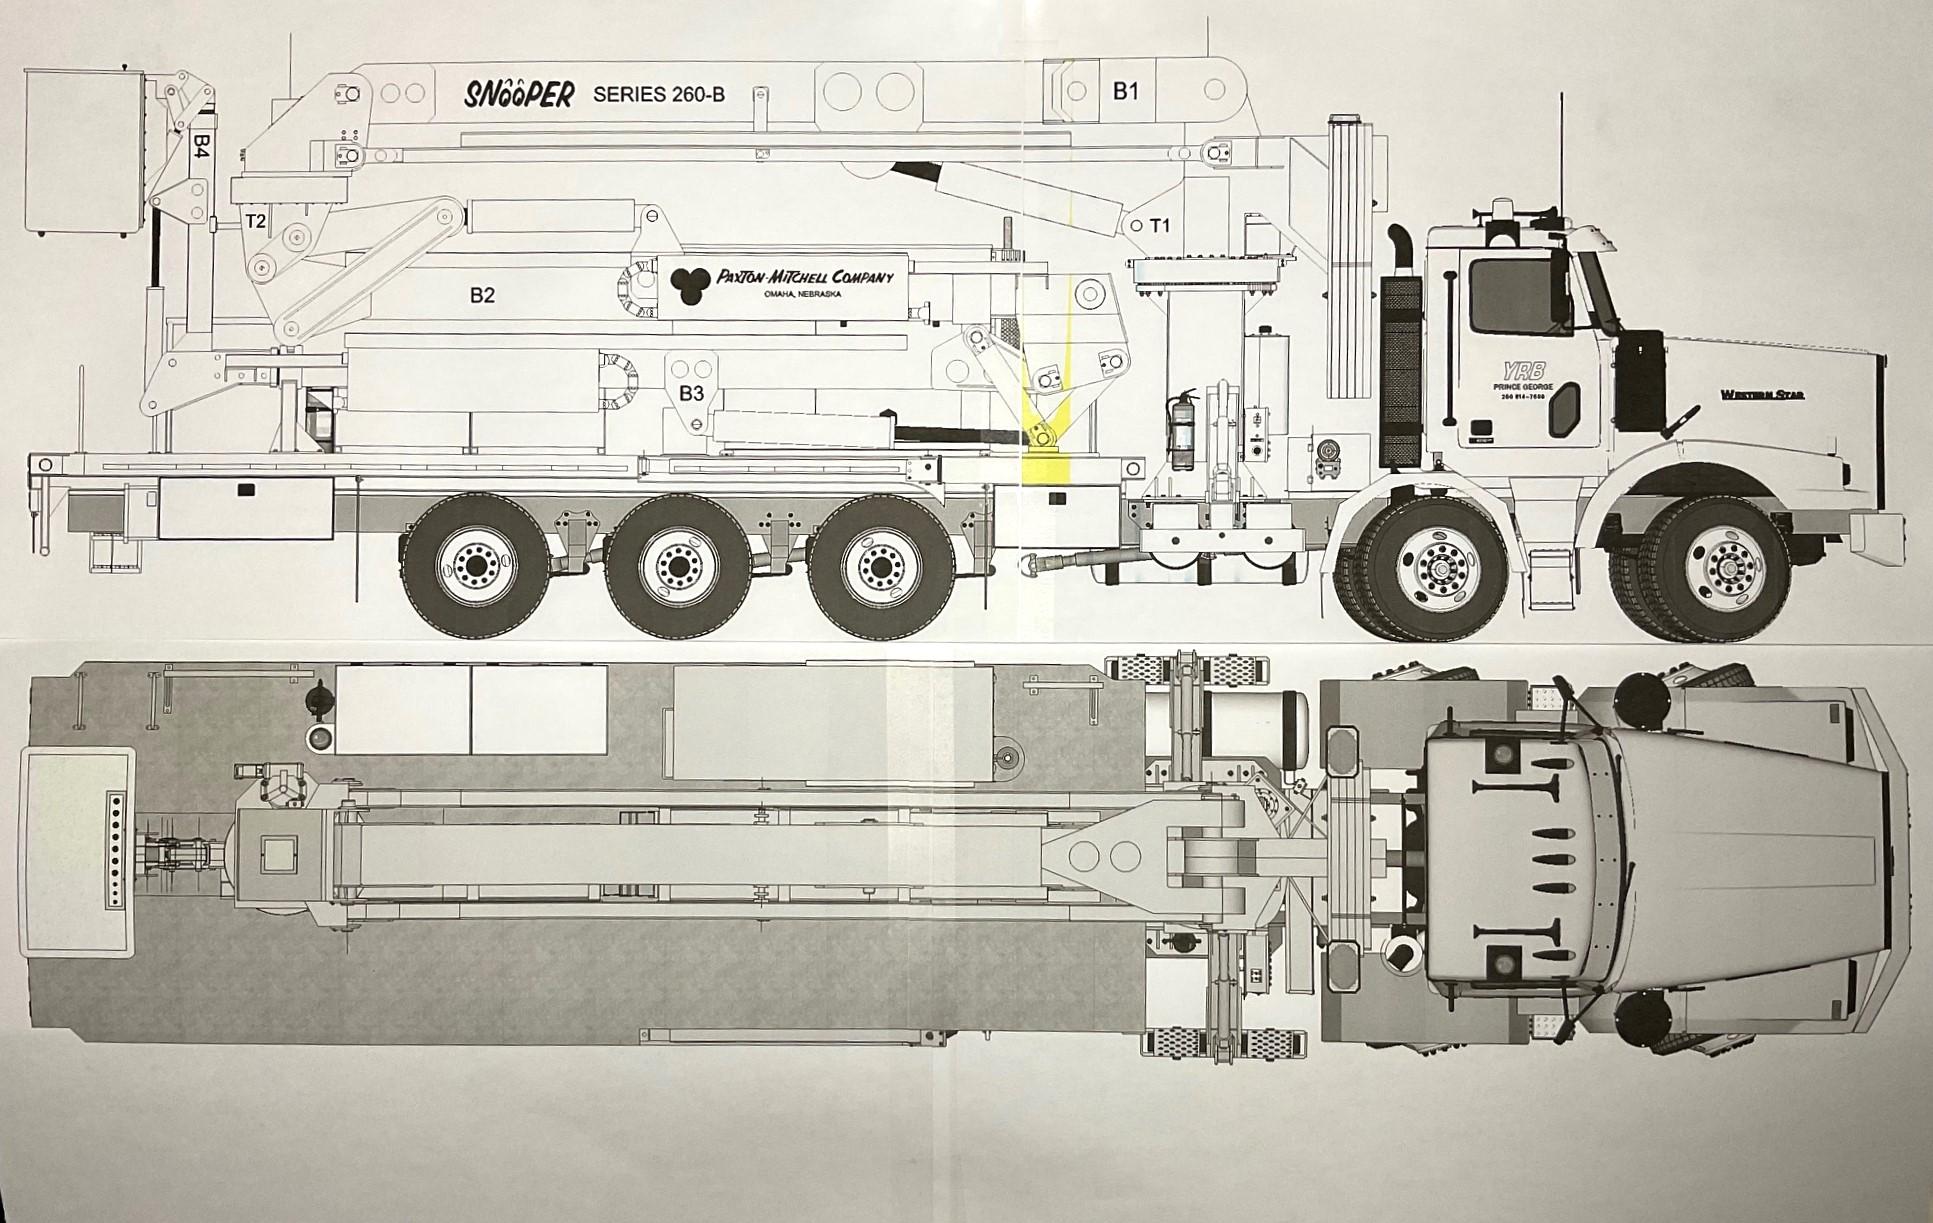
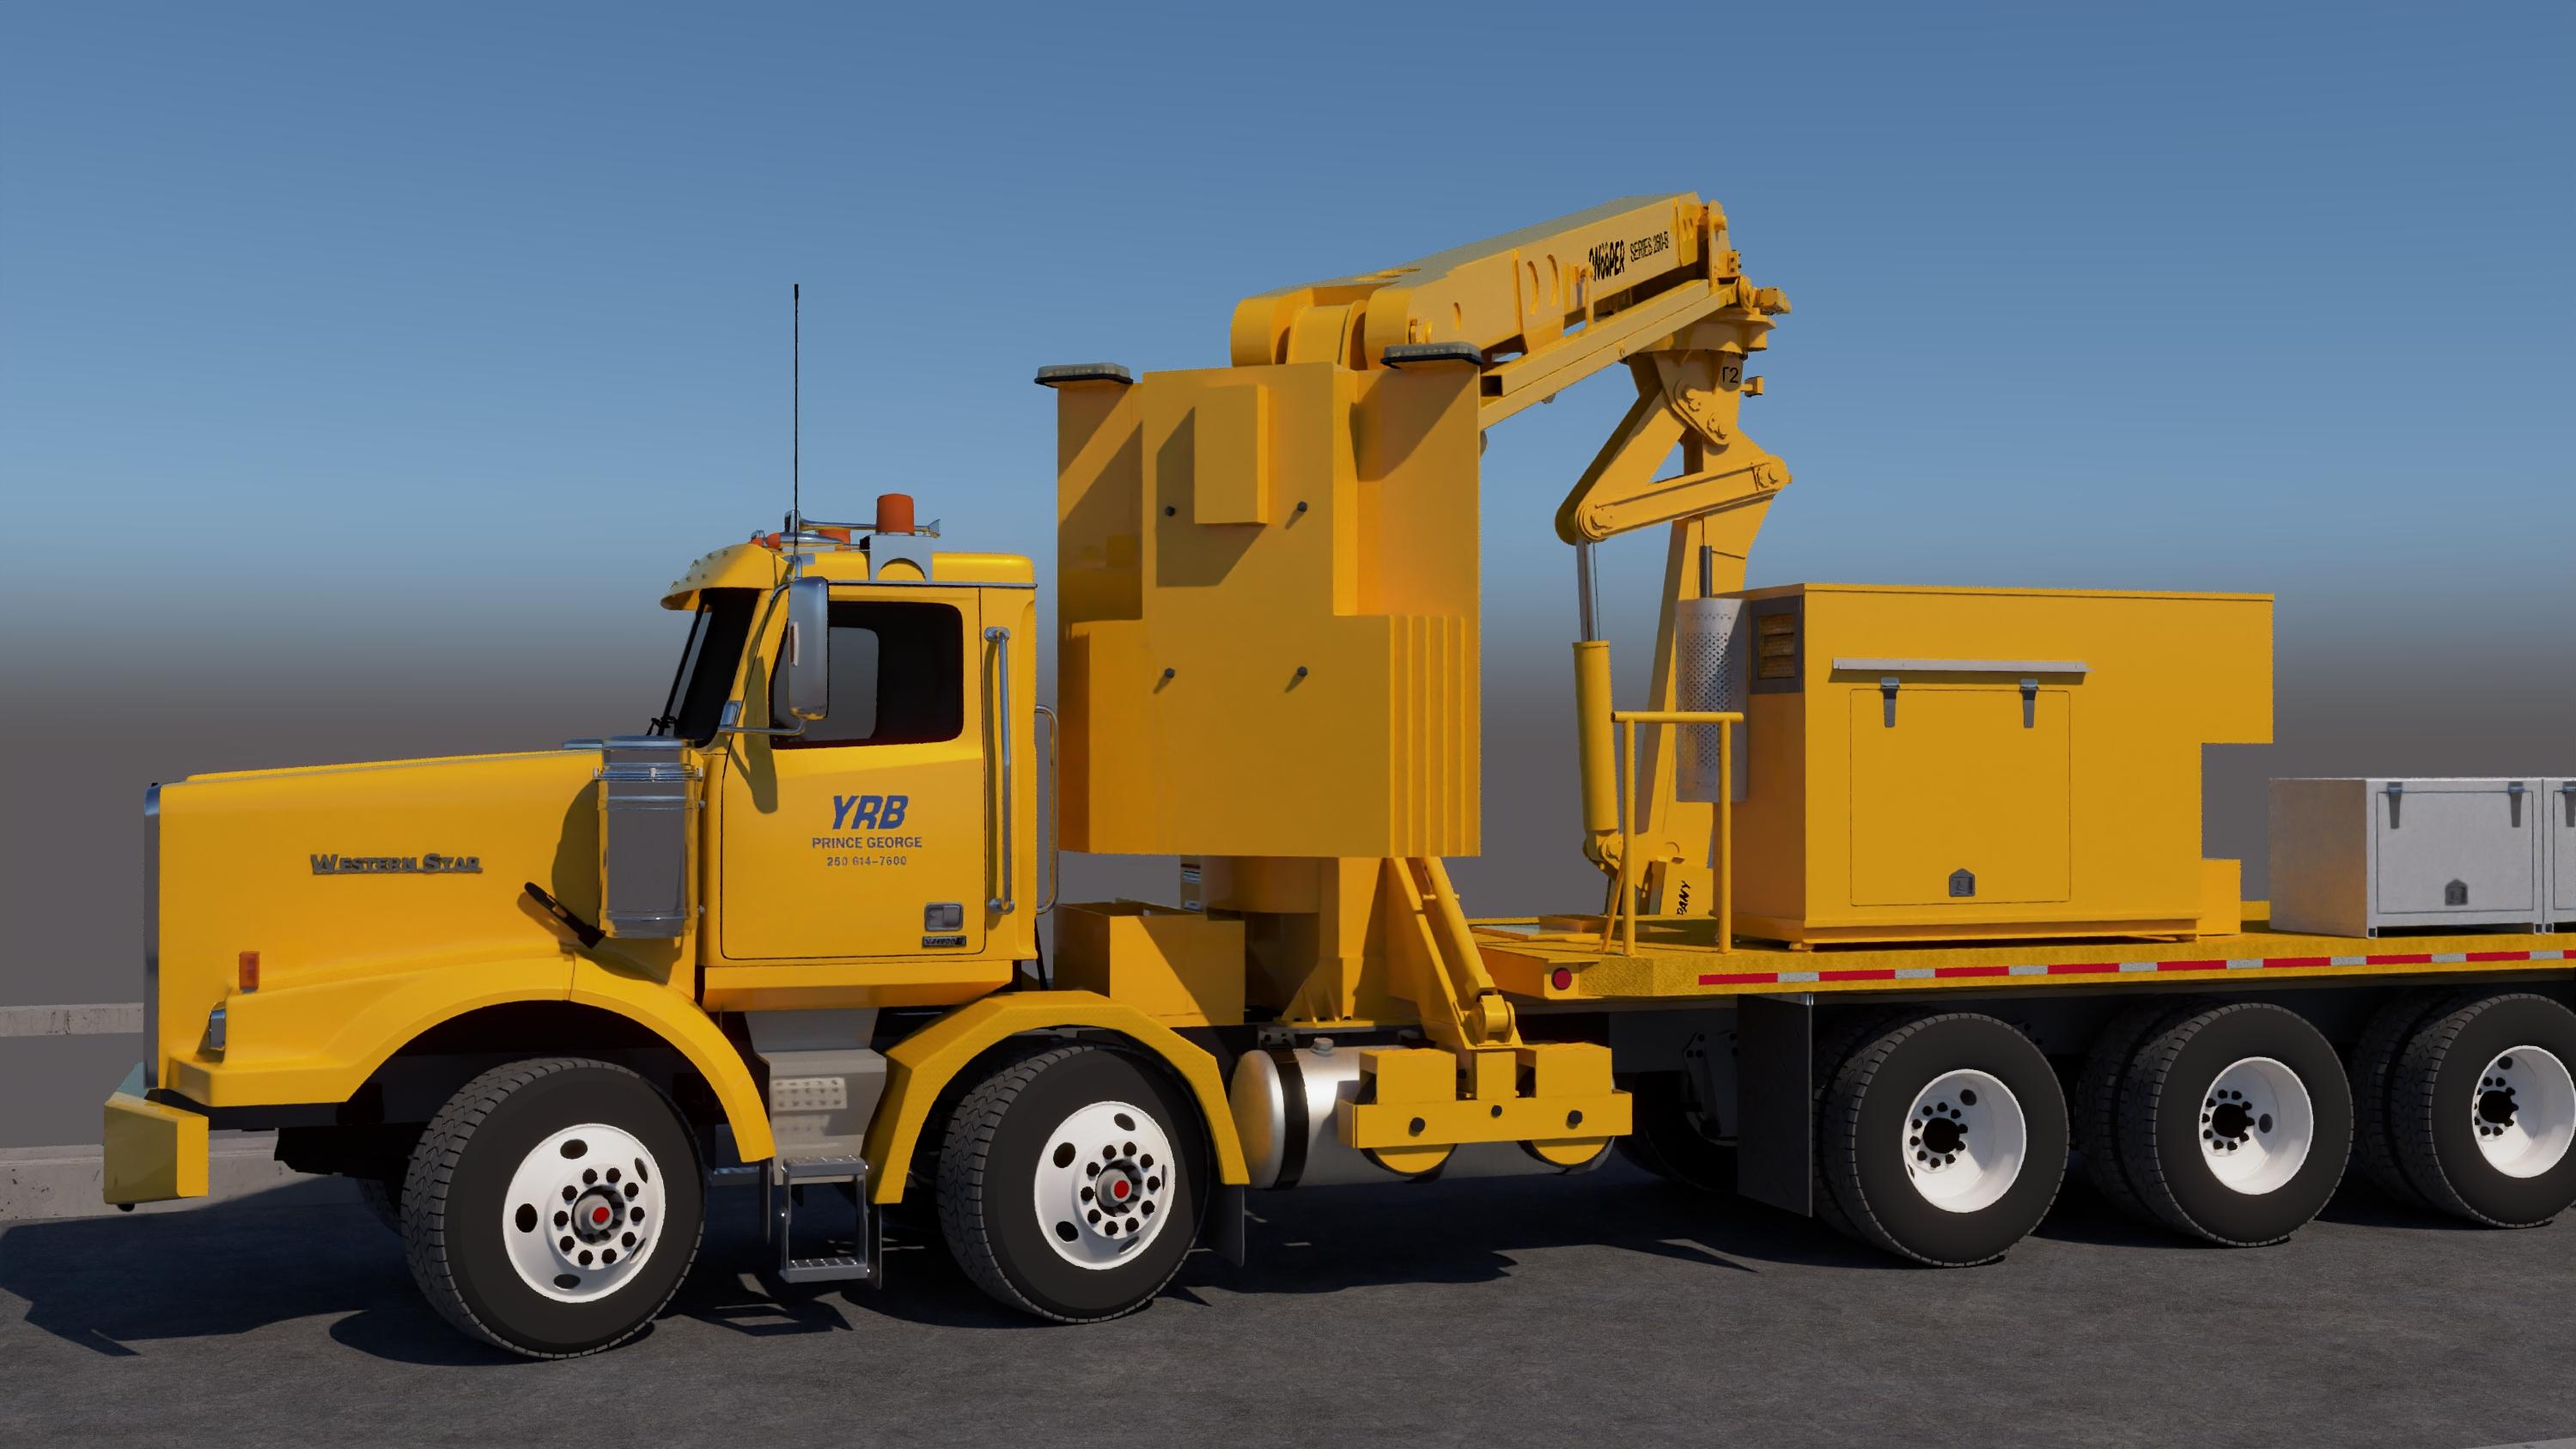
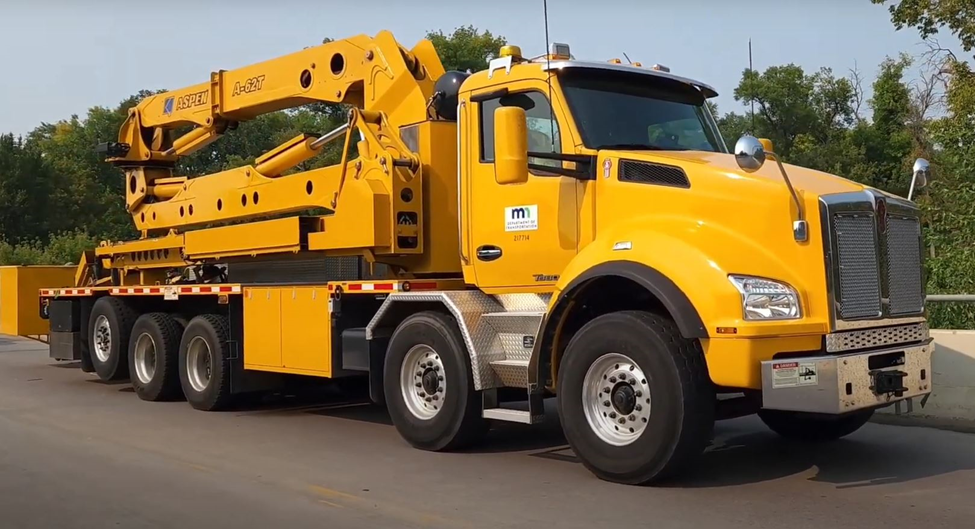
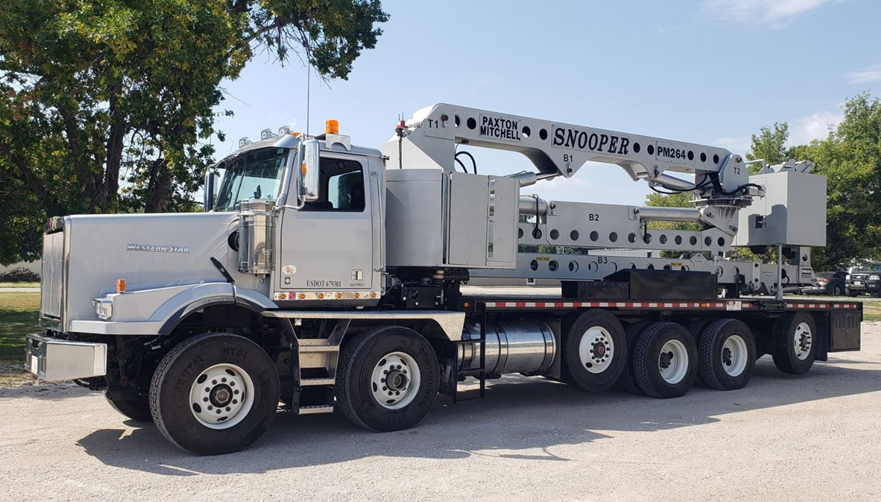
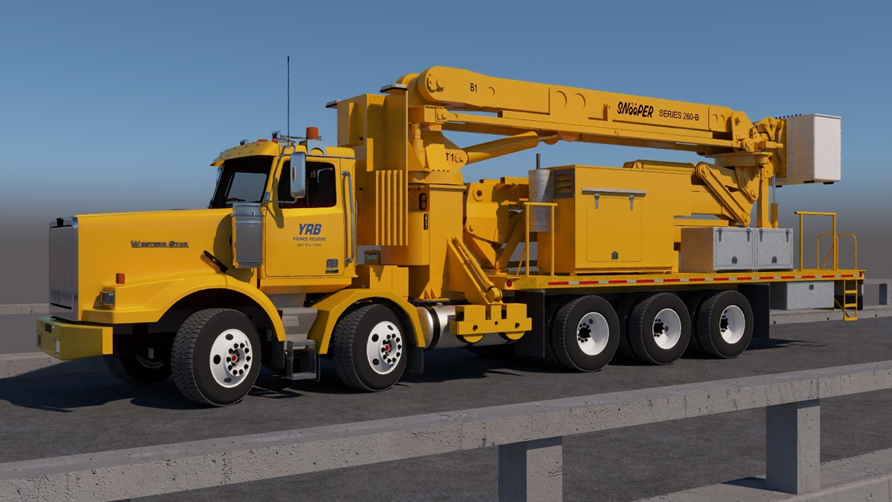
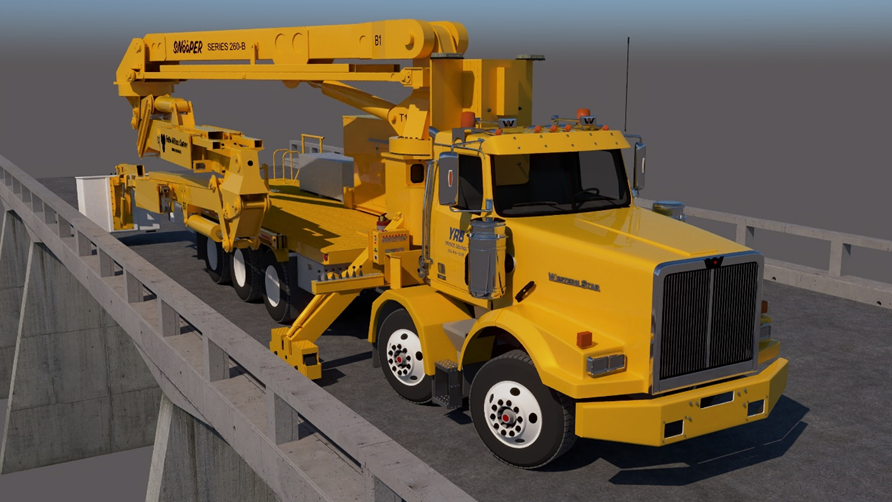
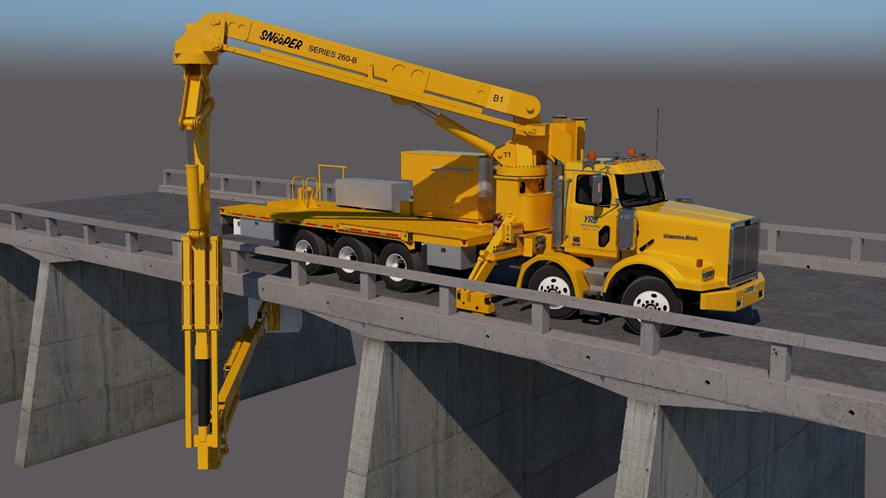
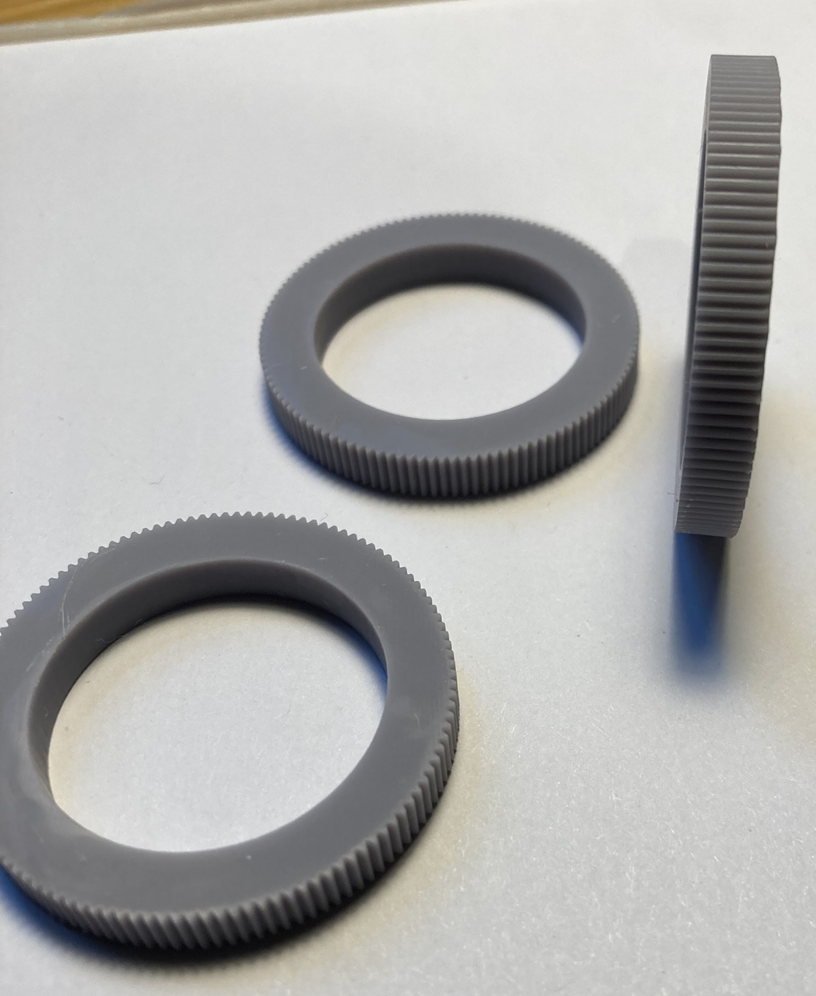
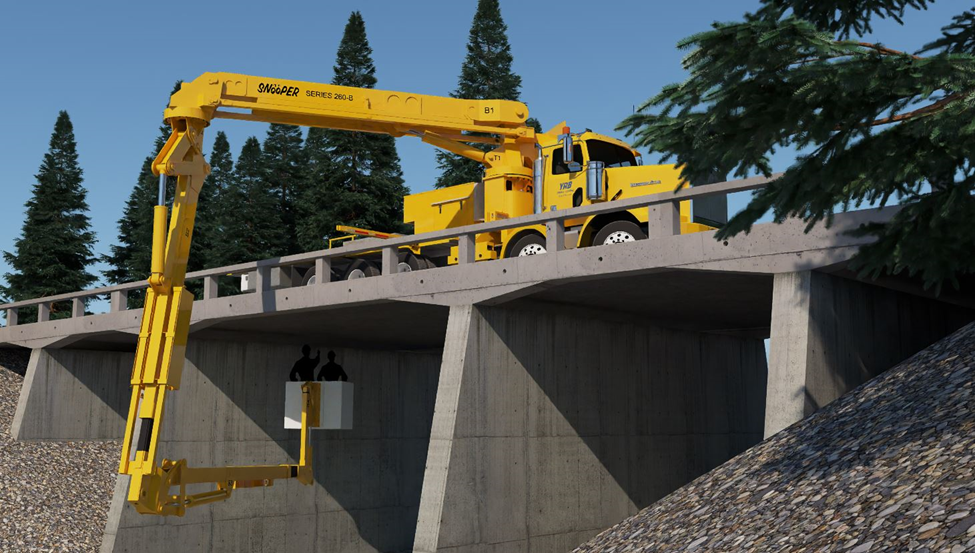
A next project is not far off! I do, however, need to finish the plow truck first, before I get fully into a new build. I’m thinking I couldn’t manage two at the same time. My paint booth is out of commission for a week or two, so I thought I’d share my idea for this next project. Going to be another highway maintenance vehicle for the scale, YRB fleet. I’ve long wanted to build some kind of twin steer crane or boom truck, but they don’t really fit into the kind of equipment that YRB has. The company does have hiab deck trucks, for smaller bridge work, but not any bigger boom trucks. A few months ago, I was going through the company’s web site and saw a pic of a bridge inspection truck, owned by the Province of British Columbia, and that helped make the decision for my next project: The equipment attached to the truck is a Paxton-Mitchell, PM-260B, ‘Snooper’ inspection unit. The model number indicates it can reach, horizontally, 60’ under a bridge. The truck that Paxton-Mitchell used, mostly, for this unit was a single steer, tri-drive, Volvo. I have also seen quite a few similar inspection units online, and in particular, one made by Aspen Aerial – a model A-62T, on a Kenworth T880, twin steer, tandem drive plus a tag. This unit can reach 62’ horizontally under a bridge, with no outriggers - One of the searches also led me to this unit on Paxton-Mitchell’s website – a prototype Snooper, the PM-264 (64' horizontal reach under a bridge) - I contacted the company to see if they would share any information or cad drawings on the PM-264, but they said it was a ‘one of a kind’, prototype vehicle, built in 2019, and no information could be shared. So, back to looking for info on the PM-260B. The unit on YRB’s website is owned by the Province of British Columbia and, back in June, I found out it was going up for auction soon. I was fortunate to be granted access to the unit, about 45 minutes from where I live, to take pics and measurements, and I spent two days gathering a bunch of details (700+ pics, lots of measurements and several short videos!). Given the similarity of the Paxton and Aspen twin steer units, I decided to combine some features from each, into an inspection truck in YRB livery. I want to make my cab and chassis based on Paxton Mitchell’s - a Western Star 4900 SB, twin steer, but with a tri-drive – no pusher or tag - and model the slightly smaller PM-260B (I did ask Paxton-Mitchell if a manual for the 260B was available – I was told I would need to own a Snooper before I could get a manual!). I found it was extremely helpful to have designed my plow truck in Sketchup before building it, so, during the month of June, while the memories and pics were still fresh in mind, I made a Sketchup model of my vision for this build – Outrigger down and booms lowered to basket 'entry' position - Inspection underway! - I have some parts already in hand – same two, Western Star kits I used for the plow truck, the tires and some steel, 2 and 5 hole wheels from M & R Wheels. I am hoping that a bunch of what I learned doing the front end work on the plow truck will make the going much easier for modifying the hood for the set back, twin steer configuration of this truck. Many other parts of this build should also be easier because of the plow truck build – that’s another reason to stick with the Western Star theme. The Sketchup model’s parts are made as separate ‘groups’, so almost all the components – boom sections, hydraulic cylinders, outrigger arms, deck equipment, etc - are able to be isolated from all the others, and viewed from all angles (and posable for different renders, too). I’ve spent a lot of time looking at the Snooper and complicated as it looks - from the tower support, the counterweights, to the boom sections - most pieces are made of lots of rectangular plate (need to get more styrene sheets!), square and round tubing, and lots of pins for pivoting parts. I am hoping to use the 1/24th scale 3D model for dimensions and template patterns for cutting out parts from those styrene sheets. I’ve not designed most of the Sketchup model to be printable – that’s a much more involved process - but some parts are. The Snooper unit has two towers that rotate, to get the man basket under a bridge. More thanks to @Bren, who agreed to do a test print for me of a sample outer ring gear of the slew ring that rotates the main tower behind the cab (the test ring gears below are 1.5 inches in diameter, with 120 teeth) – The outer gear sample, which bolts to the lower, support portion of the main tower, needs to be modified to add the inner portion of the slew ring, which the upper tower portion bolts to, so the drive motor can rotate the rings around each other. I just needed to see how the gear teeth would turn out on the test ring and they look good from the pics Bren emailed me. He has sent me the actual rings, so should be able to check them out up close in a few days. I’ll admit this will be a very challenging build, and maybe as long as the plow truck build. But doing more practice builds isn’t going to help. Time is marching on and I can only hope that I maintain the ability to at least give this build a good go! So, as soon as the plow truck is finished, I’ll start in on this one. I’ve learned a bunch about these trucks, from the few month’s research I’ve done, from the time spent going over one in person and from making the digital model. Lots of ‘how to’ stuff is figured out for the model already, but lots more to figure out yet. And speaking of the Sketchup model, it’s also been fun to add a few other items to the model before rendering. An ‘on the job’ situation – I’m looking forward to getting started on modeling my version of the ‘Snooper’ - back in a few weeks!
-
Western Star 4900 FA plow truck
BK9300 replied to BK9300's topic in WIP: Model Trucks: Big Rigs and Heavy Equipment
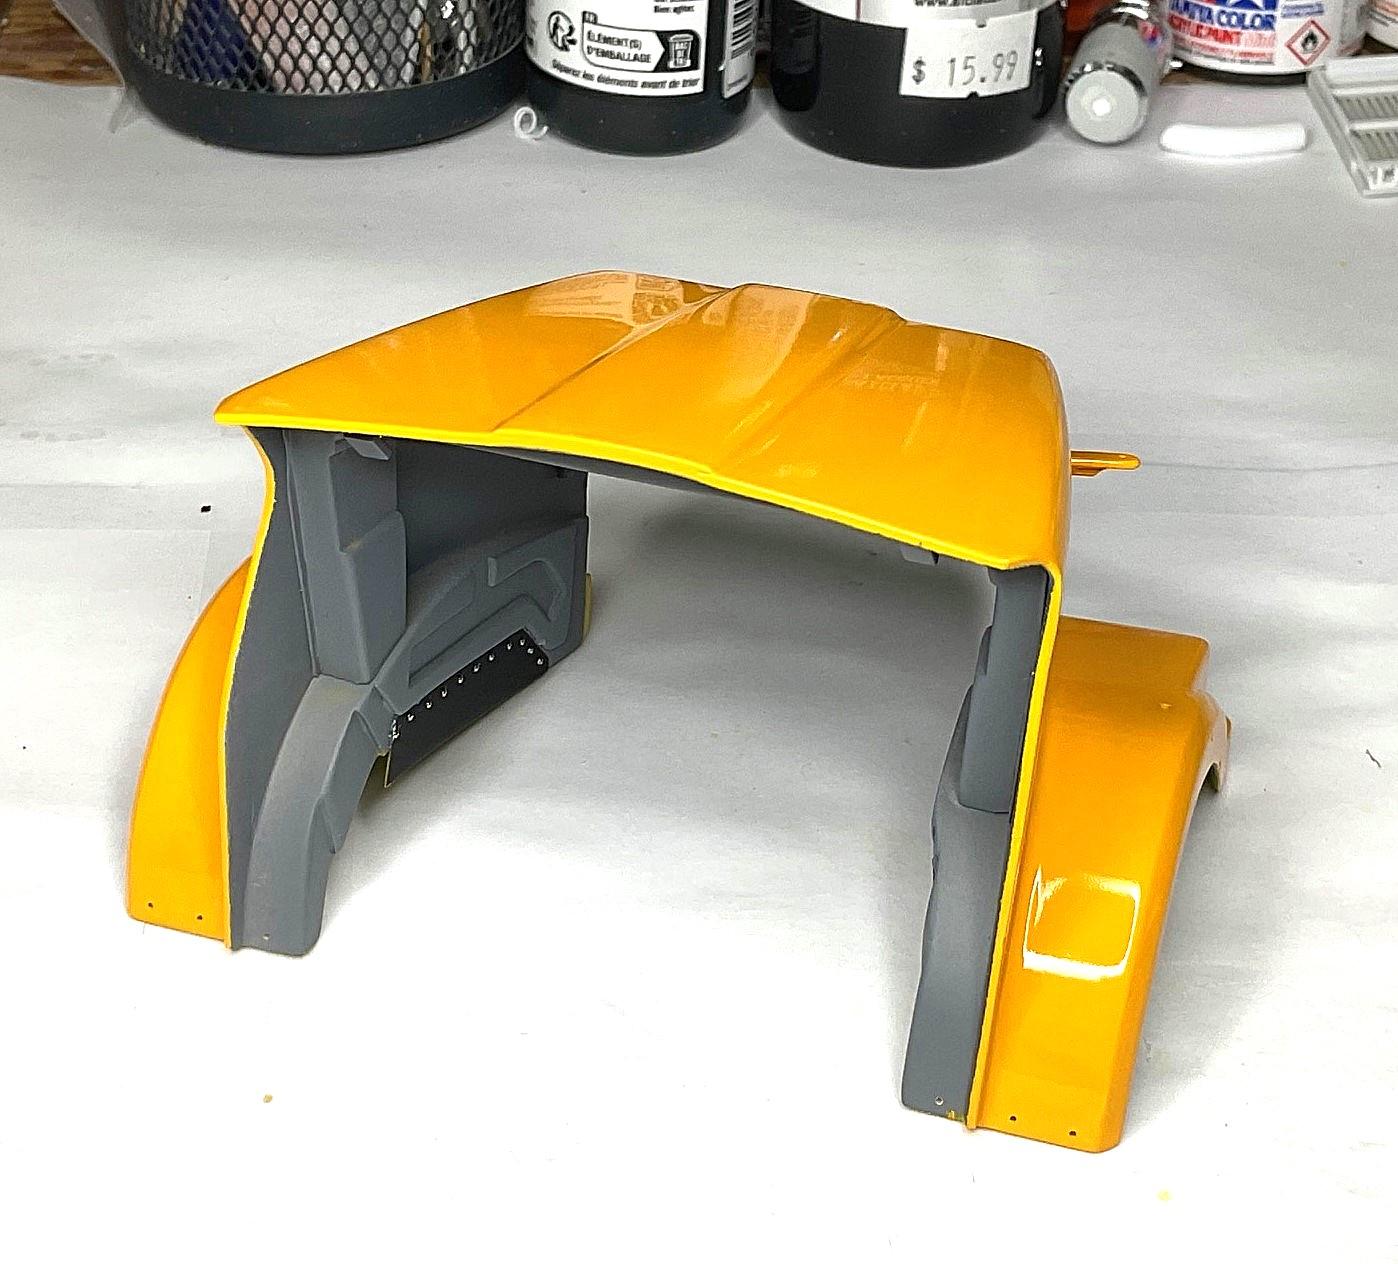
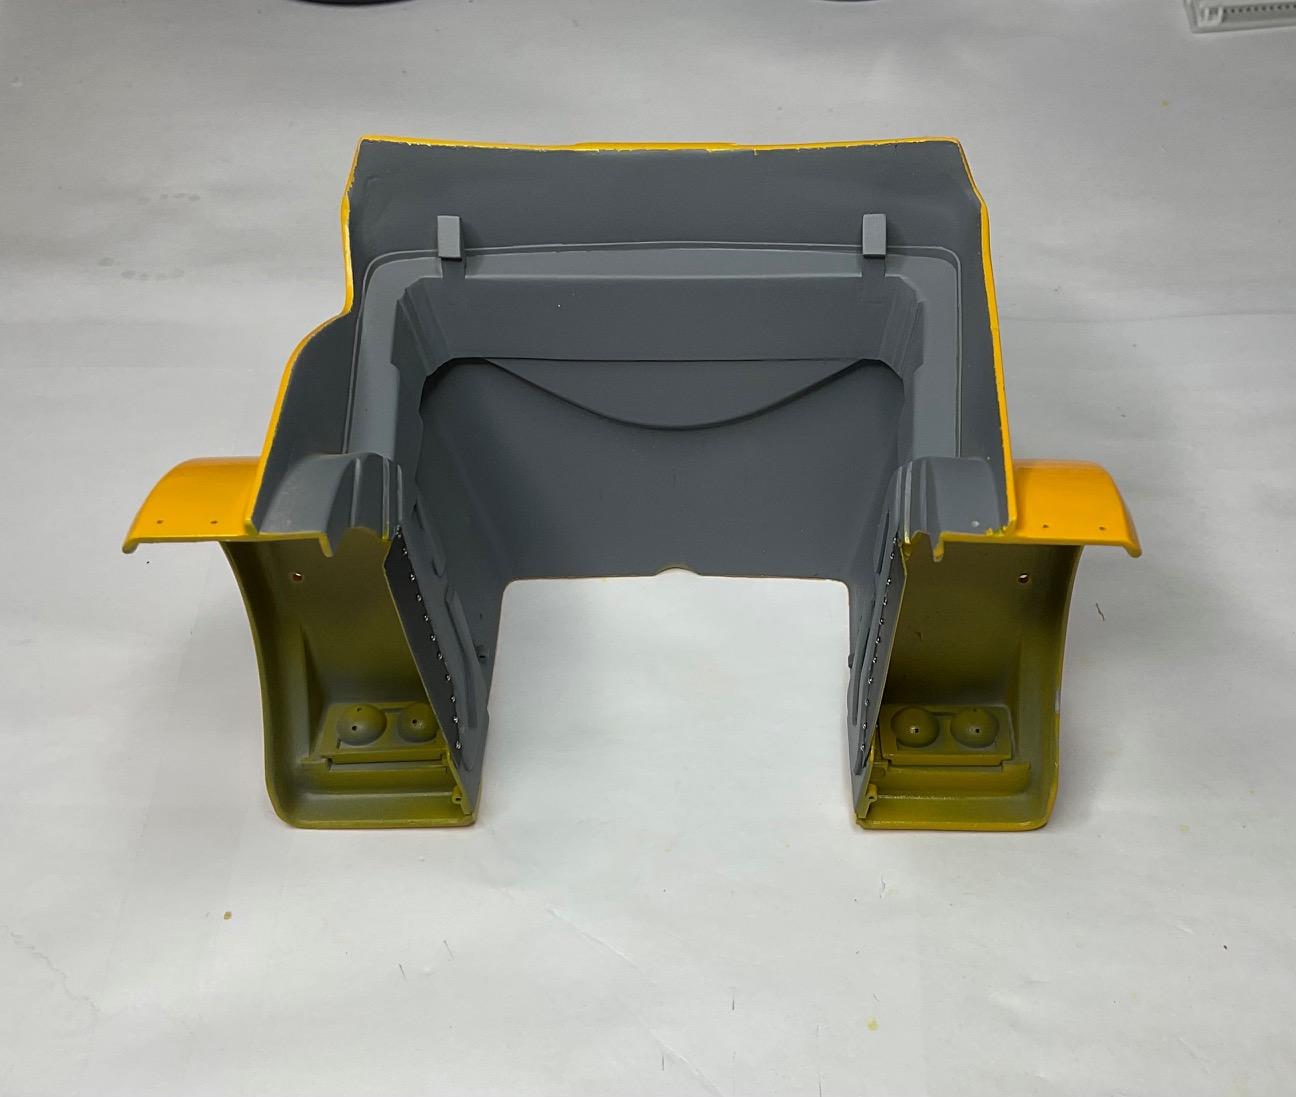
About that paint booth issue; almost immediately after posting about it, and realizing that I should have had the painting all done by now, I got worried about the masking tape I still had on the inside of the hood. Don't know what issues leaving the tape on longer for would have created, if any, but I didn't want to chance it. I carefully removed the tape and it all came away cleanly, much to my relief. Will need to re-mask for final top coat, though, but am happy that all is good on the underside for now, save a few spots along the edges, where some yellow did manage to creep in. When all is finished on top, might still do those slight overspray areas along the inside edges of the hood and bracing, too. Very happy with how this is looking!
-
Western Star 4900 FA plow truck
BK9300 replied to BK9300's topic in WIP: Model Trucks: Big Rigs and Heavy Equipment
Thanks for those kind words, Dom - hoping to stop adding details soon (still a few to go, though), and get on with the final assembly! -
ALF Industrial Pumper
BK9300 replied to Firebuilder's topic in WIP: Model Trucks: Big Rigs and Heavy Equipment
Nice work on the hose bed hoses, Dom. May just be my eye, or the camera angle, but the rear panel for the intake/discharge lines seems to be lower than in your earlier pic of the chevron taping. Is it possible that panel slipped down? -
Western Star 4900 FA plow truck
BK9300 replied to BK9300's topic in WIP: Model Trucks: Big Rigs and Heavy Equipment
I really appreciate all who take the time to look in on this build! Unexpectedly, my paint booth will be out of commission for a couple weeks, so not likely to be many posts in between. But, I have been thinking about my next project quite a bit in the last little while, so I'm going to use this down time to do an initial WIP for it later this afternoon. I'll get back to the plow truck as soon as I can paint again - take care! -
1984 Chevy Suburban
BK9300 replied to Chariots of Fire's topic in Model Trucks: Pickups, Vans, SUVs, Light Commercial
Looks great, Charles - every fleet needs a vehicle for the boss! -
Super clean build going on here, Jim, with lots of great detailing. I know next to nothing about these kits, or the full size car(s), so I’m curious why the kit’s rear wheel well seems higher than that of the SO-CAL car. Very nice build to follow!
-
This is spectacular work, Andrew - amazing amount of detail you fit into the suspension pieces (and other parts of model as well!)
-
Lonestar - Hot Rod custom
BK9300 replied to LOBBS's topic in WIP: Model Trucks: Big Rigs and Heavy Equipment
I’m not knowledgeable about toterhomes, but your question made me curious. Some searching around says toterhomes can be anywhere from 25’ long to 65’ long, depending only on how much money an owner wants to put into one. Average length was mentioned to be around 36’, so the 280” wheelbase you mentioned would seem to be in the lower to mid range. It does seem, like you said, they are built to whatever length the owner specifies (and can afford!). Looking forward to what you decide to make it for yours. -
1970 Winnebago D27 Chieftain
BK9300 replied to Repstock's topic in WIP: Model Trucks: Pickups, Vans, SUVs, Light Commercial
This is just fabulous - right down to salt and pepper shakers at the table, jackets on the hook and so much more! Amazing work. -
Good back story and a fabulous job on your HQ - beautiful!
- 25 replies
-
- 1
-

-
- ddacollectibles
- streetmachine
- (and 1 more)
-
Western Star 4900 FA plow truck
BK9300 replied to BK9300's topic in WIP: Model Trucks: Big Rigs and Heavy Equipment
Thanks, Jim! Made me chuckle a bit, because I can relate to not having much knowledge about some of your builds, like the Monogram Midget, but I sure can appreciate all the excellent work that you put into it! -
Western Star 4900 FA plow truck
BK9300 replied to BK9300's topic in WIP: Model Trucks: Big Rigs and Heavy Equipment
Thanks again, Victor - good to know more lists are out there! -
Convoy, take 7
BK9300 replied to Jürgen M.'s topic in WIP: Model Trucks: Big Rigs and Heavy Equipment
There's no doubting your passion for the trucks of that movie - that's quite the lineup of trucks you have completed! -
Another fabulous creation, Luke! I'd sign up to watch a WIP from you about polishing paint finishes - especially how you do it right up to trim pieces and tricky curves. Very well done!