Andy Oldenburg
-
Posts
335 -
Joined
-
Last visited
Content Type
Profiles
Forums
Events
Gallery
Everything posted by Andy Oldenburg
-
Hi Steve, you got me, I´m an amateur?? If it dosn´t say FORD on it, I wouldn´t notice the difference. Pls excuse my ignorance!? Of course someone did notice... But thanks for the knowledge!
-
Hi Bob, just discovered this thread of yours. Very nice work on this build! Clean look of your engine with fine detailing. Are you going to give the engine some patina and grime?
-
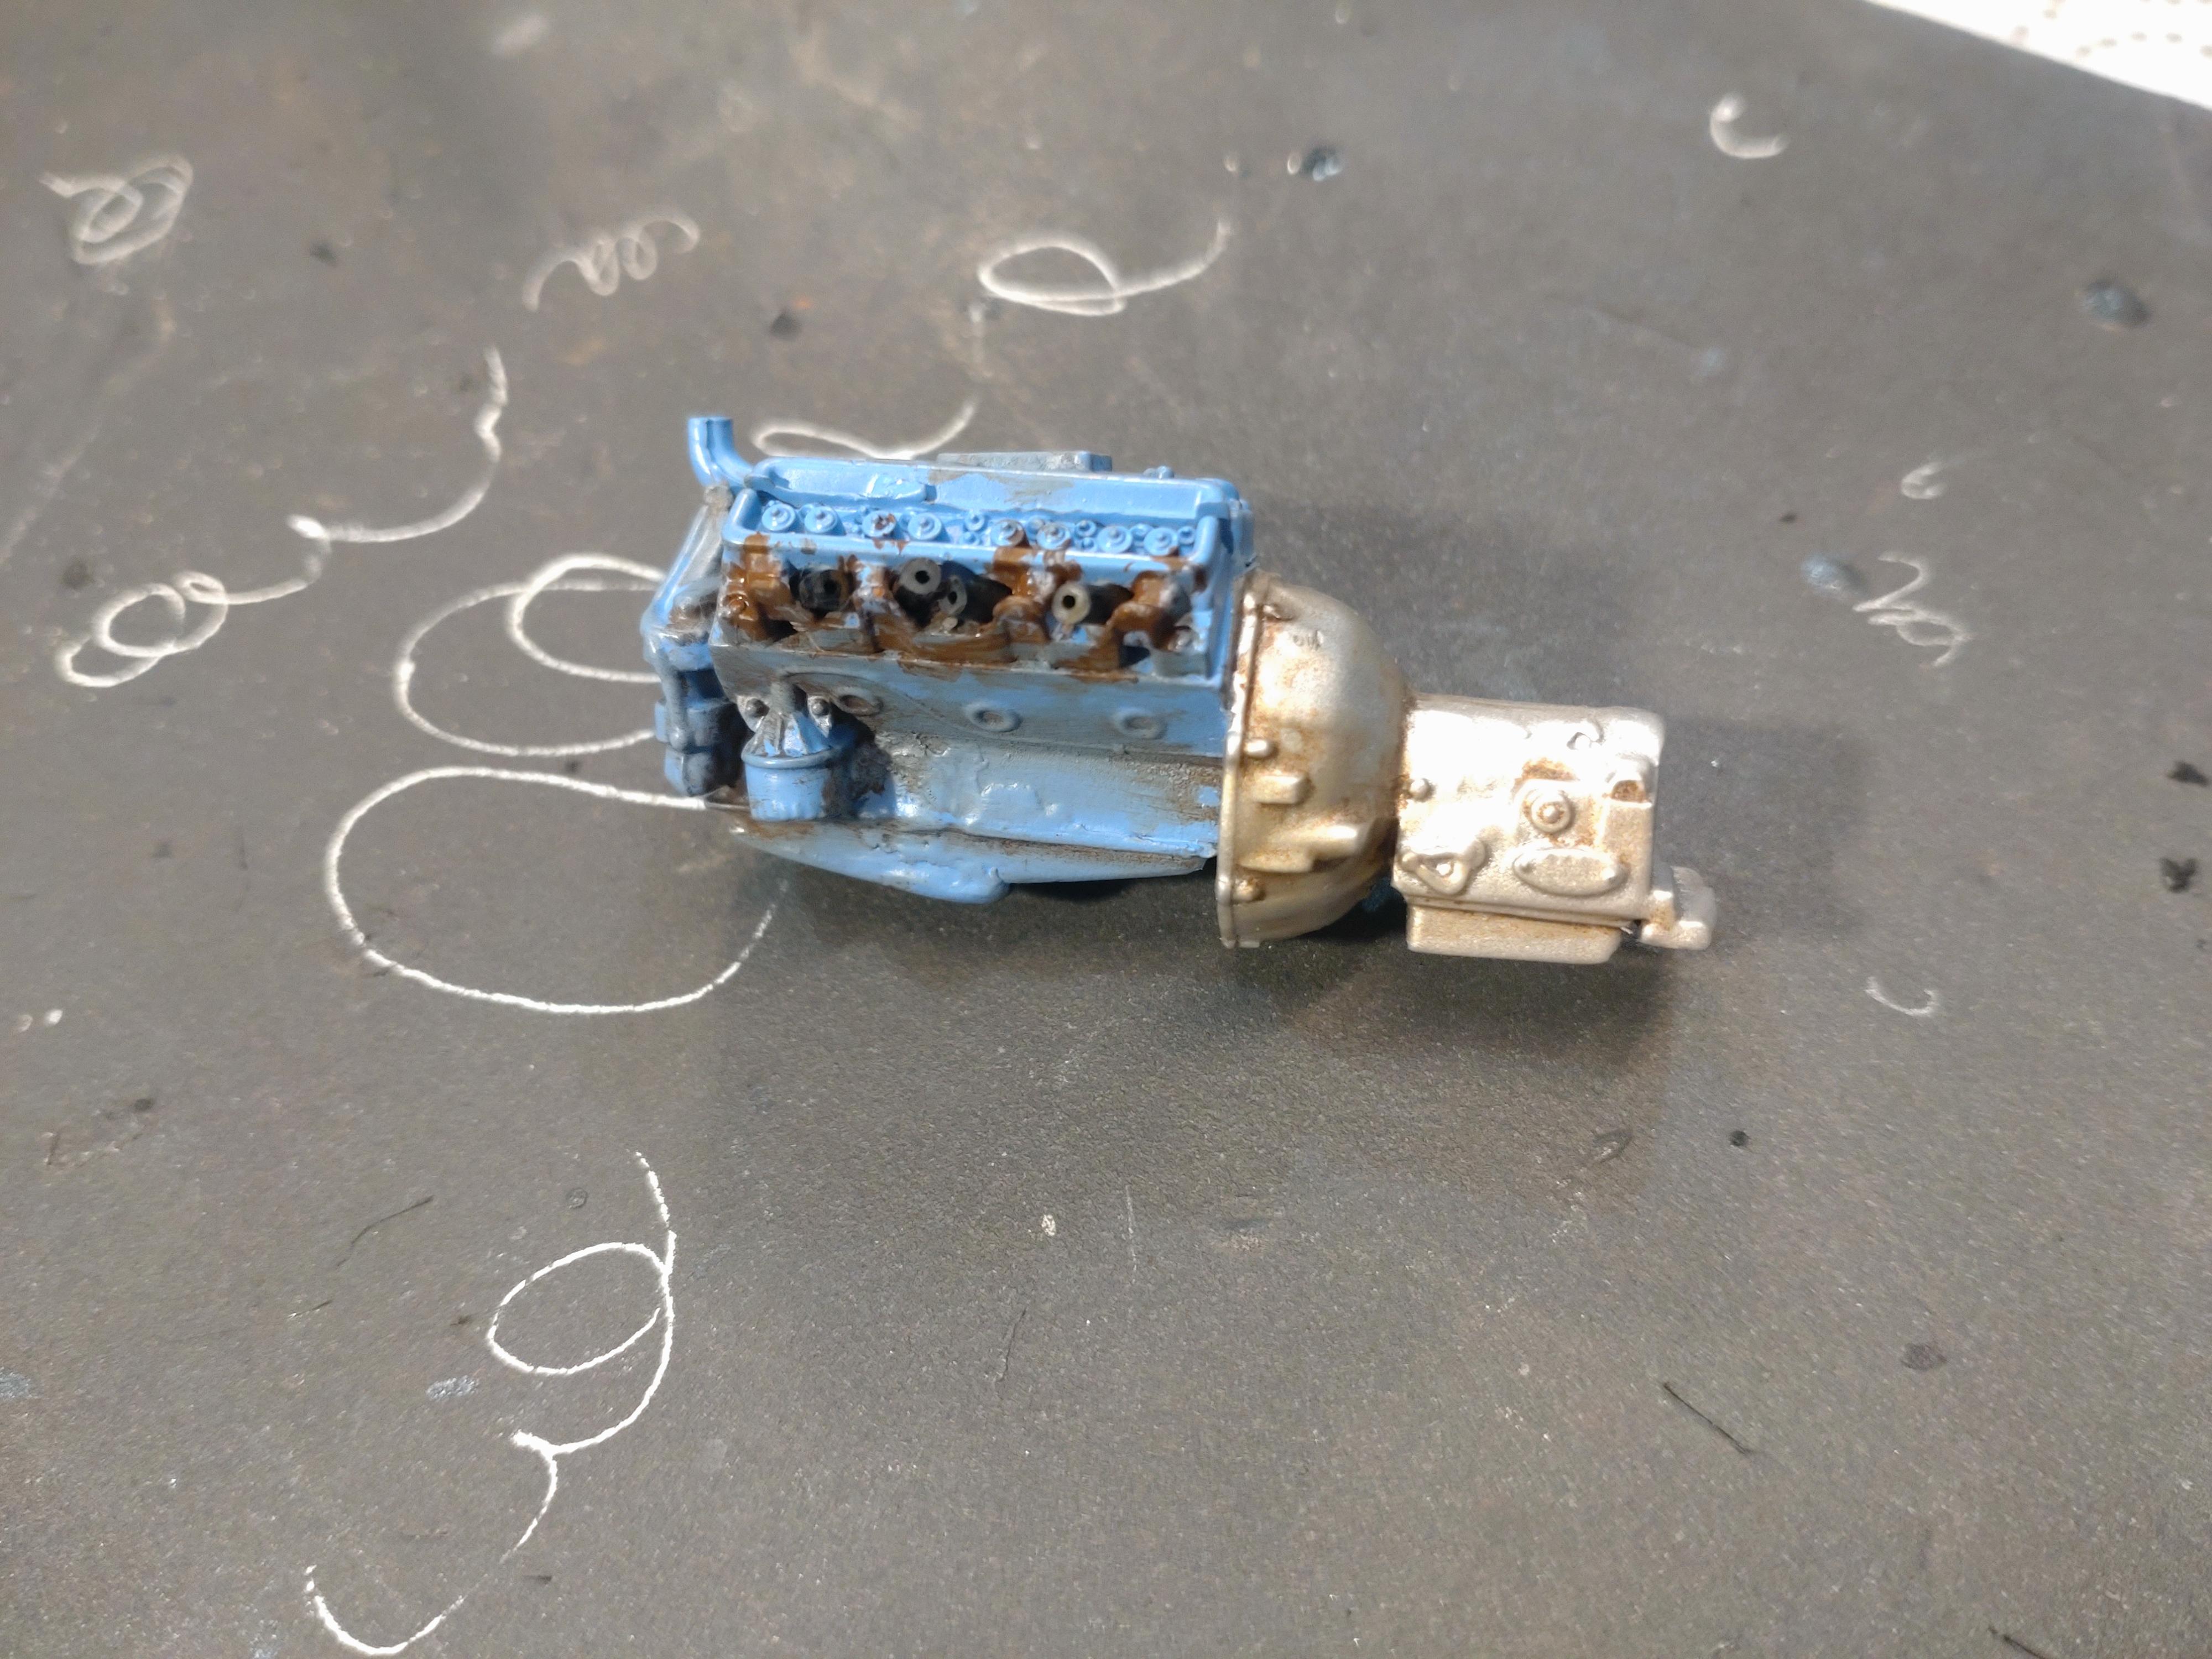
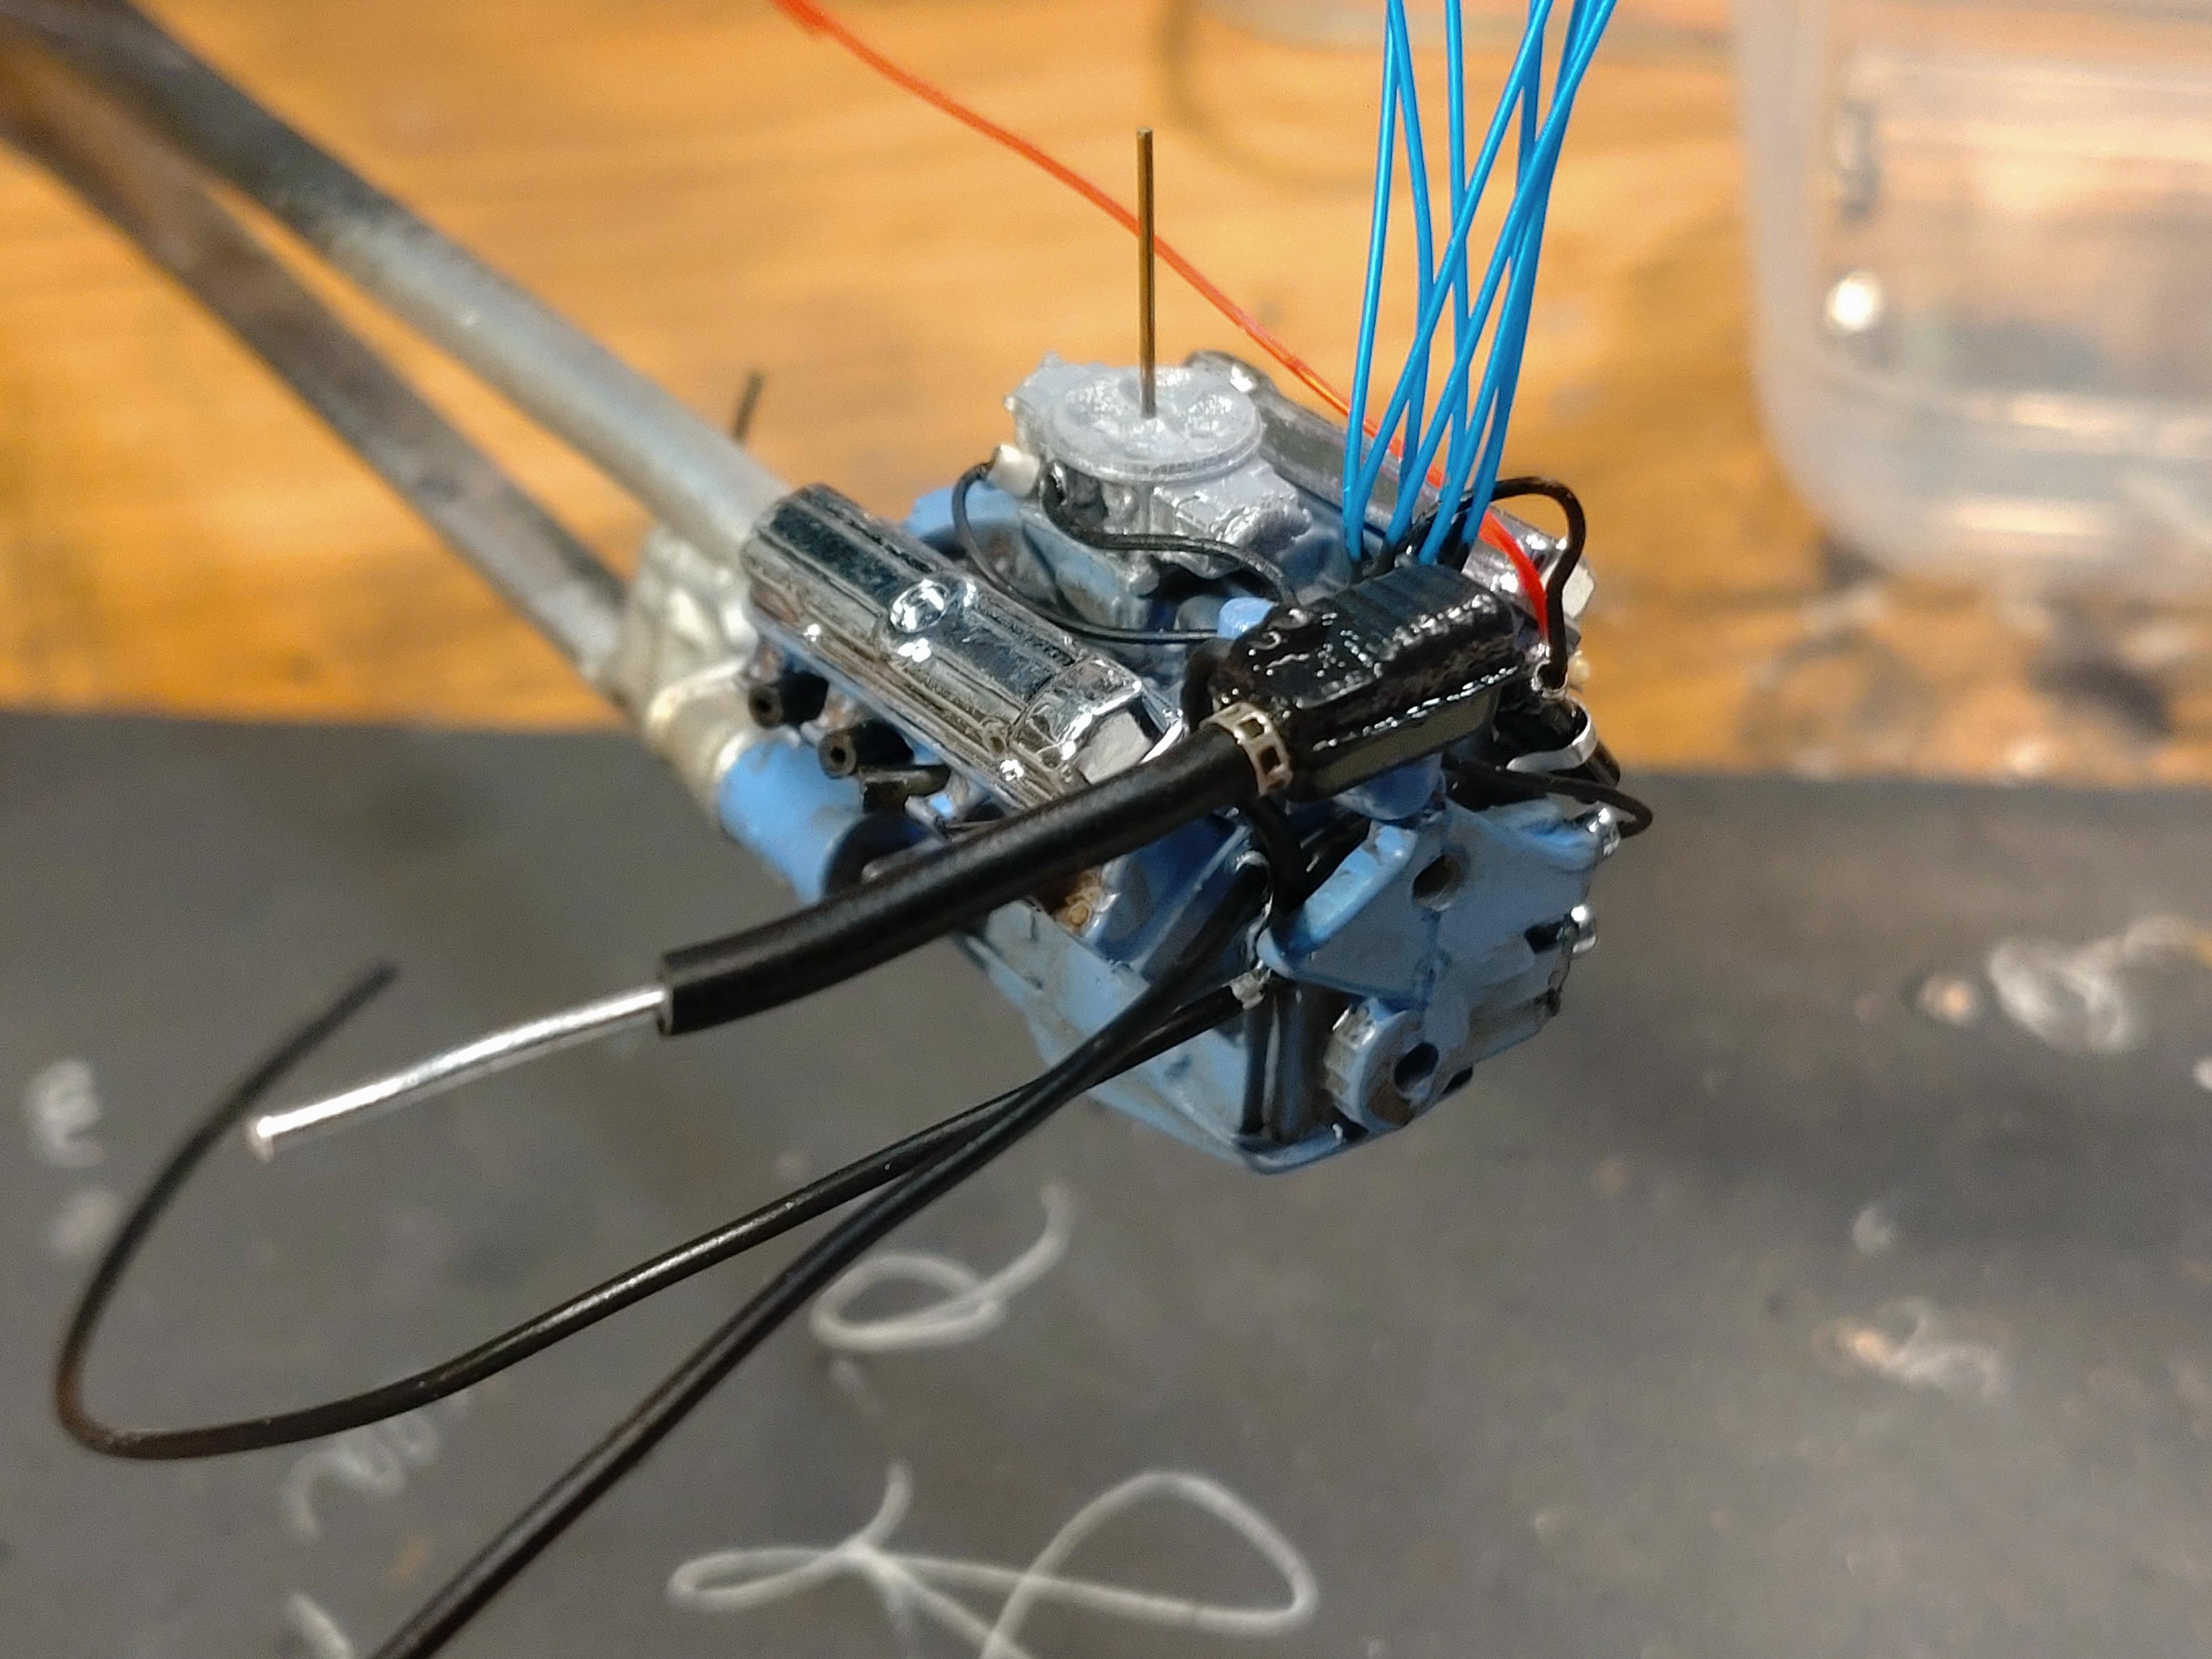
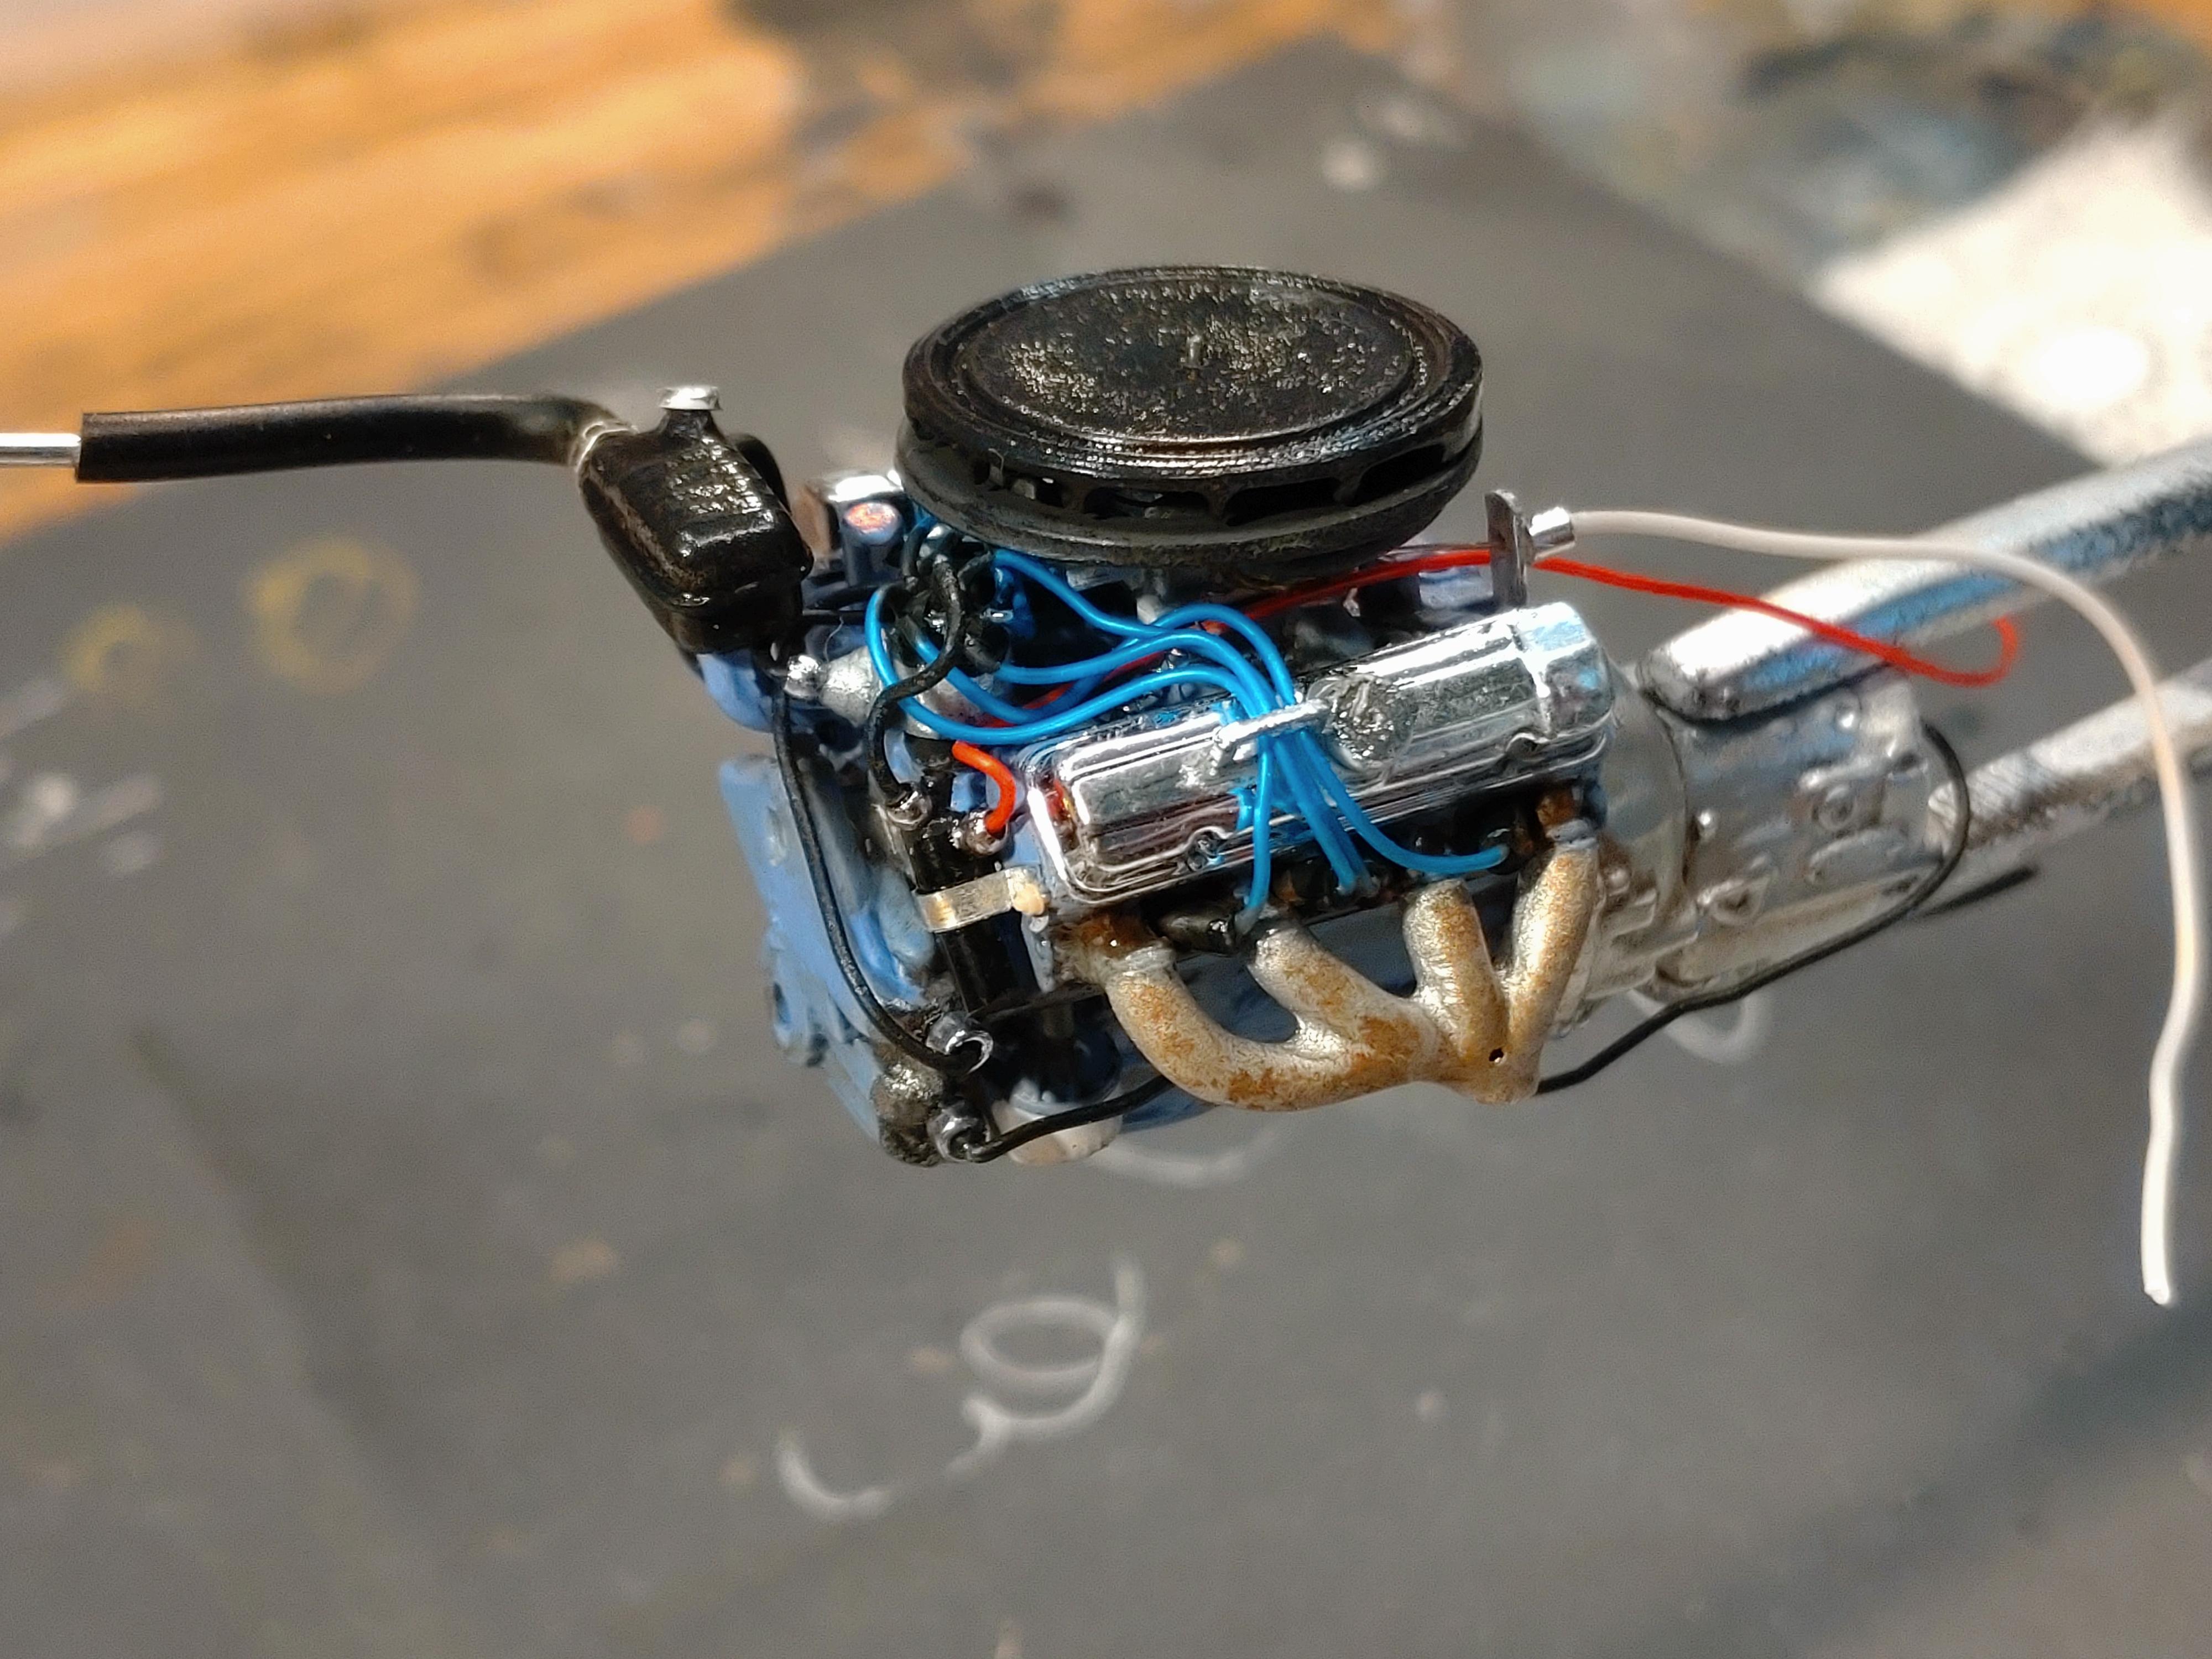
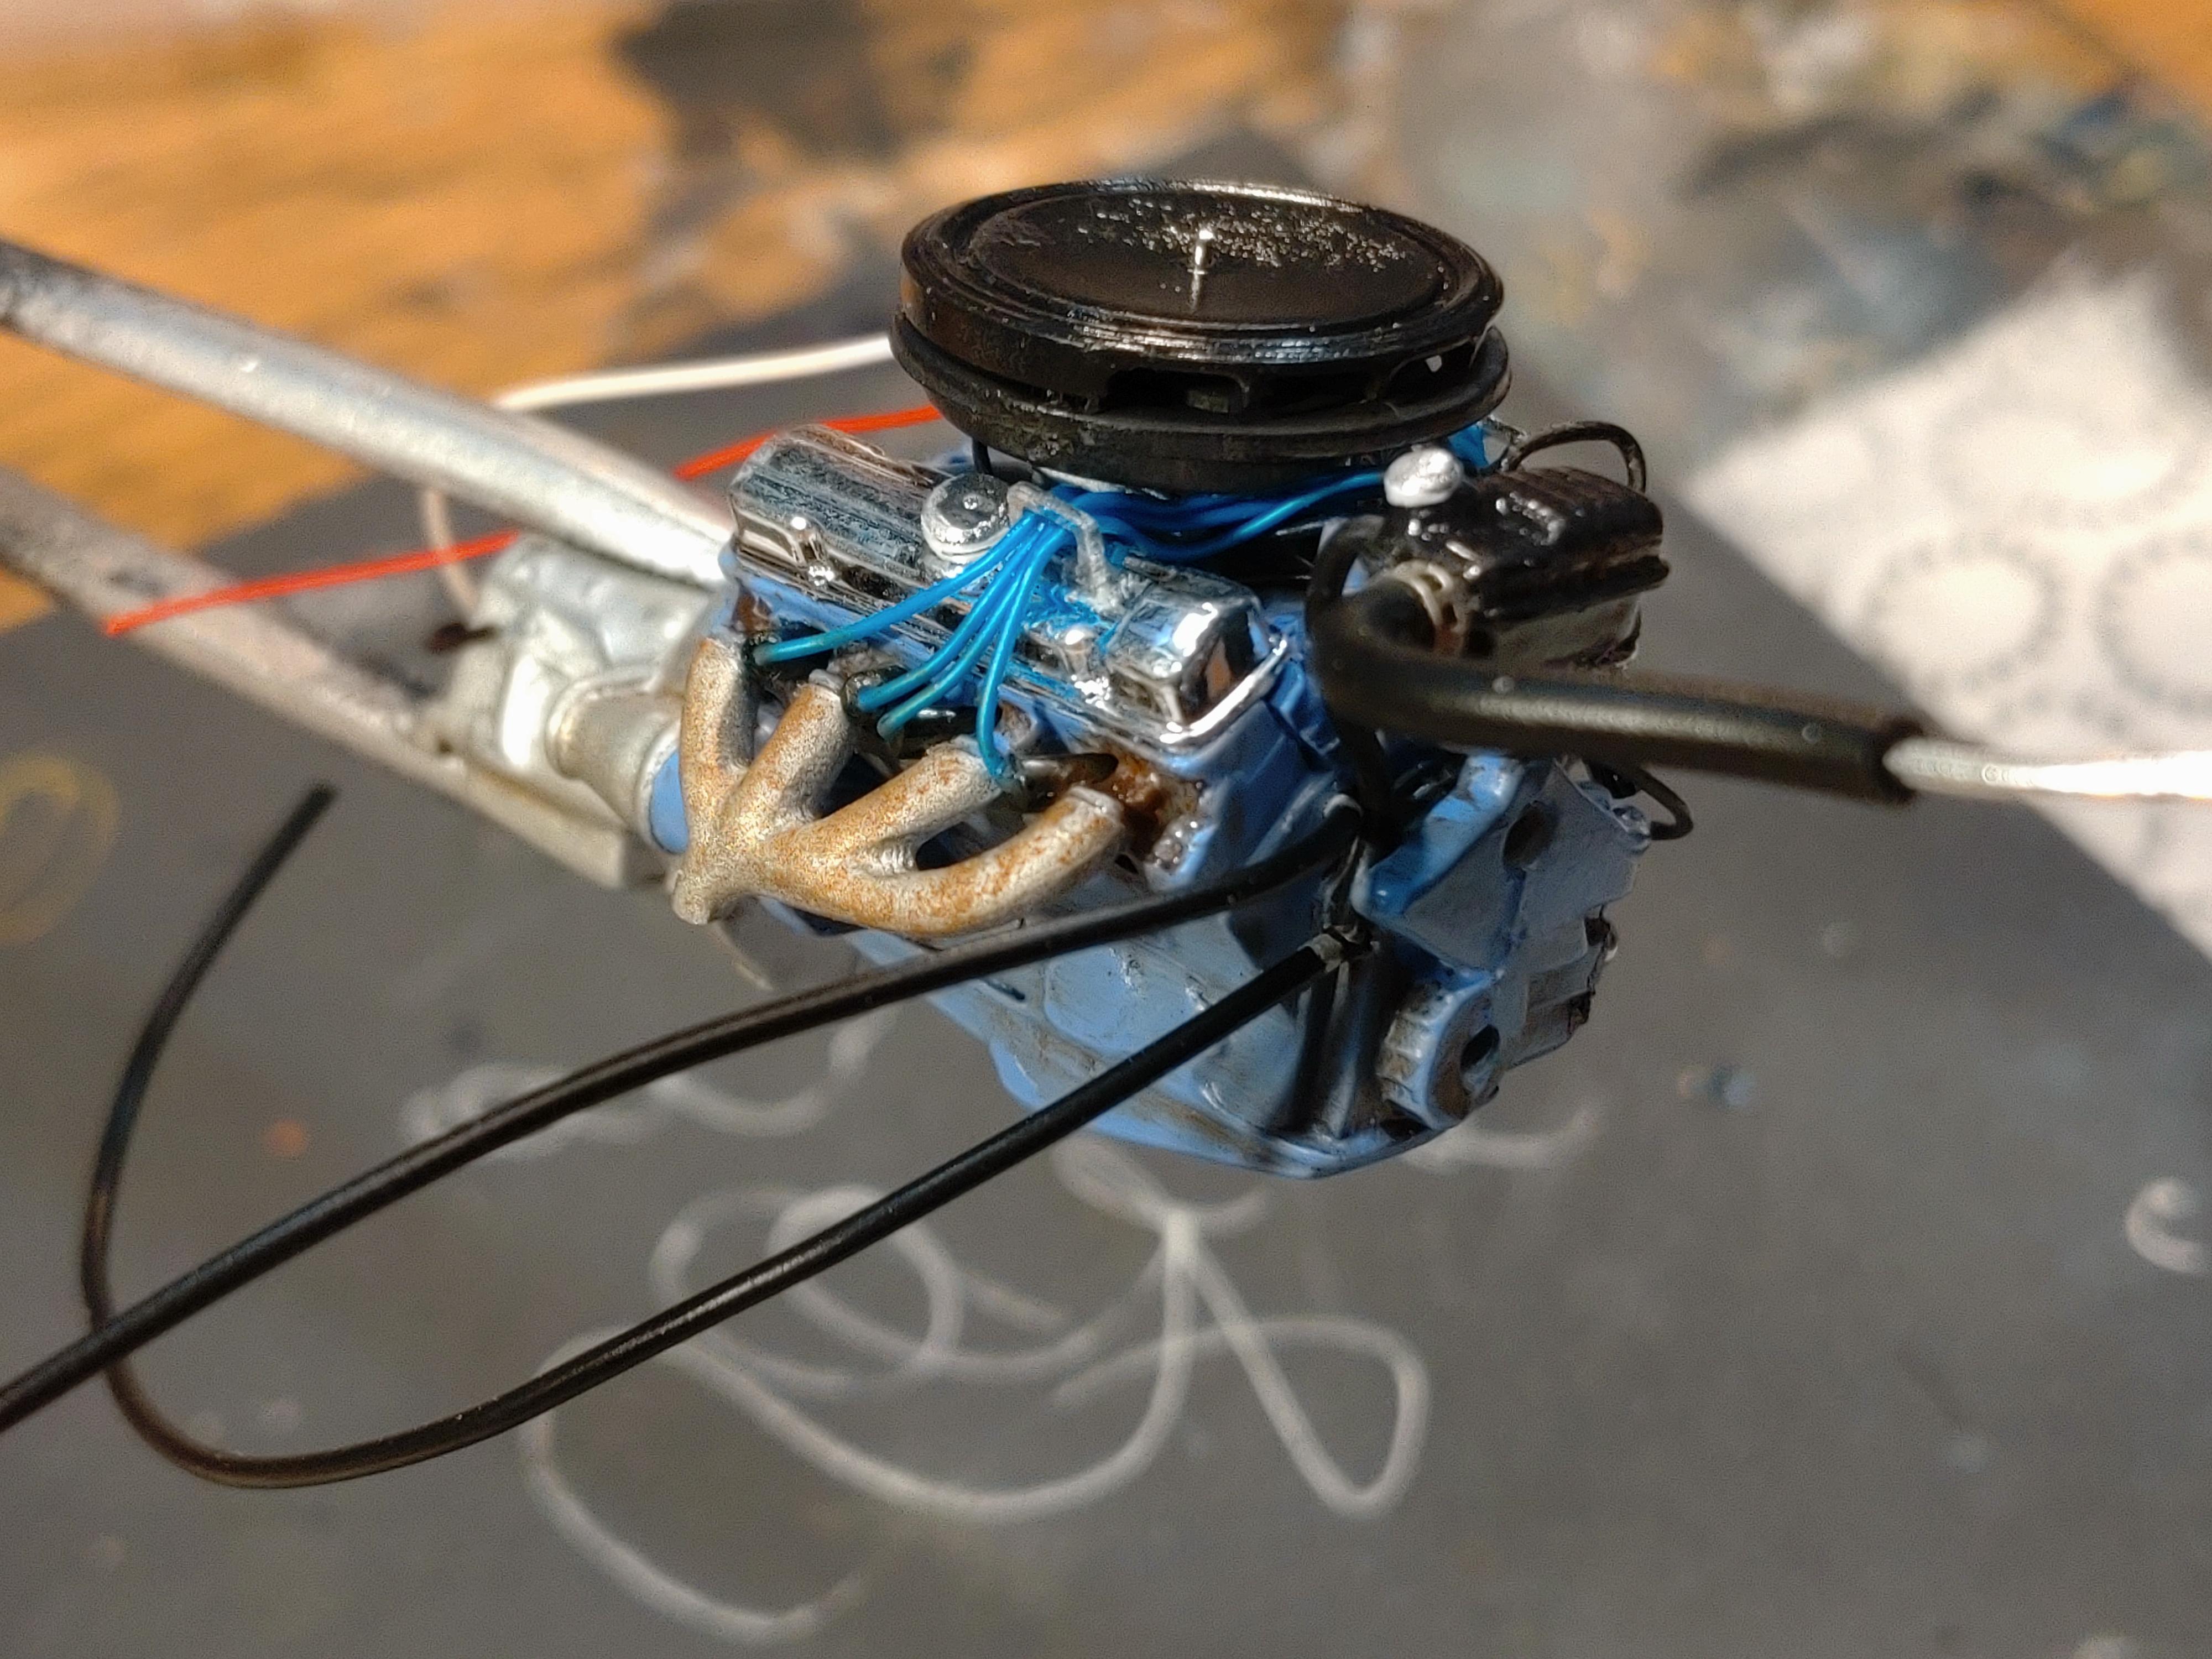
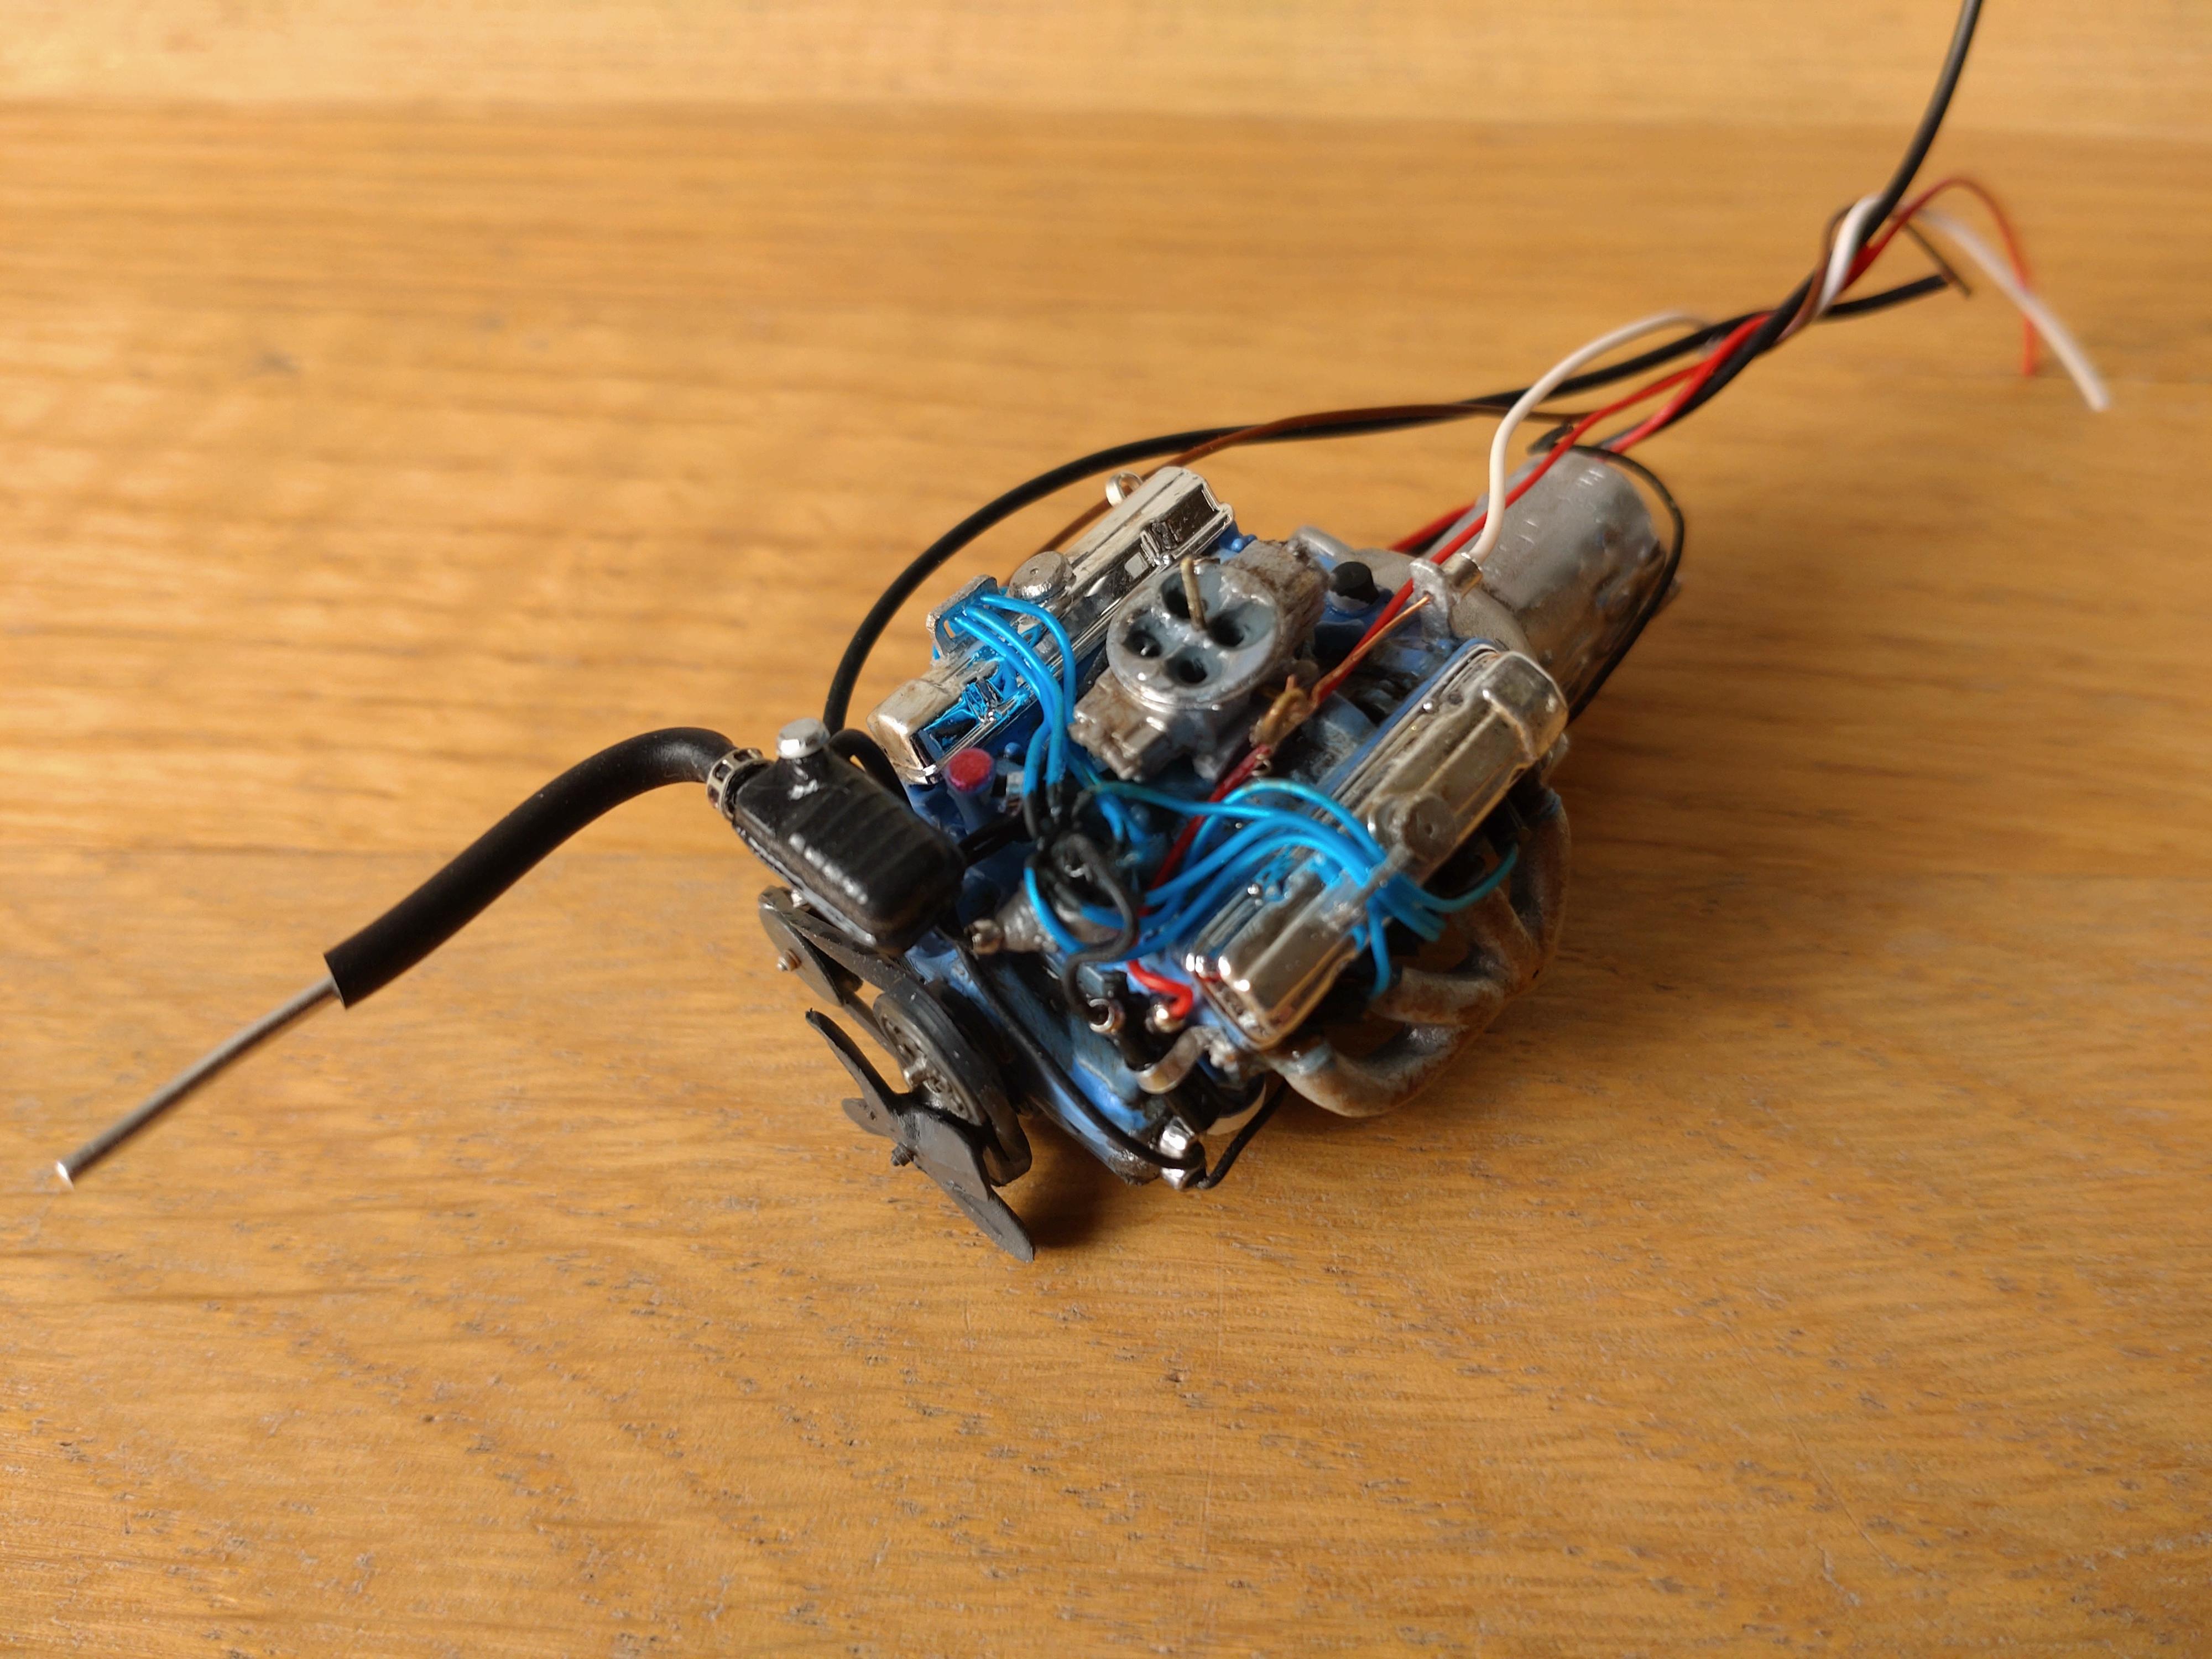
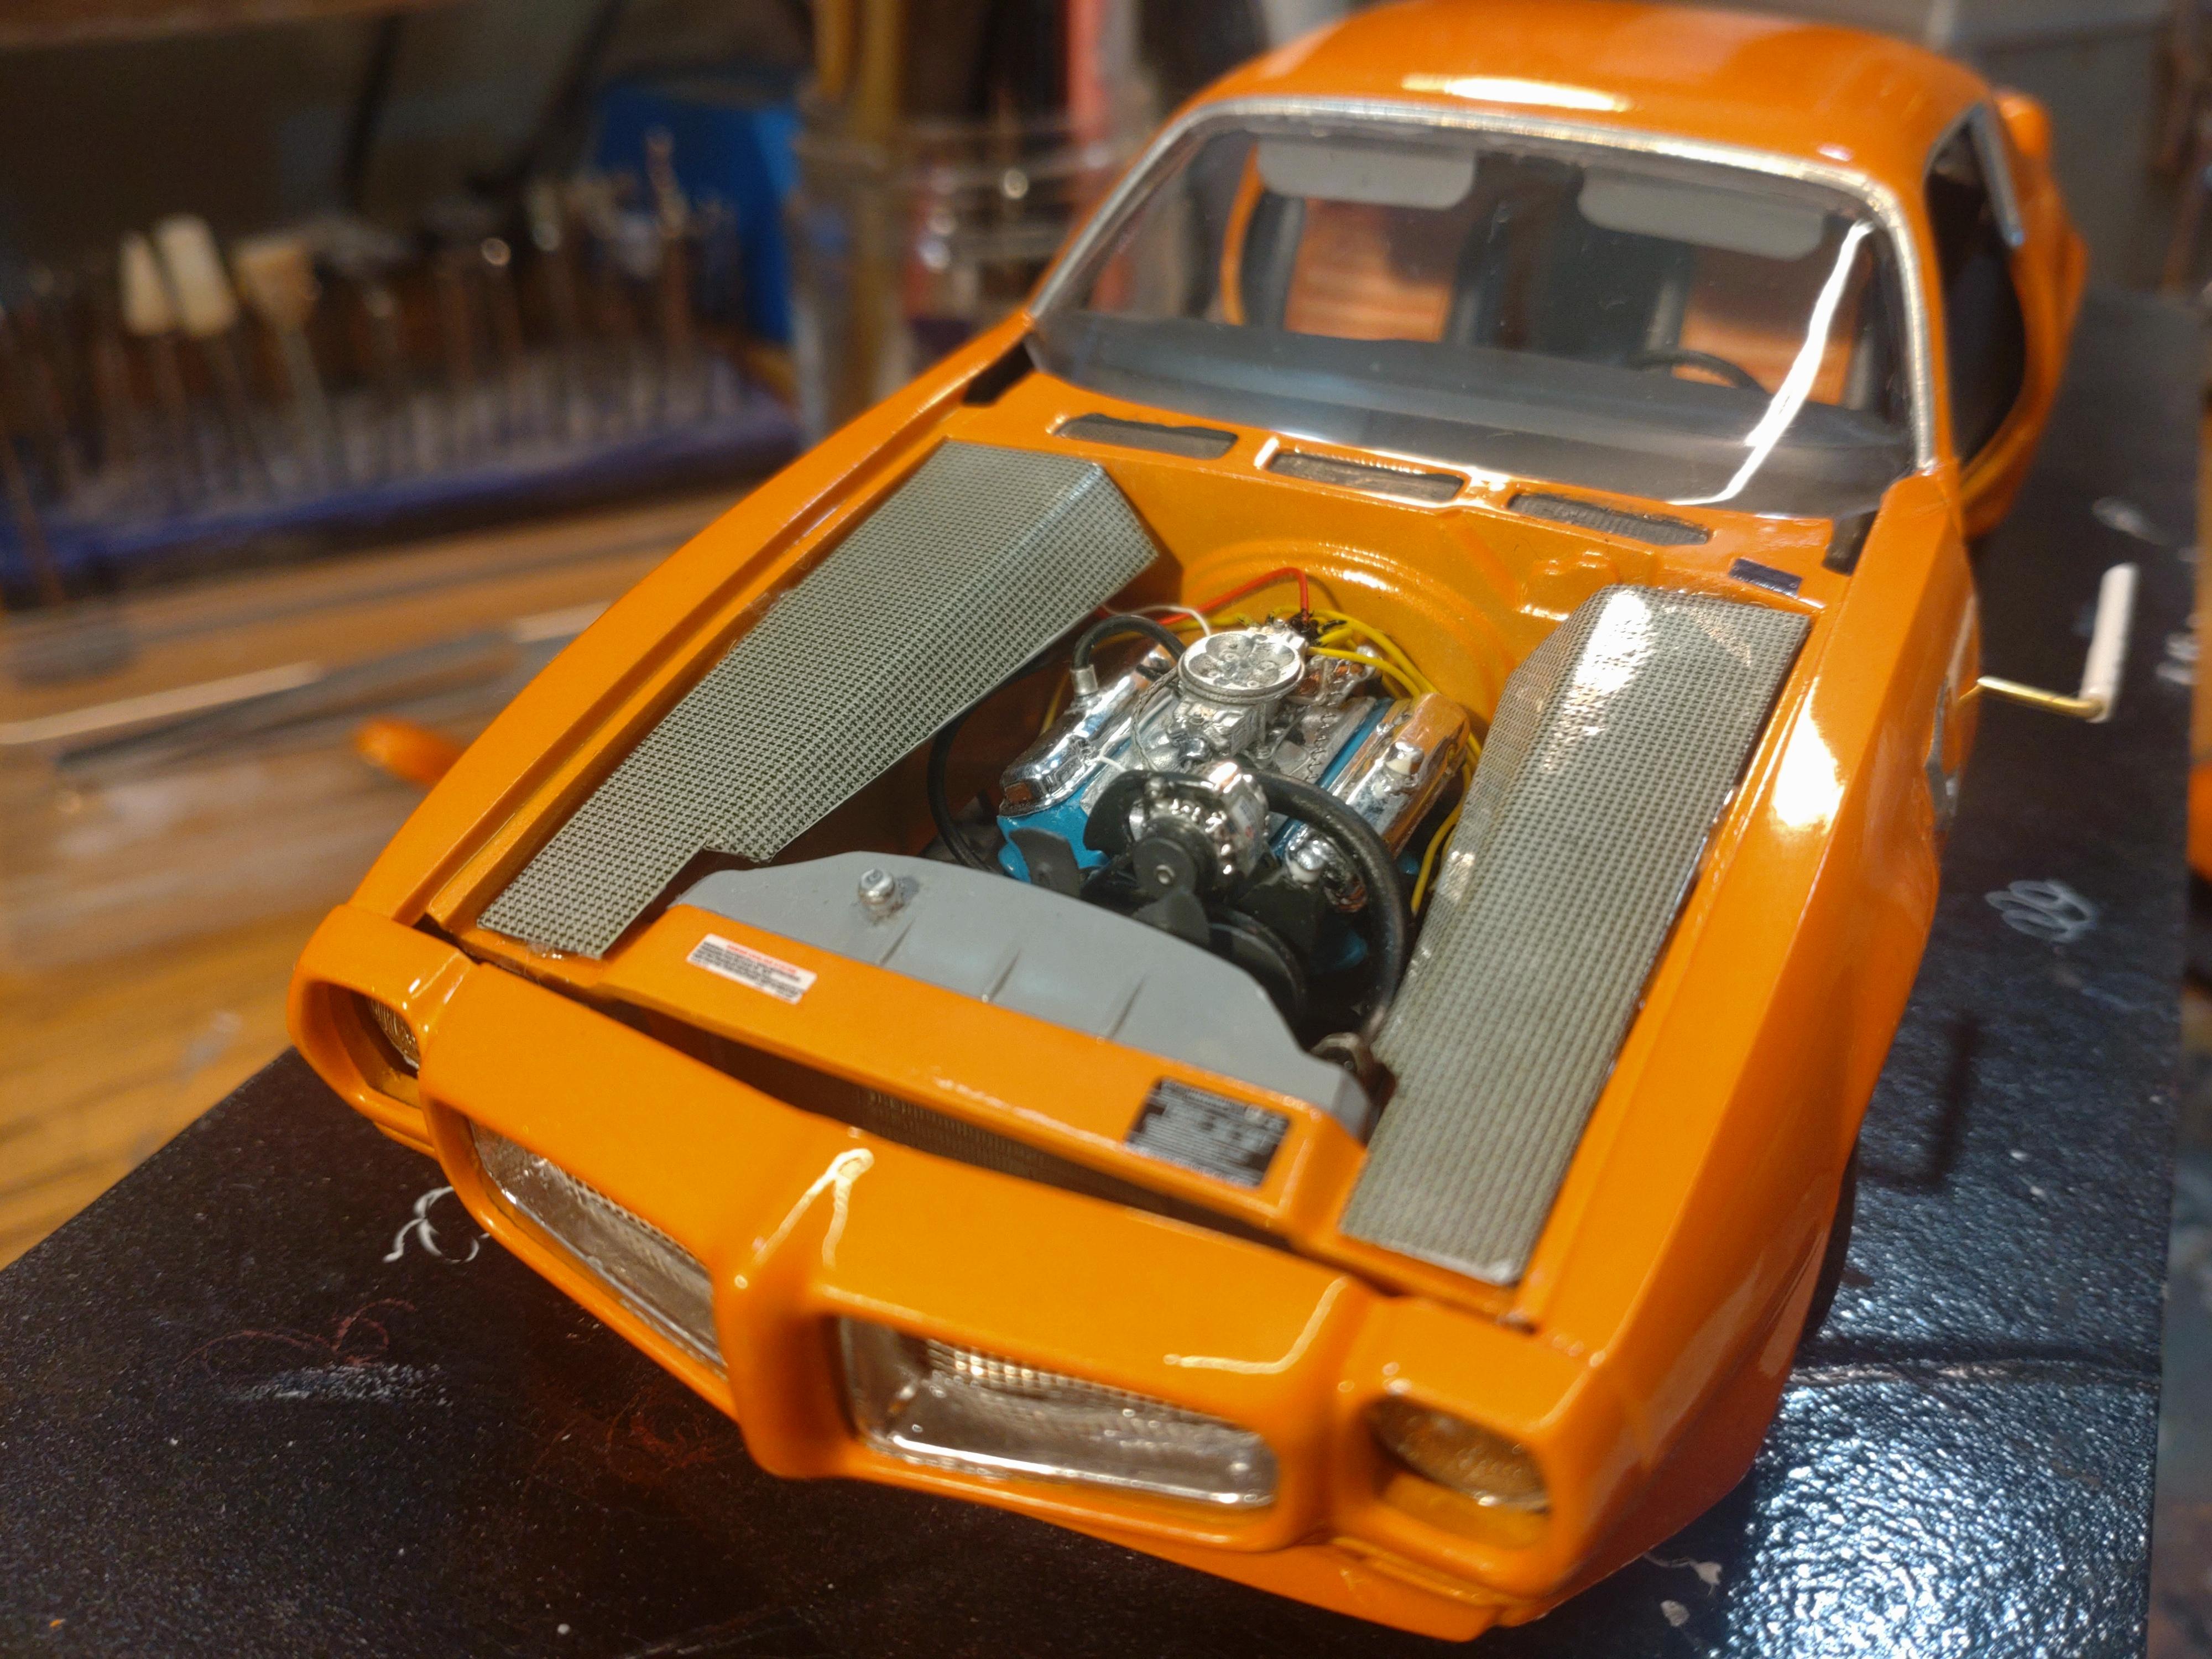
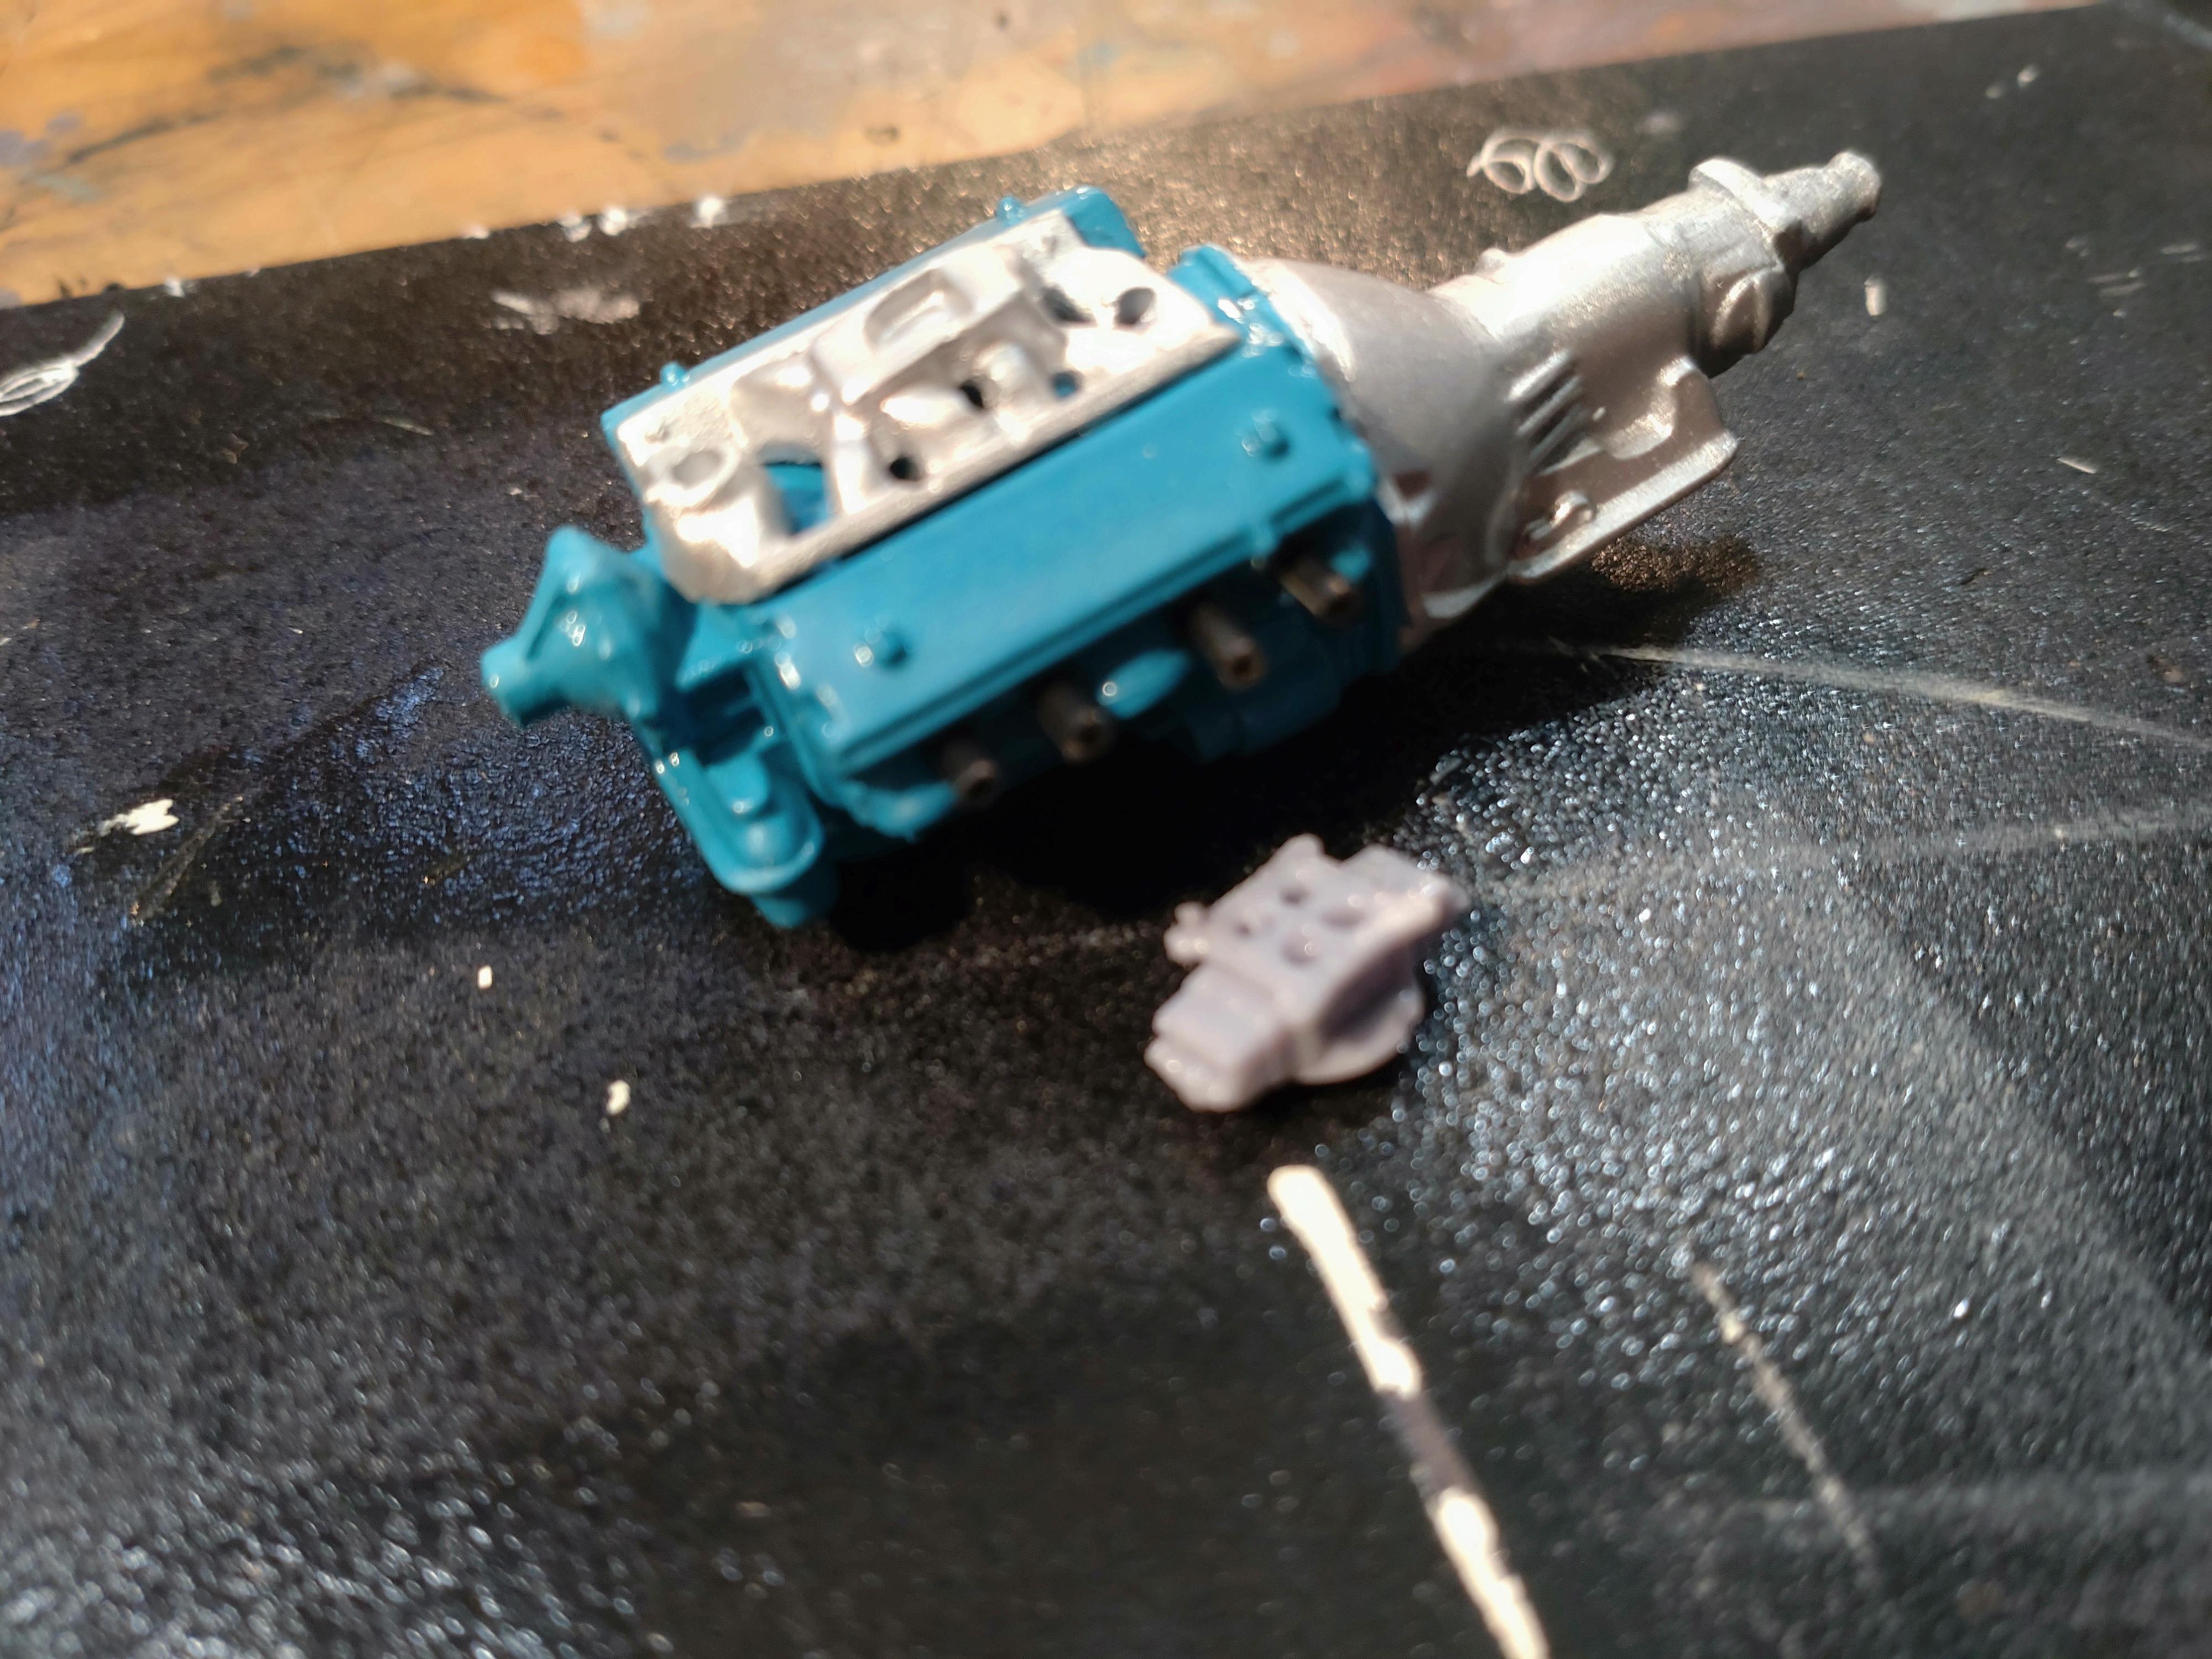
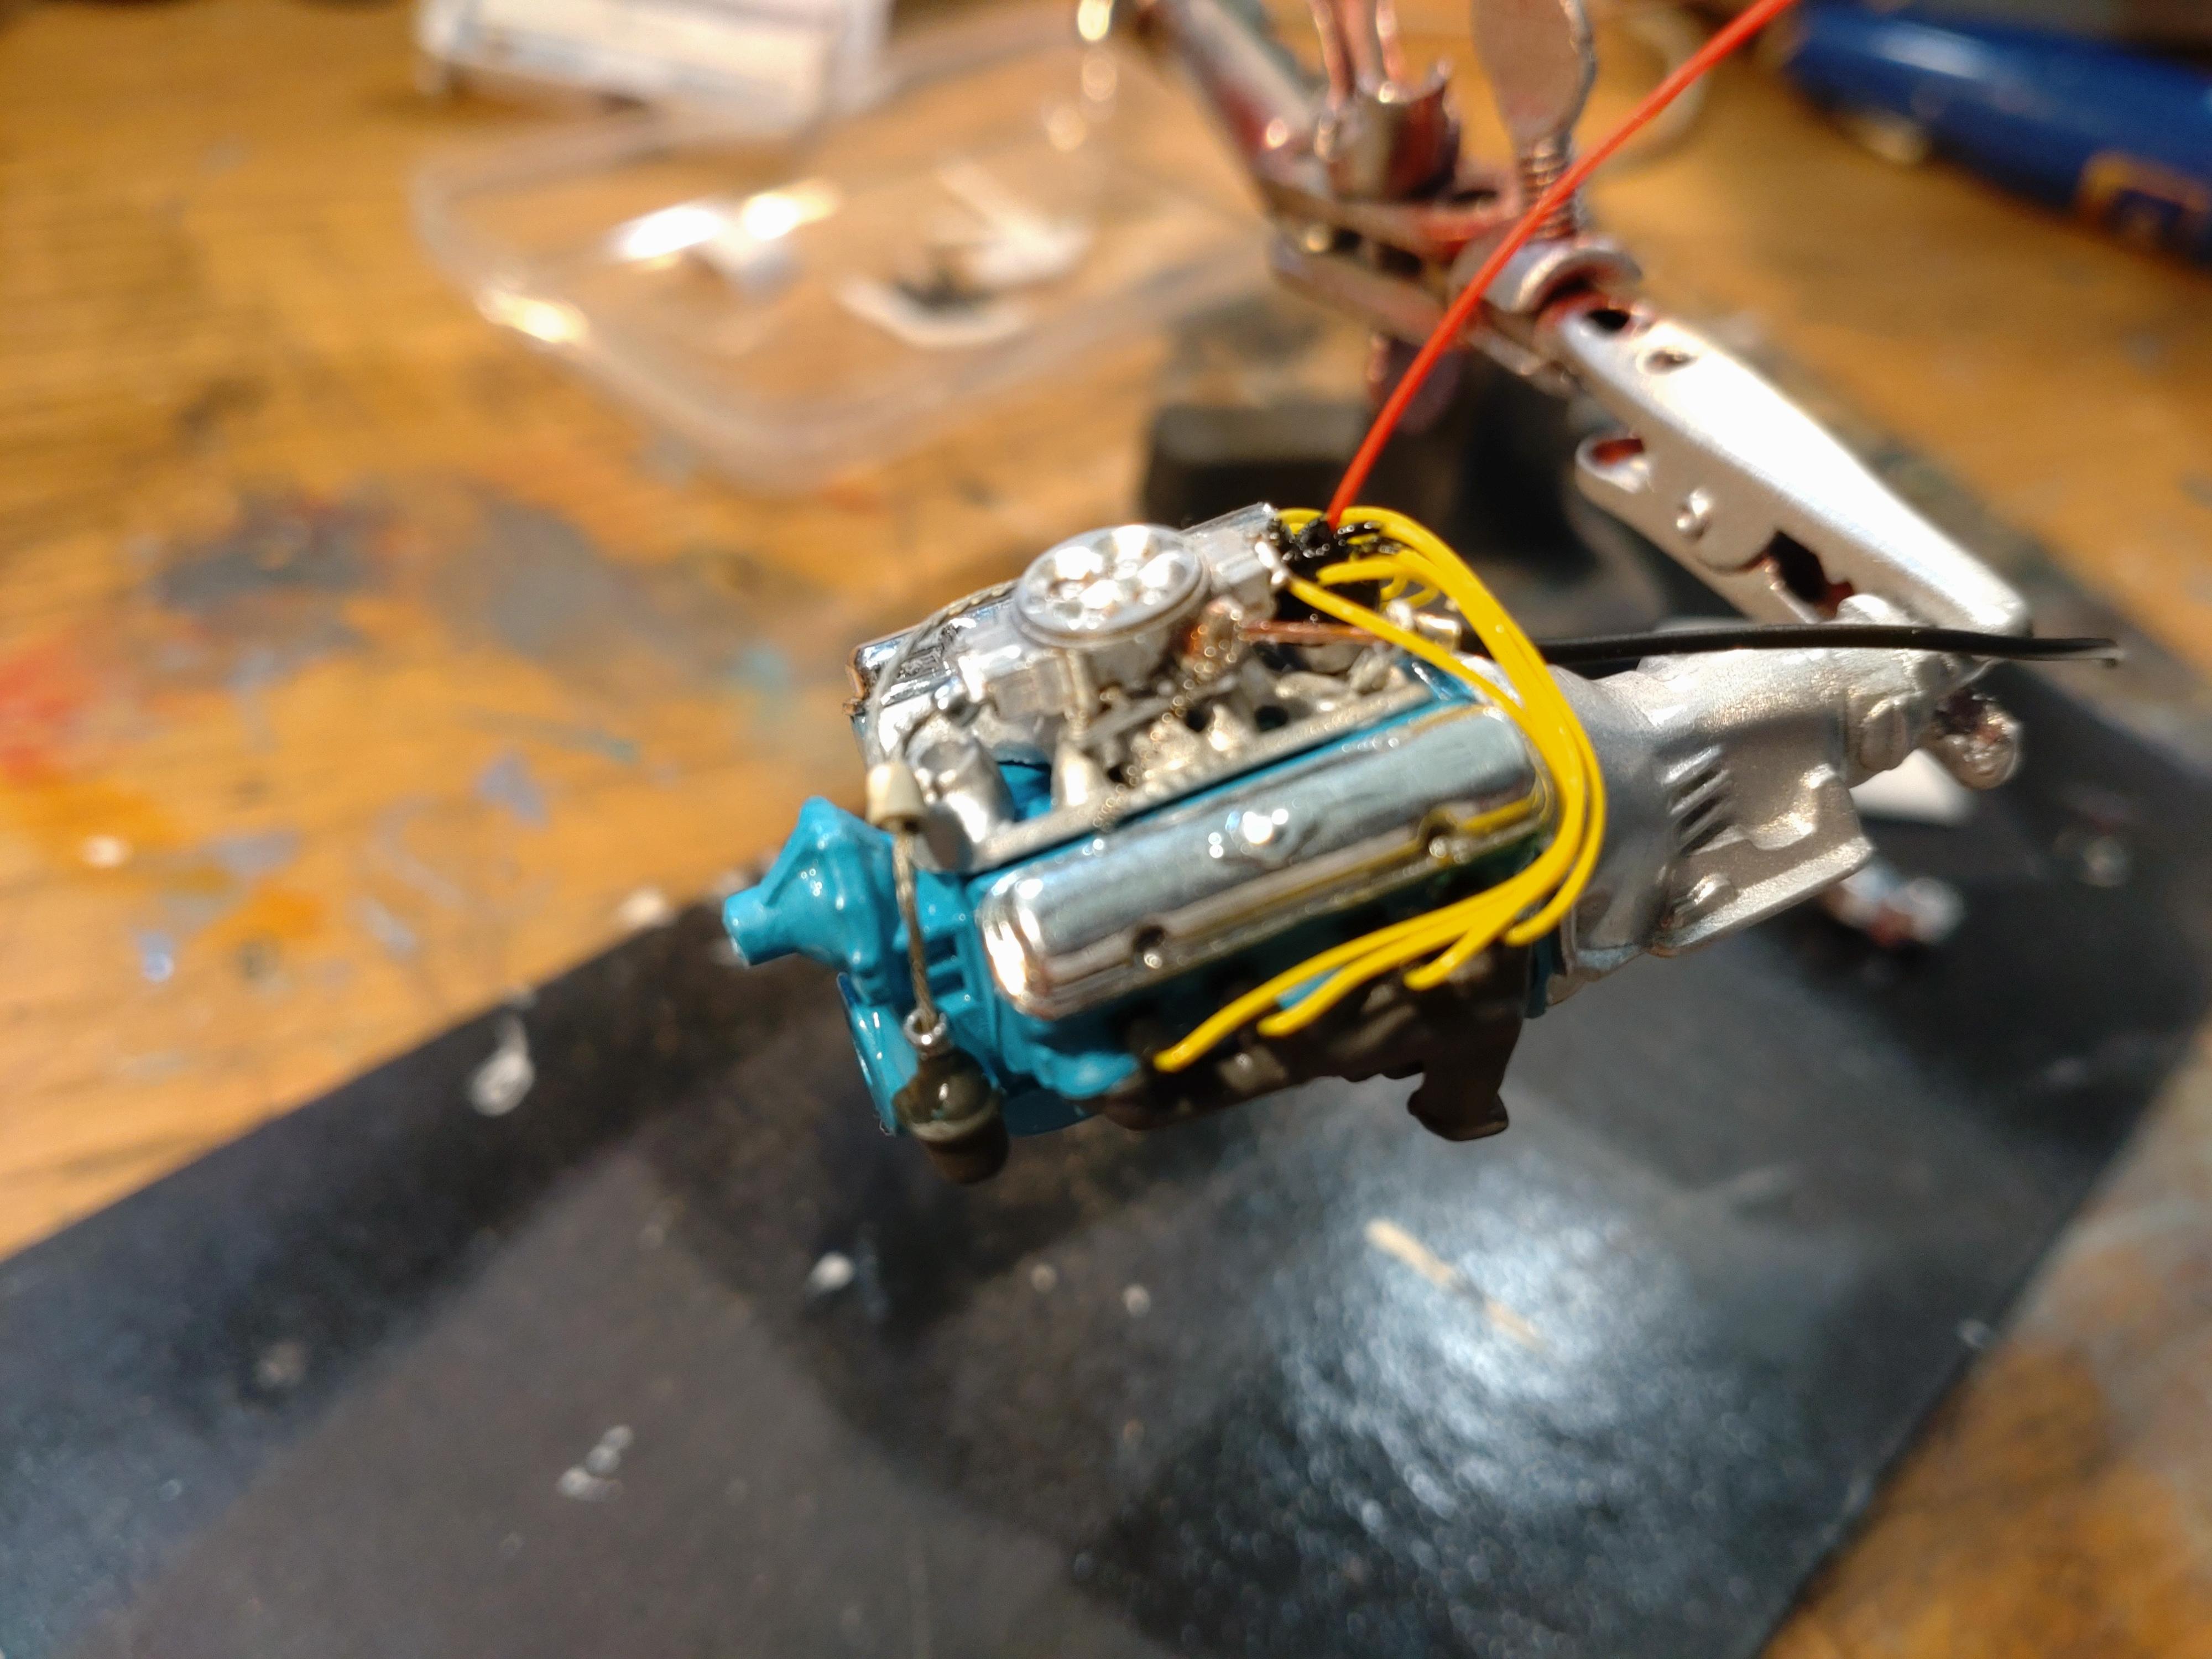
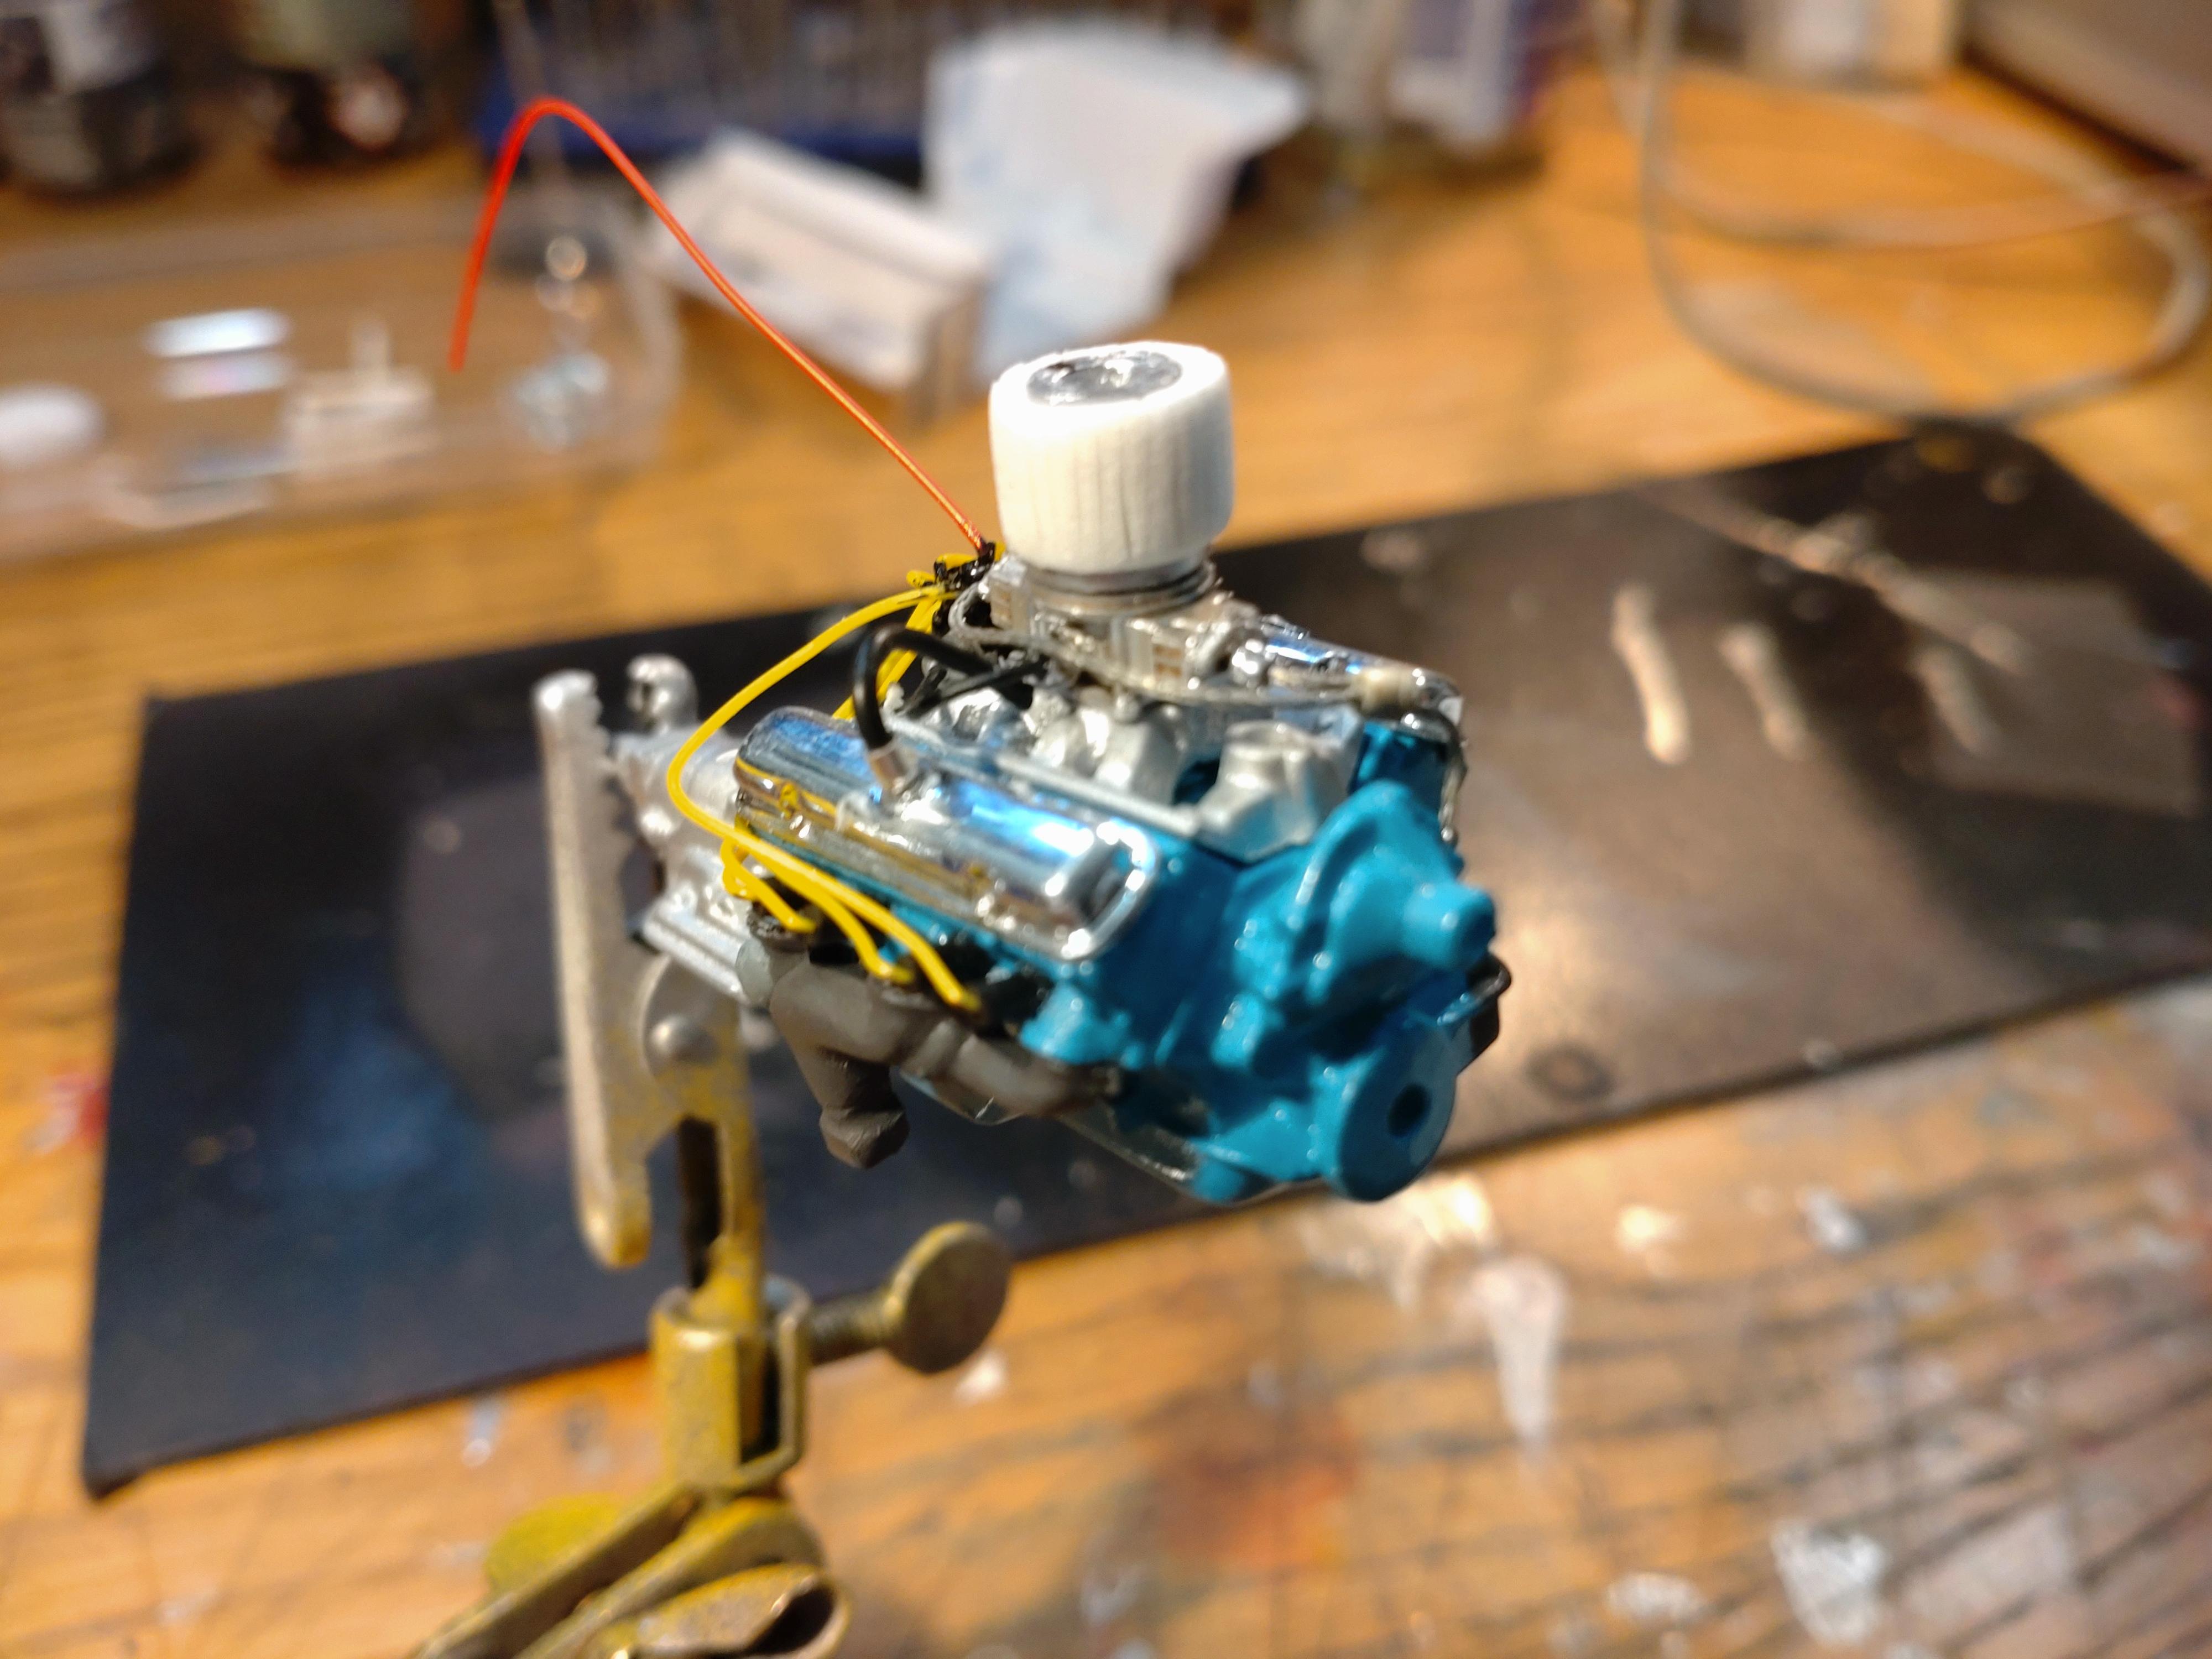
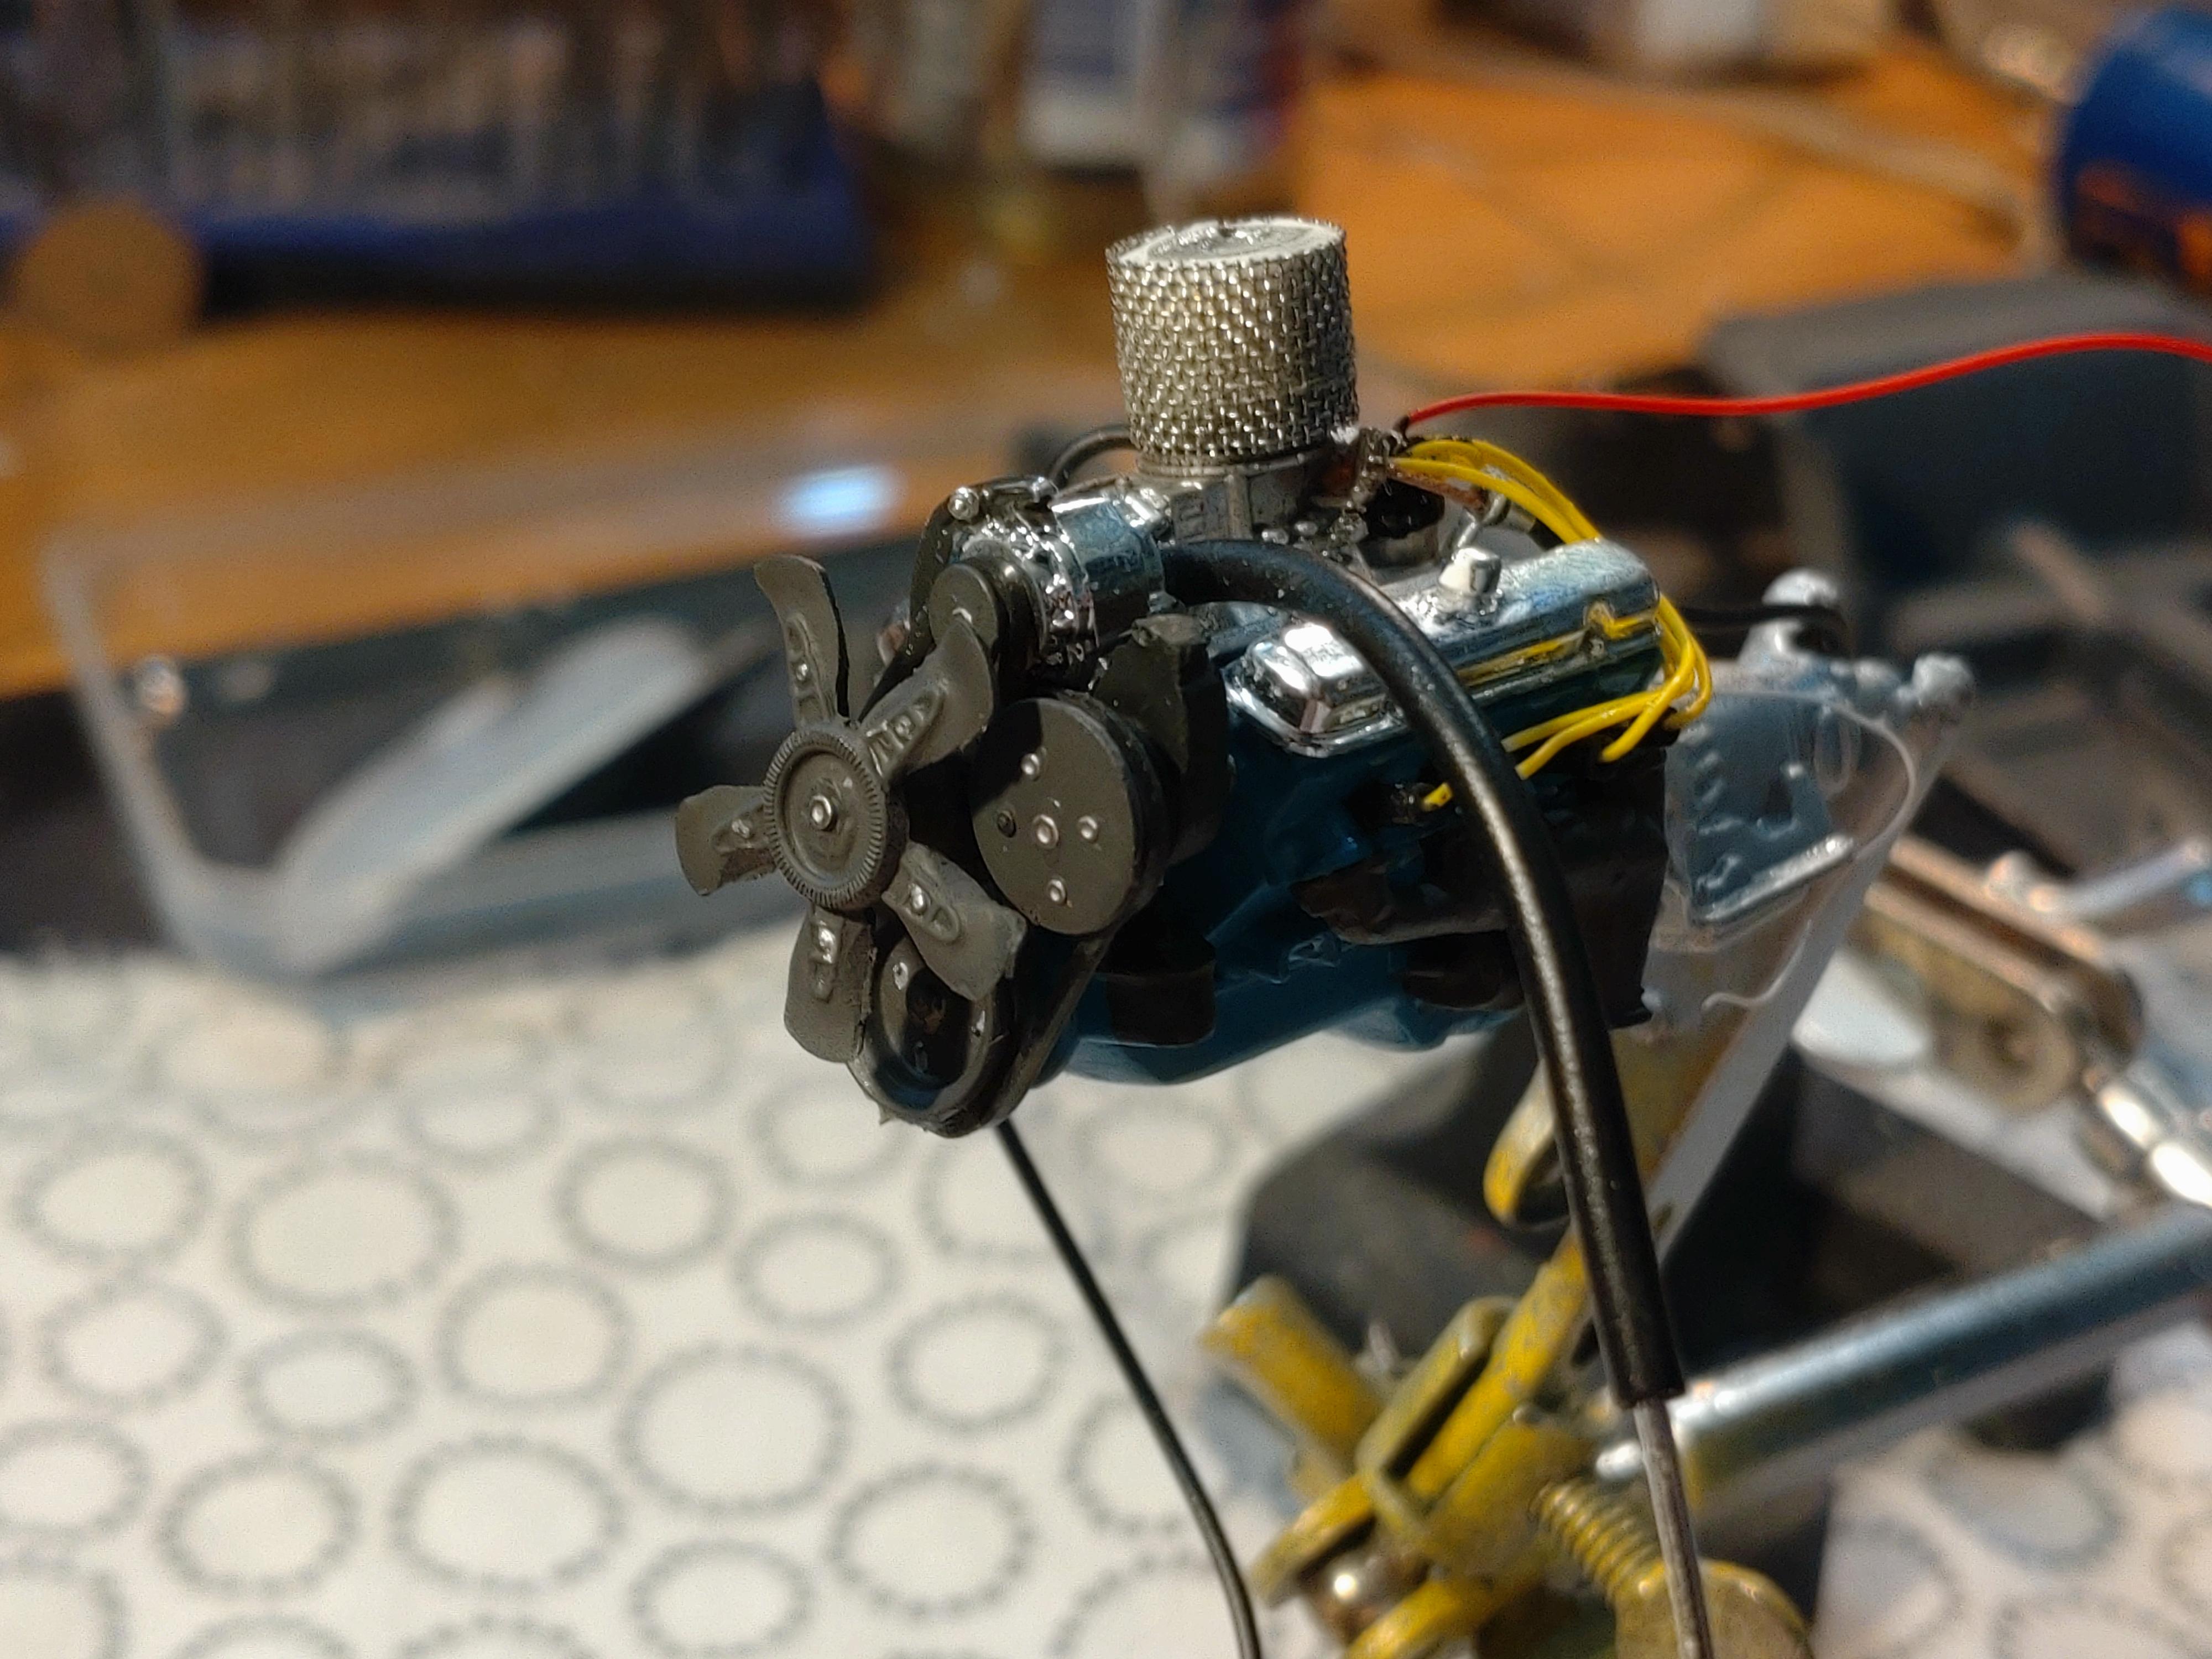
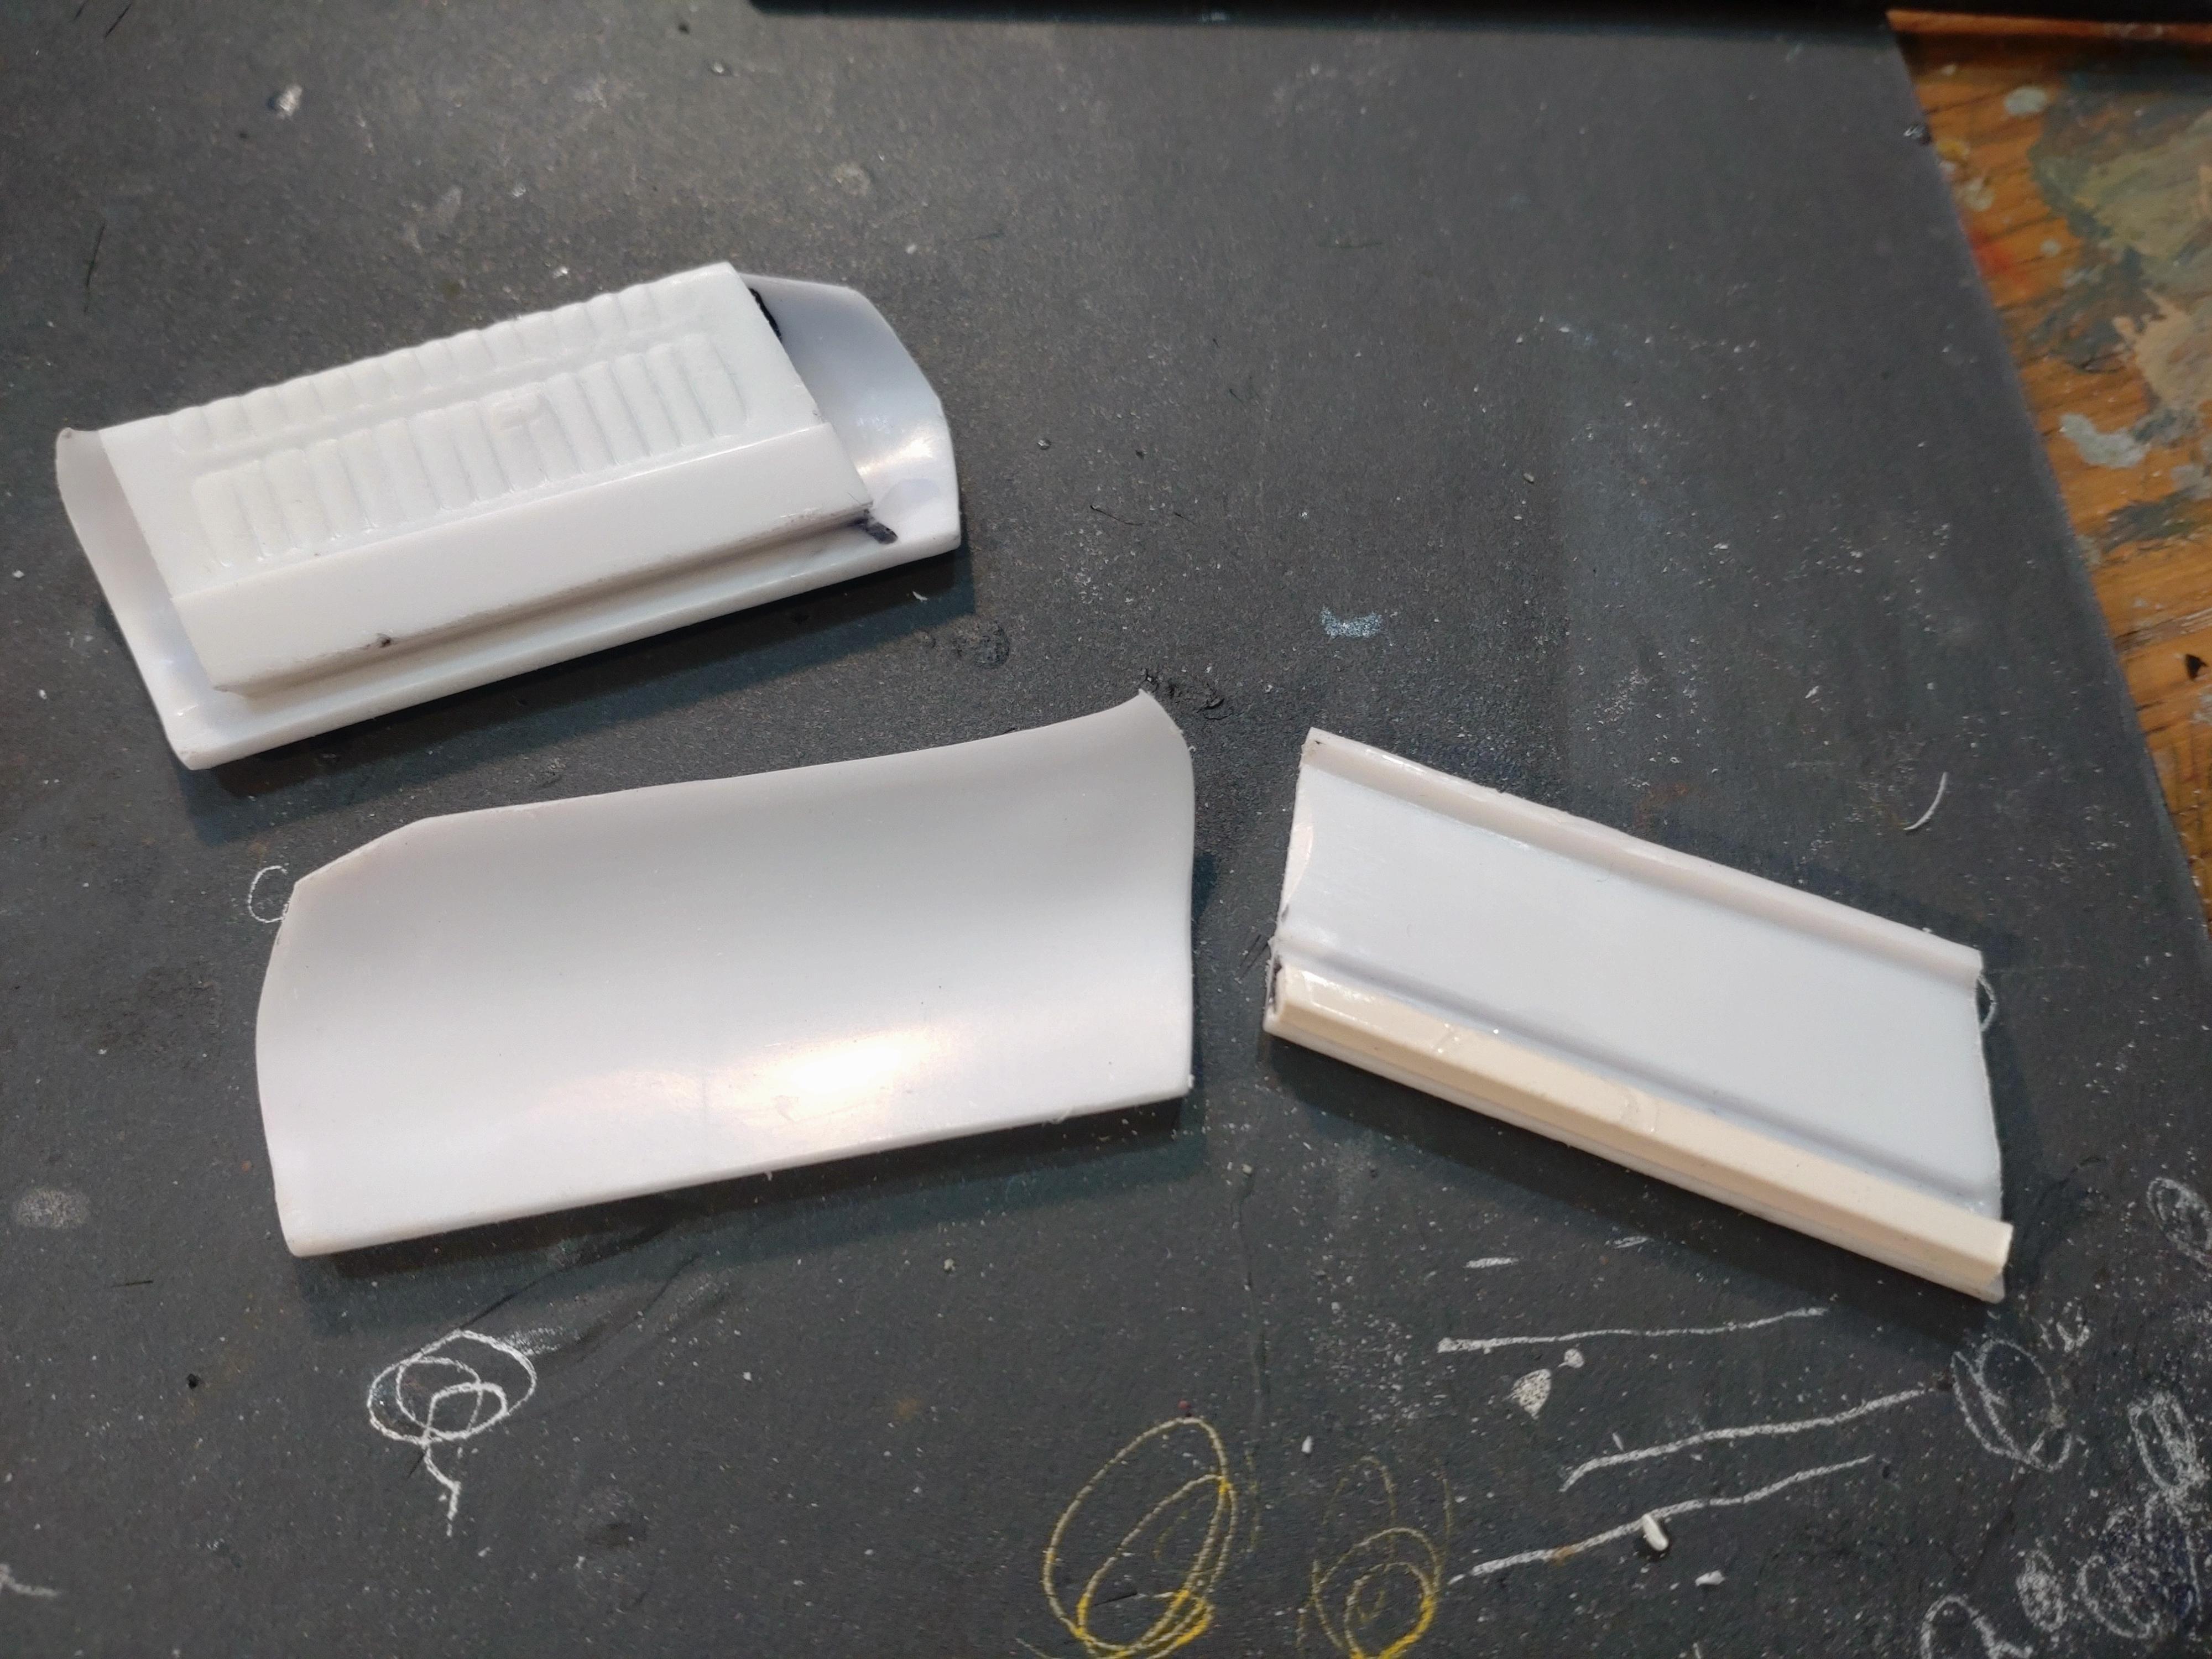
The engine is finished. Engines have been my favorite part on every model since I have started. I love that tiny fiddling and can get lost in attaching wires and cables. In this kit, the detailing and the number of parts of the engine are under average. I had some parts on stock so I was able to bring the engine onto a higher level. I started by replacing the single part intake manifold and headers. This Marauder kit has metal rod axles that also go through the block so I filled and puttied that hole. The pan needed some heavy cutting and crafting to make the the competed engine match with the new front suspension. The Ford blue is sprayed, patina applied and the spark plug boots inserted. The distributor and coil are home made. The head covers are spare parts. The expansion tank received some detailing and the hose was replaced with a rubber tube stiffened with a wire. The 3D printed carb is from Scale Production. The brass wire will later hold the air filter. Next I connected the spark cables and the exhaust manifolds. The various lines for fuel etc. are connected also. The pulley wheels and the generator are cut off the standard part and modified to take a belt. The belt will be a .5mm slice off a thin rubber mat. The generator will be attached to the block with a wire pin. Here we have the finished engine with the pulleys and belt attached. Here and there I added some 1mm printed hex nuts for added detailing. I´m bending into the last lap now and am looking forward to get everything together. I hope that the door and the hood hinges don´t cause too much hassle while assembling. Crossing my fingers! Thanks for watching!

-
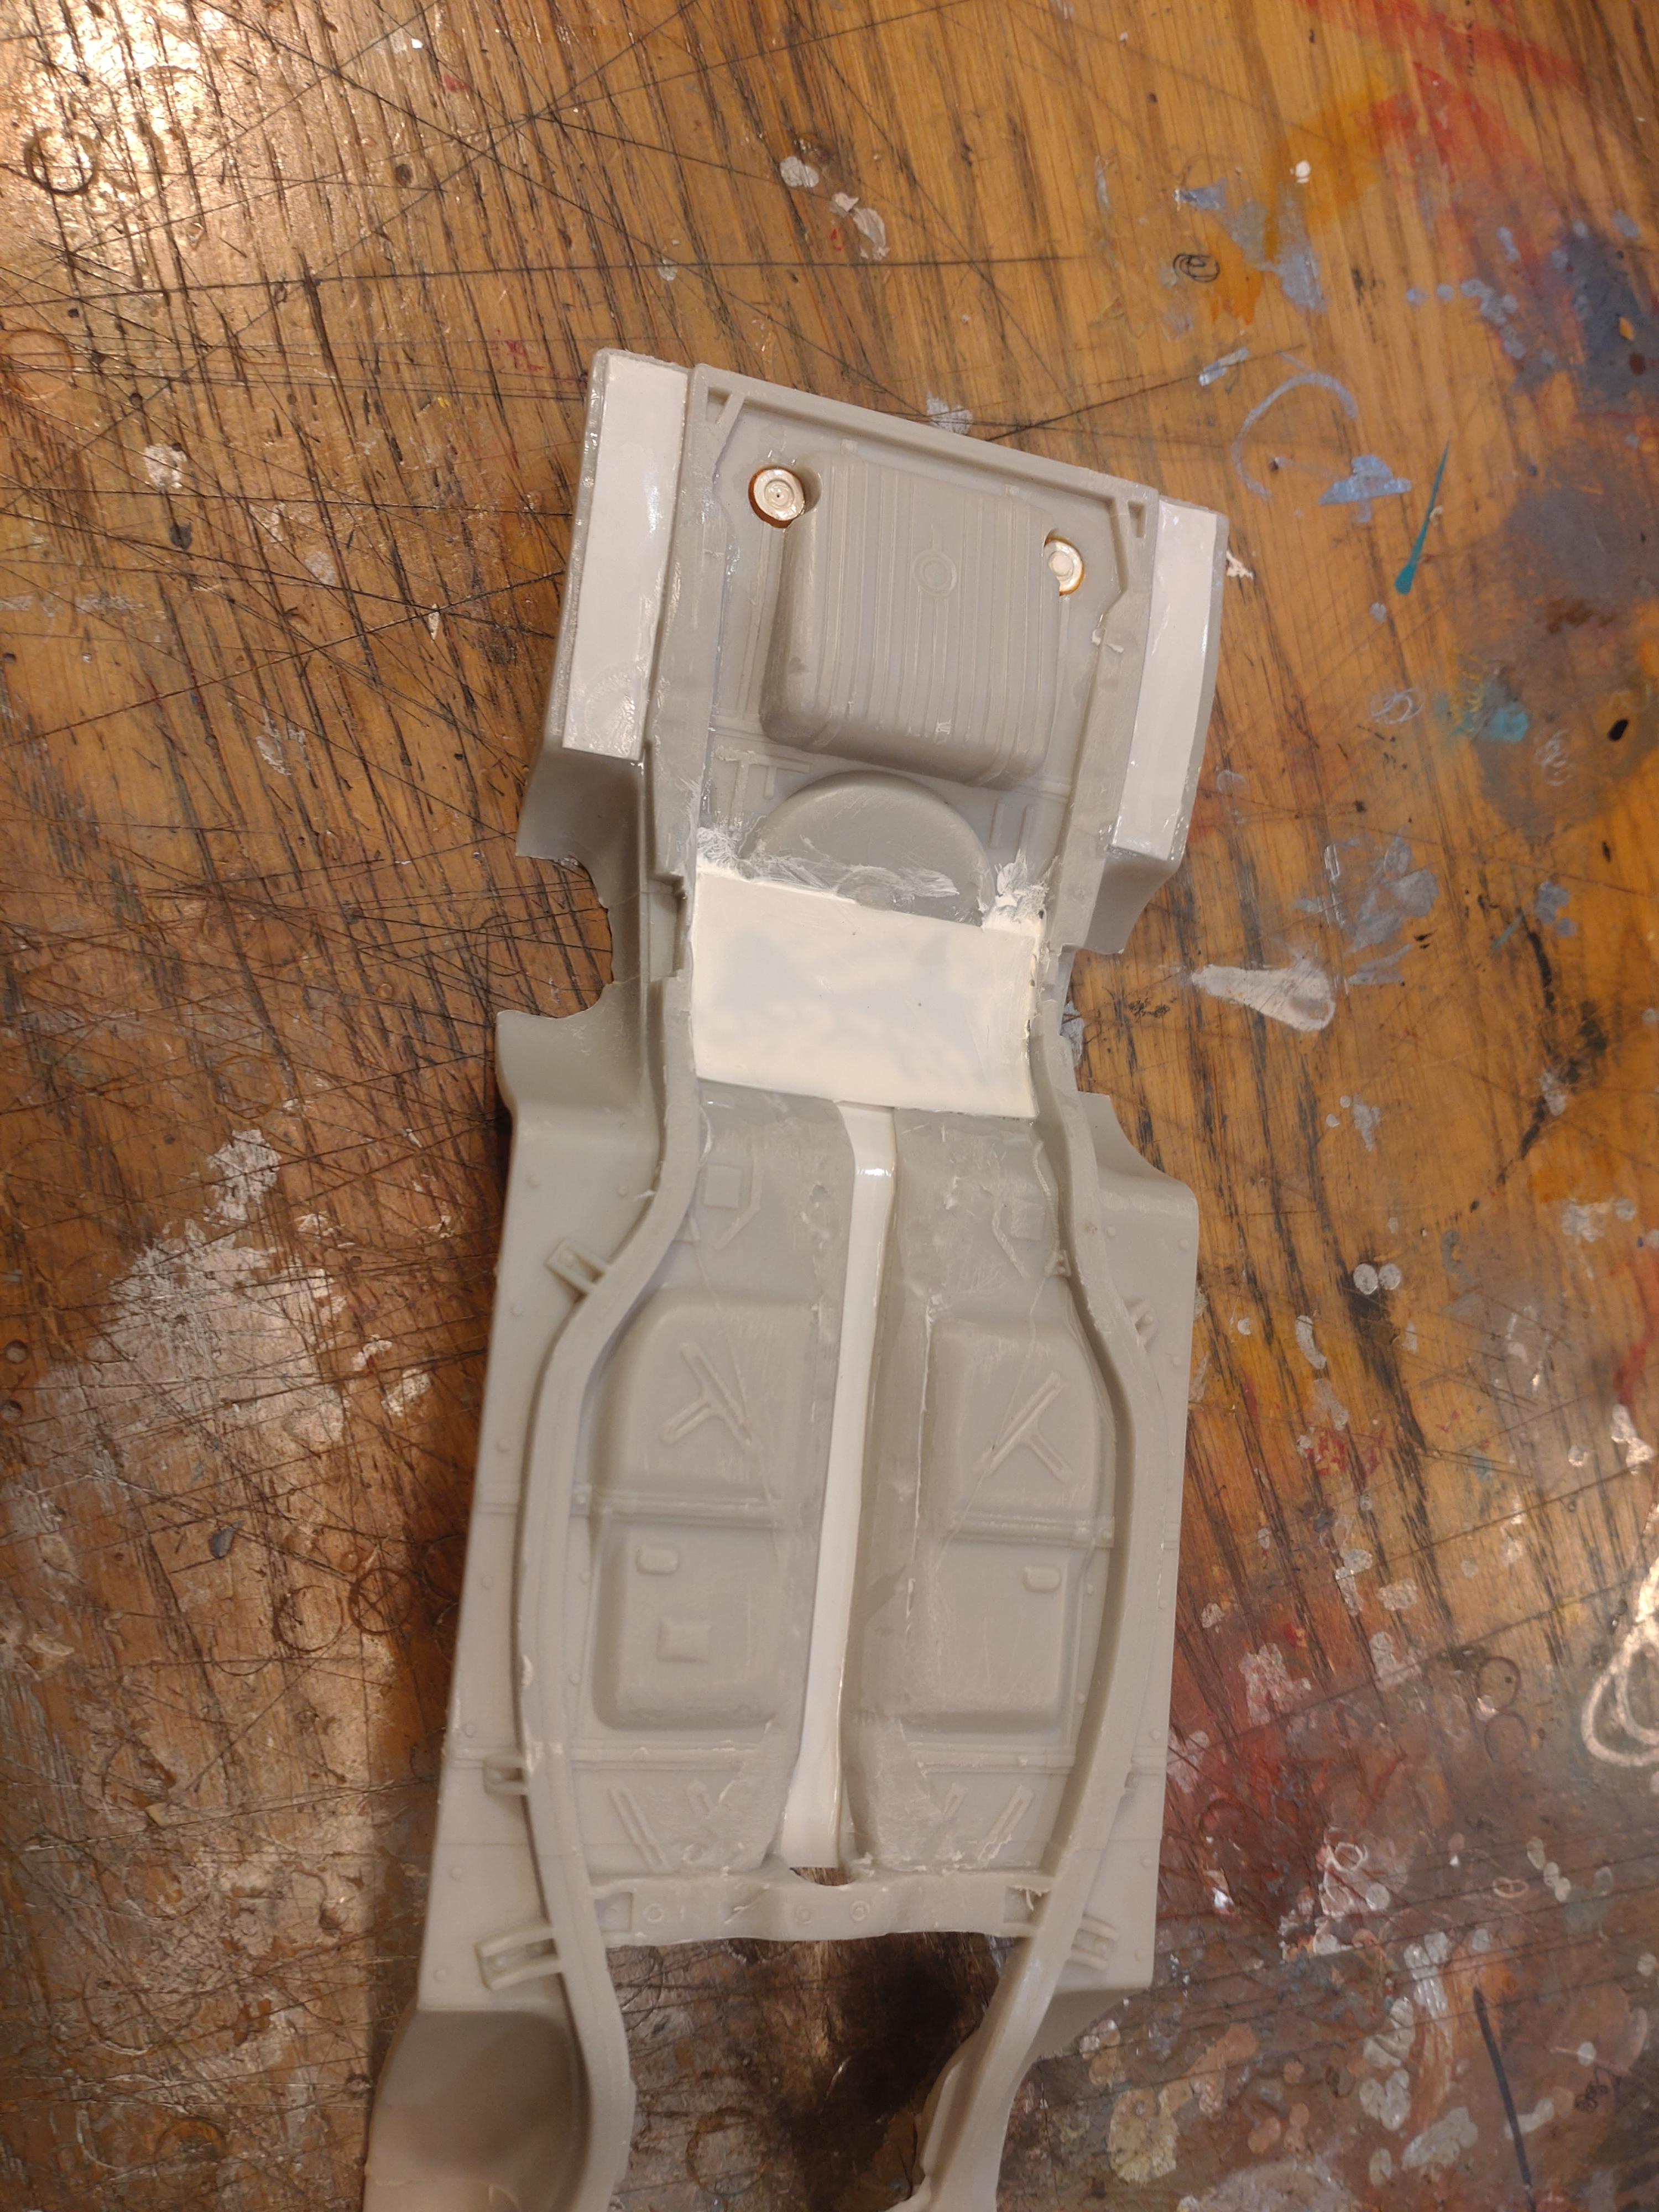
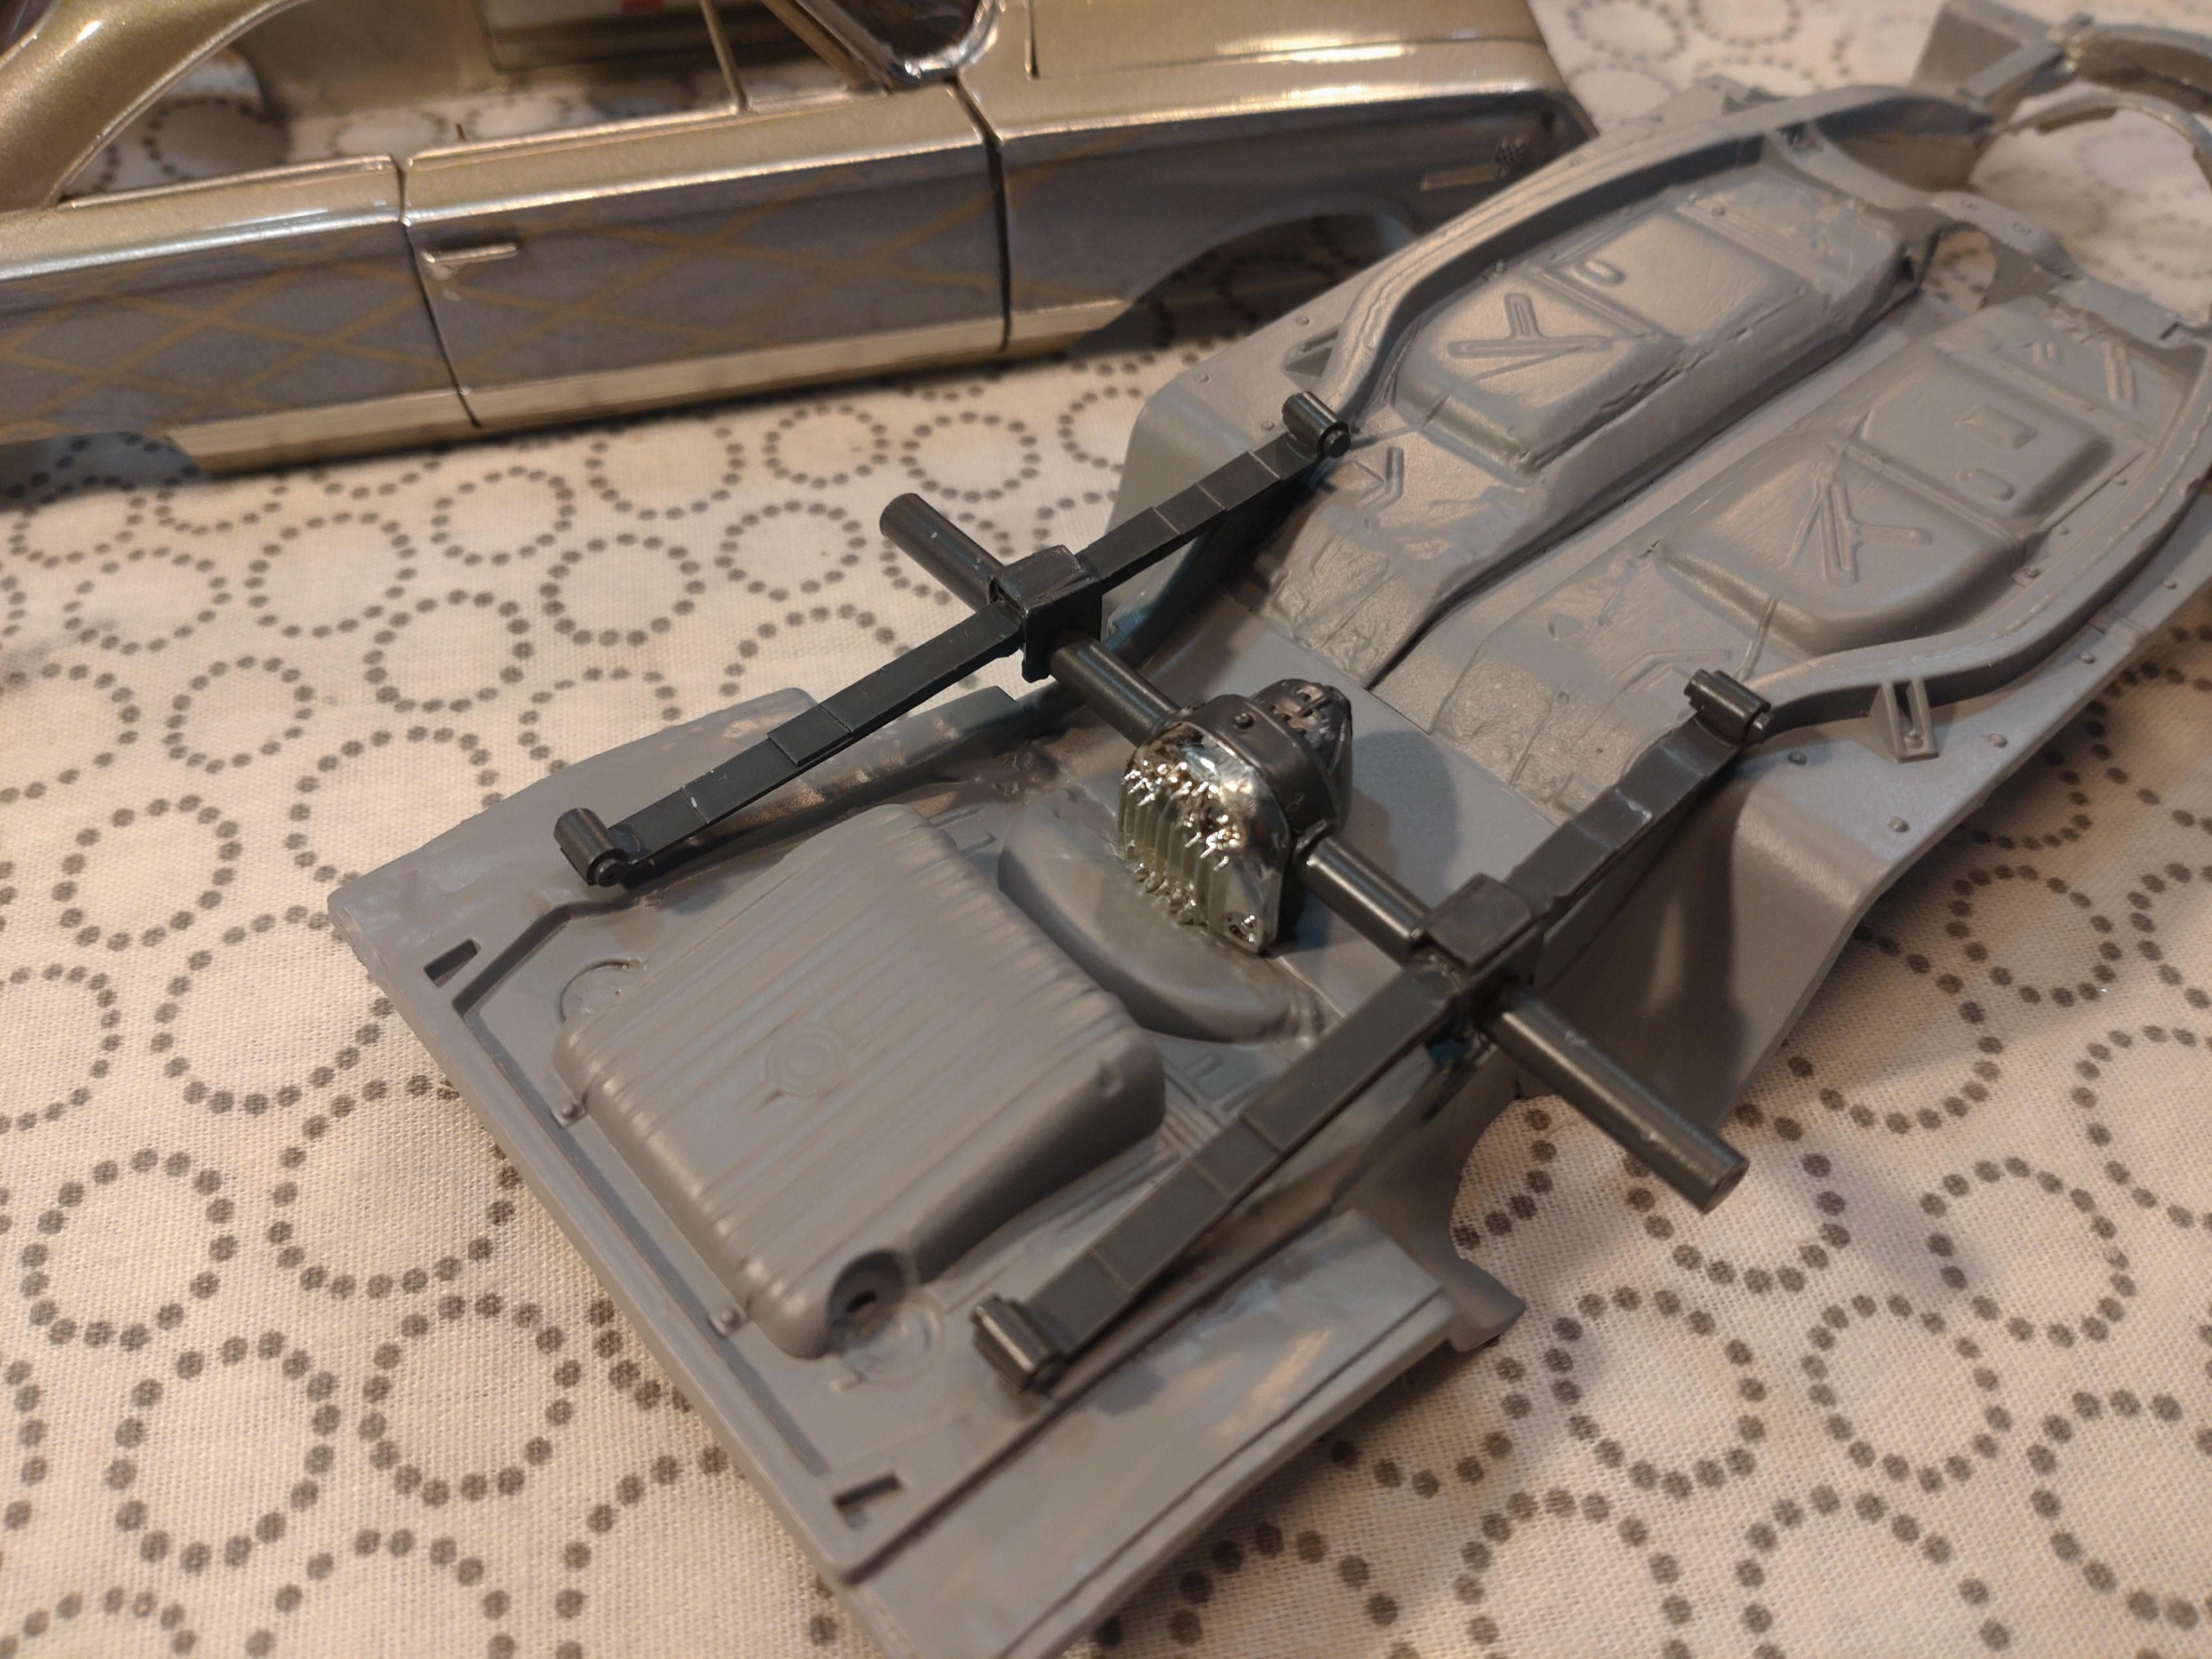
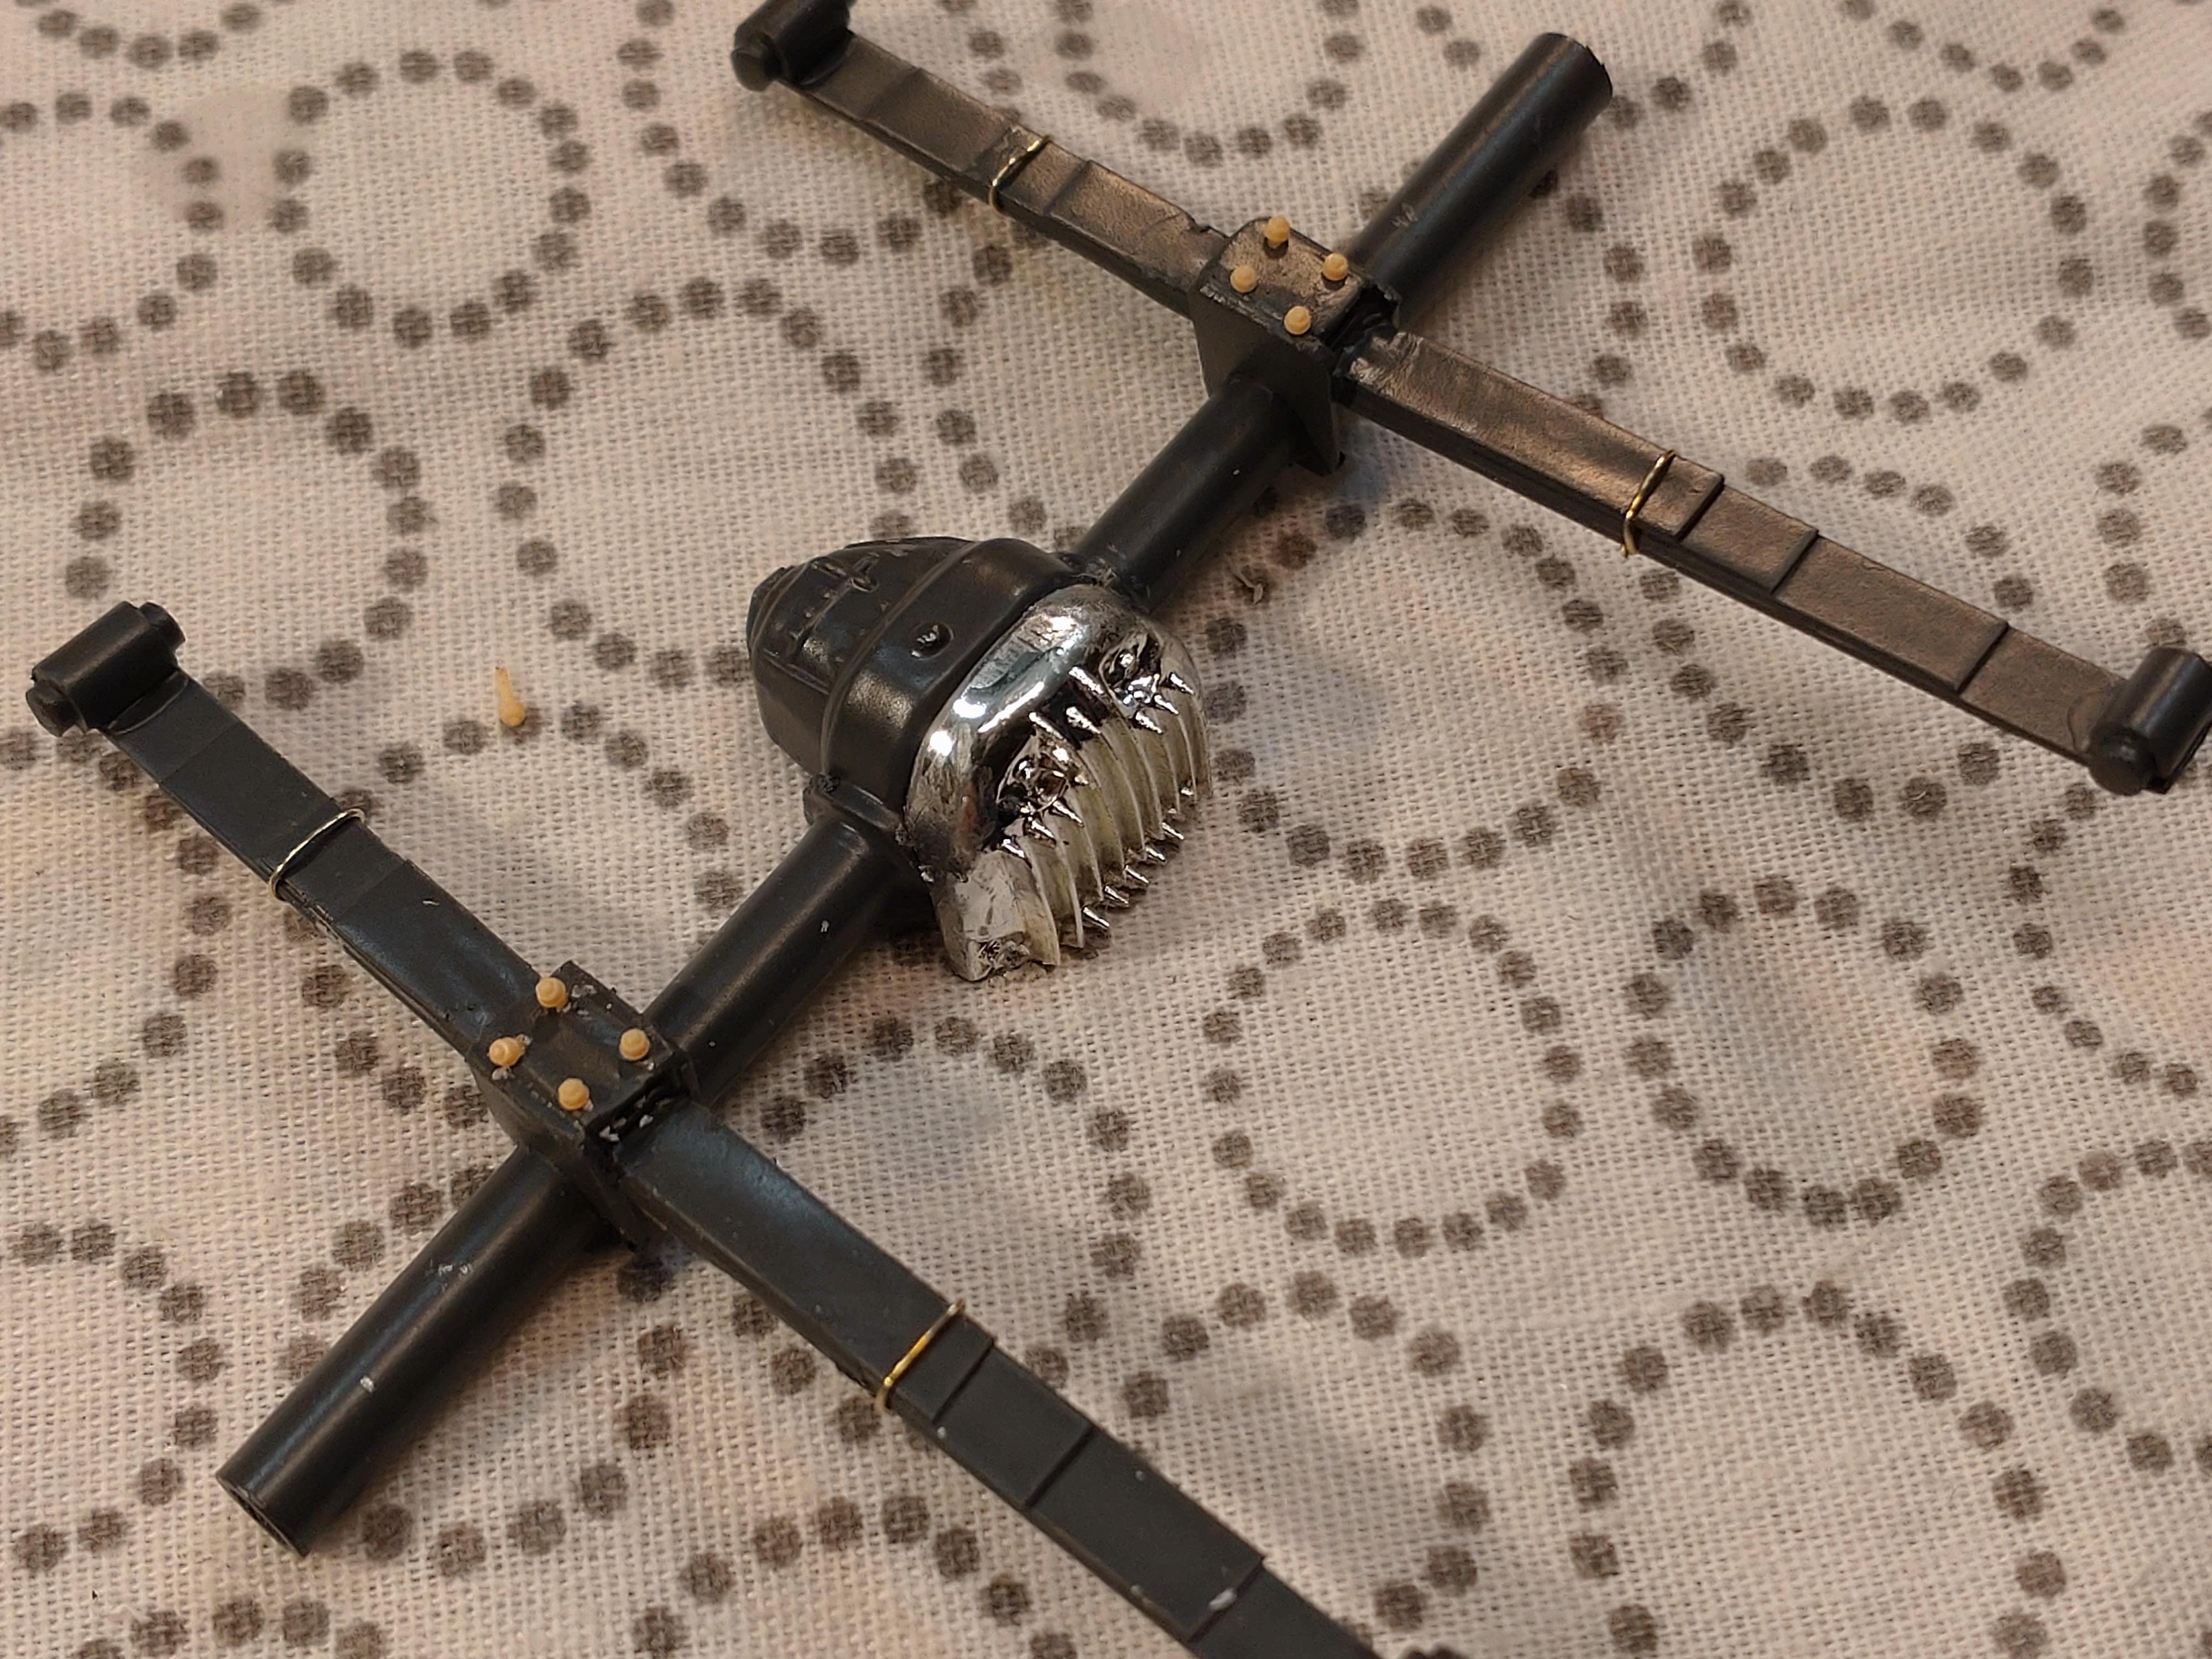
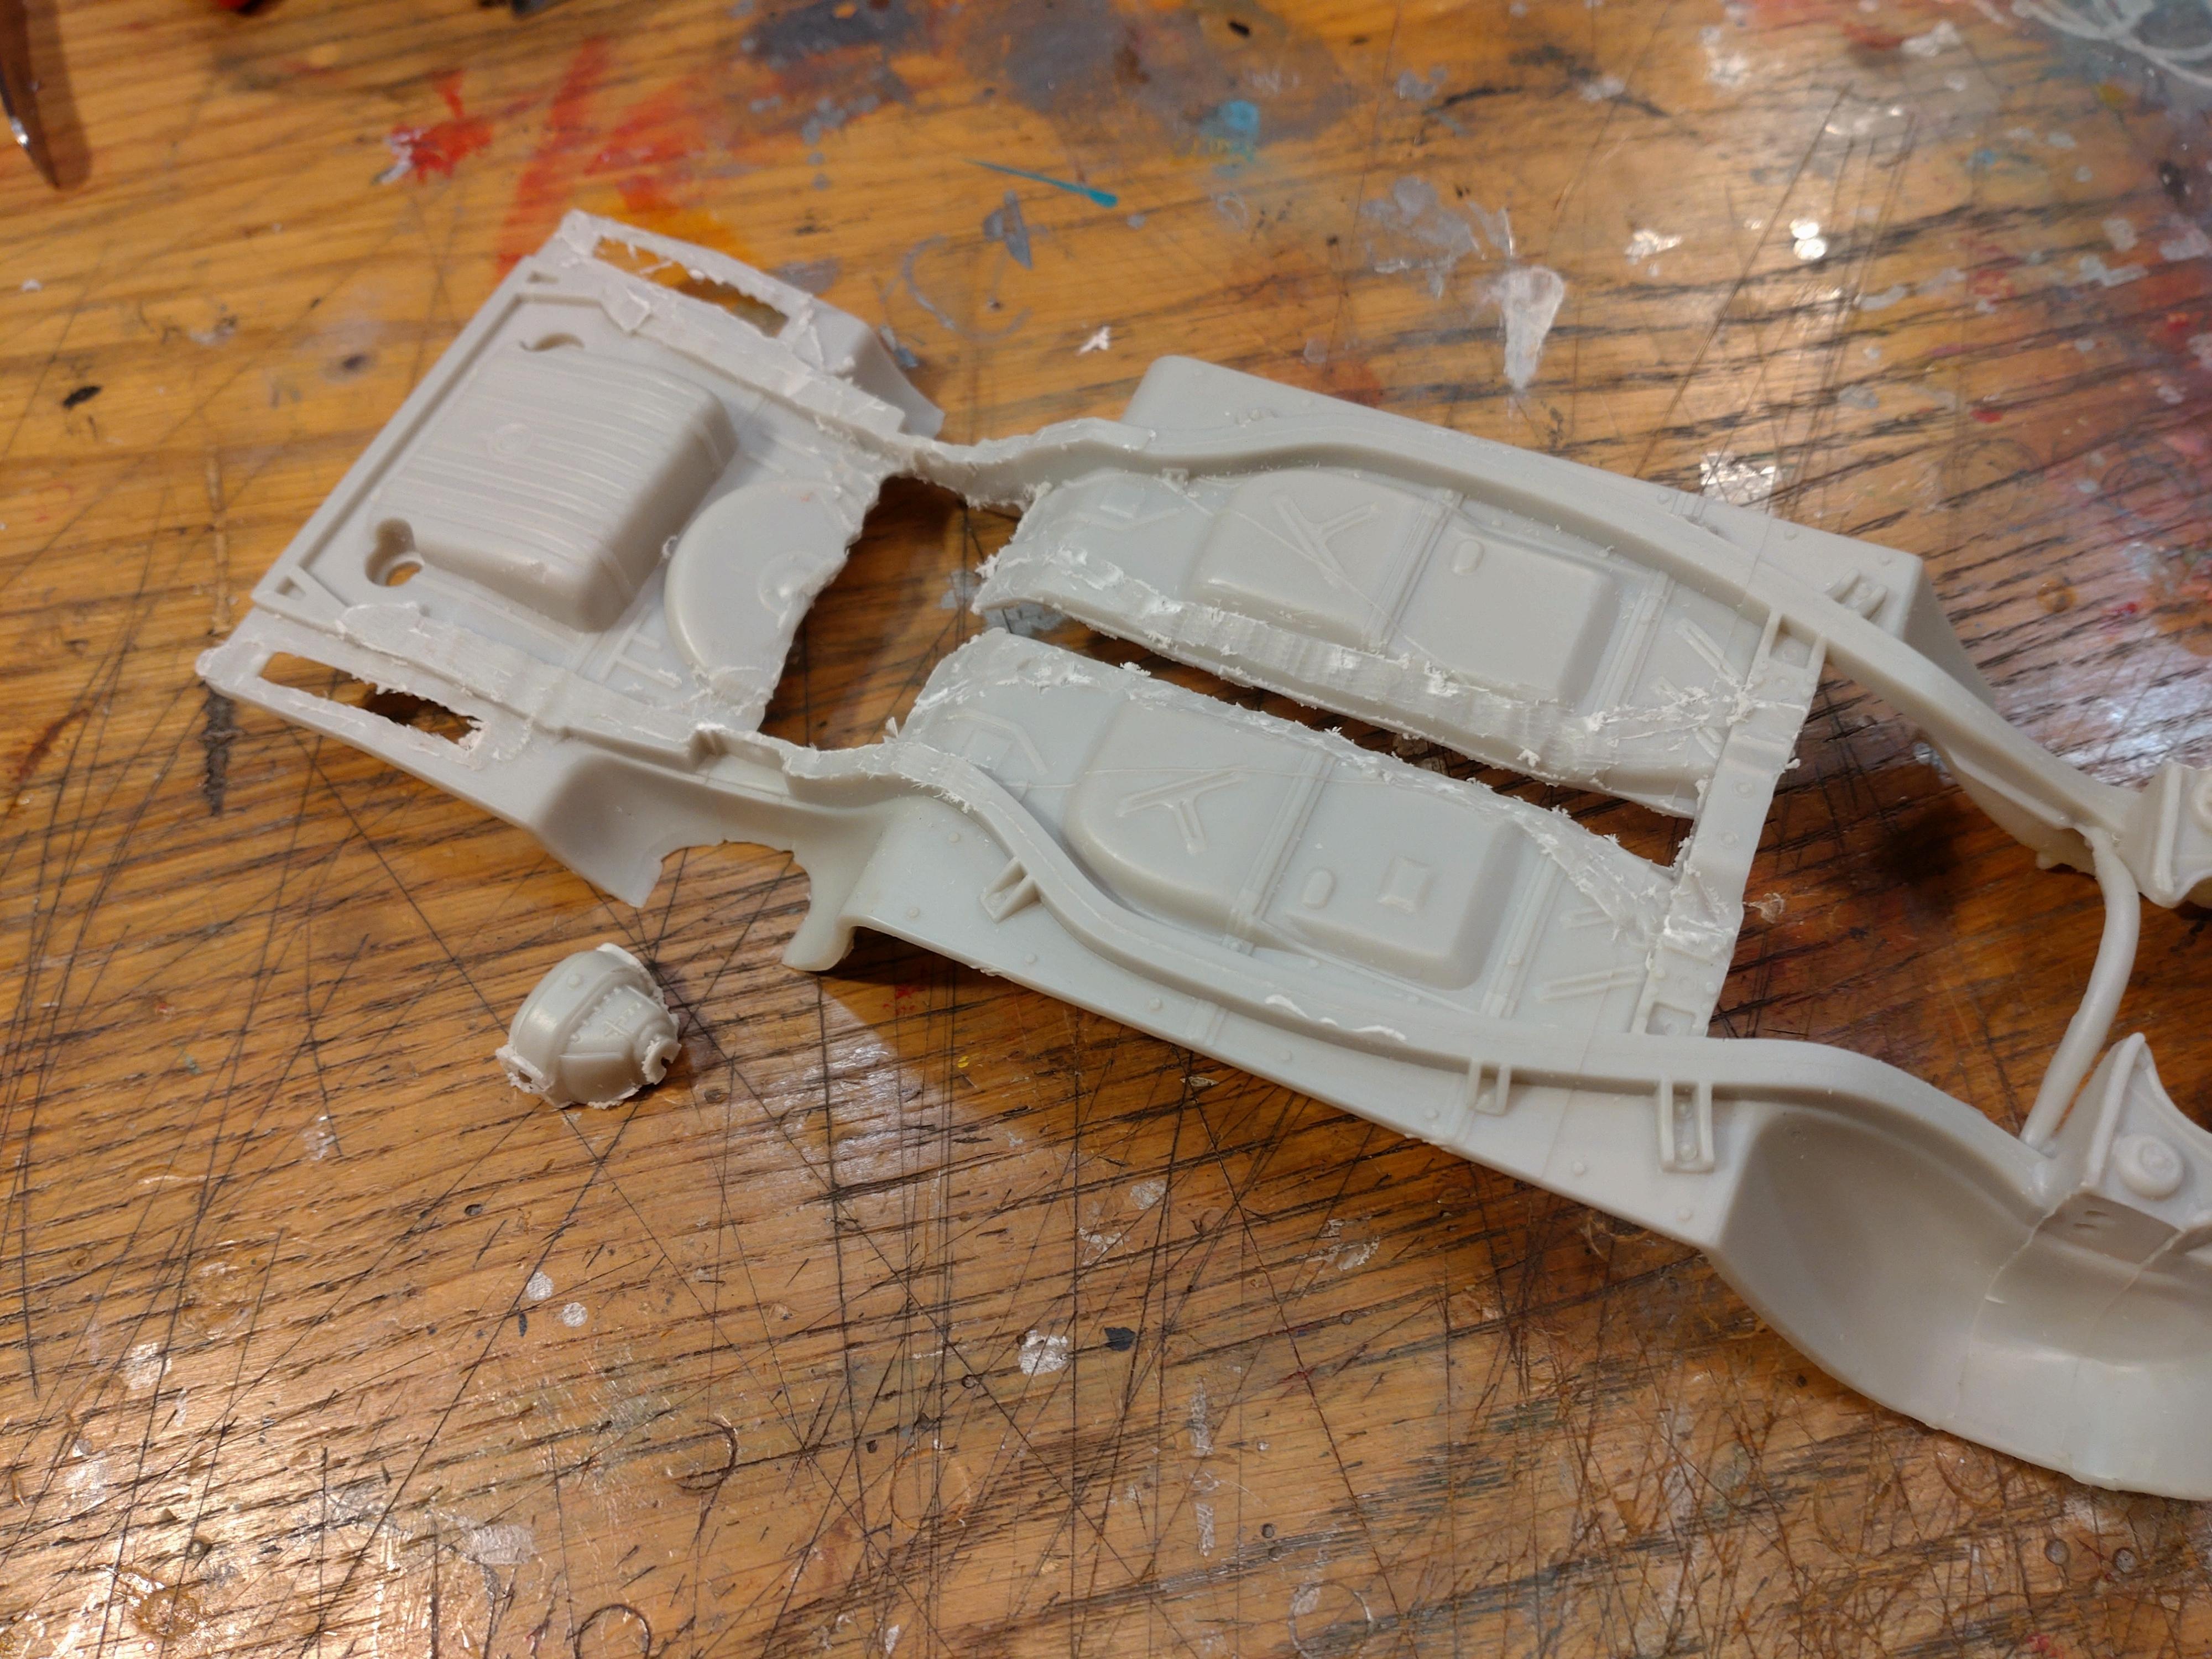
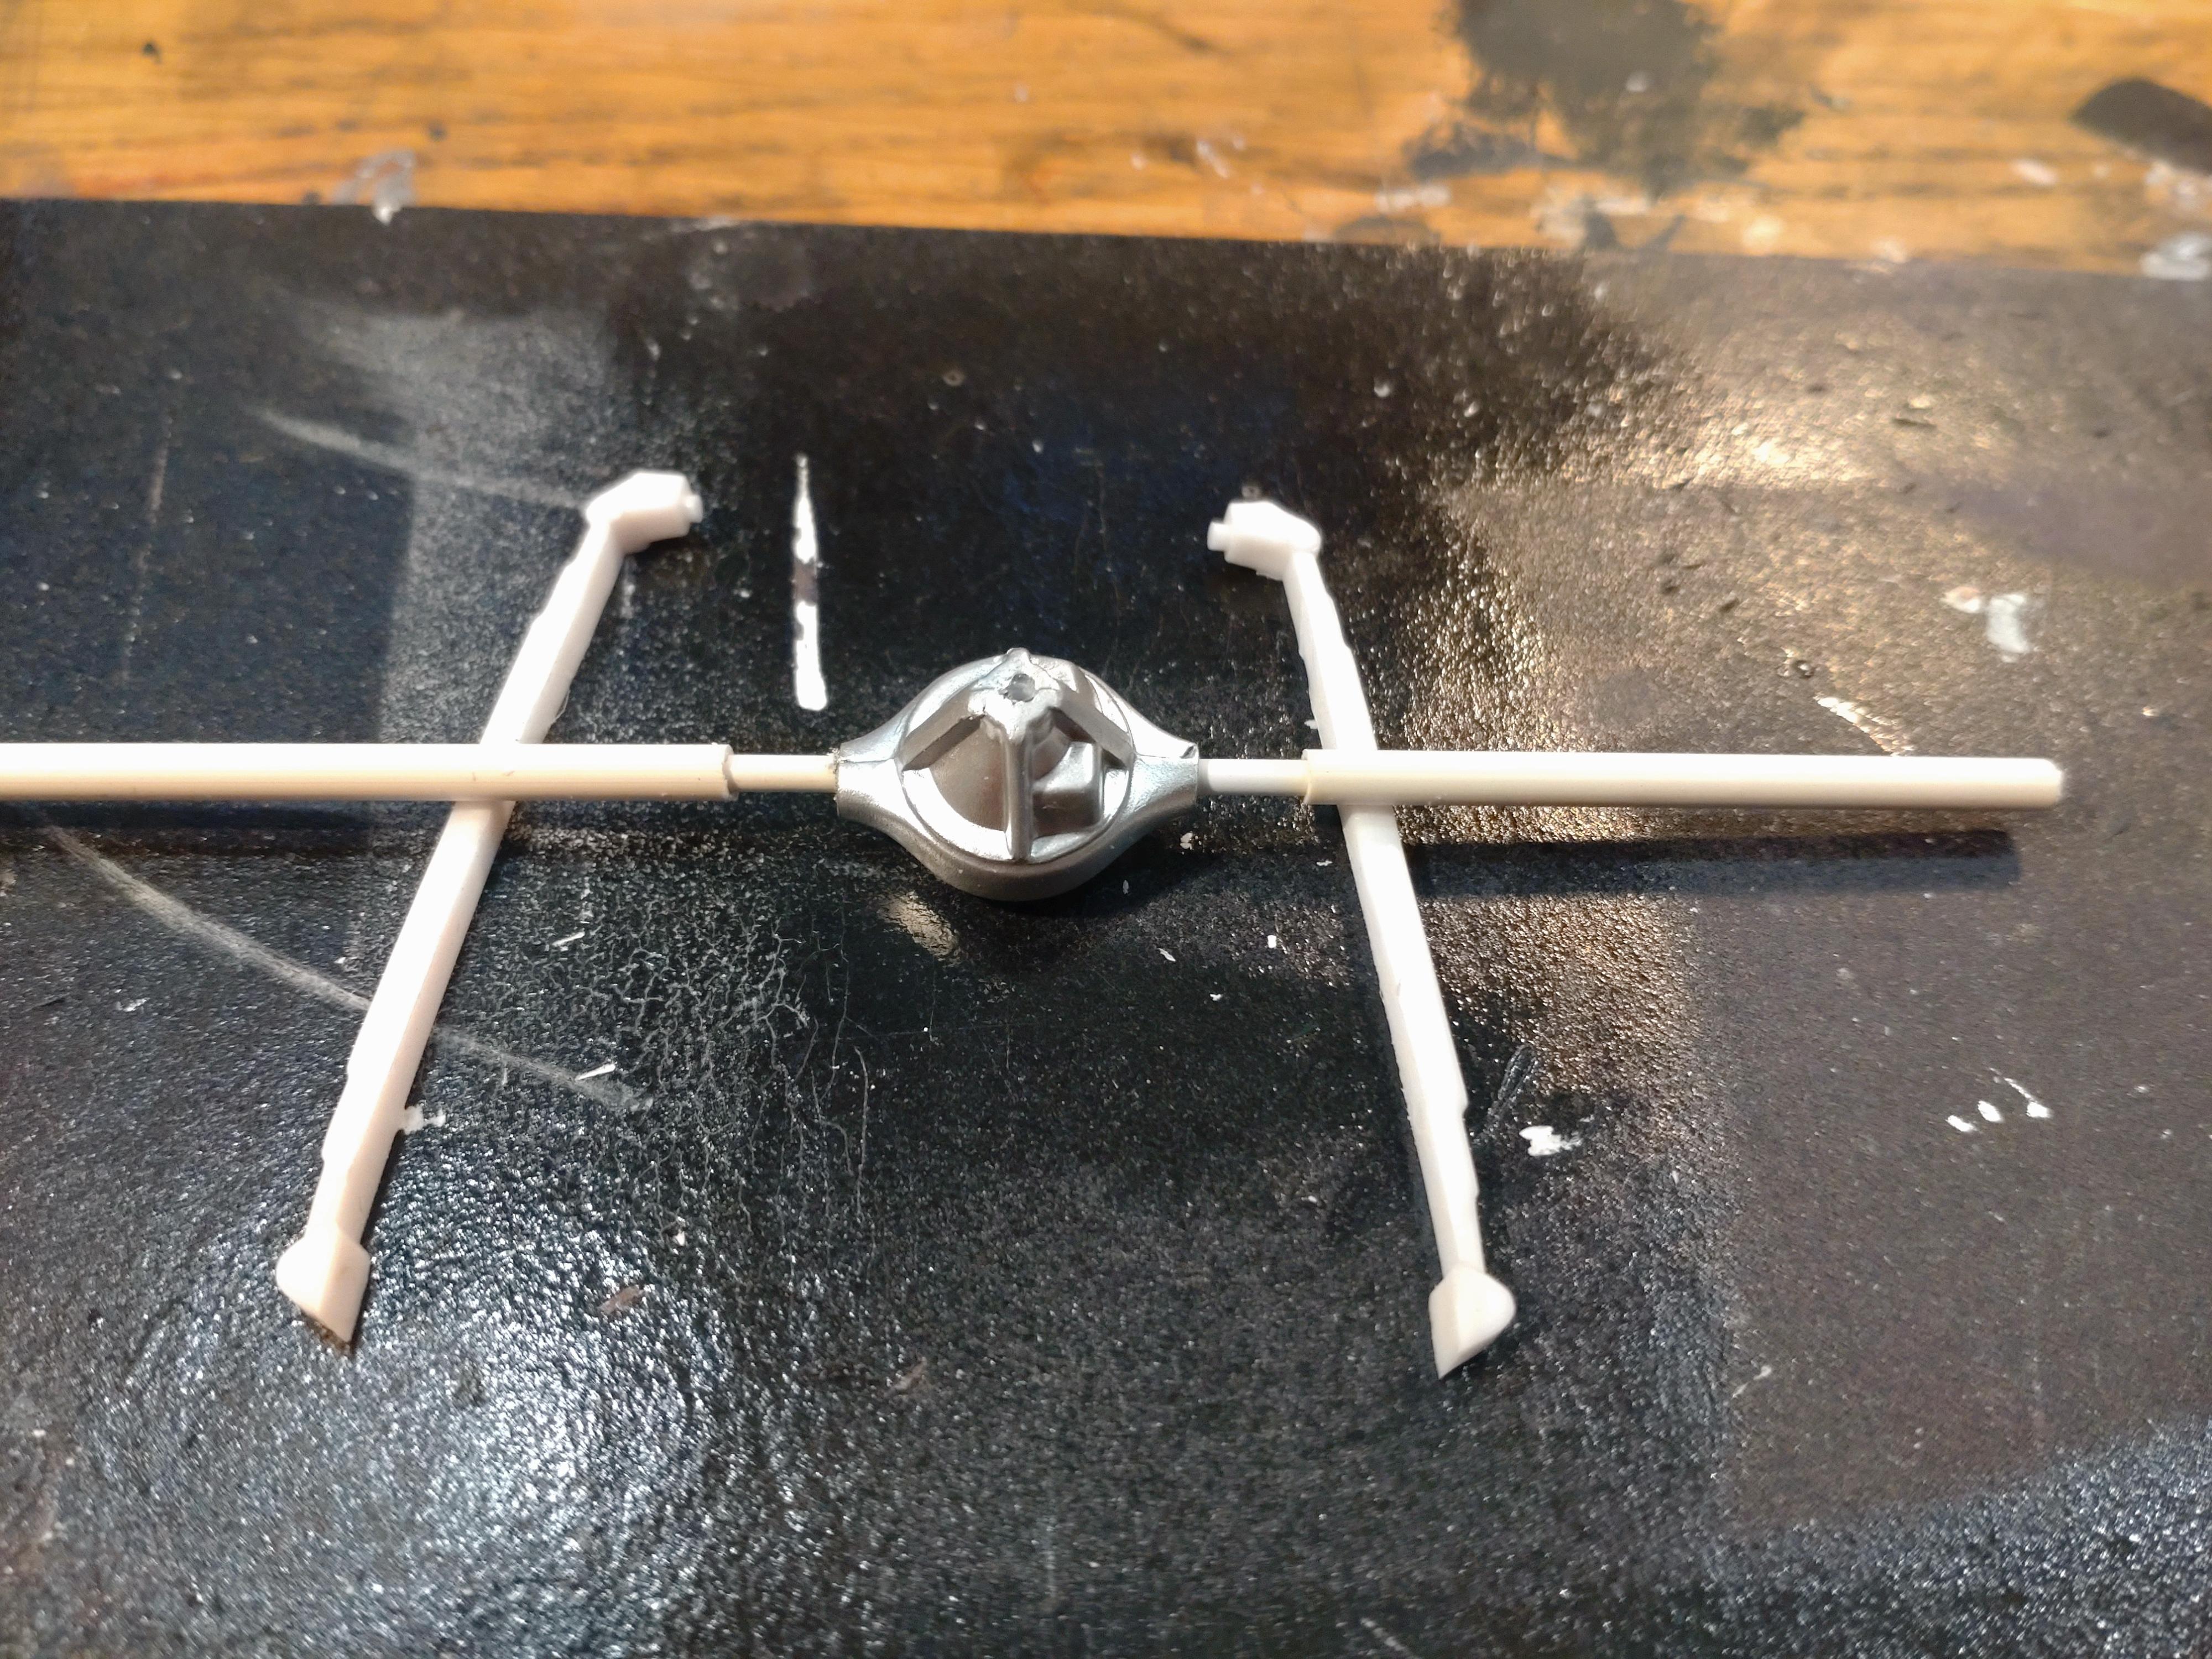
First I have to correct a specification about the clear spray varnish I use. It is NOT Molotow, but AK crystal varnish. Very high gloss, compatible to every other paint I have used so far and dries very hard. I have better images now of the finished body paint work as a mock up of what to expect. I´m not quite sure yet how to treat the wheels but for the moment I guess they will receive the champagne silver of the body. A hard contrast won´t look too well. The door panels are attached and the doors are finished now too. The cranks are home made with styrene rod, 0.5mm brass rod and crimp beads for the handles. The trim is 0.6 and 0.4mm silver plated wire. Next to do was the undercarriage. The part in this kit has one of those completely molded boards with all the "details" and a set for metal rod axles. I will go for more and better details, meaning some heavy disruption. I cut out the complete front and rear suspension, the drive and grinded off the exhaust system. Yes, some work, but I hope that the results will reward me in the end. The cavities are covered with sheet styrene and filled with putty. The only part I could salvage was the differential. Then came the creative part of rebuilding the rear suspension and transmission with basic styrene tubes and sheet. I will show the stages step by step. I rebuilt the exhaust system with 2mm styrene rods and fabricated the muffler from 6mm tubes. It took a lot of bending back and forth until both sides were almost identical. Next to do were the brake line, the fuel line and the parking brake. These are the only things I can glue to the undercarriage now. For the front steering and suspension I stole parts off a glue bomb from my early days. I want to come close to a "real" look but have to make some sacrifices. Still, the front had to lose some plastic and adopt to the reconstruction. Last to do was give everything some patina and make it look like a well maintained everyday car. The suspension and exhaust pipes are not glued to place yet and only mocked. I still have to bend the pipes to match the exhaust manifolds and find the correct length for the drive. So I have now started to build the engine. Thanks for watching!
-
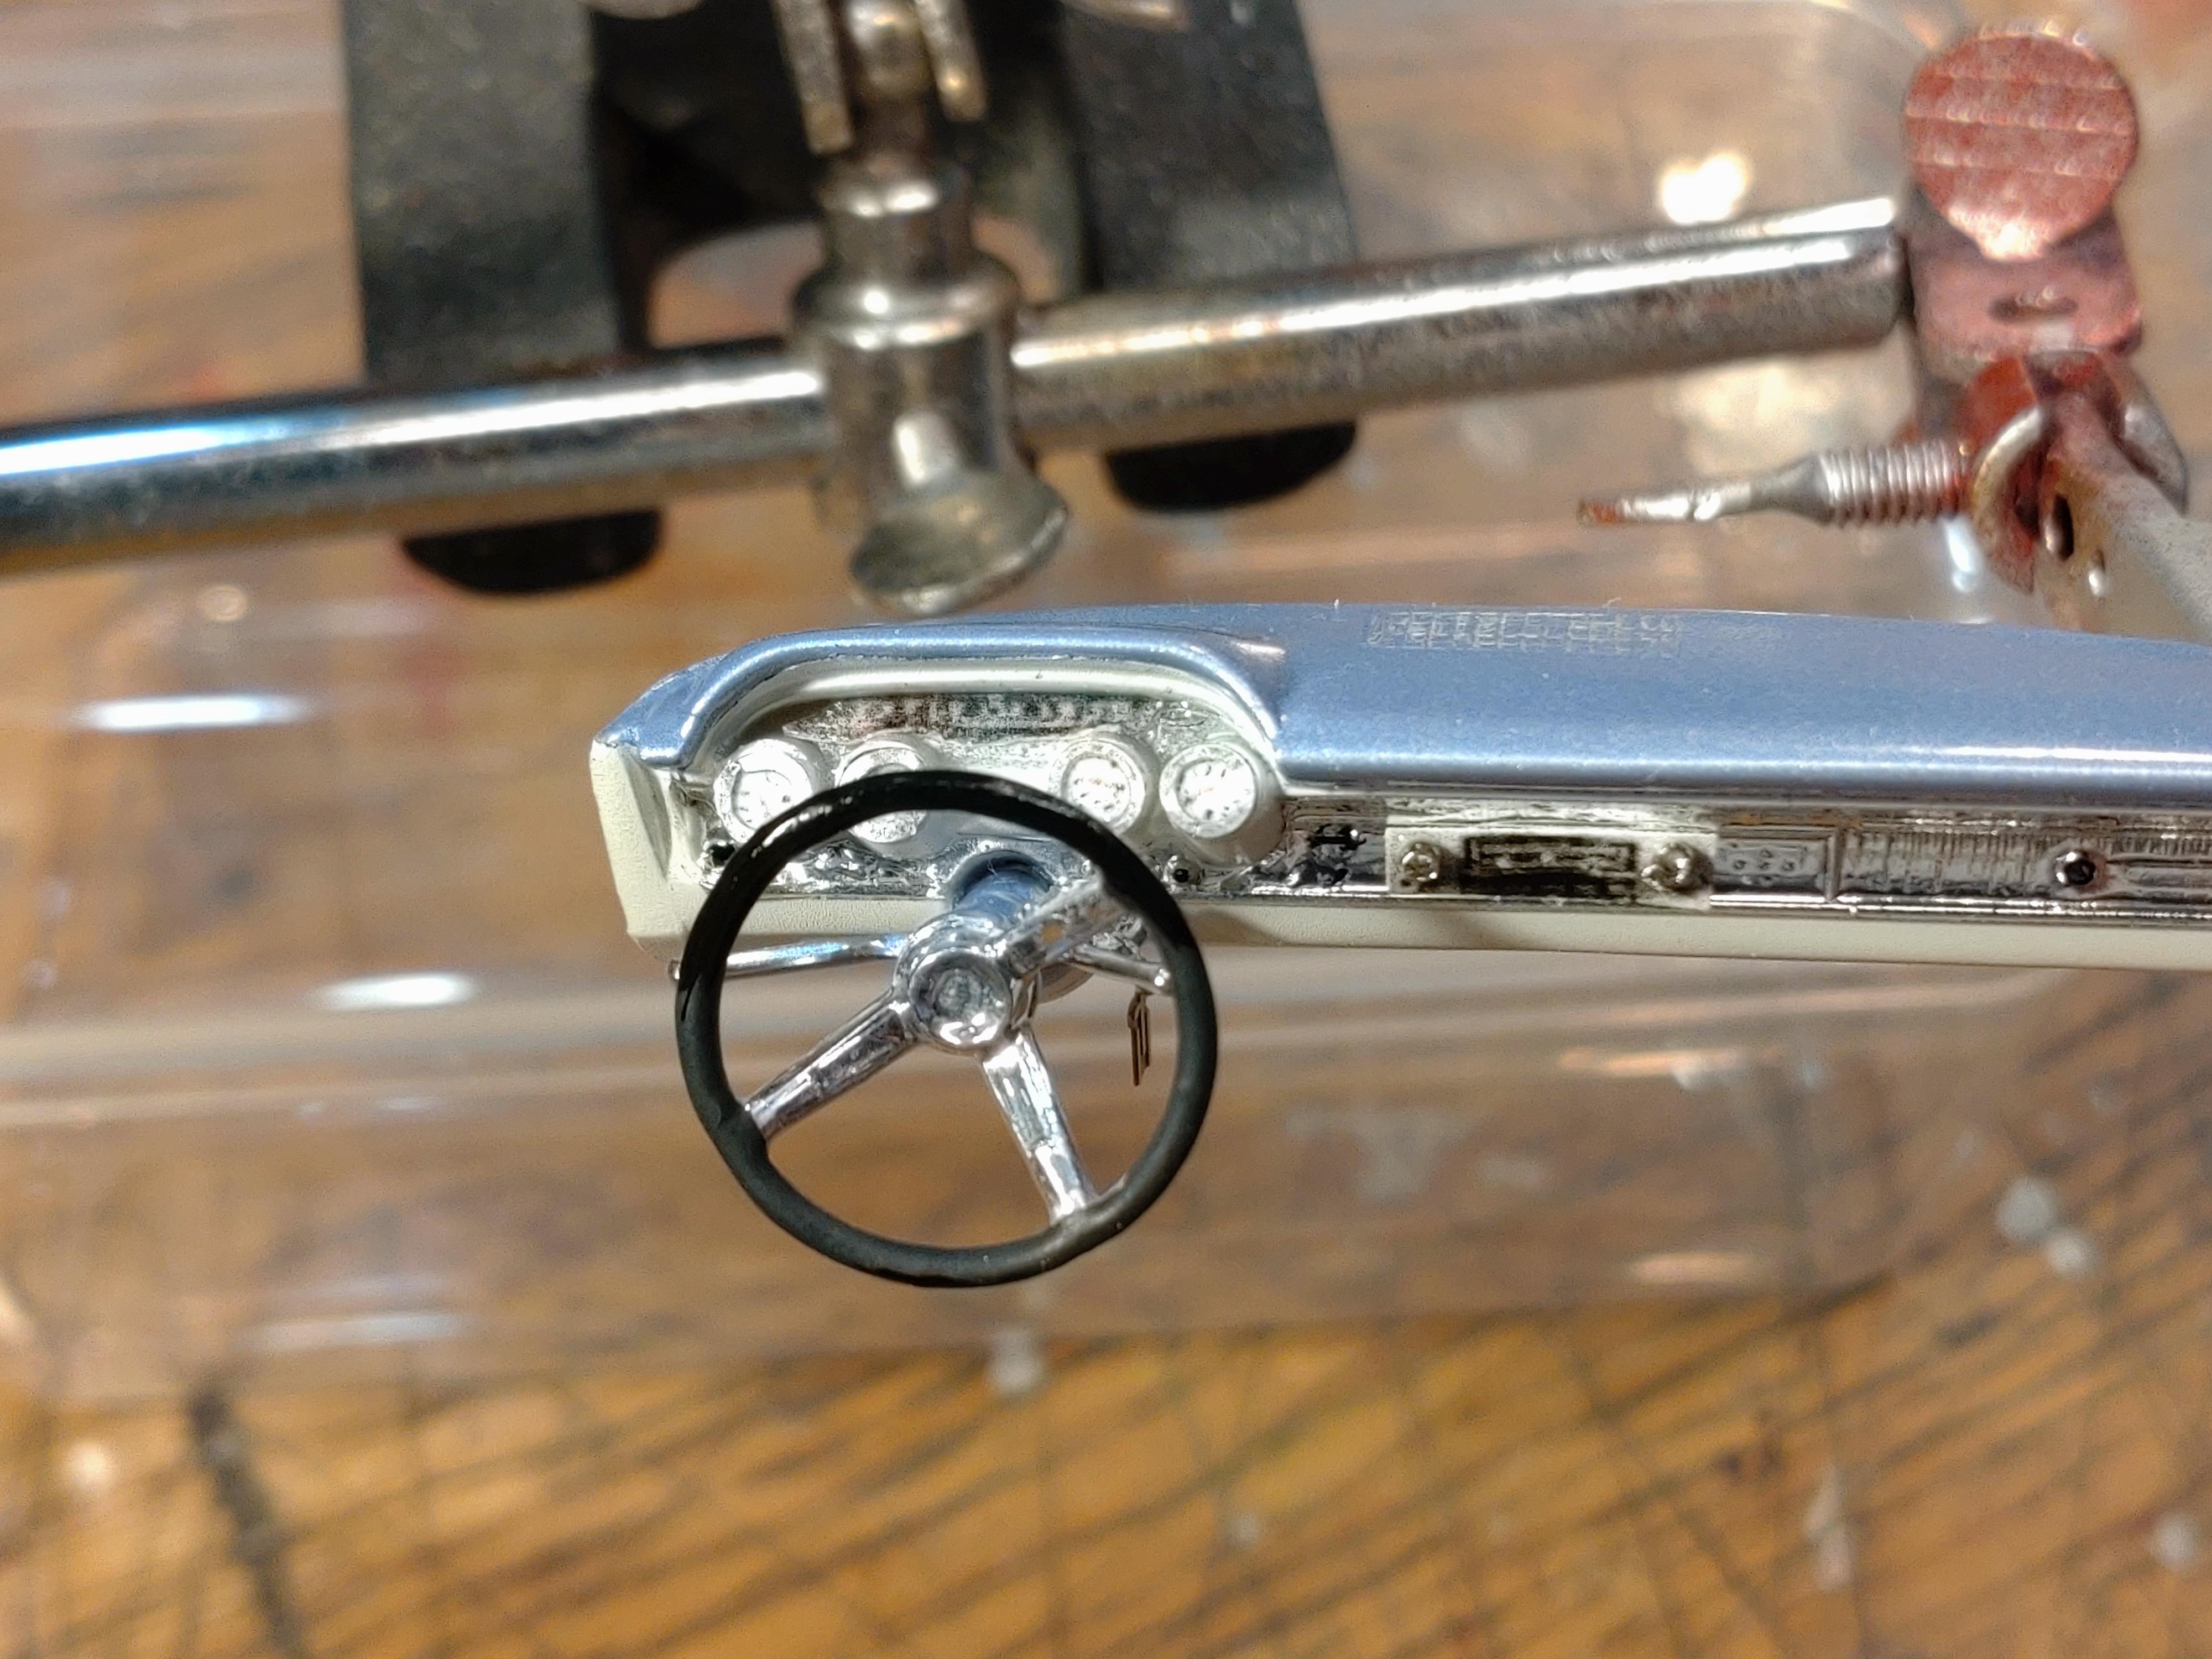
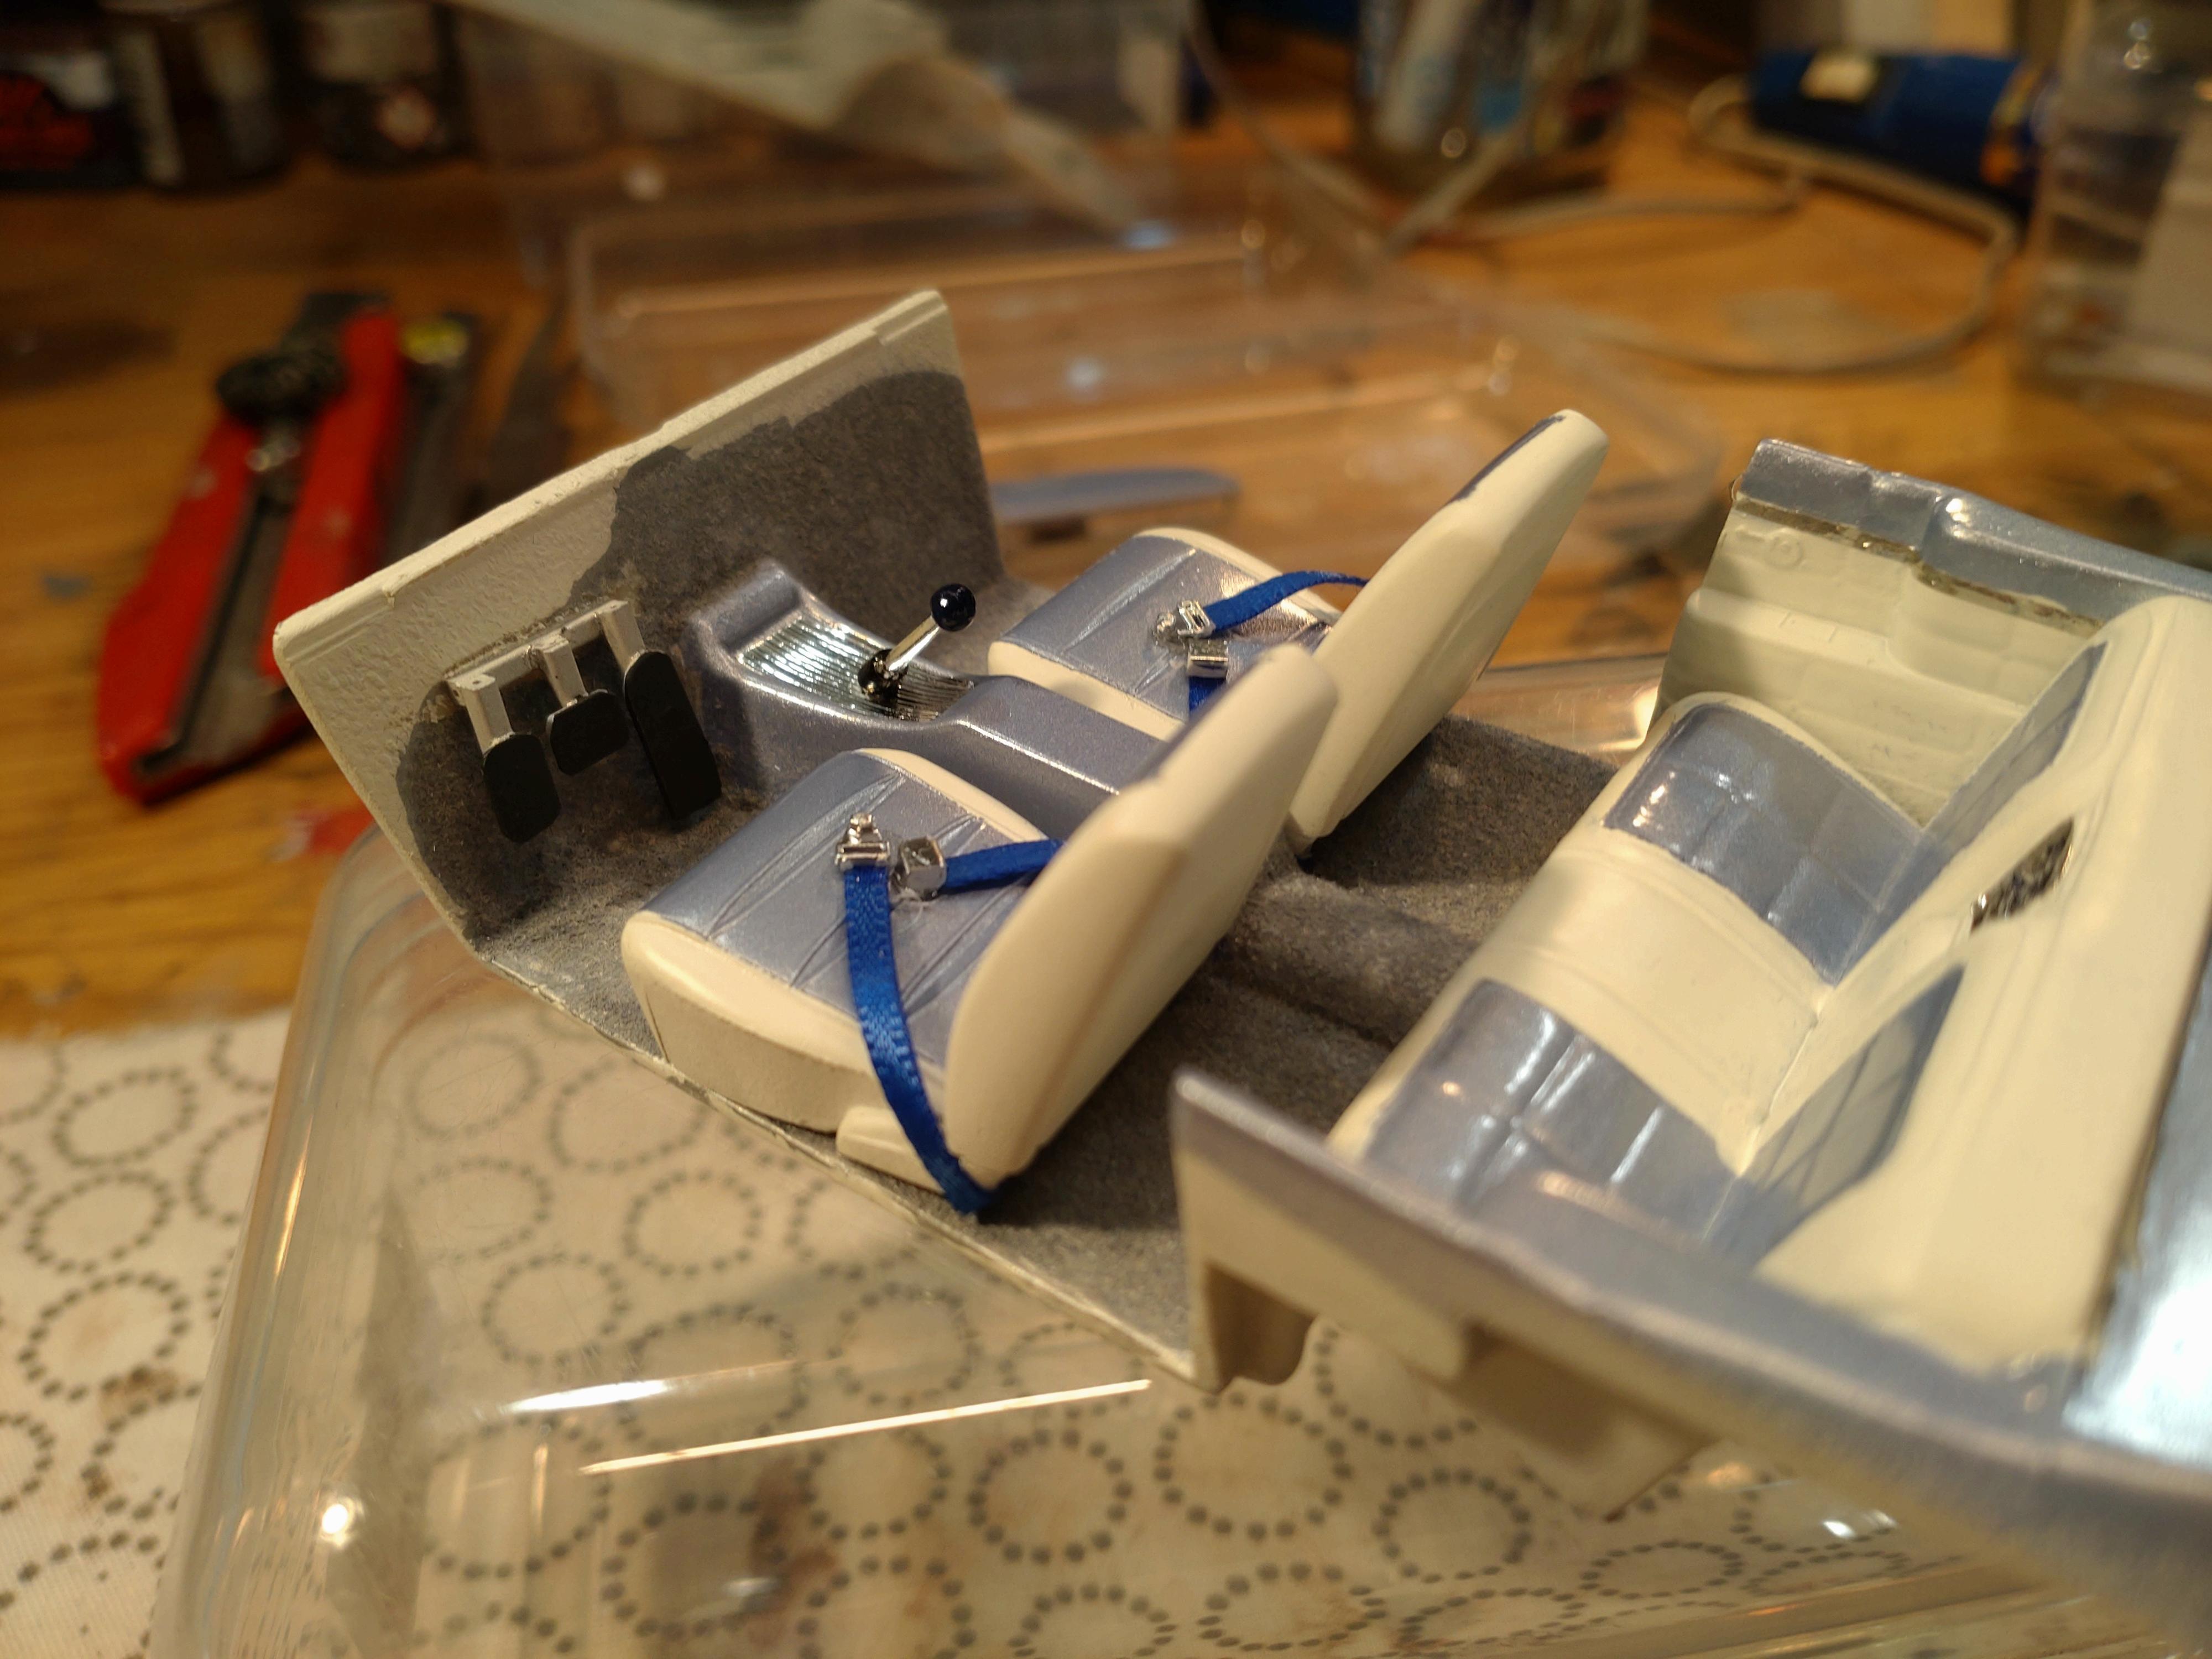
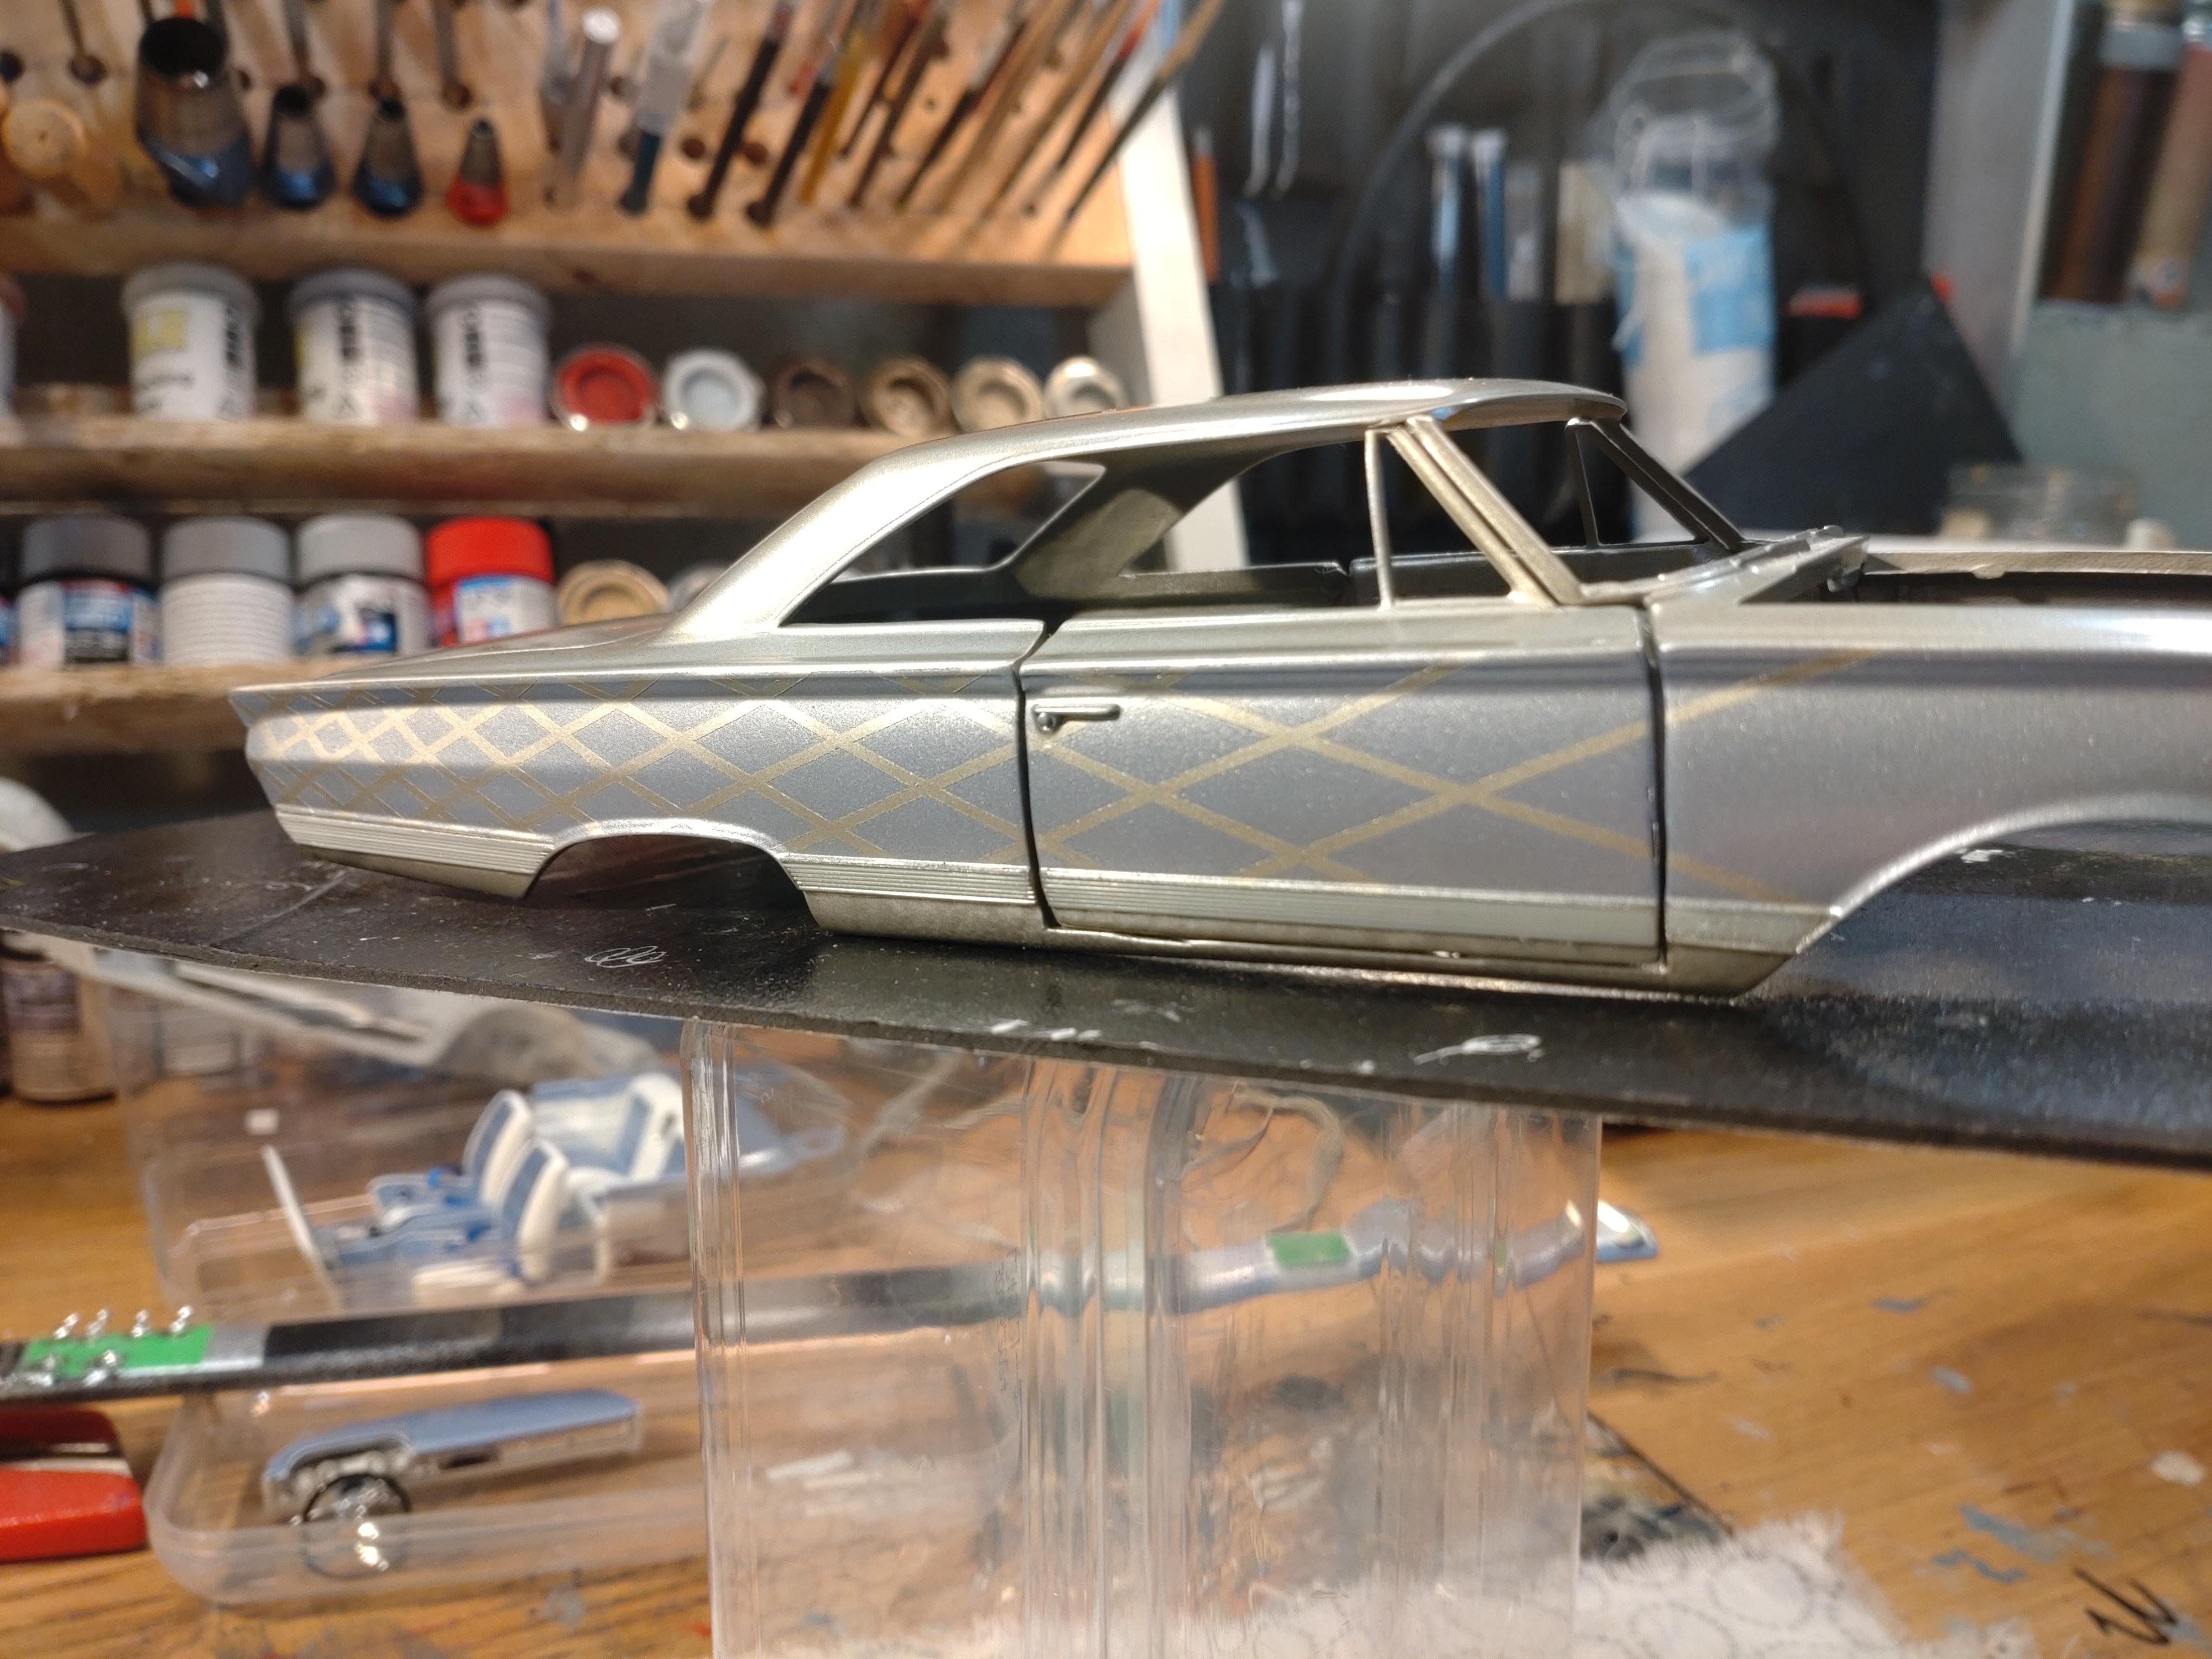
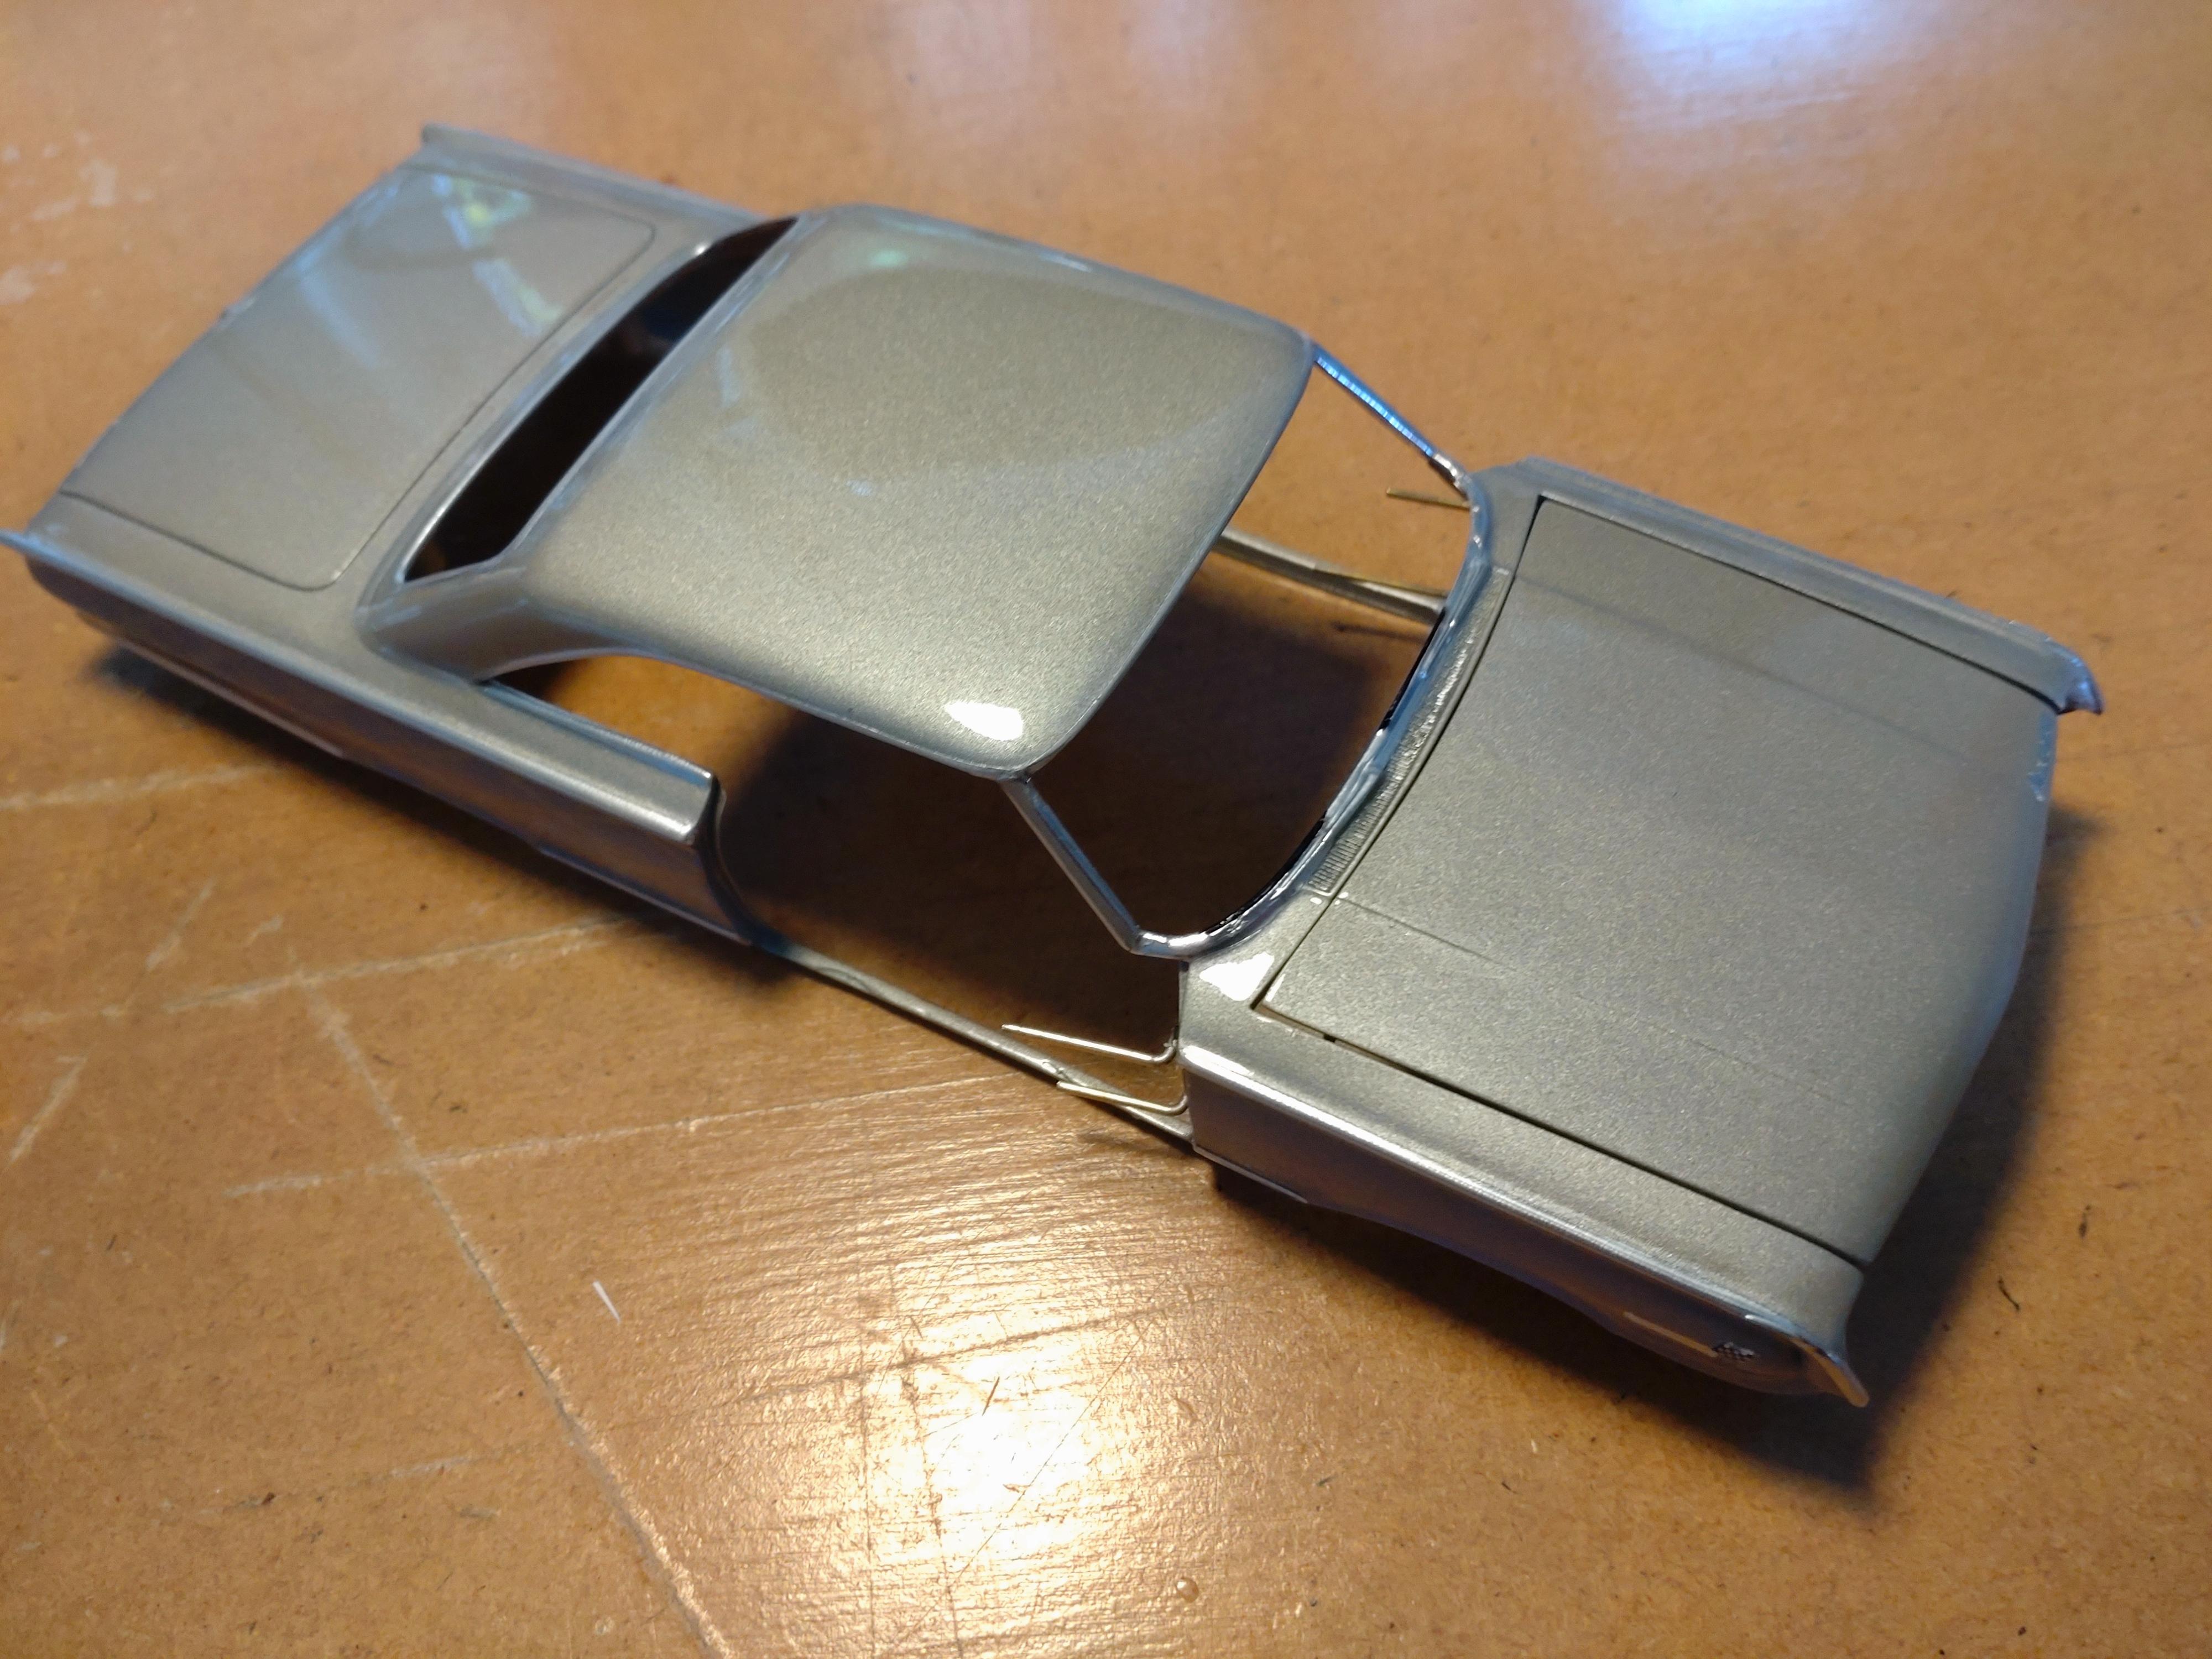
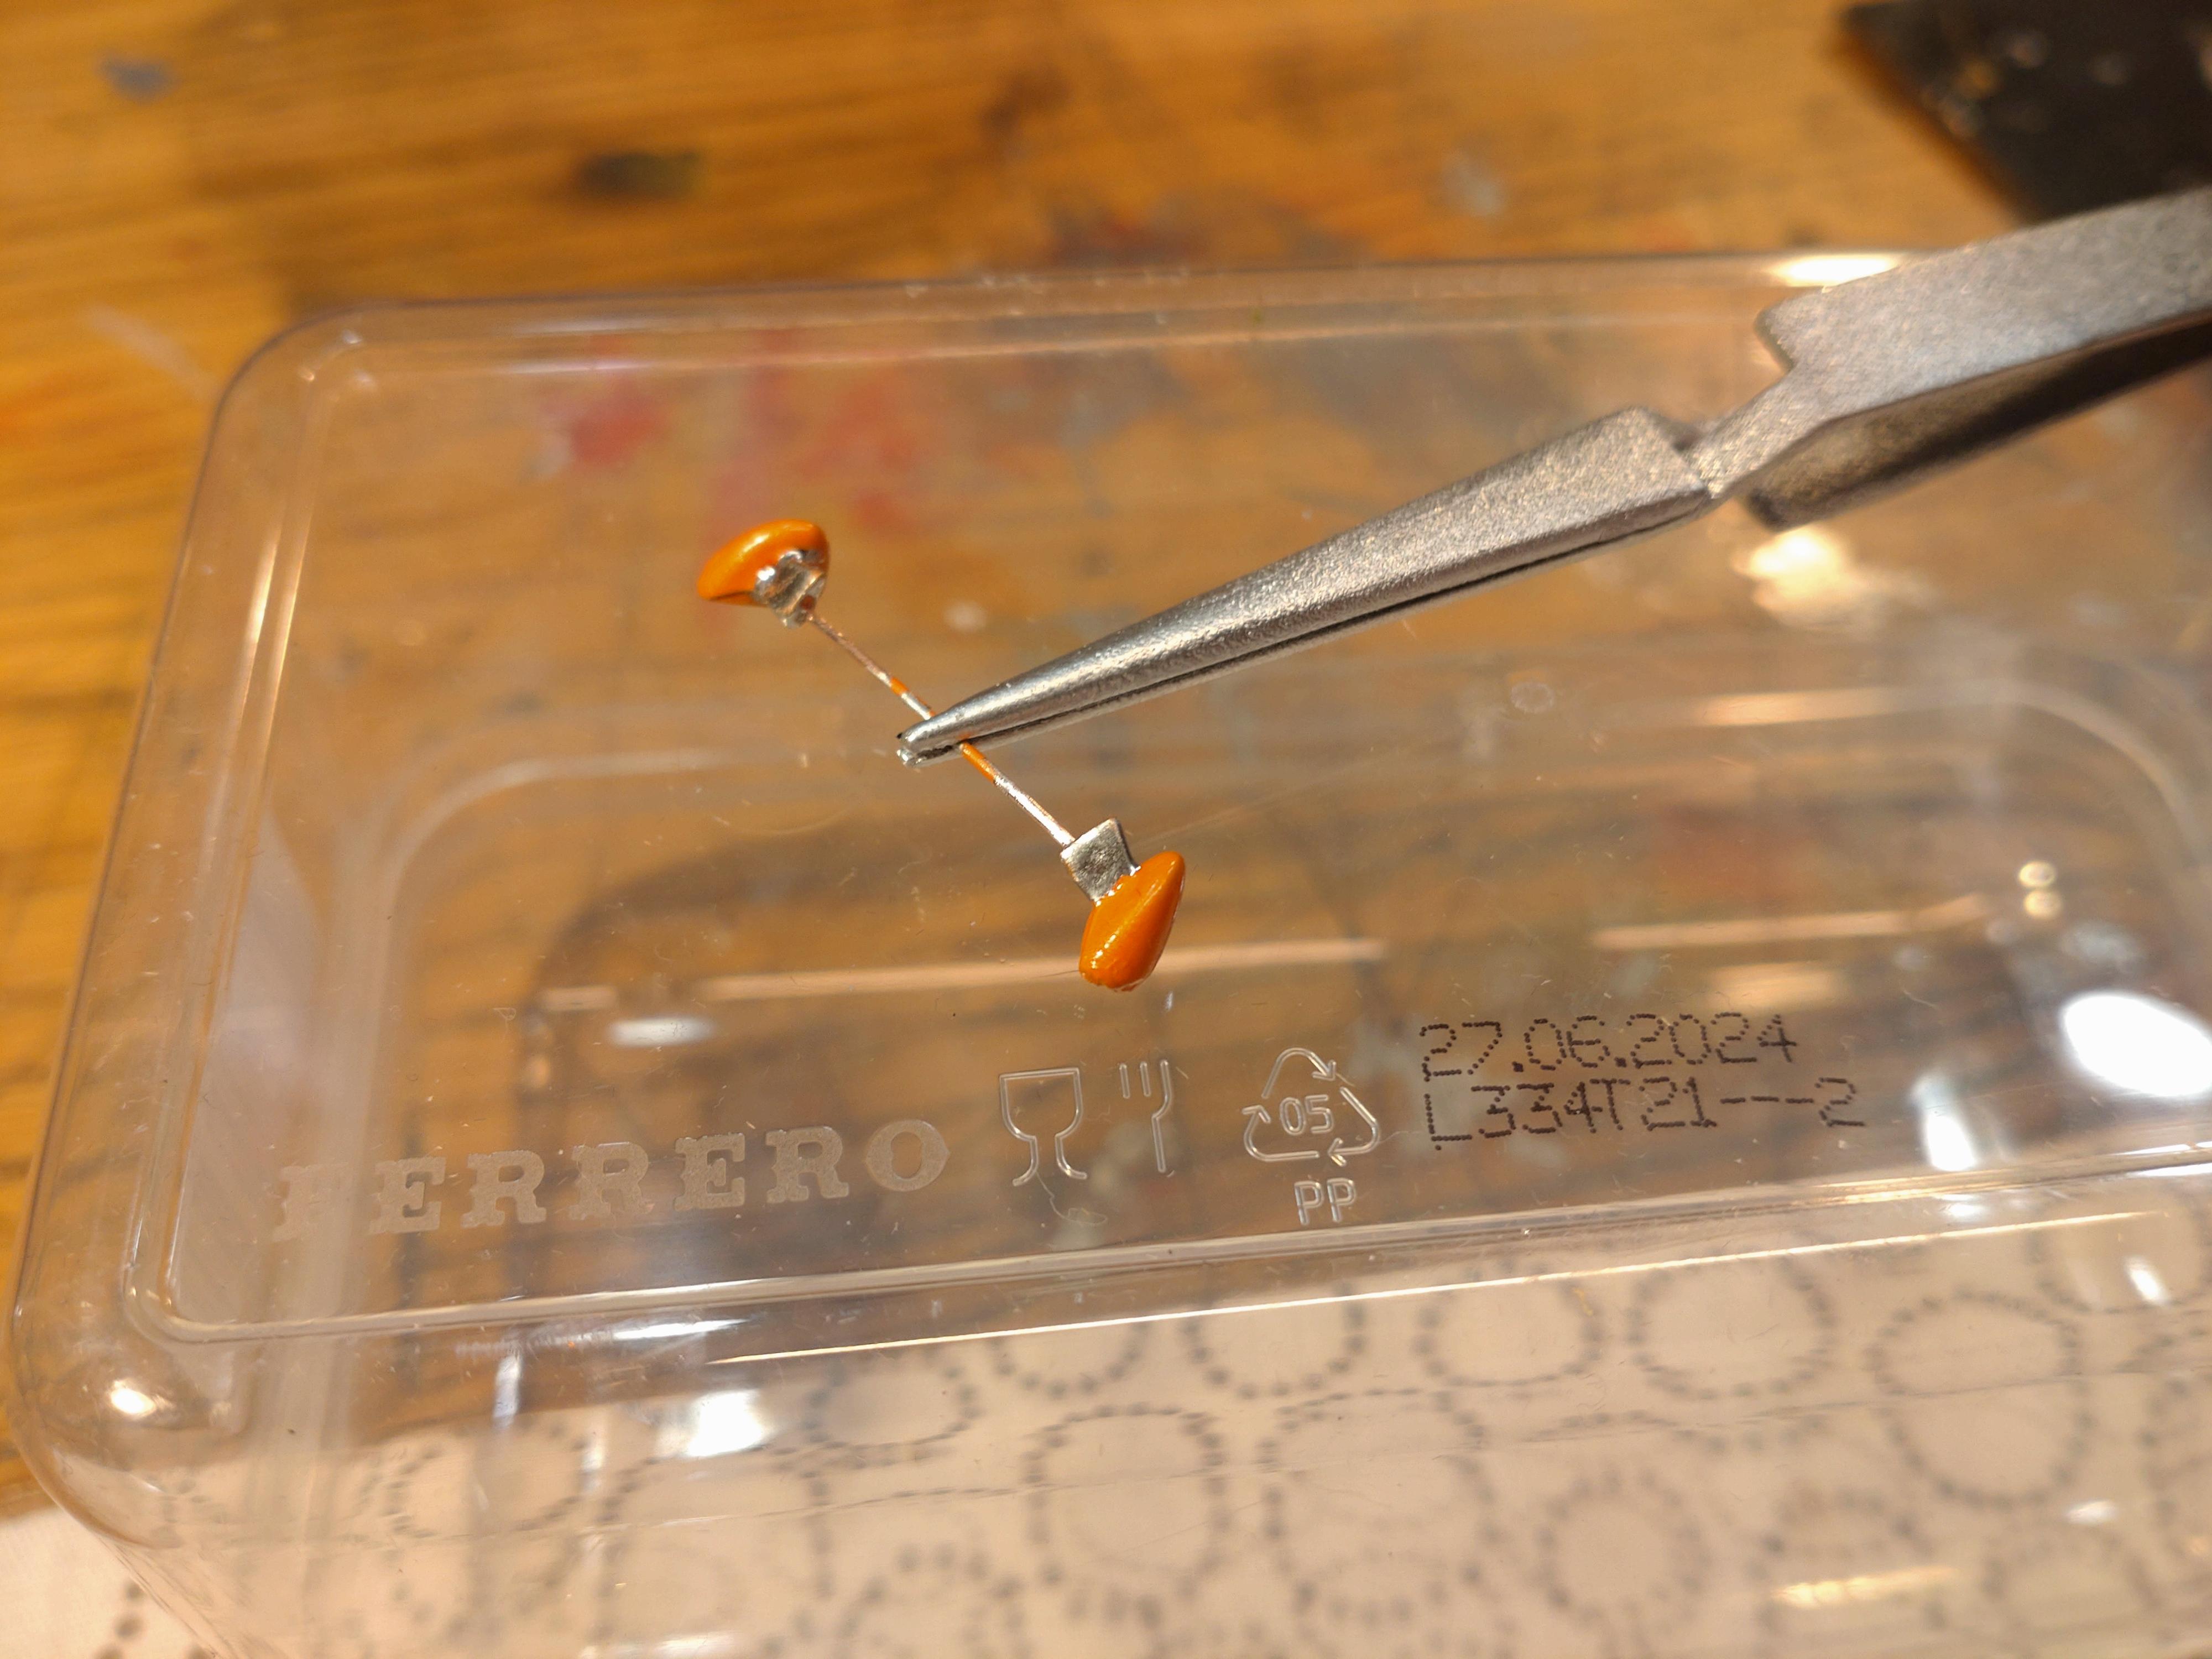
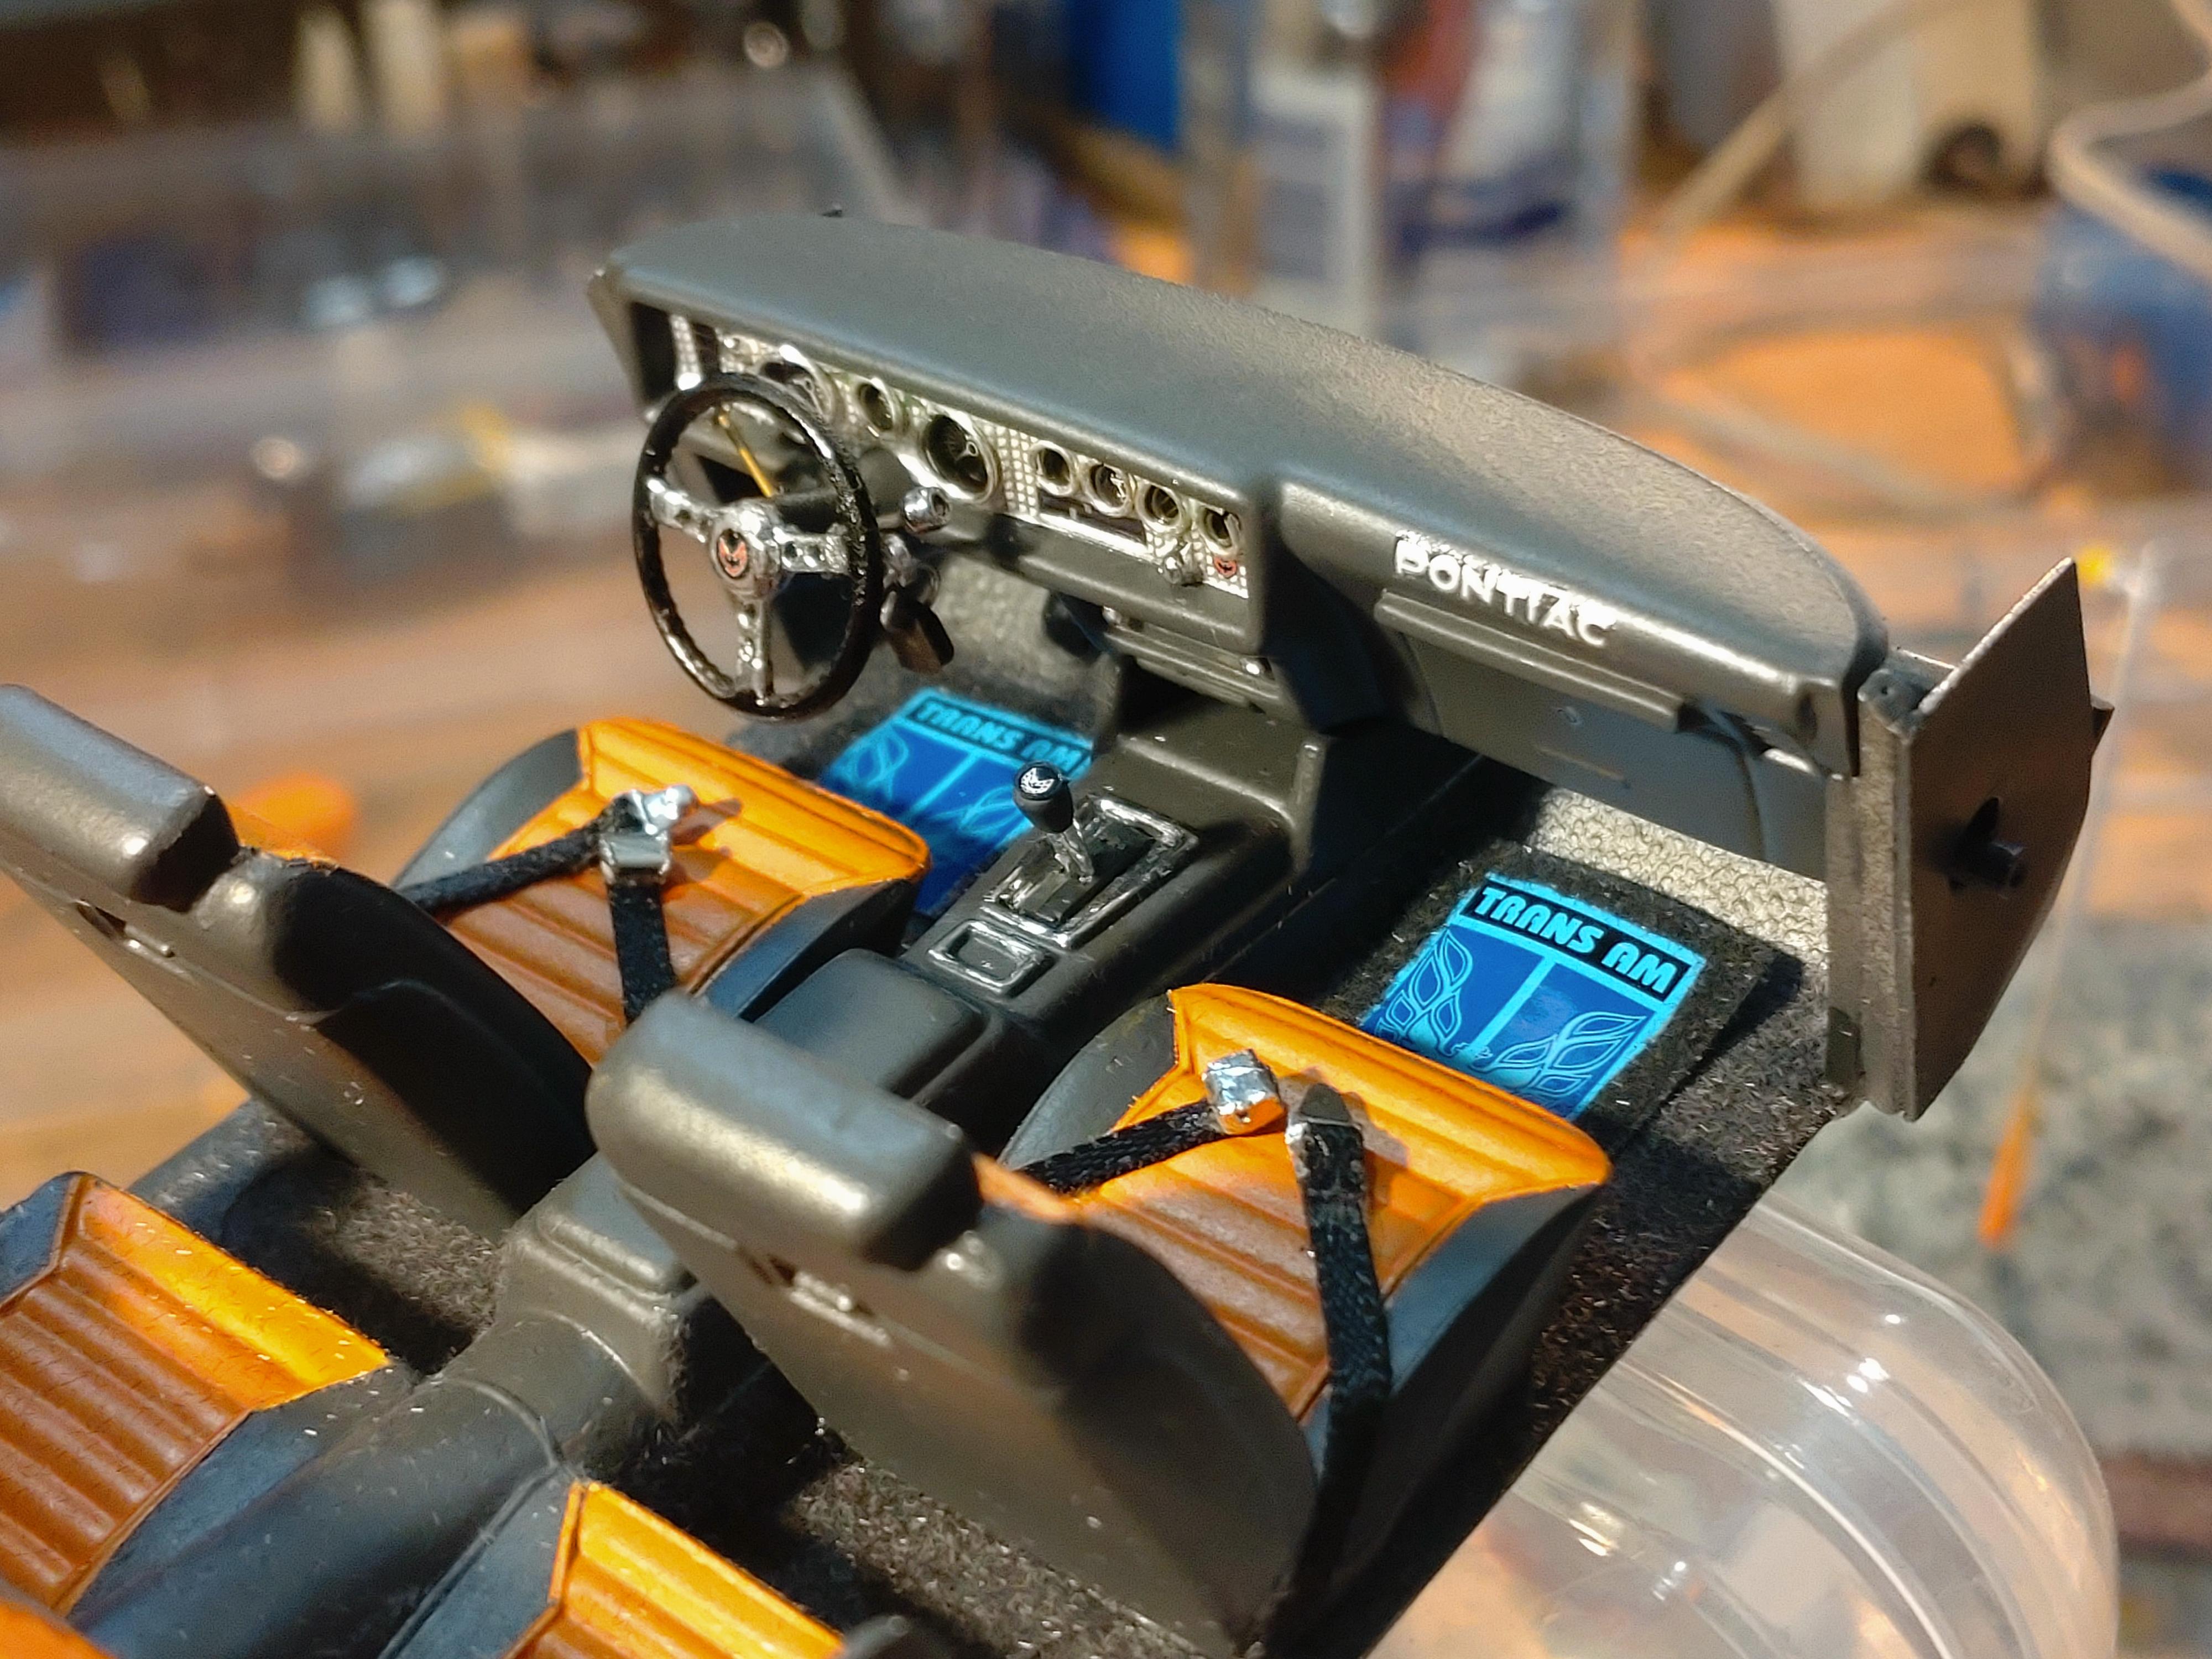
I´m finished with the body. I wanted to add a little jazz to the paint job. Not too wild, but with style. The second color is Tamiya TS-58 Pearl Light Blue, not too much a contrast in color and shade. The sides were masked and with 1mm masking tape I added a graphic texture. After the paint had hardened I fine sanded the masking edges with grit 2000 for a smooth surface. Next step was applying the BMF and the side trim still had its details. Unfortunately this kit comes without a decal sheet. I had sanded off some of the labels but I would have appreciated the labels for the trunk and bonnet. I had some flags to spare for the front fender, otherwise it was BMF for the rest. The finish is two layers of Molotow crystal varnish. While waiting for the spray coats to dry, I had started with the interior. The basic color is a cream white with the contrast color the light blue for the seats and highlights. Coming without decals, this could have turned into a bland dashboard, so I printed gauges from images I had taken off the net onto gloss photo paper. I cut the round gauge trim off the dash and glued the speedometer and round gauges with white glue. Then bent new trim from .4mm silver wire and flattened them with a pliers. The radio is also printed and with tiny crimp beads as dials. The steering wheel is tipped to the left to match the wheel position later. The key chain is a hood lock from a photo etch set. In the meantime I have corrected the black of the steering wheel. I replaced the kit seats for a more sporty version from my spares box. The floor is flocked with a mix of grey and a bit of blue. The pedals are manufactured from styrene sheet and square rods. The seat belts are too dark blue, but I was unable to find a lighter ribbon. Now that the body paint job is done, I can finish the interior by completing the door panels. The window cranks are finished and waiting to be attached. The panels have received some structure in form of arm rests and handles. I will come to that next. Thanks for watching!
-
Thanks everyone for your friendly response! Making progress and will show more soon!
-
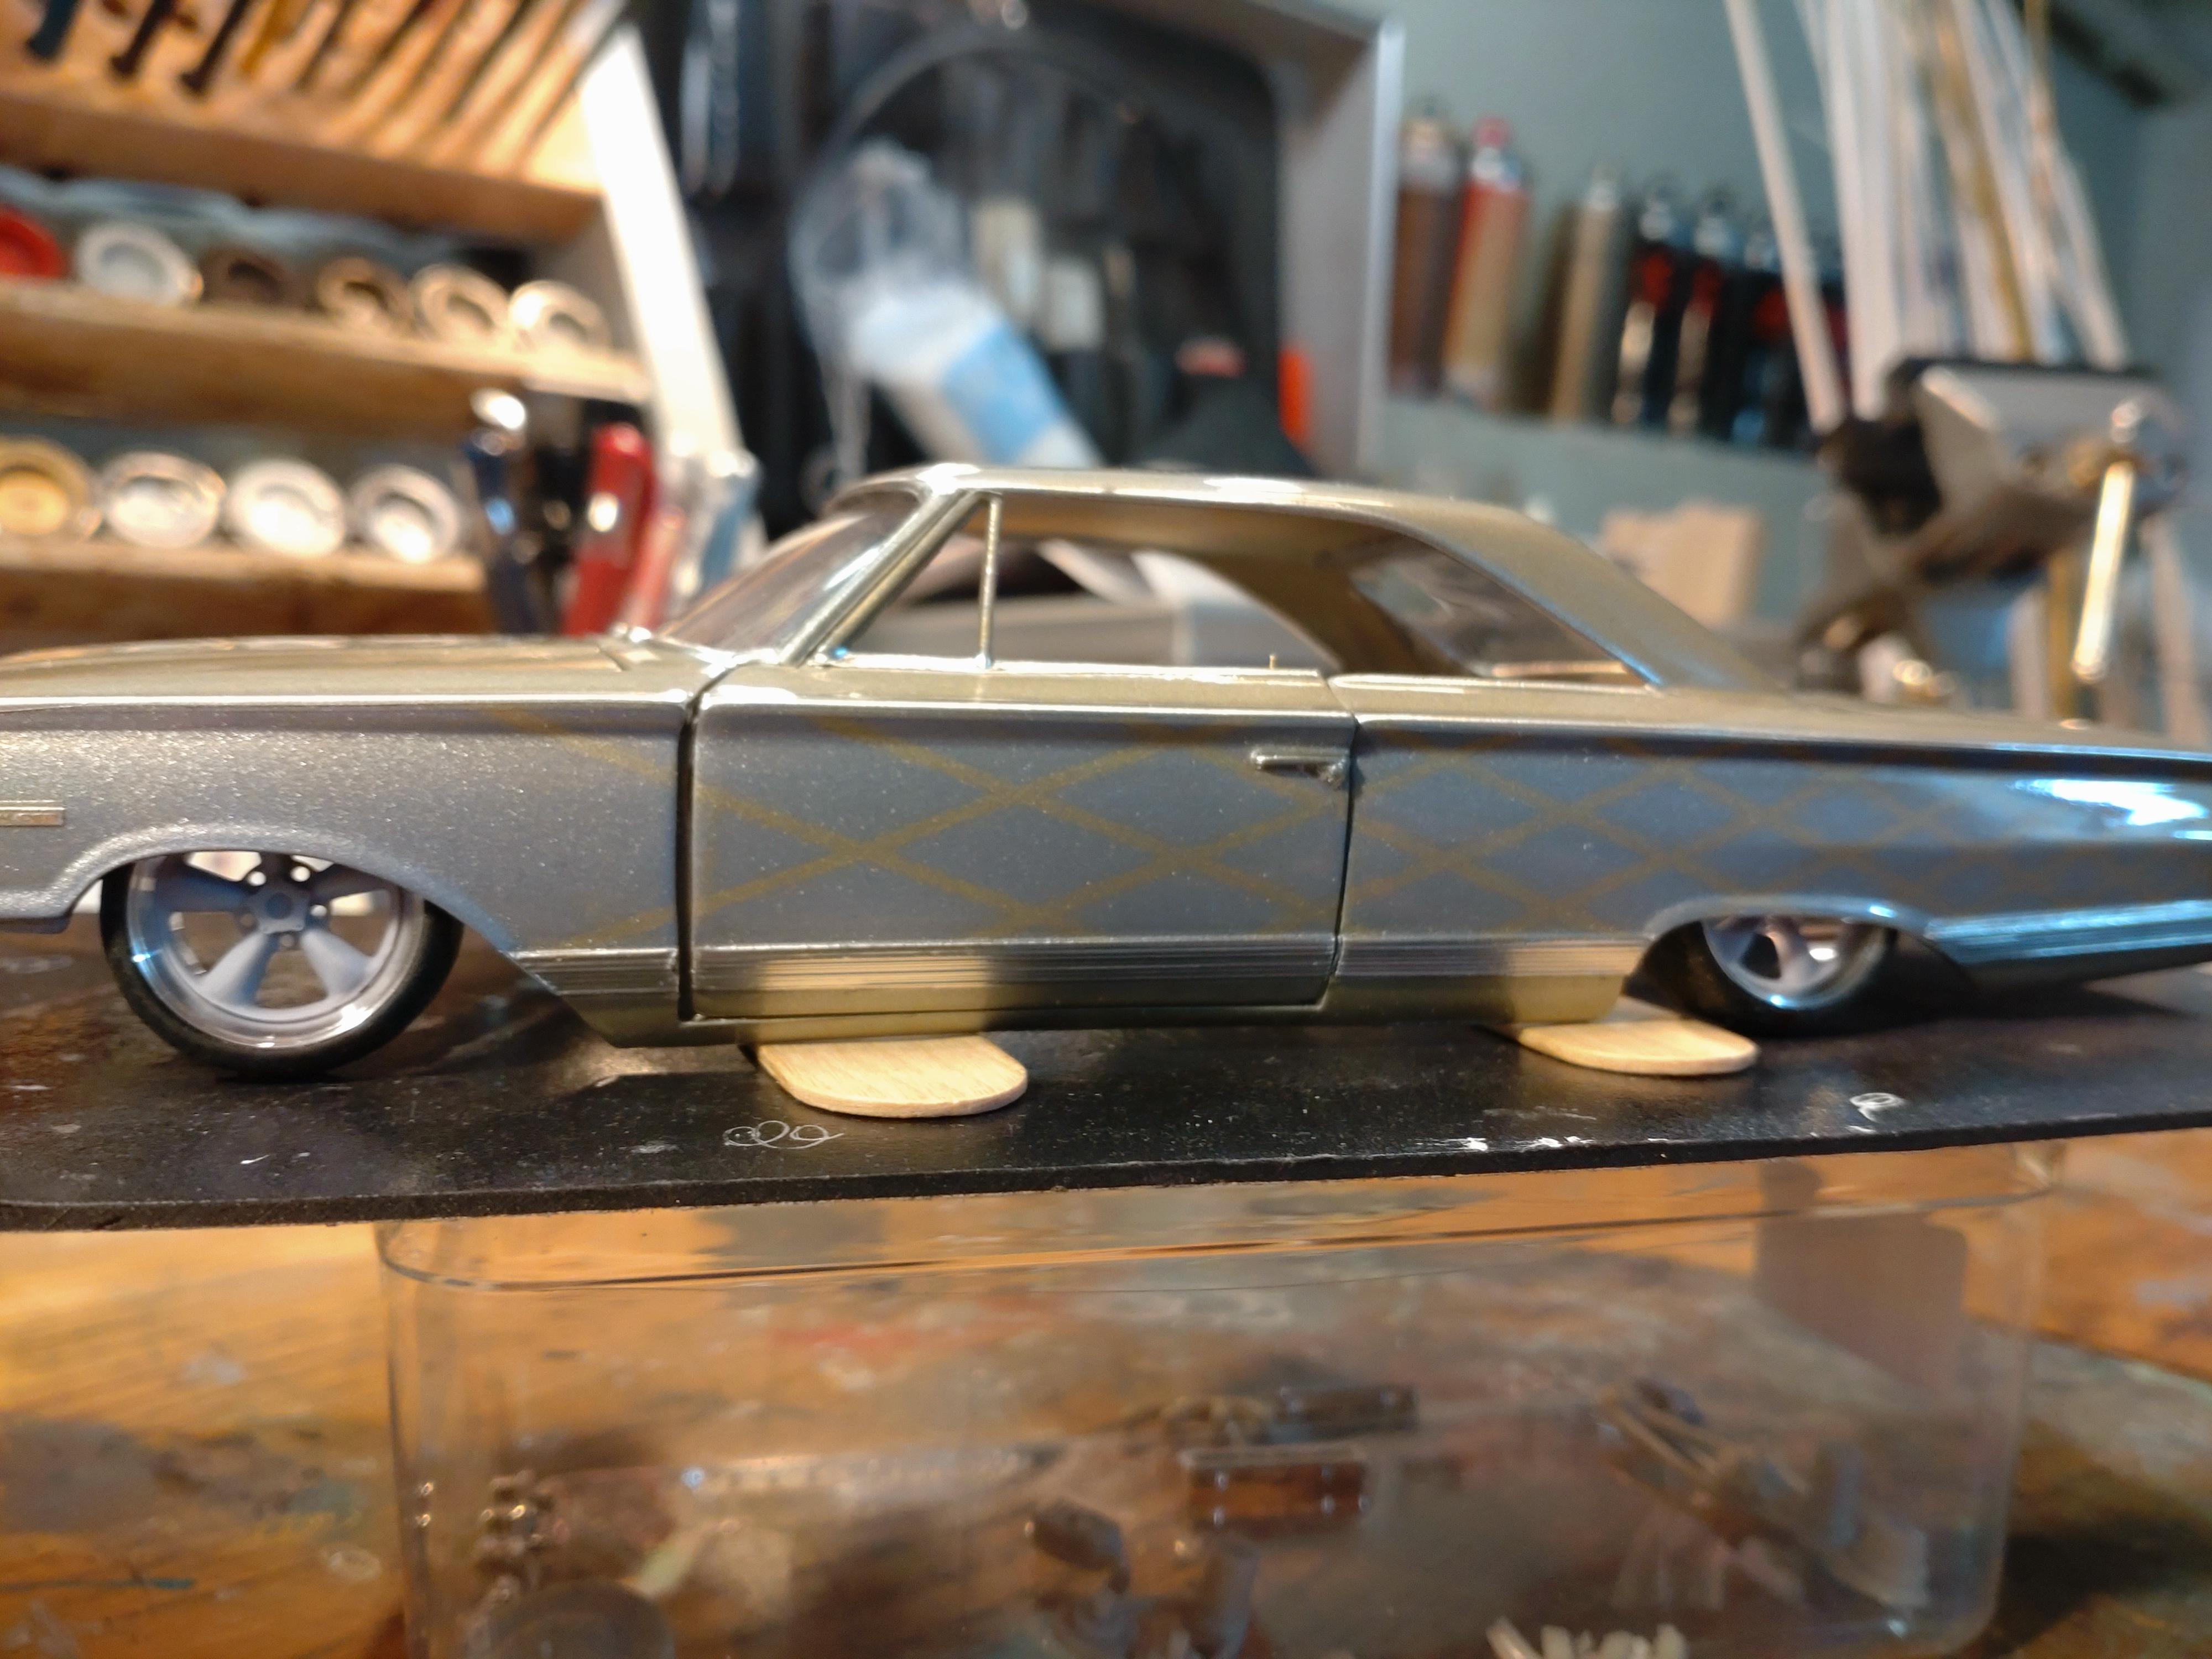
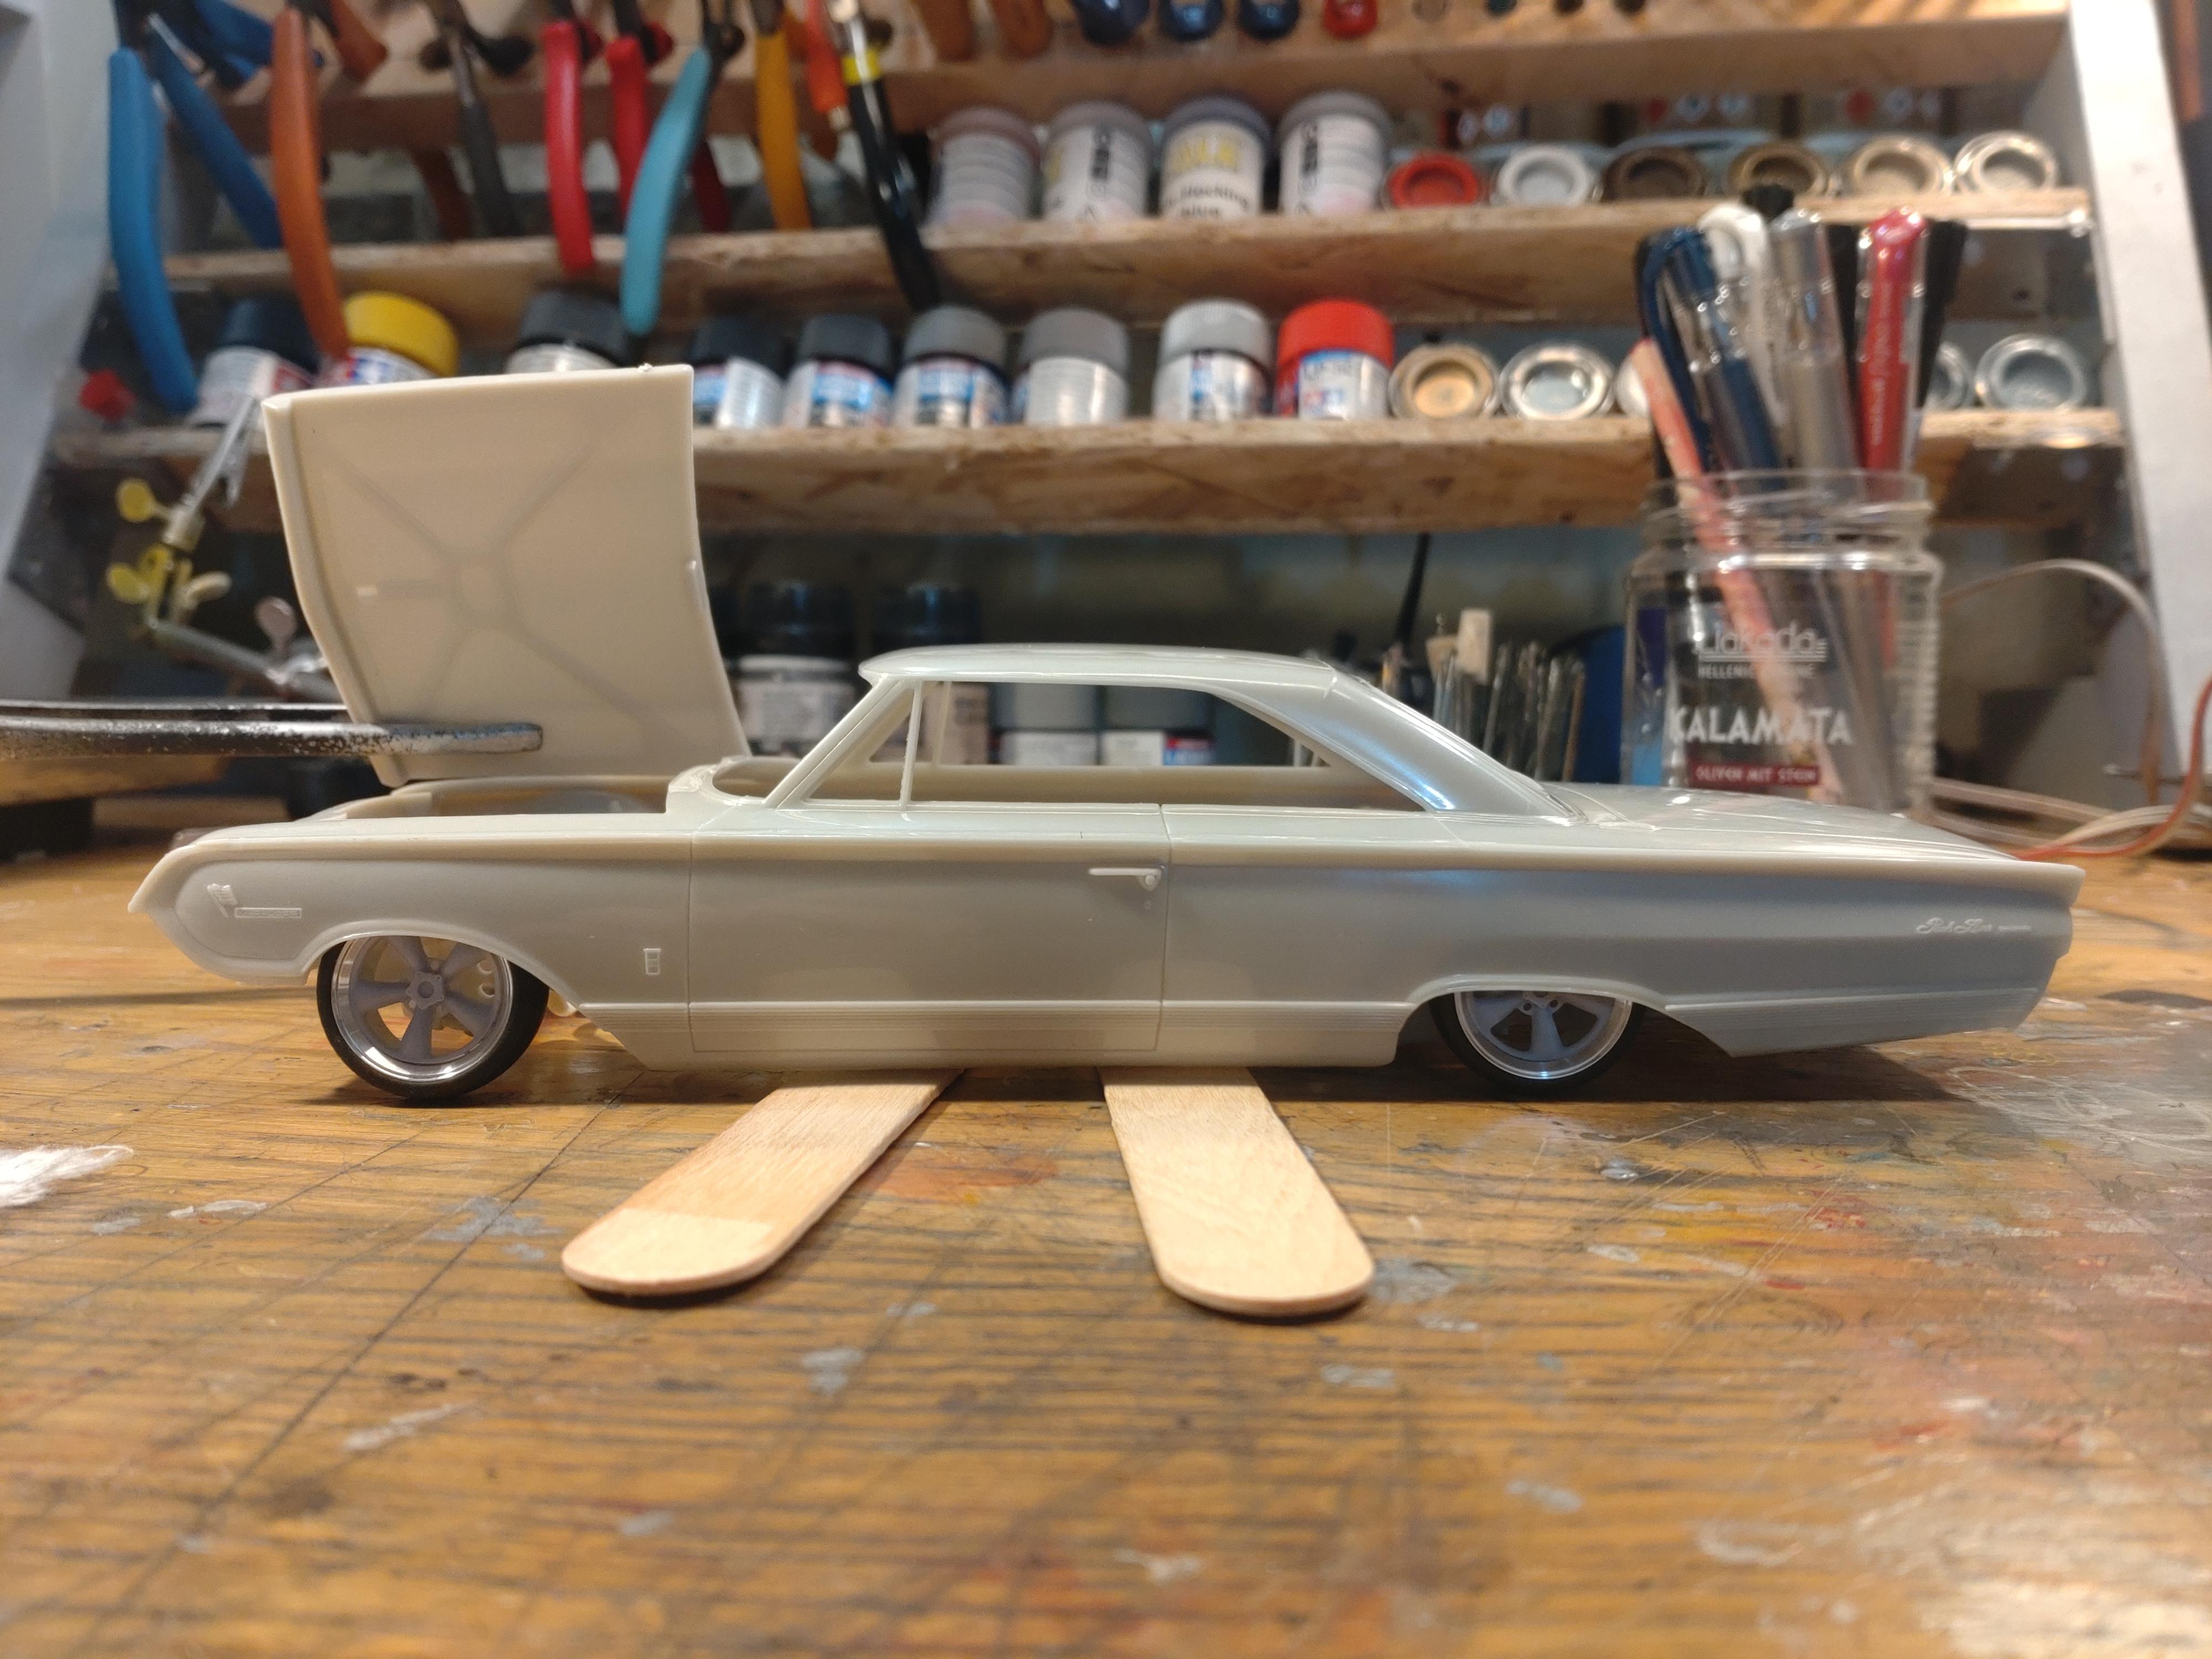
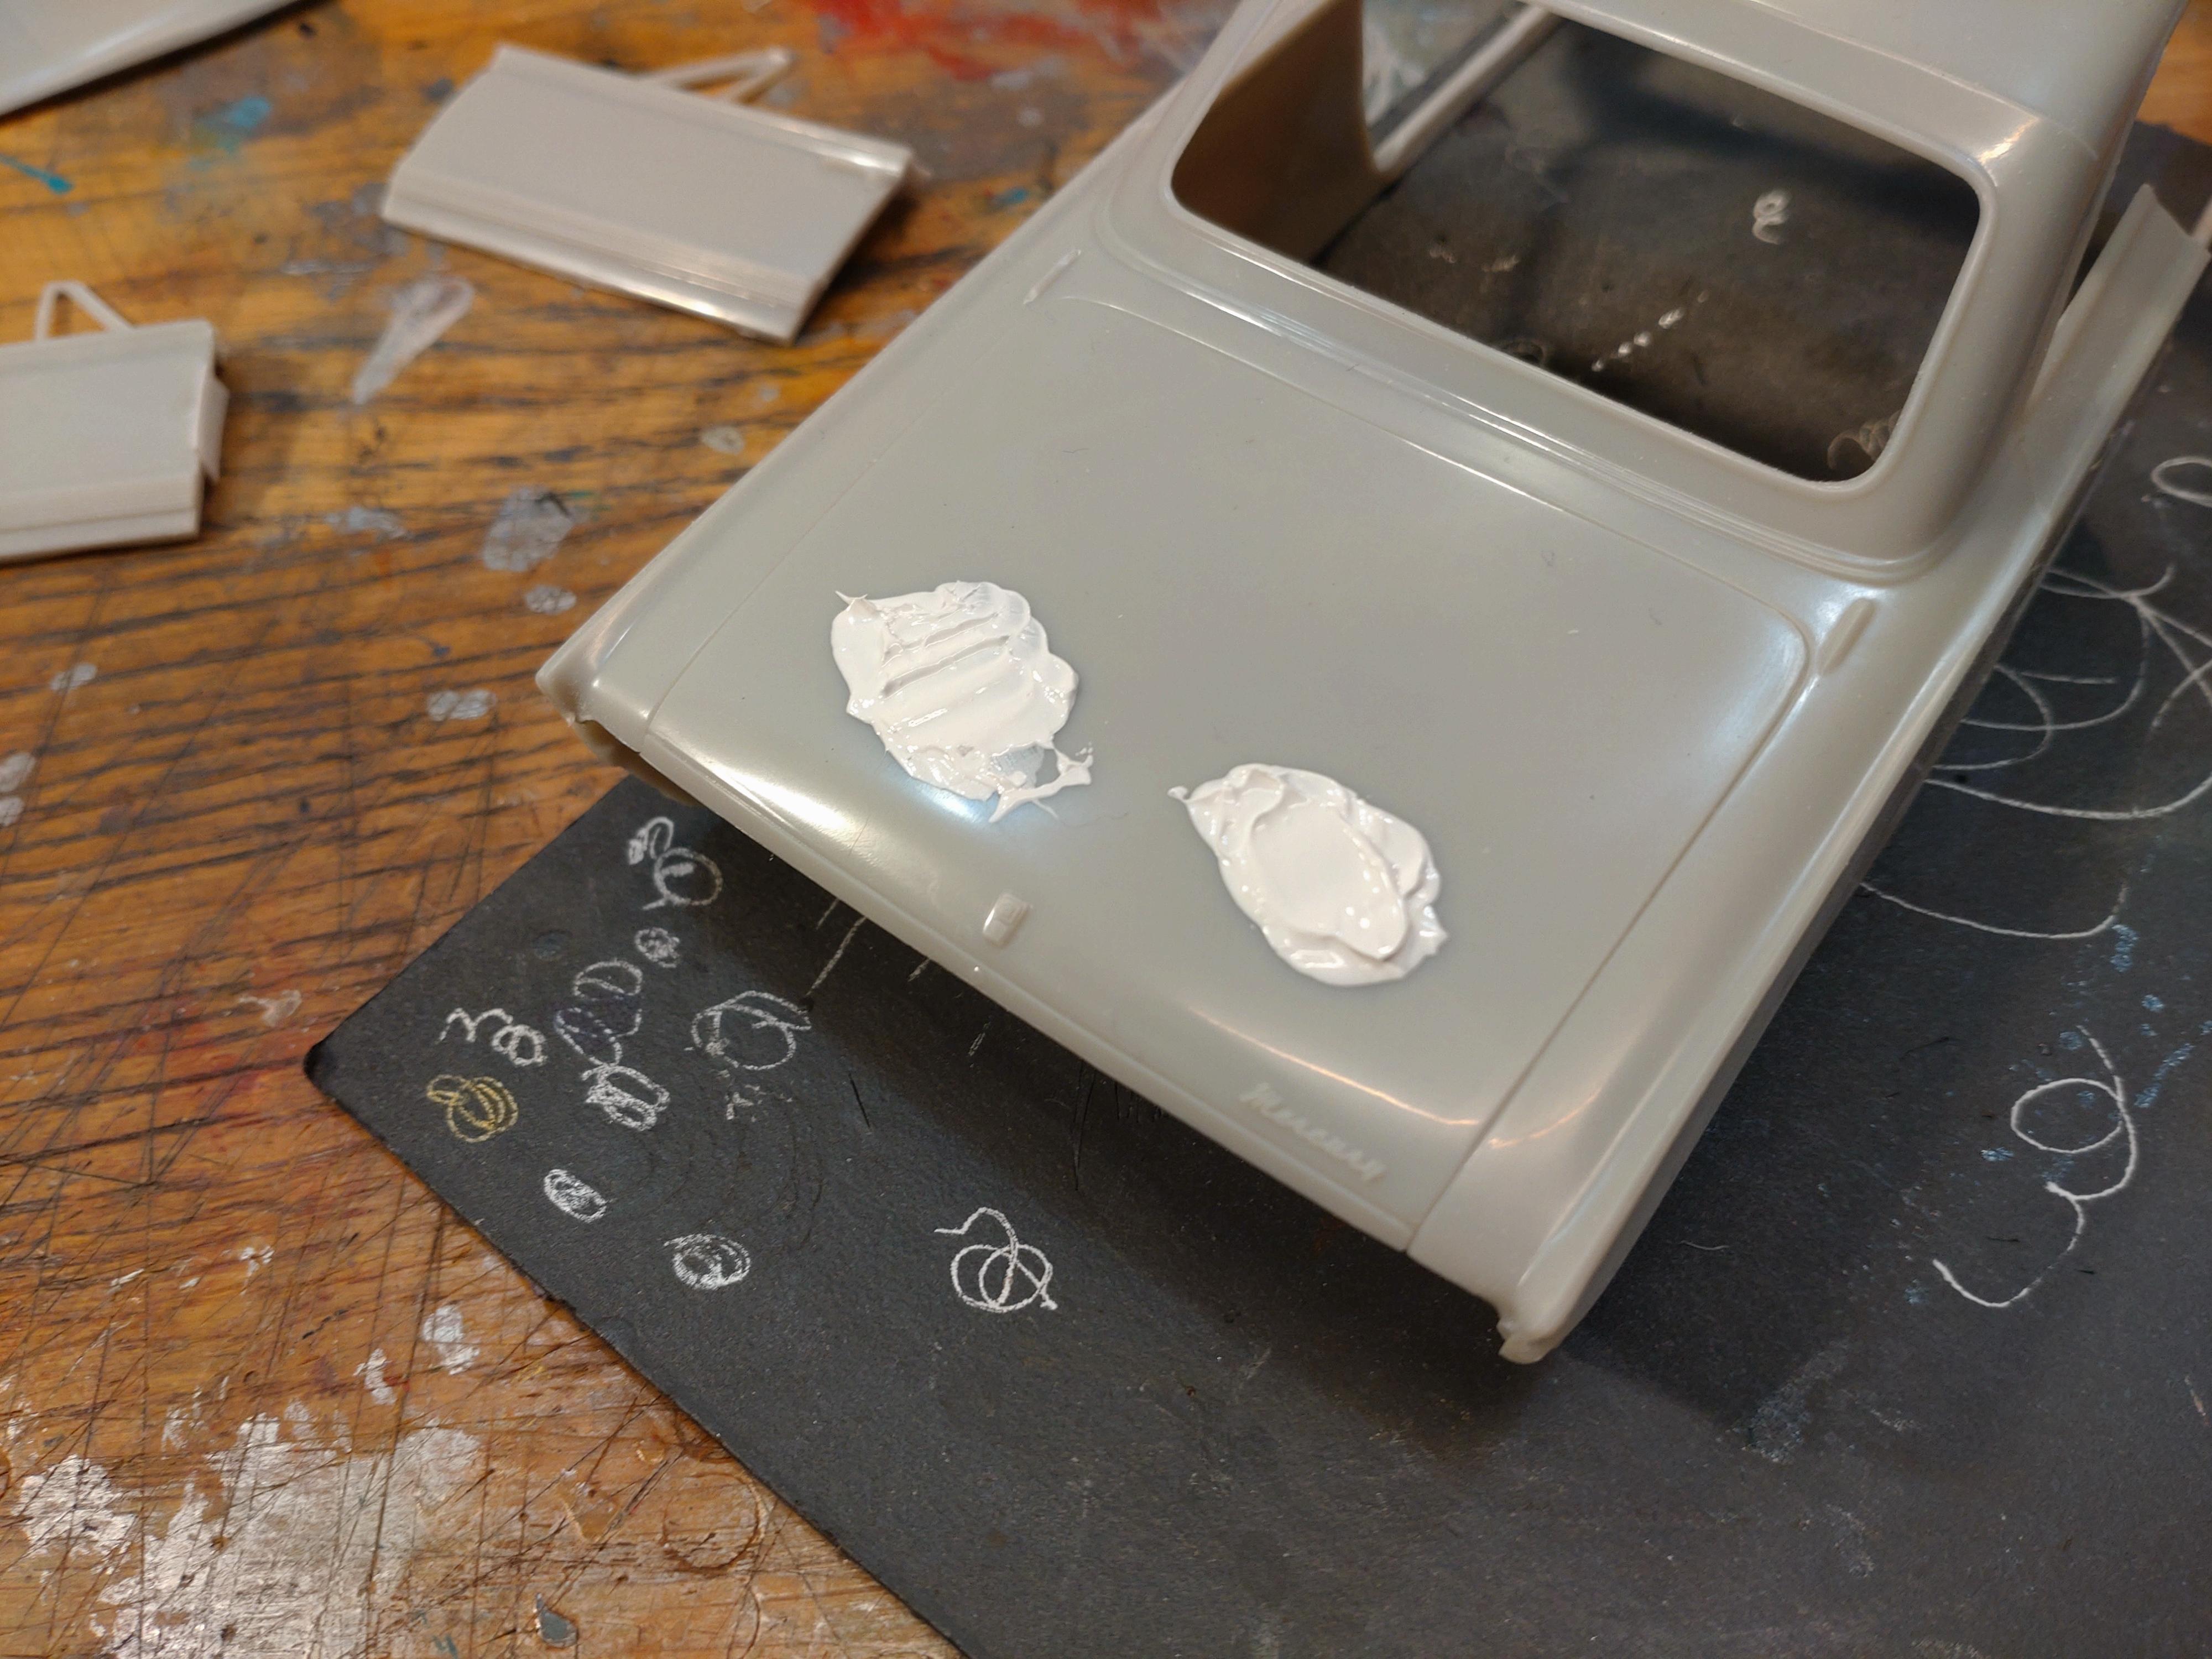
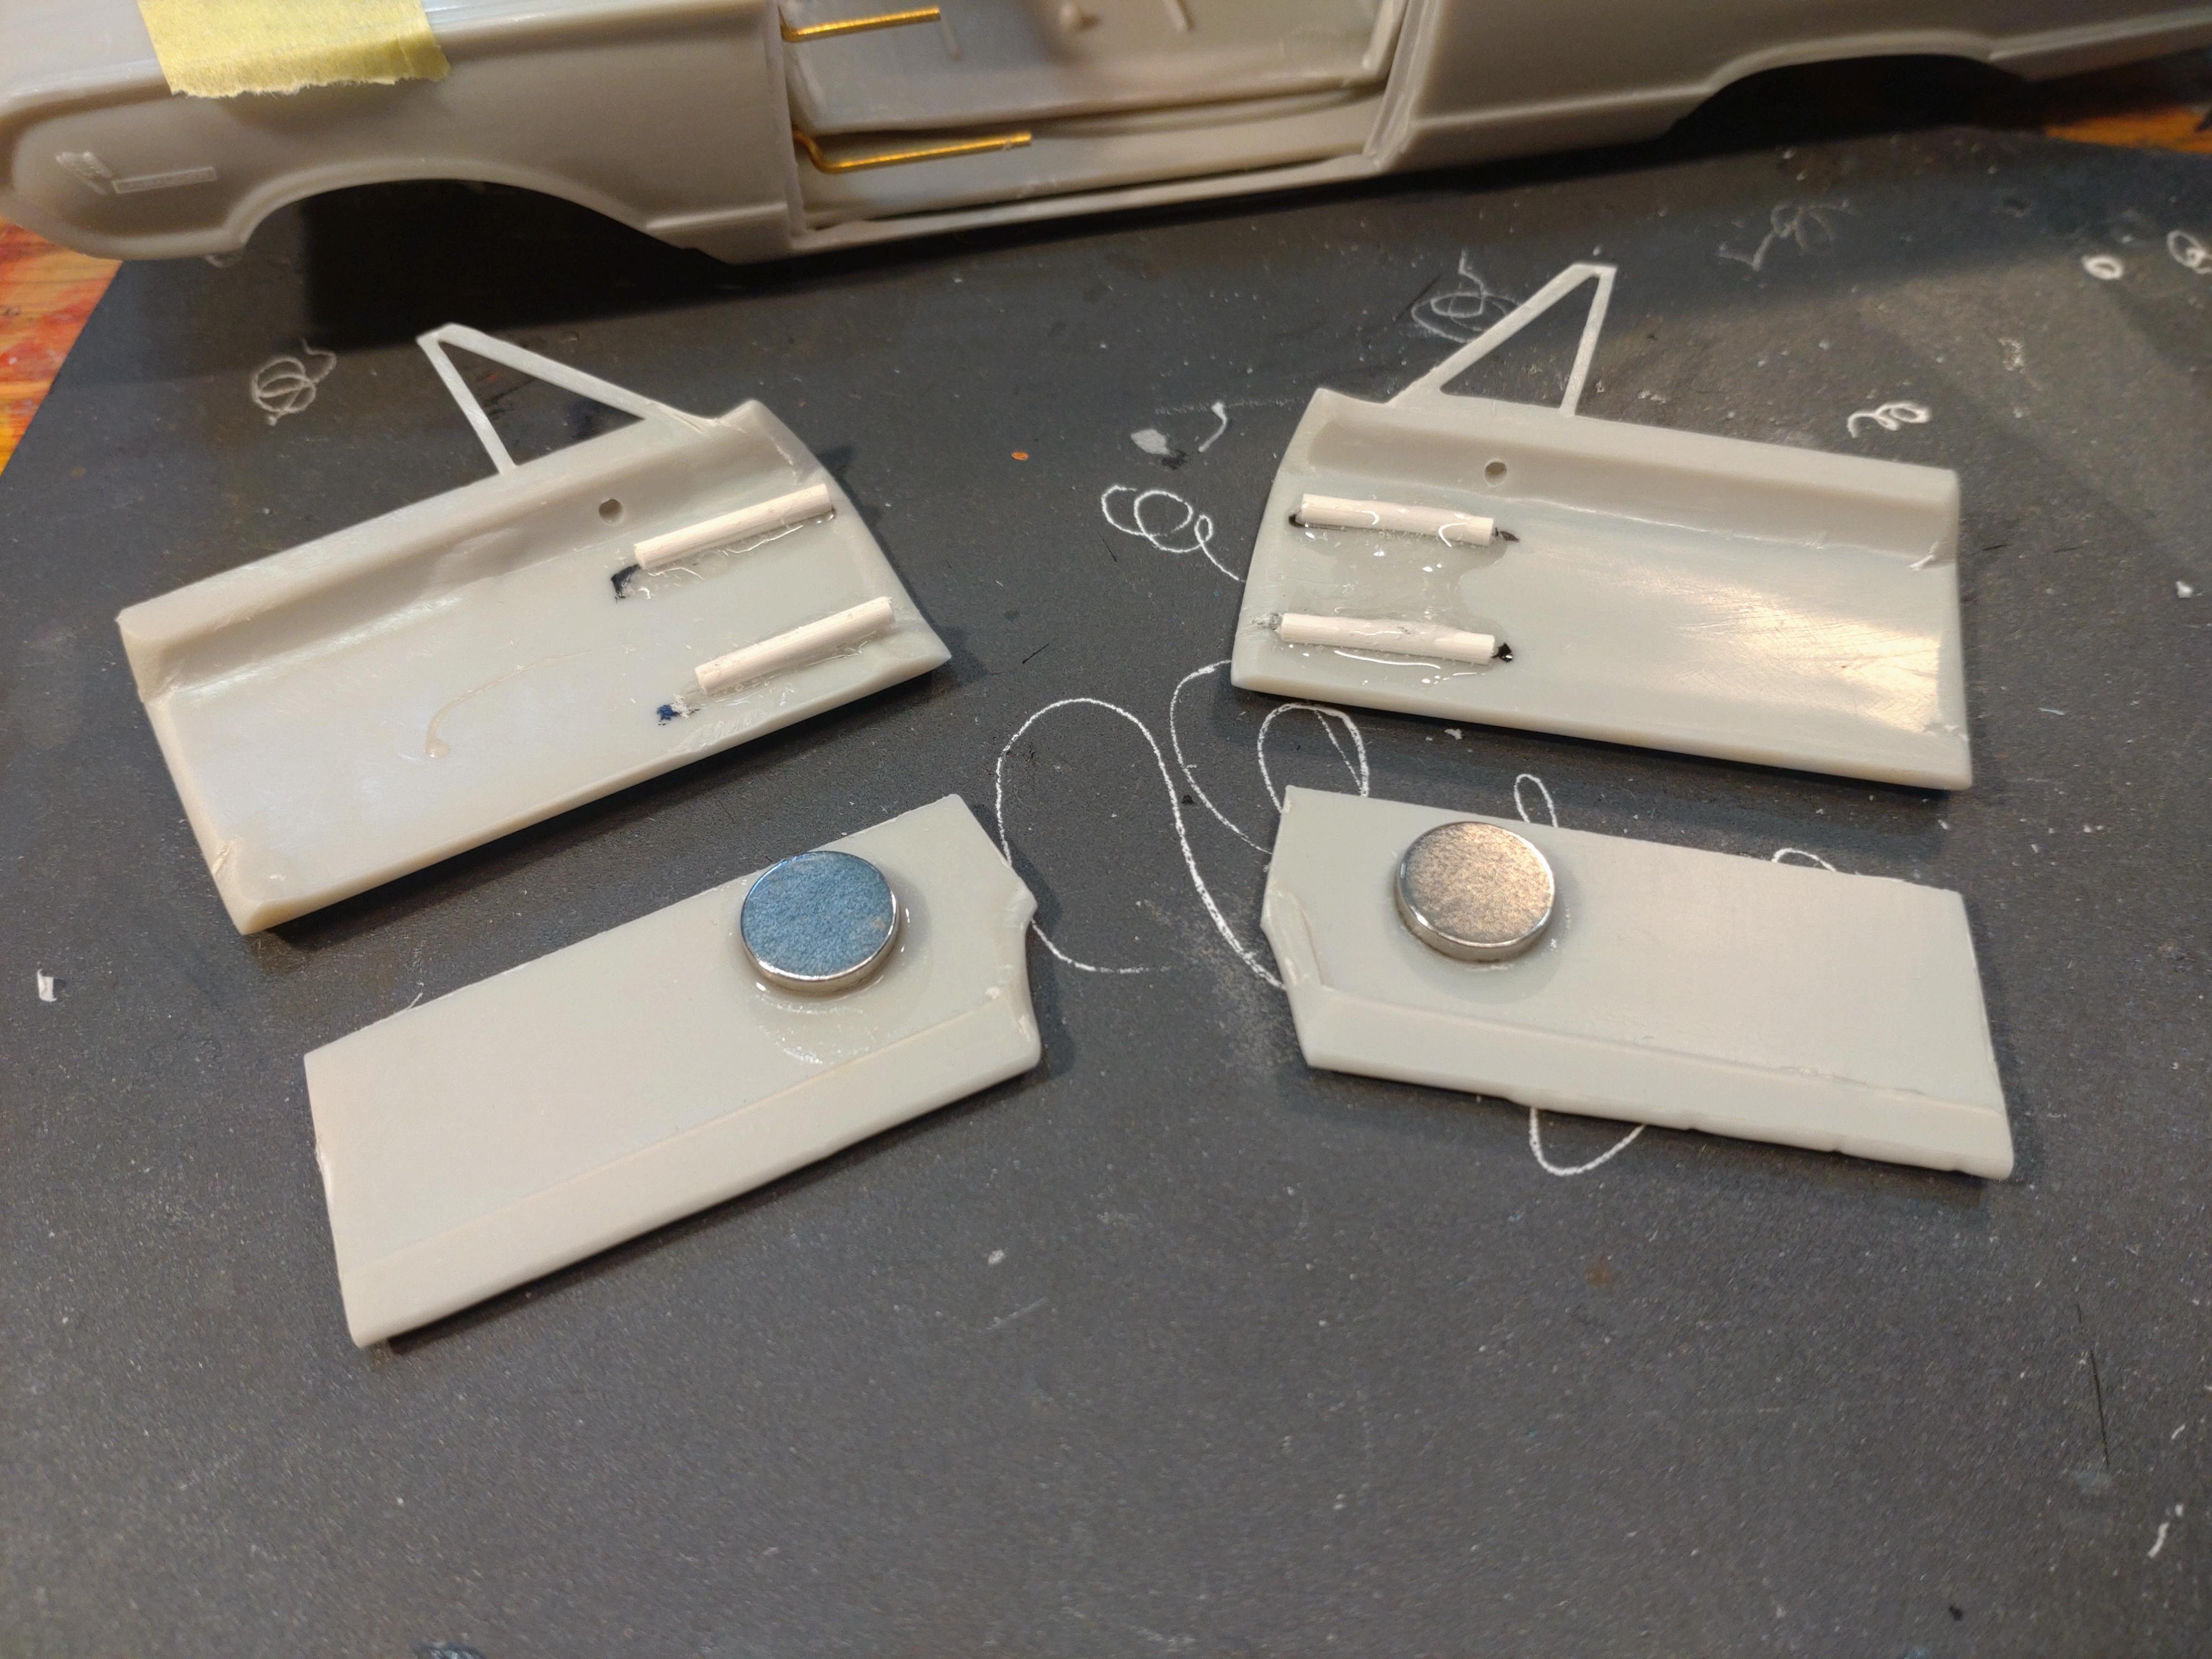
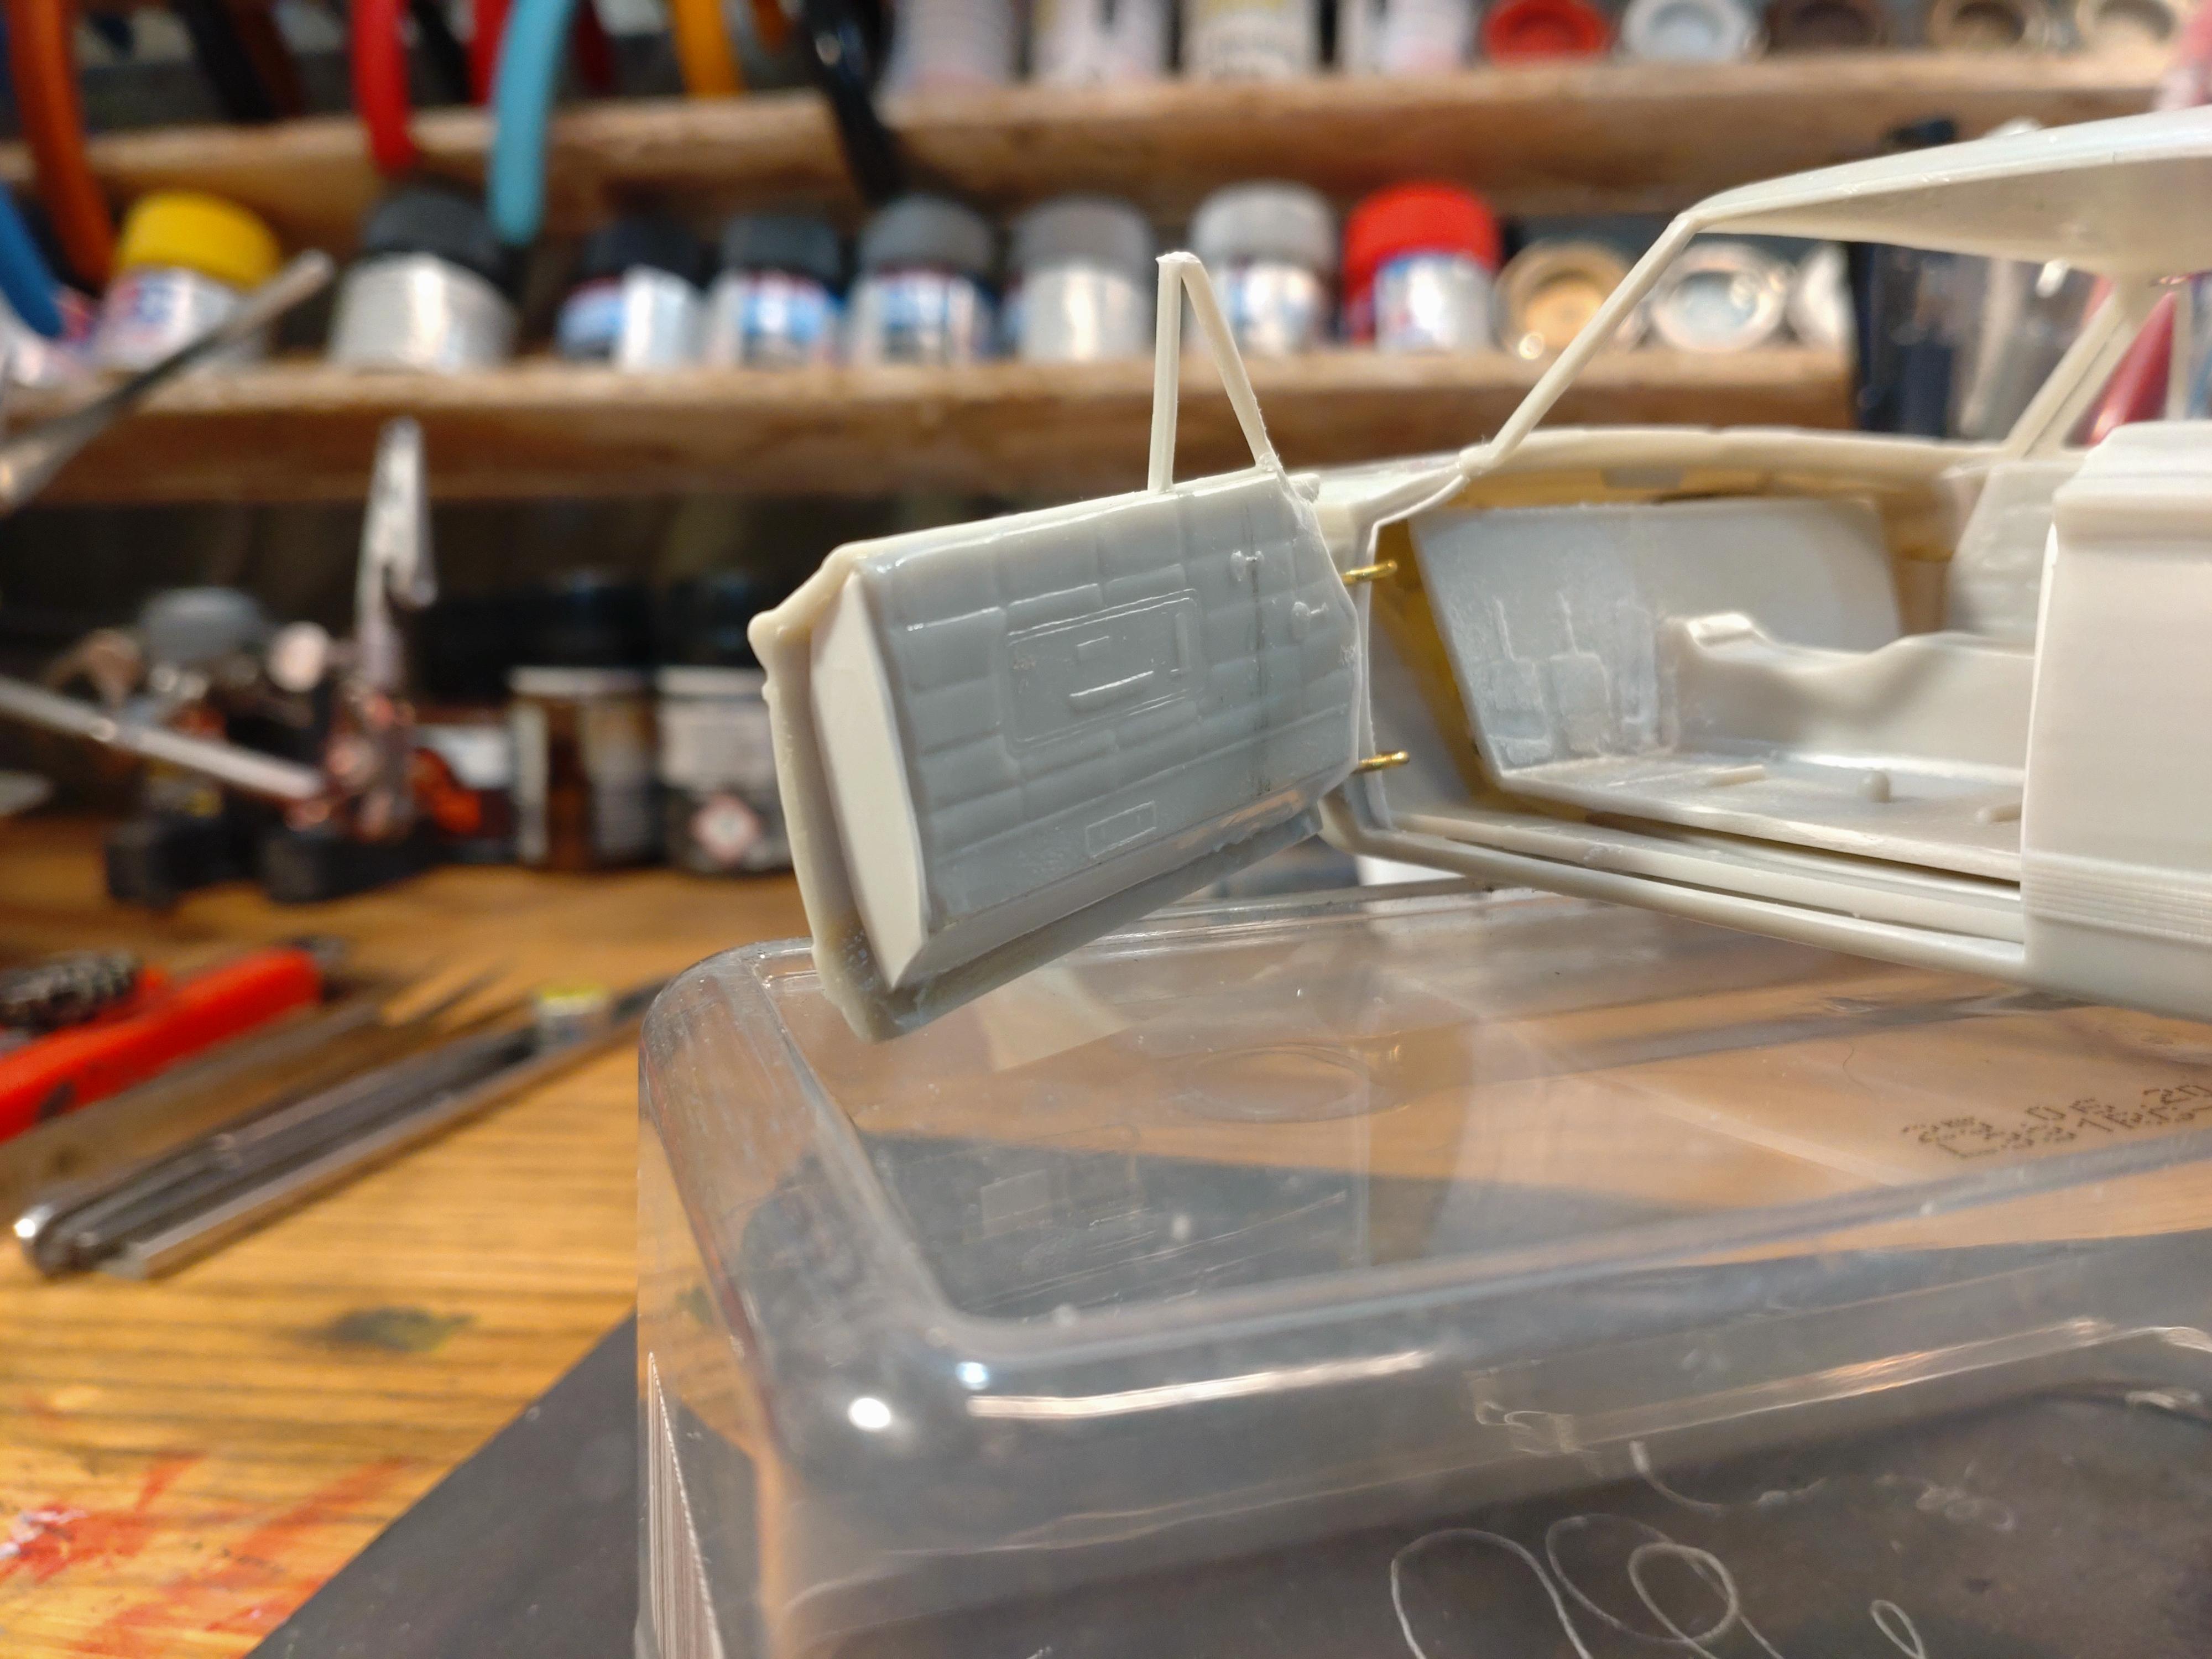
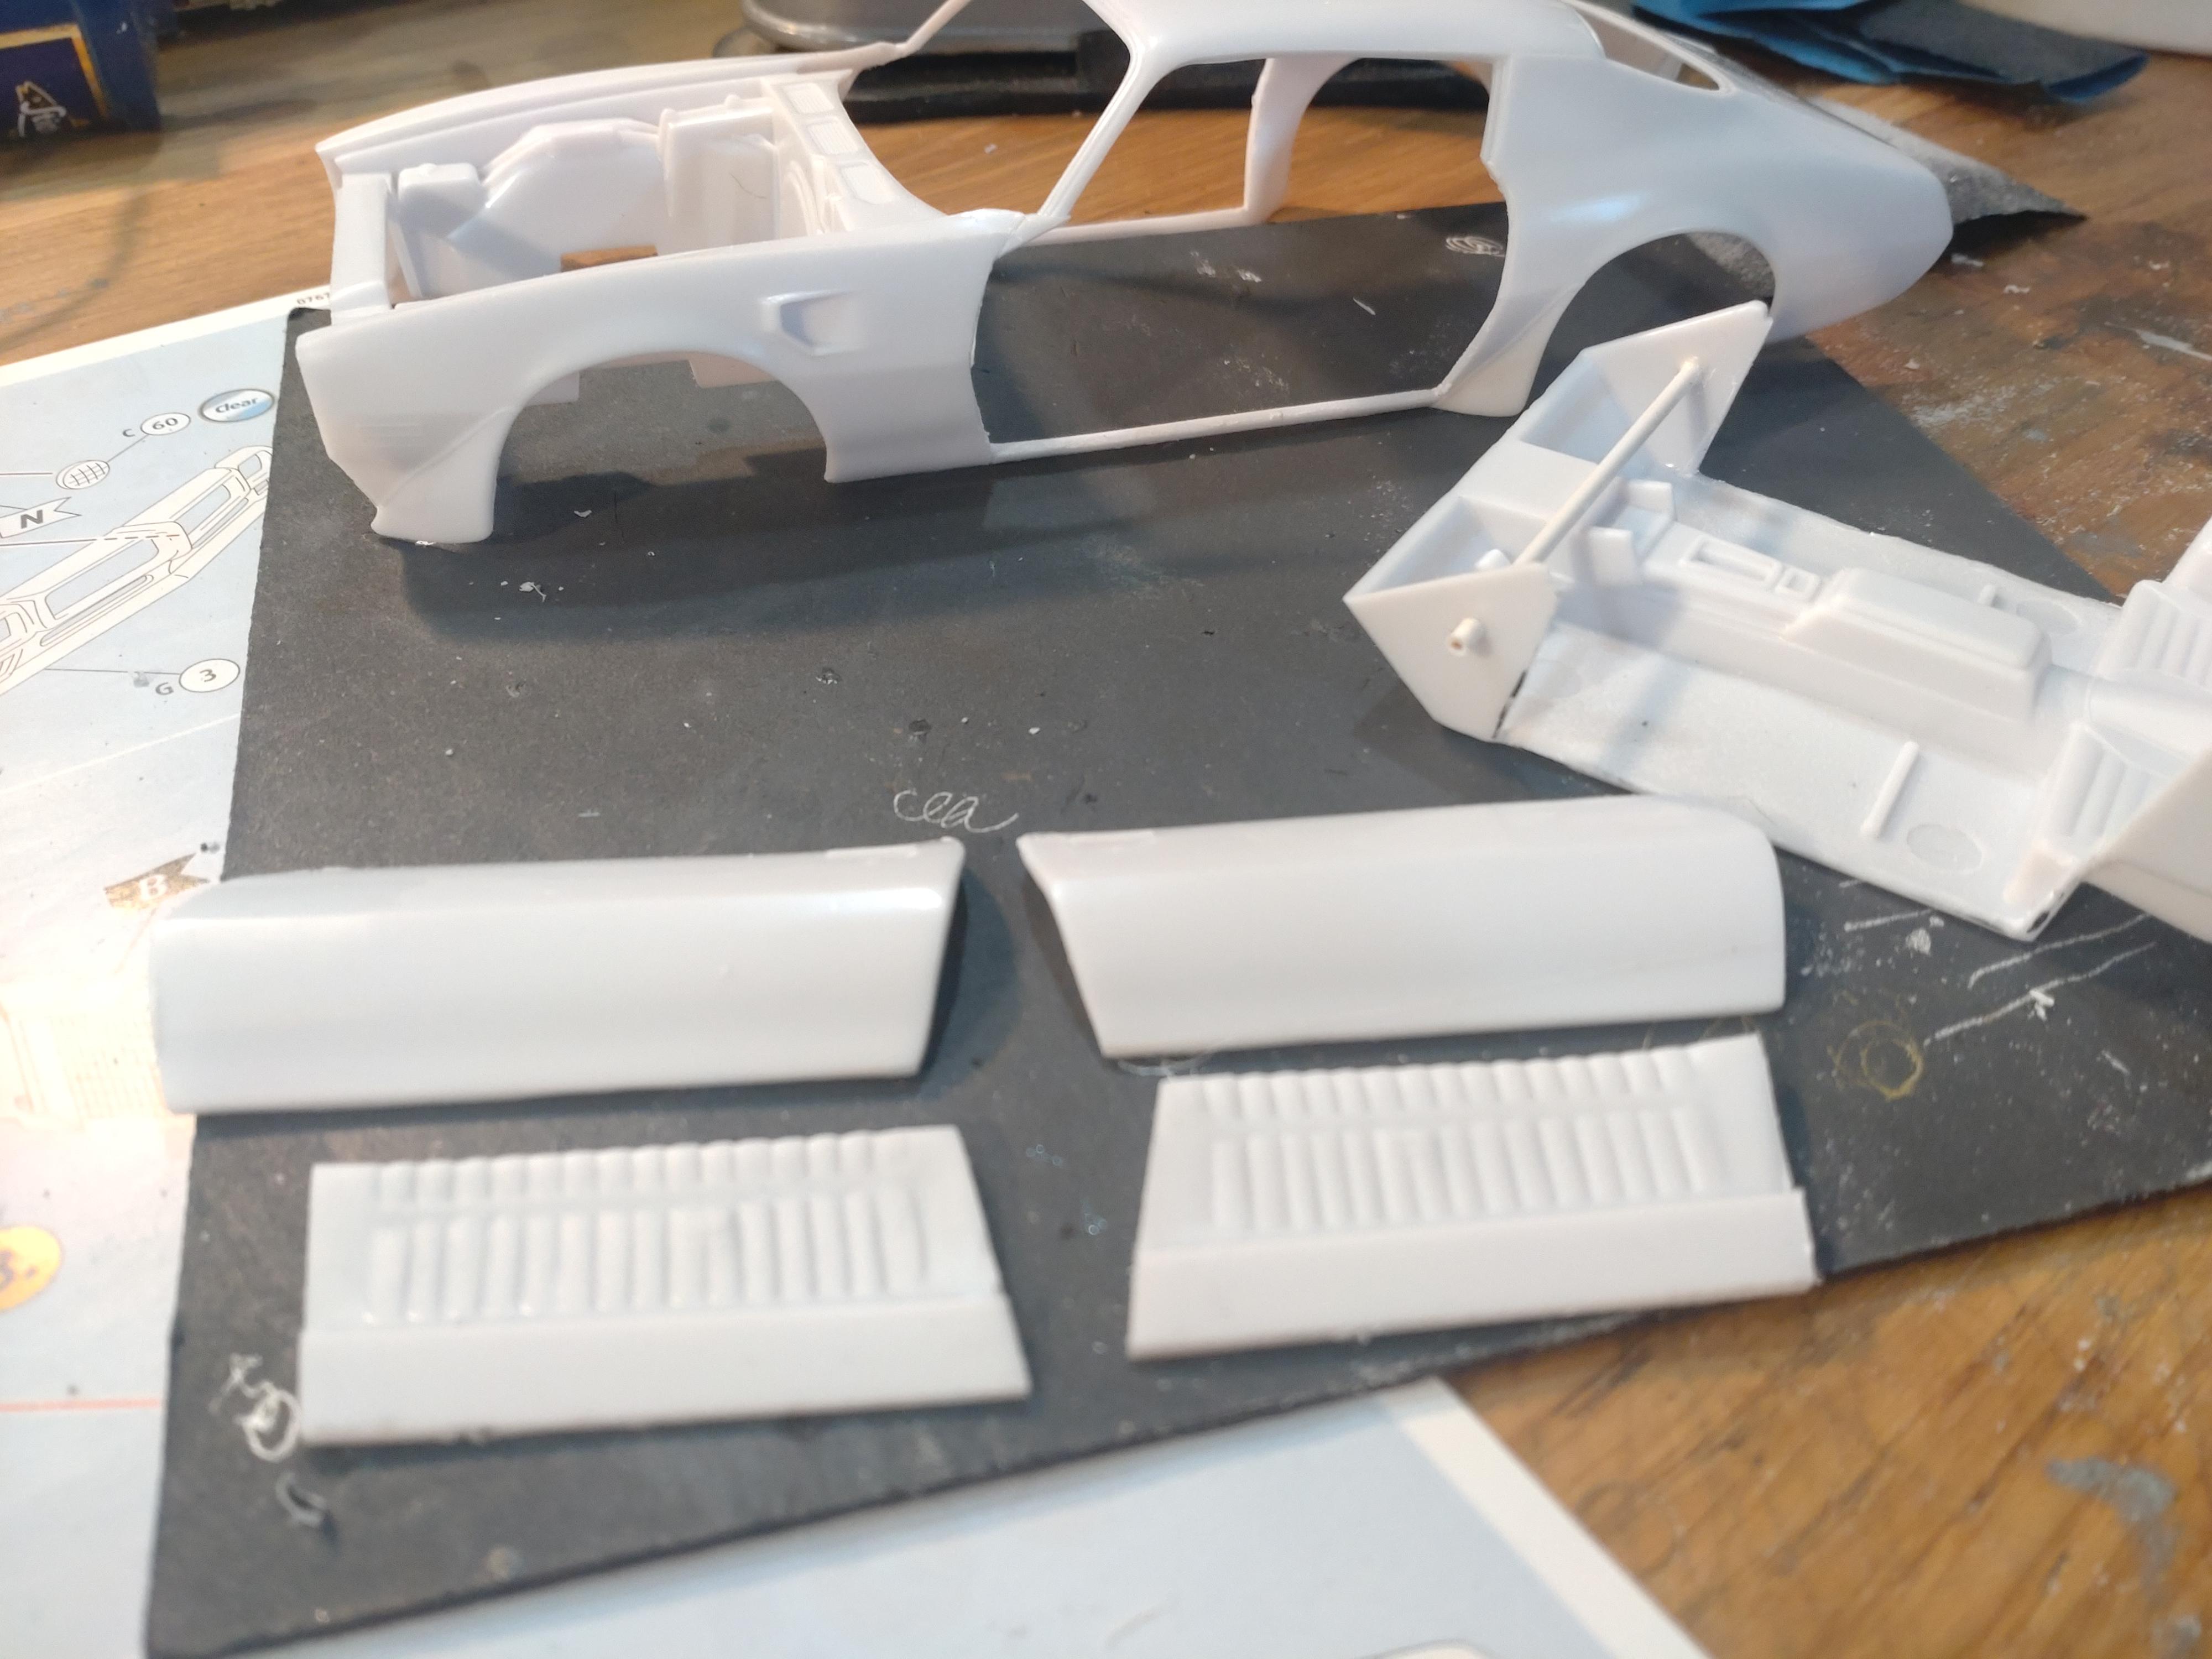
This AMT kit is only a level 2 and the complexity of engine, interior and undercarriage are not what I would call a serious challenge. The body and undercarriage are screwed together and I will have to work a bit to make those rough details disappear. BUT!!!, the body is a fine and crispy part, and this Marauder has enough potential to turn into cool build. Seems like not many builders pick this kit, because the emblems and the trim are in a very good condition for a old edition mold. Whatever, I chose to build a classy low cruiser with a few goodies. Opening doors, yup. But I also wanted to connect the bonnet to the right fender, as I have seen on videos from car shows. This is the first mock up. The wheels are from Scale Production. Cutting out the doors was a tricky job because the rockers and vent windows are very thin. I have to hold this body like a baby to prevent the front window frame or a rocker to snap. Until now I was lucky.? The trunk had those typical dents from the screw mounts and needed some putty. After first sanding. Adding the door lips with .5mm styrene. Opening the doors means thinking 2 -3 steps ahead. Once you get too far and have forgotten an important detail, you end up ripping things apart again. I want the doors to close and fit tight, meaning I will hide magnets in the right places. But first I cut the interior door panels off the tub and made them fit to the door opening. Next step was bending the hinges for the doors and bonnet. The rods are 1mm brass that fit smug into 3mm styrene tubes. Gluing the hinges in place means working very precise. If I don´t get the hinges exactly into place, ripping them off again can mean ruining my build, or the doors might not close correctly. Having had my issues with loose hinges before, I roughen the slick body surface with a grinder to help the glue stick better. And I flatten and roughen the hinge tubes also for the same reason. I use a 2-part epoxy that hardens in 15 minutes. The surprise part, of course, is: Will it WORK???? Yes is does! ?? Before I can finish the doors, I have to get the magnets placed in the right position. So the interior tub and the seats must be mocked temporarily. One magnet will be glued inside each seat with the counter magnet under the door panel. Just in time I noticed that the right seat magnet was turned wrong? and had to be plied out again. That done, the panels were glued to the doors and the open sides were covered with 1mm styrene. And the magnets work! Now I could start painting. The first layer was a simple flat grey to check if I had any flaws left on the body. Well, a few minor. It was important to me that the side trim would not be flooded with paint and loose its detail. So with every paint coat I covered the trim with masking tape. The hinges need some protecting also, or else they will not fit into the tubes any more (had that on my first door build and ended up carefully scratching off 3 layers of paint). After 2 layers of Tamiya TS-88 titanium silver I feel quite comfortable with the paint job so far. But i´m not finished yet. I will let the paint harden for a few days for the next step. Thanks for watching so far!
- 26 replies
-
- 11
-

-
Hi guys, thanks for the friendly replies!
-
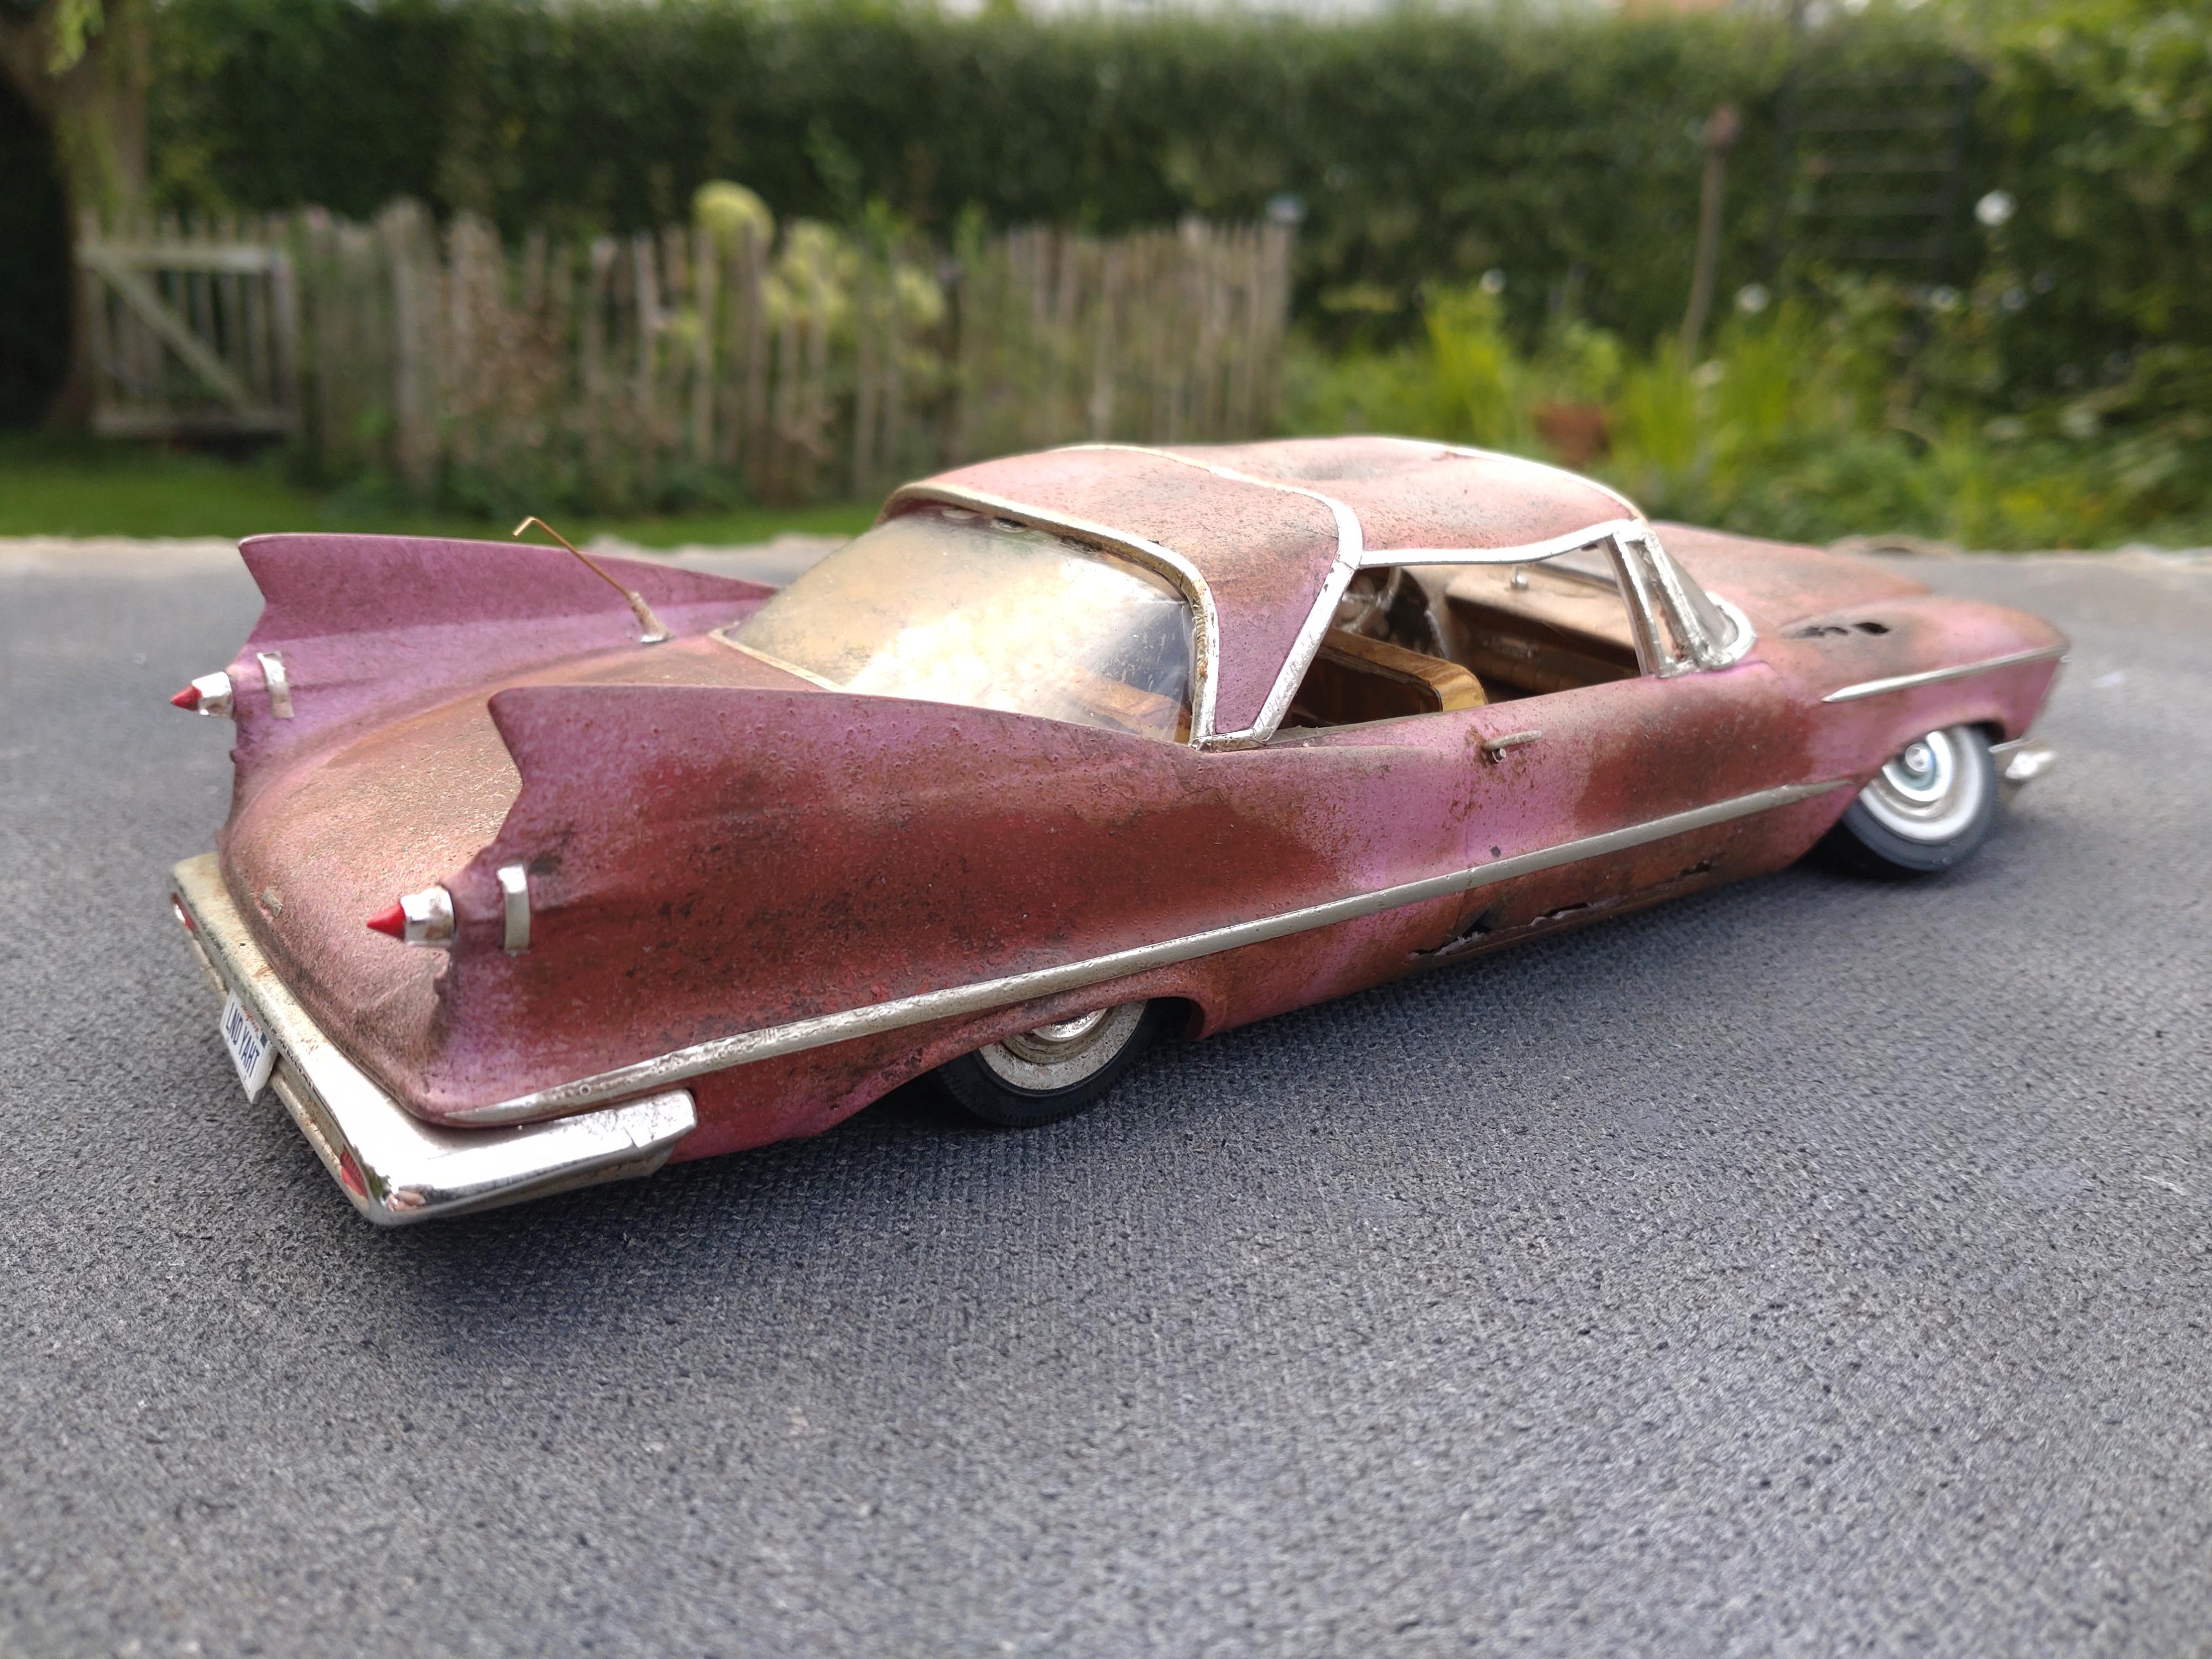
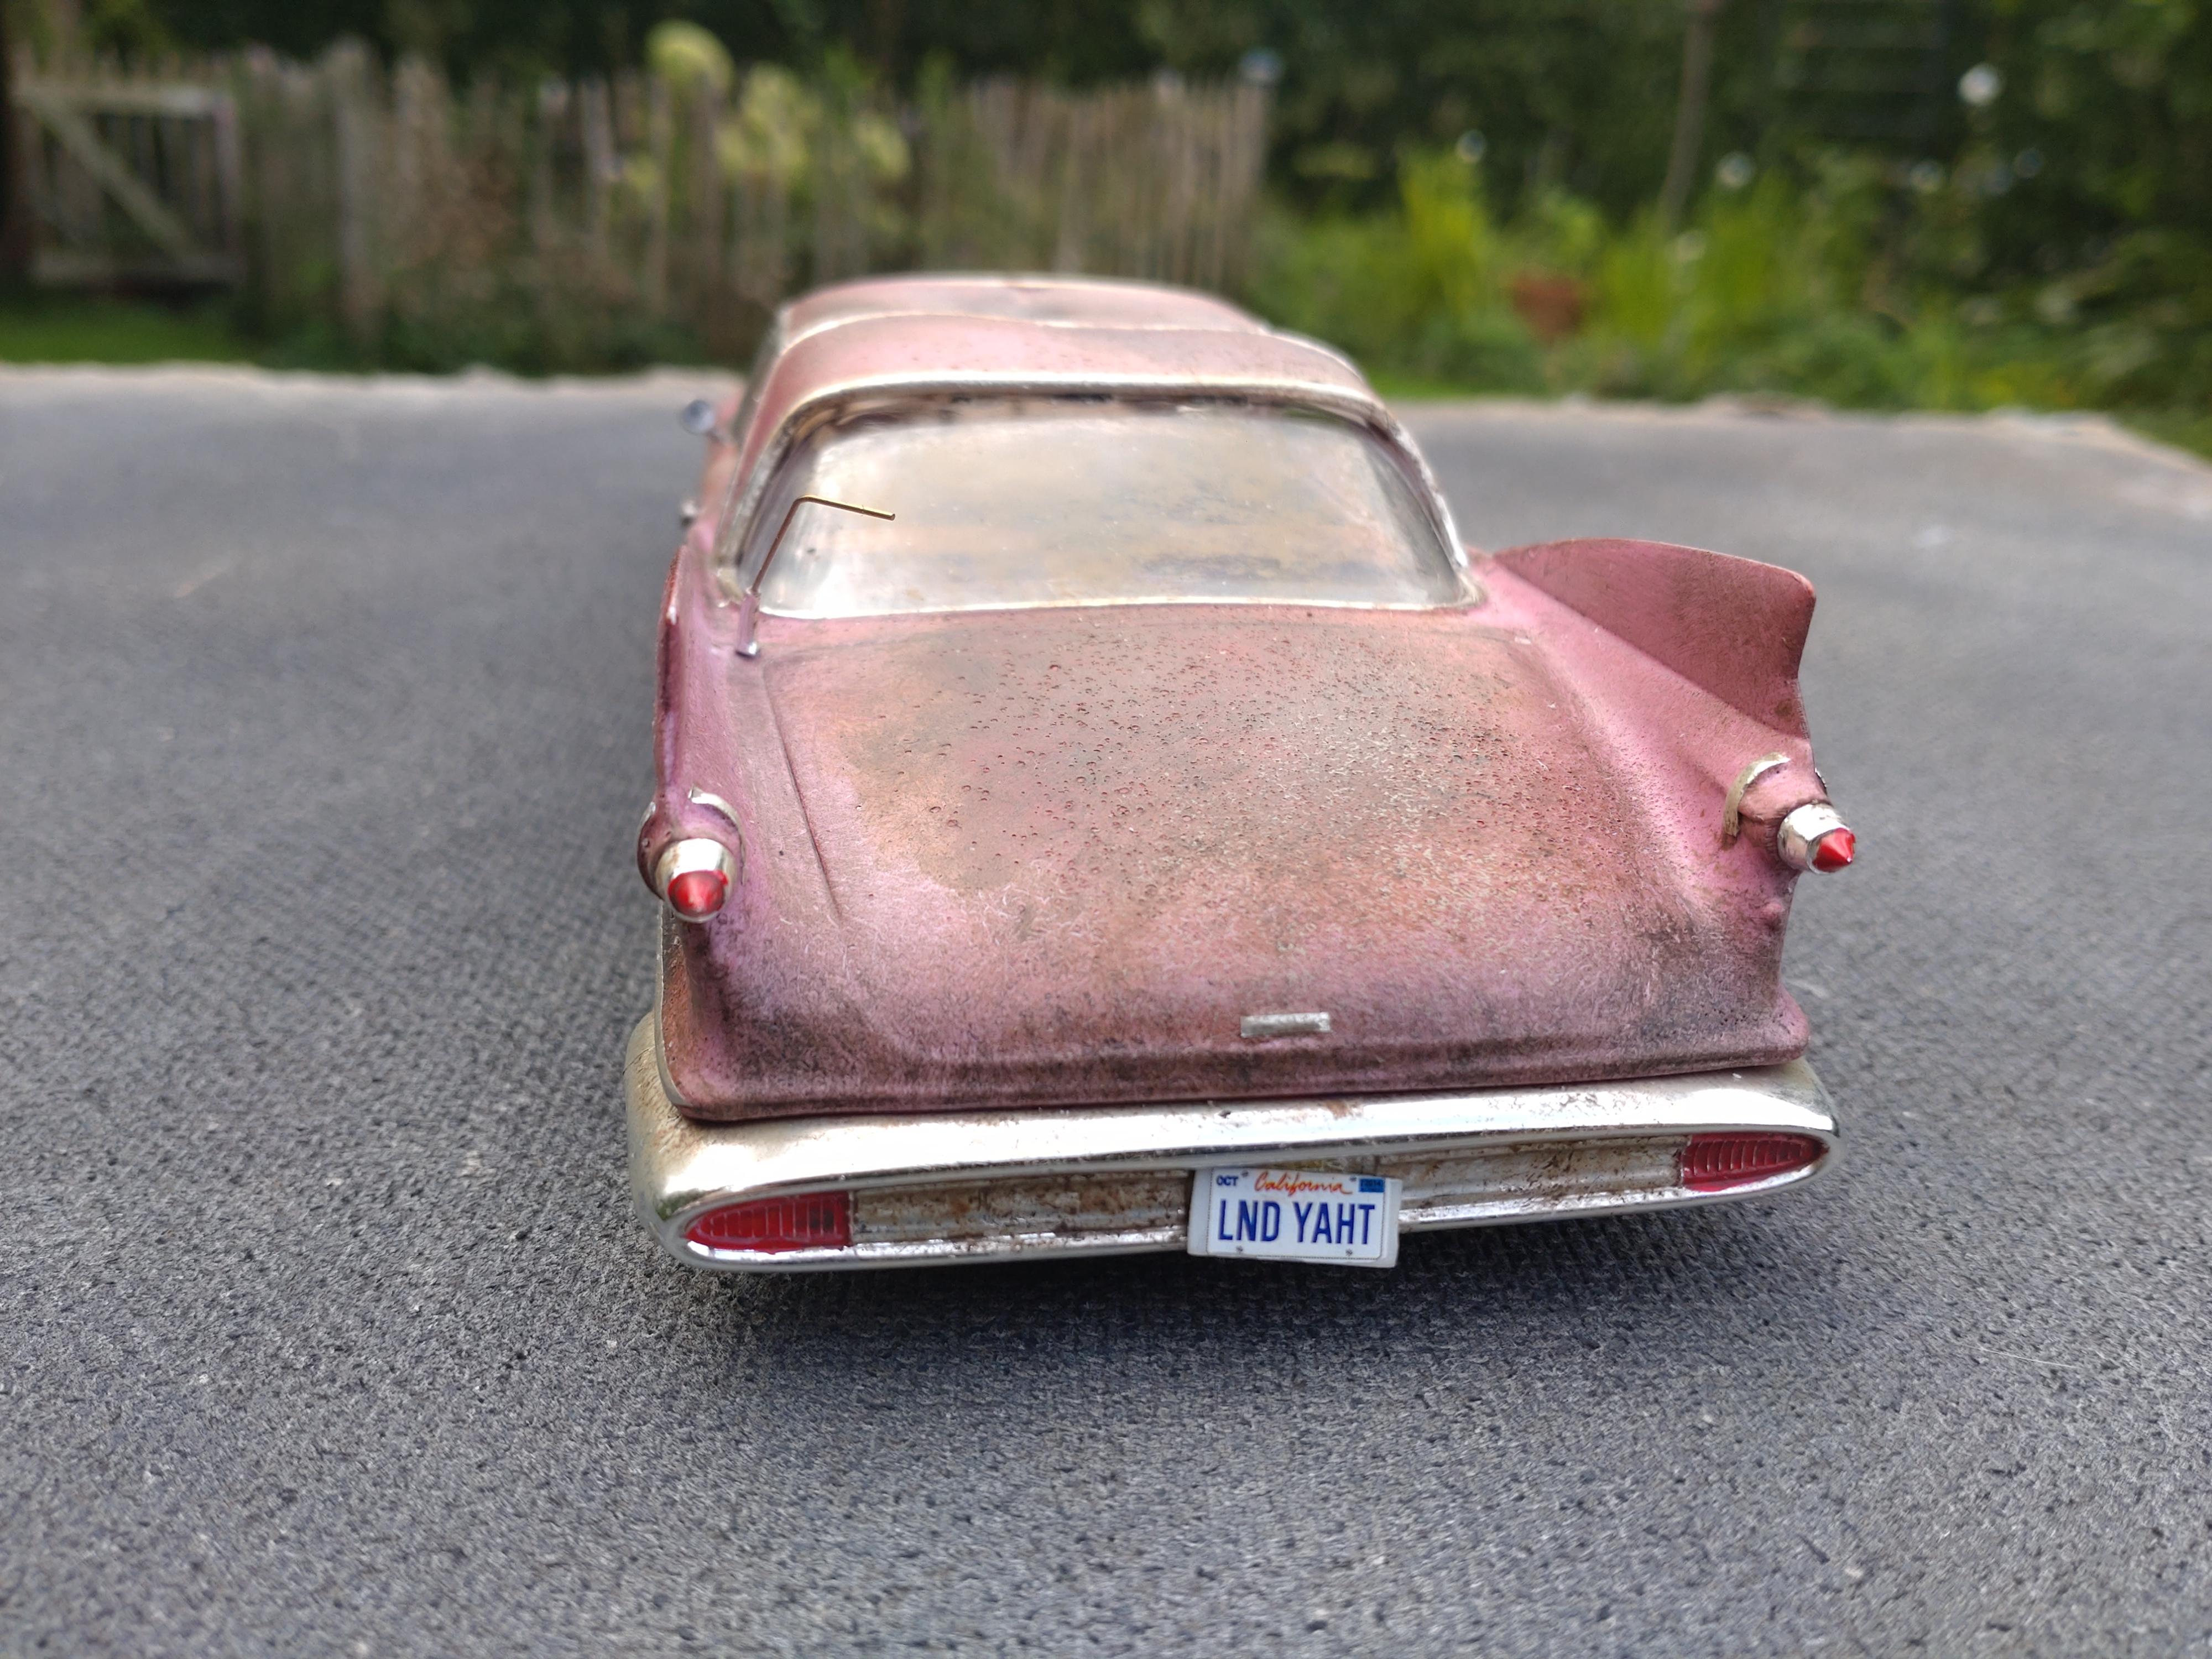
I guess everyone has build this old kit. It was my first kit after I restarted model building 4 years ago. Back then a good effort to get my toes into the wet pool before my plunge into the deep end. But a while ago I just silently took it off my shelf. Compared to my current builds, it was just a bit embarrassing. But I had a plan for a big comeback! This rebuild was a quick and dirty job (literally), since I had no engine to care for and the interior and the chassis were finished. I just had to turn it into a dignified old lady, forgotten and lost on a junkyard. First of all, the crash was produced with the help of a heat gun, pushing the body to my bench after it got soft enough. Further big dents followed. The turquoise finish was sanded off and after a rust colored primer I sprayed the body pink. Rust holes were grinded from the inside with a small power tool. Getting the rust effect onto the body was a matter of about 10 rounds of dabbing with rough sponges and old bristle paint brushes. The BMF was applied after I gave the body a rub with salt on a matte spray finish. The front grill/bumper I had to cut into strange shapes and apply to the body with a hot glue pistol, with which I filled the remaining cracks. Another round of matte aluminum paint and rust streaks finished the front. The interior just received a good amount of smudge, same with the undercarriage. Thank you for watching! You can watch the video with this link: https://youtu.be/znuzEhetpf0
-
Hello Jeff, that´s a mean looking monster! Great job with your details and the engine compartment shows that your build is looking for trouble! Just plain COOL!
-
Impressive build! Looks cool to me, I love it! Did I get that right, the body is an print?
-
Hello Tim, very cool build. Would like to cruise in that one!
-
Hello Lee, great job on your rod! Perfect and beautiful paint and a crispy look.
-
Hi James, wonderful build! Very clean point job and your engine details look great! A front row model on any shelf.
-

1970 Pontiac Firebird wing door showcar
Andy Oldenburg replied to Andy Oldenburg's topic in Model Cars
Hi guys, to everyone that replied during the last week, THANK YOU for your kind response! -
1970 Pontiac Firebird wing door showcar
Andy Oldenburg replied to Andy Oldenburg's topic in Model Cars
WOW, I am stunned! So many replies.... I feel flattered and greatly appreciate all of your positive feedback. ? Danke schön! (German for thanks?) -
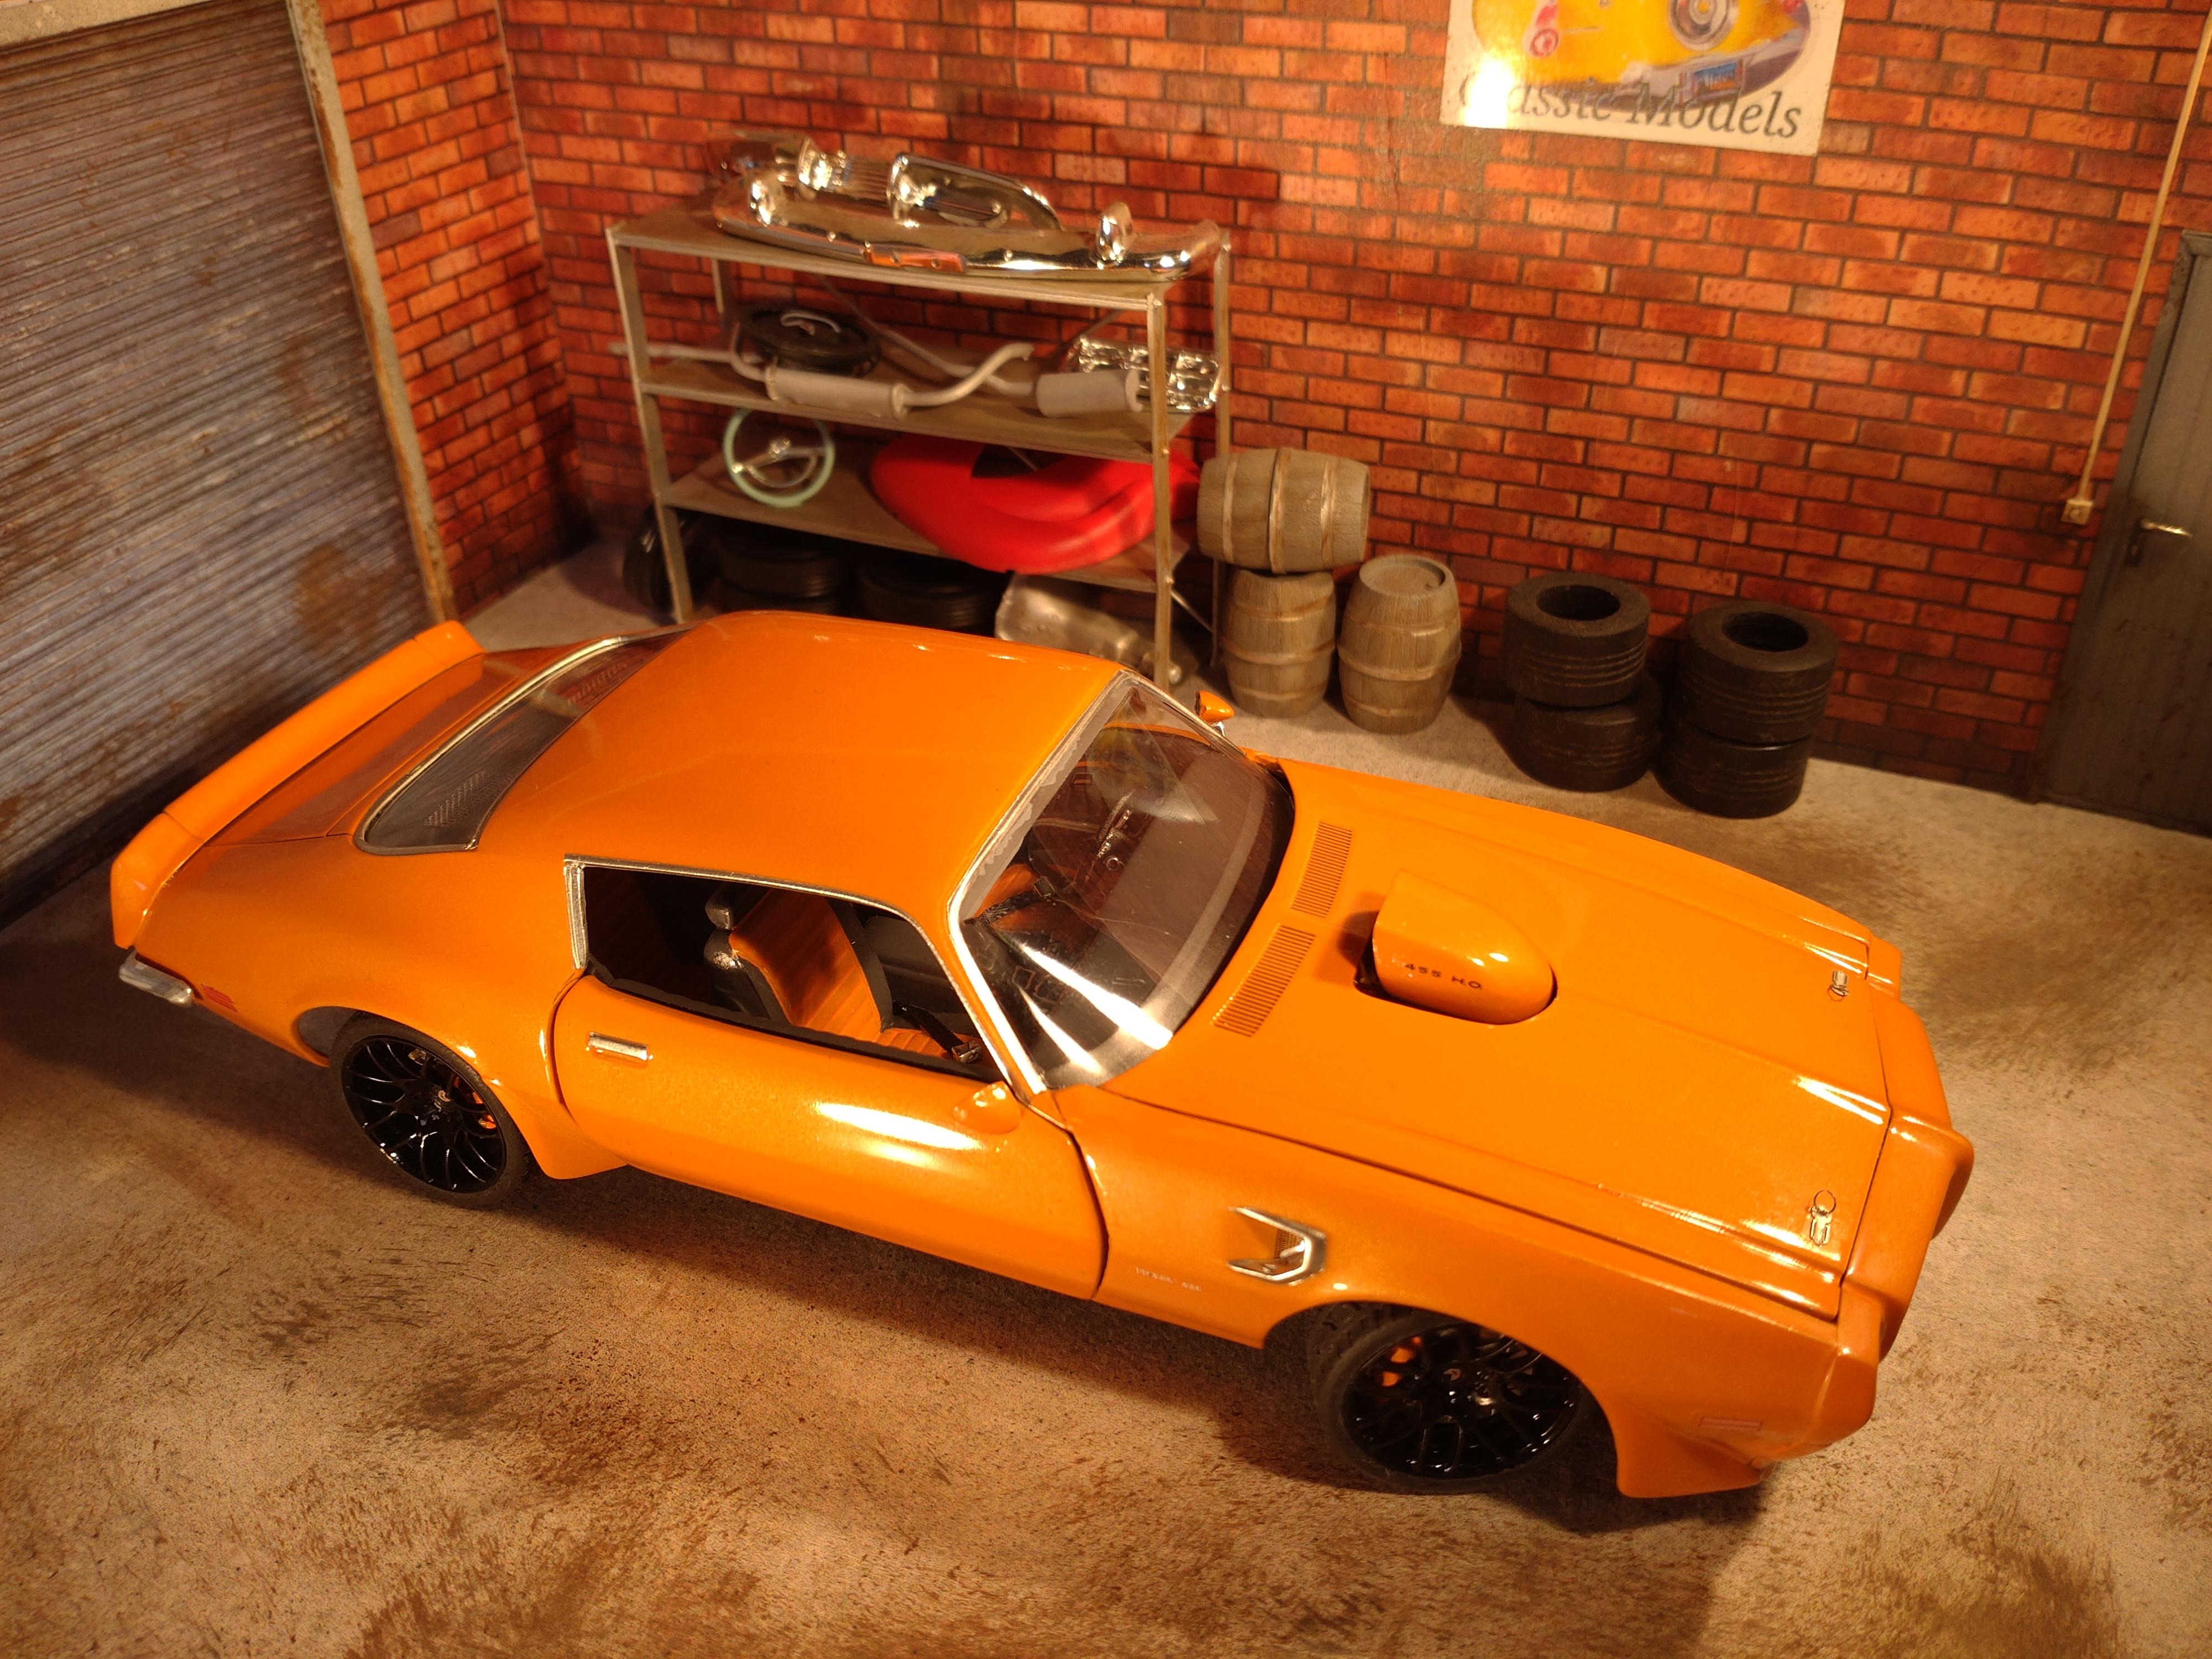
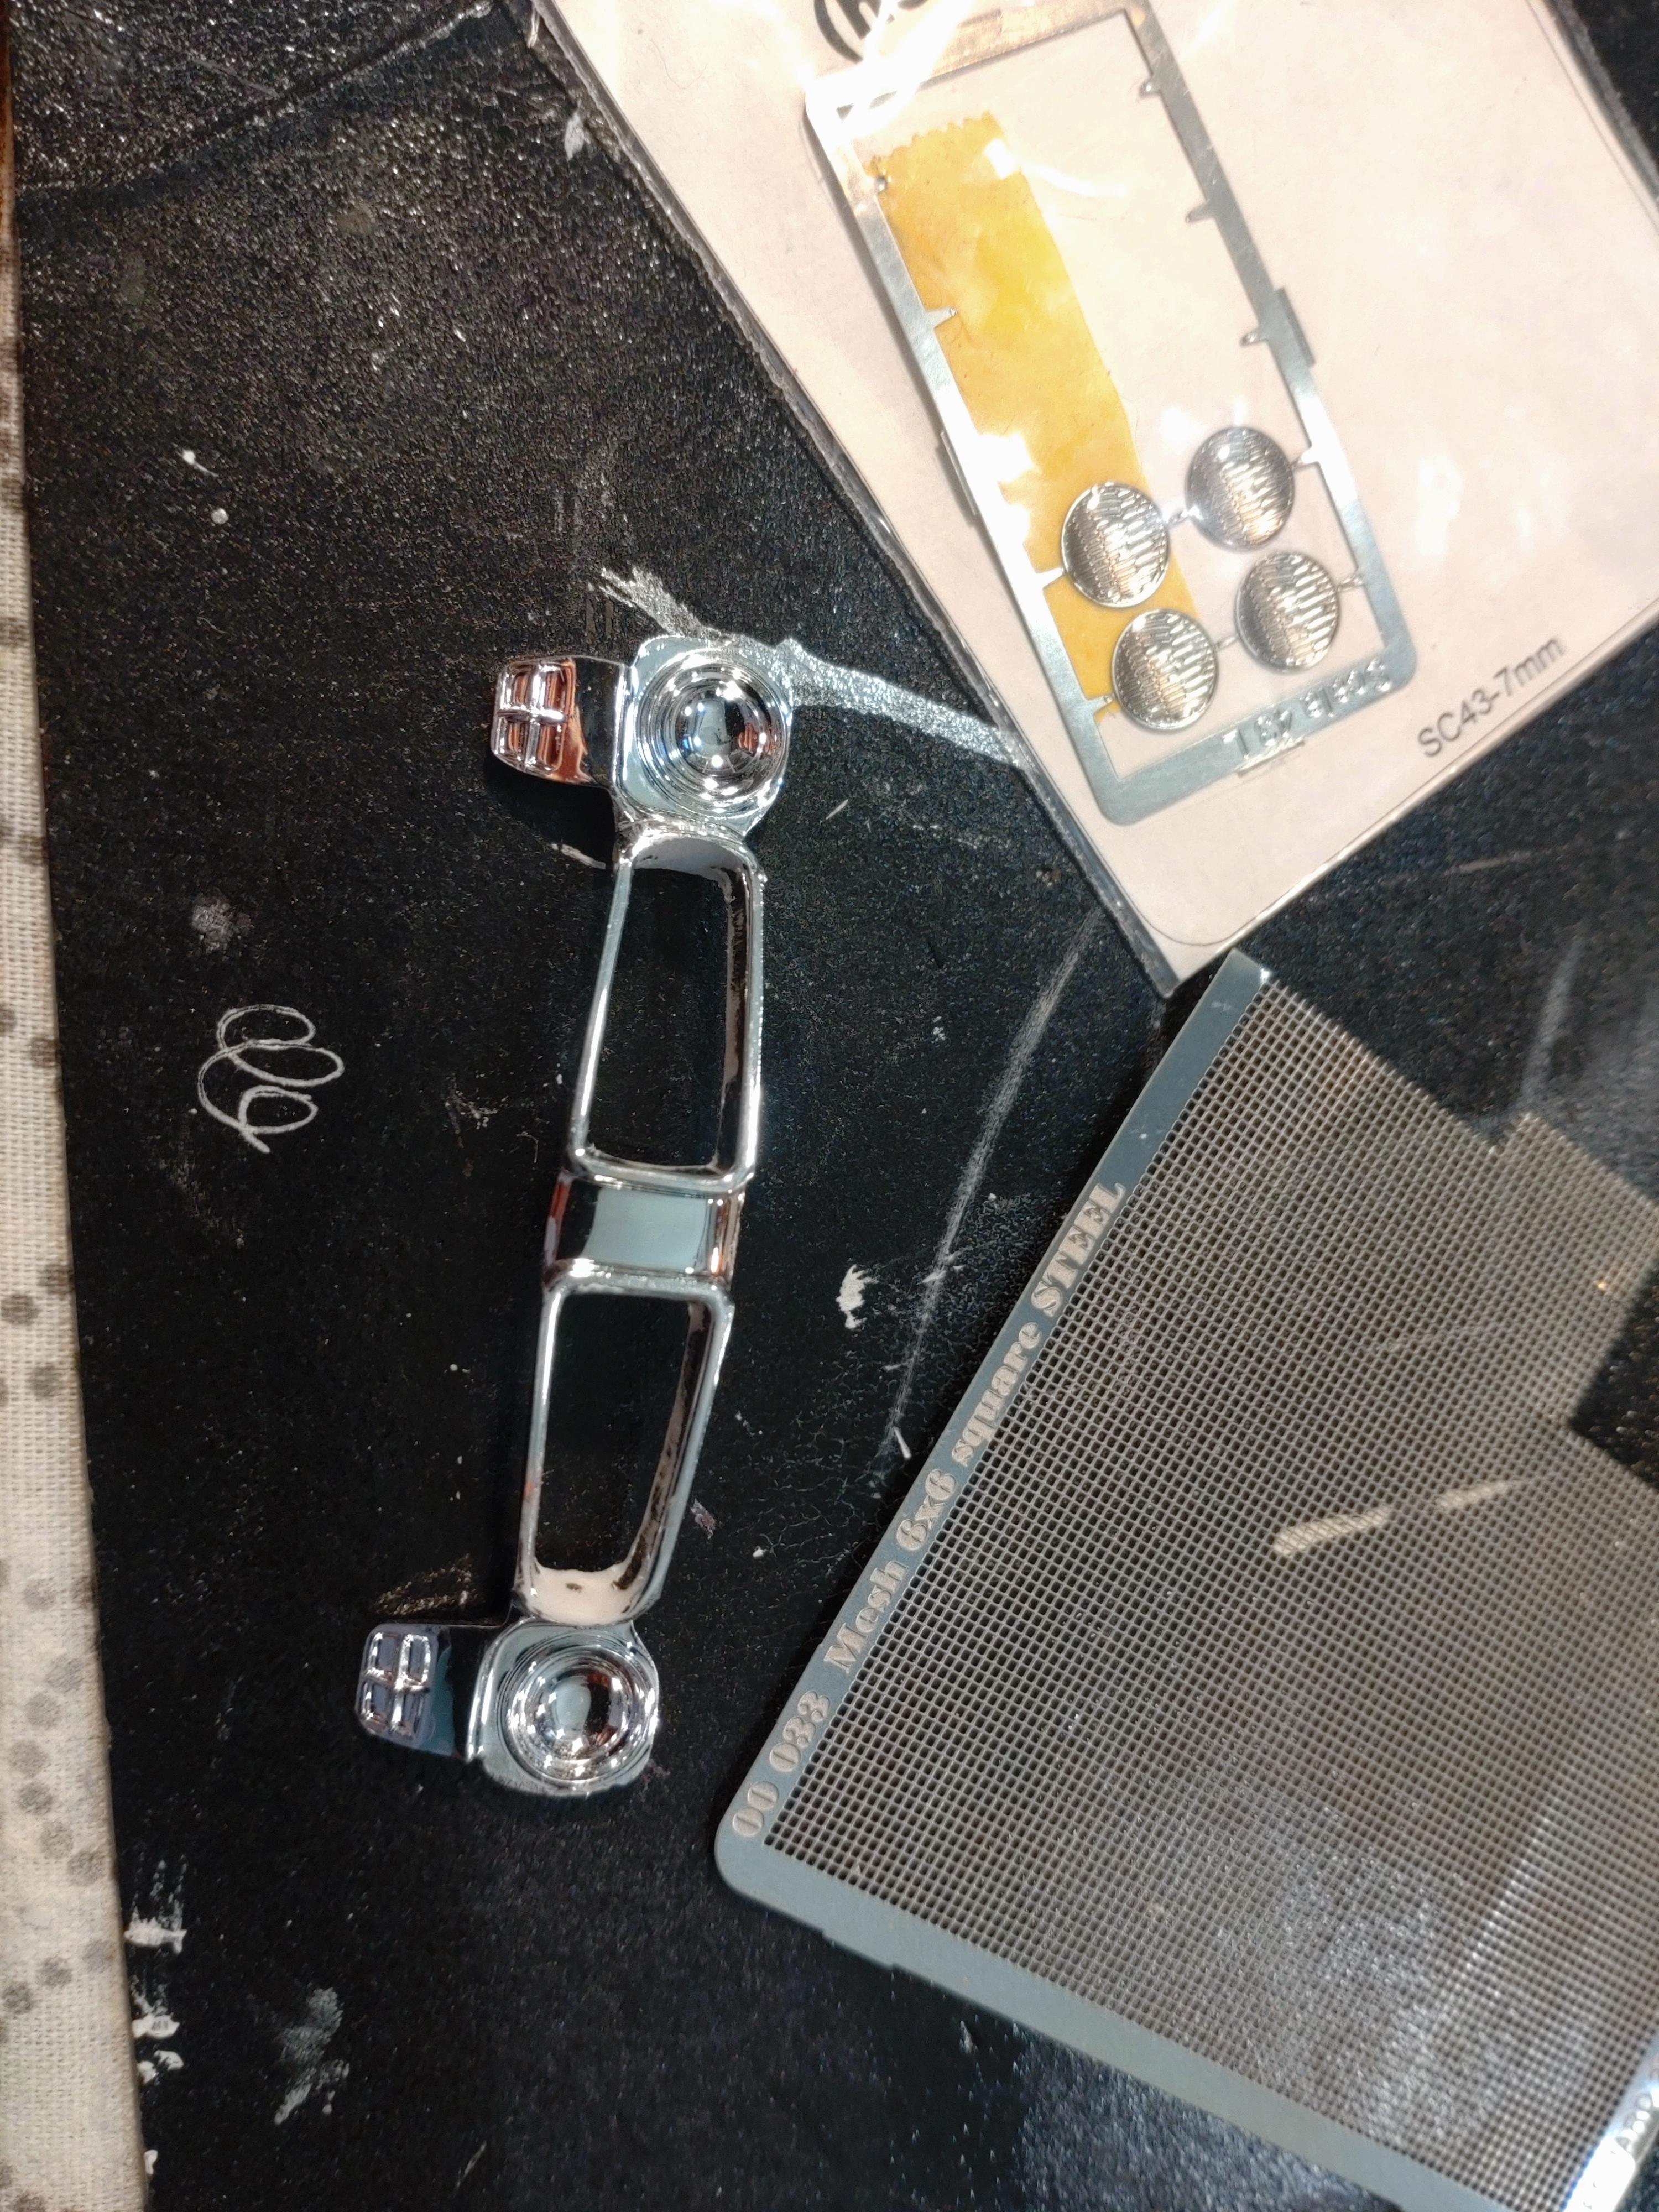
I came about this kit by chance as a cheap special offer (15€), and didn´t know from the start what to do with it. I didn´t want to build yet another stock pony car with rally stripes (no offense to you fans out there✌️). Then I saw some pics from car shows with heavy modifications. Well OK..... can I build wing doors and how to engineer them??? Those show cars have a hydraulic system that pushes the door outward first, then tips them upward. I was unable to manufacture that hydraulic system in 1:25?. But the solution was a single pivot point in the body. The doors are connected with a 1mm brass rod in an styrene tube. I pull the doors outward carefully and then tip them upright, voila! The paint is a self mixed orange with 30 % metallic fluid, Schmincke AERO Color Airbrush acrylic. 2 Layers of AK Crystal Varnish give it the proper shine. The wheels and some smaller parts like the carb are from Scale Production. I had to slice the front wheels to make them fit under the fenders and for a real look. The grill is cut open and replaced with metal mesh. The engine was modified for a power look, plus various details. I discarded the air filter box and attached the scoop right to the custom air filter. This is one of those builds when I dream of what a 1:1 would look like in front of my house??? I hope you like my ideas! More details are in my WIP thread. Thank you for watching! You can check out the video with this link: https://youtu.be/VhkiVH2p-vk
-
Hi Alan, Kyle, Robert and Andrew, and anyone I might have forgotten, thanks for your friendly response! That means a lot to me and gives me motivation for my next build. Which will be....?, haven´t decided yet?
-
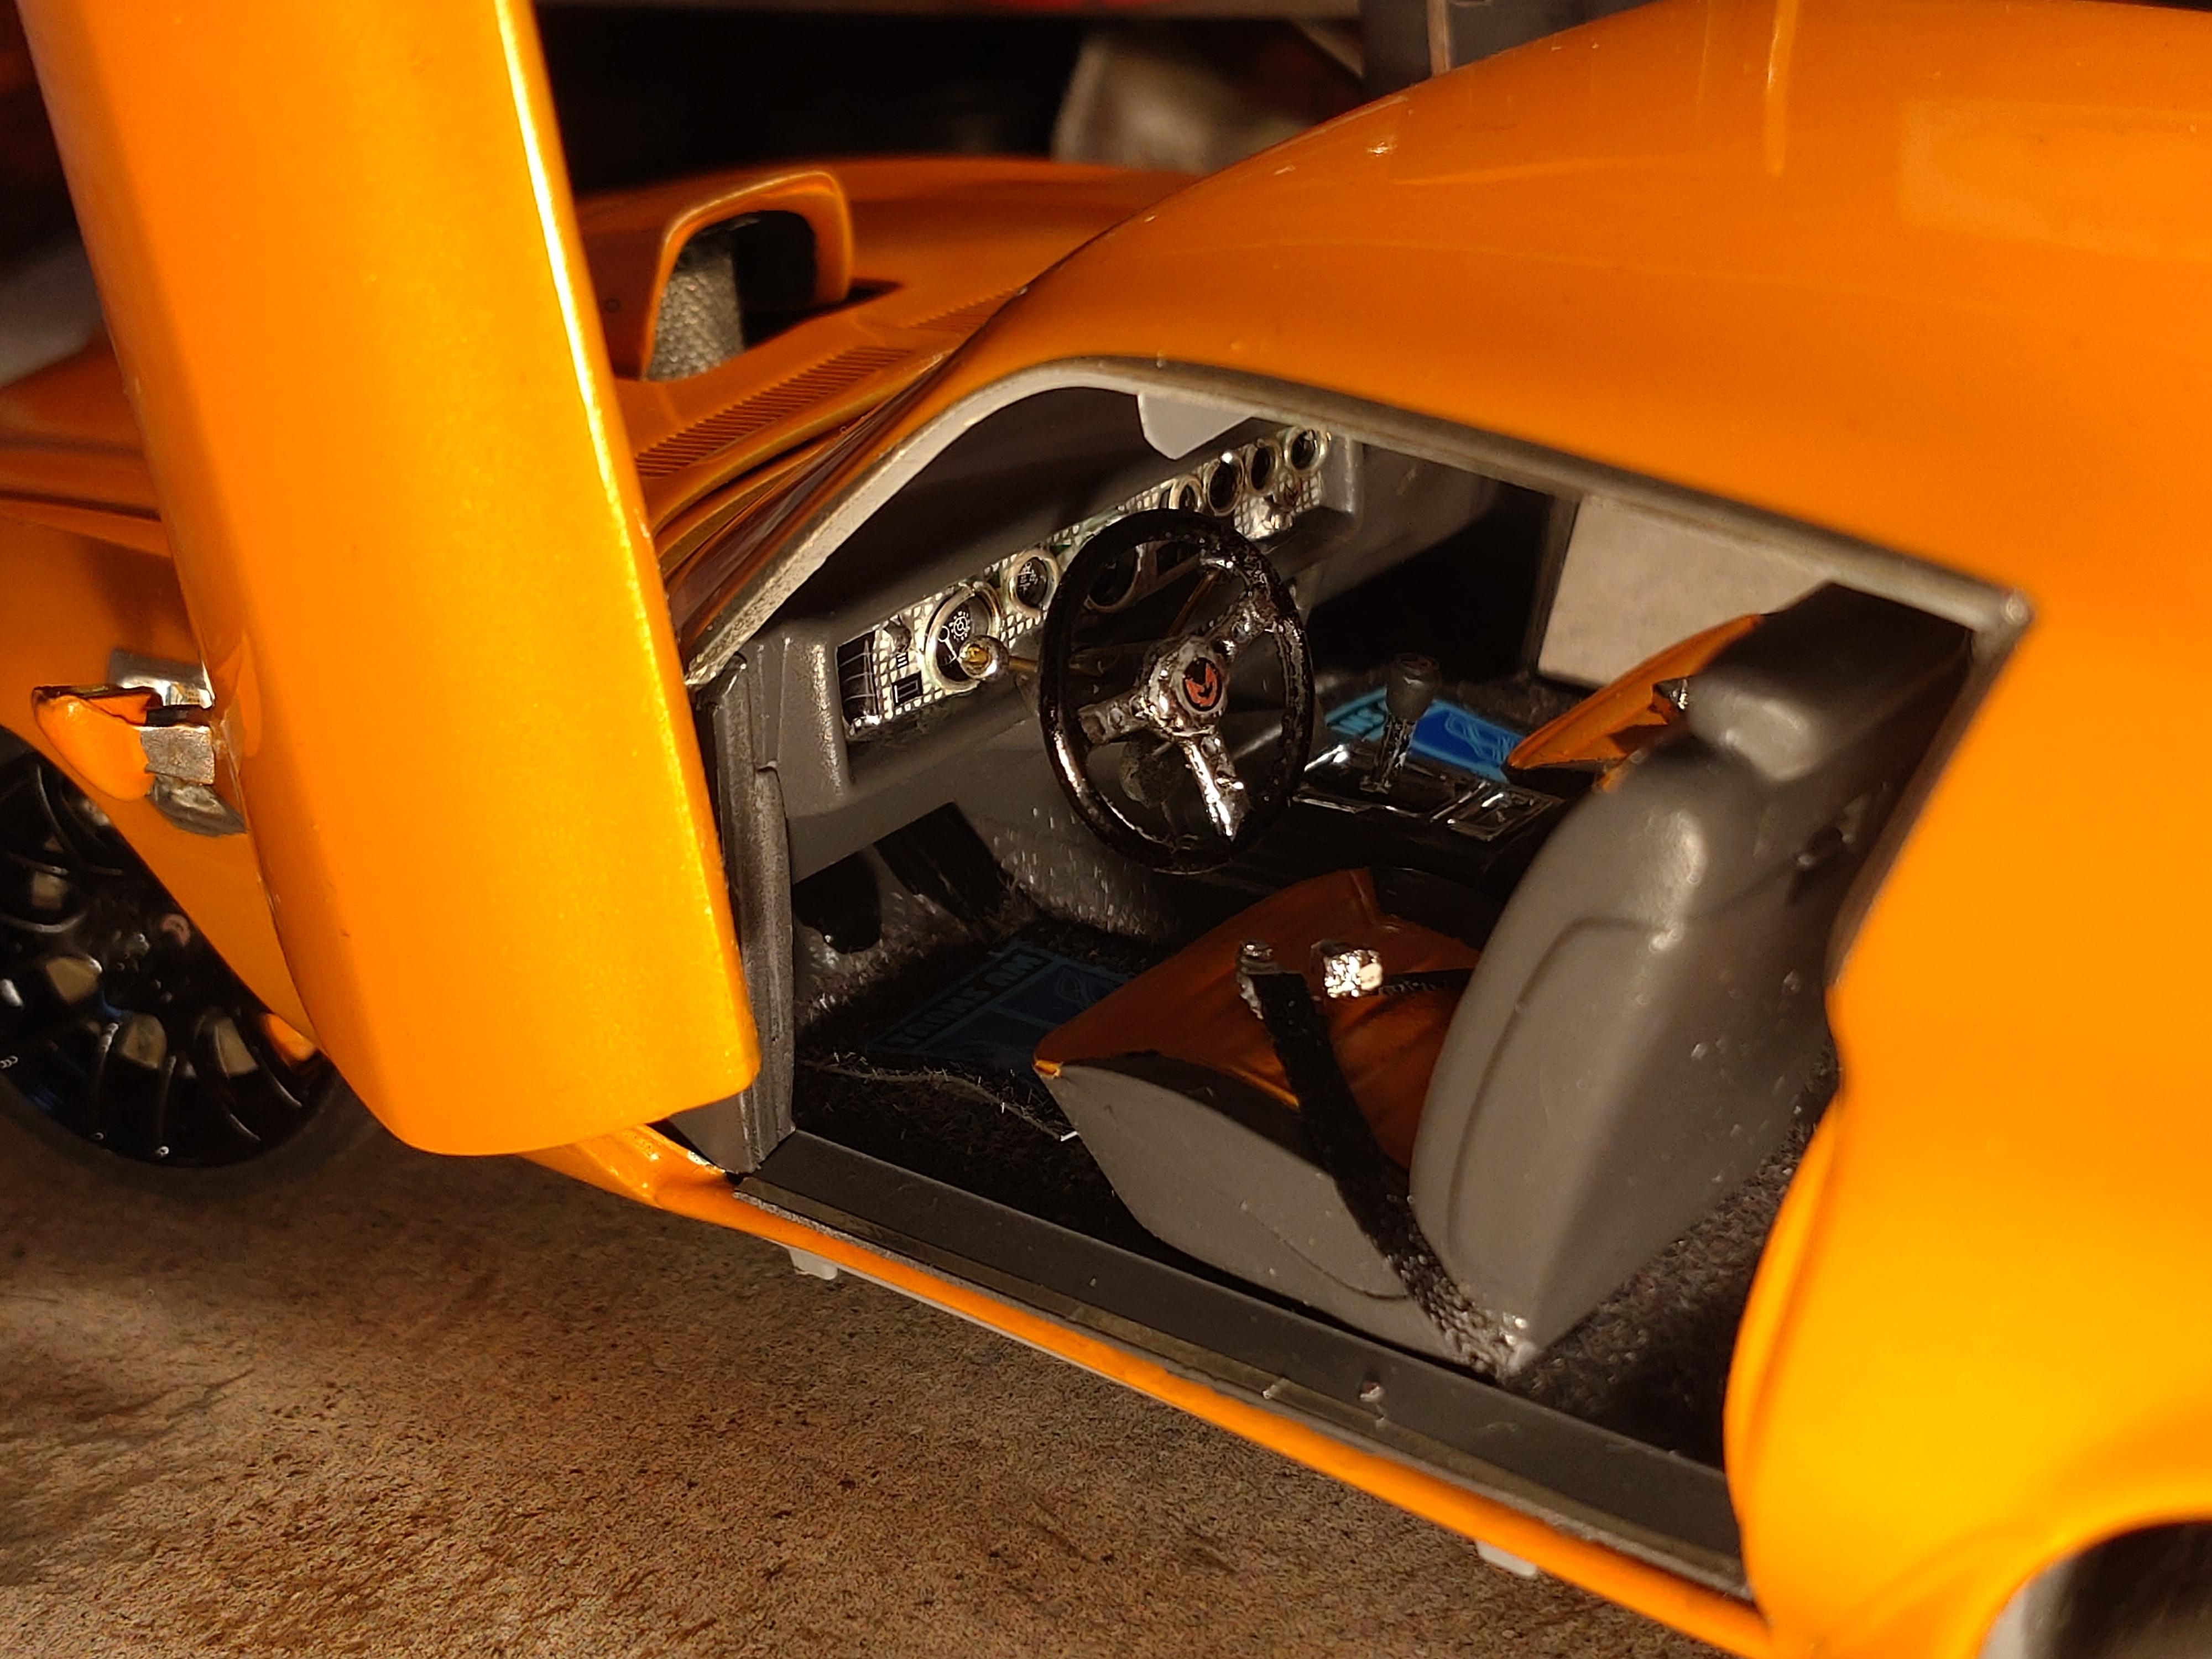
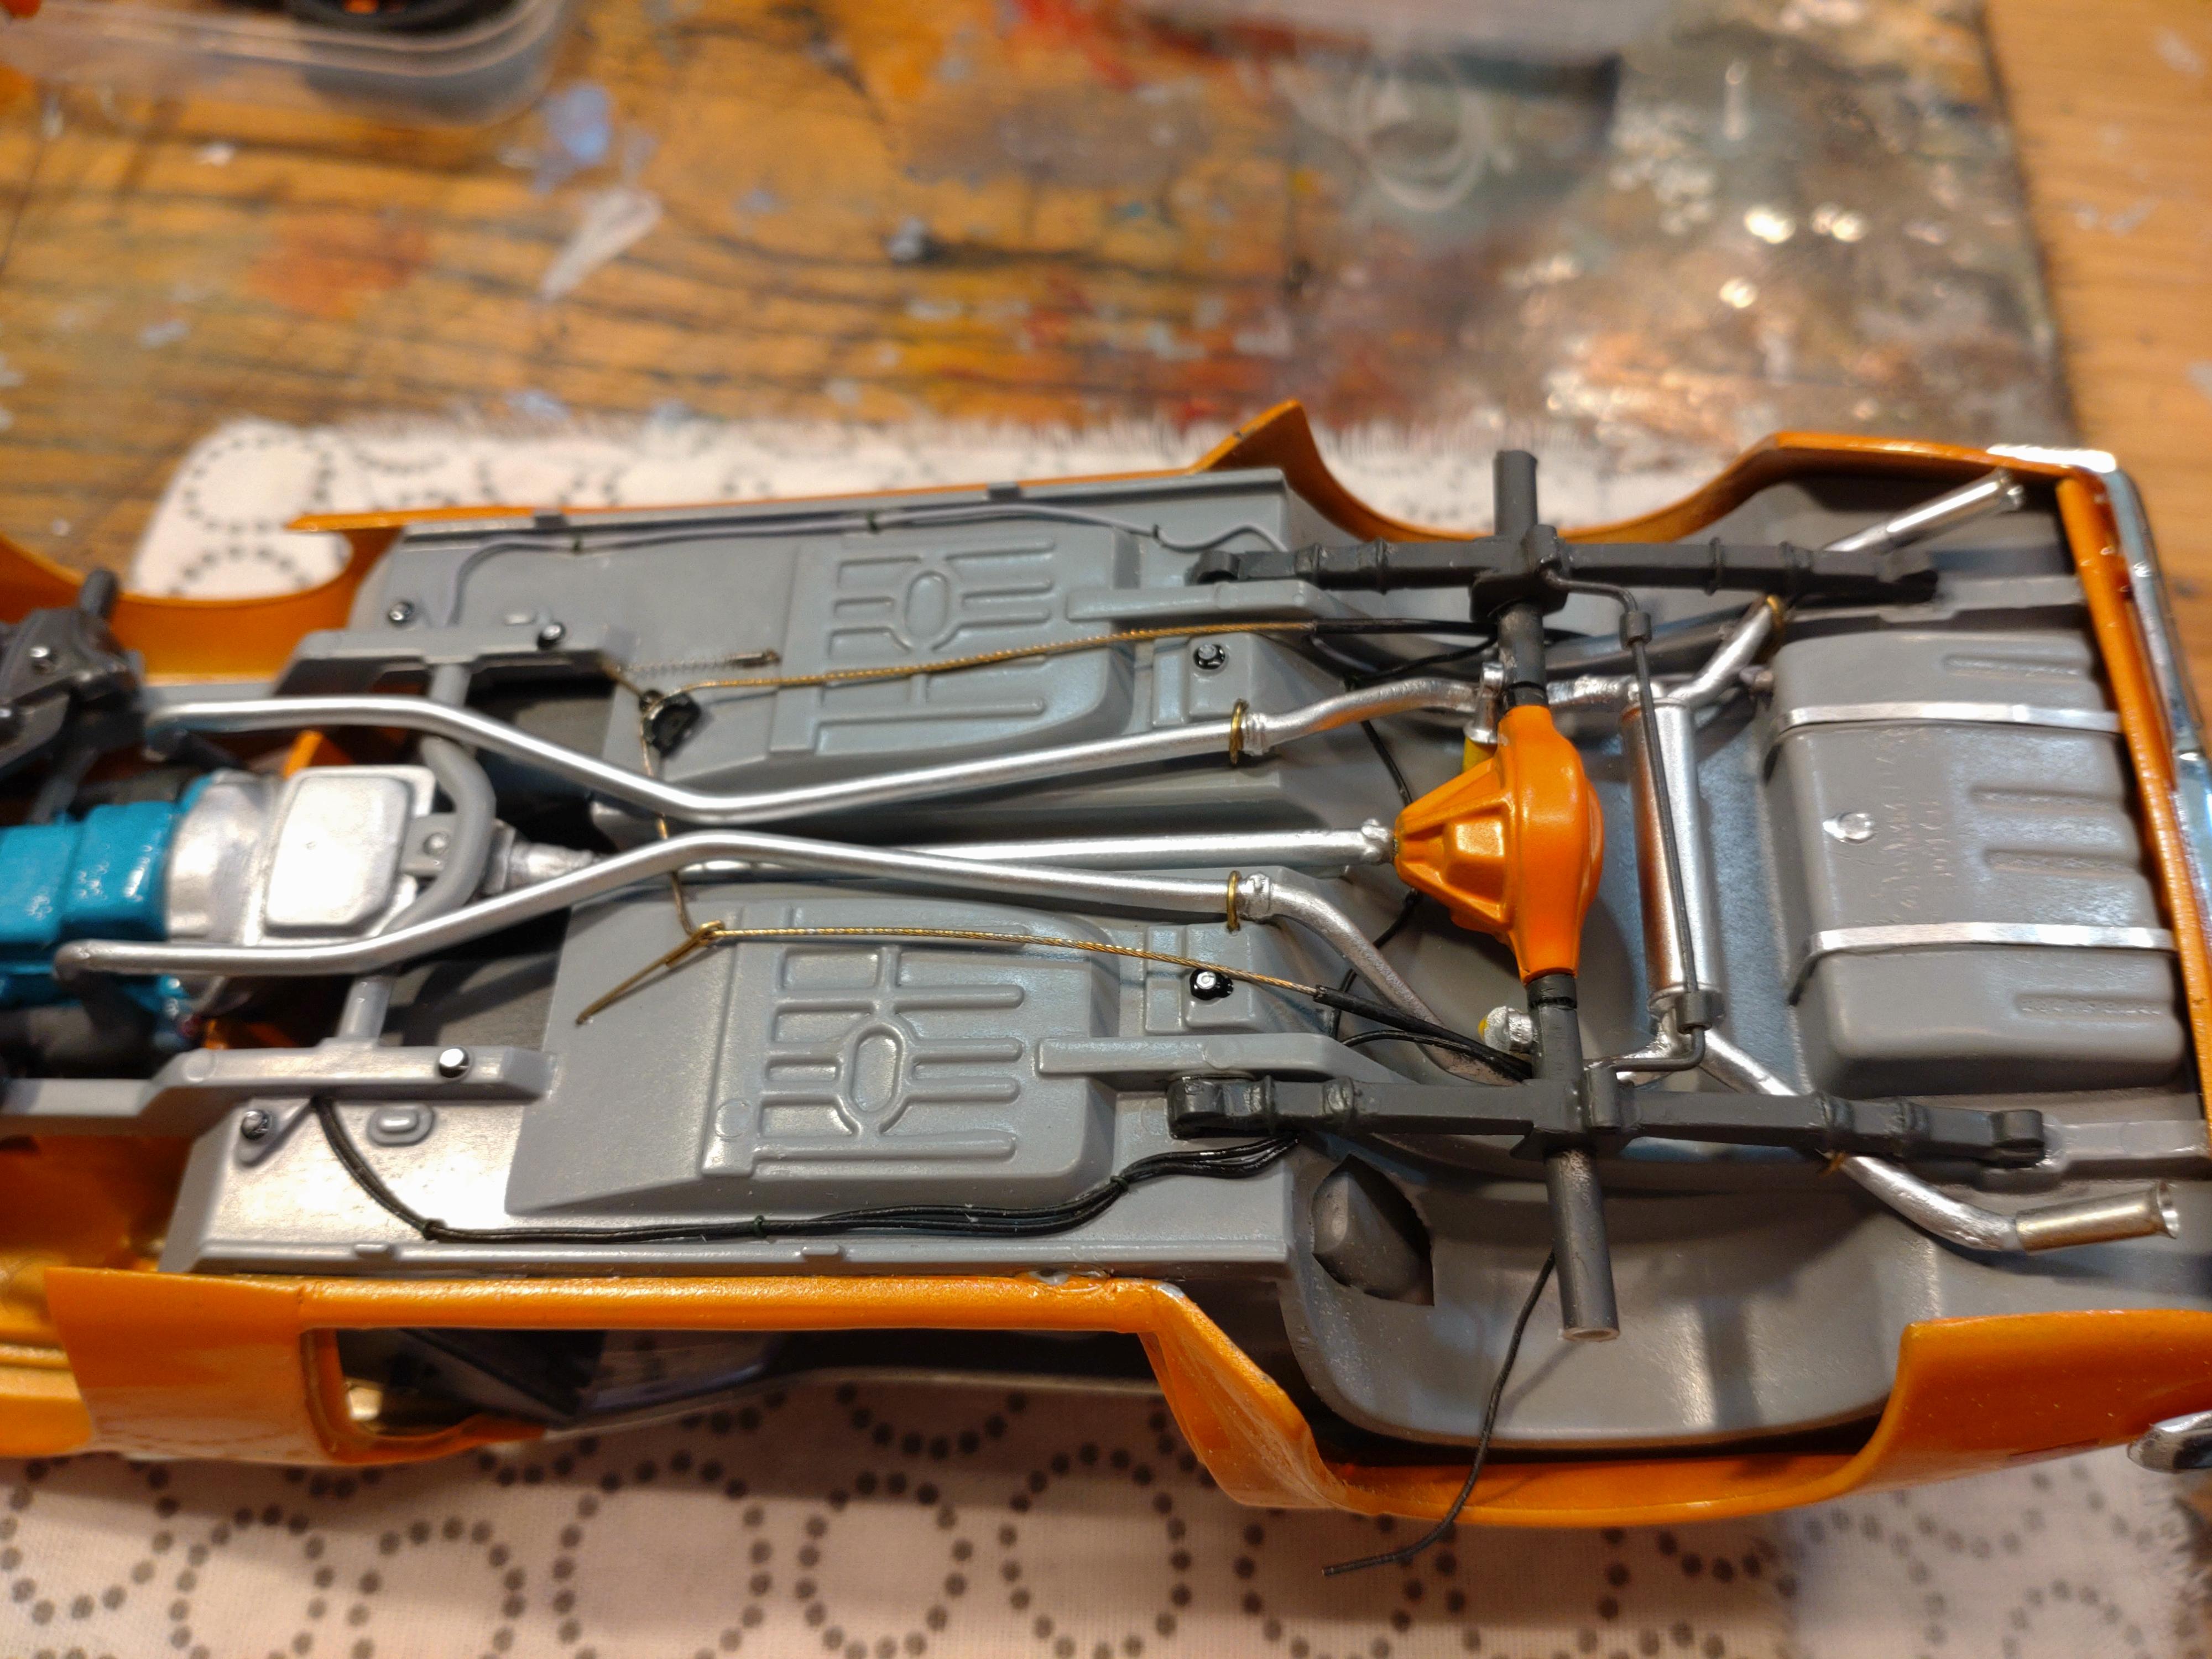
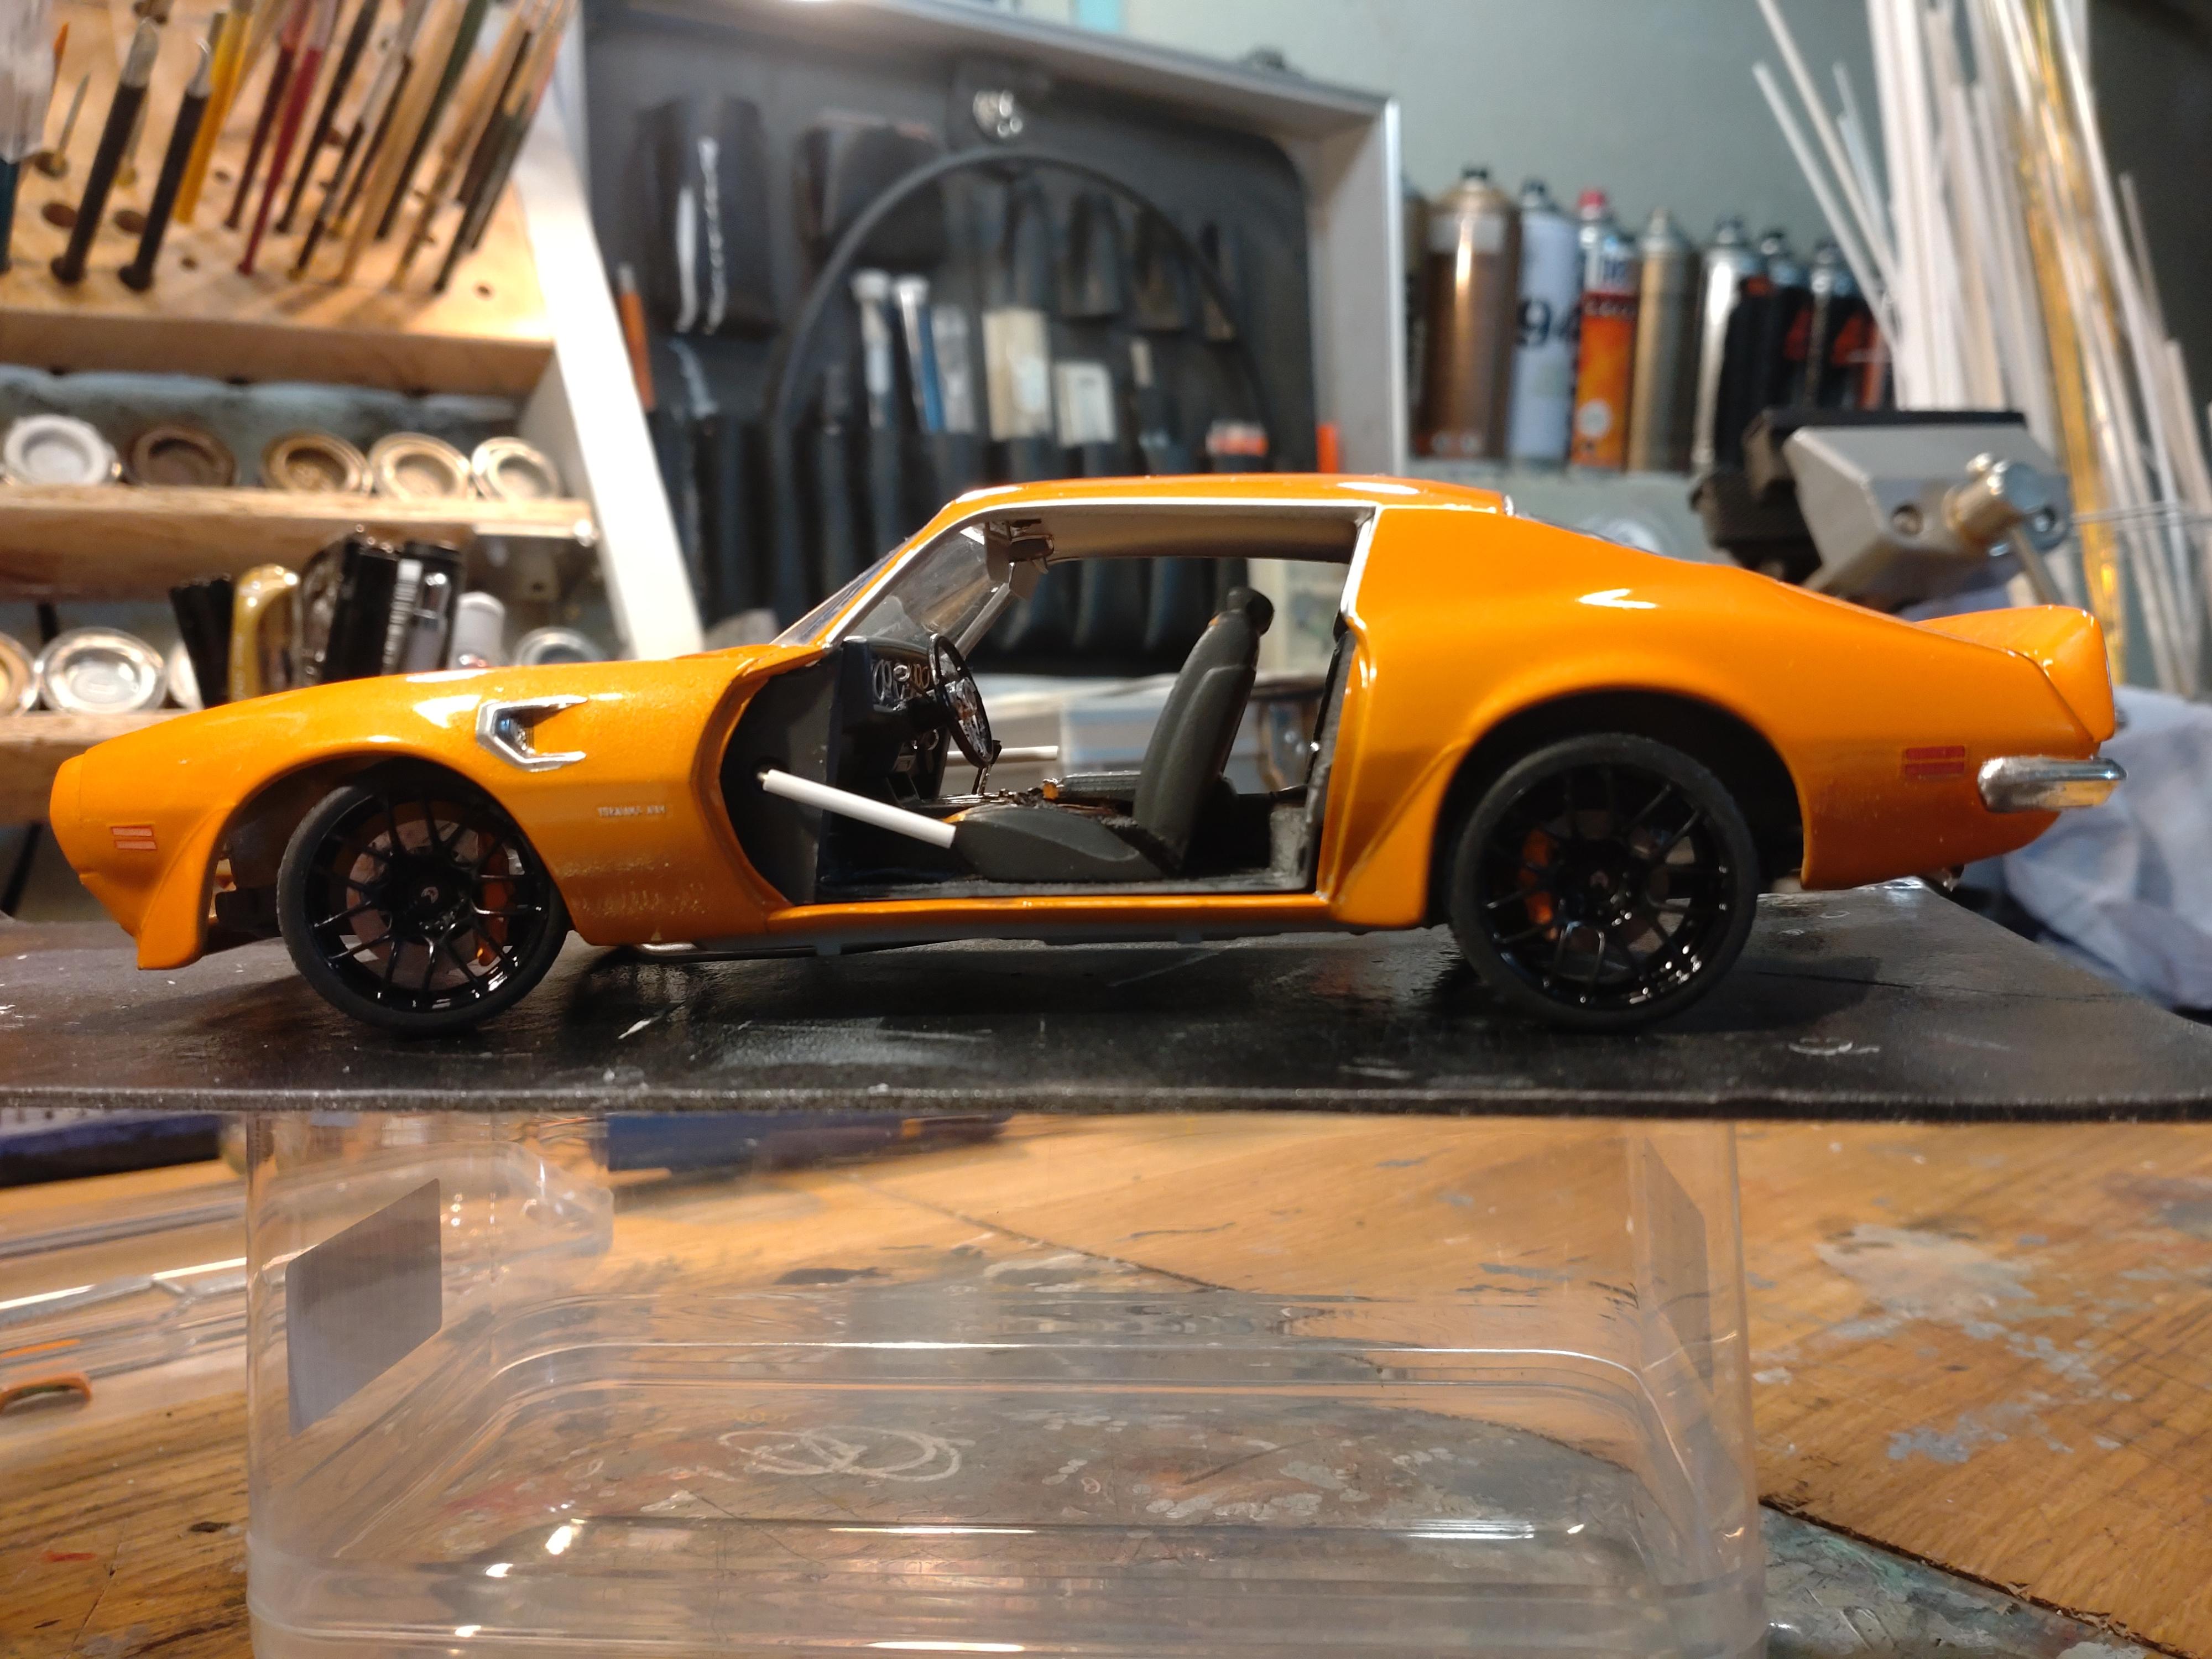
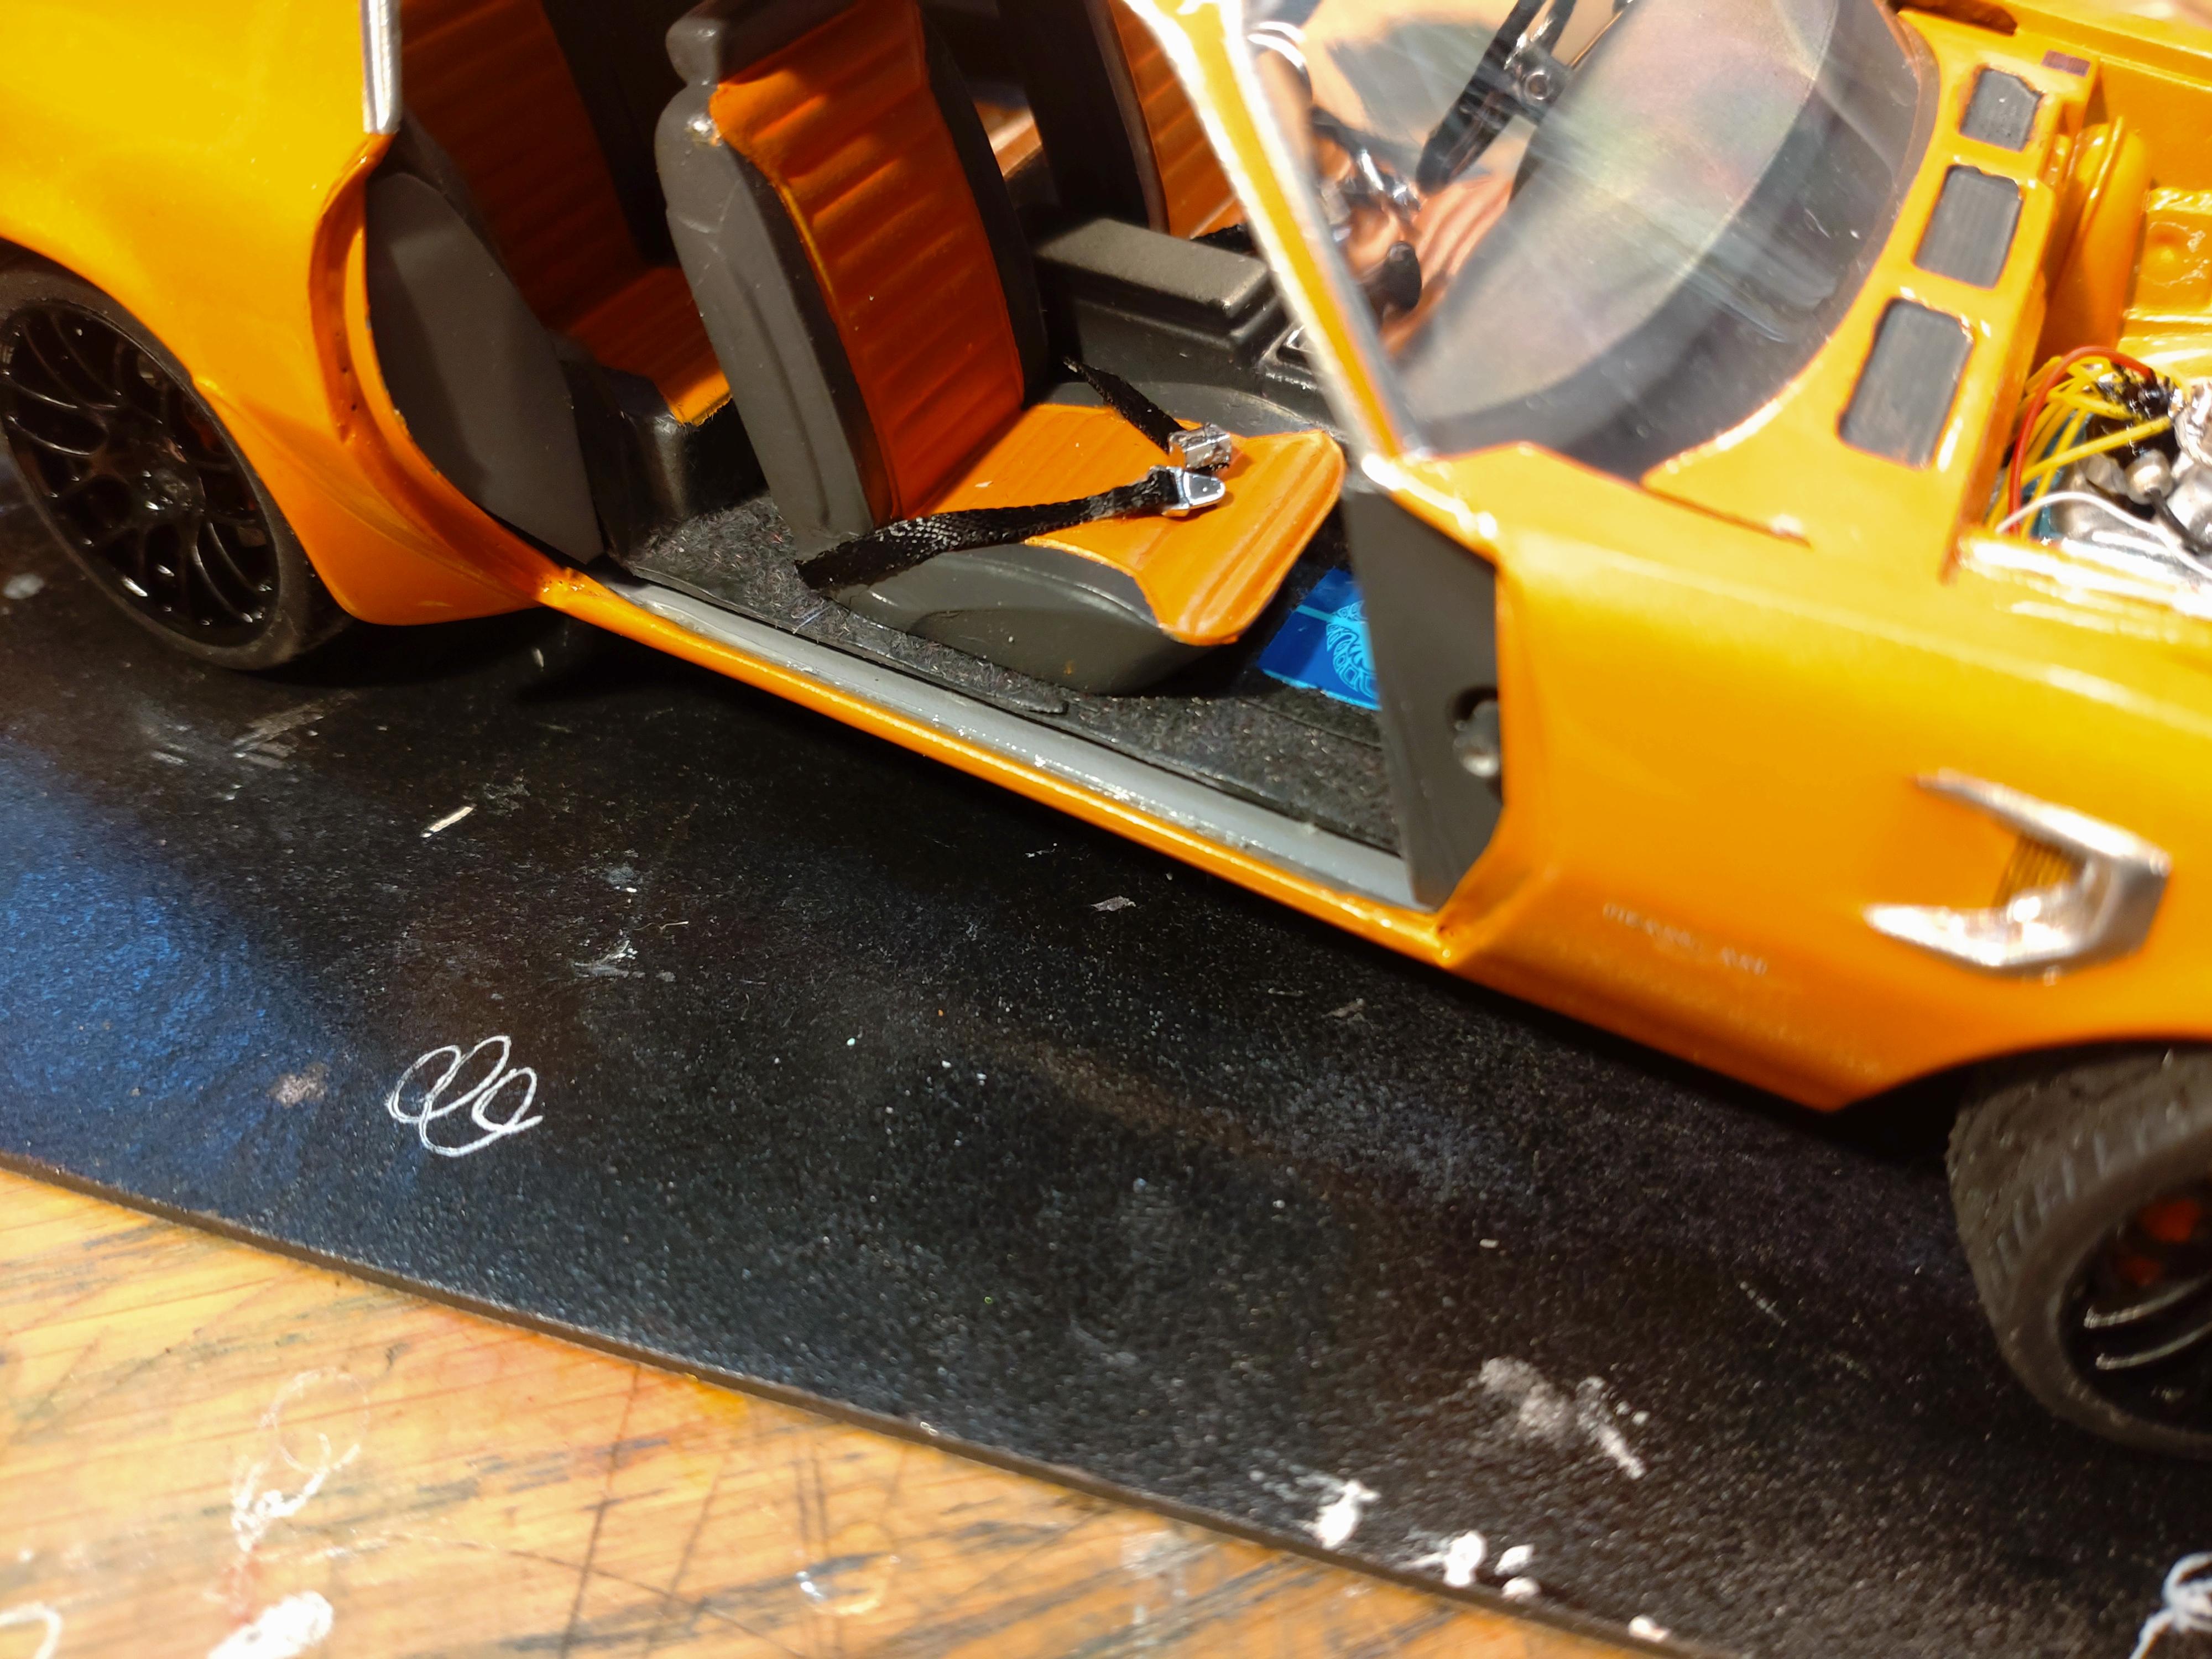
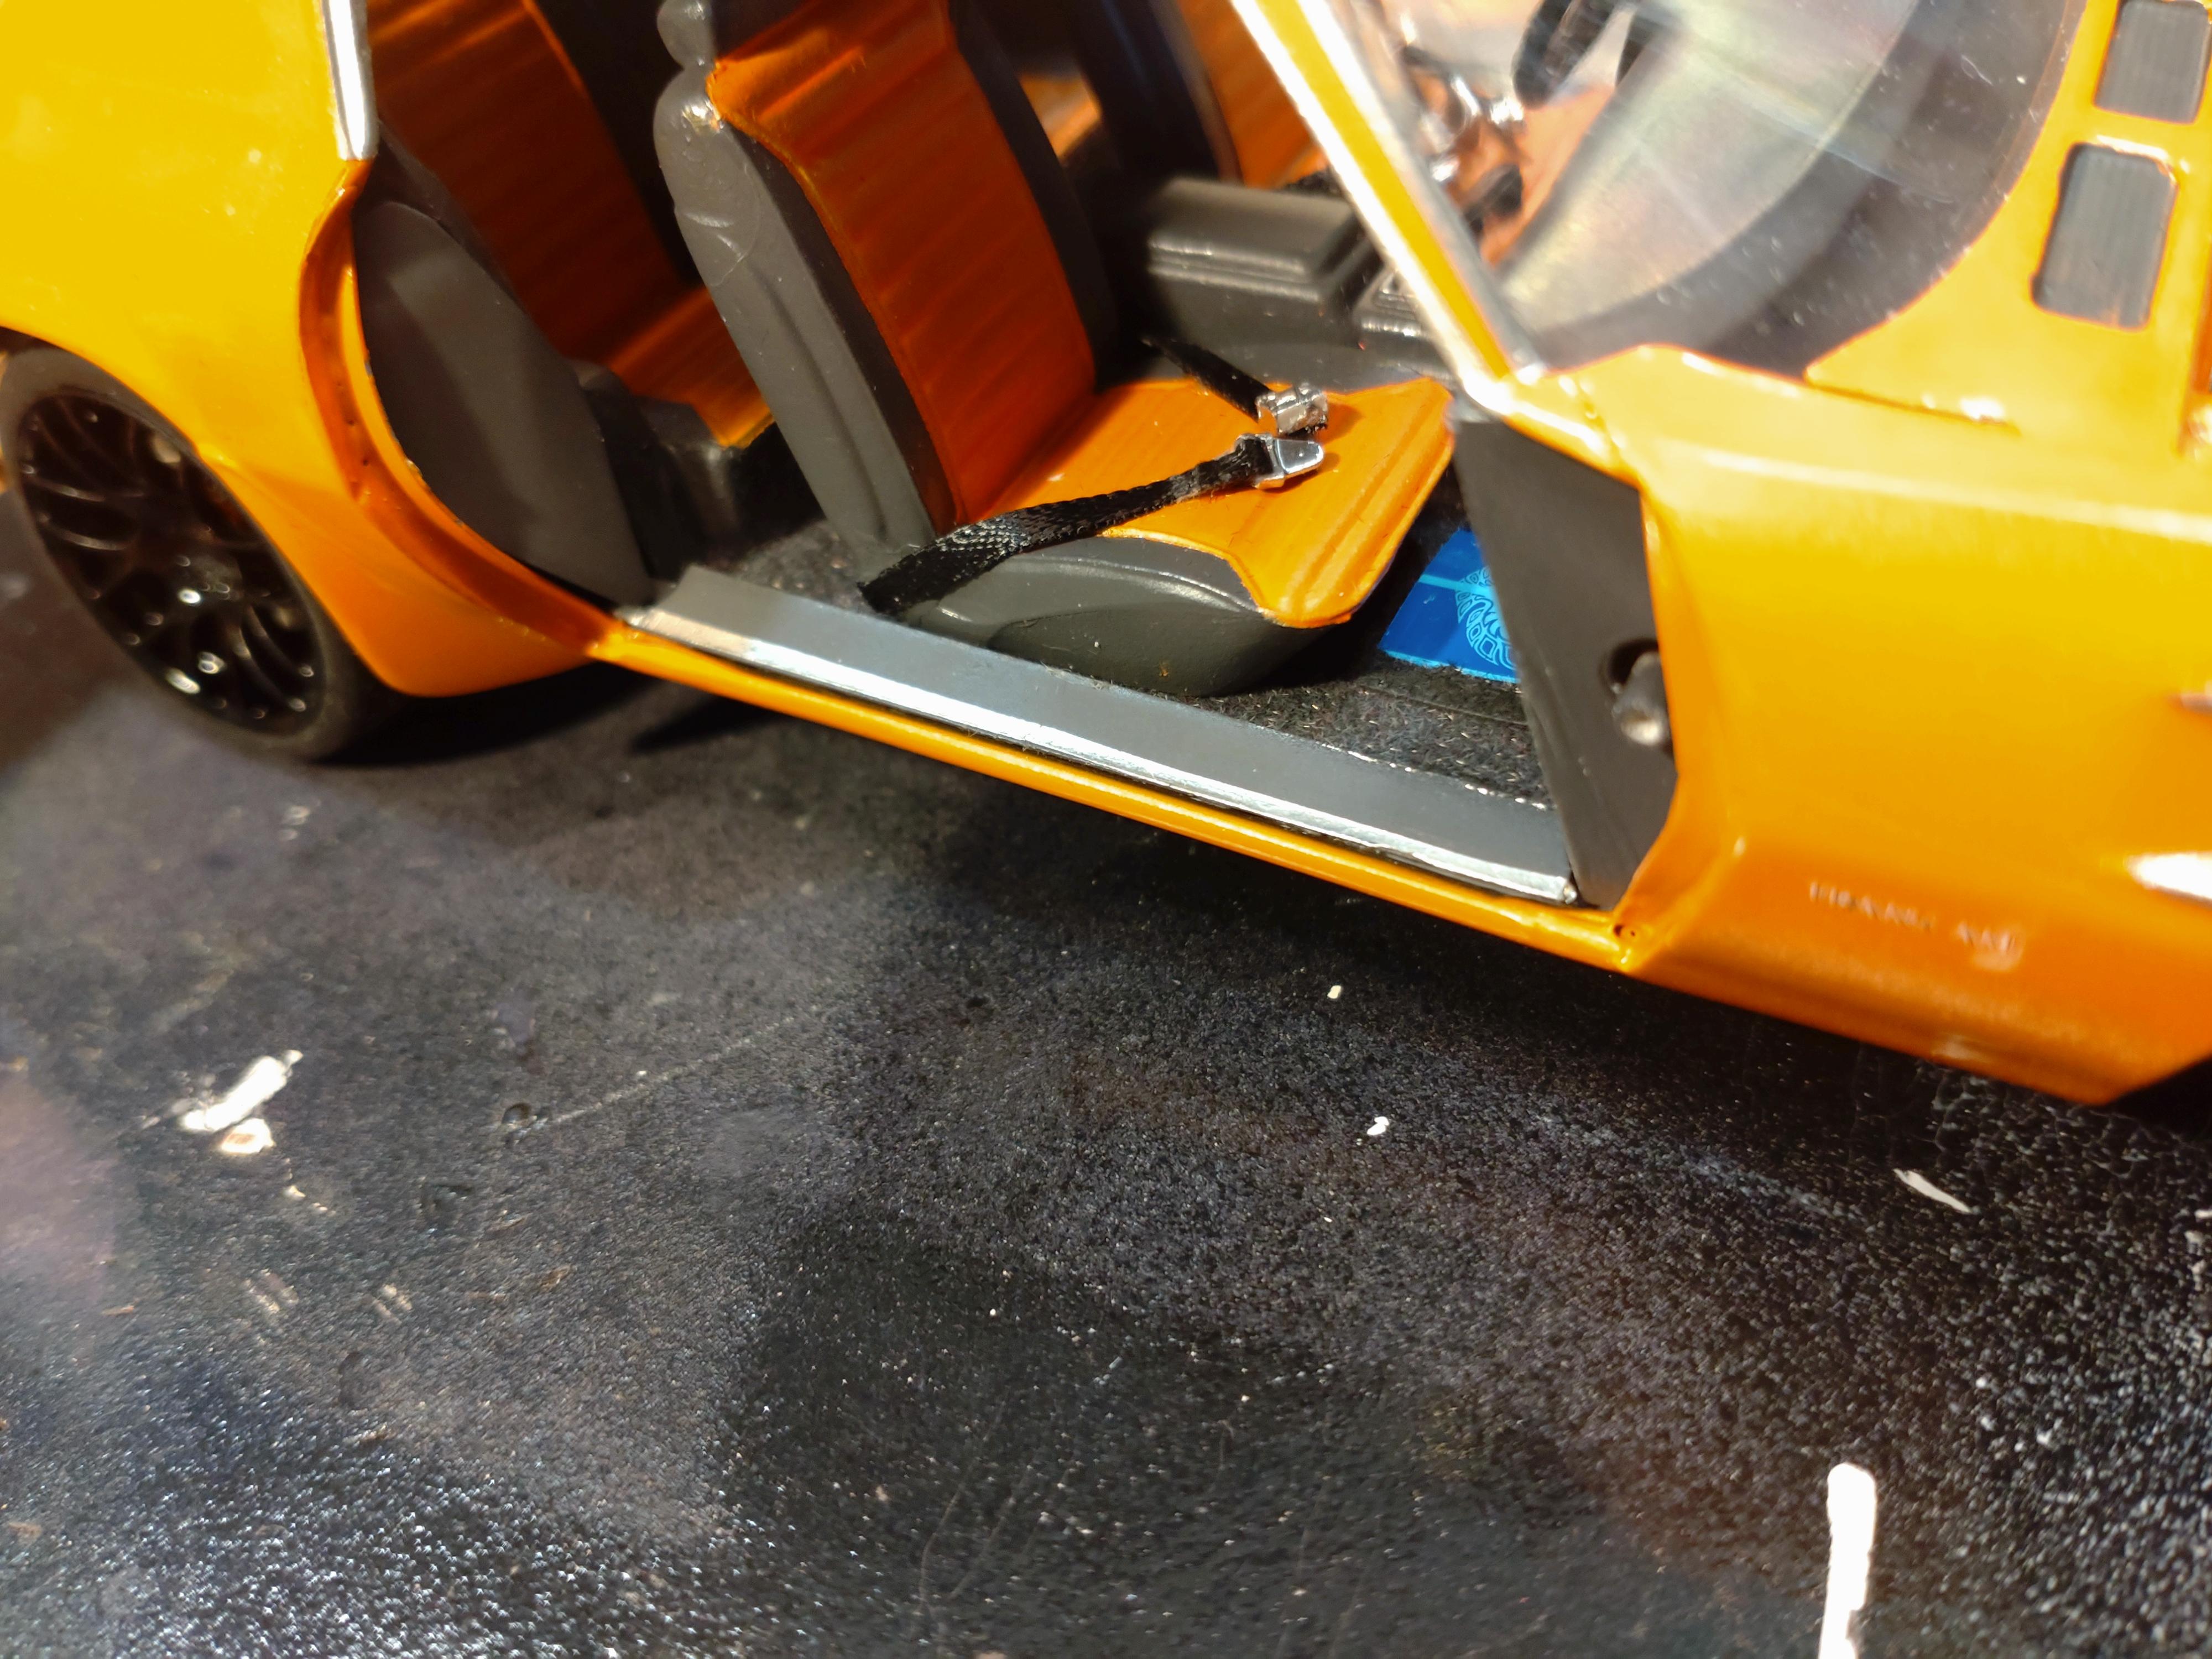
I´ve finally crossed the finish line! Getting the last parts together went faster than I had expected. Fortunately no bad surprise came up and I wasn´t forced to any emergency surgery on the chassis or body?. The wedding was easy peasy. The undercarriage got a last treatment before I could assemble the exhaust system and the suspension. Since I wanted to drop the body as much as possible, the spring mounts were cut down as much as possible. It was a pinch assembly with a little tension on the exhaust pipes. So I clamped the parts until the glue dried. I was quite dismayed about the details of the engine bay. Battery, brake booster, washer tank etc are all molded on. I didn´t have the nerve on this model to chop up and rebuild the bay, so I chose to craft covers for the bay sides. First, the cables, lines and the cooling hose needed to be connected. The kit scoop was disconnected from the filter box. I attached it directly to my custom air filter and that looks quite aggressive now. The covers are fabricated from .5mm sheet styrene. I had a decal sheet for quite a while with a carbon/kevlar print and now I finally had a suitable use for that look. The upgraded grill needed a small amount of filing to fit correctly and the metal grid looks much cooler than the standard structure surface. The epoxy printed wheels are now jet black and glossy. I added disc brakes and calipers painted in orange to match the body. Originally I had planned to set the front wheels straight. But while the epoxy glue was drying I tipped them into a left steered position and just had to keep them that way. Unfortunately, now the steering wheel is positioned straight... well, I won´t tell anyone. I had to fill the gap on the rocker and between the rear bench and the body. The sheet styrene is sprayed in the anthracite interior tone. I added a thin stripe of BMF to the doorstep. Now comes the last step that I was nervous about: Connecting the gull wing doors. I had my plan how to glue them to the hinges. First I had to make sure, that they would not disconnect by slight force or my clumsyness any time later. I sanded the inside surface of the doors rough to make the epoxy glue stick better, then I worked the hinges in a similar way. I inserted the correct amount of glue into the door cavities, slipped the doors onto the hinges and then gently closed the doors. To make sure nothing would slip they were fixed with tape. While the glue was hardening, I attached the prepared door mirrors. I generally pin my mirrors to the doors. No more slipping off, no glue mess on a finished body. I can glue them with white glue and that leaves no mess or marks. And they don´t break off so easily any more. My hopes were not disappointed! I danced a pogo round my shop after opening the doors for the first time! The idea worked and the effect is stunning! I am in model builders heaven.... I now have to think about how to stage this build for the "Under Glass" forum and YouTube. Thanks to those that gave me support and watched my WIP thread. Best wishes!
-
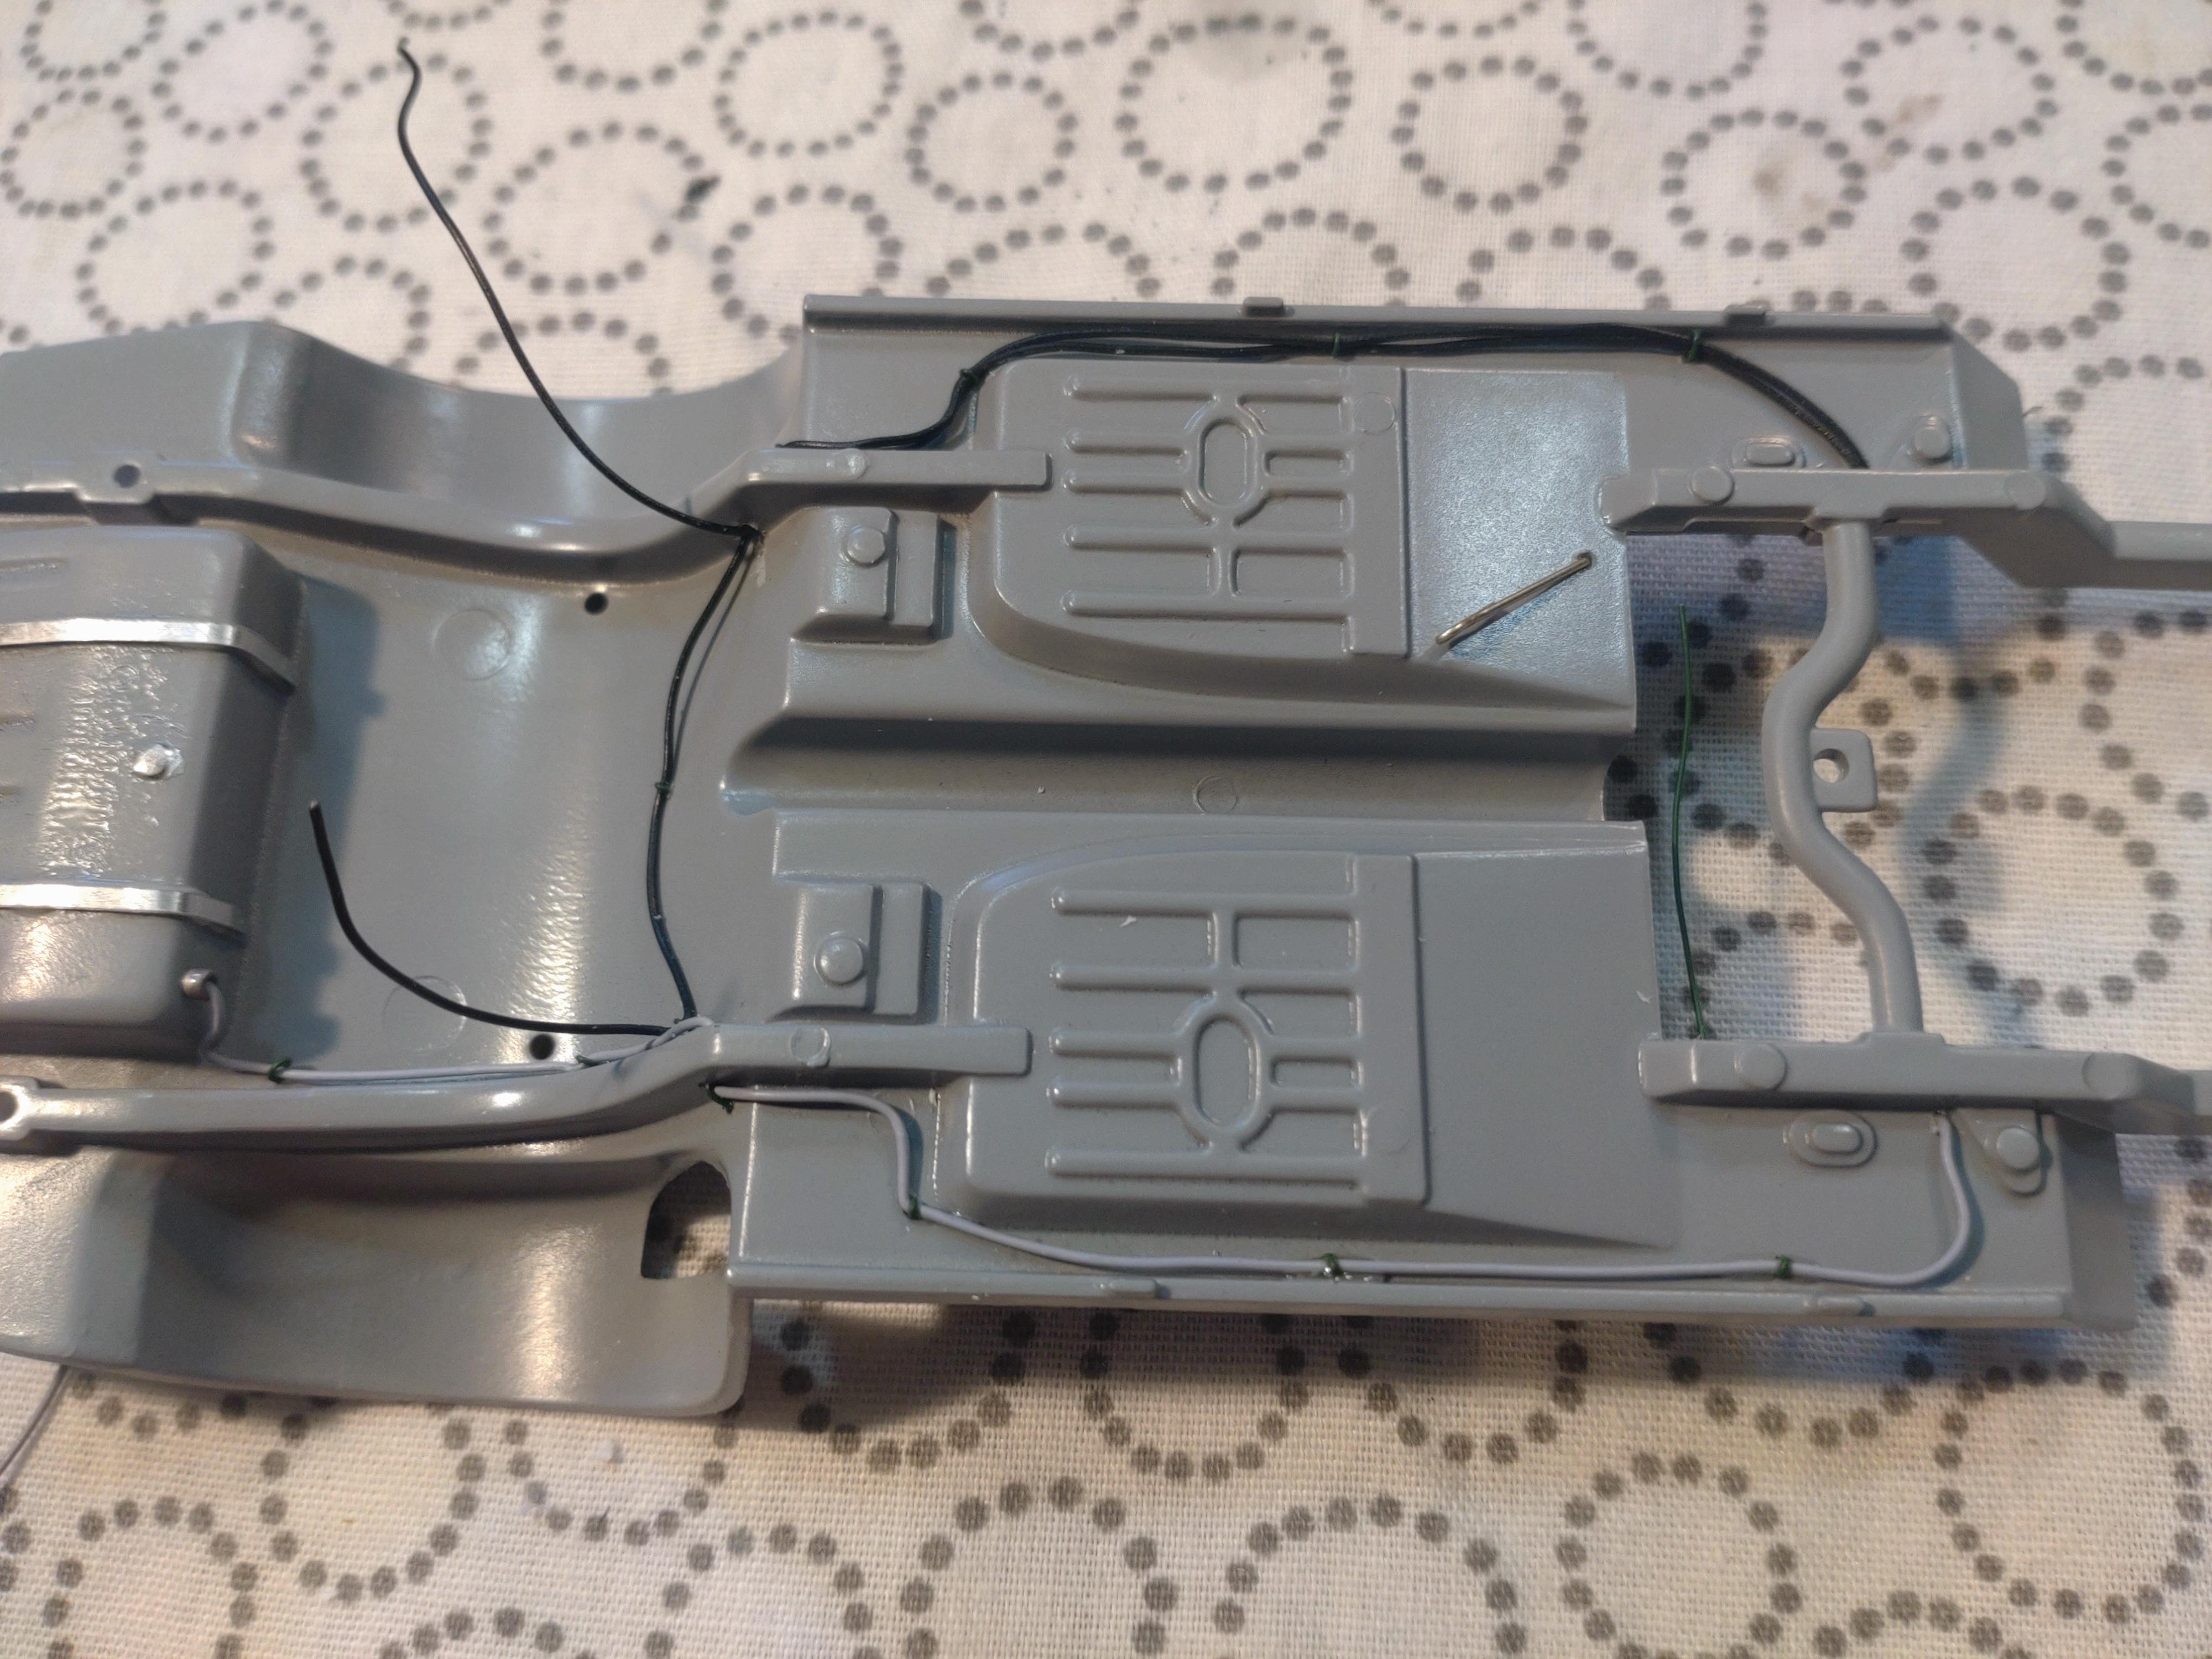
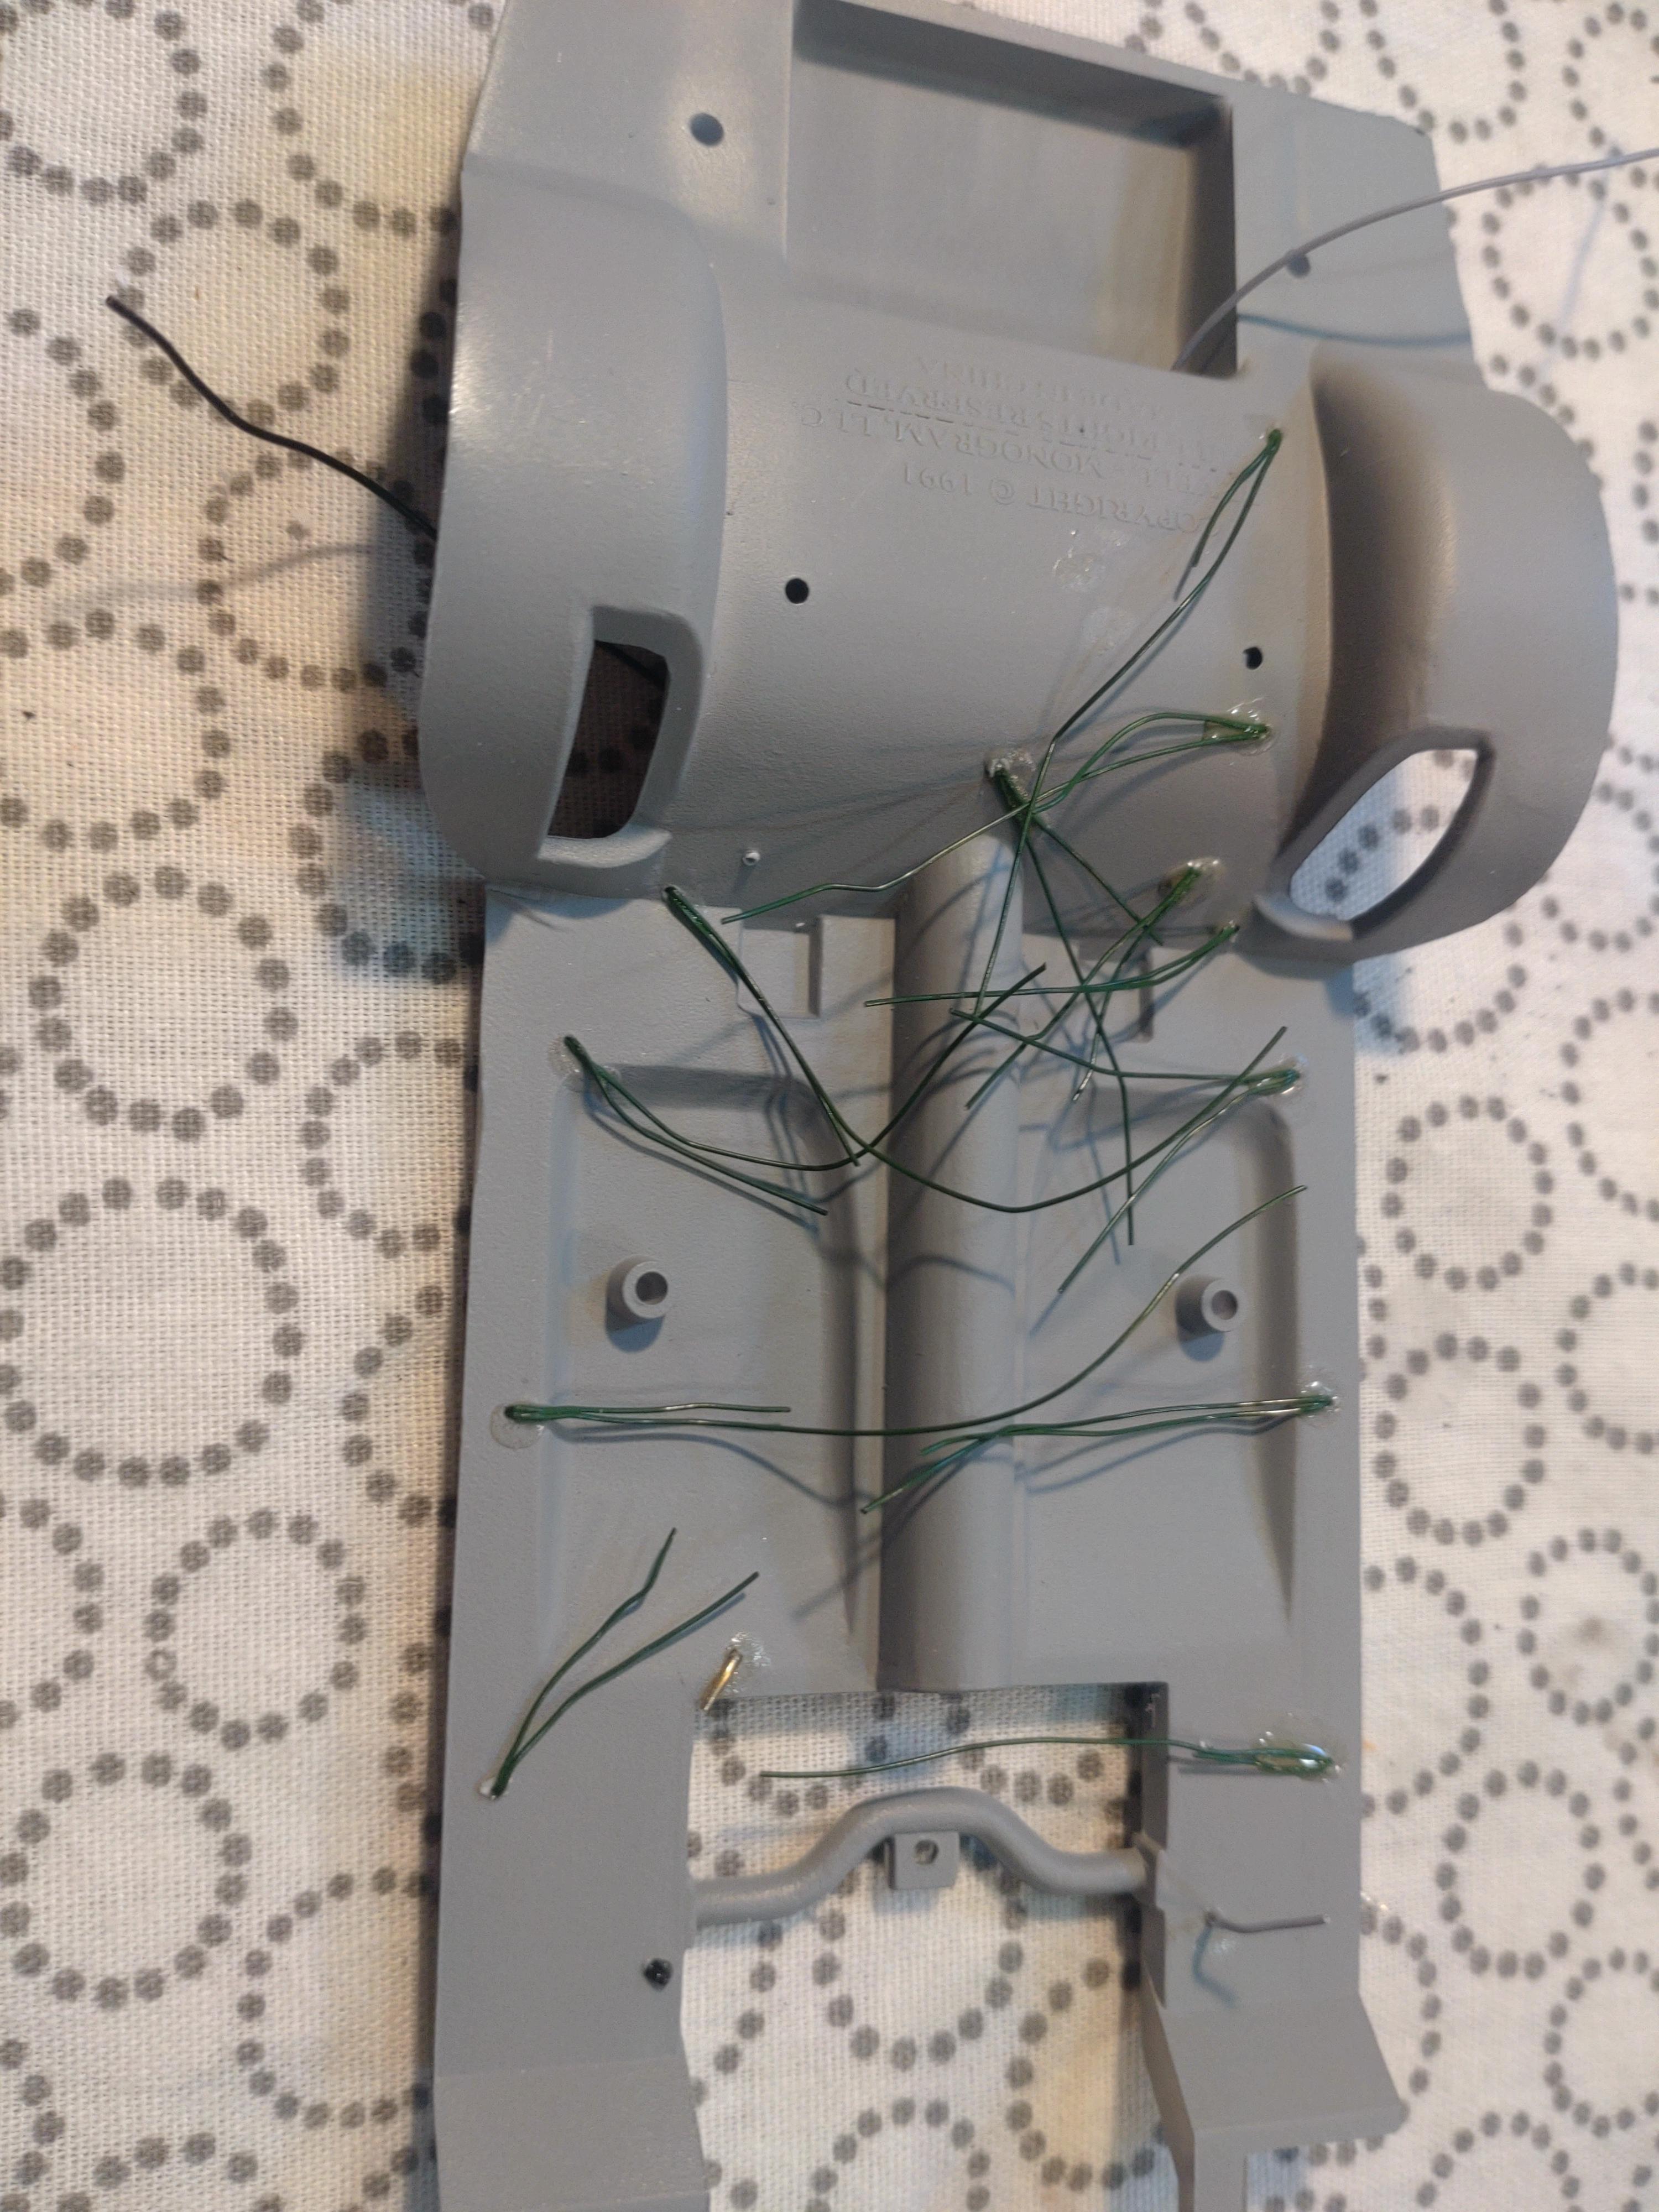
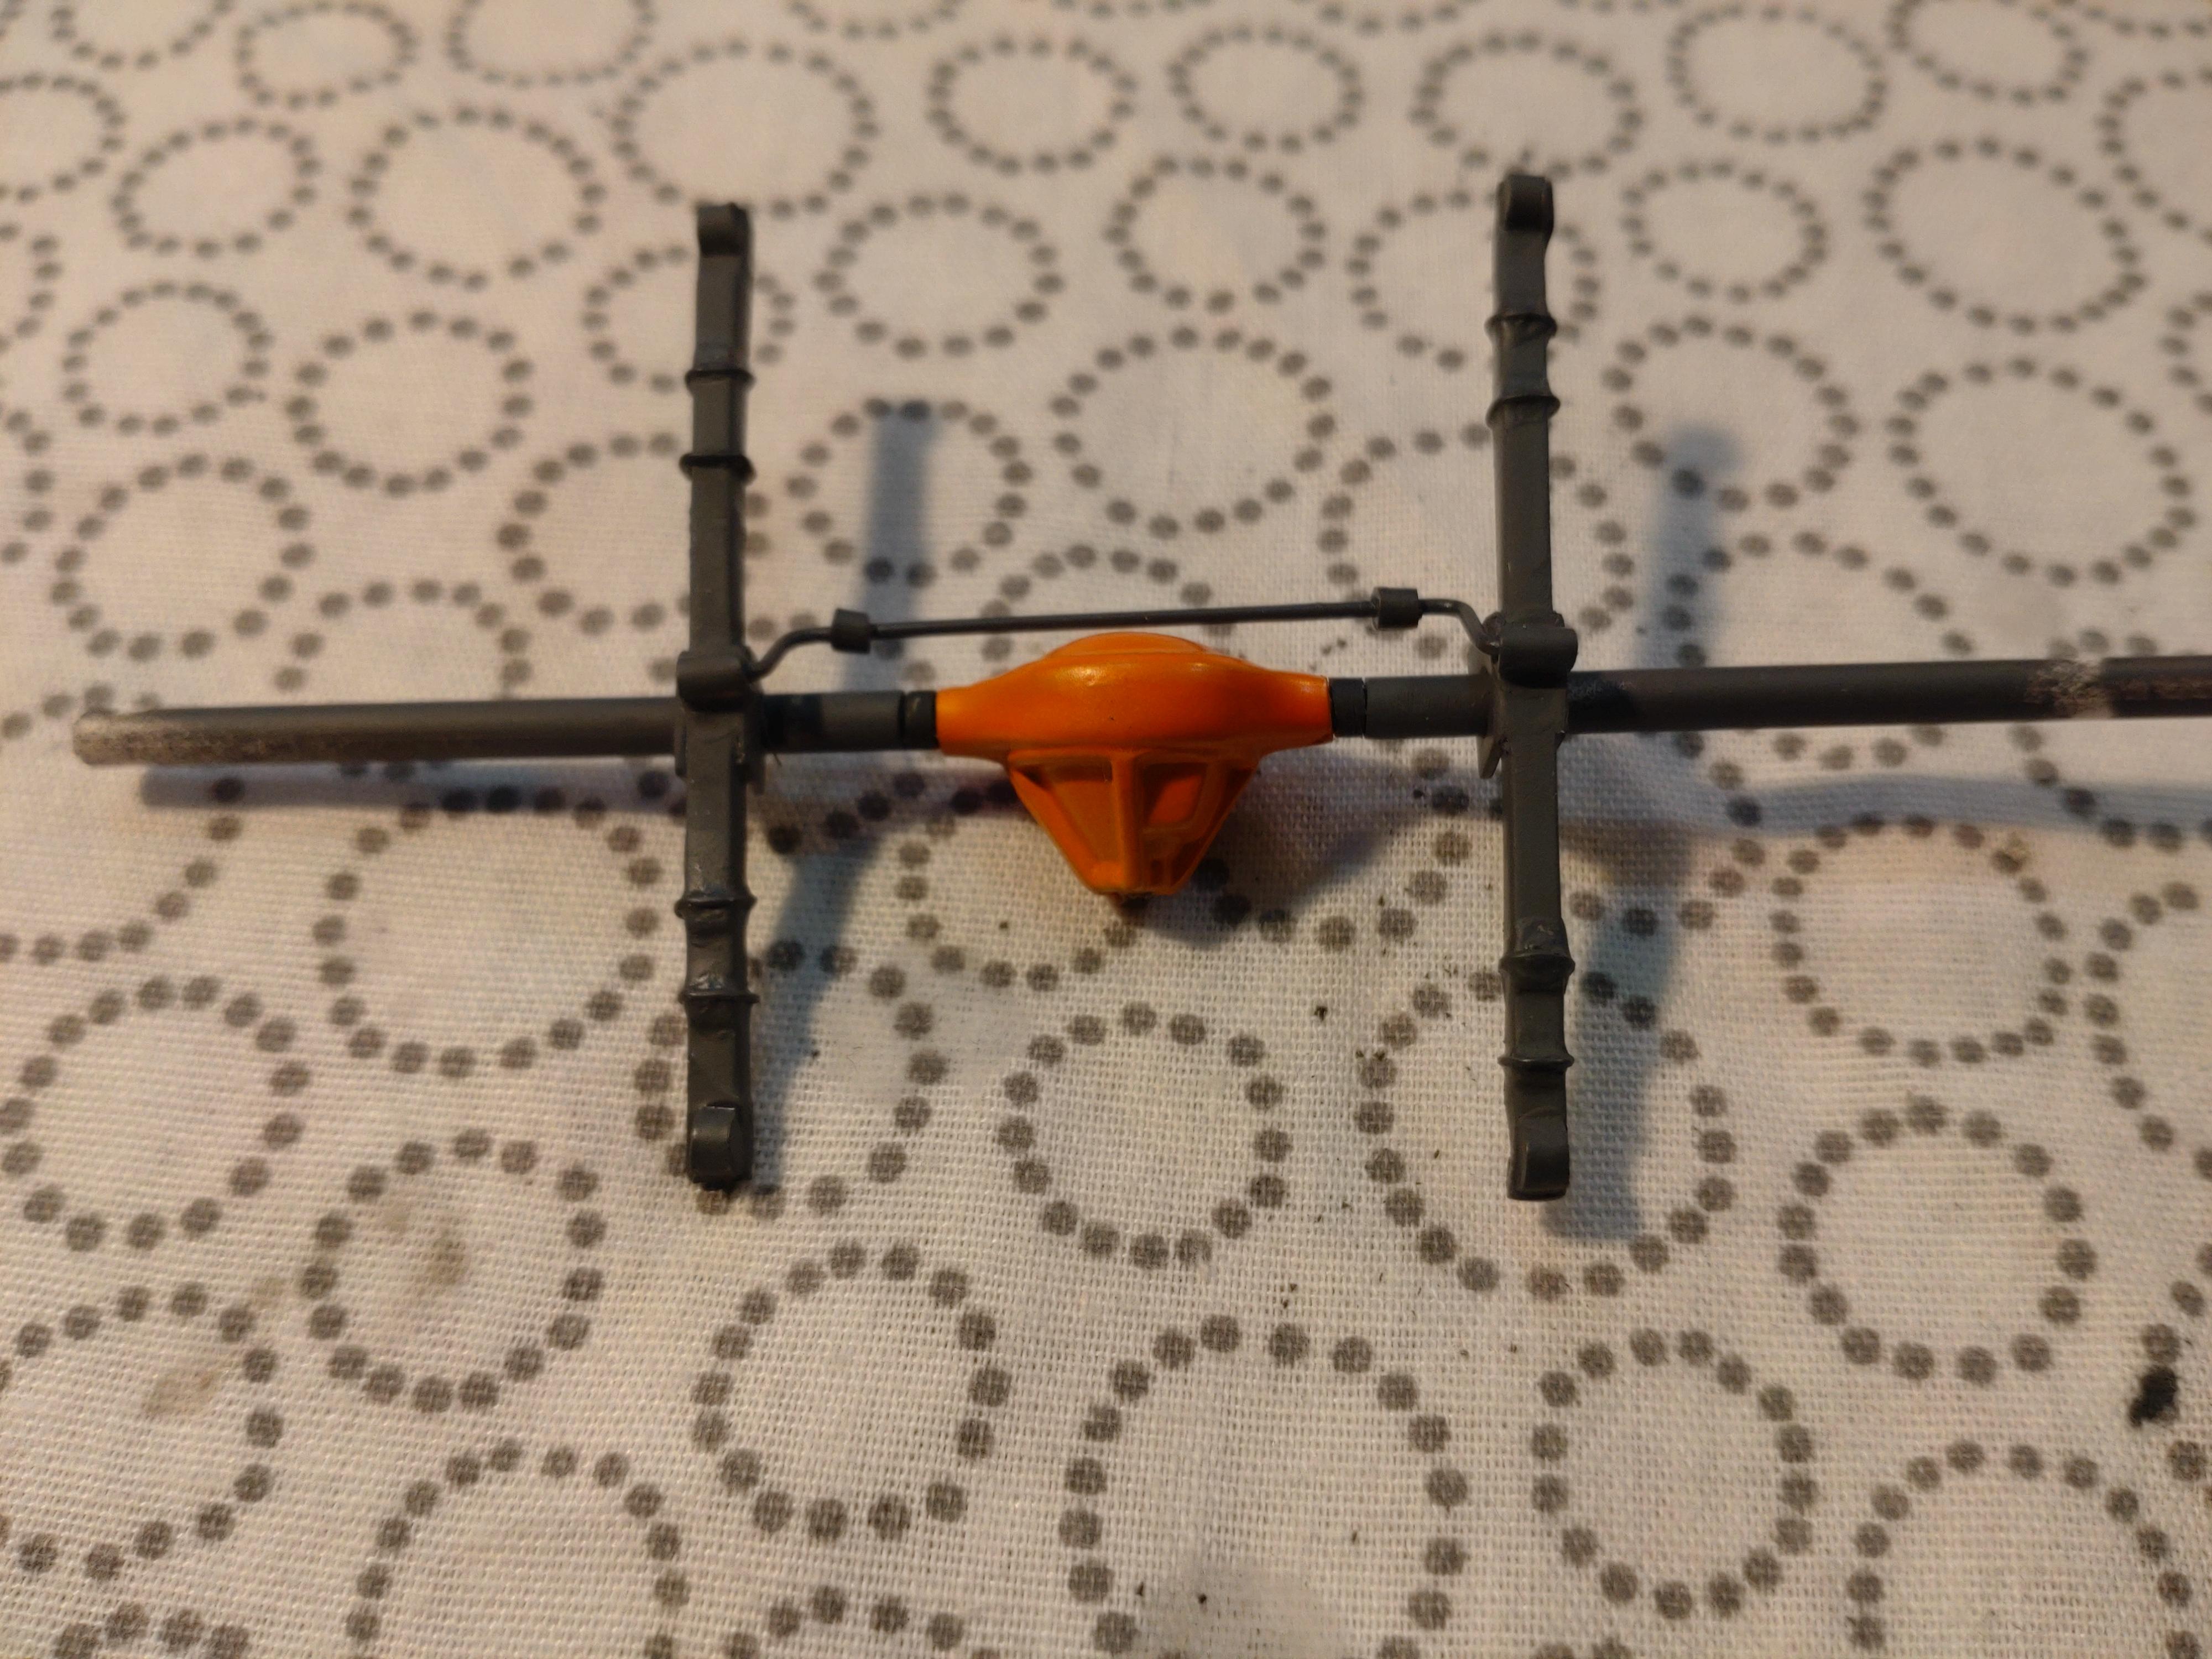
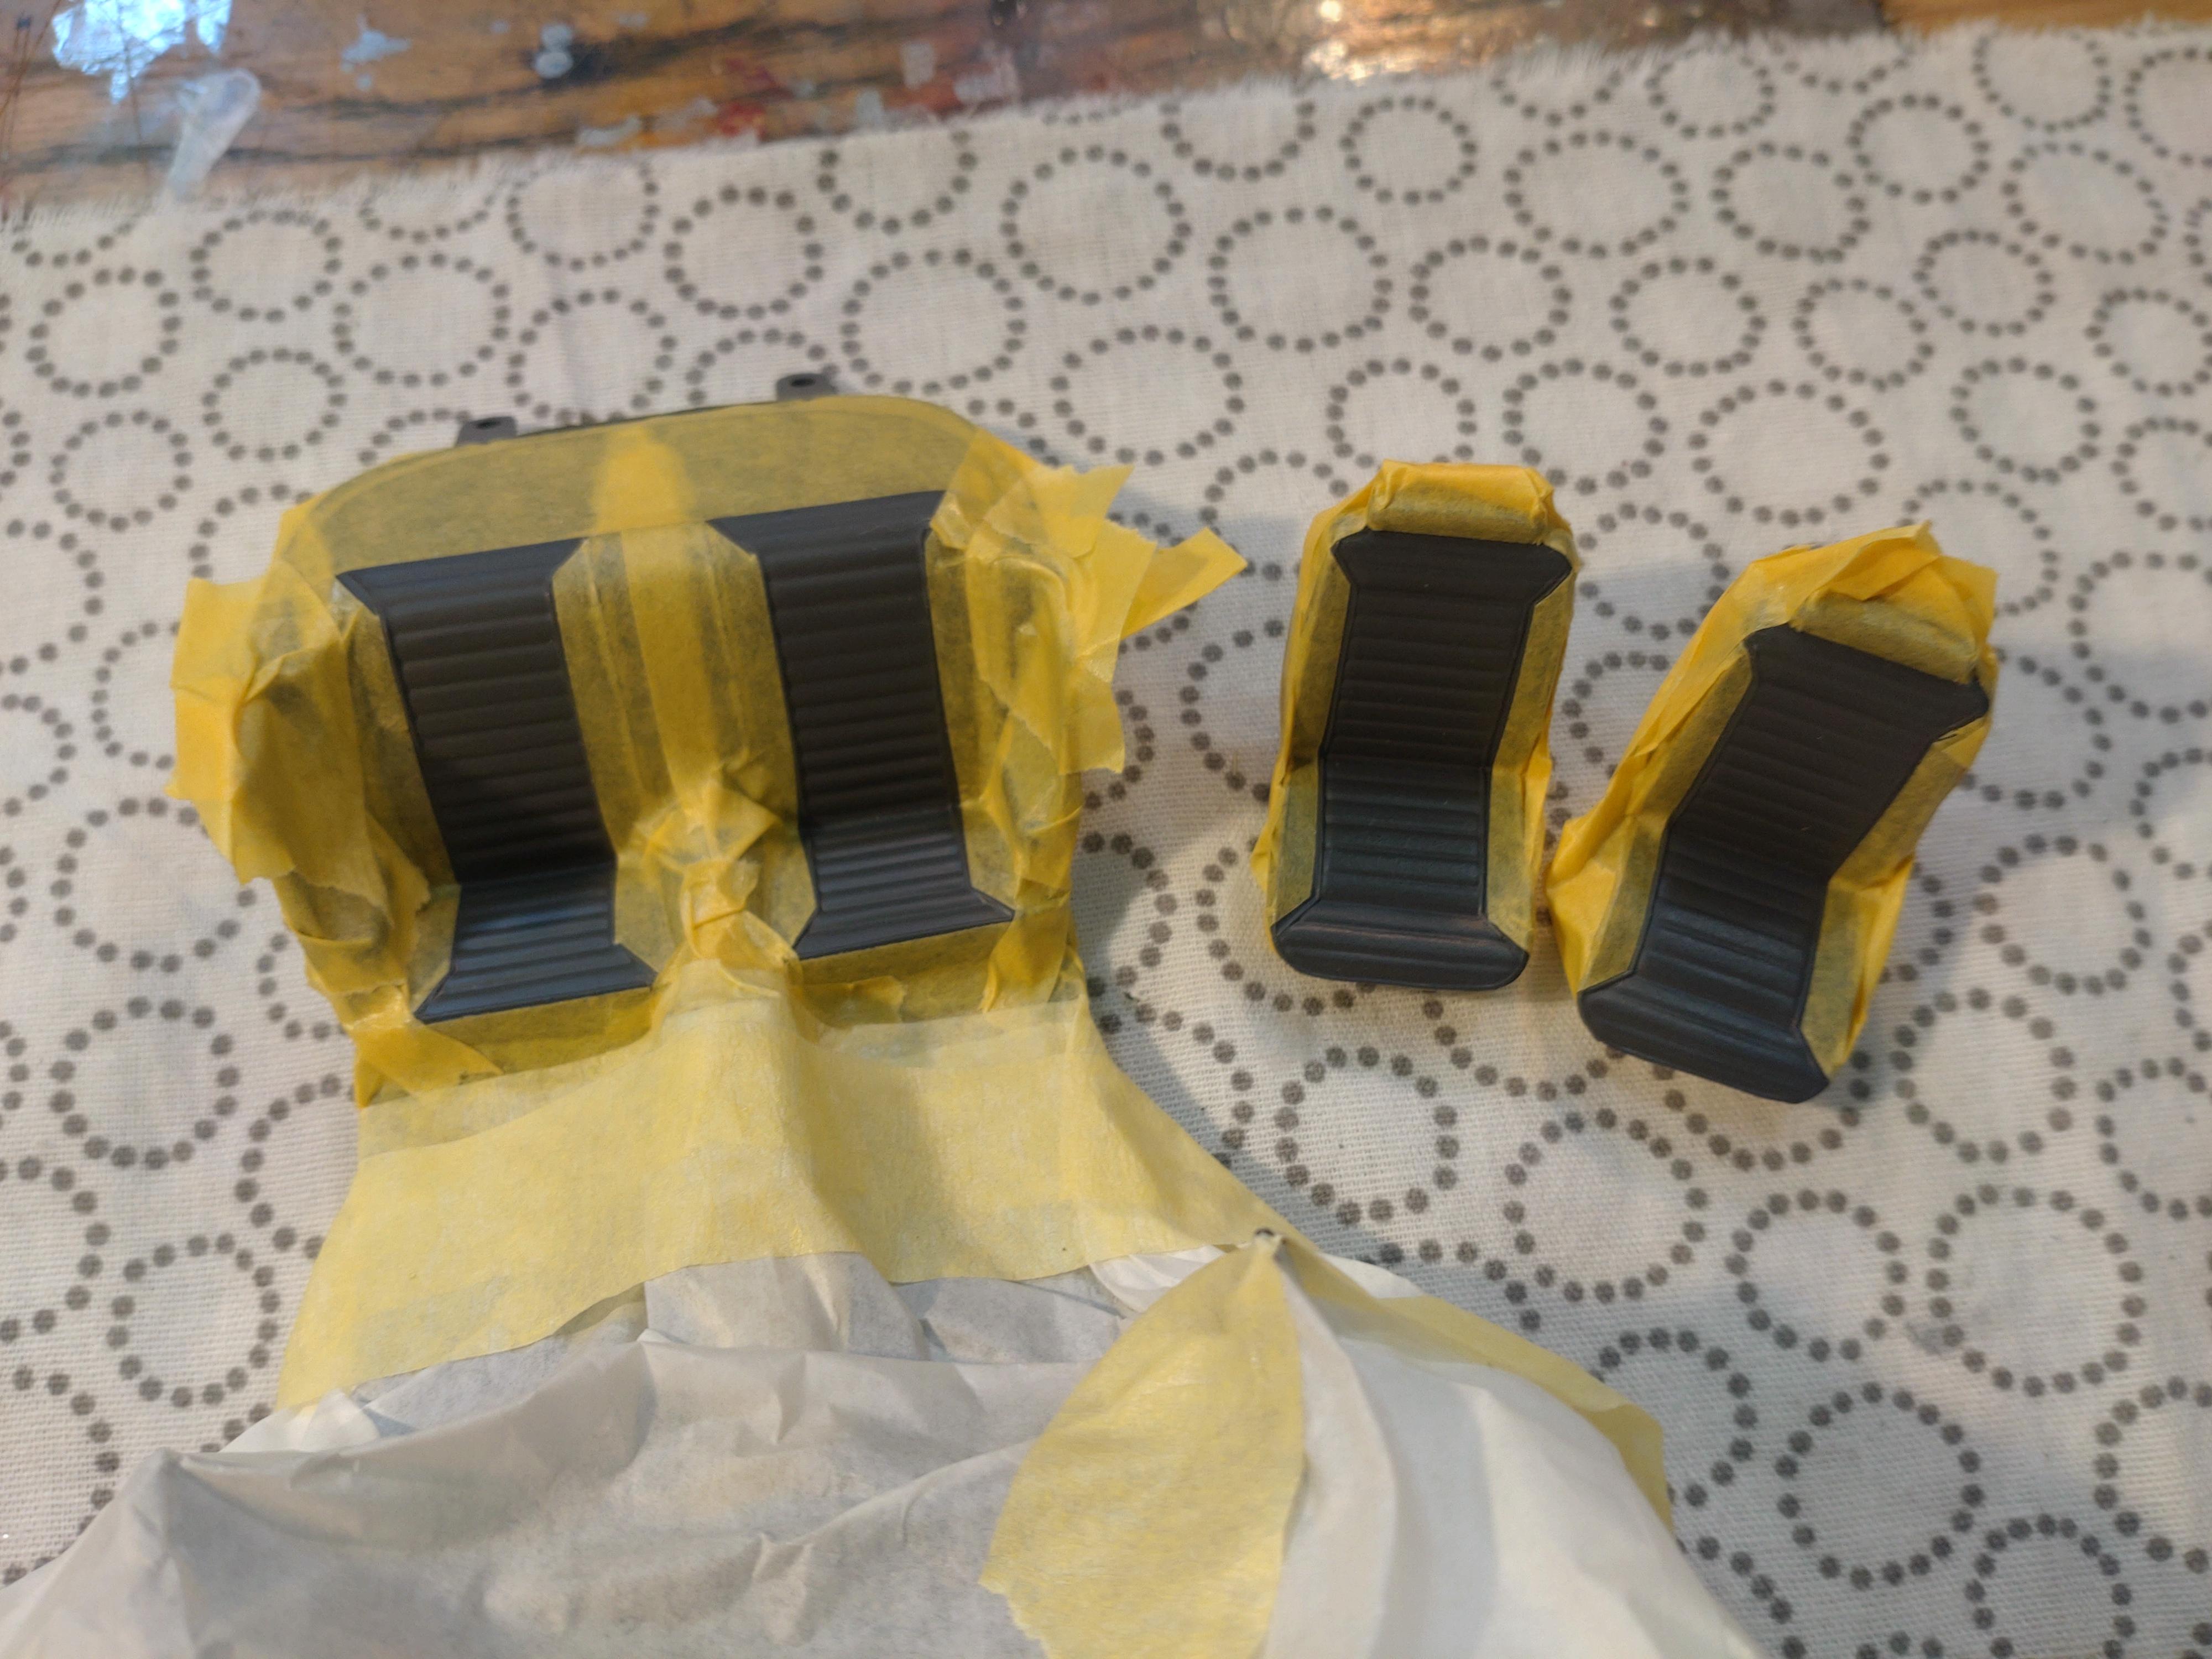
I´m finished with the interior tub. The floor is flocked in anthracite and seat belts are added. I was unsure if the blue kit floor mats would match to the orange seats, but they do harmonize well. The mats have received a flocking on the edges too. I drilled holes into the steering wheel sprockets and added a key with a hanger. A pair of sun visors will enhance the interior. I have expressed before, that the level of detail and complexity on this kit does not match the level 4 classification. The rear suspension/transmission and the exhaust system come as one part. And that part isn´t very detailed. So I deconstructed the whole thing with the aim to get more wow to the undercarriage. A new axle was connected to the differential and then to the springs. For more detail I added a sway bar made of .5mm brass wire. The springs received clamps made of thin florist wire. To this point, the differential was still loose on the axle for the orange paint job. Now I could spray the spring/transmission setup with anthracite grey. I attached the brake lines and the fuel line to the floor part. I drill small holes and loop the thin cables with a thin wire and then pull the wire tight onto the top side. The wires are twiddled a bit and bent down to be fixed with a drop of super glue. After the glue is dried, I cut off the excess. The parking brake cable needed a bit more effort. for this I use a very thin coated cable I get from a crafts store for fashion jewelry. The setup on the 1:1 Firebird was not too difficult to duplicate. On the side the body work was moving on too. After the first clear coat and a grit 6000 sanding, the bare metal and my selection of decals were attached. I had to wait a few days for the final clear finish, because we had a very high humidity here. I wanted to avoid having to polish much afterwards. I warmed my can of Molotow Crystal Varnish to make the paint flow better and the result was great. My wheels are from Scale Production, fine printed and with rubber wheels. But all four have the same width and they don´t fit under the front fenders, would not look good either. I sliced the front wheels by about 20% to make them fit and give them a realistic appearance. The kit grill needed some treatment for more detail also. I cut off and opened the back side, so I could fit in a fine metal mesh. in addition, the kit headlamps were replaced with metal/epoxy lamps. There is not much work left on this kit. I´m putting the major parts together now and am exited about how the looks will be! I am still a bit nervous about fitting the doors. That will be the very last step. Crossing my fingers...?? Thanks for watching!
-
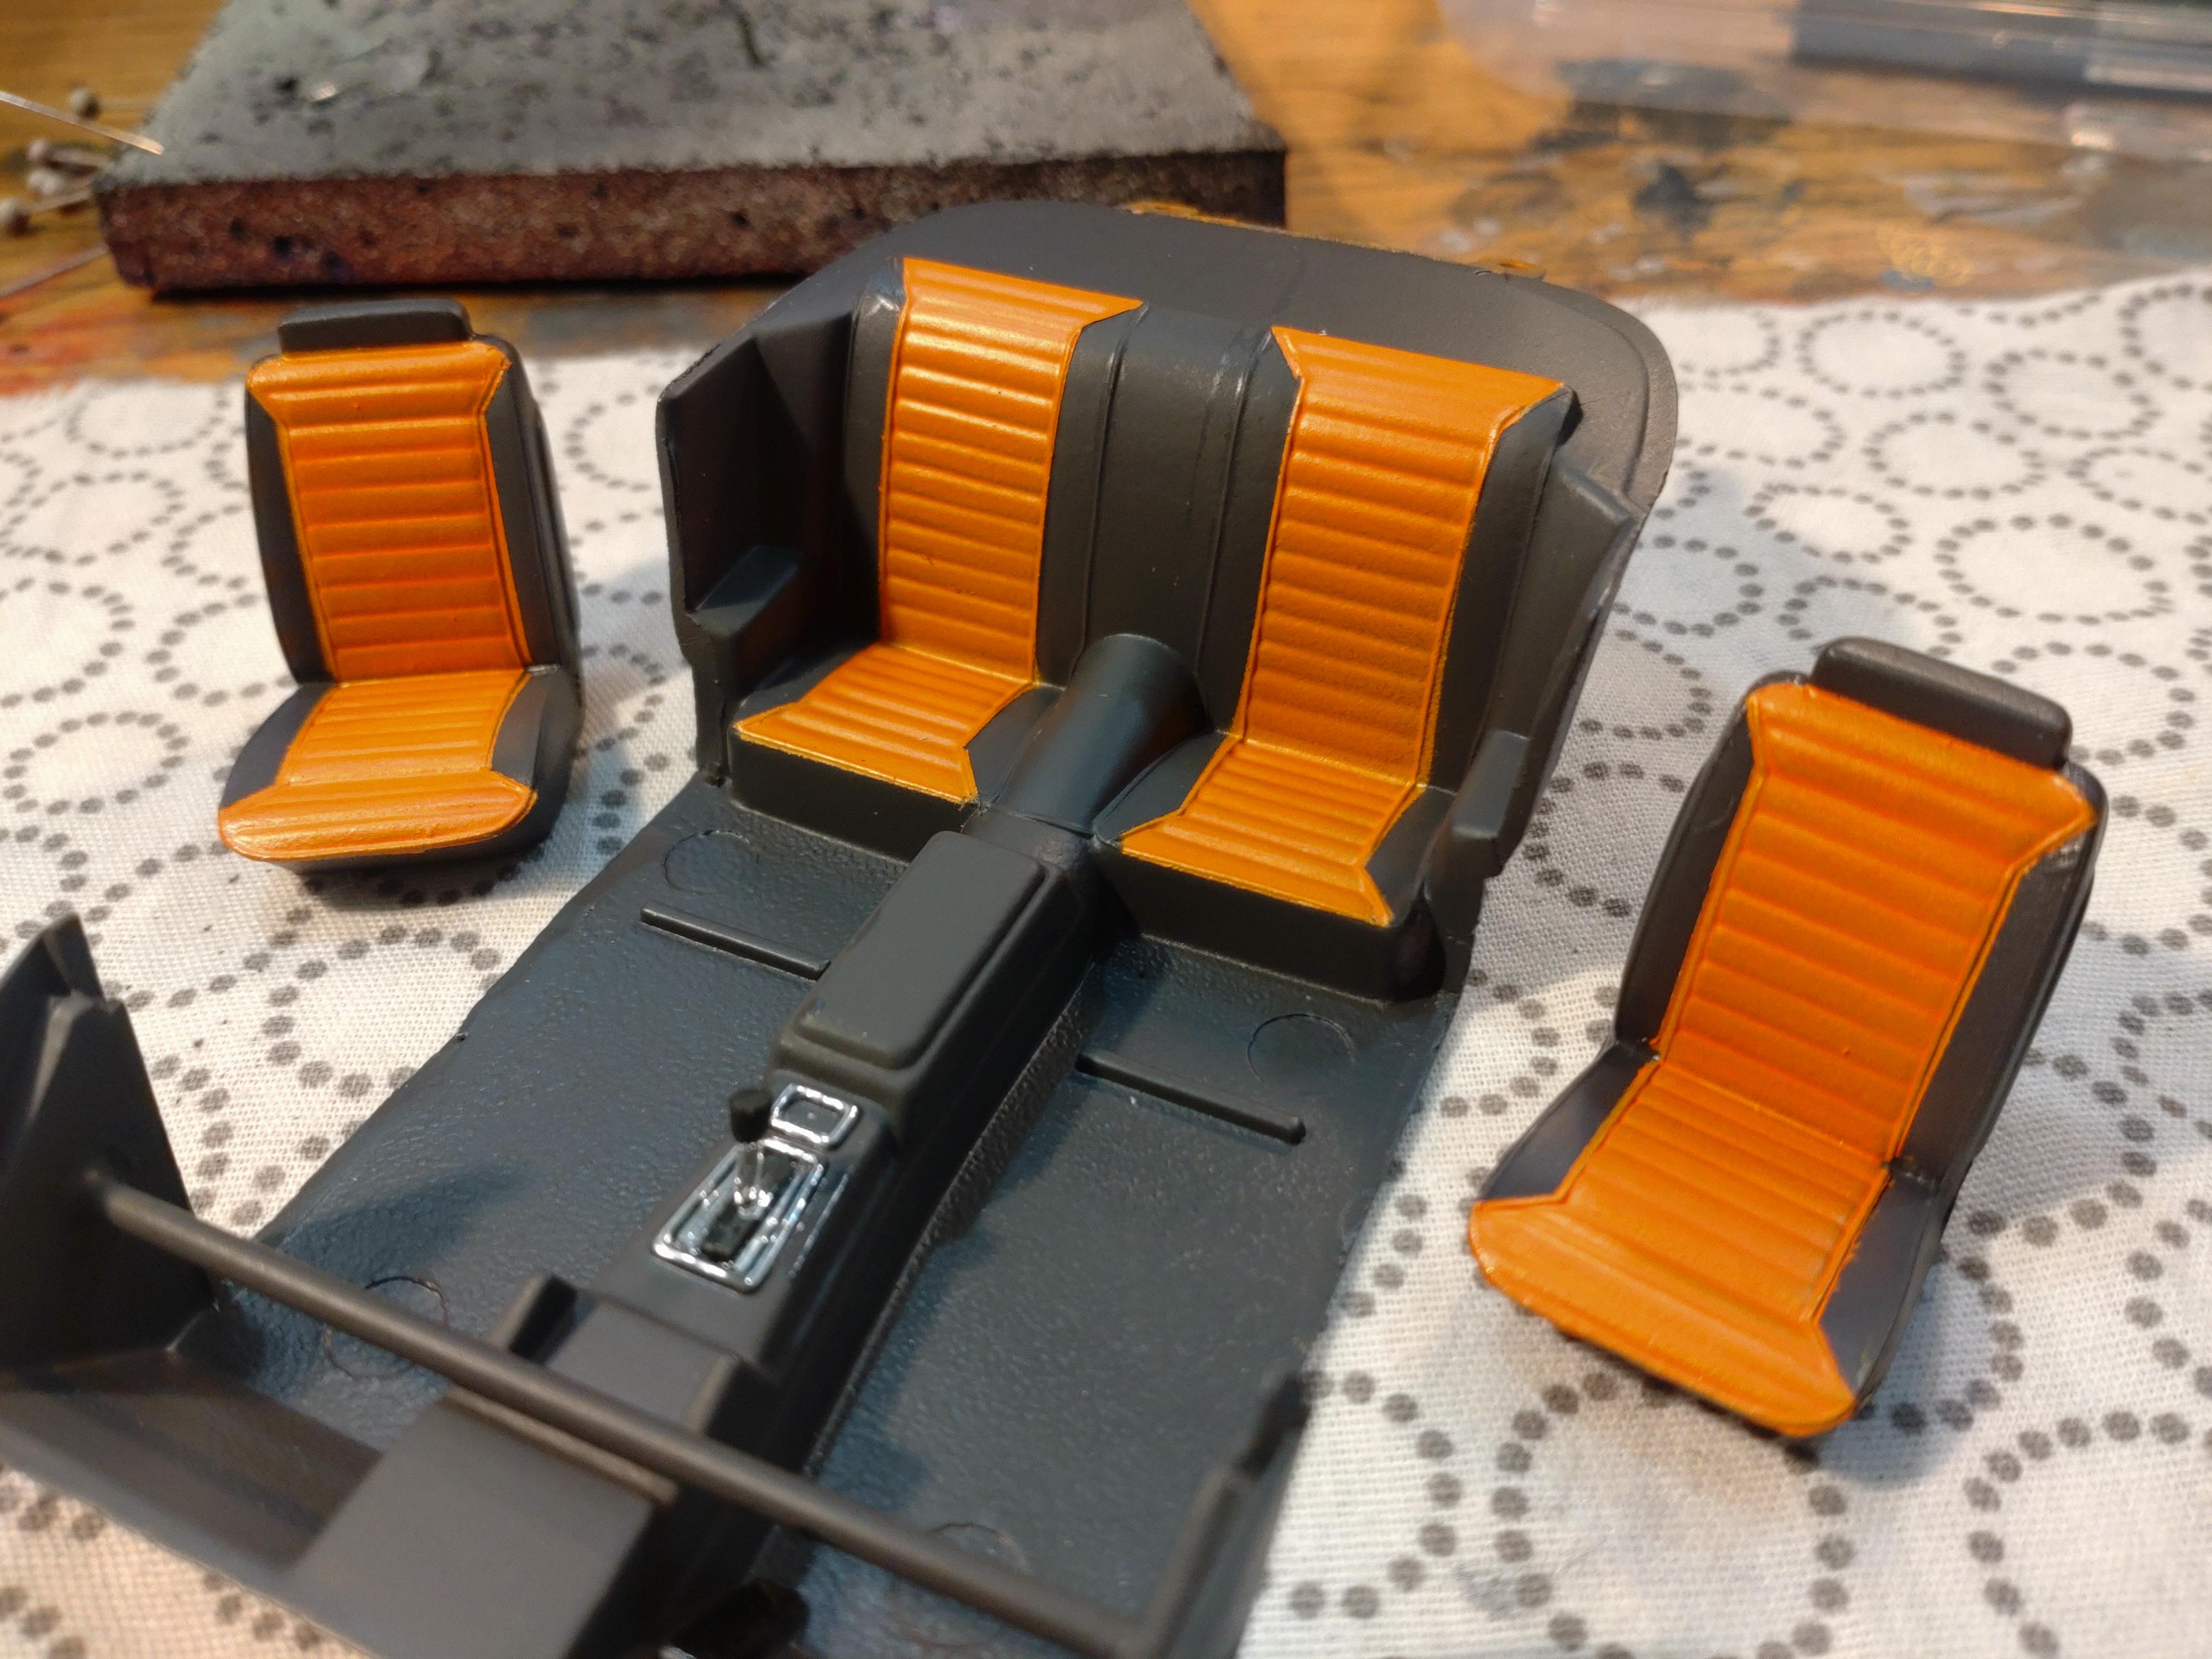
First of all thanks guys for your friendly response! I finally found time to get into my shop again! Making progress with the body, engine and interior. This is the body after the first clear coat. The orange is self mixed with Schmincke AERO Color acrylic airbrush paint, with about 25% metallic fluid. I really like using AERO Color, but due to a very high humidity, it took longer than usual to dry. Since it is water based, you have to apply and add up very thin layers to get the final rich color. I speed it up a bit with a heat gun, held at a safe distance?. The first layer Molotov crystal clear already looks good. Next step is 6000 grit wet sanding and the next layer clear. You can see that the hood is slightly warped and does not close perfectly. I have corrected that before painting with heat 3 times already but it keeps coming back, yet less serious than before. Must use my heat gun again a last time. The engine is just about finished. I wont bother you with the first steps. I discarded the kit carb. Generally I was expecting more and better details in a level 4 Revell kit. This carb is from Scale Production and does the job much better. Sorry for the fuzzy image... As always, I built the distributor myself for more detail. The messy paint on the cables will be removed later. Fuel lines, spark lines and the throttle are attached. I will not use the standard air filter box in the kit. For this 4 barrel carb I built an air filter that will be connected to the scoop, which I cut off the filter box. The filter is foam rubber wrapped around a styrene tube. Cooling hose connected. I pull the thin copper filaments out of a vinyl wire and fill the space with a 1mm aluminum wire. It is now bendable in every direction and shape. I like to deconstruct the pulley/belt part so I can set up "real" rubber belts. The wheels get some working with thin styrene slices and photo etched nuts. The belts are cut off a 1mm rubber mat. Getting 2 belts on the pulley wheels took some weaving, but it ended up in line. The air filter received a mesh metal cover. For the interior I chose a dark grey called stealth. I don´t often use a heavy black. If you look at a car or any other item, it is hardly ever a deep black, unless it has a high gloss finish. Typically matte surfaces appear anthracite or, if aged, very dark grey. Imho a black also neutralizes many fine details. Anyway, after 2 coats of stealth I masked the seats for a 2-tone upgrading. After a silver base coat I airbrushed the orange body paint. The dashboard received the same color and fortunately this kit has good decals. As so often, the open areas for the gauges didn´t quite fit perfectly. With a round nose pliers I bent rings of .4mm silver wire to enhance the gauges. Hm... magnified this big, now I see that the rings are a bit wonky? Thanks for watching!
-
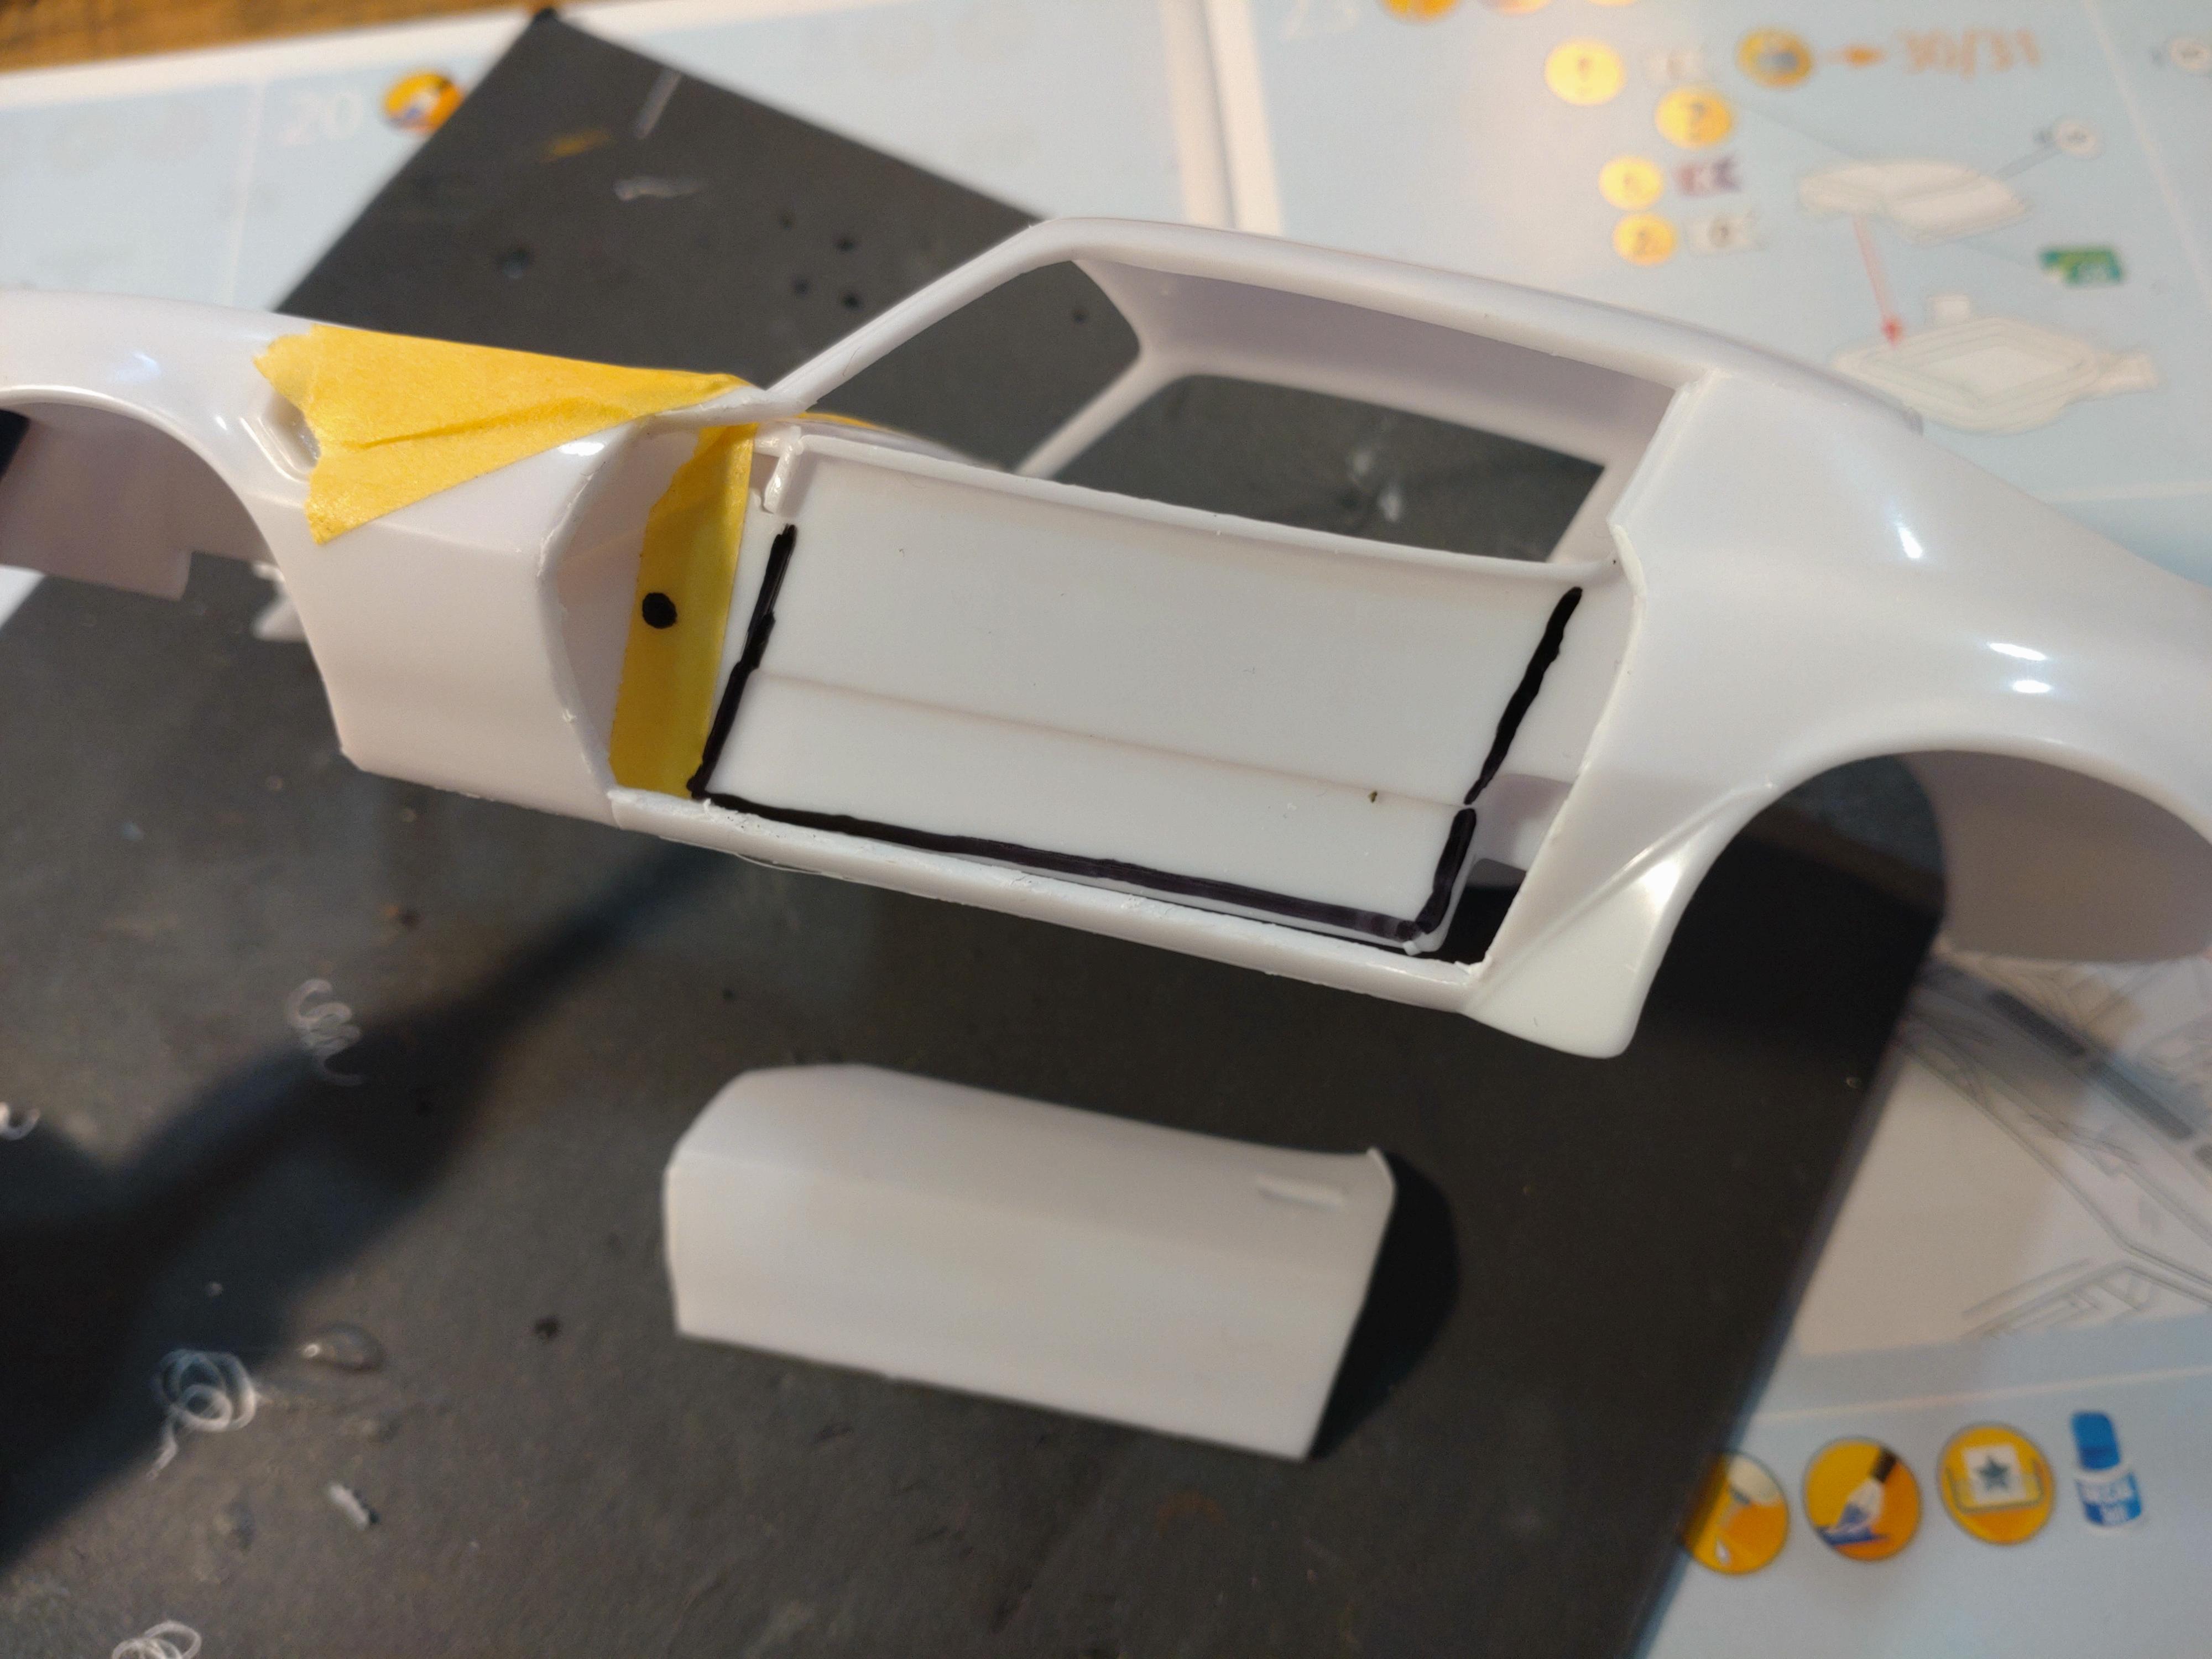
This kit was on special sale and out of an impulse I bought it, without really knowing what to do with it. I am not THAT fond of the Firebird, but it seemed to call my name and send wishes to make something special out of it. After brooding about the possibilities I decided to turn it into a show car. But a show car needs something special for the show, so it had to be the doors. Simple hinges were not enough... How about gull wings! Tricky, hard to build and: I had no idea how to get the engineering to work. But eventually I did come up with solution that could make the show. First I had to cut out the doors. And keeping in mind where I was going and thinking at least three steps ahead. Meaning, not forgetting the tub with the door panels. I had to figure out the sweet spot for the hinges. The doors should move out and swivel up. I saw how this worked on a 1:1, but of course with much more hydraulic mechanism. So the open doors shall look like this: That spot on the tub: That´s my sweet spot. And with those special wheels from scale production I like the looks and the stance. After cutting out the door panels I attached a 3mm styrene tube for the "hinges". I will reinforce the tub in a later step. The panels have to fit at a precise spot, making the doors close correctly, but also giving them a natural look when opened. Here I have the front part of the tub reinforced with an extra layer of 1mm styrene. That hinge tube will be hidden completely by the dashboard. Now it´s time for the door lips. Having made a bad experience with my first door jobs I have come to add another slice of 0.5mm styrene to the body before I attach the actual lips. This way, the paint layers building up won´t prevent the doors from closing correctly. Seems to fit very well. A bit of fine sanding is necessary, but the looks are going into the right direction. A base coat in silver is applied and the body is ready for color. It did take some small amounts of putty to smooth out a few cuts on and around the door made during the door cutting process. Here you can see how the hinge is supposed to work. Thanks for watching!
- 17 replies
-
- 12
-
-
‘40 Ford coupe appreciation build
Andy Oldenburg replied to atomicholiday's topic in WIP: Model Cars
Just had the time to check out the WIP forum again and discovered this thread. Jeremy, a great idea to invest this effort to make your dad happy. And a bit emotional to see everyone go along with all that advice and inspiration! Like mentioned before, your dad will be a very happy person, whatever your decisions made. But getting it close to stock and with a dark blue finish looks like a very fine option. Looking forward to the progress! Good luck! -
Thank you everybody! Great motivation for my next build.... which will NOT be a barnfind?
-
Hi guys, thanks for your friendly response! I'm happy you like my build?