Lone Wolf
-
Posts
71 -
Joined
-
Last visited
Content Type
Profiles
Forums
Events
Gallery
Everything posted by Lone Wolf
-

3D printed wire wheels for Revell XKE
Lone Wolf replied to jacko's topic in Model Building Questions and Answers
I have no experience with them personally, but you might try contacting Roswell Customs and Chrome, which is about the only "plastic parts plater" left in the USA, that I've heard of, anyway. -
3D printed wire wheels for Revell XKE
Lone Wolf replied to jacko's topic in Model Building Questions and Answers
Jacko, I know this isn't what you asked about but it could be an alternative? First, you'd need to know how many spokes in total those Jag wire wheels have, each. [Edit: 72 Spokes] This link is to photo etched wire wheel centers that are used with your existing outer rims. They aren't made specifically for Jags, that I'm aware of, and I don't know their diameter. Anyway, if the 3 or so spoke options, pe wire wheel centers don't show about half way down, hit "filter" near the top left and choose "wheels" at the bottom of the list. https://www.detailmaster.com/collections/etch-parts/wheels -
BBC Single-Plane Intake Manifold, Finally!
Lone Wolf replied to Lone Wolf's topic in Car Aftermarket / Resin / 3D Printed
Thanks horsepower. I remember those intakes, a guy I knew about had one back in the 70's, when it was "the hot setup". -
BBC Single-Plane Intake Manifold, Finally!
Lone Wolf replied to Lone Wolf's topic in Car Aftermarket / Resin / 3D Printed
Calb56, and others looking for a sbc single-plane intake, I remembered another source. The following kit, possibly related others I'm not familiar with, have such an intake manifold. I've got one and tested it on an amt bbc engine (67 pro-street chevelle) and it fits reasonably well, good enough if you only need one, it'd work.
-
BBC Single-Plane Intake Manifold, Finally!
Lone Wolf replied to Lone Wolf's topic in Car Aftermarket / Resin / 3D Printed
Bytownshaker, Thank You for sharing that information. Hopefully there are some here who will find it useful. Although I feel I now have all the single-plane bbc intakes I'll ever need, I might even look into these just for the possibility of having something different? To be fully honest, I can't help wanting at least one of these, tall, cool looking, bad boy's:
-
Mark, Thank You very much for the reply. Dang it, I didn't realize I needed to "follow" things, I thought making a comment automatically did that, oops. So, Evercoat glazing putty it will be. Yes, PC-7 is amazing, great stuff, I've been using it for many decades and have always kept some on hand. Although I'm not certain it was PC-7, in the 70's, some well known pro-stock racers used it, or a similar gray epoxy, to "reinforce" the outside of aluminum tunnel ram intake runners so they could port them out further than the aluminum would allow them.
-
BBC Single-Plane Intake Manifold, Finally!
Lone Wolf replied to Lone Wolf's topic in Car Aftermarket / Resin / 3D Printed
Since many of us (street/drag/road racer types) have no clue about the specific chassis style you mentioned, could you please give the kit names so we could Google them? -
Interesting thread. I thought I'd throw my 2 cents worth into the pot, for consideration. At a certain fb modeling group, on an almost daily basis, I'd see yet another ruined and wrinkled paint job. 9 out 10 had Rust-Oleum (RO) paints, most often the painters touch line. These failures always involved a RO clear coat. It didn't help these poor souls that numerous people were always telling them they'd be "safe using the same brand" paint. What I eventually discovered was this, the RO colored paints are an Acrylic-Enamel while the clear is a straight Enamel. According to the now very old "painters rule" LEA, your not supposed to put Enamel over Acrylic. Obviously, there are many modern paint developments that allow the old LEA Rule to be violated, but in those cases it appears to still apply. One odd, or frustrating thing, about RO spray paints is they almost never label the cans as to exactly what's in them. Finding the color paints were an acrylic-enamel also took a lot of tedious research. Anyway, what I'm getting at is this, please don't use RO clear (over RO colors) on your precious old model kit. If you clear it at all, please test it as you have been doing. Best of luck to you!
-
What everyone else said, times a dozen! Very cool outside the box - van thinking. It's good knowing I'm not crazy, that others, or you in this case, think much like I do. I've got the same van kit, in planning a mid-engine, funny car like drag racing machine. But, thanks to you, I now have some aerodynamic body modification ideas for it. To me, these wild, endless possibilities, are what I like the most about model building.
-
BBC Single-Plane Intake Manifold, Finally!
Lone Wolf replied to Lone Wolf's topic in Car Aftermarket / Resin / 3D Printed
Calb56, the closest thing I've seen to what you want is at Ron Coon Resins, on the "Engine" page (way down, & down past a lengthy blank section): https://roncoon.com/ -
Mark, obviously an older thread but I needed some resin related info, if you don't mind? When it comes to using "filler" on cast resin bodies, what will stick to it, that hopefully is not overly difficult to sand? I do have some Evercoat Metalglaze 2-part polyester glazing putty, some Tamiya white solvent putty, thick/medium/thin CA hobby glue, and 2-part hobby (clear) epoxy. Additionally I have PC-7 Epoxy (it's like thicker JB Weld) and some Milliput (both of which dry nearly rock hard)... I mostly need to fill some door seams (converting a 4-door to a 2-door coupe, w/the doors molded shut). Potentially, I may need to fill various small flaws (just ordered kit)? Thanks!
-
BBC Single-Plane Intake Manifold, Finally!
Lone Wolf replied to Lone Wolf's topic in Car Aftermarket / Resin / 3D Printed
I hope they do well, very well.!! I'll more than likely lose sleep over it, if they don't. -
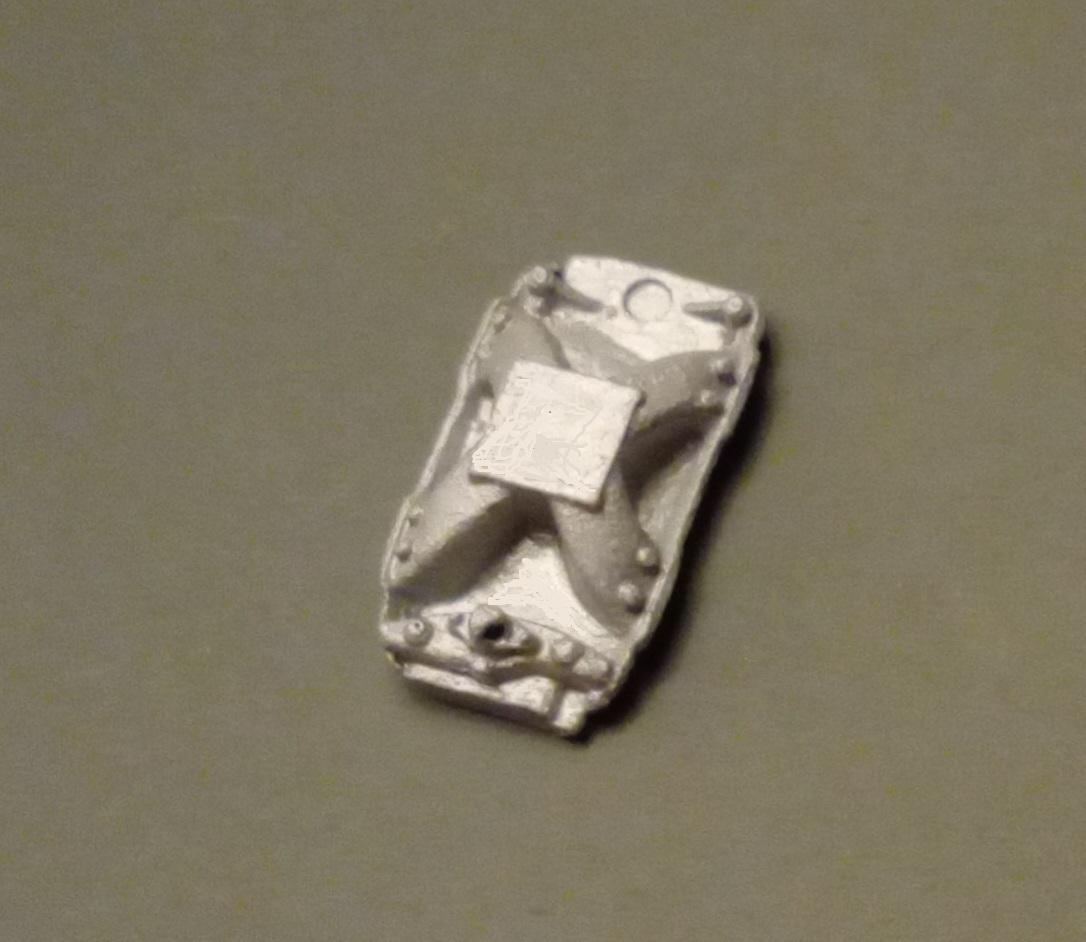
Great news for all of you BBC Street Machine, Pro Street, Street Outlaw, and other Drag Racing fan/model builders. Those of you who know something about Big Block Chevy engines, know the performance quickly falls off above 5,500 to 6,000 RPM with dual-plane intake manifolds. Additionally, when using Nitrous Oxide they perform far better with a single-plane intake manifold. I've been looking for well over a year, and even asked a few different resin casting guys about making these single-plane intakes, but until recently, had no luck. Thanks to Joel Mendoza of Iceman Collections, we finally have these badly needed intake manifolds available. Although it isn't named as such, it has the general appearance of a typical Edelbrock Super Victor intake manifold, a dyno proven racer favorite. Those of us who've long waited for these intakes can finally buy them at a steal of $3 each. Of course, those looking to add one or more Nitrous systems to their BBC engines can now have the exact intake that's needed to get the job right. Link: BBC Single-Plane Intake Manifold Note: This is one (above) of my new intakes that I hastily slopped some flat white enamel primer on, followed by an equally rushed brushed on aluminum paint job. Below is as printed by Iceman Collections (except they're actually done in gray resin).
-
HPI Guy AMT 1965 Craftsman style GTO
Lone Wolf replied to Daddyfink's topic in Car Kit News & Reviews
If you had read my whole post, and understood it's point, I did mention how the wheelbase was not the same on all of the various a-body models, however, since they share so much else in common, it's not inconceivable to make some modifications in order to use them in the absence of having a chassis on hand with the correct wheelbase. Contrary to your statement concerning the 1st gen Monte Carlo's, their 116" chassis is in fact an a-body chassis (I had a 70 SS454 Monte). The g-body came about later. -
HPI Guy AMT 1965 Craftsman style GTO
Lone Wolf replied to Daddyfink's topic in Car Kit News & Reviews
If it helps (?) the GM A-Body line includes: the Chevy Chevelle/El Camino/1st-gen Monte Carlo, Pontiac GTO/Lemans, Olds Cutlass/442, Buick GS/Skylark?, among those I may have forgotten...? That said, some of the wheel bases and chassis lengths can vary, such as the Monte Carlo's (14" IIRC) longer front frame section, to name one. Referencing real 1:1 car specifications would detail these differences. -
Revell 2015 Chevrolet Corvette C7.R
Lone Wolf replied to Jim B's topic in Other Racing: Road Racing, Salt Flat Racers
Thanks Jim, that will help guide me in choosing a new batch of semi-gloss black paint. -
Revell 2015 Chevrolet Corvette C7.R
Lone Wolf replied to Jim B's topic in Other Racing: Road Racing, Salt Flat Racers
Very nice job Jim! Yesterday I was looking through my copies of Revell's C5.R, C6.R, and this same C7.R, and noticed this is the only one of the three that has an opening hood, strange. "The interior & chassis are Rust-oleum Semi-Gloss Black which, in retrospect, was probably a mistake." I'm planning to buy some more semi-gloss black paint in the very near future (ran out) and am curious why you said that about the Rust-oleum? -
Very nicely done sir! Especially at 2.5 decades ago! "That Induction System", besides being Totally Gorgeous, is extremely well made, very detailed, and would more than likely create a reasonable additional income flow for a resin parts maker, were they wise enough to see it's potential worth!
-
Morgan Automotive Detail?
Lone Wolf replied to Sidney Schwartz's topic in Model Building Questions and Answers
When ordering from ANY Resin Parts maker & supplier, there's one thing that you always need to keep in mind. In 99.9 percent of the cases, the one making & supplying the parts you're seeking, works Alone! With the huge popularity of resin model parts, these guys stay Super BUSY! Remember, they could have hundreds, thousands of customers seeking their parts, beside you! Patience is the key when dealing with all of them! Another thing, they are so busy in fact, that it can easily irritate them when people contact them (especially if it's often!) asking "when are you going to ship my parts". I'm not saying Kris Morgan, or anyone else for that matter, intentionally ignores customers when asking about when their parts are going to be shipped, but if this happens, this could be why? Some suppliers do take the weekends off, as just like "normal people" they need some time off as well. That said, ordering from "large retailers is another story as they usually keep the parts they sell in stock, and they don't actually make them. -
Pledge Floor Care with Future
Lone Wolf replied to Joe Handley's topic in Model Building Questions and Answers
After my initial disappointing results (on 1/2) using the Bona floor product above, I thought I should try it again, but on a more conventional paint finish. After stripping the earlier Bona & paint (in dot-3), I shot half of the hood with Testors gloss black (from an old short spray can), the other half (passenger side) with Dupli-color gloss black Acrylic enamel (which came out poor, very lumpy & not very glossy). Since it's hard to see, I applied the Bona starting just above the upper edges of the headlight buckets and up about 1/2 the way up the hood. On the Testors side, the Bona blended in seamlessly. The other side wasn't bad, but the poor paint quality underneath wasn't hidden with the brushed on Bona. Regardless, I'm now convinced Bona is a legitimate replacement contender for the Pledge previously used by many.
-
Thanks mchook, I thought that was the most likely kit.
-
Great job McCook! Please forgive my ignorance, but what base kit did you start from?
-
Who took over Scenes unlimited
Lone Wolf replied to junkyardjeff's topic in General Automotive Talk (Trucks and Cars)
Attention, If you'd like to know what's currently going on with Scenes Unlimited former parts line, get on your FB account and search: Scenes Unlimited. From what I can tell, based on what I've seen on FB, it appears Danny "gave" the (former Scenes) FB page over to Paul. More likely it was part of the sale, but I personally know no details of any of that. Anyway, Paul appears to be posting regular updates on what he's doing with regards to the Scenes Unlimited line of parts, since I think February 2023. In a nutshell, my impression is he's trying out, and/or testing all (or many/most ?) of the molds Danny supplied. I also have a "sense" he might want to build up a certain amount of (Scenes) Inventory before he offers anything for sale, but this is just a guess based on very limited information. Please go see for yourselves! Note: other than being a former customer of Danny's, who was thrilled with the incredible quality of Scenes Unlimited's parts, and having exchanged a few messages with Danny, I have "no skin in the Scenes Unlimited business". -
CarIR, Nice "review" mate, and spot on about the "chunky parts", which I hadn't noticed before with my unbuilt coupe kits. That said, they do look pretty nice once built, at least yours do! I'm looking forward to starting mine, hopefully one (bone stock) in the near future. Another will be wildly modified into something along the lines of a V-8 (BBC) powered Pro Street Machine (I can't help myself), if I live long enough. Thanks for sharing and posting sir!
-
Better side exhaust pipes?
Lone Wolf replied to atomicholiday's topic in Model Building Questions and Answers
Atomic, Although there are cost free ways to work around it, the correct way for bending (small) tubing is to use a tubing bender that comes with the pictured coiled inserts. The inserts is the "secret" to keep the tube from kinking. Once you have the bend(s) you want, the inserts just pull out, to be re-used again when needed.