mitchell
-
Posts
252 -
Joined
-
Last visited
Content Type
Profiles
Forums
Events
Gallery
Everything posted by mitchell
-
Tamiya's 1/12 Caterham........Their best model (I Think)
mitchell replied to traditional's topic in Model Cars
totally agree. One of the most detail kit offer by a manufacturer. I built one out of the box and fixed another one. Added details and some weathering touch. One of them added lights for the front, rear and instrument. The other one, lowered it a touch only. Lovely cars and quite easy to built. -
great work.
-
I have some issue with Gunze product in general, they seem to be a bit off scale and the sophistication of the model is way less than Tamiya. This is the Tamiya version with a very accurate looking engine and nicely engraved interior detail. Also very well engineered with only slight fit issue. But these 500F are just cute, maybe building a few more of them in the future. Great job on the pair of the 500F. They are well built.
-
actually tried to do some orange peel to the paint work. Since this is a cheap little econobox, it shouldn't have a great paint job. Normally I will polish my car to 12000 grit, this one, i bascially just painted it. Will be doing some weathering so it look a bit used.
-
a bit more progress. it is almost done. Just need to focus on a few details and rebuild the hinges for the engine lid. The way it was design doesn't really open it up. Need to scratch built some hinges for it to open fully. But it is basically done. a wonderful little kit with a few minor problems.
-
more done on this little gem. engine is built and started the wiring on it. The kit doesn't come with a coil but i have a spare. But the odd thing about this engine is that it doesn't have the hole casted for the spark plug. Got the drill out for that. Also added parking brake cables and built a transmission relay shaft. After mounted it on the chassis, I will add more wires and weather it. Most of the painting is done already, just have to put it together.
-
great fun in following this post. great job.
-
Building a few 24 scale during a break from the 1/12 porsche. This one is a one of the great Tamiya historic car kits. Very detail except the trunk cannot open, other than that, a very accurate and detail kit. Tamiya seems to capture the magic of the cars from the 60's. Got the body done and misc. parts painted. can soon put this car together.
-
Tamiya Curbside. Tamiya did a great job with this kit. This was the metal plated version, which meant the body was also chromed. It was cheap from a auction site so I got it and stripped the paint. Other than that, just a regular S2000 kit. Very sharp detail in all interior, chassis and sheet metal. Even as a curbside, this kit is great. Flocked the interior and scratch built some seat belts, other than those a straight simple build. Thanks for looking.

-
Mercedes 300 SL cabriolet (1/16 Italeri kit)
mitchell replied to debaronFR's topic in WIP: Model Cars
the body of the this car looks quite nice and accurate. -
1/12 Porsche 935
mitchell replied to mitchell's topic in WIP: Other Racing: Road Racing, Land Speed Racers
a little bit more progress. Not spending that much time on this one lately since I got a few other 1/24 scale that I am building at the same time. But finally the exterior is together. Painted the tail and the black part of the tails, just missing the wing and some decals. -
a die-cast model that i rebuilt. Only reason for doing this is because the model is actually very nicely built other than the god awful thick paintjob. Stripped the paint and did some detail work only. This is the first time working with a 1/43 scale car.
-
putting a 6 cylinder in it?
-
1/12 Porsche 935
mitchell replied to mitchell's topic in WIP: Other Racing: Road Racing, Land Speed Racers
got the hood polished and the number decal on. Also mounted the PE hood pin brackets on. The way Tamiya did it is to glue another pin shape piece on the bracket but I think that look a bit too toyish, so I drilled the brackets and going to scratch build some post for the pins. -
1/12 Porsche 935
mitchell replied to mitchell's topic in WIP: Other Racing: Road Racing, Land Speed Racers
a bit more progress, got the hood finally cleared and polished. Weather had been lousy for the last few week and always trying to find a window to spray. The strip on the hood and the roof is buggered up a bit and it's too late to do anything about it. Oh well.
-
1/12 Porsche 935
mitchell replied to mitchell's topic in WIP: Other Racing: Road Racing, Land Speed Racers
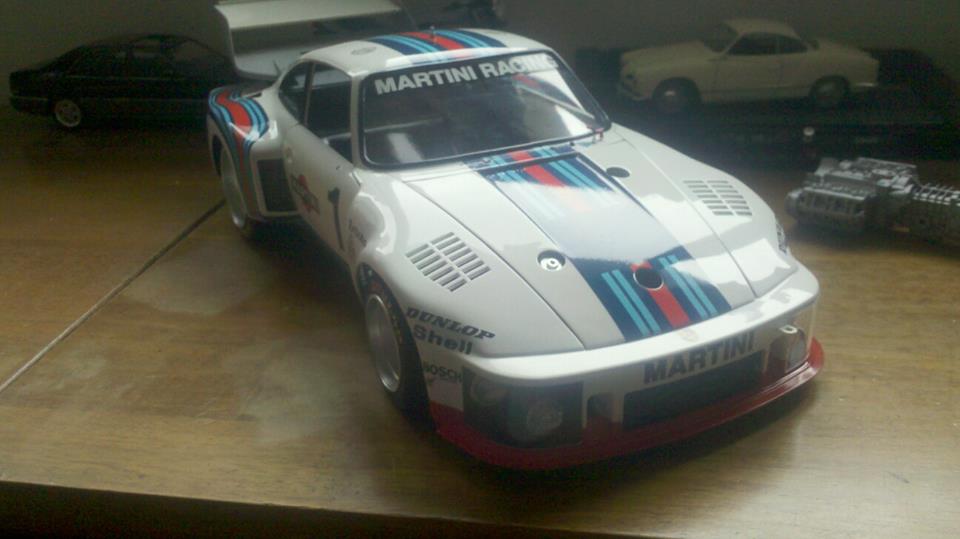
I am sure I saw Mr.Johnson's builds of the 935. There are some amazing work out there on this topic. At least now I got it on it's wheels, so at least I can see its stance. The motor and rest is still in pieces, those are the items that will take forever.The PE and Cartograph decals made it a much better kit. But I did omitted a few PE pieces up to now since I felt the original molding is much better than the PE, such as the radiators. Been hard trying to get detail picture of this variant of the 935. Most research came up with the later version Kremer K3. Most pictures that I found was on the car 4 which was on the auction block recently. really hard to find anything on car 1 and 3 which this kit is based on. But this is what make it fun. Crazygirl, this is a 1/12 Tamiya Porsche 935. -
1/12 Porsche 935
mitchell replied to mitchell's topic in WIP: Other Racing: Road Racing, Land Speed Racers
did the wiring on the fusebox on the dash board today. don't know if it is correct but just used my imagination with the wiring and the color. Also added the lenses for the gauges. There were only two lenses that fit the gauges in the kit so had to made 4 of the smaller gauges. -
1/12 Porsche 935
mitchell replied to mitchell's topic in WIP: Other Racing: Road Racing, Land Speed Racers
got the front end all done. Mounted the lights with covers plus the oil cooler screen. Also got the rear brakes on. This kit has PE for brake rotors which looks great. -
1/12 Porsche 935
mitchell replied to mitchell's topic in WIP: Other Racing: Road Racing, Land Speed Racers
did the front suspension last night. here is how it look. -
1/12 Porsche 935
mitchell replied to mitchell's topic in WIP: Other Racing: Road Racing, Land Speed Racers
did the front suspension last night. here is how it look. Also the pedal box is in place. -
1/12 Porsche 935
mitchell replied to mitchell's topic in WIP: Other Racing: Road Racing, Land Speed Racers
i bugger the decals a bit too, but since it is on already and claercoated already, can't do much about it. there are a few issues with the kit as you stated, the window frame on the car is fragile since I went through it with the 934. This version is the later version with the PE addition and the Cartograpgh decals. The decals are awesome, even when I sort of screwed it up already. There are more to come. thanks for sharing. -
1/12 Porsche 935
mitchell replied to mitchell's topic in WIP: Other Racing: Road Racing, Land Speed Racers
Joe, this is the 934 I built a few month ago. It will be feature in the local Taiwan GQ magazine.
-
1/12 Porsche 935
mitchell replied to mitchell's topic in WIP: Other Racing: Road Racing, Land Speed Racers
I did the 934 before this one, quite a few interesting change on the 935. 934 is more a street car converted to race car while 935 have parts that is built that much stronger. These kits are a gem, the engineering involved in it and it was done in the 70's. More progress today, did the suspension and the front end of the car. Drilled the pedals instead of using the PE provided in the kit. Added seam welds at certain chassis location. Build the shock and workable steering system. And built the driveshafts, The driveshaft is an work of art, with moveable u-joints and real rubber guibos. -
1/12 Porsche 935
mitchell replied to mitchell's topic in WIP: Other Racing: Road Racing, Land Speed Racers
more decals on. Since this will take some time, I think the outer body is finish. will be working on the chassis next then at last the engine. -
1/12 Porsche 935
mitchell replied to mitchell's topic in WIP: Other Racing: Road Racing, Land Speed Racers
a quick update, painted the red chin on the front body work. To answer a previous question, the body is molded in white. this is a reissue and overall the body is very good, only a slight wrapping close to the windshield area which is slowly massaged into the correct shape.