mitchell
-
Posts
252 -
Joined
-
Last visited
Content Type
Profiles
Forums
Events
Gallery
Everything posted by mitchell
-
we had one of these as a family car before too. a very odd car it is.
-
1/12 Porsche 935
mitchell replied to mitchell's topic in WIP: Other Racing: Road Racing, Land Speed Racers
got the hoses and bunch of other small details done in the front end today. It's getting close. -
looking great.
-
1/12 Porsche 935
mitchell replied to mitchell's topic in WIP: Other Racing: Road Racing, Land Speed Racers
got the trunk lay out today and also the dash on. Slowly progressing toward the end. -
1/12 Porsche 935
mitchell replied to mitchell's topic in WIP: Other Racing: Road Racing, Land Speed Racers
No problem, this thread is open to anyone interested in the building of the 935. Your pictures has been a great help for me. Almost got the motor done today, just some minor detailing needed. Then it's the wiring in the chassis. I can see that it would be a pain in the rear end getting everything done. -
1/12 Porsche 935
mitchell replied to mitchell's topic in WIP: Other Racing: Road Racing, Land Speed Racers
thanks Pete, since the motor is going to be mounted in the car and the car will look like it was being used, therefore i did some weathering. hope the results can make it look more realistic. -
1/12 Porsche 935
mitchell replied to mitchell's topic in WIP: Other Racing: Road Racing, Land Speed Racers
got the coolers and the turbo mounted on tonight. Here it is. Almost got all the parts on, now it's time to start the detailing and the weathering process. -
1/12 Porsche 935
mitchell replied to mitchell's topic in WIP: Other Racing: Road Racing, Land Speed Racers
tks for sharing Pete. I totally understand what you meant about the motor on a Porsche, it is hidden. But your pictures will help me in detailing the can't see piece. After this one is done, might have to do more wiring on the complete 934. -
1/12 Porsche 935
mitchell replied to mitchell's topic in WIP: Other Racing: Road Racing, Land Speed Racers
Hi Pete, i would be really happy if you would share your picture in this thread. On this kit, just building it box stock since it's really difficult to find any aftermarket part for the 935 now. Just going to add a lot of detailing through the research that I have on hand. This kit is the later model that came with Tamiya's own PE parts. Not much PE other than some small details like fuel neck, rotor and seat belts. Shock is stock from the kit. -
1/12 Porsche 935
mitchell replied to mitchell's topic in WIP: Other Racing: Road Racing, Land Speed Racers
after the body is done, took a break on this one and finished a few 1/24 scale cars in the meantime. But sooner or later, have tp finish this project so I got to the engine slowly. Here is a look at the engine up to today. Still have a lot to do on it and after mating it to the chassis. but at least now the main body of the engine is done. -
looks great. Good job.
-
the brake disc surface is just hand painted metallic Grey then weathered with a bit of silver and soot. hand painted the center black and highlight the bolts with silver. Also drill the vents on the brake surface. In my opinion, it looks more like carbon disc with this method than PE parts.
-
extra that I added are like clamps on the hoses, spring tensioner on the exhaust, spring on the kick stand. PE quick release on the lower cowling. PE screw for the windshield, wiring harness for the instrument and light, hoses for the brake fluid reservoir, throttle cable and few other misc. Did some weathering on the paint to make it more realistic. That's about it. For a kit that is more than 20 years old, it is more than impressive already.
-
just saw another forum member build one of these. Yamaha of this era is one of mine favorite subject so had a chance to pick up one cheap. Here is the result. And I have been building too many cars so building a bike is something interesting for a change. As other said, the box art revealed a lot of detail missing in the kit., so I added quite a bit to it.
-
won't mind doing the 968. one 944 is enough. rather be doing other Porsche's.
-
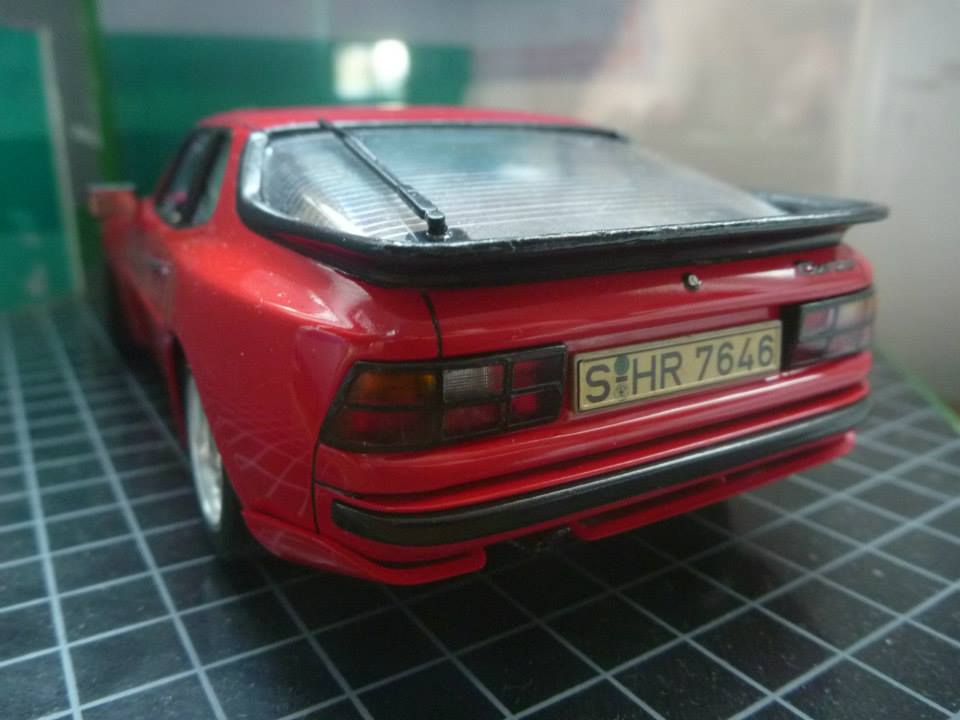
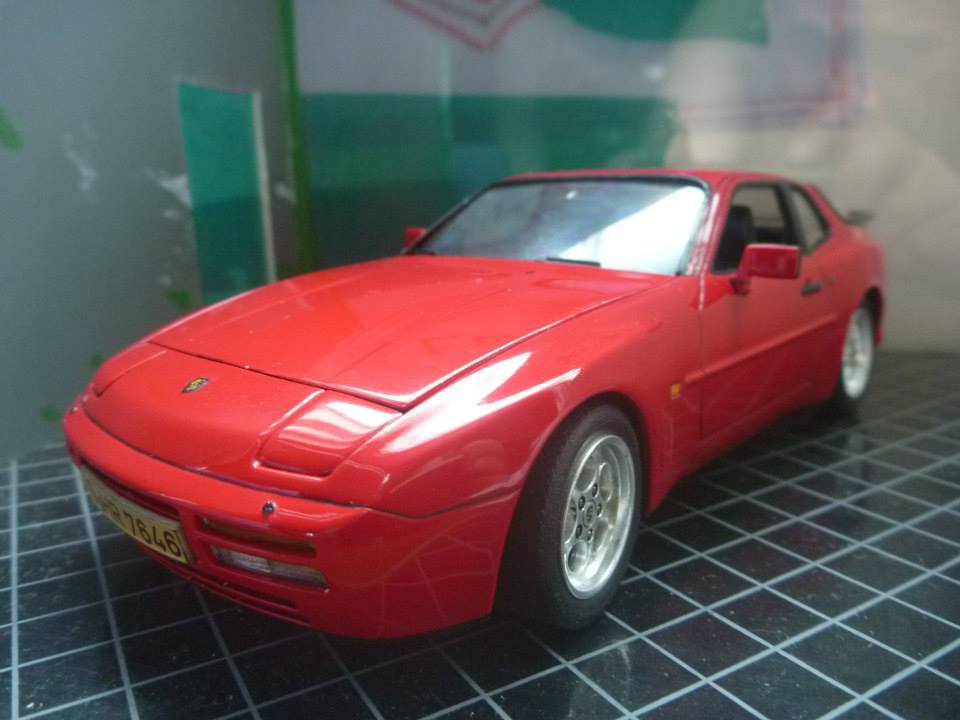
an old hasegawa kit that I rescued since can't find new one now. A decent kit but still a bit rough to put together. But overall it is a good looking kit. Car is red and interior is black with tan carpet supplied by the kit. Mods are mainly under the hood. Detail the battery and added clamps on the fuse box, turbo hoses. added AC lines, ABS sensors, cruise control module and cable and throttle cable. Added lock s to door and trunk handle and nuts and bolts on the strut tower. Try to make it look really busy underneath the hood. since the body line is quite shallow, had to make them a bit deeper and seal the sunroof. Thanks for looking.

-
here is a Porsche garage.
-
the 90's Tamiya has a magic to them, the are so accurate looking and the engineering is just amazing. Details are among the best in the business. Too bad, they started to simplified their current offering. You did a great job on this one and I will make one of these in the near future. The 7 in 1/24 scale is also a classic piece. But i am sure you will need to make more modification on that one since it is one of their early releases. But overall the 7 is a great piece too.
-
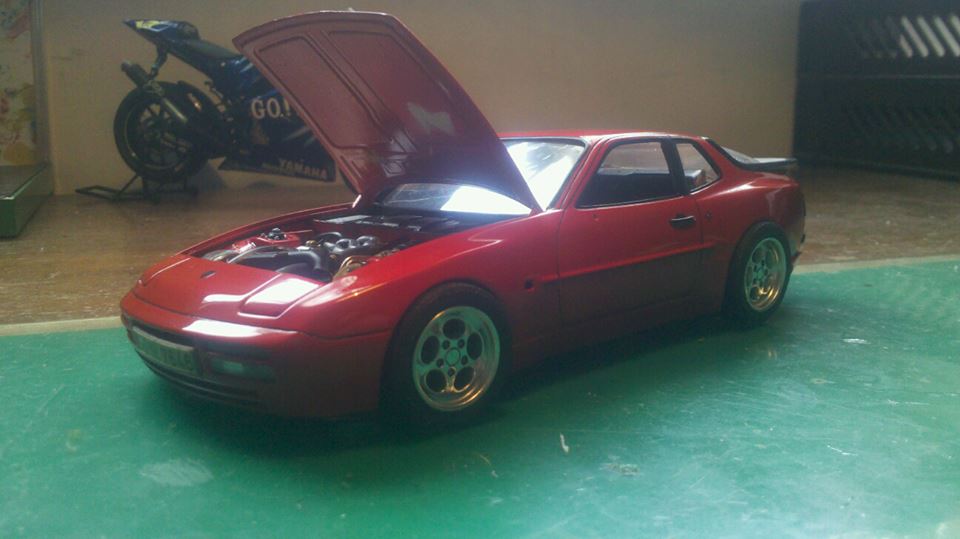
Good info, I saw the Italari kit and the ones for sale seems like a curbside, so out goes that idea. Now have to scratch build a hood latch since it is very prominent in the engine bay. That will take some time. So for now, it is consider done.
-
thanks for all the positive comment, there were some flaws with this piece but so be it; The detailing took about an extra day to complete and it does make it look busier under the hood. the detailing isn't authentic but at least it looks better.
-
Hasegawa doesn't have the hood latch and the correct headlight motor setup, their setup is for the light to be functional using a thing plastic rod. I deleted that option and opt for gluing the headlight in the shut position. the rod is wrap to begin with. Think I need to locate a Testor kit for the missing details.
-
the wheels are not really in previous picture, Now the wheel is on, the alignment is a bit of a issue and really need to trim and align it. It has some toe-out and quite a bit of camber, like it is just off a race track. I am about to call it done. and here is a picture with another family member, a GT2.
-
this is quick build for a friend. Simple new tamiya kit with another half engine. But truth is this half engine is a major disappointment, it is way to simple. had to add a lot of wires and some bits and pieces to make it look acceptable. the body, interior and chassis is otherwise excellent. Typical Tamiya, everything fits. Thanks for looking.
-
it's getting close to complete. But might be searching for a parts kit of a 944 to complete some of the missing detail in the Hasegawa kit such as hood latch and and motor and linkage for the headlight. Although this kit is quite good on the eyes, the engineering of it back then was very average. parts not lining up properly and suspension is all off, sitting on 3 wheels and had to modify it to make it sit flush. The front window fit is also poor and clashes with the dash. Had to trim the dash to make the body fit a bit better. But other than that, it is a fine looking kit. Maybe in another few days, it ready to move to Under Glass. Here are some picture of the engine bay of the original kit and after I detailed it.
-
a bit more progress today. Drilled the locks out on the exterior and got the dash almost done. And worked more on the engine bay. added a bit more wiring and detailed the bolts on the strut support. also ready to detail the battery. a lot of work needed to make it look busy under the dash.