
Steve H.
-
Posts
820 -
Joined
-
Last visited
Content Type
Profiles
Forums
Events
Gallery
Everything posted by Steve H.
-
1/18th Pegasus wheel on a 1/25 model...
Steve H. replied to Steve H.'s topic in Tips, Tricks, and Tutorials
Yes and no... I have two sets of tires (D and DZ in the product code, dunno which is which) One set is the typical lowrider style round shouldered tire. This one has a seperate ww insert that, because of the stretch, pops out. The other, square shouldered tire has a molded ww and 18" peggys fit fine. The other diff between the 2 tires is that the second is about 2"-3" taller. Look at all that dust! -
Maybe an "Underwhelming quality of photos" but it sure is an Overwhelming quality of build! Keep us updated!
-
Oh yeah, I have lots of valid reasons why my projects get pushed to the back of the bench! This one had me stumped for a grille, along with bodywork burnout... Figured out how I want to do the grille, just never picked it up again, beyond a few half-hearted attempts to start again :oops: Wasn't happy with the paint job quality... I've since decided that it needs some primer patches and rust, along with a for sale sign. Simple curbside that got stalled trying to find Chevy rallye stripes that would fit it. Found the stripe, but not the inspiration to pick it up again... :cry: I started this as an all-out, Salt Lake show effort and stalled out waiting for custom machined wheels. To be honest, I haven't had the time or patience since to start it up again. Since it was to be a SLC entry, it deserves both to be done right. :roll: Of course, there's always the excuse of Adult Onset ADD... Or Too Many Projects, Too Little Time... Then again, Maybe this post is my way of convincing myself to pick one up and finish it! :? There's lots more projects where those came from! http://public.fotki.com/ModelCarGuy2003/corvette_gs_roadste/ http://public.fotki.com/ModelCarGuy2003/cu...model_projects/
-
Wierdly cool, but we expect no less from you!
-
The Roadster/Boat is a wild idea, but there might be some issues with that grille! :shock:
-
Overhaulin Bel-Air on EBAY
Steve H. replied to gasman's topic in General Automotive Talk (Trucks and Cars)
A little known fact about Overhaulin'... The owner doesn't get the car back at the end of the week. Yes, theres a big tearful unvieling and all, which looks good on film. But the cars are sent to another shop where they are thoroughly gone over, bolt by bolt. It actually takes several months for them to put thier official stamp of approval on it (there are some horror stories concerning this length of time). Lets face it, the production company (and Foose) understands the liability issue and are not going to release an unsafe car. I've talked to a few people who have been involved in the builds on the show and they have been impressed by the guality of the cars, given the time frame. Of course they're not Ridler Contenders! But the cars are in much, much better shape than when they started! As for Pimp My Ride... Theres a tri-five Chevy here in town... after a few months, you can already see the paint starting to bubble. Don't get me started on how bad that show is... I, for one, think Foose is one of the best designers around... just look at his Ridler and AMBR wins! I'd also love to have my 64 Galaxie cv on Overhaulin', but I don't think thats gonna happen! -
Nice stuff, but I really like the artwork... pics 22 and a few more. I really need to take time to work on that some more! I'm not a "artist" but I used to enjoy drawing a lot!
-
WIP: 66 Nova Pro Mod (some more scratchbuilding!)
Steve H. replied to Stingray69's topic in WIP: Model Cars
Awesome! You've got a ton of work in that already, Can't imagine how much more you have to do! You Race Car Guys are nuts! -
1/18th Pegasus wheel on a 1/25 model...
Steve H. replied to Steve H.'s topic in Tips, Tricks, and Tutorials
A friend tried it... Results are that its more tedious than BMF and doesn't look as good. You have to polish the chrome areas, tape it off, apply the dark base and chrome, unmask it, hope that you got even coverage... Beyond that, although I like Alclad, I find its always a bit too dark for my taste. (But then, I'm still working on that paint technique!) Although, BMF has the limitation of being one tone, which is not true on a real car (yes, I know there's different types of BMF, but I find that after its burnished down, it all looks the same to me!). Stainless, chrome, pot metal, aluminum... They all look different and we typically BMF "Chrome" everything! Take a look at a Juha model sometime and look at his metal finishes... dead on every time! -
1/18th Pegasus wheel on a 1/25 model...
Steve H. replied to Steve H.'s topic in Tips, Tricks, and Tutorials
Hmmm... Cutting BMF to an exact size (and laying it down straight!) seems tough. I've noticed that about window frames also. Isn't it amazing how chrome tape highlights bad areas, too?!?! I polish out the frames with the rest of the body. Always seem to forget those areas in the wing windows, though! My buddy Andy mask all of his chrome areas to keep them clean, but sometimes has to deal with paint edge/BMF overlap. BMF is the best/worst thing we use... -
She's coming together... 61 Dodge Phoenix Kruizer
Steve H. replied to Steve H.'s topic in WIP: Model Cars
Bad story about the HH resin... I had another 61 phoenix almost to completion and finally gave up. Too many problems in the resin kept surfacing... oil spots (unmixed/uncured resin?) soft spots and deforming in my warm paint booth... final straw was the window trim under the drip rail... The resin was full of bubbles, which I thought I'd filled, only to have them come back during BMF! I gently (!) packed it away and ordered a Modelhaus... Infinitely better casting! I had a warped promo for glass, bumpers and steering wheel. The HH resin bumpers and sw were unusable. Yes, I alcladded the promo bumpers. -
She's coming together... 61 Dodge Phoenix Kruizer
Steve H. replied to Steve H.'s topic in WIP: Model Cars
Oh Puhleeze... I'll have to retire mine after you build one! Things to watch out for... The window fit is loose, had to do glass trimming to get the window to snug up (And sractched the windshield!!!). It still doesn't meet up with the c pillars. I also have some wierd issue with the taillights mounting square, also... need to fiddle with that. Modelhaus is excellent stuff, but all resin has issues... -
1/18th Pegasus wheel on a 1/25 model...
Steve H. replied to Steve H.'s topic in Tips, Tricks, and Tutorials
Got a new sheet of BMF just for this project! I suspect the top of the side spear is going to be a pain... no real distinct edge to cut against. I'll probably lay some masking tape on the body to give myself a cutting guide. -
I run into this problem every time I get on a board with this format! You would think, living and working is Silicon Valley, that I'd be a little more competent! Anyway, I have several pics I'd like to "Avatar" and would appreciate any help... Thanks
-
New Members PLEASE READ THIS!
Steve H. replied to Jairus's topic in General Automotive Talk (Trucks and Cars)
-
So...here's where everyone is!
Steve H. replied to Matt T.'s topic in General Automotive Talk (Trucks and Cars)
Kinda nice to see "On Topic" post for a change! I was pleasantly surprised to see some names here that quietly dissappeared elsewhere. Granted, there still some great people "over there" that I enjoy trading post with... I'll have to nudge them to this board. I'm Steve... and I'm like the poster boy for the Special Olympics of Model Building! :? -
Need to finish up some interior detail, yank and remount the taillights and bumper and wax 'er up! Tip... Kdog's pinstripe decals are awesome, just don't use micro-sol on them! I'll get some sunlight pics as soon as its done.
-
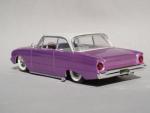
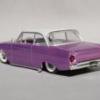
Works rather well! These are Pegasus 1/18th lowrider wheels, which I believe are 14" in scale. Measured in 1/25th, they're approximately 20" wheels. Since the Imperial is so big, I think they work well on this car. I didn't like the 3 blade knock-offs that came with the wheel set, so I came up with another idea for a cap. The baby moon is a thumb tack, polished up in my dremel. The only round stock for axles I had handy was a styrene tube, which by luck fit the thumbtack perfectly!
-
I've done the same with a slightly different technique. I glued the large styrene sheet to the leading edge of the hood, then built a hidden support under the back half using .040 square rod. I massaged the large sheet to the gentle curve seen here and glued it to the support structure. After that had cured, I glued in sheets on the sides, slightly larger than needed and filed them down after it cured. The bead down the center is a craft wire blended in with putty. Mind you, this is a 1/18th diecast, so it was a little easier to work with.