

diymirage
-
Posts
3,599 -
Joined
-
Last visited
Content Type
Profiles
Forums
Events
Gallery
Everything posted by diymirage
-
as a rule of thumb you should always use a primer before puttying that way the putty has something to bite into
-
rock on, that will look like it was birhted my ma mopar herself when its done great work
-
interesting, i have NEVER had decals react to clear, not the kit provided decals nor the decals i print myself (of course when i print decals myself i use the same clear to seal the decal as i use to clear the model)
-
that is something to celebrate and it should have been acknowledged more thanks as for the 69, this may sound silly but my favorite part is the exhaust, somehow that colour/sheen is perfect
-
hey Rich, that is shaping up real nice between you and me though, i would try my hand at making the cuda hood fit, the lines of that shaker just clash with the lines in the hood it just doesnt look like it was designed to be there know what i mean ? but if you do decide to keep the charger hood might i make a suggestion ? get a file and bevel the edges of the hood where the shaker pokes through, it will make the whole thing look much better (if you look at the cuda hood you'll see that they did the same thing to make it fit nicer) i really love the way the paint looks by the way, that is a nice mirror cant wait to see the interior done
-
Modeling Basics 101: Assembly and Decaling.
diymirage replied to Mr. Moparman's topic in Tips, Tricks, and Tutorials
what i like doing is adding a drop of dish soap to the water to help the decal slide nicely if im worried about it sliding on the model OR if im placing a larger decal i will also grab a brush and wet the model where the decal will go with the same water i used to loosen the decal from its backing -
The Future is Now!
diymirage replied to Harry P.'s topic in General Automotive Talk (Trucks and Cars)
you know, i ran into an issue with my 06 passat the other day that reminded me of this thread the wifey has been driving my passat to work and i've been scooting around town in her winterbeater (08 charger) this way she get the better gasmileage on her longer trips anyway, she was complaining about a grinding sound everytime she hit the brakes so i stopped in at the local car parts store and bought some new brake pads the sound was coming from the rear and since i'd replaced the fronts not too long ago i figured just the rear would be fine so i jacked up the car, removed the wheels and took the calipers off, everything fine...so far but then i wanted to spread the caliper so i can fit the new pads in there and guess what? there is an electro motor mounted to each rear caliper that is part of the electronic park brake system when you set the park brake this motor runs in the piston and sets the brake, then when you let of the brake it run the piston back in a certain way so now i need a laptop with VAGCOM and a CAN-BUS connector just to replace my brake pads THIS IS REDICULOUS!!! luckily this is a very basic system where you can change the direction by swapping the polarity on the motor so after i pulled the connecter of the little motor i could use my lawnmower battery and a wire with gatorclamps on them to "hotwire" my brakes to retract the piston i miss the days when the only electrical parts on a car were the headlights and the cigarette lighter -
well that explains why yours always runs counter clockwise
-
What is your Favorite Hobby Tool?
diymirage replied to XJ6's topic in General Automotive Talk (Trucks and Cars)
excato knife, hands down i cant do ANYTHING that does hot involve the knife at one point or another -
for one, the automatic is quite a bit bigger see?
-
tyre wall decals.
diymirage replied to richcrabman's topic in General Automotive Talk (Trucks and Cars)
some kits come with them aswell the revell 67 GTX for one has them on the decal sheet -
Cheap snap-tite kits for kids
diymirage replied to Pastor Plastic's topic in General Automotive Talk (Trucks and Cars)
no help here but a kind word of advise, stay away from the cop-out duster it is a great kit and a awesome looking model BUT it is by no stretch of the imagination a "basic builder" -
hey Bence welcome aboard cant wait to see the 'bird have a look at this page it will tell you how to post pictures using photobucket, step by step
-
i would be cautious here. if we dont allow the younger, inexpierenced ones thier saw we are at risk of quencing thier fire how many of us havent build models with younger siblings or cousins or nephews? i for one have a 12 year old nephew whose skills are are you described but i often ask his input on my models to keep him interested and going i might nor always take the advise others have to give me (and this ranges from my nephew to some of the greats here, its my model after all) but i will ALWAYS apreciate someone taking the time to look at and reply to it. as for common mistakes in models, one thing that very often gets me is when i get my model all ready for paint, everything is sanded down smooth, i have all the parts together and go to town primer primer primer paint paint paint decals clear clear clear i take the model over to the chassis to do a mock up and there in the box staring at my, blinding me with thier pale white styrene look are the COLOURCODED SIDE VIEW MIRRORS I FORGOT TO ATTACH TO THE BODY BEFORE PAINTING so out come the chrome partsbox mirrors
-
you say "potato" i say "tomato"
-
hey Ulf, those are great looking cars the stock version has the perfect feel to it but somehow the rally one looks toyish (cant really explain it, somehow the paint has the wrong shine to it) maybe if you do a little bit of weathering on it ?
-
you're right, the stock manifolds should fit just fine with this subframe the suspension is somewhat crude but i never minded that let me know when you want to swing by and pick it up i kid man...i know you live a few thousand miles from here do you want me to send the whole thing over or cut it just behind the subframe (where the exhaust and drive shaft are molded in) ? you will need to do a little bit of trimming on that section anyway to make the tranny/driveshaft clear the subframe shoot me a PM with your address and what you want me to do and ill get it out asap oh, and to give you an idea of how it build up, this is the same frame under a 74 GTX but with a 440 in it
-
what about directional tires that are mounted backwards ?
-
thanks guys too bad the good people at hotwheels got the paint right the first time
-
it all depends on what i am doing when im trying to remove scrips, flashline or anything else before putting down primer i generally use 180 gritt its a nice agressive sandpaper that will cut through the plastic at a decent speed if i am sanding down putty i usually start with 180 and work my way up to about 600 the 180 is to get the putty down to a rough shape and by the time i hit 600 the shape is right and im just smoothing out the edge (again, this will still get primered) if im working on a painted surface i almost exclusively wetsand, starting at 600 and going up to 1200 one more sheet of sandpaper i use is 80 gritt drywall paper this i use to sand down larger parts that need to stay flush (like rims) i lay the paper on the table and run the part over it in a circular motion
-
i always apply my decals underneath the clear coat
-
Painting Cars 1/32 scale to 1:1scale
diymirage replied to XJ6's topic in General Automotive Talk (Trucks and Cars)
i think i've met a guy once who did a woodgrain on his car...not just one panel but the whole thing....he mighta used a roller a buddy of mine also did his car with a roller but that was a 300 dollar duster (not the cool 70s one, the 90s one) -
feast your eyes on this.... the model is a revell/monogram 69 z/28 camaro and the frame is the MPC generic late 60s early 70s mopar chassis (this one came from a 74 GTX but ive seen the same one under superbees monacos, you name it) as you can see the engine bay is wide enough to fit underneath the camaro fenders most of these cars came with bigblock power including the all powerfull hemi the wheelbase is very close but not perfect for the camaro and the body of the camaro is wider then the mopar frame so you may have a bit of trimming to do if it were me, i would cut out the front end of the mopar frame and attach it to the rear end of the camaro frame if your interested you can have it
-
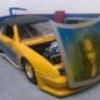
victory might still be mine the decals are aplied and clear coat is drying as we speak (on second thought i should have printed the panels on a red background so i could cut it without worrying about the halo effect but that will be noted for next time) here are some mockups...let me know what you think
-
no, dont give up i have faith in you man i think the GTX headers that were mentioned should fit just fine (ill check my partsbox and see if i have a set....we might be able to make it work) plus, a hemi would really make that car kick do it do it do it do it do it do it do it do it do it do it do it do it do it do it do it do it do it do it do it do it do it do it do it do it do it do it do it do it do it do it do it do it do it do it do it do it do it do it do it do it do it do it do it do it do it do it do it do it do it do it do it do it do it do it do it do it do it do it do it do it do it do it do it do it do it do it do it do it do it do it do it do it do it do it do it do it do it do it do it do it do it do it do it do it do it do it do it do it do it do it do it do it do it do it do it do it do it do it do it do it do it do it do it do it do it do it do it do it do it do it do it do it do it do it do it do it do it do it do it do it do it do it do it do it do it do it do it do it do it do it do it do it do it do it do it do it do it do it do it do it do it do it do it do it do it do it do it do it do it do it do it do it do it do it do it do it do it do it do it do it do it do it do it do it do it do it do it do it do it do it do it do it do it do it do it do it do it do it do it do it do it do it do it do it do it do it do it do it do it do it do it do it do it do it do it do it do it do it do it do it do it do it do it do it do it do it do it do it do it do it do it do it do it do it do it do it do it do it do it do it do it do it do it do it do it do it do it do it do it do it do it do it do it do it do it do it do it do it do it do it do it do it do it do it do it do it do it do it do it do it do it do it do it do it do it do it do it do it do it do it do it do it do it do it do it do it do it do it do it do it do it do it do it do it do it do it do it do it do it do it do it do it do it do it do it do it do it do it do it do it do it do it do it do it do it do it do it do it do it do it do it do it do it do it do it do it do it do it do it do it do it do it do it do it do it do it do it do it do it do it do it do it do it do it do it do it do it do it do it do it do it do it do it do it do it do it do it do it do it do it do it do it do it do it do it do it do it do it do it do it do it do it do it do it do it do it do it do it do it do it do it do it do it do it do it do it do it do it do it do it do it do it do it do it do it do it do it do it do it do it do it do it do it do it do it do it do it do it do it do it do it do it do it do it do it do it do it do it do it do it do it do it do it do it do it do it do it do it do it do it do it do it do it do it do it do it do it do it do it do it do it do it do it do it do it do it do it do it do it do it do it do it do it do it do it do it do it do it do it do it do it do it do it do it do it do it do it do it do it do it do it do it do it do it do it do it do it do it do it do it do it do it do it do it do it do it do it do it do it do it