Art Anderson
-
Posts
5,052 -
Joined
-
Last visited
Content Type
Profiles
Forums
Events
Gallery
Everything posted by Art Anderson
-
The closest thing to Dixon's wild ride that I can think of was Tom Sneva's incident in Turn 2, in 1974. Sneva's McLaren M-16C/Offy ramped over the rear tire of another car, and began flipping end over end, rotating on it's axis as it did so. When it stopped bouncing, it was nothing but the "tub", the Offy engine and driveline, as well as all the front suspensin had been shed, the tub itself bent seriously in the middle. Now, fortunately for Sneva, his car made no contact with anything solid after the original collision, but had it come down on the wall as did Dixon, we'd be reading of his demise in the history books today. I cringe when I hear "race fans" complain about how "they don't build race cars like they did when I was a kid"--and I for one am very happy that they don't, as without all the development work done on driver safety, we'd have had at least two driver fatalities at Indy this Month of May.
-
Ken Kitchen (d/b/a Kitchen Table Resins) makes the correct "underslung" aircleaner as used by Chevrolet on the 235 cid inline 6 from 1955-1962. Art
-
How to protect lacquer paint?
Art Anderson replied to Yohan's topic in Model Building Questions and Answers
Not to make a mountain out of a molehill here, but sounds as though you've missed a VERY important step here, that being surface-preparation, I have NEVER had either Modelmaster or Tamiya lacquers chip whatsoever. If the color coat is chipping or "flakng" off the surface of your model, then that IS due to either no, or unsufficient surface preparation--the most common contaminant there comes from your fingers--skin oil: We, all of us, each and every one us has natural oils on our skin--that (it's what keeps your skin from cracking and splitting. Solution? Thoroughly washing both your hands, AND your model body shell with SOAP and water, before you paint, and in between each succeeding coat of paint or clear lacquer. These two lacquers, formulated for use on polystyrene plastic, are very reminiscent of the old AMT lacquers of 45-50 years ago. They are what are called "non-penetrating lacquers" in that the solvents used in their manufacture do not "penetrate" polystyrene, which is the solvent actually attacking the plastic surface, causing anywhere from light "frosting" to serious crazing. Neither of the two brands in common use today will do that, in my experience (and neither die those AMT lacquers of over a generation ago. However, succeeding coats of these lacquers will "penetrate" the previous coats, making a very secure bond between coats of paint/clear coat (but again, surface prep is a must--wash with water and soap. (for soap, I keep worn-down pieces of the same DIAL soap I shower with right at my sink. I simply use an old, worn out toothbrush wet with hot water and then "scrubbed" on the soap, to gently scrub down my work before painting. If I am applying subsequent coats of paint (and this applies to all my paint jobs, be they lacquers or enamels) I repeat this washing step before each additional coat of paint. This has never failed me, and that goes way back into the 1960's. Art -
I'll be reviewing CAD files with David this weekend. Art
-
Clear coat problem.
Art Anderson replied to Old Fart's topic in Model Building Questions and Answers
Steve, I can only recall just one paint job that cracked over time, and that is a Monogram '37 Ford Tudor Sedan street rod that I built in 1987, painted it with automotive lacquer too. I've done dozens of model cars over the years with automotive lacquer, and that was the only one to have paint that cracked. That said, I almost never use a clear coat on any model car project, but when I do, it's always been in the same brand and type of paint as the preceding primers and color coat. Art -
Clear coat problem.
Art Anderson replied to Old Fart's topic in Model Building Questions and Answers
"Out-gassing" of enamel more than likely is not the problem here: Enamel paints dry "click hard" in essentially two phases: First, the solvent (the thinning) evaporates, and then the enamel resins harden by exposure to air. This latter step takes longer than the "flashing off" of the thinner or solvent, which is why enamel paint takes a lot longer to cure out than say, lacquer. Art -
Only about 3,000 or so kits here. Gentlemen, in all of this, BEAR in mind that model kit manufacturers don't manufacture the plastics with which they mold model kits--that's WAY out of their league. They, just like most any producer of molded plastic products (of all types,sizes and genre's) are pretty much limited to whatever materials are out there, readily available. With the issue here being tires--there are only a handful of plastics that can be used to make "soft"tires for model kits--PVC being the most plentiful (and the subject of this thread)--most others have drawbacks far worse. I along with others, have given very valid, truly workable techniques for eliminating the tendency of SOME PVC tires to attack the rims--I've done the BMF foil barrier several times, and can attest that it does work; so does a thin wipe of epoxy glue around the circumference of the wheel rim. Of course, there is an alternative--molded polystyrene tires--ala Italeri in a number of their kits, but there goes the fine tread detail we all love to crave, not to mention having to paint te danged things--but I am pretty sure that from the standpoint of any model car kit manufacturer, that could very well be the only reliable solution to this periodic situation. Art
-
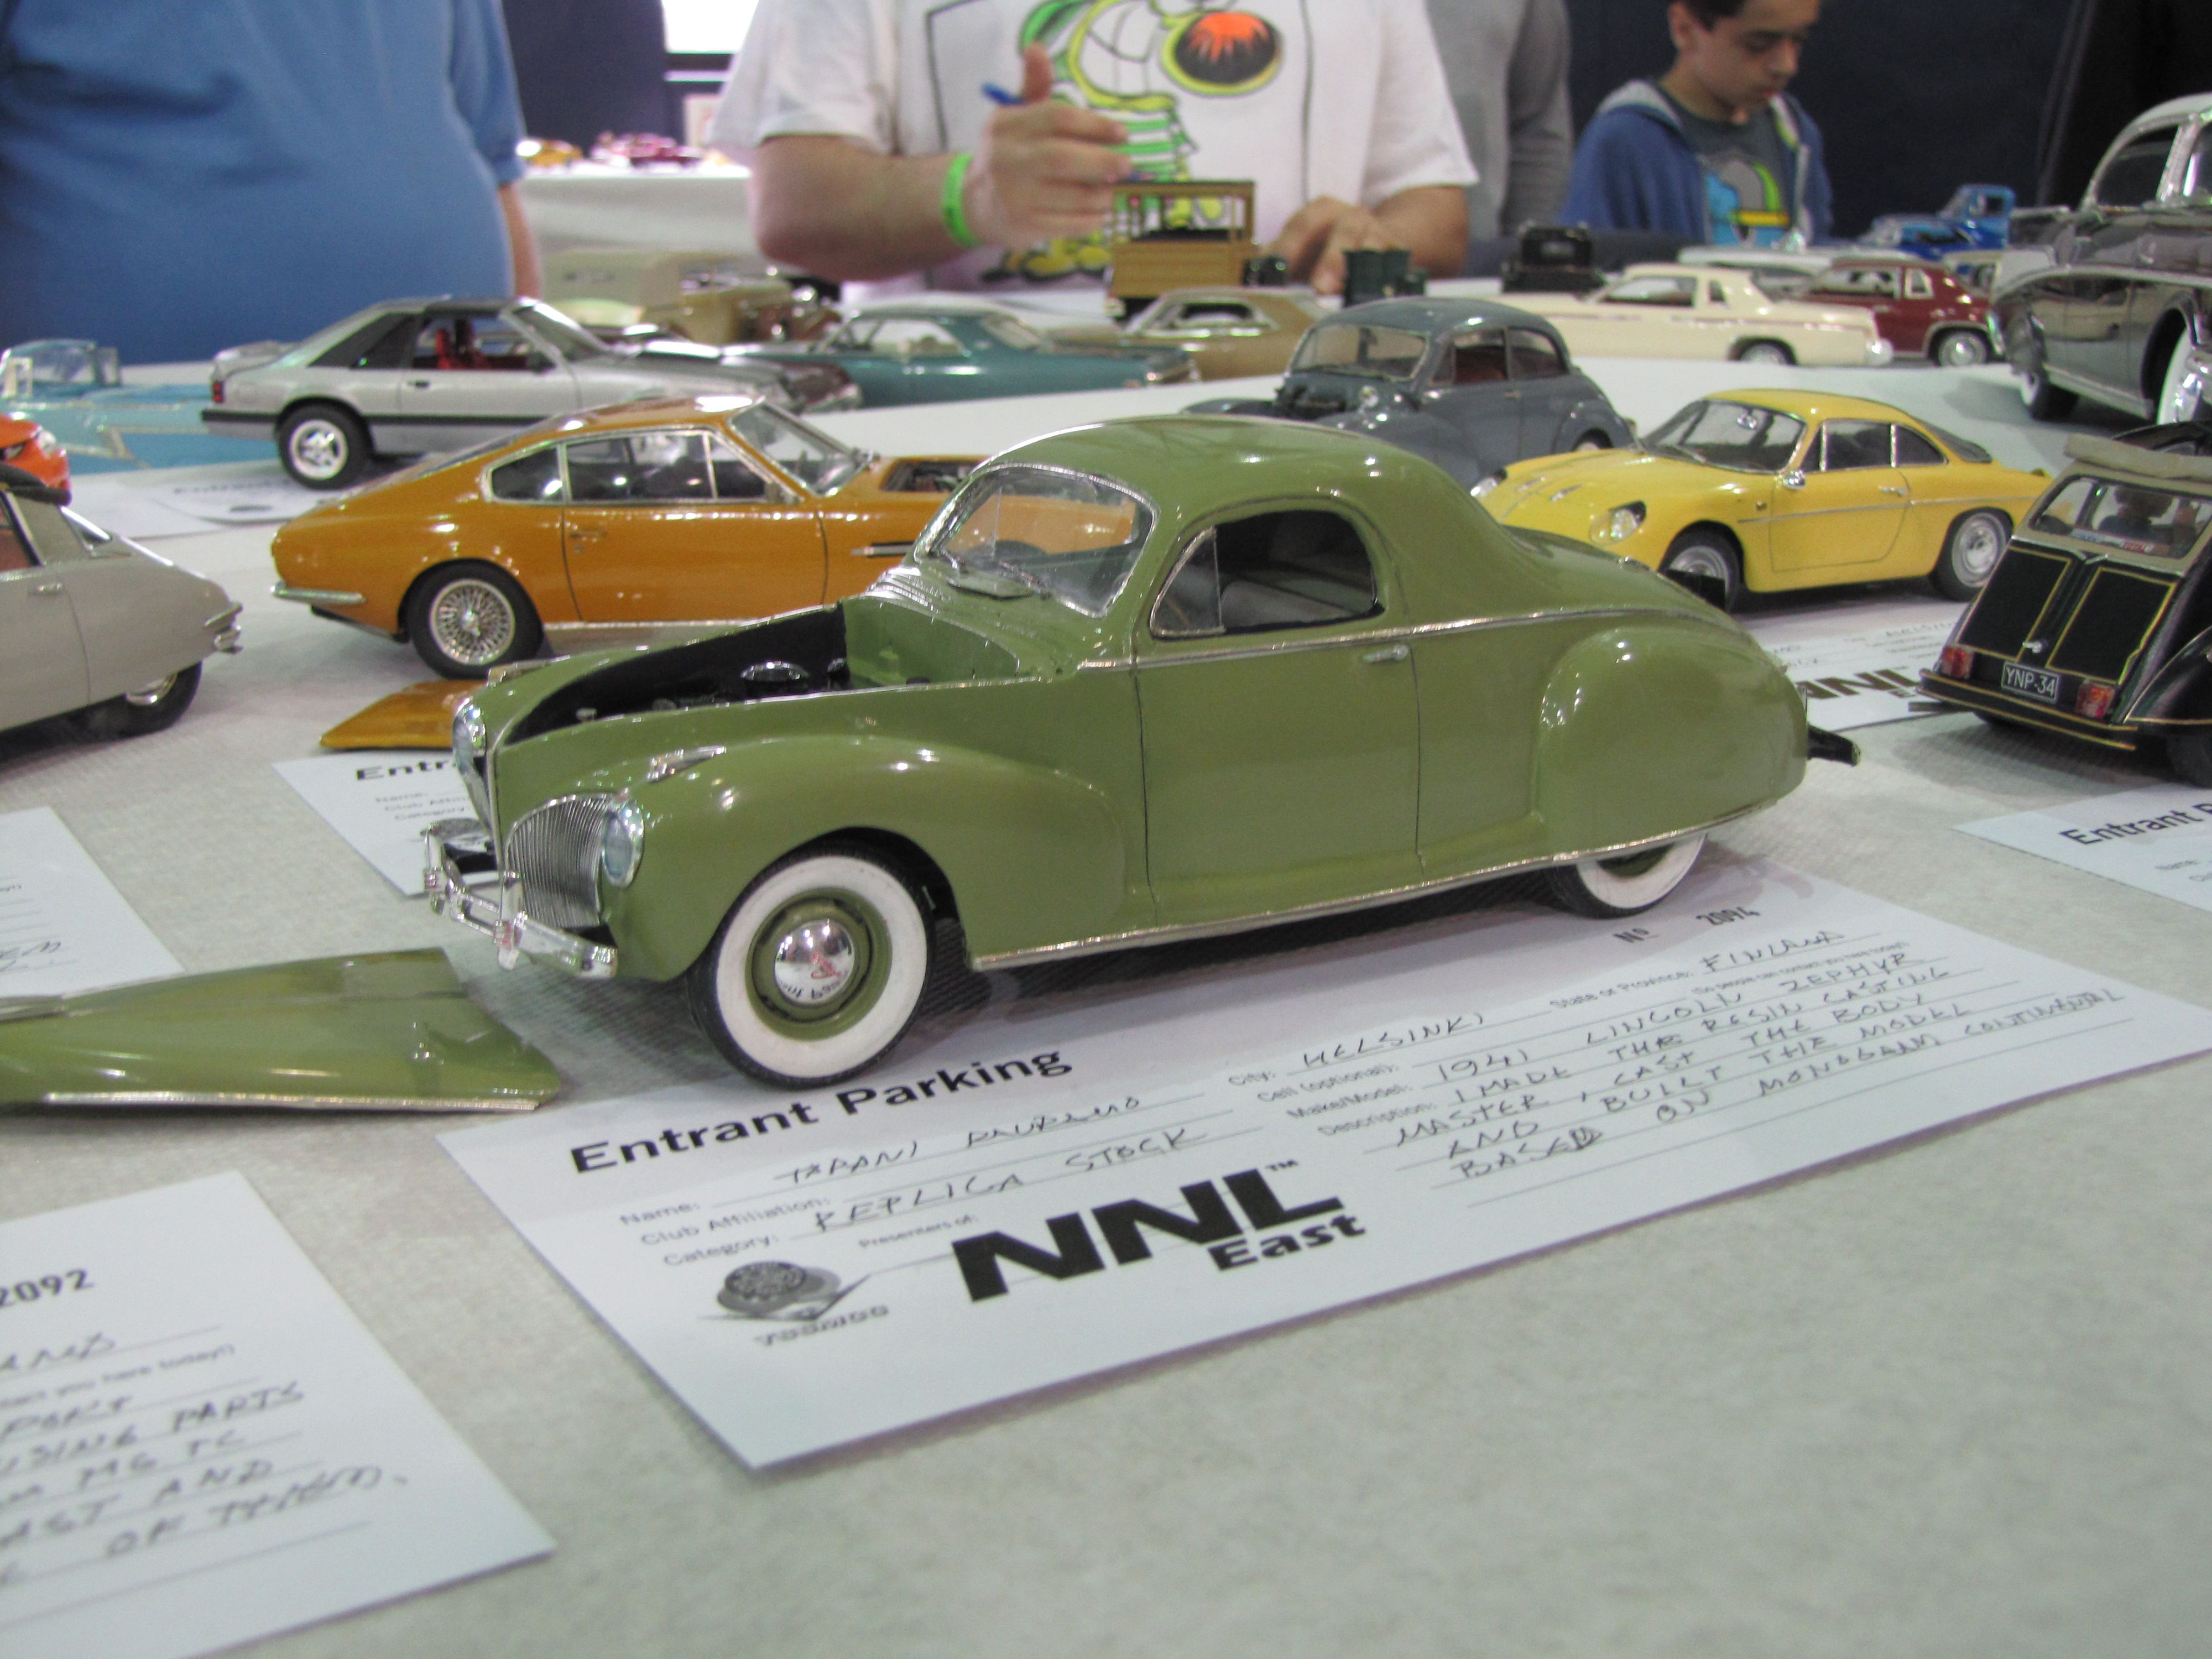
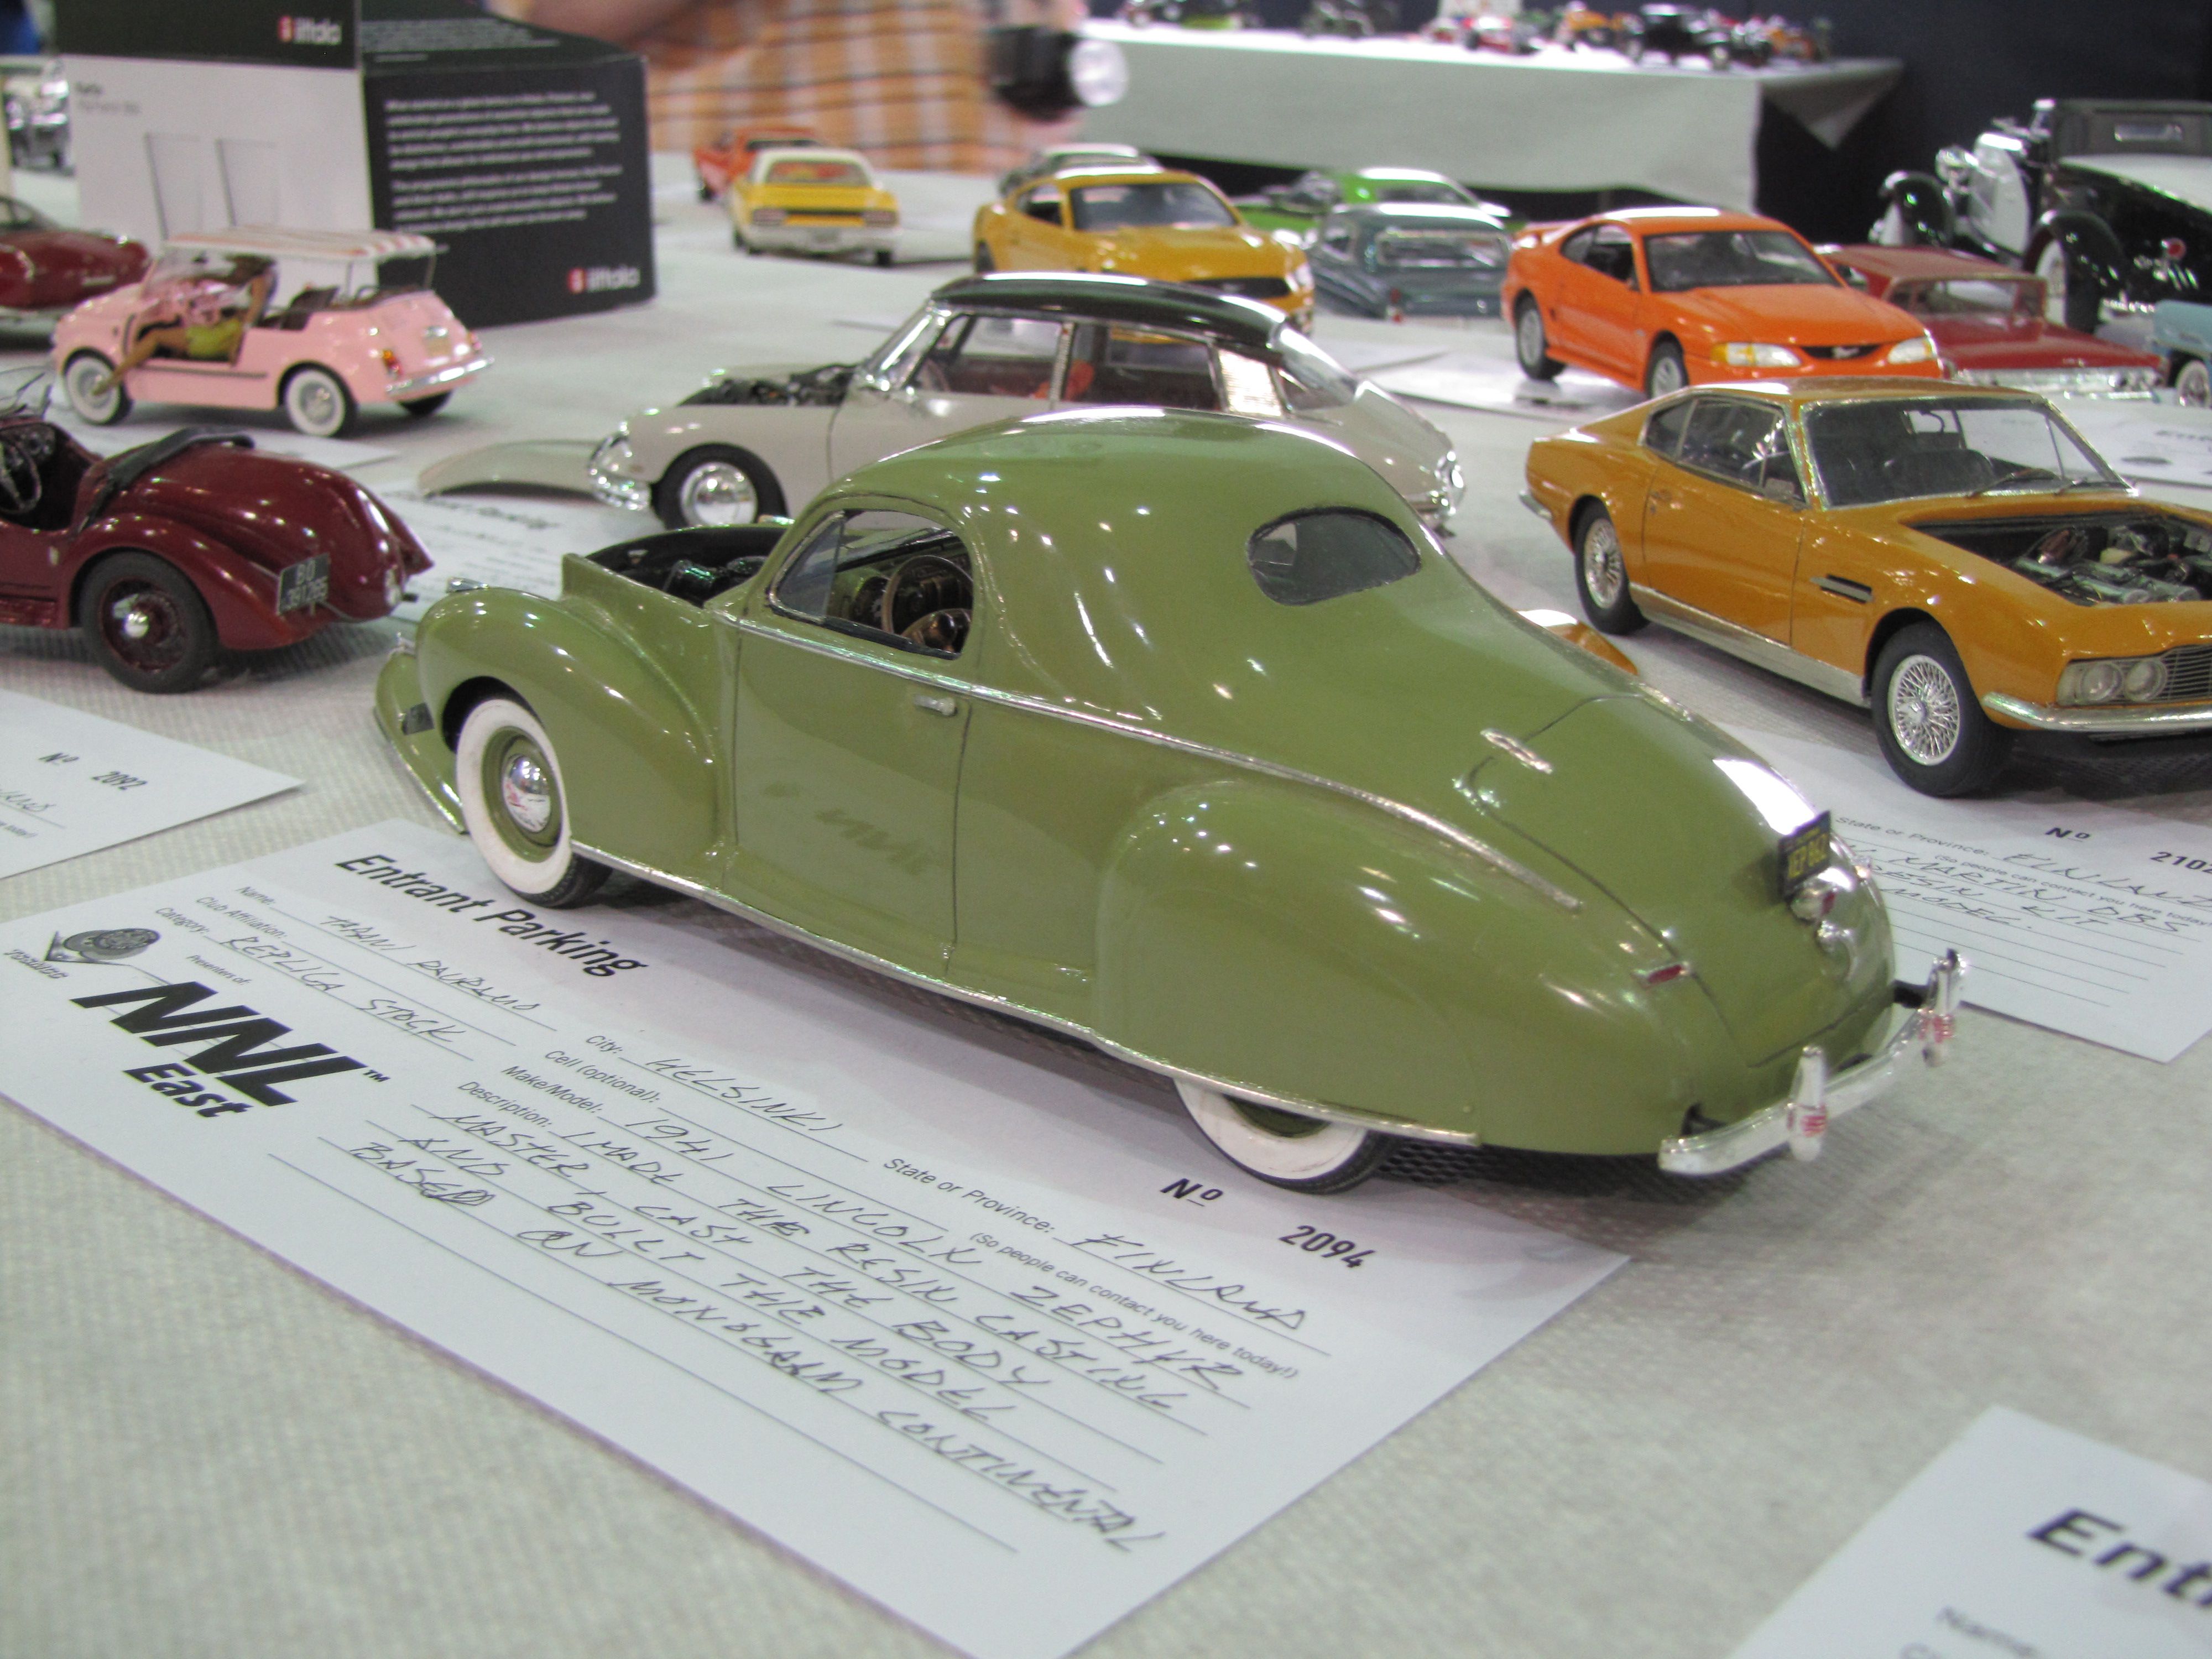
I spent a good part of NNL Friday Evening with Tapani and Juha Airo--What a great pair they are to chat about model car stuff with! Bought their Morris Minor 2dr Saloon, hwich is beautiful, at their hotel room--about noon on Saturday, at the NNL, Tapani came, almost running, to the Moebius Display, where I was assisting Dave Metzner, to tell me with a very red face, that he'd just realized he'd forgotten to include the chassis, and will be sending it to me ASAP. I was so impressed with that, I went back over to their tables, and plunked down the dollars for their forthcoming 1941 Lincoln Zephyr Coupe. It does take some time for any shipment to make it from Helsinki Finland to the US--Helsinki isn't exactly on a trade superhighway, but be patient--their stuff is all a CLASS ACT, as are the two of them. Art
-
Exactly how I do it! In addition, I've never bothered with straws, or anything other than just the standard spray nozzle on the spray can--I've simply learned, over the past 50 years or so, to regulate the flow of paint from the spray nozzle as it can be varied by simply not pressing it all the way down. To further moderate decanting directly into a paint jar (airbrush color jar in my case),I spray the paint against the side (inside!) of the jar, which allows the decanted paint to simply flow down the inside of the jar, without the tendency to "blow back" up and out of the jar, into my face. As I almost always add at least 10% more lacquer thinner to paint that's going to be airbrushed, seldom do I ever need more than 1/4 of the airbrush jar's 3/4 oz. capacity, as for me, when painting, less is better than more (why obscure all the fine surface details I paid good money to get in a model car kit? Art
-
OK, some thoughts (and things I've learned!) about decal sheets: For starters, decals (incidentally, the word "Decal" is a contraction of the original name "Decalomainia" which dates from at last the 1920's or so), are multilayered in their manufacturer: The "decal paper" on which decals are printed is basically "blotting paper", which is highly water-absorbent. Waer penetrates this paper from behind, NOT through the decal itself. The "glue" (adhesive) traditionally is just plain gelatin (as in Jell-O, albeit with no flavoring, sugar, or food coloring). Good quality decals are printed in lacquers, with a clear base (either printed in the shapes of the artwork, or sprayed all the way across the entire sheet. Commecially made decals are printed, most often in lacquers, the succeeding colors printed on as layers, in solid layers, as opposed to those old cheap model kit decals we used to see years ago, which more often than not were printed by lithography (which gives an uneven coloring, looking like either "cross-hatched" or "dot matrix". It can, and has happened, particularly in mass-production printing of decal sheets, that the first step in printing the decals somehow the clear lacquer basic coating got missed--but that is very easy to spot--if you look closely at the decal sheet, and see the gelatin adhesive exposed, with NO clear film around the edges of the various artwork, it is time to STOP! The lacquer printing itself is nowhere nearly strong enough to withstand being wetted, and then "slid off" without merely crumbling into tiny bits. So what to do? Whenever I encounter a decal sheet that is either very old, or appears to not have been printed over a clear film applied to the decal paper, I have simply airbrushed a coat of clear non-penetrating lacquer over the entire sheet. Clear "non penetrating lacquer" is as readily available as can be: Model Master gloss clear lacquer, as well as Tamiya TS-13 Gloss Clear!. Are the decals from an old kit? If so, they can be prone to splitting apart due to their age, and quite possibly some curling of the decal sheet (blotting paper absorbs moisture, and it's at all particular where that moisture comes from, be it the dish of water you dip decals into, or from the humidity in the ambient (surrounding air). So, again, clear gloss non-penetrating lacquer (as described above) comes to the rescue, and it can (and in my decades of experience) does preserve such older decals quite well. From late 1966 through the winter of 1983 I built (along with several local model car friends) a large number of Indianapolis cars--most of which required decal graphics that did not exist in any form whatsoever. For these, I used both scraps of decal sheets (the clear parts left over after cutting out the kit decals) and even raw decal paper having the gelatin glue coating but not even clear film--simply spraying (back then AMT Clear Lacquer--which was about the same thing as Tamiya or MM lacquers) to get that clear film laid down--and then literally hand-painting graphics such as car numbers, even driver, car owner, and sponsorship graphics. On more than one occasion I even airbrushed colors used in the basic paint scheme onto clear decal film, then cut out my own shapes in order to get some of the more complicated paint schemes into areas of the body work, where masking and spraying was just not possible. For hand-painting smaller decals, such as car numbers, even down to car owner logo's (such as JC Agajanian's legendary "pig riding a race car", drawing inspiration from an articles in the likes of Car Model, and Rod & Custom Models on this subject. I've even changed the colors of such things as race car numbers, and cleaned up the cheap lithography on old 1960's era AMT and MPC decal graphics. None of what I'm saying in this long-winded missal is at all highly technical--it's easy, but with the caveat that there are "learning curves" along the way, particularly with hand-painting--but it is all doable, I've both done it, and have seen others do it, all along the way. Art
-
Polystyrene packaging and tyres
Art Anderson replied to Mattblack's topic in General Automotive Talk (Trucks and Cars)
John's got the basic answer here: "Vinyl Tire Disease" didn't really crop up until the very early 60's, when model companies (at the time, AMT, Revell & JoHan) began using a then-much-softer variety of PVC, for molding model car kit tires, in order to get more realism and finer detail than had been possible with the harder PVC formula used on promotional model cas and the earliest of 1/25 scale model car kits having PVC tires molded in black (the black pigment was never the problem). I think that coincided with the introduction of Saran Wrp (and other generic brands of clear, clinging food wrap). Unfortunately, plastic model kit mfr's are very much at the mercy of the plastics industry--being able to access only such materials as have been developed and manufactured. As such, certainly where softer plastic compounds are concerned, it appears that there are not many (at all) that can be used to mold an acceptable soft model kit tire, it having a truly dark black color, the ability to at least stretch a little bit over a model car kit rim, and not require a lot of prep or painting work. And even PVC has never been "uniform" as used for model car kit tires--while those of us with more white than color in our hair certainly remember the dreaded "Revell Tire Disease" of the 60's into at least the middle 70's, for the most part even that wasn't completely a uniform problem--not even all Revell car kits suffered that malady, even "back in the day". And yet, today, I have many model car kits that were produced in the 1960's through the mid-late 70's, in which the tires were never placed in polybags (such as Zip-Lock or similar) that have NEVER marked a body shell or window glass--leading me to be convinced that Revell notwithstanding, this was never a universal, nor a situation guaranteed to occur. Other materials have been used to make model car kit tires--for example, AMT Corporation used up a fairly large quantity of the soft-rubber Firestone Nascar Tires they developed for their neat (but commercially unsuccessful "AMT Authentic Model Turnpike" 1/25 scale motorized racing sets of the early 1960's. Those tires did not eat up the rims on which they were mounted, but in fairly quick order, the rubber compound (Neoprene perhaps?) tended to dry out, shrink, and split apart. Tamiya used rubber from the very beginning on their model car kits--had many Tamiya model car kits produced and built in the late-1960's well into the 1970's suffered the same drying out and cracking of those tires (I have a Taimiya 1/12 scale Lotus 49 F1 model that was built in 1971, whose hollow tires first collapsed under the weight of the model, then dried out, crumbled. A sure-fire solution to this problem (certainly with newly molded model car kits) is to place the tires in a polyethylene bag ASAP upon opening the kit--the bags do not even have to be sealable--just large enough to hold the PVC tires with the bag completely wrapped around those tires. Upon building the model, IF this tire melt is a worry--two preventative options: Before painting the wheels, wipe a thin coat of epoxy glue around the mating surface of the rim--just enough to be a barrier between PVC and the styrene wheel. Or, a strip of Bare Metal Foil can be used to do exactly the very same thing--both epoxies (in my experience) and any metal foil will serve as a barrier to any PVC Monomer that might seep out of a vinyl tire. I've done both, whenever I've had any concern about tire melt, pretty much "end of the problem". Art -
Only about 3,000 or so kits here.
-
Hmm, i've not experienced the so-called "tire melt" in perhaps 40 years now! WTF is going on here? Art
-
The rookie passed his test.
Art Anderson replied to 935k3's topic in General Automotive Talk (Trucks and Cars)
Uh, the likes of AJ, Mario, Jim Clark, Gurney and several hundred other drivers also passed their Rookie driving test with flying colors: It ain't rocket science, guys! Art -
NNL West Canceled ?
Art Anderson replied to Greg Myers's topic in General Automotive Talk (Trucks and Cars)
In LA: "Don't spit on the sidewalk! Have you never heard of the Johnstown Flood"? Art -
OK, a bit of history and a technical note: Ever since AMT, JoHan and Revell started offering "soft" tires in their model car kits (those AMT and SMP 1958-59 3in1 kits had a harder plastic tire), the material of choice has been Vinyl, or PVC. For years, in order to make a soft variety of PVC, there was a compound used that would attack polystyrene ("tire burn"), rather intermittently--it happened sometimes but not always "back in the day" (I've been building model cars since 1952--I do have a little bit of experience). About 1974 or so, the US Government slapped controls on a chemical called "polyvinyl monomer" which was a gas given off in the injection molding of PVC, and I got caught up in all of that, being the HR person in our local Essex Group Wire Assembly Plant (we made all the dashboard harnesses for both Lincoln Continentals and Ford Thunderbirds at the time, plus smaller harnesses for Pinto's and all of the "service replacement wiring harnesses for both Ford and Chrysler older model cars). All of those wiring harnesses had injection molded polyvinyl plugs at both ends! Almost simultaneously with the "at least temporay" ban on soft PVC plastics in consumer products, and their ultimate return to production (remember those gawd-auful AMT hard plsstic 2pc tires of the middle 70's?), tire "melt" almost magically disappeared. It did come back though, with the shift of model car kit production to the Far East, but in my considerable experience, that was a good decade or more ago. Now, how to prevent its unlikely appearance (I've not seen any evidence of it on models I've built in the last 210+ years!), as Bill Engwer suggests, a quick "wipe" of epoxy around the circumference of the rim works, as does a strip of Bare Metal Fol--no polyvinyl components will penetrate either one in my 65 yrs experience building model cars. But, I must say that I've not had the problem crop up on a model car in perhaps 20 years, and not even in more than 40 years on a US domestic-produced model car kit Art
-
Funny thing is: Not long after I finished my ICM '13 T Runabout, a friend out of Indianapolis sent me a couple of pics of a '13 Model T Runabout, finished almost exactly as I did my model--AND that actual car lives just 9 miles due south of me! Art
-
Yes, my typo! Art
-
Sure looks NICE!

-
Like the Continental, those Lincoln Zephyrs were (and still are) almost NEVER seen without fender skirts. Art
-
I spent quite a bit of time chatting with Tapani and Juha Airio of Airtrax, who flew all the way from Helsinki Finland with a couple of trunk loads of goodies--this one REALLY grabbed my attention on the Factory Stock table at NNL-East: 1941 Lincoln Zephyr Coupe! They had just the one builtup on display (I placed my paid order at their table!), and frankly, I think it's plum gorgeous! (Fits the Monogram '41 Lincoln Continental kt) ARt
-
Snagged this one from Kris on Satiurday at NNL-East. What can I say but WOW! (fits the Revell '49 Ford kits, of course)
-
Tom Geiger told a couple of us, over breakfast at the La Quinta, there were over 2.000 people through the doors--HUGE family reunion of model car builders! Art
-
Bear in mind that polyurethane resin softens at a much lower temperature than does polystyrene, and it's not a gradual transition from hard to soft: That said, resin bodies, even if perfectly straight out of the mold, can (if put under stress--such as packing in a box under stress) can warp over time as well. my advice (speaking as a former resin caster with experience gained from thousands of castings) would be to be VERY careful about using heat for that very reason. I've had success in straightening a warped (as in twisted) resin body shell by strapping it, with tape, firmly to a known flat surfaace (in my case, I have several pieces of thick tempered plate glass for building surfaces), and have done this. Key here is patience--the warpage won't come out overnight--it might take several days to accomplish. As Bill Geary mentioned, resin does have a bit of a memory--if the body shell originally came out of the mold, then it should straighten and remain so, but if the master got "twisted" when it was being "laid up" for mold making, then the warp or "twist" may very well creep back in, unless the body is held in its straight configuration promptly during final assembly. Art
-
1955 Pontiac chassis
Art Anderson replied to fomocomav's topic in Model Building Questions and Answers
The 9" difference in wheelbase certainly will make a difference--that's 9mm, or in English Measure .360". Now, the easy part of this is that wheelbase difference is all forward of the firewall, as Pontiacs used the same GM A-bodies as Chevrolet. With this im mind, and considering that the only 1/25 scale Pontiac plastic models were made by JoHan as promo's back in the day--a '55 or '56 Pontiac done from that tooling might possibly be just a it undersized--due to a quirk in GM Marketing's specification that alll promotional models of GM cars back in those days simply had to be packaged in the same exact-sized boxes. With this in mind, it might be worth checking out the chassis (and floorpan) of the Revell 1950 Olds 88 kit--as that is also an A-bodied car, and the chassis comes with a ready-made X-member. With both the Pontiac and the '50 Olds, the overall length and wheelbase differences vis-a-vis Chevrolet was in the front clip. Just a couple of thoughts. Art