Art Anderson
-
Posts
5,052 -
Joined
-
Last visited
Content Type
Profiles
Forums
Events
Gallery
Everything posted by Art Anderson
-
Nearly every original Toyoda AA was destroyed during WW-II, many in the field as staff officer's cars. One example was found in Manchuria, much the worse for wear and quite rusted out, and what examples remained in Japan after the surrender on September 2, 1945 seem to have disappeared.
-
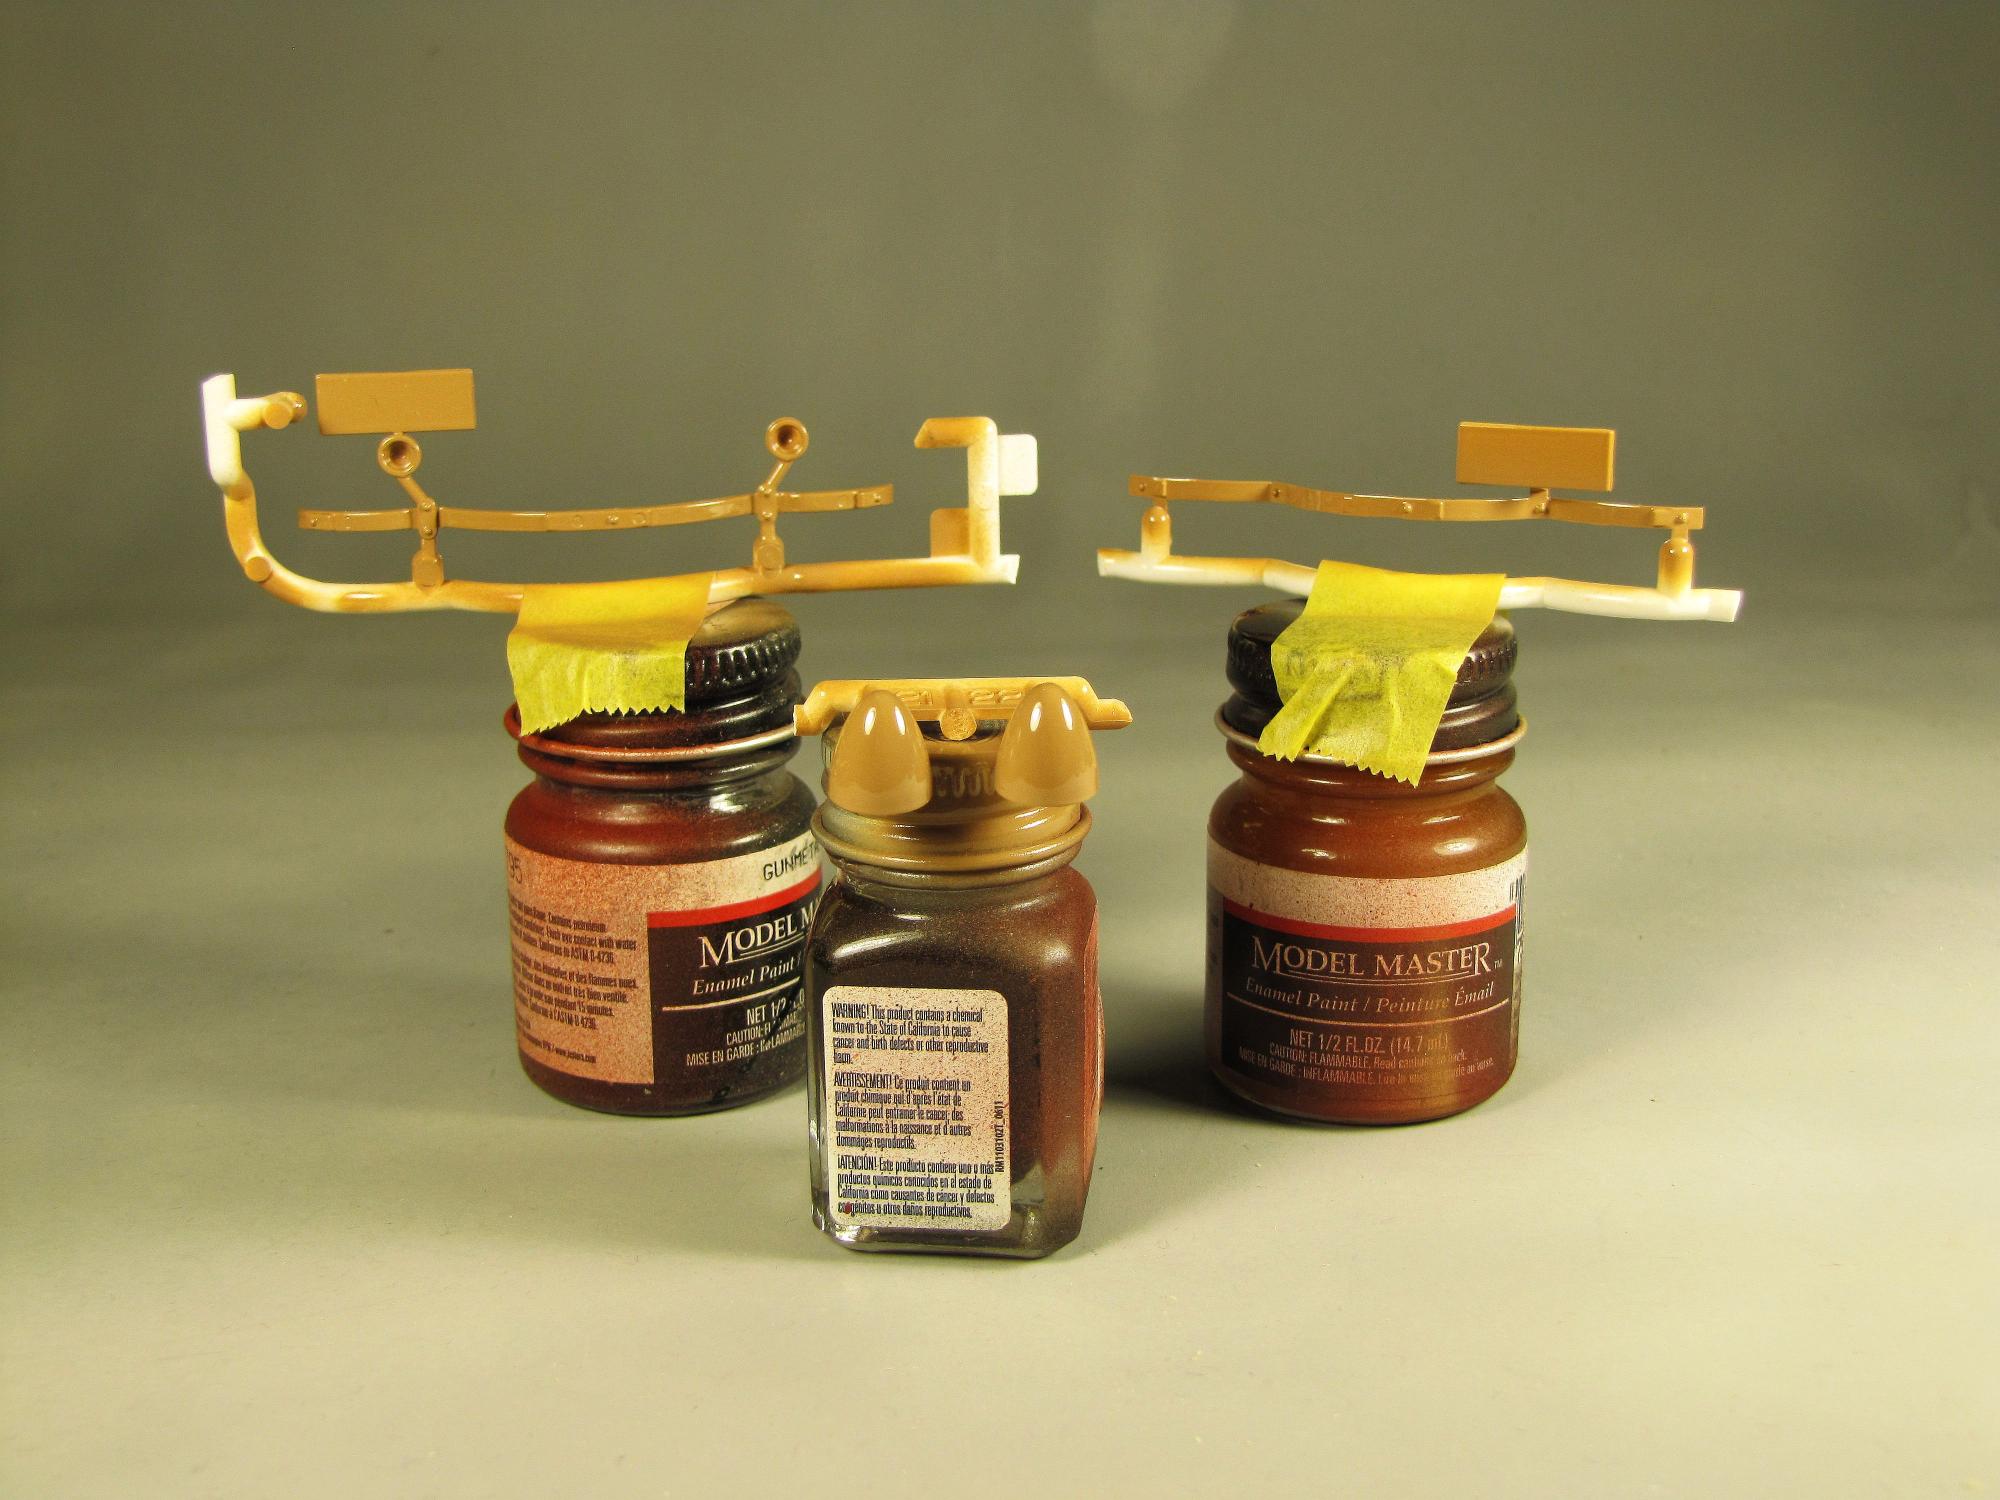
Now, for an update! One of the problems to overcome with painting a model car is "how do I paint those little parts? In the case of the Toyoda, this meant the bumper brackets, and the painted headlight "buckets". Kudo's to Tamiya for the way they put these on their sprues. As you can see from the pic, the sprue attachment points are at two points on the brackets, and on the tips of the mounting pins for the headlight units. What you do not see, as I clipped them away, were the Tee-shaped sprues that came up from the middle of each sprue secton, with an injection point to the brackets from each end of this bit of sprue, and an injection point under the forward edge of each headlight bucket. Tamiya was very thoughtful with those headlights, as the sprue attachment points mentioned will be on the underside of the headlight once assembled to the fenders, and will NOT be visible due to the very tight clearance there above the fender (just a little bit of shaving with a #11 blade there took care of any visible issue). This left the main bits of sprue available to hold the parts for spraying. While as you can see, the bumper bracket sprues allowed room for a bit of masking tape to secure the entire sprue with bracket in place to the cap of a paint bottle. With the headlight sprue, tape was not an option, but Bondic UV-cured glue was--so that is what I used. (Bondic works great, but it is fairly easy to pop the glued-on part off of the paint cap once the paint is dry!) All that will be necessary now, is to clip these parts from their sprues, trim carefully with a #11 blade, and touch that up with the same paint.

-
Harry, while this might be belaboring the point, The Toyoda AA is NOT a direct copy of any car whatsoever. The differences between it and a Chrysler Airflow begin with dimensions: For starters, the wheelbase of the AA is fully a foot shorter than that of the basic Chrysler Airflow. Second, the AA has a heavy X-member in the middle of its frame, for stiffening, which is a sure indicator that Toyoda did not use the system of heavier tubular steel body reinforcement (A, B, and C pillars, all connected by a tubular "halo" which was very predictive of the basid roll cage of any Nascar stock car from the late 60's onward. Along these lines, I rather doubt that Toyoda used the "down bars" between the A-pillars and the front of the frame rails (again, something characteristic of just about EVERY tubular framed race car since the the 1950's (Indy, Dirt Track, Sprint Cars, Midgets and even Nascar since the late 1960's). In addition, the Toyoda AA is not nearly as wide as the Airflow, and as noted above, dramatically shorter as well. All that said, the fledgling Toyoda company, just as with most every other automaker on the planet, saw the advantages of moving an engine dramatically forward, OVER the centerline of the front wheels, which allowed the body to be moved forward, to the point that rear seat passengers no longer sat directly over the rear axle, as had been standard practice with 5-6 passenger cars from the beginnings of the automobile. While the Airflow was a sales disaster for Chrysler (people dissed it, saying they would not ride in "a lump going down the road", Airflow did have a lasting effect on the entire auto industry--even down to some of its shapes, much of which turned up in styling from just about every automaker on the planet, over the next decade or so. Art
-
Seriously? I've NEVER had a problem with Duplicolor Sandable Primer. For starters, I find that an airbrush (Oh, I know, that requires decanting the paint into my color jar, but I've been doing that with all rattle can primers since the late 1960's) works best for such paint. I always decant some primer into my 1oz color jar, then add approximately 20% more lacquer thinner to it, and mix thoroughly. I then lay this primer on in light coats the first of which will lightly "frost" the plastic--meaning very fine crazing (so fine that it literally disappears with another pass with the airbrush!. For lack of a better description, I have come to call this "shock-proofing" the surface. I proceed rather slowly, with light coat passes, until the primer color is uniform. Once dry (this takes no more than 15-20 minutes, and then actually polish the primer with a Micromesh 6,000 or 8000 grit polishing cloth. This allows any surface imperfections to show up darkly where the polishing cloth (used wet, BTW) can't reach--then it becomes a decision as to whether to use a bit of lacquer spot & glaze putty, or will some heavier application of primer followed by polishing do the trick? Once I am satisfied with the surface corrections, I simply airbrush the same strength primer all over, to get a uniform surface. It may sound like heresy, but I seldom ever polish the primer after this, only doing such if I see a fleck of lint or dust. It's a system that I have come to call "TSC": Thin (the primer in a spray can is still far too thick in my opinion for a good job--hence some lacquer thinner (I like Kleen-Strip lacquer thinner a lot, it's relatively inexpensive, and widely available), so I thin all paint, be it lacquer or enamel, to approximately the consistency of 2% milk. Soft means adjusting my airbrush down to a soft spray--which I do by opening the petcock on the bottom of my now 54 yr old Binks water trap (which is in the middle of the air hoses from compressor to airbrush), to bleed off excess air. "C" stands for Close: by using weil thinned lacquers (even enamels!) and a soft air pressure, I can move my airbrush in quite close--I do most of my airbrush finishes at no more than an inch to and inch and a half from the surface. This allows me to get not only a thin layer of paint with each pass, but also ensures that each pass will be nearly as smooth as glass (for replica stock models, where there is nice surface detail such as badges, scripts and chrome trim spears, this actually makes those details really stand out. Where there are prominent body characteristics, such as tail fins, or raised character lines, those get several more passes with the airbrush, just to give a thicker coat of color which greatly minimizes the risk of rubbing through the paint in such raised spots when polishing. This is a method I developed over the years, with a lot of forethought, and even more practice--but I will stand by it. Art
-
Scale Finishes
Art Anderson replied to crazyjim's topic in General Automotive Talk (Trucks and Cars)
When you ship a package on your own, at a Post Office, the receipt printer prints a tracking number on your receipt right then and there, along with the website to go to, and track the package. Pretty much the same sort of system that UPS and FEDEX have used for years as well. -
Just two ways to Chop a Deuce coupe or sedan top--either stretching the top in the door area, or cut and slant the A-pillars to the rear after chopping them--the latter technique being simpler to do (both in 1:1 and in scale modeling). Art
-
1:24 Scale Wire wheels
Art Anderson replied to Austin NJ's topic in Model Building Questions and Answers
FWW, there are/were, more of less, two ways of making "wire" wheels: Of course, there are the "laced" wire wheels, which have been around since at least the 1880's-using spokes which are manually "laced" into the hub and rim in the very same manner as classic bicycle wheels. This type of wheel is built up, one spoke at a time, each spoke having a formed head (like the head of a nail) at one end (almost always at the hub), with a threaded, female head at the outer or "rim" end for adjusting to true up the wheell. This type of wire wheel was/is used mostly on vintage race cars (before cast alloy racing wheels became available), as well as on sports cars (even a few exotic luxury cars well into the 1960's. However, the "wire wheels" most commonly seen on hot rods in this country were/are of the "welded steel spoke" type--a construction method pioneered for Kelsey Hayes and Ford Motor Company in 1926 to replace the much more vulnerable wood-spoked wheels then almost universal across the US auto industry. These wheels have far fewer spokes, each spoke being far heavier than any wire spoke--generally anywhere from 1/4" to 3/8" in diameter, made as steel forgings with a "mushroom" shaped "head" at either end. The rim and hub were placed in a jig, each having slight "dimples" pressed into these parts for the location of each spoke. The spokes were then lightly pressed into place, and once all were installed, they were welded (using the then fairly new "resistance" welding that was coming into use in automobile construction. While most commonly thought of in terms of Fords 1926-36, this type of wire wheel found wide use in the US auto industry--with Auburn Automobile Company probably the last to use them in regular production through their last year of production in 1936. However for early hot rodders, who were using primarily Ford axles front and rear for a few decades, Ford welded steel spoke wheels became almost tradtional, certainly when wider tire sizes came into use (very popular for years were 1935 Ford "wires" which were 6:00-16's, a tire size that Ford used all the way through 1948. Because of their fairly complicated hubs, and the equally complicated task it would be to lace these for a proper appearance, I've never seen this wheel reproduced in "fine scale" appearance. The only model of these wheels I've ever seen, were done for my All American Models 1935 Ford 1/2 ton pickup and panel delivery resin transkits, in cast white metal, by the former R&D Unique afternarket resin & white metal producer out of the Seattle/Tacoma area. (They were adaptations of the same wheel as produced by Danbury Mint for their 1/24 scale 1935 Ford pickup, which was produced about 1997 or so. Art -
Yes, considering that the Airflow had what we would think of today as very much like a NASCAR roll cage built into the body. Art
-
Interesting about the chassis, given that the AA has parallel leaf springs front and rear, quite unlike any Ford V8 car through 1948. As for directly copying the Airflow, is a MUCH larger car than anything Toyoda would have even considered. But, there definitely are styling similarities, and by 1936, virtually every US automaker was using frames having a substantial X-member.
-
Not at all surprising, considering the destruction of Japanese industry in WW-II.
-
Bill, the kit is simply amazing, even if curbside. The parts fit of the bodywork is simply beyond reproach. It would not take a ton of work to make it full detail, and perhaps that '32 Chevy Cast Iron Wonder engine done by MPC would work--but that's a project for another day, another time, and ANOTHER builder. Art
-
I know that, but I am not at all concerned. A massive company such as Toyota is entitled to recreate the car from their beginnings, just as Ford Motor Company had every right to exactly recreate their 1914 Model T for the Centennial of the Model T back in the early 2000's.
-
Close, but no cigar, Harry! While the Toyoda AA sure shows a lot of Chrysler Airflow influence, it is NOWHERE nearly as big as any Airflow, either Chrysler or DeSoto. As I believe I pointed out, it's much more the size of a '36 Ford or Chevrolet, and at that it's decidedly narrower. If you meant to imply that somehow the Model AA was little more than a Japanese copy--well consider that almost all the way back to the beginnings of the automobile, engineers and designers studied what was already out there, and often borrowed what they thought might work (sell) from preceding products--and went forward from there. The list of such "copying", if you want to call it that, is virtually endless. Art
-
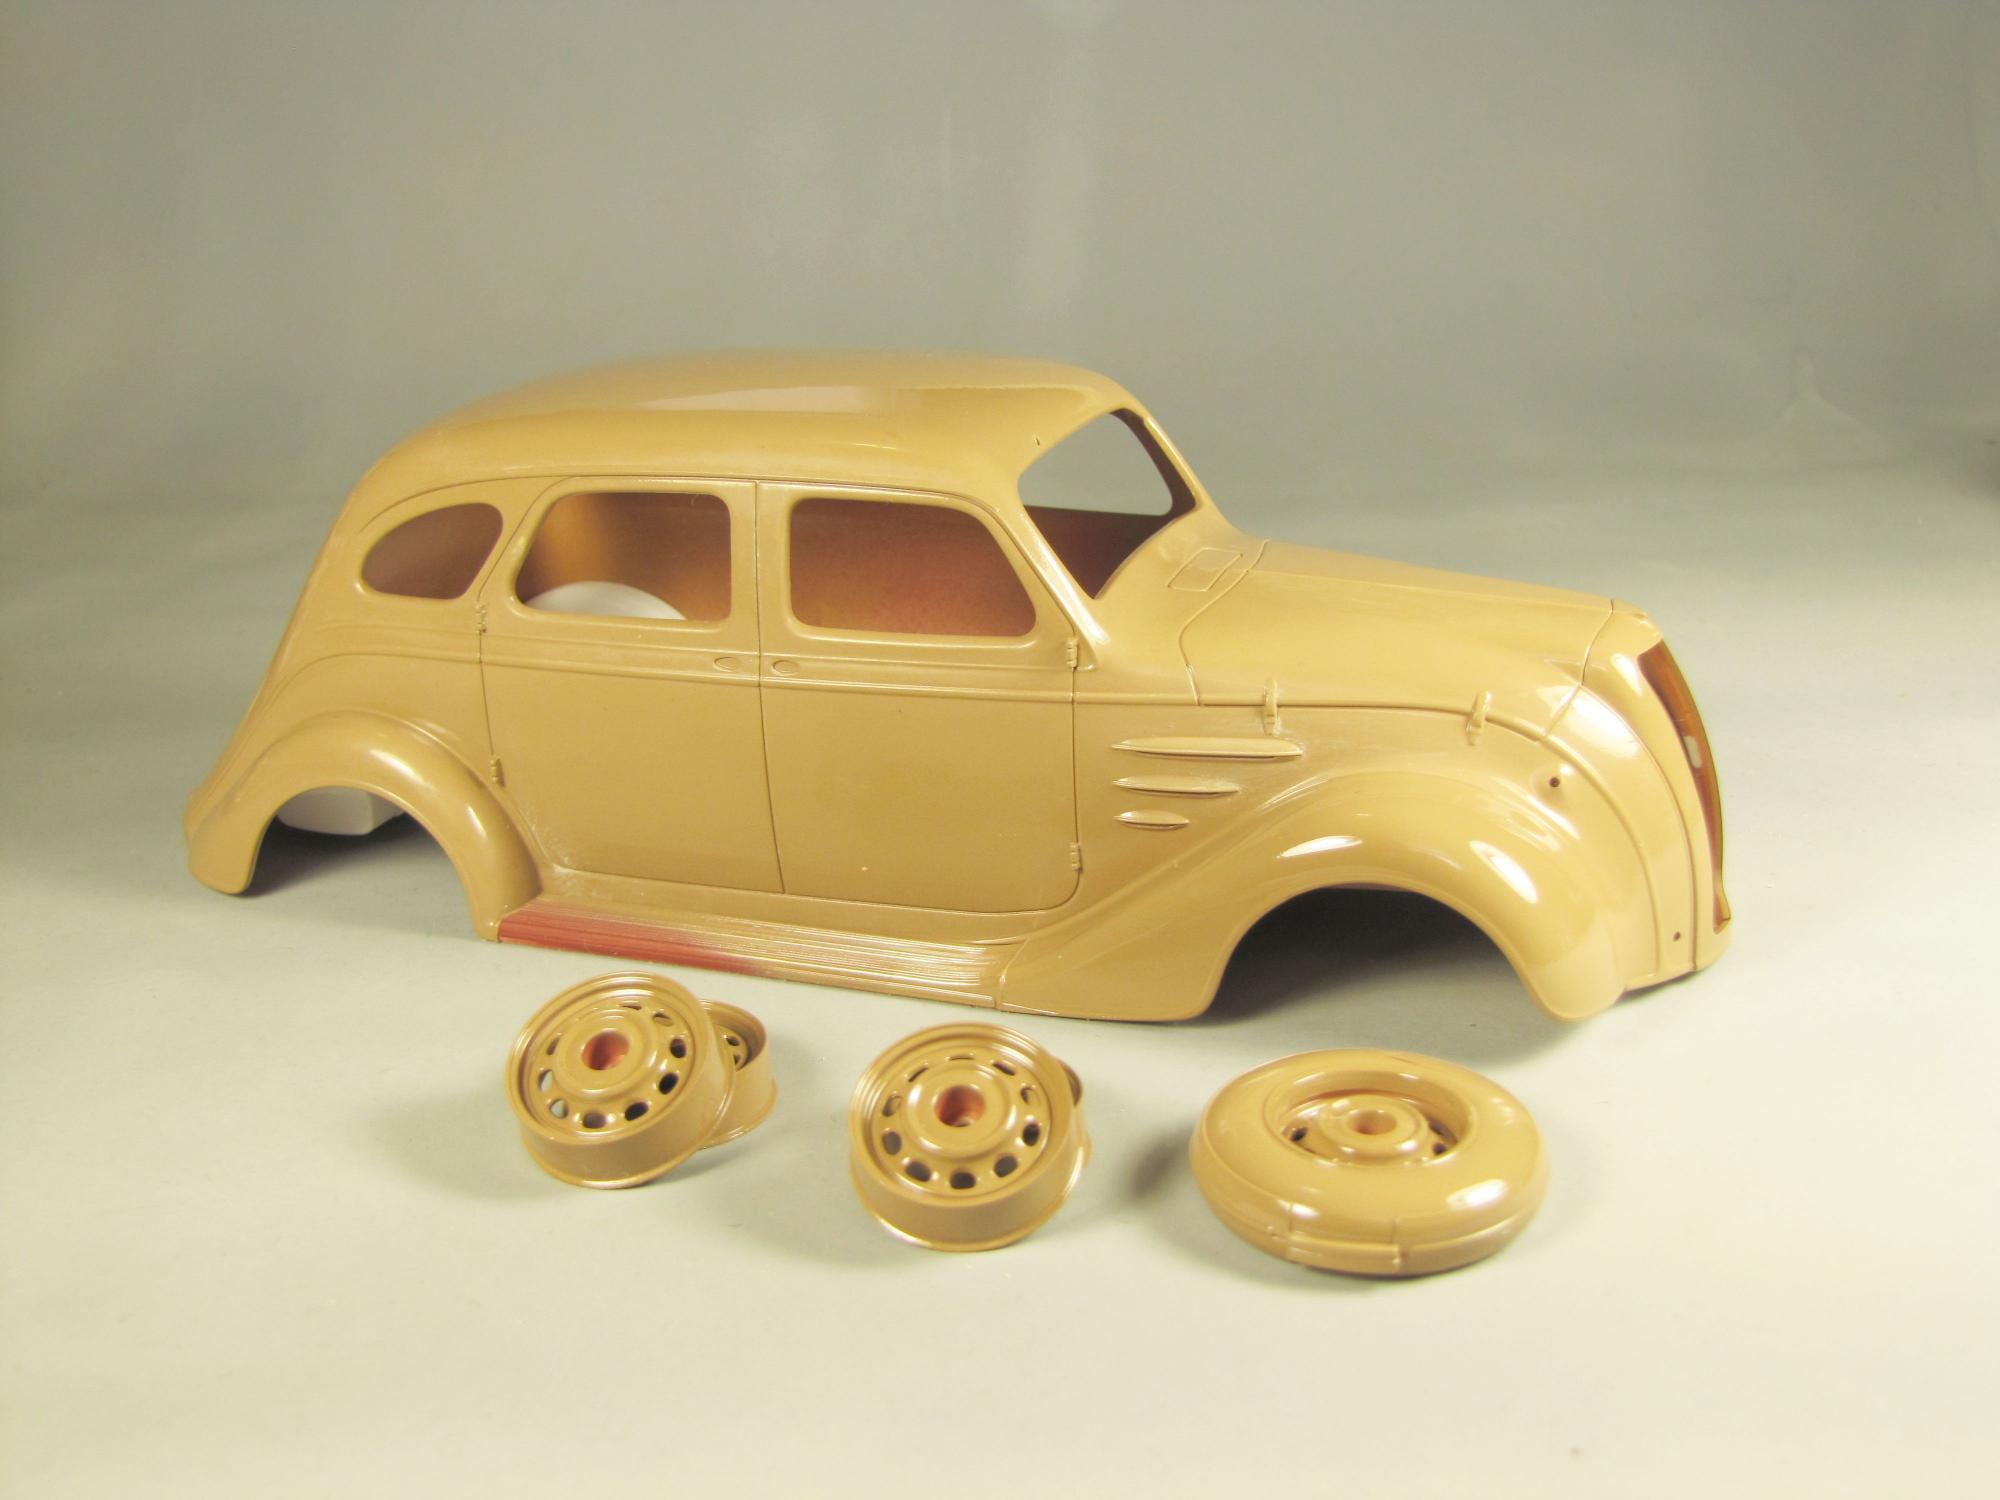
Taking a bit of a break from a very intense Duesenberg project, I latched onto the newly released Tamiya kit of the 1936 Toyoda Model AA. This is not the tiny scrunched up Toyota's of the postwar era--it's as big a car as a '36 Ford or Chevrolet--powered by a 3.2 liter OHV inline 6-cylinder engine (195 cid--not that much smaller than the Chevrolet 6 of that year). The kit, for a curbside (rather unusual for Tamiya) is so very precise, once the body is set on the fender/running board unit, and the grille shell set in place--is so cleanly fit, you really have to look twice to see the seam around the front fenders. The paint is a home-brew: Testors #1141 Wood Tan, with 8 drops of #1140 Brown, and 5 drops of #1114 Yellow added, to get close to the color of a real, restored AA I found online.
-
Scale Finishes
Art Anderson replied to crazyjim's topic in General Automotive Talk (Trucks and Cars)
Fedex and UPS BOTH provide tracking numbers for items shipped through them, as does USPS. The tracking number would be on the receipt for shipping. -
Just a bad can of paint--I've seen that sort of leakage several times over the years, used to scope every can of spray paint that I received in m hobby shop--any sign of leakage, and it got returned to my supplier for credit. Art
-
Correct: Polyester fibers are hard fibers--they are made from the same basic material as polyester resin, AKA Fiberglass Resin. For my money, I rely on 100% cotton tricot, which is the knit cotton fabric we wear as tee shirts. I have used old cotton tee's as polishing cloths for years, now use fresh scrap cotton tricot which is sold in bulk for dustcloths. Art
-
Old Revell "H" part # kits
Art Anderson replied to Brutalform's topic in General Automotive Talk (Trucks and Cars)
Those mid-late 60's Revell kits, with their gobs of parts, opening everything, got a pretty bad rap when they were new--they were kits for grownups being pitched to kids who were the primary 1960's model car kit market--aged approximately 10-about 15 or 16. As some others have stated, they CAN be built, but they do require more than the average amount of work to get them done well. Art -
Scale Finishes
Art Anderson replied to crazyjim's topic in General Automotive Talk (Trucks and Cars)
I'll weigh in here: I have ordered, and received, numerous bottles of paint from Jameston, with but one glitch, which was NOT his fault. About 18 months ago, I ordered some paint for a pair of '54 Hudson builds, and that was promptly acknowledged, and shipped--Jameston even gave me the tracking number in an email. As some may know, USPS contracts most of its surface mail to private companies, so here is the tale: My package was delivered to the Post Office in Sandy UT, on the Friday before Memorial Day 2015 (all this is from the tracking report, which I accessed online). It was delivered to the US Parcel Post facility in Denver on that Saturday. On Tuesday, the day after Memorial Day, it was sent back to Salt Lake City! A couple of days later, the package was sent BACK to Denver, where it sat for nearly a week, finally to be sent to Memphis TN. A day later it was SENT BACK TO DENVER! From Denver, it went back to Memphis, where it sat for a full week. Finally, I read that my package had been sent out from Memphis, but no destination was given. Another week goes by. At last, my tracking report showed it was in Indianapolis (just 65 miles from me, but there it sat for several days. Finally, it showed up at my doorstep (my letter carrier always brings my packages inside, upstairs to my apartment door. Total ET? one day shy of FOUR weeks. In all of this,Jameston offered to refund my money, but I refused, telling him that it wasn't particularly his fault. He did tell me that it would be the last time he would use just basic Parcel Post--and indeed, my next paint order came by Priority Mail. As Bill has stated, living (or for that matter, operating a business) in rental properties does carry the possibility of a sudden, unwarranted eviction. So with this in mind, I am inclined to say give Jameston a break in all of this--I along with several other model car buddies have had nothing but positive experiences with Scale Finishes, and I'll be happy to order more paint from him as the need arises. -
Harry, that is AWFUL news to read today! While I cringe at the thought--please be as brave as you possibly can (braver than brave seems an appropriate term here) and go foward, post-haste for sure. We may have our disagreements, but seriously, the World as we here on these forums NEEDS YOU! (Oh and your kids--grandkids too if that fits--to be here going foward. My prayers are already going up for this to be a positive outcome! Art Anderson (who knows a little bit about life-threatening issues!)
-
Why no kit plating chrome?
Art Anderson replied to JollySipper's topic in General Automotive Talk (Trucks and Cars)
A large part of the problem is that the vacuum-plating shops that do resin parts on occasion aren't all that experienced with such rather small parts runs, unlike the model companies either have in-house or under contracts. Any part can be as perfectly made, with absolutely mirror-finish, but if the lacquer precoating used prior to vacuum-metalizing isn't completely smooth, slick-shiny, then the plated results won't be either. Art -
Correct on the '27 T Roadster body--that was pretty easily done, as the steel panel behind the front seat is the same as the back panel of the '27 T roadster in shape and dimension. I think you may not have seen my correction of my post you quoted--I did that almost immediately after I posted it, to read pretty much what you are saying. Art
-
I believe Barris Kustoms started with a '28/'29 Model A Roadster Pickup body shell, and replaced the rear, very squared off section with the rear (tonneau) from a '27 T Touring Car. They may well have rounded the lower corners of the Model A roadster pickup doors. Art
-
Why no kit plating chrome?
Art Anderson replied to JollySipper's topic in General Automotive Talk (Trucks and Cars)
Modelhaus figured that out back 25 yrs ago. It's called "Attention to all the details" on the part of any resin-caster--some do very nicely, others haven't quite figured that out yet. Art -
TONKA #7018 1913 Model T "Four-Alarm Call" 1/24
Art Anderson replied to Mike999's topic in Car Kit News & Reviews
Those TONKA "Diorama" kits were very well done--particularly for their time, if a bit simplified (the Tonka Model T vis-a-vis AMT's 1925 T kit for example). Sadly, they were somewhat a "fish out of water" in the marketplace--kits that really didn't fit the model car kit market at the time (1974 was the beginning of the end of model cars as THE "thing" for kids to build, and the large "migration" back to our boyhood hobby of the 50's and 60's had not yet really taken hold), making this series of historical model kits one which really had no clear market. Had those kits been introduced a mere 10 to 15 years later, things may well have been markedly different. Those Tonka diorama model kits languished on hobby wholesaler shelves well into the middle 1980's--I was picking them up at distressed market prices from a couple of hobby wholesalers in Chicago for half their original dealer cost in the middle 80's, for my own hobby shop, the "Model Maker", the 1980's being still before closeout stores the likes of Big Lots/Odd Lots and Ollie's came on the scene. Still though, even though Mattel has owned the TONKA brand for a couple of decades now, I wonder if the tooling for these kits still exists? Art