Art Anderson
-
Posts
5,052 -
Joined
-
Last visited
Content Type
Profiles
Forums
Events
Gallery
Everything posted by Art Anderson
-
Correct! That is an Impala--I forgot that the bubble top was an Impala feature for 1961.
-
Any paint that can be thinned can be sprayed through an airbrush, plain and simple. Art Anderson
-
It's the Lindberg '61 Bel Air HT, in an AMT box. Art
-
Just a thought about 3D printing
Art Anderson replied to mikemodeler's topic in Car Aftermarket / Resin / 3D Printed
About the only problem I can see with doing all the drive train components for a NAPCO 4wd setup for that '66 Suburban, would be that when 3D printing such parts, UNLESS the resolution of the printer itself is quite fine (as in very THIN layers), those parts can come out looking as if they were made from rather well-worn wood, due to their rounded, rod- or tubular-shapes. Having evaluated just about every Moebius tooling mockup (and those are done in 3D printed form), it's pretty hard at times, to judge such parts for their correctness, their accuracy. NAPCO, a St. Paul MN auto parts house, created the 4WD setups for GM Truck back in the 50's and 60's, working with available axles, differentials, transfer cases and driveshafts, as a "parts kit" that GM assembly workers could simply bolt into place. Some research would be advisable as to just whose components NAPCO used for their conversion parts kits sold to GM for 4WD vehicles--quite probably they are out there in model kit form someplace, or at least can be worked up from available model kit parts for use as masters for resin casting. Art -
“Chrome” edges around the “wheel well”.
Art Anderson replied to Zoom's topic in Model Building Questions and Answers
Deleted -
Spray paint and sanding help?
Art Anderson replied to Suzier's topic in Model Building Questions and Answers
Steve, I was first introduced (like many modelers my age) to "Wet-or-Dry" sandpaper WAY back in the early 60's when AMT Corporation put out their line of "Styline" kits, model cars with a tube of putty and a small sheet of 400-grit wet-or-dry sandpaper (the black stuff used to this very day in autobody shops everywhere. I always keep a pack of 3M 400-grit sandpaper in stock in my model room to this very day. I simply cut it into smaller sheets, which I then fold with a sharp crease, and use wet on a model car body, to gently remove mold parting lines (those often raised, sharp lines where the different mold sections have to come together on a model car body, in order to mold it as a one-piece unit. (Bear in mind, that in order to make a one-;piece plastic body in styrene, it takes a minimum of SIX mold sections, which "slide together" as the mold closes up, to make that body. It's much like looking at a cube, or a rectangular box: a mold section to make the upper surfaces, a right side mold, a left side mold, a front end mold a rear end mold, and the sixth one to make the inside of the body shell. No matter the manufacturer, this practice does not change--only the precision (or seeming lack thereof will change). Now, with most all modern-made model kits the parting lines (where those mold sections must meet and close up tightly) will be there, and they will show, of course, through a paint job unless removed. This means working often in tight places, which is why I use small bits of 400 grit to get at those. It also means working carefully, sometimes quite delicately, so that I don't damage or remove the raised detailing that I paid good money to get in the first place--just the offending, but necessarily present, mold lines. Sometimes, particularly with older kits, those tooled in years past, before truly modern toolmaking reached the model kit industry as it is today, there may be places where the tool sections do not meet up exactly precisely, meaning there can be some misalignment (if this is the case, that's were a set of really decent "needle files" can come in handy--but again, planning, and learning to work very delicately has to come in!), and there may be a bit of putty work needed sometimes as well. Again,think about how to work putty in small areas (I use the very smallest artist's painting knife I can find (my current painting knife, in stainless steel, as a blade shaped much like a miniature masonry trowel, is polished stainless steel, and was milled to a tapered thickness, which gives it a good bit of "springiness" which I find both advantageous and critical! Its nose or front tip is rounded as well. Where to find one? Look no farther than the art supply section of Hobby Lobby or Michael's, or any good local art supply store--those painting knives will be right there in with the artist's oil paints or acrylic artist's colors (the stuff in those little "toothpaste" like tubes--I paid less than $10 for the one I use, but that was about 10 years ago now--might be a bit higher these days. For putty, I prefer autobody spot n glaze putty, the one-part lacquer-based putty, found in the autobody supply sections in most Big Box stores, or if you have a professional level auttobody supply store (I have one about 6 blocks from my home), and some lacquer thinner (I use Kleen Strip from Walmart, and a small jar (a glass baby food jar works great!), for cleaning up my painter's knife after each use). Let that putty dry hard, then sand smooth. Long-winded, yes I know, but this is stuff I've learned how to use and how to do, over now more than 50 years of building model cars. Art Anderson -
Tools for lathe work?
Art Anderson replied to noname's topic in Model Building Questions and Answers
To add some to this discussion: I bought my Sherline lathe in 1981, and have used it many times--it had to have a motor and speed control transplant about 10 years ago, and what a difference the new digital speed controller makes (the original used a speed control that worked with electronic "spikes" to get lower speeds). As Pete and others have repeatedly said here, "cheap is as cheap does" No matter how precise a Jacobs chuck you fit to your electric drill, without any sort of FIXED tool post, you can never get anything like precisely turned metal parts with a drill clamped into a vise (many have tried and failed--and that includes ME. As currently upgraded, my Sherline lathe (and the Sherline mill I added in 2008) will last me the rest of my natural days, to the end of the time when I can still build model cars. If the price of a new one seems out of your league right now, keep your eyes and ears open--many of these lathes have been bought over hte past 35-40 years, and their original owners in many cases have reached the age where they've had to give up doing this sort of fine metalworking, be it for models, or other pursuits--so they do come up at estate sales, even garage sales and flea markets. One thing for sure though is, any part or accessory for current Sherlines will fit the originals--if any doubt, a phone call to Sherline (they are located in the LA area out in California) will get you the needed advice. Sure the price of entry is up there--that first part turned costs the initial price paid for the equipment (just as it does with an airbrush outfit), but with each additional part made, the price per part drops, and so on. But the value of of the project made is way up there, in terms of the horizons opened by having that machine at your disposal for whatever and whenever! Art -
Ferguson Tractor from Heller
Art Anderson replied to carsntrucks4you's topic in Truck Kit News & Reviews
The "original" that keeps being mentioned was by Airfix, back a good 60 years ago, and was molded in acetate plastic, which warped like crazy over time. In addition, it was nowhere NEAR as detailed as the new Heller kit appears to be. Art -
's funny, as I have used Duplicolor primer on all of my builds for years, INCLUDING modern-made kits done in that "new-improved trash plastic, with no problems at all. Art
-
AMT '77 Pacer Wagon - a new loser out of box!
Art Anderson replied to Faust's topic in Car Kit News & Reviews
It would be doubtful, as originally, the Pacer sedan was tooled and produced by MPC, while the station wagon was an AMT tool. -
Engine with no cam!!
Art Anderson replied to gbdolfans's topic in General Automotive Talk (Trucks and Cars)
Actually, I believe that at least one of the very first automobile engines was a 2-cycle. -
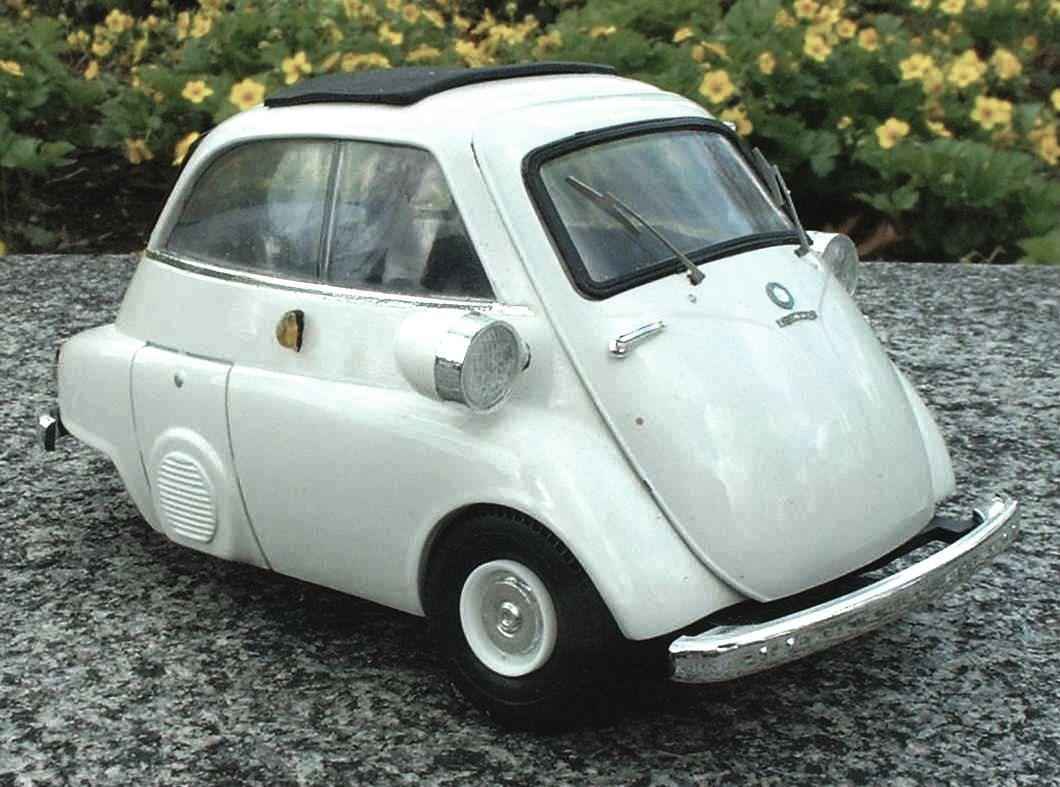
Bill, and everyone else: I guess I should add a bit of my rationale here, in addition to having explained my concept of "TSC" as posted above in this thread! In short, I shoot (no pun intended!) for "maximum coverage with minimal paint"--essential, or so it seems to me, when dealing with painting in 1/25 scale, for realistic finishes. I'm not going for "Best Paint" awards, hence my distaste" for that "dipped in syrum" look. Now, if you think of it, a rattle can nozzle (be it on a can meant for painting on 1:1 car surfaces, or on a 1/25 scale model car body--is about as delicate as trying to paint a real car body with a freakin' firehose! That's what got me into airbrusing in the first place, WAY back in January1962! While of course, at that time, I was more worried about getting nice paint jobs with the likes of Pactra "Soft-Spray" hobby enamels, the same principal applies even more when using automotive lacquers. Sure, there will be minute crazing even with an airbrush--but that's much more like very fine "frosting" of the surface with the first pass or so, than serious crazing which can rival the skin of a 120-yr old man with a serious skin disease (OK, so I exaggerate a bit here!). SERIOUSLY, the only time I have ever had to deal with that sort of crazing with Duplicolor or other lacquer primer on styrene, was when I painted a Gunze-Sangyo BMW Isetta body that was molded ENTIRELY in clear styrene (which is by its nature, the purest form of styrene of polystyrene there is. Here is the final result, once I figured out how to proceed--perhaps the proof that my TSC philosophy does work for me, first time, EVERY TIME: Please note that this pic was shot in 2003, with my first (and very primitive) digital camera--but if you really look closely, you will not see any crazing in that surface! It's all a matter of stopping, thinking, and figuring out how to use so-called "Hot Lacquers" on "craze-sensitive" styrene surfaces. I think this model speaks for itself as to how possible it is to use even the hottest lacquers on even pure styrene. Art

-
1948 Chevy Panel Truck
Art Anderson replied to Mike C's topic in Model Trucks: Pickups, Vans, SUVs, Light Commercial
Very nice indeed, but that's NOT a Panel Truck--Panel Trucks were based on the pickup truck chassis and bodywork. This one is, on the other hand, a Sedan Delivery--which is passenger car based. Art -
Least popular kits
Art Anderson replied to iamsuperdan's topic in General Automotive Talk (Trucks and Cars)
Actually, the AMT Thomas Flyer made it through two releases! AMT Corporation, of course, and then Lesney-AMT did a reissue. Bear in mind, however that model companies almost NEVER give out production or sales numbers (unless for bragging rights), there is virtually NO WAY that anyone outside of those manufacturers, along with a few wholesaler executives, who would have even any idea. On the other hand, it took Revell-Monogram SEVERAL years to sell out all the '64 Thunderbolt kits that they produced in just the initial run. That was related to me by the late Bill Lastovich (a friendship of mine that carried over about 25 years, including both his career at Trost Modelcraft & Hobbies (the original full-line hobby wholesaler beginning in 1932) to shortly before his passing. Art -
Tools for lathe work?
Art Anderson replied to noname's topic in Model Building Questions and Answers
Files perhaps, but any sort of true cutting tool hend-held? A recipe for disaster, up to and including potential serious physical injuries. About the only metal working lathes I've ever seen which were set up to use hand-held cutting tools are the old-fashioned "Jewelers' (read that watchmaker's) lathes, most of which were hand-cranked, with very small cutting tools designed for that sort of use. As for ordinary chisels--those are shaped at angles completely different than regular lathe tools--won't do much more than rub on the work, until they are dulled beyond use. At any rate, should you truly attempt to make turnings as you suggest--please wear appropriate PPG (Personal Protective Gear) which needs to include proper eye protection. Art -
Actually, Monogram's 1935 Duesenberg "Disappearing Top Convertible Coupe" (no, that body style is NOT a roadster--as roadsters had snap-on side curtains, where convertible coupes had rollup windows) IS a model of a Rollston bodied car--the only Murphy Convertible Coupe ever done in plastic kit form was the 1/10 scale kit from Ideal Toy Corporation, about 1960-62, and scarce as hen's teeth today. Art
-
Got Mini-Boxes???
Art Anderson replied to bonehead23's topic in General Automotive Talk (Trucks and Cars)
We did a lot of those back in Tom Lowe's former life, when he owned Playing Mantis, the producer of Johnny Lightning diecasts--we had a series of JL cars that were directly model kit-inspired, and their blister card included a miniature of the model kit box. Art -
Geez, and all these years I seem to have been doing it all wrong. I've merely turned paint bottles upside down, smack the heck out of the cap end on the heel of one hand until the paint's all stirred up. Hmmmmmmm. (?) Art
-
Scalefinishes application tips?
Art Anderson replied to RyanR0101's topic in Model Building Questions and Answers
I use the same airbrushing technique as I described in another forum right here on MCM: http://www.modelcarsmag.com/forums/topic/116530-duplicolor-primers-too-hot-for-current-production-kits/?page=2#comment-1701235 Ryan, I treat my airbrush as if it were a scale spray gun--at least in its spray patter. I use repeated passes with every step of my painting process, as I have learned to get maximum coverage with minimal paint buildup. That said, I want even that first coat of paint to have complete coverage, even if the coat is too thin to withstand much in the way of polishing out. Generally, for me, it's two coats of color, followed by a few hours in the dehydrator. after which I can polish out the finish quite easily If anything here, I wonder if guys aren't trying to make the process of airbrushing a model car far too "technical"-----in my pea-pickin' little mind, it just ain't rocket science. I suppose that comes from my being 72 yrs old, and growing up with a morning paper route in the middle-1950's having TWO body shops as customers. Much of what I learned about spray-painting model cars came from watching those old autobody guys do their thing--then translating that to the very early Pactra and Testors rattle can model paints. An airbrush was merely a step up from those. Basically, Ryan, I do not try to get a finished paintjob in one sitting--rather it's a minimum of two steps with the finish colors. Rather than "thinking of coats" of paint, I think of it as a series of "passes" across the body surfaces, to get the color coverage desired. Each series of color passes with my airbrush constitutes a "coat" of paint--as trying to get full coverage with any one "pass" of the airbrush just won't give a very good paint job at all--runs, sags, heavy coating of wet paint "pulling away" from engraved panel lines. A professional painter of real cars doesn't try to get full coverage with just one application (Earl Scheib excepted!)--it's no different with a model car. Art -
Scalefinishes application tips?
Art Anderson replied to RyanR0101's topic in Model Building Questions and Answers
My post pretty much says it all, Ryan. -
Photoetch wire wheels
Art Anderson replied to imatt88's topic in General Automotive Talk (Trucks and Cars)
Ian: Yes, just exactly what do you mean by "Classic Car". The wire wheels used on real cars range all over the place in diameter--from about 14" up to perhaps 24" in diameter--all depending on the era and the particular car in question. Art -
Scalefinishes application tips?
Art Anderson replied to RyanR0101's topic in Model Building Questions and Answers
Ryan, perhaps an understand of how enamels work might help? While lacquers dry entirely by solvent evaporation, enamels, which are basically some form of varnish or another, dry in "two" stages: First, the solvent (enamel thinner, which is generally petroleum-based) evaporates, albeit much more slowly than lacquer thinners). The second stage is the "oxidation" of the enamel/varnish resins--these don't evaporate, rather they "oxidize" upon contact with air. This process does take longer than lacquers, of course, as even varnish takes a long time to cure out at room temperature. Testors enamels have a plasticizer added to them, which makes them "flash off" to a dry touch rather quickly, but they still need, at room temperature, days to harden. Industrial and automotive enamels take far longer at room temperature, and even an attic in summer isn't all that hot (unless you live in Arizona, perhaps). This is where a food dehydrator really kicks in--mine is an Oster, factory-set at 125F, which is hot enough to force even Scale Finishes to dry rock hard in mere hours, and yet will not damage any polystyrene that I've come across over the past 5 years since I acquired it. I generally put a body shell and related parts painted in enamels in mine for 6-8 hours, while I am doing other things around the house, and I've NEVER had a problem with any enamel finishes not getting rock-hard. Art -
Bill, in retrospect, although I don't recall seriously thinking of it--in a way, the technique I've been using all these years is pretty much a matter of treating a pant job as if I were doing it with a spray gun that was at least close to 1/25 scale! It does give maximum color coverage with minimal paint thickness, and with practice, this method allows me to get away with relatively little in the way of polishing. Art
-
Both chrome strips on the spare wheel are BMF--I decided against using the chrome decals provided. It was far easier done than you might think!
-
Shellac traditionally uses Methyl Acohol (methanol) as it's reducer, and methanol is almost death on styrene., not to mention almost all commonly used enamels and lacquers--it's the active ingredient of most paint/vanish strippers (that are not to be used on non-ferrous metals such as aluminum). Art