Art Anderson
-
Posts
5,052 -
Joined
-
Last visited
Content Type
Profiles
Forums
Events
Gallery
Everything posted by Art Anderson
-
However,the "Ultra Chrome" is a completely different animal than the regular BMF--MUCH thicker, nearly impossible to work down into the often suble, small details found in model car kit chrome trim details. As a consequence, it doesn't stick down quite as well--and being thicker, it's a good deal more difficult to trim, even with the sharpest of #11 blades. I suspect it works much better for flat surfaces, such as mirrors and the like--but for the chrome trim on bodies--the original BMF works far, FAR better. Art
-
Our first model car contest since 2000! Saturday, August 20, 2016 Community Reformed Church 2501 South 18th Street, Lafayette IN 47909 (2 blocks South of Teal Road (US-52) Doors open for entrants at 9am, Awards at 3pm. Food available in the Church gymnasium. (This is shaping up to be a great contest!) Art Anderson
-
From late 1913 through the last of the small radiator/hood 1925 Model T's yes. Prior to that, and for 1926-27, other colors were available.
-
Except that the Moebius kit is of the '54 Hudson Hornet "Special" which was a somewhat de-trimmed Hornet. The car pictured in this quiz is a fully trimmed and equipped Hornet. Art
-
Needs a shower head, hot & cold running water!
-
I kitbashed the Gable "SSJ" back about 1979-80 or thereabouts, and yes, the Weymann Torpedo Phaeton's rear "deck" combined with the forward "cockpit" of the Torpedo Phaeton is a great place to start on the project! I also have a couple of Danbury Mint's SS-J's, which are the Gable Car (Gary Cooper's car has more "bobbed" rear fenders). FWIW, the engines in those two 125" cars were the same as Augie Duesenberg built up for Ab Jenkins' 'Mormon Meteor--having a two-stage supercharger coupled with dual carburetors on "rams horn" intake pipes---for a HP rating of 425hp from 420cid, making the two SSJ's and the Meteor (which was streetable with fenders, bumpers, lights and windshield installed) the first production automobiles with engines producing more than 1hp per cubic inch--22 years before Chevrolet tried to claim that title for their 283 Fuelie!. Art
-
AMT 1960 Ford F100
Art Anderson replied to my80malibu's topic in Model Building Questions and Answers
Considering that we're talking 1960 Ford F100 pickup kit from AMT, May 1960, 1960 being the model year of the actual pickup. -
427 Ford SOHC engine source
Art Anderson replied to Paul Payne's topic in Model Building Questions and Answers
DOHC: Dual Overhead Cam (one cam actuating the intake valves, the other the exhaust valves). SOHC: Single Overhead Cam (camshaft actuating both intake and exhaust vavles. Art -
AMT 1960 Ford F100
Art Anderson replied to my80malibu's topic in Model Building Questions and Answers
All AMT "Annual Series" model car and pickup model kits (the so-called "3in1" kits) were based on promotional model tooling that was done to provide the Big Three automakers with scale model toys of the new cars they were selling--as promotional items. Those came first, as automakers' marketing departments (and new car dealers) wanted those in showrooms as close to new car introduction dates as possible. "Kit Information" came in two forms back then: "Sell Sheets" mailed to local hobby shops (or sent to them by their wholesalers), and ads in magazines (most notably Rod & Custom, Car Craft and Hot Rod Magazine. Those print announcements tended to be a good 6-8 weeks before kits actually reached store shelves in many cases however. As for the '60 Ford F100 3in1 kits, I seem to recall those hitting our LHS here in Lafayette (the former Bell Auto Supply) whose owner was extremely agressive about always getting the latest model car kits ASAP, just about the time school let out in late May (I was a HS sophomore at the time--coming up on getting my driver's license that summer!) Annual 3in1 kit releases always took some time to come to market--due to tooling/retooling lead times: Generally speaking though, most all 3in1 Customizing 3in1 kits were released int the first quarter of the year of the actual vehicles. From my recollections, convertibles came first, followed fairly quickly by hardtops, with the AMT '60 Ford and SMP '60 Chevy pickup kits hitting stores sometime in early May of that year. Art -
Finally, I have the assembly of the interior worked out! For starters, much like just about any resin transkit (regardless of subject matter), small, fine locating pins and the holes they fit into often cannot be mastered and then cast with any degree of success. In the case of this Duesenberg, we'd made no locating pin/hole combination for any of the vertical panels, deciding to leave that up to the customer/builder. In my case, however, as considerable paintwork will have to happen in the interior,along with the added detail of upper window frames for the insides of the doors, and an inner window frame for the rear window, each spaced out from the inside of the body .015" to allow for .015" clear plastic sheet to be slid into the openings to replicate window glass. This means a lot of sliding the interior into the body, then removing it, for the purpose of testing the fit of those frames and the "glass", in addition to being able to pull the interior unit apart for paint and detailing. In order to ensure the correct alignment of the "privacy panel, both fore-and-aft, and side-to-side, once the positioning of this vertical panel was established by measurement and ensuringit's being absolutely square to the center line of the fender/running board unit, I "tacked" the divider panel in place with a couple of small drops of CA glue, using a piece of .250" square Evergreen stock to make a very secure footing for this vertical panel, I then drilled a pair of .022" holes up from the underside of the floor into that large block of Evergreen, removed the panel and inserted .020" brass pins with a drop of CA (hint: To ensure that the CA grips such brass pins securely, lightly "sand" the rod stock first, at an angle oblique to the length of the rod, to give the CA something to grip the CA with!). After reg-gluing the privacy panel in place, I test fitted each side panel against the divider and the edge of the floorboard, and marked both the edge of the floor, and the lower surface of each side panel, at each the front and rear end. Then, after drilling .022" holes at the marked points add corresponding holes up INTO the panels themselves, I simply inserted .020" brass pins into the panels, and set them in place on the sides of the floor. To secure the panels for all the test fitting (assembled, and disassembled these from the floor many times as I ensured a decent, proper fit), I drilled a horizontal .022" hole through the middle of each side panel, and into the sides of he privacy panel, and after inserting brass pins into the privacy panel, I now have an interior unit that can be slid in and out of the body as needed, while still keeping those parts at least loosely assembled. The Duesenberg is beginning to come together!

-
Water spots on final color coat
Art Anderson replied to 69NovaYenko's topic in Model Building Questions and Answers
For starters, I know of no city that doesn't have at least some mineral content in their water supply--so droplets of that city water will necessarily leave at least some mineral deposit as they evaporate. Remove this type of water spot? Plain old VINEGAR (AKA acetic acid) will remove small water spots--I know, because I do that every night at work. Oh, and vinegar won't hurt lacquers or enamels. Art -
40 Ford Standard Grille?
Art Anderson replied to TimNYC's topic in Car Aftermarket / Resin / 3D Printed
The old (1961-vintage) Monogram '40 Ford pickup is 1/24 scale. Art -
40 Ford Standard Grille?
Art Anderson replied to TimNYC's topic in Car Aftermarket / Resin / 3D Printed
Similar theme, but an entirely different grille. Revell's '40 Ford coupe has that Standard grille. -
Check me if I'm wrong, but really, do we truly need robots driving cars on public roads--mixing it up with living, breathing human drivers? Not yet, in my opinion. Art
-
AMT 1979 Penske PC6 Indy Car
Art Anderson replied to Darin Bastedo's topic in Car Kit News & Reviews
During the 1970's, I was a dedicated Indy Car model builder, in addition to being a contract "box art & trade show display model builder" for AMT. As part of that, I was connected by AMT to Norton Group, who'd sponsored Rick Mears' 1978 Norton Spirit Penske PC-6, to build 25 models of that car with acrylic display cases and walnut bases for them to present to Penske, Mears, several associate sponsors, as well as for display in various venues around the US. Those had to be built from 1st round test shots, which I found be have a fair number of problems. When the kit was finally released in early 1979, some of those test shot problems had been corrected (as one might expect), but not all--a lot of shortcuts in the design and development (but then, their earlier (1976) releases of the Gurney Eagle Model 6 and the McClaren M16-C had many very similar issues, some leading to serious inaccuracies. Those all took considerable reworking, even the addition of a few parts on my own (not including added superdetailing), but they all could (and still can) be corrected. Such was the state of plastic model car kits introduced in the mid-late 1970's. Bear in mind that in the eyes of the US model kit industry, plastic model kits were still considered the pastime of early teenaged boys, were considered little more than toys, and were marketed & sold as exactly that. Especially problematic was that model kits of Indianapolis race cars had only limited appeal outside of the US Midwest--not surprising given that Indy Car racing was then centered still primarily in the Midwest and Great Lakes states, and generally had but a one-two year market, before time passed them by as far as kit sales were concerned--that was a lesson that AMT, MPC and IMC learned in the mid-1960's, and Aurora Plastics well before then. So, it's little wonder to me that most all of those kits (MPC's Eagle and Turbine kits being the exception) were apparently designed and developed on rather low budgets--get them out quickly, sell some, and move on. Art -
AMT 1979 Penske PC6 Indy Car
Art Anderson replied to Darin Bastedo's topic in Car Kit News & Reviews
AMT was in ever-deepening trouble by late 1977, and was literally within hours of going to bankruptcy court when Lesney stepped in in late summer to buy them out. Art -
Believe me, there are more licensing issues with military equipment than you might have ever guessed! For example, of all the major aircraft companies producing military aircraft here in the US during WW-II, only Curtiss has completely disappeared. Every other military aircraft producer from the US during WW-II is still in business, in some form or another, and most of their now-parent companies do protect their WW-II products. Be reminded, that with aircraft, with only one ot two exceptions, combat aircraft are designed and developed privately, with modifications required for production based on flight tests. Even most US Navy ships are covered under such intellectual rights, even though much of their design was carried out by the Bureau of Ships. Screwy? Yes in a way, but that is what it is.
-
Running board brackets! This is something that I wish, today, that model companies would do for cars of the 1930's on back--but I do understand that when most such kits were created, model car building was primarily a "kid" thing--and we kids years ago were often turned off by "fiddly" stuff. http://images15.fotki.com/v1631/filesgit/96f8b/4/43743/3168549/hassiswithrunningboardbrackets.jpg Art I had considered curving the drain moldings as you suggest, but that would have made the coachwork a bit "busier" than I wanted--besides having any number of pics of such a formal car with the drain moldings as I've got them--it's a judgement call, Chris. As for altering the side windows in any way--I want to keep the character of the source of the fictitious body. Art
-
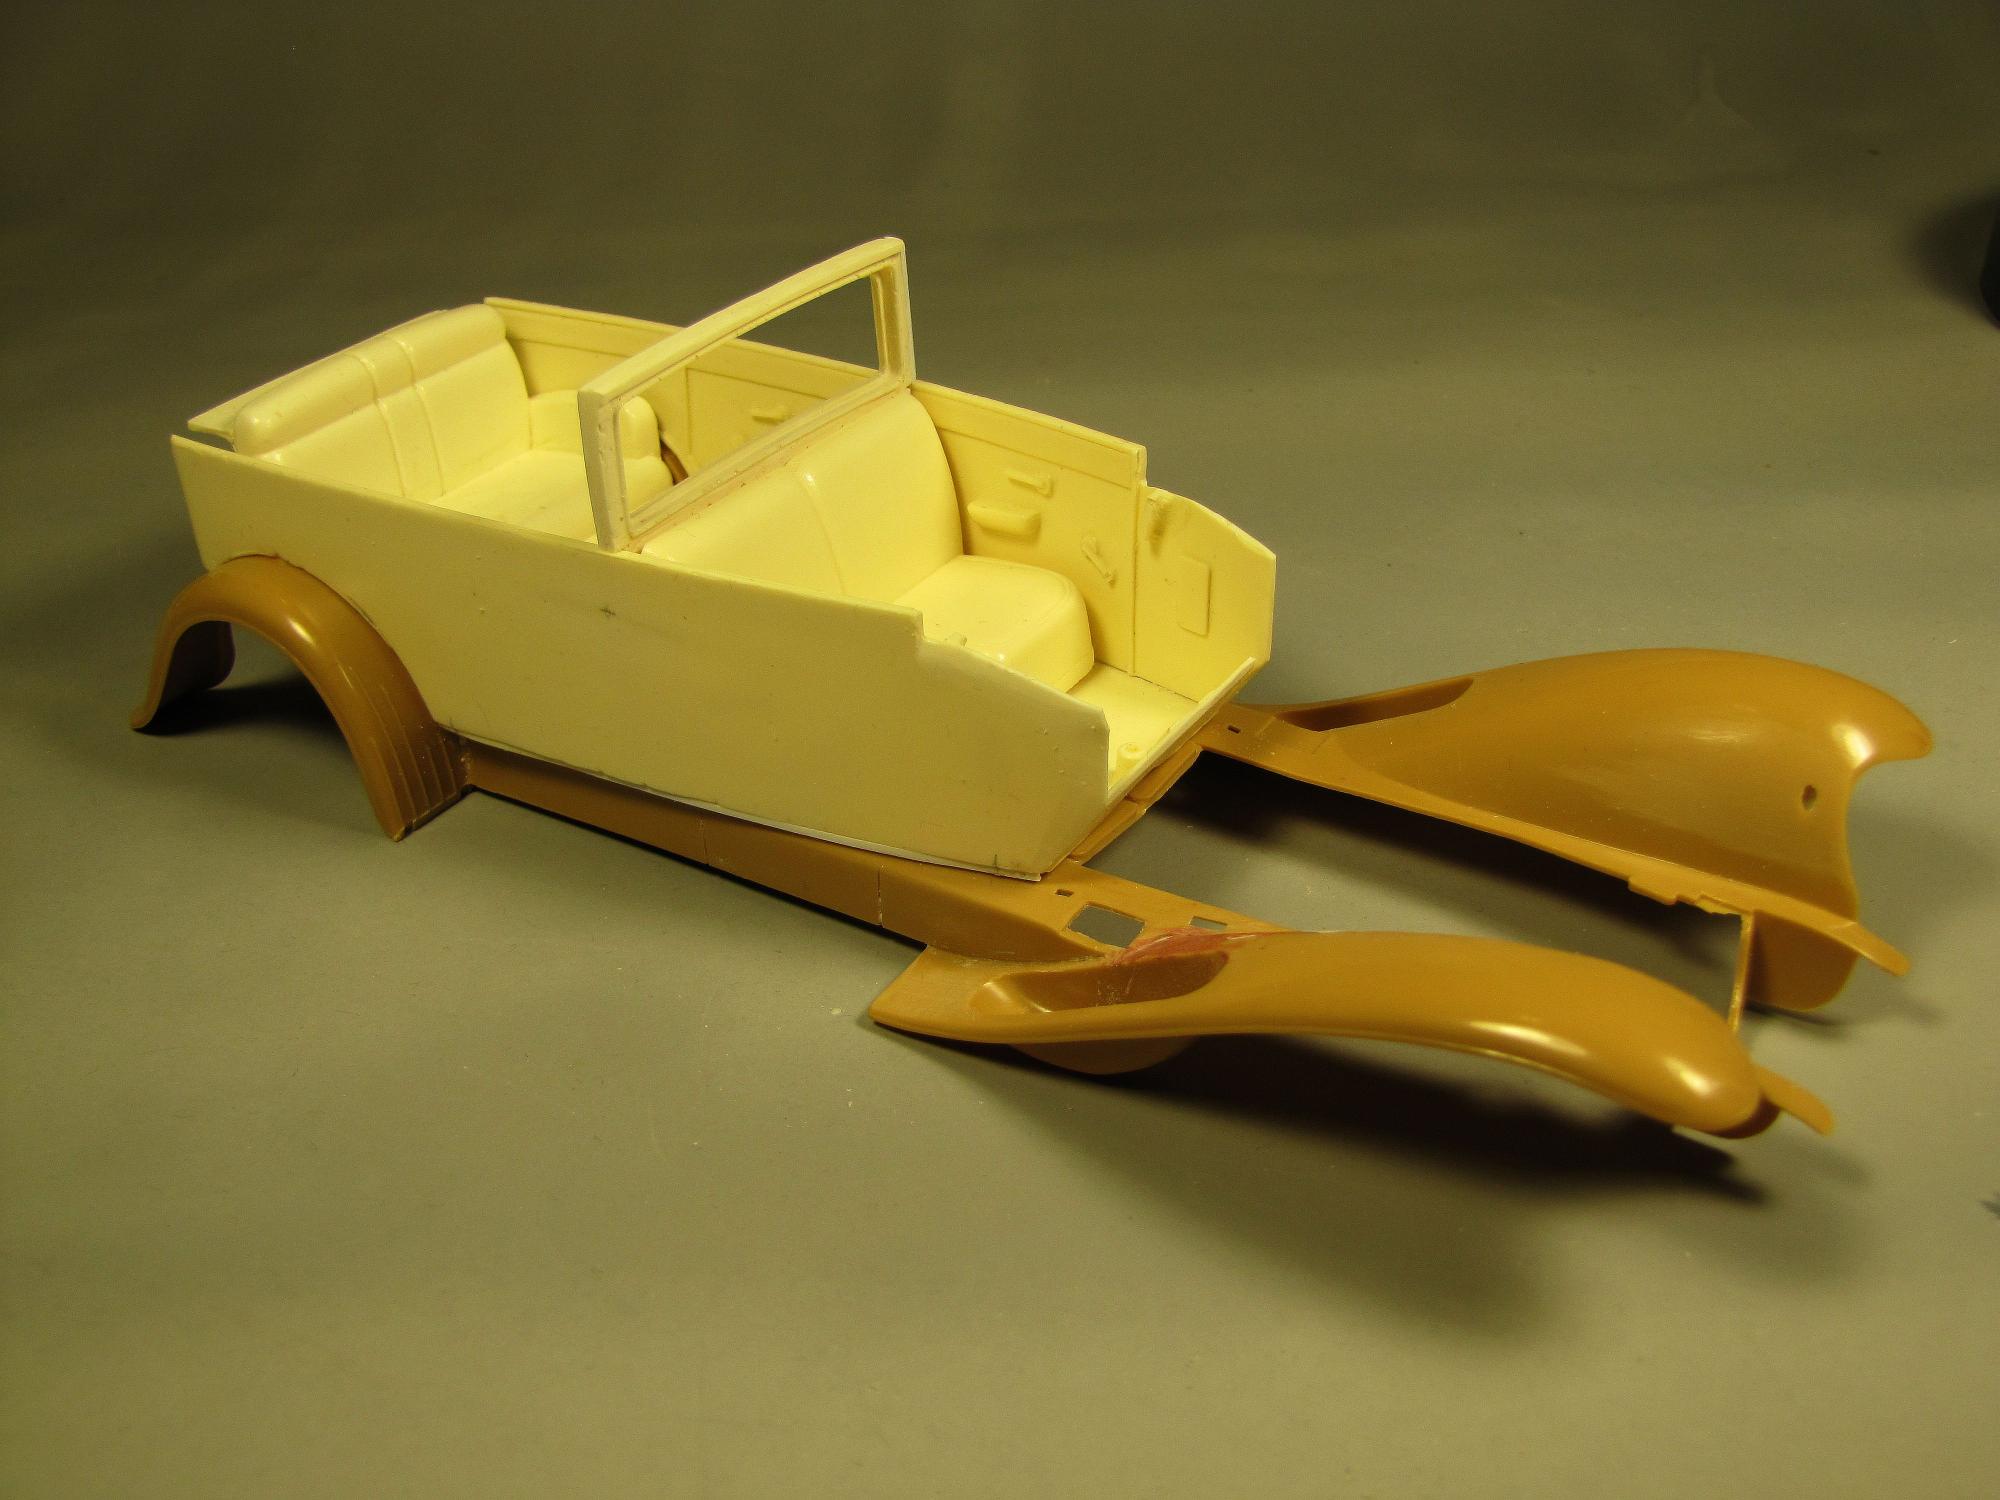
It's a bit past time for a new update: First, after a lot of consideration, I decided that the Berline needs to be much more formal-looking, with blanked off rear quarter panels providing greater privacy for the rear seat passengers--so I used some sheet styrene, along with CA glue, and just a thin swipe of "spot & glaze" putty to remove all traces of those offending quarter windows: Next, I test-fitted the interior together, sans side panels, for seat placement (as cast, the divider wall is about 3/32" too far back, so that has to be moved forward. The interior side panels are "from the beltline down", and will need to be relieved a bit to clear .015" clear sheet plastic for the side windows. In addition, I decided to get rid of the very "1932-ish" Ford windshield shape, and go with a wider, more angular look, so that means building an all new windshield frame from strip styrene. It's starting to come together, I think. Art
-
Harry, the original Barney Oldfield "Golden Submarine" was pretty much right on the money for 1919, when it was built, and as restored/reproduced by a Michigan enthusiast back about 25yrs ago (I've seen it in person, it's really pretty awesome. However, the later "reproduction" is just plain awful--I've seen it multiple times, as the guy keeps running it through the auction at Auburn IN over Labor Day. Art
-
Virtually no plastic model car kit has, or does today, enjoy and open-ended production run. Hence there will always be some limit to the supply. Art
-
Well, for whatever it's worth, many of us have this very Cobra in our model collections! It's the one that AMT Corporation referenced back in 1964 for their 1:25 scale model kit. Art
-
Wrecker / Rollback 'steel' cable ?
Art Anderson replied to 57peppershaker's topic in Model Building Questions and Answers
AKA Carpet Thread--available at Hobby Lobby & Walmart. -
In my experience, I've found that real leather is seldom dead flat in finish though, but more a semi-gloss, particularly if used a lot--Tamiya's spray Semi-Gloss lacquer does a really good job at making the leather effect. Art
-
Replacing Ribbing
Art Anderson replied to MrObsessive's topic in Model Building Questions and Answers
I've had some success (back in my Indy car building day) making ribbed surfaces by using Grandt Line (a model RR detaling supplier) styrene rod stock laid on smooth styrene surfaces. To ensure that these "ribs" would be straight, and spaced evenly, I've used pieces of K&S brass rod stock at whatever diameter would give me that spacing. Use quick-drying liquid cement, such as MEK or TENAX. Art