

Chillyb1
-
Posts
895 -
Joined
-
Last visited
Content Type
Profiles
Forums
Events
Gallery
Everything posted by Chillyb1
-
 That just goes to show that the varieties of rust are infinite. I love it.
 -
That is very cool, indeed. I don't know how you kept your sanity with those decals. By the way, do the decals come with the kit or are they aftermarket? How does the kit go together overall? I've been reluctant to get any of the many Fujimi varieties of this kit because I've heard mixed reviews.
-
Yes, by "below" I mean lower than. I think all systems work that way except for microns.
-
I'd suggest you get sandpaper, sanding pads, sanding sticks, and Micro-Mesh cloths in every grit available; that is, standard grit wet/dry paper from 150 to 2000 and Micro-Mesh from 1500 to 12000. In my experience, however, some grits are more used than others. I very rarely use anything below 400 (that's 1500 in Micro-Mesh) and usually start with 600 (1800MM). If you aren't going to go for super-shiny high-gloss finishes, then you can probably dispense with upper range of the Micro-Mesh cloths and pads. Conversely, if you are doing lots of body work and customization, then you'll need the lower end grits (below 400). Also, be aware that there are several different but common conventions for designating such abrasives. Here's a link to a helpful grit conversion chart: http://www.sisweb.com/micromesh/conversion.htm
-
So Harry is God now? That's only going to go to his head, you know!
-
How do YOU like your tires ?
Chillyb1 replied to Greg Myers's topic in General Automotive Talk (Trucks and Cars)
Whatever Tamiya uses in its kits, that's what I like. -
I got a new model room
Chillyb1 replied to MicroNitro's topic in General Automotive Talk (Trucks and Cars)
That is one spectacularly nice place to build models. But by posting this I hope you realize you are just going to make a bunch of modelers jealous. And you've finished it just in time for your birthday! Happy Birthday, one day early. -
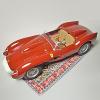
Here's what it looks like on a model: Its uses for modeling purposes are limited. It is much thicker than BMF (or its homemade equivalents) and that thickness is visible. It is very difficult to cut, so many very sharp blades, and a surgeon's steady hands, are necessary. I don't think it is as aggressive adhesive-wise as the other posters have claimed. When I was experimenting with it a couple of years ago, I never had a problem with it lifting any paint (I was using enamels and lacquers, so I can't say what it might do to acrylics). And when you remove failed attempts or excess tape, the adhesive lifts with the tape and does not leave any mark or residue on the paint. There are types of automotive brightwork that are notably, visibly thicker than scripts and other trim bits. This aluminum tape is, I think, best suited to windshield and rear window surrounds and some rocker panels. I don't really us it very much, but because I have several hundred yards of the stuff I still look for the occasional suitable application of it. It may not be very easy to see in this photo, but the bumpers and the side/rocker trim on this Porsche are aluminum tape: The trim on these VW running boards are also done in aluminum tape: And, just for kicks, I used the stuff on the underside of this Ferrari F40:
-
Marcos, I absolutely hate your builds! I don't like being jealous and envious and your builds always fill me with jealousy and envy. That Miura is just gorgeous. That color combo is one that really complements the styling of this most-beautiful of Lamborghinis. Your finish is flawless, every detail precise, everything's just as it should be. (My envy-level is now rising to a dangerous high.) A couple of questions: I don't remember if you pointed this out in your WIP or not, but did you do anything to accent the panel lines? They look just right but not overdone as is often the case. What did you use for the valve stems? On your photoetch wipers, did you use any of the kit's plastic parts for the base? Did you use Alclad chrome for the headlights and/or the side rearview mirror? Oh, and I think I see a couple of wrinkles in your BMF! (Did I mention that your builds also make me petty and mean-spirited?) Keep it up, Cruz, and I may have to quit the hobby.
-
Any comprehensive paint and finishing guides?
Chillyb1 replied to Mr. Show's topic in Tips, Tricks, and Tutorials
You can try these: http://www.italianhorses.net/Tutorials/Primer/primer.htm http://www.italianhorses.net/Tutorials/PerfectPaint/paint.htm Those will get you started. Then it's a matter of practice, practice, practice. Followed by more practice. -
To those of you who have built Revell's 1968 Pontiac Firebird: The instructions call for the rear brake-light panel to be installed in Step 6 but is there any reason NOT to install the part immediately so as to facilitate painting the whole body at the same time? Does the body not fit over the chassis if that panel is in place before the body is seated on the chassis? I'd prefer to install that piece at the beginning of the build process so I don't have to glue it in place after painting it and the body, thereby running the risk messing it up while applying glue (something I can foresee happening to me). Thanks.
-
Felix, do you do a lot of armor modeling? I've just begun getting into it because I really want to do some serious weathering. I like the look of your Tiger.
-
Enough about the car. Tell us about the "Exclusive Record Offer Inside."
-
Yes, I have a method, but you have to be very, very careful. I learned this from someone on this forum and I can't remember who. Anyway, use regular Scotch-type clear tape. After you trim with a sharp blade, you can apply the tape where you want to remove the decal and, voila, it will remove it. Sometimes it takes a couple tries before it all comes up, but if you are patient you can get it all removed without damaging the decals you leave in place. Does that make sense?
-
Thanks. I like this particular shot:
-
Tamiya Porsche Carrera GT
Chillyb1 replied to bobthehobbyguy's topic in General Automotive Talk (Trucks and Cars)
All I can say is, good luck, my friend. The Studio 27 pieces are too thick and, in fact, out of scale. I tried a kind of annealing process by heating them with a lighter, but that had a negligible effect. If you first try to use the clear plastic pieces from the kit as a kind of buck, then you are part way there. After you get some gentle bend to the pe pieces you can try using two different rods or dowels or anything stick shaped and round of suitable diameter to shape the pe parts. There are basically only two curves to those screens. Make sure, also, that they are trimmed to fit exactly into the space under the engine cover. Once I had them more or less of the right curvature, I put them in place and CA glued them in a single spot, let that dry, then worked my way around the thing to get it firmly glued in place. Does that make any sense? Here's a couple of photos of the result: Depending on the angle, a gap can be seen between the screen and the engine cover where there in the maximum curvature. It couldn't be helped. Overall, they look pretty good. However, I'm currently working on a Carrera GT using the Scale Motorsport detail set and the screens are much easier to work with, though still not trouble free. Again, good luck with it. -
Thanks for the comments, folks. This is a departure, subjectwise, for me. I usually build European sports cars and rally racers. The color is Bright Aqua Metallic from Duplicolor, which I think is meant to be a touch-up paint for a GM factory color. I really like the color and think it suits this car. I don't know if they were ever available in the shade, but it strikes me as a suitable color. The rest of the build should come together easily enough. I made my own replacement glass and everything else is pretty much ready to go.
-
I'm currently making considerable headway on this build. A friend found the kit at a thrift store for cheap and bought it because the box art looked cool. Then he remembered that I build models and he shipped it off to me for a restoration. This is what it looked like when it arrived: And here are a couple photos I took today. I've repainted it twice due to modeler error and am very happy with it now. The interior is done. Now to BMF and then final assembly.
-
Starting with the hints already, Harry?
-
Jo-Han '66 AMC Marlin : "Forgotten Build"
Chillyb1 replied to Monte's Motors's topic in Community Builds
I, too, love the Marlin. Such a cool car from that era. Anyway, can't wait to see more. -
You can say that again. These things can be really frustrating and, as Bob mentioned, this one isn't even the most complicated of the Enthusiast series kits. One thing I've learned is that if the kit gives you the option of opening parts that are molded in place, DO NOT take that option. This one has the hood/bonnet molded in place, but scored so you can fairly easily remove it. I thought this would improve the final result; however, I didn't anticipate that the hood would never again fit in its place because a million little things that affect the torsion of the body, which makes misalignment all but certain. Also, there are a bunch of leftover parts that I decided I'd rather toss in the parts box than try to put in place. Screw it, nobody will ever notice. An astute Porsche enthusiast might see what's missing in the engine bay, but most people wouldn't: Anyway, it was fun enough and I'm happy enough with the result.
-
Here's the latest from my workbench. This is Fujimi's Enthusiast Model Porsche 911 Turbo from 1985. Typical of the Enthusiast series of kits, there are a bunch of fiddly little parts that cause many headaches for the scale modeler. Paint is Model Master Fathom Green Metallic lacquer with Rustoleum clear, if I recall correctly, though it may be Tamiya clear. Interior is a mix of Tamiya acrylics but I can't remember what colors I used. There are things I like about this build and things I don't really like, but I'm pleased enough overall to present it here. The photos aren't great because the light was bad today. I may try to take some better photos when the sun shines again. More pictures can be seen here: http://smg.photobucket.com/albums/v230/ChillyB1/Fujimi%201985%20Porsche%20Turbo/
-
This will be a fun build to watch. However, Erik, what has happened to the Citroen DS? By the way, you have excellent taste in your model subjects: I'm also working on a Heller DS and have just pulled out a Tamiya Enzo to get that underway! Can't wait to see more.
-
Can anyone explain.........
Chillyb1 replied to Pete J.'s topic in General Automotive Talk (Trucks and Cars)
They are meant as illustrations of what French car design is like in the early 21st century. They aren't at all intended to be understood as classics, but as a point of comparison to, say, Ford Taurus or Chevy Malibu, for those who don't know what cars look like in other countries. My point is that the French still produce much more stylish mass produced cars than do most manufacturers from most other countries. -
Can anyone explain.........
Chillyb1 replied to Pete J.'s topic in General Automotive Talk (Trucks and Cars)
The short answer to that question is, Nothing at all! It may be a case of beauty-in-the-eye-of-the-beholder, or perhaps you (and others) are simply unaware of the many French classics, or (in some cases) crass anti-French bigotry or Gallophobia. France can hold its own against any and all other automobile producing countries in terms of technical innovation, performance, and design; and for elegance and beauty, I daresay, France surpasses all others dramatically and frequently. Skip got off to a good start with his short list but could add Salmson, Amilcar, Chenard et Walcker, Hispano Suiza, or even Simca and Renault. I personally happen to think the Citroen DS is the most beautiful car ever mass produced. But maybe that's just me. During any time period, French manufacturers produced beautiful, powerful, technically brilliant automobiles, be it the 1930s: The 1950s: Or more recently: There is no shortage of examples from any era nor in any automotive category that equal or surpass those from other countries. Designers from Chapron, Antem, and Figoni & Falaschi to Franay, Saoutchik, and Letourneur & Marchand, are every bit the equal of any Italian designer. I hope this helps toward explaining your initial query. This is simply not true, neither as a statement of fact nor as an explanation for the original poster's questions. If you are referring to Renault's former status as a nationalized company, then you must be mistaken in your claim or your understanding of the meaning of nationalization; the company was NEVER funded by the government. No country's manufacturers were so fiercely independent in financing and management as France's. No company had any government relation before World War II, apart from munitions production and military vehicle construction; after the war both Berliet and Renault were nationalized, Berliet was fortunate to live long enough and have enough offspring to bring the company back to private family ownership. Renault, on the other hand, remained a nationalized company but was run entirely independently of any government agency or ministry. Renault was also France's largest and most successful car maker for the entire postwar period until Citroen and Peugeot merged. Anyway, there was no government funding of any car company in France.