Mark Brown
-
Posts
193 -
Joined
-
Last visited
Content Type
Profiles
Forums
Events
Gallery
Everything posted by Mark Brown
-
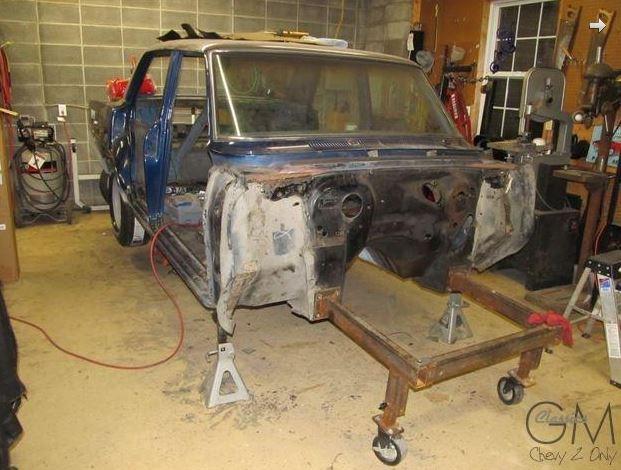
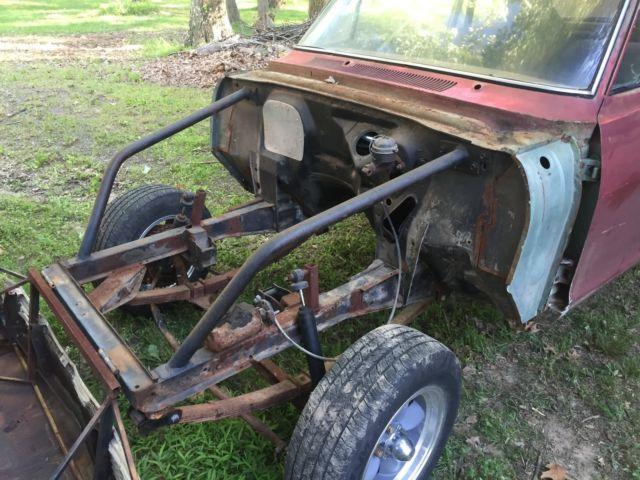
Right you are, Mark - my mistake. I had forgotten about the bolt-on clip on the earlier Novas. Here's a couple of pics that illustrate it. One where someone has put a straight axle setup on the stock rails (and you can see the bolted connection at the firewall) and another where someone has removed the framerails and bolted on a dolly arrangement. These show pretty clearly where the aftermarket front end kits bolt on.

-
The lower rails are attached to the subframe stubs, where you cut off the stock subframe and weld plates over the ends. The upper supports bolt to the firewall but are just supports - the load is carried through the subframe rails.
-
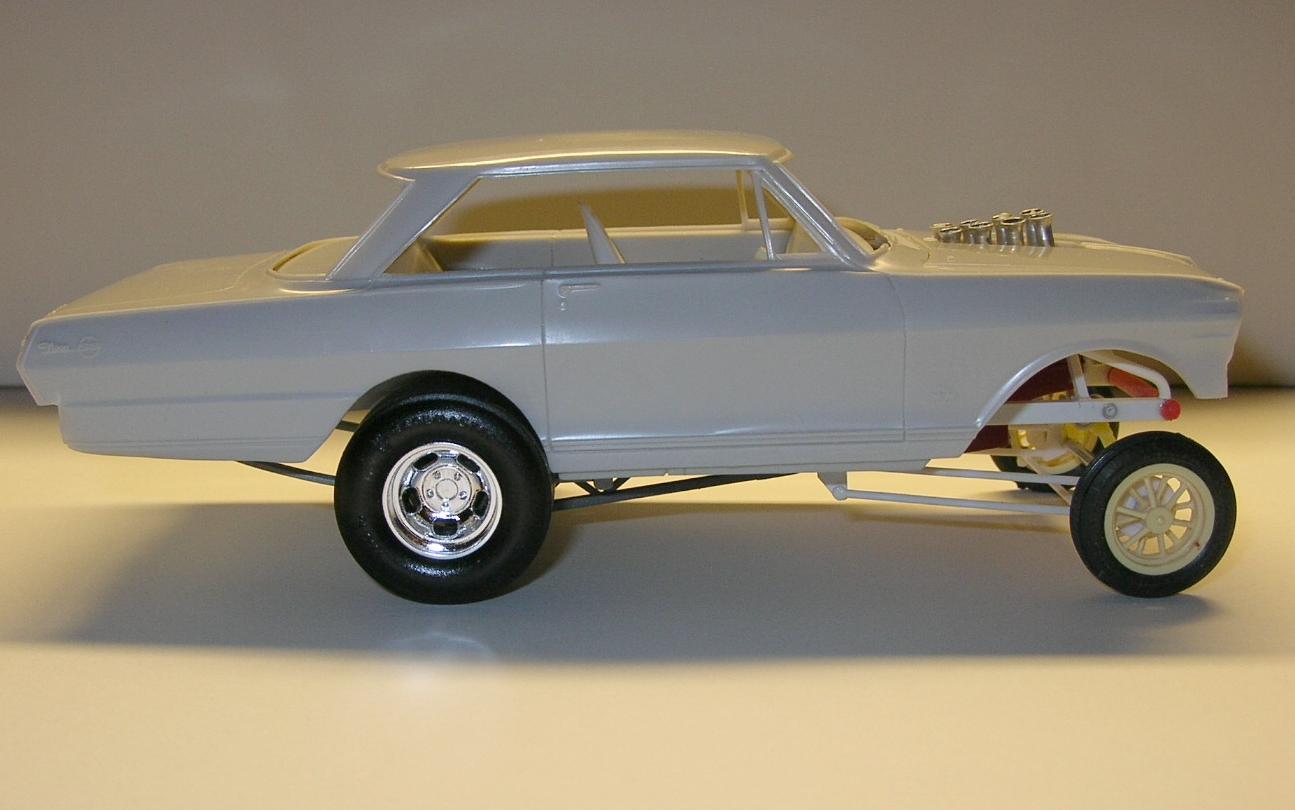
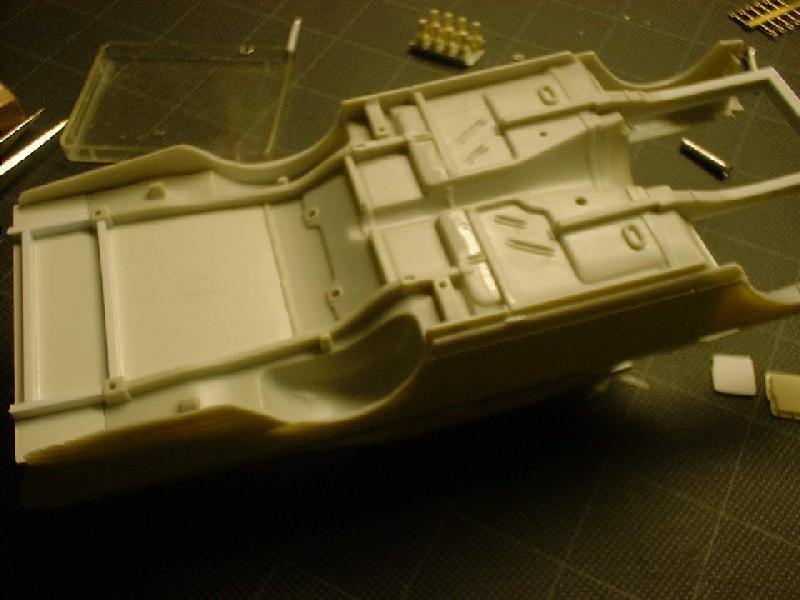
The AMT '66 Nova chassis is an excellent swap for the old Rat Packer. Here's a couple of pics of a project I've had going on for way too long. I chopped off the front clip and added plastic rails as was so commonly done back then with commercially available kits.
-
As is usually the case, I paid a bunch for it, and by the time I get around to doing anything with it, the kit will have been reissued. I used to tell people, if there's an OOP kit you want reissued, just let me know and I'll buy an old on on eBay to big bucks, and the original will get reissued within months!
-
It's just the same as this one on eBay http://www.ebay.com/itm/MPC-1-25-SCALE-1978-PLYMOUTH-VOLARE-DEALER-PROMO-STARLITE-BLUE/111960297007?_trksid=p2047675.c100011.m1850&_trkparms=aid%3D222007%26algo%3DSIC.MBE%26ao%3D1%26asc%3D35624%26meid%3D914563154a5243118f1bcee11d5223ee%26pid%3D100011%26rk%3D4%26rkt%3D10%26sd%3D361522137496
-
Interesting discussion. I've got a Volare promo that I've been saving for years. I hope a new (or repopped) kit sees the light of day so I don't have to keep hoarding my promo (and so I don't have to deal with its dark blue plastic). One of the obstacles to consider on these, if you are building one stock, is the front suspension. Chrysler used a transverse torsion bar front end on these cars, as opposed to the longitudinal torsion bars you find on almost all Mopars before these came along. They were actually used as a street rod front end swap before rodders discovered all the benefits of the Mustang II front end. I'll be interested in seeing if MPC actually replicates the front suspension or just uses the same chassis as on the earlier A-body kits. I owned a '79 Aspen back in the early '90s and it was really a pretty decent transportation tool, if slow with the 225-inch six. I bought it with the notion of swapping K-members and putting a 440 in it, but I got bitten by the Mustang bug around that time and that was the end of what was only my second ever Mopar (the first being a '64 Barracuda).
-
From the Rod Shop Facebook group
-
Yup, forgot about that one.
-
That wouldn't be Grabber Orange. Ford last used GO in 2009. In 2012 they used Yellow Blaze and in 2013 it was School Bus Yellow.
-
CA glue (cyanoacrylate) is another term for "superglue". I use the gel type since it's easier to control. What you don't want is to soak the belt, because that will make it stiff and hard to work with. You just want a very minimal amount of the glue - less than a small drop dabbed on the teeth - enough to keep the teeth attached. Don't get frustrated if your first belt doesn't turn out - learn from that one and try again. Words that scratchbuilders learn to live by.
-
It's not too difficult to make your own, and it costs virtually nothing. I use electrical tape, and I tape a piece two-inches or so in length and as wide as needed for the blower belt, down on my workmat, sticky side up. I stretch some sprue so it's a good thickness for the belt teeth, and lay it across the tape, cutting it close to the edge of the tape. Repeat until you have all your teeth added, and then trim them to the edge of the tape with a razor blade. Before trimming, push them down to the tape firmly so they'll stay stuck in place. Once they are all added and trimmed to fit, I very lightly dab with some CA glue to hold them in place. This step is critical, because if you use too much CA it will make the belt stiff, and you don't want that. Once the CA dries, shoot the tooth side with some semi-gloss or flat black and you're ready to go.
-
Not to get nitpicky, but what you are replicating there are not the actual parachute shroud lines, but the fireproof cover that's required to cover them (and also the chute itself). You can see in the photo at the beginning of the thread how the covers snap over the shroud lines and when the chute(s) deploy, the lines pop free of the covers, which are anchored at the chute. These covers are pretty smooth in texture so using material with a fabric texture to replicate them isn't really necessary......they're more like a really heavy tightly-woven cloth-type material.
-
Weld Magnum wheels, where to get?
Mark Brown replied to Hawk312's topic in Car Aftermarket / Resin / 3D Printed
No, they're aluminum, which is a real bonus, because, as you know, nothing looks more like an aluminum wheel than an aluminum wheel. Another cool thing they have is separate rear beadlocks in different colors. Not only do they look right but they also serve to cover up any sawmarks from "un-deepening" the wheels. Here's another shot of my first order from Fast Eddies - you can see the separate beadlocks. -
Weld Magnum wheels, where to get?
Mark Brown replied to Hawk312's topic in Car Aftermarket / Resin / 3D Printed
Here's a selection of the Pro Track wheels, mounted with various kit tires. They come with foam slot car tires, which must be removed, and the rears are very deep dish and need to be modified. No biggie on that - a minute with a razor saw does the trick. -
Weld Magnum wheels, where to get?
Mark Brown replied to Hawk312's topic in Car Aftermarket / Resin / 3D Printed
They're not resin but most guys I know are using the Pro Track slot car wheels. I get mine from Fast Eddie's House of Speed http://stores.ebay.com/Fast-Eddies-World-of-Speed/Drag-Racing-Tires-/_i.html?_fsub=5&_sid=4632732&_trksid=p4634.c0.m322 -
Here you go - these are very nice pieces, by the way. http://www.dirtmodeler.com/store/
-
I dabbed the teeth on mine with a very light tough of CA glue - enough to permanently hold them in place but not enough to stiffen up the belt. Ten or so years later they're all still hanging in there, so I guess it worked! I haven't seen the kit - I've got a pile of the old AMT '57 "street machine" kits that I bought for some of their neat parts, so I'm good on classic Corvettes for some time to come. I started messing with a project similar to yours a couple years ago, and it just recently found its way back to the bench. I've got most of the chassis stuff done (my favorite part) and now I'm trying to make my mind up on a powerplant......strongly leaning toward a 426 Max Wedge/four-speed combo. I really like those small pinstriping decals and I might have to pick up that kit just for those.
-
Nice! Do you remember these photos from the old SLM days? I used stretched sprue for the ribs on my belts and made them with black electrical tape - it has a pretty realistic look to it when finished and doesn't really even need painting (though the ribs do). Did you get your issue of Hot Rod yet? One of those Corvettes even stole your paint color!
-
Check out the new issue of Hot Rod, Terry. I just got my copy in the mail today and it's got a feature on two MS-styled Corvettes that you're going to want to see.
-
This could be an interesting CBP. Keep in mind that rules vary widely, to put it mildly. In this area alone there are several series mandating 10.5 tires (and/or drag radials) and, unfortunately, the rules vary enough that it's not always possible to build one car to run at different tracks. In the south, where 10.5 outlaw racing arguably began, most tracks are 1/8 mile or have gone to 1/8 mile racing since these cars are extremely quick/fast and simply outpower many of the smaller rural tracks they race. A couple of tech type things that are fairly universal in this type of racing. Most of the time stock suspension is mandated, as are factory floorpans. In reality, "stock suspension" means stock suspension mounting points. This is why the racing is usually dominated by late model Mustangs and Malibus, with their factory four-link suspension. In most of the 10.5 outlaw racing I'm familiar with, backhalf (aftermarket four-link or ladder bars) aren't allowed, and if they are it's with a hefty weight penalty. Also, since these cars can run in the low 7s/high6s at well over 200 mph in the quarter mile, and since tube chassis are disallowed, there are pretty exotic chassis upgrades mandated, usually 25.x cages and underpinnings. You'll often see a tube frame beneath the stock floorpans (as I've done in this Mustang project I'm messing with) and a minimum of 12-point cages with funnycar bars and the whole shebang. On engine choice (or power adder choice) you'll find as many nitrous cars as turbo/supercharged cars, depending on the rules and track. Nitrous cars tend to do better on short tracks since turbos make big power on the top end and are trickier to launch than a nitrous or blower car. Small blocks are most common, since big blocks usually get a weight penalty (and you can build some pretty big small blocks these days). But you'll find plenty of big blocks. In a lot of cases, racers have to add weight - sometimes a lot of it - to the car to make class weight with a big block motor. We tried to put 500# of weight in a friend's car to make class in a race a few years ago.....and failed. Filled the bumpers with concrete, bolted in all the free weights we could round up, and still didn't get the car heavy enough to make weight with its 600-inch motor. For my money, this is by far the most exciting racing around these days and if you haven't ever been to a 10.5 race in person, you're missing some really wild stuff.
-
making resin engines
Mark Brown replied to alarmstrong's topic in Car Aftermarket / Resin / 3D Printed
If you don't get the results you like, don't give up. I liken it to buying a cheap guitar to see if you like playing. Cheap guitars have ended countless guitar playing careers before they ever got off the ground. Again, that's just my experience, and maybe the kits have gotten better since I got talked into trying one. -
making resin engines
Mark Brown replied to alarmstrong's topic in Car Aftermarket / Resin / 3D Printed
I've done it both ways. The main impetus for doing the 429 that way was that it came with a four-speed trans in the kit, and I wanted to build a replica of my racecar, which at the time had a C6 automatic. Casting the entire block/trans as one piece is problematic.....too many undercuts. If I was doing it, I would join the halves of the engine/trans and then separate the trans, but you'll probably have to have two kits to do that, because of the material you'll lose cutting them apart. You might well be able to add the missing material from thin sheet plastic. Casting the engine/trans halves works OK but if there is any warpage in your parts you end up with the two halves not matching exactly. That was my experience, anyway. Large lumps of resin like that can warp a bit and with something as long as the engine/trans, a little warpage can be a real problem. -
making resin engines
Mark Brown replied to alarmstrong's topic in Car Aftermarket / Resin / 3D Printed
I tried one when I was first starting out and all it did was cost me time and money. There's the right way to do it and then there are the easy and cheap ways. With the easy and cheap ways you generally get back what you invest. If you're just casting one part or a few parts, they may be a good solution, but if you are considering getting into it on any level above that, talk to some of the people who sell their resin and ask them how they operate. I really feel that you need a pressure tank and compressor, and you need to buy good quality silicone mold material and good resin. If there's an alternative I haven't seen it personally. -
making resin engines
Mark Brown replied to alarmstrong's topic in Car Aftermarket / Resin / 3D Printed
If you do, feel free to ask me - and others - lots of questions along the way. I had a couple of great mentors when I was getting started and I can't overstate the value of shared experience. It's not hard to do, but it does cost some money up front to do it right, if you are at all picky about the results. It's really a lot of fun and if you are seriously into scratchbuilding (as I am) it's a must. -
A bit more eye candy for you Fox fans, courtesy again of my nephew, Chris. First, his completely restored '86 DPS coupe. And his 24K mile original '85 Dominator And his red '86 Dominator. You could say he takes his four-eye Foxes very seriously. His new toy is a '13 Gotta Have It Green Boss 302.