Farmboy
-
Posts
518 -
Joined
-
Last visited
Content Type
Profiles
Forums
Events
Gallery
Everything posted by Farmboy
-

Bathtub Buggy Build
Farmboy replied to Farmboy's topic in WIP: All The Rest: Motorcycles, Aviation, Military, Sci-Fi, Figures
My apologies for the delay in posts. Onward and upward. First off, the tub, beginning with the legs/feet. The moulded on 4 pegs didn't do it for me and I looked a long time for ball and claw feet. I honestly bought a few dinosaur toys hoping to wrap some T Rex claws around a small round bead but no luck. I decided to go art nouveau and put my own idea together. It started with things called earring backs. They're shiny brass with a clear flexible plastic flange that's easily separated with a single cut from a knife or scissors. Dollar store of course. While there, I grabbed a variety size pack of pearl beads. The photo below shows the two cemented together, cemented to the tub. I think it looks ok. incidentally, this corner foot isn't secured in this shot, but the 3 others are. I decided to keep with the kit supplied stop light assemblies, but a quick stop in to the brother in law's got me a couple of much better looking 'lenses'. The make ceramic christmas trees so they have lots of sizes and colors of this sort of stuff. The curved assist bars are craft items. I didn't feel they looked out of place. These bars have flat ends with holes in them. A few pins snipped off at the head left just enough of the pin to hold them in the hole. CA cemented and all done. These shots as usual are hi mag and don't look half as primitive up close as they do here. A bit of perusing the internet for french tubs told me I wanted a hand held shower. I had a necklace with a snake chain, small enough to suit my needs. I built the sprayer from a cut down shock absorber body, a short piece of brass wire, a round piece of aluminum I had punched (a leftover from another project) for the sprayer back, and a 4 cyl photoetch distibutor for the sprayer face. I drilled a hole in the top of the tub faucet, cemented the necklace part into it adding a short piece of brass tube for support and devised a way to make it look halfway believable. A piece of brass colored wire was formed to make a support for the shower head and cemented under the lip on the outside of the tub. Not exactly scale but I'm ok with it. Next I decided on a footrest. These are apparently quite common in a wide array of forms though I've never heard of one. I made mine from a piece of brass and a couple of craft support pieces that lent themselves well to the project. I painted the tub interior with Tamiya white primer, leaving a smooth eggshell finish that's easily and invisibly touched up while I was still working on this. The outside was sprayed with Humbrol copper, but didn't like too bright and shiny finish. I ended up using acrylic copper craft paint, darkened with a few drops of acrylic Gunmetal. Worked great, tough as nails. That's it. Back soon. Comments and observations welcome. -
it's the potvin direct drive blower assembly from the Mooneyes kit modified to fit a flathead engine assembled from the partsbox. Worked out ok.
-
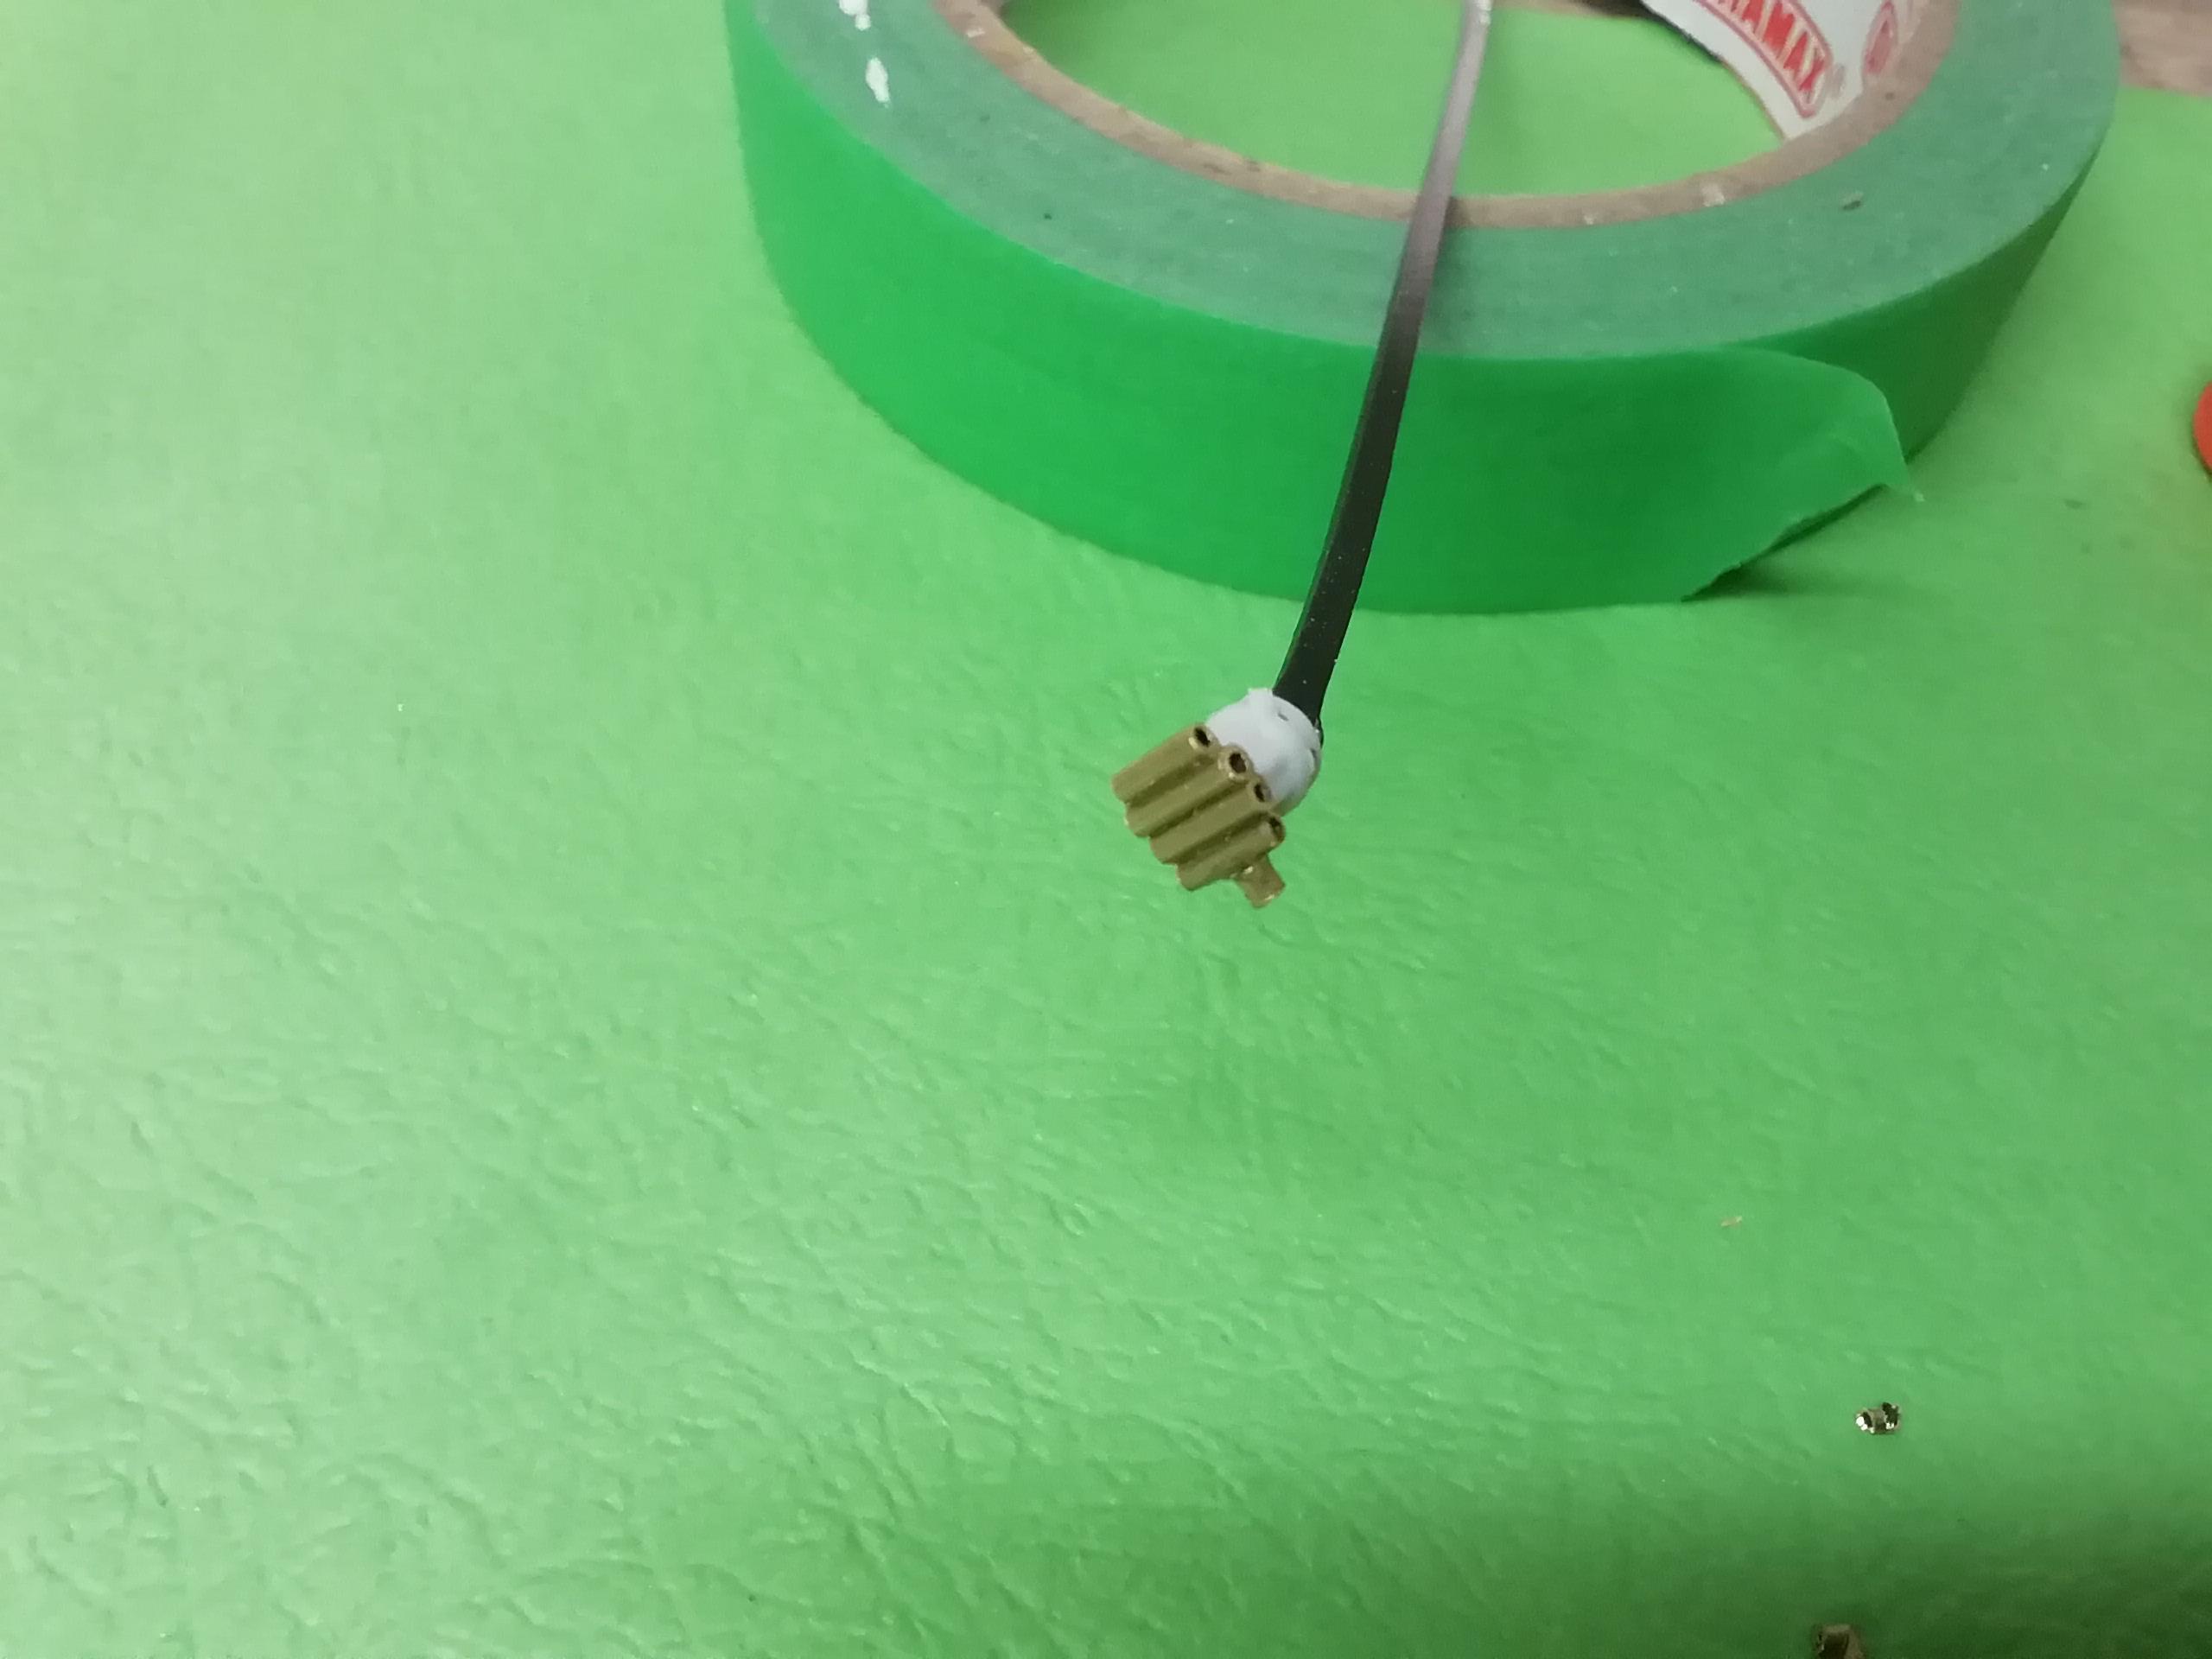
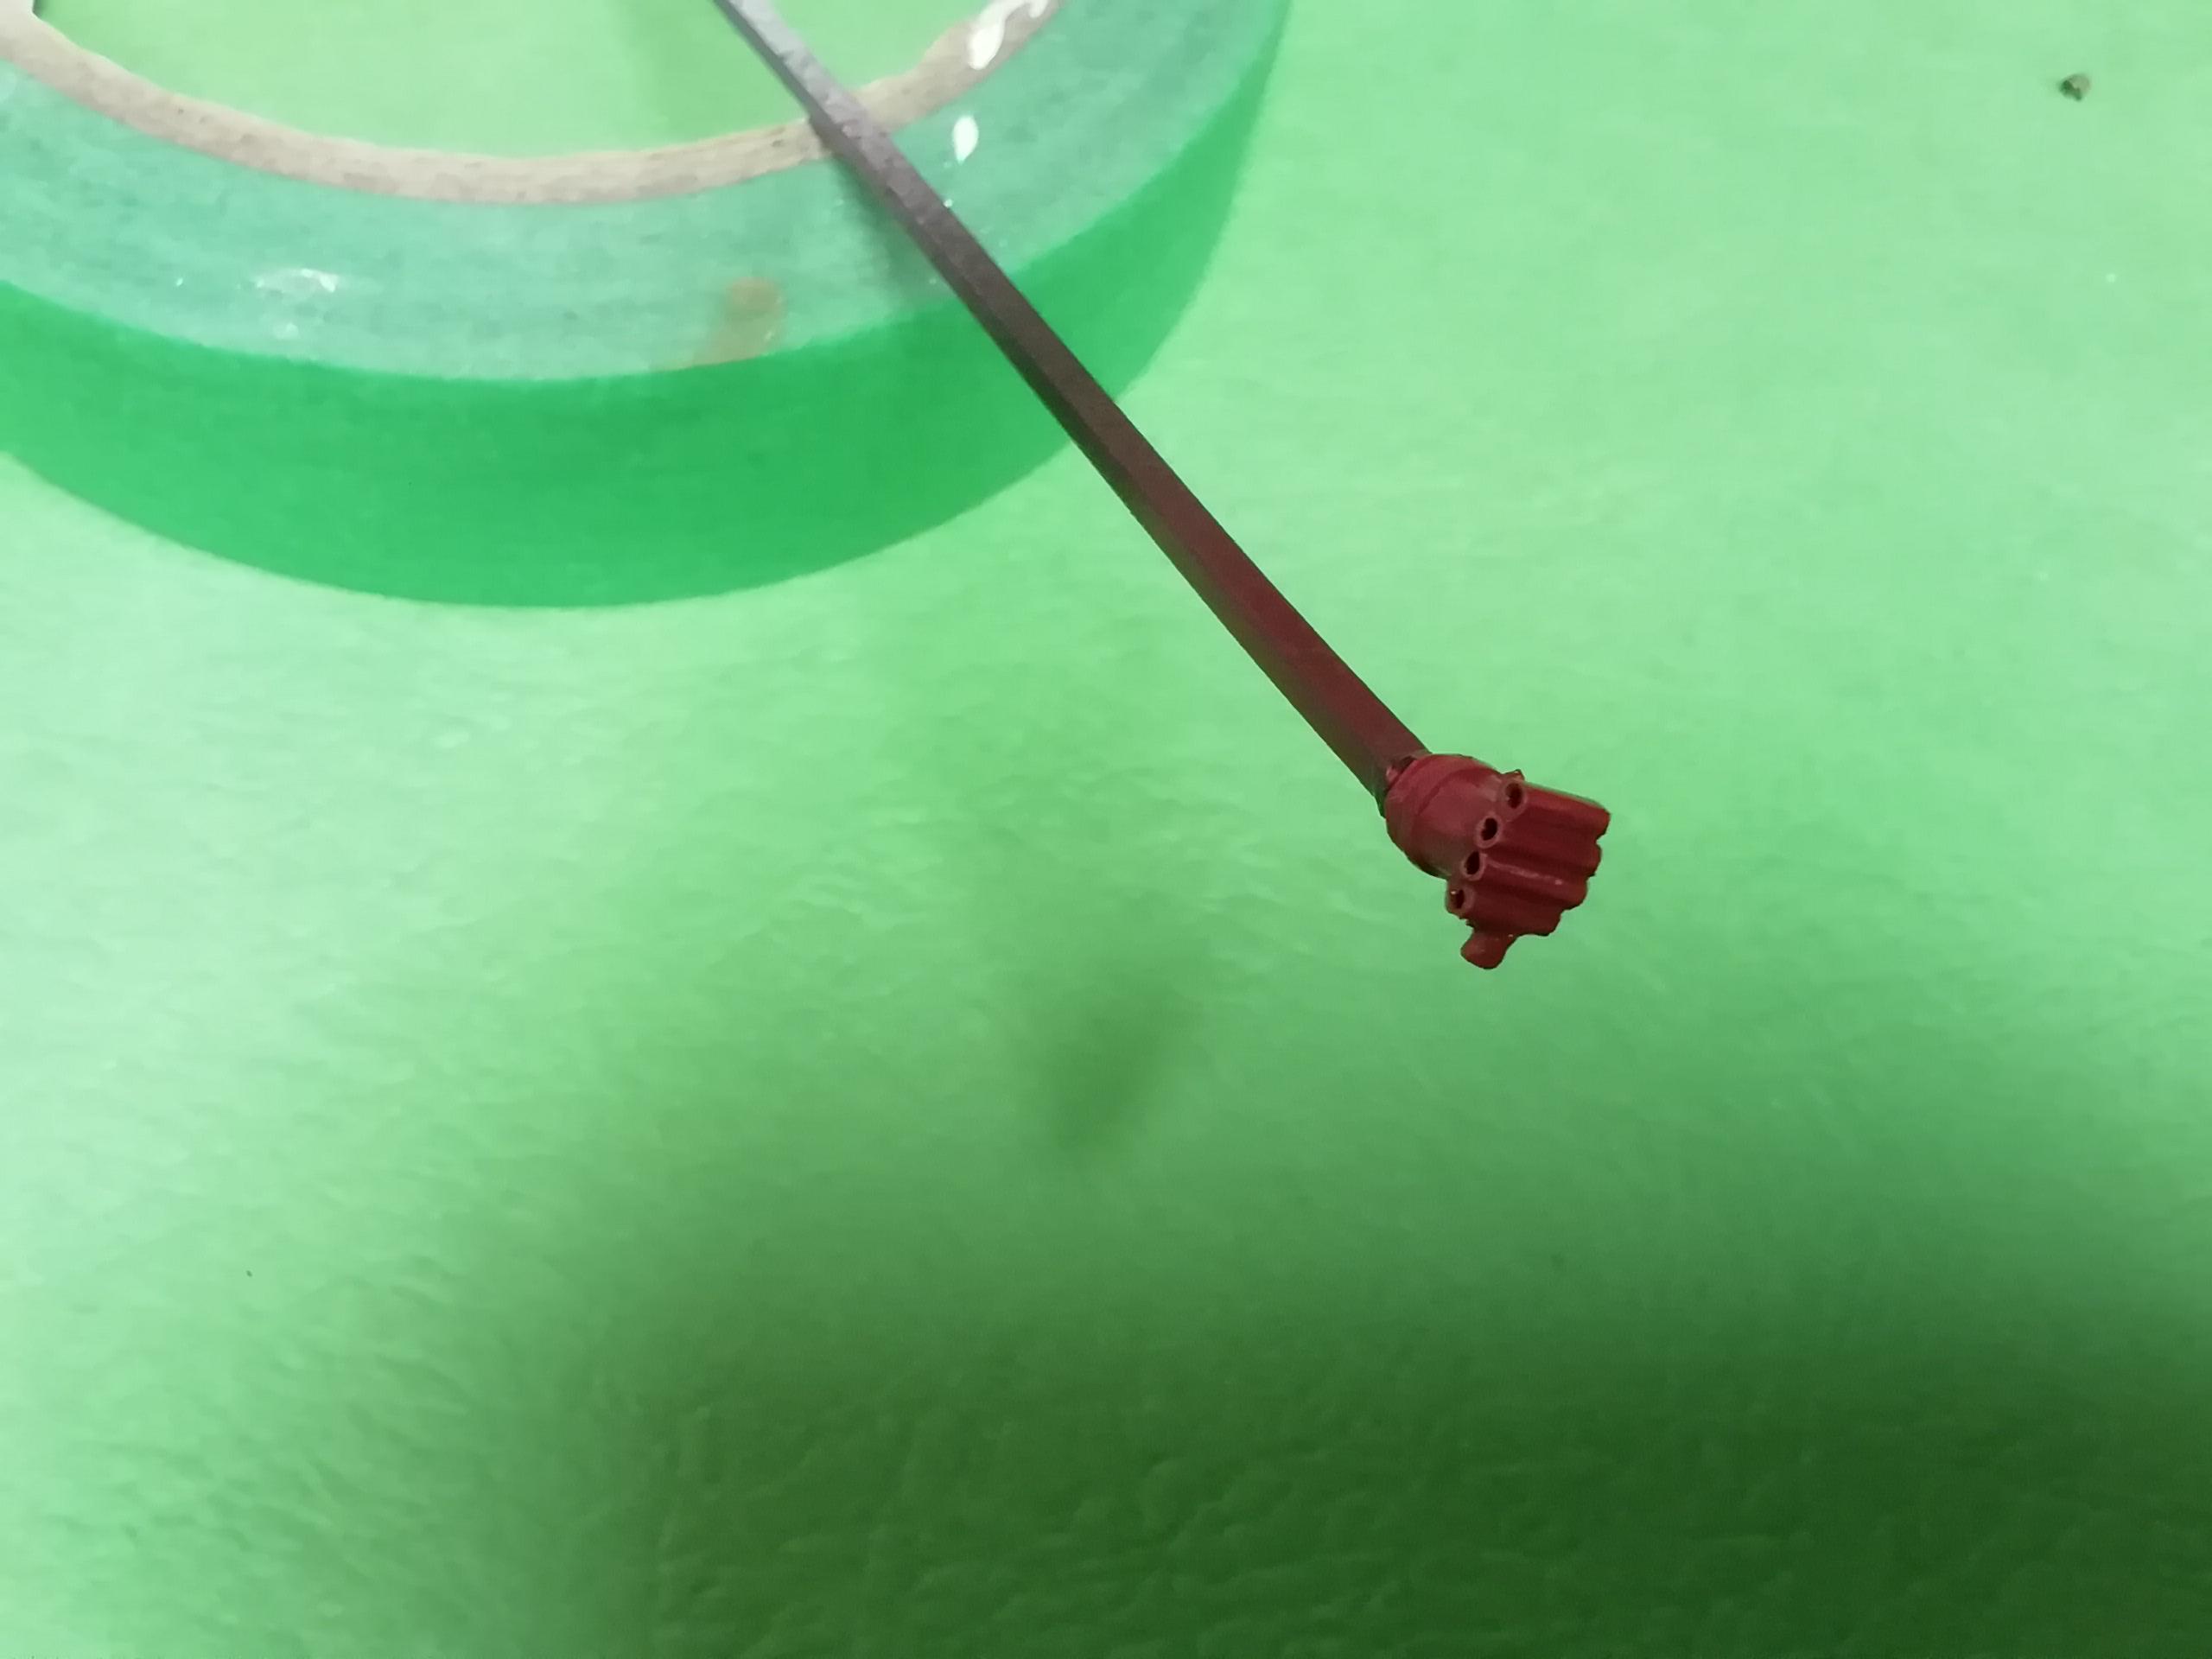
I wanted to try something different than a plain Jane distributor, didn't want a magneto either. I've seen this referred to as an e-fire, or crab type. Looked like a candidate for a simplified version. Using brass tube I cut lengths to approximate shape -- better too long than short. I lined them up, applied some thin ca, and filed each one to length, adding the coil tube 90 degrees to the rest. On the shots I've seen on the real deal, the coil connect was parallel with the rest but as I said, I was out of room. The real ones also had a shallow dome center to them but I kind of like the tuck 'n roll look. It was attached to the kit distributor after filing down the distributor posts, then sprayed red. A short shaft will be attached to the bottom of the assembly and mounted in to a hole I'll drill in to the side of the engine cover. You can see how it fits neatly in the space available, not interfering with the air intakes and cooling hoses. I had originally painted the plug boots red but thought it looked too much like a Fisher price toy lol. Out came the black. and it all tucks nicely behind the belts. This is a mockup of hose connections to make sure everything fit. just another option.

-
The 8 velocity stacks were just an air intake 'hat' over a single carb. Both engines are from amt's Pontiac Catalinas. A bit of modification was necessary for this build but I found the stock blocks to be very nice pieces.
-
I have always found Michaels' kit selection a disappointment.
-
Nice looking kit, but I also think that engine's killer kool! Clean job on a nice lookin' piece o' gear! Looking forward to the rest of the build.
-
Bathtub Buggy Build
Farmboy replied to Farmboy's topic in WIP: All The Rest: Motorcycles, Aviation, Military, Sci-Fi, Figures
From here on in, "Hydro Dipping" it is Gary. Wasn't even sure there was a specific name for the process lol. Thanks for the heads up.? Dave, happy you're enjoying the build! Slowly working my way back to the bathtub. -
Bathtub Buggy Build
Farmboy replied to Farmboy's topic in WIP: All The Rest: Motorcycles, Aviation, Military, Sci-Fi, Figures
I've used the 'aqua' paint technique a few times, mostly for stark contrast. This is the first time that I'm after subtleties. I'm going for a marble desktop finish. I decided on tones of gray. I used primer/gloss and flat. Not much of a difference in the end anyway. For those not familiar with this technique, it involves water and paint. A suitable container (line it with plastic if it's reusable) is filled deep enough water to cover the piece you want painted. Submerge your piece and spray the top of the water at a very shallow angle. When you see a pattern you may like raise the piece up thru it, gently rolling it to avoid wrinkles as you do. Here's what's left after I did my counter top thru three shades of gray. ...and here's the immediate result I'll be v e r y gently giving it a wet sand tomorrow, finishing with clear matte. Here it is ready for sanding. I put the unfinished gauges on just so I was sure the pattern is something I liked. Mikey likes it! The sides will be done in gold to match the rest of the boudoir. Comments and observations welcome. -
Bathtub Buggy Build
Farmboy replied to Farmboy's topic in WIP: All The Rest: Motorcycles, Aviation, Military, Sci-Fi, Figures
Got the two piece windshield installed, but just before we get to that, here are the pins I used to do the lightbulbs. I find them great for glue application of course, but I buy them because if you drop one or set one down, it's so much easier (for old guys like me anyway) to pick up the first time ?. Nothing big to report, just a mockup. The two windshields were easy enough to make. I didn't measure but started with a rectangle of clear plastic. The pieces are small enough to cut in one scissor snip so I just kept gradually cutting a narrow strip, test fitting, cutting another etc until it made for a gentle friction fit. I used Future clear acrylic (or whatever the name is this week) on a pin, touched it to joint letting it evenly fill in. I managed to get glare in the bottom piece so you can see it's there. The top piece that's canted out has a goldish strip of tape along the bottom. It's only there so your eye picks it up. The top of the piece has a dark brown hinge fabbed from a stir stick (thank you Tim Horton's) that's been split and glued at an angle. It's not really necessary but I find it makes for a better -- and less obvious -- glue joint. I could have tinted the glass with clear acrylic and food coloring but that whole area is busy enough already. Some minor paint touch up and that piece is finished. Comments and observations welcome -
Bathtub Buggy Build
Farmboy replied to Farmboy's topic in WIP: All The Rest: Motorcycles, Aviation, Military, Sci-Fi, Figures
Many thanks for the shout outs guys. Some things are working out better than others, but overall I think it's turning out ok, glad you're enjoying the build. -
Bathtub Buggy Build
Farmboy replied to Farmboy's topic in WIP: All The Rest: Motorcycles, Aviation, Military, Sci-Fi, Figures
The following items are still in the 'just finished' stage. A little touching up with a microbrush will make the firewall and window frames respectable, but that has to wait till the unit is installed. Still have the windows to put in and some curved wire shapes to attempt. I did this boudoir piece in white but the color kind of took over. Think the tub will be a bit of an issue but I have time to think about that. Anyway, gold it is. I gave the foil finish a coat of Molotow and it is now in harmony with the engine compartment and mirroring. The bottom left of the foil needs adjusting even though it's not visible when the piece is in position . I've removed the lights from the windshield frame, they reminded me of the popcorn vendor wagon at the fall exhibition. Then it looked a little naked so I rebuilt my own and put them facing the desk/driver area. Two shots, one with flash, one without just because.. They're build from plastic headed pins, a 3/64ish piece of brass tube, and a small sequin. Each. I predrilled the ten holes earlier. The wear on the paint comes from handling. That will be taken care of. I still have more to do to this piece so I'll put it off for now. Comments and observations welcome -
Bathtub Buggy Build
Farmboy replied to Farmboy's topic in WIP: All The Rest: Motorcycles, Aviation, Military, Sci-Fi, Figures
Hey Dave, Carl. Many thanks for the kudos and observations. Hope you're having good holidays, and thanks for stopping by! -
Bathtub Buggy Build
Farmboy replied to Farmboy's topic in WIP: All The Rest: Motorcycles, Aviation, Military, Sci-Fi, Figures
moving another step backward.... This build started at the front as the placement of the sink/rad shroud/engine dictate the placement of the boudoir back. Speaking of boudoir... This is the firewall side of the desk/windshield(s). The foil pieces off to the side are inserts cut oversize for trimming. The whole plastic piece will be white and here's a rough-in of the effect to make sure all pieces fit nice and tight before gluing. Again, this stuff is easily trimmed with an Xacto blade and it conforms when cementing with no 'spring'. ...and it's free with every can of Melitta ground coffee lol! I have a few things to do to the boudoir piece before adding the foil. Firstly I've removed the lights from the outsides of the window frames, rotating them 90 degrees to face the rear. I'm thinking also of replacing all overly thick curly pieces with wire equivalents like shown below. I think I can pull this off with a bit of practice.. As for the windshield, I'm tossing the oval idea and filling the bottom square with 'glass' and the upper section with the same, but pivoted out from the bottom at the bar, much like the model T's and others of years gone by. This may take a few days what with Christmas, New Year's and all... Comments and observations welcome. -
Bathtub Buggy Build
Farmboy replied to Farmboy's topic in WIP: All The Rest: Motorcycles, Aviation, Military, Sci-Fi, Figures
Always happy to hear when someone's enjoying a build process Gary. Thank you much. -
Bathtub Buggy Build
Farmboy replied to Farmboy's topic in WIP: All The Rest: Motorcycles, Aviation, Military, Sci-Fi, Figures
A few photos. Finally have the engine installed. Hard to see close up let alone in a photo are the upper and lower rad hoses. Also, note the fuel delivery line up to a kitbashed distributor block at the front of the intake. Fuel is sent via 2 lines, one per intake. On the rear of the intake is a throttle lever that will be attached via linkage to the gas pedal. Looking real close you can see the rod running horizontally between intakes to make it one cohesive unit. The scoop is drying. Still working on the transmission tunnel. The kit has no transmission linkage I can see on the real thing except for one blurry piece on the left front corner of the countertop. I'm assuming it's the shift lever and it's automatic as there's no clutch pedal. A short linkage assembly imagineered to fit to a small locator box on the tunnel directly under the counter top should do the job. The tunnel is not connected. I'm in the process of modding the boudoir assembly and one relies on the other. I'll be back when I have more. Comments and observations welcome -
Bathtub Buggy Build
Farmboy replied to Farmboy's topic in WIP: All The Rest: Motorcycles, Aviation, Military, Sci-Fi, Figures
Hey Mike. There are plenty of good oob builds of this kit out there to satisfy the model historians. No radiator, no headlight lenses, no gear shift, a kid's' kit from the late 60's fer shur. This is my impression (as far as my skills allow me to get it) of a grown up, modified version....perhaps an escapee from the Amber room? Where's my candelabra? Many thanks for the comments and observations....and the kudos! -
Bathtub Buggy Build
Farmboy replied to Farmboy's topic in WIP: All The Rest: Motorcycles, Aviation, Military, Sci-Fi, Figures
This photo was taken seconds after the last plug wire was installed. Some gentle curving and placement needed yet. That will come after the fuel line is installed on the left of the engine up to a distributor valve with two lines going to the sides of the intakes. Too much handling yet to say it's the finished plug wire presentation The mag was built from a section of sprue, the cap rim made from a section of wire wrapped and cut to fit. The effect is pretty good in person. Alternator is installed in the general vicinity of where they appear to be on 1:1 engines I've seen photos of. Note the holes in the sides of the intake for the fuel lines. 3 of the 8 plug wires are visible on the magneto. Quick mockup of how the headers will look, only they'll be straight on the final build lol. The toothbrush is my Super Clean scrubber holding the engine up for the shot. Planning on painting the oil pan chrome or black. We'll see. Comments and observations welcome. -
Bathtub Buggy Build
Farmboy replied to Farmboy's topic in WIP: All The Rest: Motorcycles, Aviation, Military, Sci-Fi, Figures
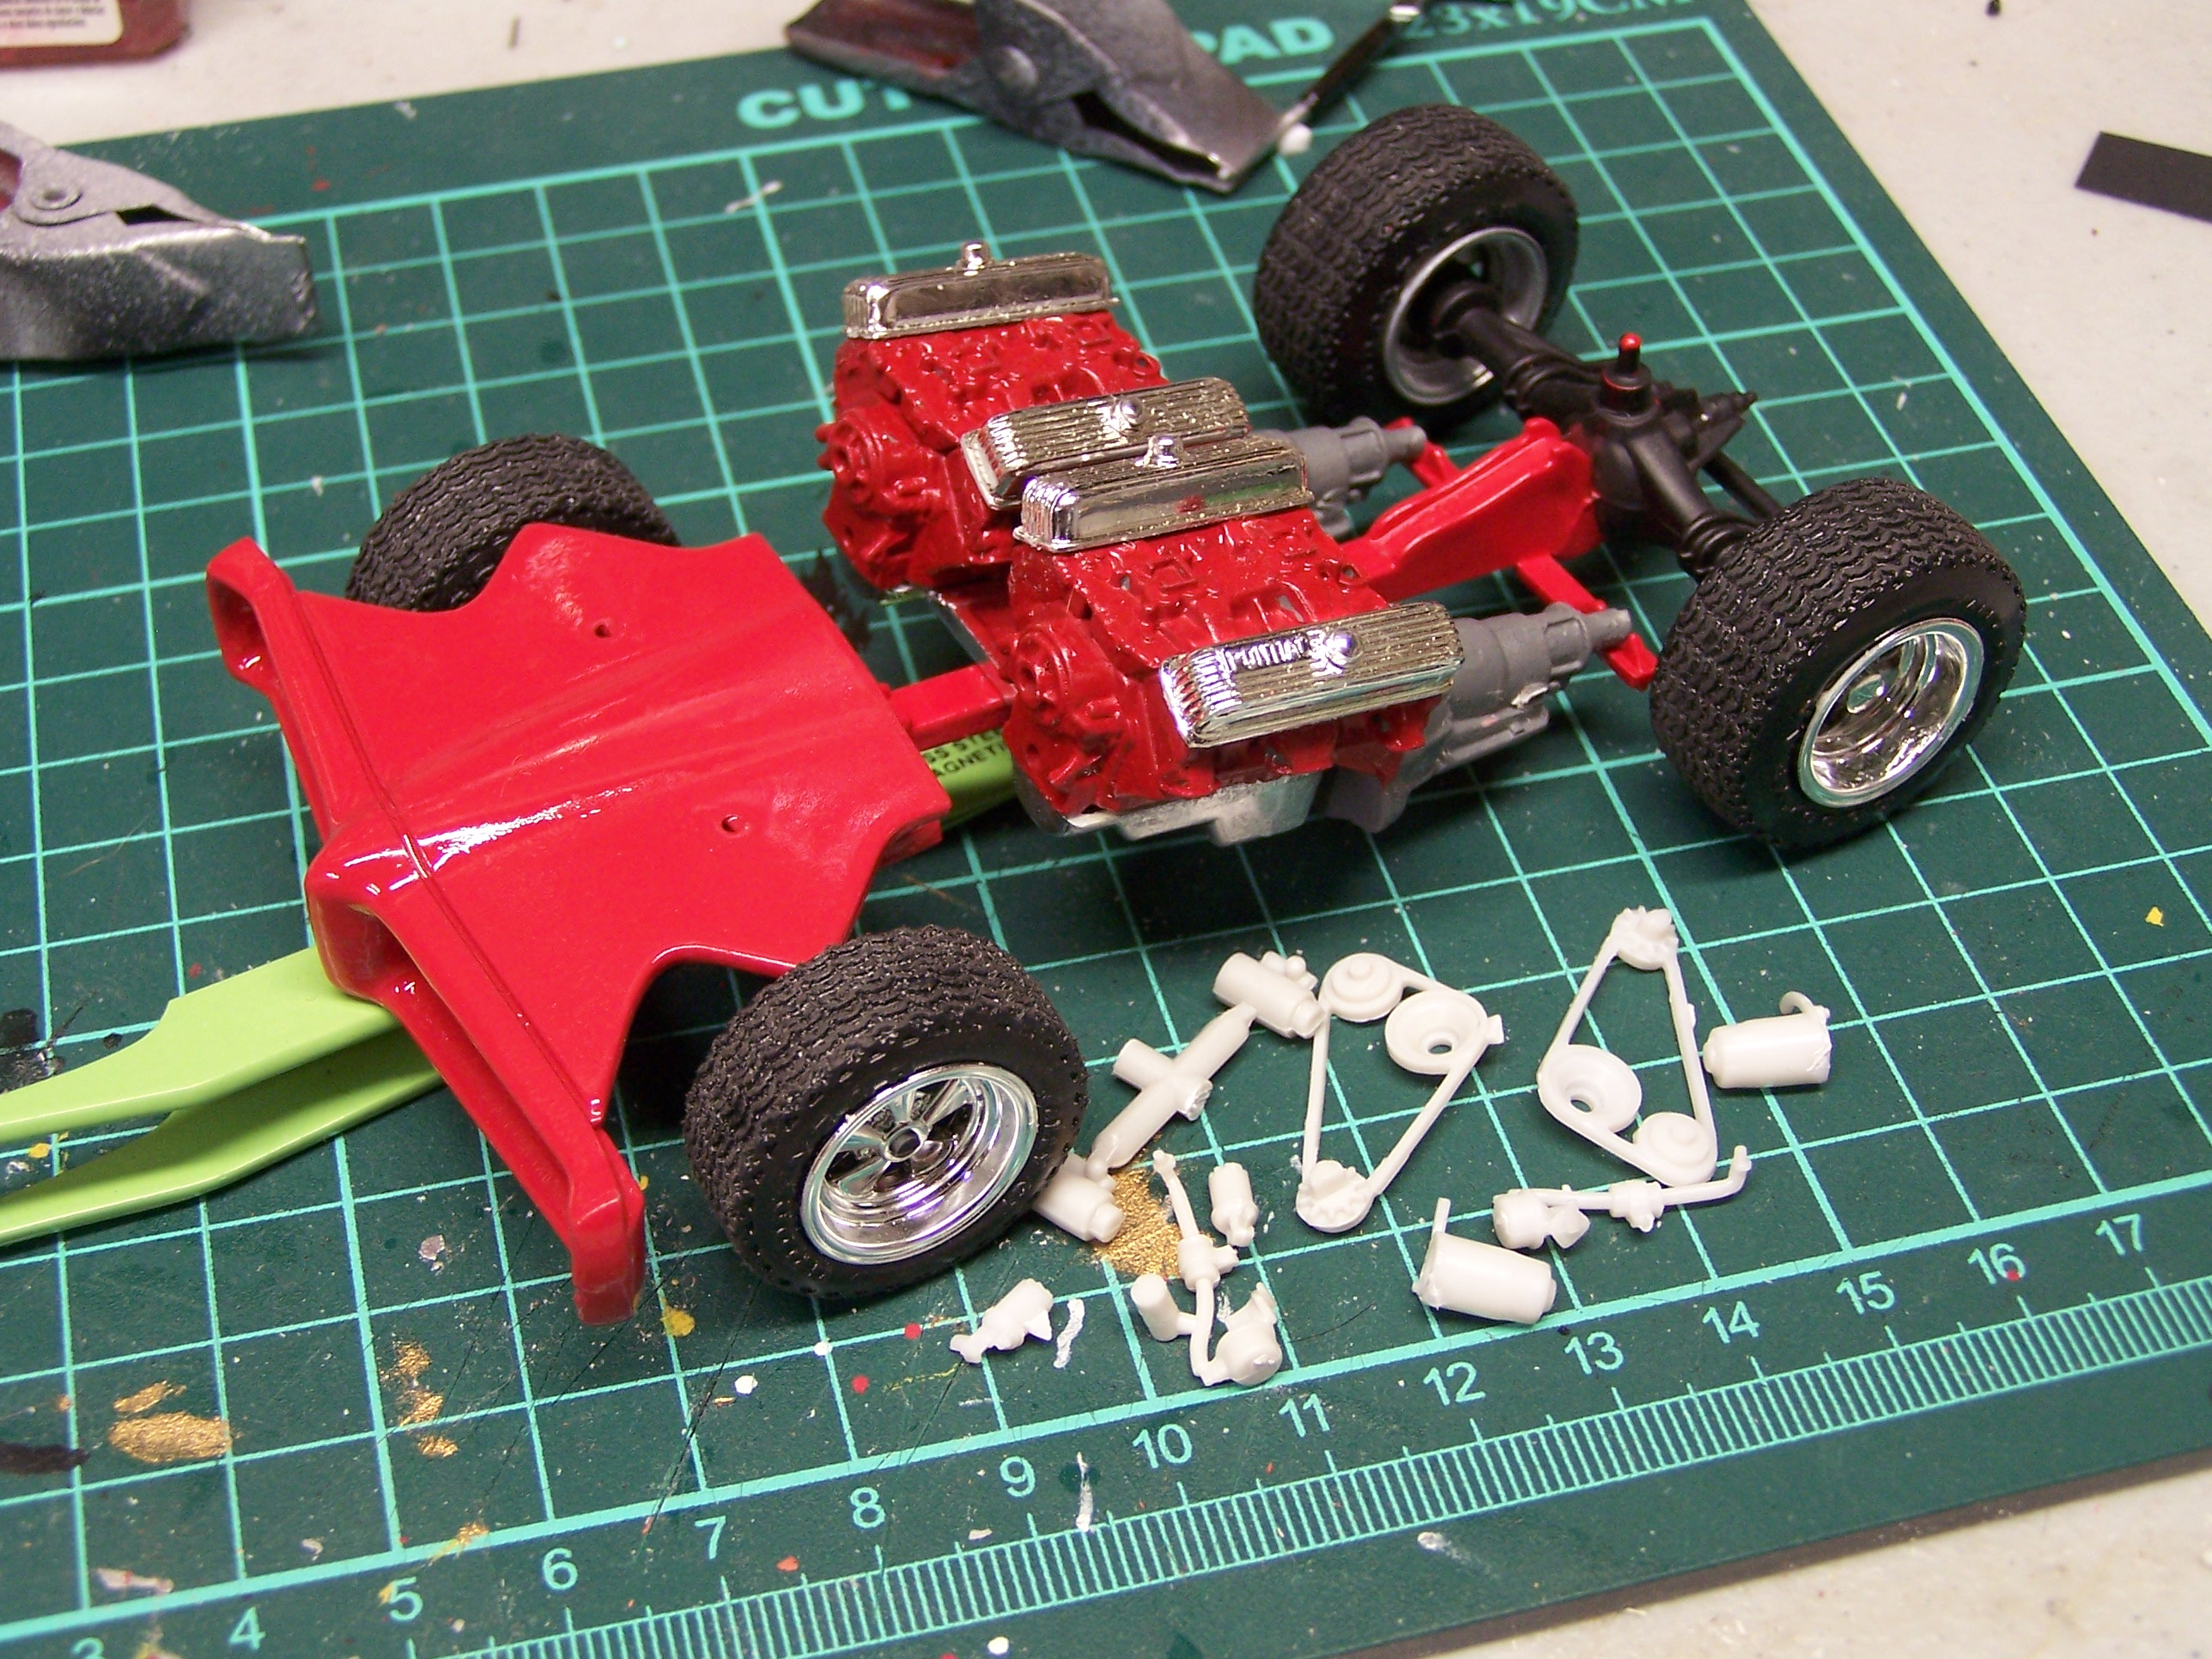
Managed to squeak in some engine time. Made the decision to go with a blower assembly to replace the mystery manifold box supplied with the kit. Though not in the photos below, the blower intake is thru a scratchbuilt double port inlet with a parts box scoop intake. I've also deviated from the norm adding a magneto for spark plus an alternator and battery for the starter and rest of the electrics. That covers exhibition runs and lighting. I think the battery would be in the kit supplied round brass plated towel hamper. Still the odd area to work on. Le crack in the oil pan is a doozy. No worries. The hole in the block front is for the magneto stem that will come out at an angle. Here's the magneto under construction. The tops on these are normally a tan shade. This one is red. The bottom will be chrome or silver. more to come. Comments and observations welcome -
Primer for Krylon Spray Paints
Farmboy replied to midlineqb's topic in Model Building Questions and Answers
Looks like it should work, it always did. Oh well, there are plenty of paint lines out there. I do think a change to one's go-to spray paint that can now potentially ruin someone's project (model builders not withstanding) should be noted somewhere else besides the side in the small print.
-
Primer for Krylon Spray Paints
Farmboy replied to midlineqb's topic in Model Building Questions and Answers
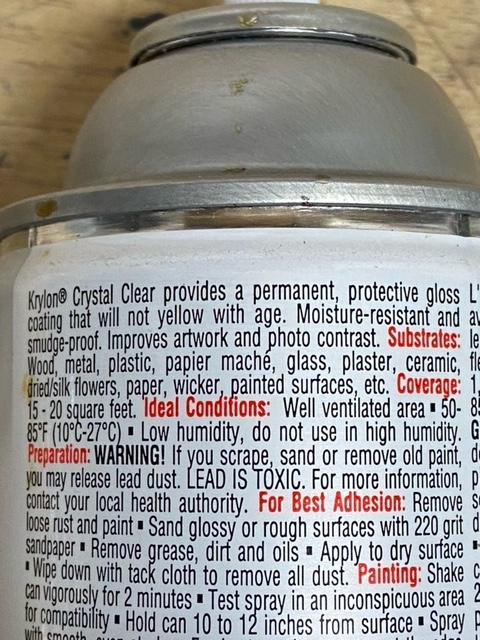
Had the same happen to me using Krylon clear but why? Same Krylon clear I've used forever it seems. Then I compared the small print. Both read the same till it gets to the cleanup part. The old reliable Krylon clear said to use mineral spirits, the new Krylon clear said to use lacquer thinner. I see that as the issue. Dammit Jim, I'm a modeler not a chemist! I bought a spray bomb of Rustoleum clear that said cleanup with mineral spirits.....problem solved. Pain in the a** this new important change wasn't noted separately on the main picture label. Hope this helps. -
Bathtub Buggy Build
Farmboy replied to Farmboy's topic in WIP: All The Rest: Motorcycles, Aviation, Military, Sci-Fi, Figures
..and here's what it ended up looking like. Not too bad. I think the work's ok, but the effect makes one think it might be a one piece gold unit depending on the angle of view. Hmmm. Might change it, might not, but probably not. The gold screening looks chrome in the photo but not in reality Anyway, on to the engine. Comments and observations welcome. -
Bathtub Buggy Build
Farmboy replied to Farmboy's topic in WIP: All The Rest: Motorcycles, Aviation, Military, Sci-Fi, Figures
Thanks for the shout out Gary, glad you're enjoying the build. -
Bathtub Buggy Build
Farmboy replied to Farmboy's topic in WIP: All The Rest: Motorcycles, Aviation, Military, Sci-Fi, Figures
...I got to thinking about the headlight lenses for the 'buggy. I dwelled on the paperpunch/clear plastic idea but went in a slightly different direction. In the photo below is what I've developed (sorry). They fit nice and close to the actual Kleig light and I think will fill the bill. I punched out a few chrome dots from some adhesive vinyl I have on hand. Then, I punched out a few screen dots from one of the splatter screens hanging in my shop, thinking of a look kinda reminiscent of some old 'vettes with the screen over the headlights. So, below is the sequence from left to right. Your eye just doesn't pick up the waffle weave detail anywhere near this. Course, one could use flat nylon screening but I want some surface texture. 1st A raw punch out of screening 2nd The piece would be painted gold, here quickly done for the photo with a paint pen. Also, the dot of the chrome vinyl it will sit on. 3rd The last piece on the right is how it gets put on the front of the Kleig. It's held together with a base coat of Future. This whole shot is at quite a magnification value on my old Canon. Your eye just doesn't pick up the waffle weave anywhere near this intensity. Course, one could use flat nylon screening but I want some surface texture Back in a day or two with the finished product. Comments and observations welcome -
Bathtub Buggy Build
Farmboy replied to Farmboy's topic in WIP: All The Rest: Motorcycles, Aviation, Military, Sci-Fi, Figures
Good tip on the headlight buckets Carl! Think I'll replace the lens with another of the same type. If I'm still not satisfied, out comes the paper punch lol. Might experiment with a chrome insert behind it too. Thanx for the tips. -
Bathtub Buggy Build
Farmboy replied to Farmboy's topic in WIP: All The Rest: Motorcycles, Aviation, Military, Sci-Fi, Figures
A few pictures of the almost finished light installation. Some details to add yet like small styrene 'pucks' to simulate pivot and attachment points between the Kleig light proper, the cradle, and radiator shroud mounts. Most disappointing are the light's lenses. They were milky just a few minutes ago before the shots were taken so I'm holding out that there may yet be improvement as the liquid acrylic (Future) dries. If there's no improvement, I have a couple of other lenses to replace them with as they'll just pop off using an Xacto. The more I look at it them though, the less impressed I am with them, and the more I'm thinking regular headlight lenses will do the job. I read somewhere someone had used a paper punch on clear plastic packaging and fit perfectly. Could be an idea...any thoughts? Comments and observations welcome.