
shucky
-
Posts
1,102 -
Joined
-
Last visited
Content Type
Profiles
Forums
Events
Gallery
Everything posted by shucky
-
Hello! This was Mr. Metallic Color Metal Peach (GX212) over Mr. Surfacer (white) through the airbrush and topped with Super Clear III (also airbrushed).
-
Took the completed Fujimi Suzuki Wagon R RX outside for some pics in natural light. Overall very happy with how it turned out. Fujimi kits especially the older ones can be a little difficult with fitment, quality of plastic, etc. but can come together nicely with proper test fitting and prep. Hope you enjoy it as much as I do (I love this little thing) and comments welcome.

- 11 replies
-
- 14
-

-
Finished pics will be posted in the proper forum as the last detail bits added were photo etched key holes for the doors and hatch, added wipers, and lastly the side mirrors. Thanks for watching.
-
It's getting there. Here we have the exhaust getting finished. I removed the molded rear section and added twin outlets to the factory muffler. Masked the exhaust and airbrushed with metalizer. Made a tiny exhaust hanger for added strength for the twin pipes. I tried something new with the license plate. I placed the decal on thin gauge aluminum a little thicker then tin foil then used decal setting solvents to get it adhered as best as possible. Airbrushed the thin red stripe which in Japan allows an unregistered car to be drive on public roads then carefully bent the plate upwards which is common on Japanese modified vehicles. Added two photo etched phillips head screws to the plate to finish it off.
-
Some misc. pieces finished and ready to install. Tamiya clear yellow airbrushed inside the headlight lenses, oil cooler installed, wheels/tires and brakes ready to go, and a peek at the projector headlights. I made these with an unfaceted craft store gem (turquoise in color) inset into the factory light bucket. Used chrome and black BMF along with a photo etched circle around the "projector." I cannot say enough good things about Scale Production wheels and tires, they are simply amazing. Up next will be the exhaust, license plate, and tail lights.
-
Here we go with the completed interior! Simple belts from craft store ribbon and installed dash, seats, pedals, arm rests, roll bar, etc. As you can tell from the pics, this thing is rather tiny but I love the look so far.
-
Some progress on the interior. Painted the roll bar, dash, etc. Made some seat adjustment levers, speakers, floor mats (textured craft store paper) and added the billet emergency brake.
-
Few mods to the interior but overall kept it simple and clean. Made headrests from shaped styrene, roll bar, arm rests, etc. Shifter is made from pink glass tubing and RB Motion bits. Steering wheels was airbrushed with Mr. Color blue with added Mr. Color "rough" clear additive which provides a textured alcantara look.
-
This is Mr. Metallic Color Metal Peach airbrushed over white and Super Clear III airbrushed on top. Added various decals prior to clearing that fit the theme of the build.
-
Felt like the little van needed some extra aero so I made chin, side skirts, and roof wing from styrene.
-
Hello friends, here we have a Fujimi Suzuki Wagon R RX. Mocking up with cool Scale Production BBS wheels and tires. Lots of surgery to get it to sit just right, but overall really like the stance. Quick scratch built air suspension, brakes, etc. I build slow and stink at updates so this thread will have the work in progress pics as the model was finished yesterday. Finished pics will be posted in the appropriate section.
-
Cleaning Airbrush From Metallic Paint
shucky replied to Milo's topic in Model Building Questions and Answers
Mr. Hobby Tool Cleaner will remove ANYTHING. -
Steve, excellent information and superb results! It's something I've struggled with for sure as I haven't dedicated enough time practicing. Thanks for sharing.
-
Rattle can lacquer finish questions
shucky replied to atomicholiday's topic in Model Building Questions and Answers
I do not have most of my photos at work, but this was DupliColor spray can paint and clear rubbed out with Scratch X only. Not sure why someone would BS another modeler when they were trying to help them, but whatever. Your mileage may vary.
-
Rattle can lacquer finish questions
shucky replied to atomicholiday's topic in Model Building Questions and Answers
To the OP, as someone else here already stated, paint jobs, like everything else related to building a model can get overly complicated by people. Don't believe me? Look at how hard some people make resin casting (it isn't). I see a lot of general information here, but what seems to be missing is the fact that all paint brands spray differently. What works for Tamiya spray cans does not necessarily work when spraying DupliColor. For example, Tamiya spray paint tends to be on the thin side. In my humble opinion, this makes it a bit more difficult to spray than DupliColor Lacquer. You have to build up layers of Tamiya spray while avoiding runs, etc. through a series of several color coats. Also remember, the more coats of anything being sprayed is more opportunity for something to go wrong. If you want to achieve spectacular paint with minimal effort and are okay with sticking with spray cans for now, your best bet is mastering DupliColor first. Ready to be blown away? You absolutely do not have to build up "mist" coats or spray multiple layers over long periods of time when using DupliColor lacquer. I have NEVER sprayed multiple layers of DupliColor in 30+ years. In fact, 100% of the time I can lay the color down in one single spray session (and you can also!). DupliColor has excellent coverage and dries almost immediately. This is why you can paint an entire car body in one painting session with no runs and no orange peel. There is no secret here. Just spray at a slow to moderate pace spraying past the model body and overlapping with each pass. Work your way around the body until your desired coverage is achieved. Because it dries so fast, you may continue to spray after only a minute until everything is perfect. After clearing using DupliColor clear (2-3 coats) you can simply rub out the paint with Scratch-X. I assure you, polishing using 15 different grits of sandpaper over the course of several hours or days is so unnecessary. I'm not knocking people who do it, but it is certainly not necessary and there is no discernable difference when comparing side by side. So long as your primer is nice and smooth, you should not have to touch sandpaper after that unless you get debris in the paint which requires fixing. Why do I make these comments? Because I used to overly complicate painting and polished using 15 different grits of sandpaper for hours on end. It was awful and I hated it. Good luck and happy building! -
Does anyone know if Robert Bentley (RB Motion) is still making his wonderful aluminum fittings? His website has been weird for several months and he is no longer on eBay either. I did send him an email yesterday, but no response yet. Just curious if anyone has ordered from or heard from him recently. Thanks guys.
-
For the most part, I use Devcon 5 Minute Epoxy on the majority of parts for my models along with thin super glue and occasionally thin Tamiya cement. I started using Epoxy about 15 years ago, and found that it was simply superior to other glues and methods. I can mix tiny amounts within seconds, apply very minimal amounts in a controlled method using a toothpick, and have time to position the parts exactly how I want them. It doesn't fog chrome or glass either. I always have a large paper plate next to my bench where I simply dispense a series of dots in two rows of both parts A and B. I mix the resin and hardener together as needed and assemble whatever I'm working on accordingly. If I do not use all of the tiny dots that I dispensed onto the plate, no worries as you can keep it as is (exposed) with no complications for use another day. Doing so does not affect the resin or hardener whatsoever. I simply could not build a model w/out Epoxy. Simply wait a couple minutes and everything is rock solid.
-
I've been using Alumilite white (resin) for close to 20 years and have never had a bad batch. It is still my "go to" resin. I have tried Smooth On resin as well and while it does the job, I find Alumilite white to be easier to work with (for me at least). I do really like Smooth On's "Onyx" resin though, it is wonderful if you need something cast in pure black.
-
You know, when I saw your recent stuff in IG, I thought to myself, "wow, this guys stuff reminds me of Cool Hand Luke from Model Cars Mag Forums...." and well, here you are and the SAME person! LOL! Awesome stuff here. Not sure anyone does black as smooth you sir!
- 770 replies
-
- 1
-

-
- stalled builds
- quick builds
- (and 2 more)
-
RIVIERA ROYALE: a heavily customized coachbuilt 1966 Buick Riviera
shucky replied to Claude Thibodeau's topic in Model Cars
Wow, that is very cool! -
Olson Bros. resin parts - update on Chris
shucky replied to gui_tarzan's topic in Car Aftermarket / Resin / 3D Printed
I ordered some parts several months ago through his website. My friend did the same. We never got anything. No emails, no parts, no responses. Contacted Paypal and got refunds. Several weeks later I get an email saying my parts are ready and that I should pay. Yeah, no thanks. People should not have to wait months (or years) for resin parts. It is why I stopped selling resin. I refused to get behind and make people wait and it was taking too much time away from my personal modeling projects. If he cannot deliver, he should stop taking orders. Simple as that. I have no sympathy for this kind of business practice. -
3D Printed Honda N400 Drift Car
shucky replied to shucky's topic in Car Aftermarket / Resin / 3D Printed
Hello! No donor needed. It is a full kit and 100% complete. -
Hi folks, I saw the artist post pics of this on Instagram a couple months back and drooled all over it. I wished I had a 3D printer to print it myself, but as luck would have it, a company in Canada snatched up the file and had at it. They changed the engine from a 4 cylinder to an RB26 (Skyline engine) transverse mounted in the back and the print quality and packaging is superb. I'm beyond happy with the purchase.
-
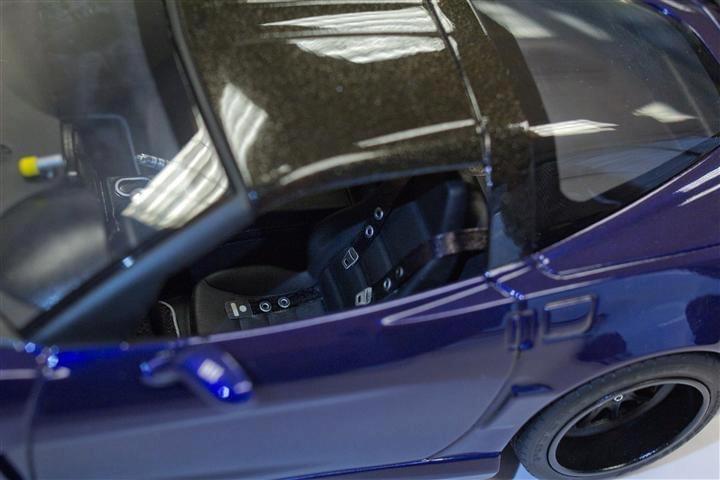
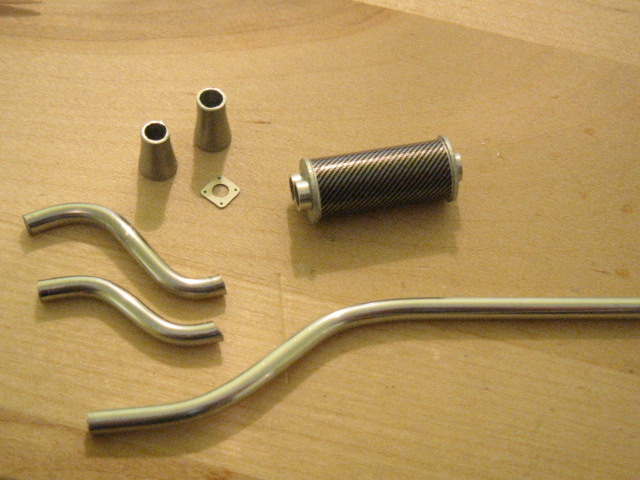
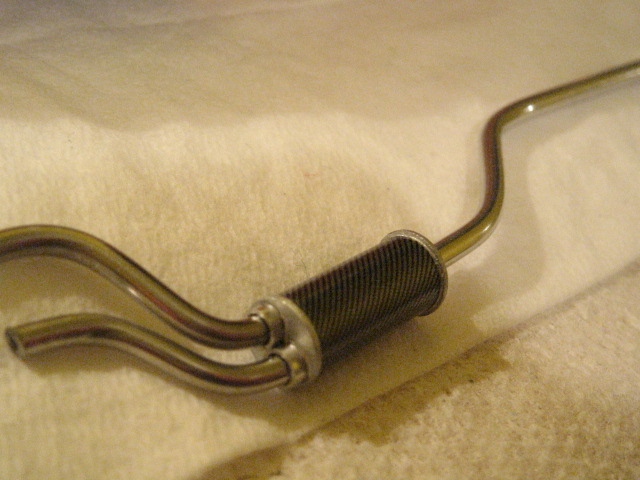
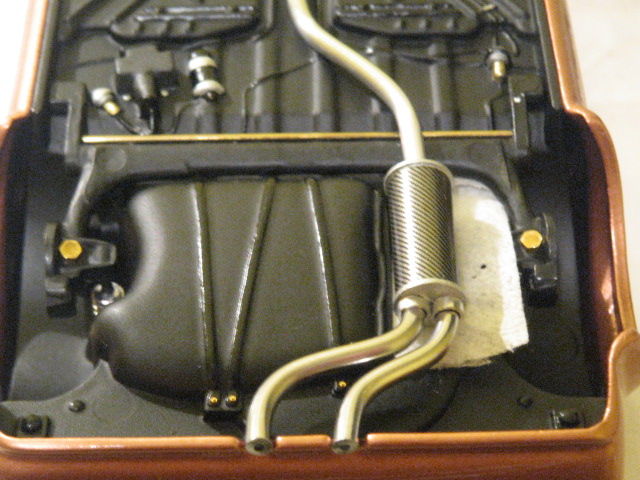
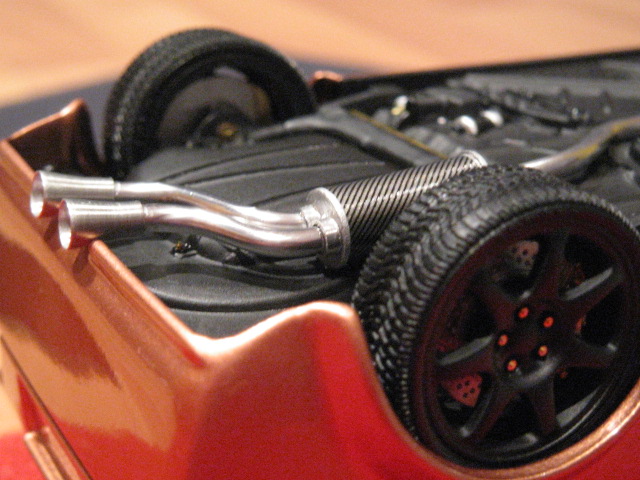
Made something similar on a GTI build a bunch of years ago. Made a "carbon" look can using styrene tubing with single inlet and dual outlet. Front pipe and rear pipes were polished solder.
-
2JZ and Demon
.jpg.b3344dae56b180ee7aabb8813a7dbc01.jpg)
.jpg.24ba43cedfbf58b447c16e76c24d3d3c.jpg)
.jpg.a789aa556b381449ce7aa0fde4fde1c0.jpg)
.jpg.8bf7cefa9eb3f72cdd444617d124d48e.jpg)
.jpg.f9925e09115392d334de34e09afd1185.jpg)
.jpg.72619095d582f570b880e702873aff79.jpg)
.jpg.e7ee52947f01efbea4f3d5341fe71740.jpg)
.jpg.5ad85fb33736fb42c6398fd8fba48796.jpg)
.jpg.497e57a244479bbc8885df362ec2b778.jpg)
.jpg.7eb53fbffcb57506472a8316adaacb58.jpg)
.jpg.10857d8e09bfa09663c62eb8e31075d1.jpg)
.jpg.bbda6889635df5c96efe071610d453ae.jpg)
.jpg.ba078ddc852b2eeb36896fab1769913b.jpg)
.jpg.5b9351c5db552b22efa96c232b6423e2.jpg)
.jpg.162592352f173ee124c5a27da40e0b52.jpg)
.jpg.3effe2e324da62d9bed52f5e65f133d4.jpg)
.jpg.1ccd28f7a61f6187bf7a44cf69814d72.jpg)
.jpg.c44b335792c63732184833c3e741f471.jpg)
.jpg.3bdbccbcd7ef8e1435eaf39312d6f733.jpg)
.jpg.929ddeefbd39f98a4529b298a6c39f63.jpg)
.jpg.30f9c5f05b3b30314c23f991138ee0f7.jpg)
.jpg.19798f8bafd73af2d2dac8d95ea92b18.jpg)
.jpg.f43df8b7d07ae15fc909f33b7c45fdad.jpg)
.jpg.5932a49846a6be030b658a07b0eb1352.jpg)
.jpg.af2e34acb4db5207c4d3dba351cef654.jpg)
.jpg.795811f28bbd076564ed0acf3ac41d78.jpg)
.jpg.d10c8531a60d72efc20d15d763ca70d0.jpg)
.jpg.55cd48eeee4f88e30f8b521e172a27b7.jpg)
.jpg.e20bc1f85e256cb9166953f7038e4e6f.jpg)
.jpg.a28c5b1b639c60a885c4919a012bf1f9.jpg)
.jpg.30cd4861aeb1a6715ed61e98d93c1a83.jpg)
.jpg.be101d60e5fd21699f6ffd83b7a38add.jpg)
.jpg.a1d16ecbb5760f94f730f82808719f64.jpg)
.jpg.3939dcea22ad3697c5a7ddc3dc14c835.jpg)
.jpg.07db7fb56837100609ddd7710e2e9929.jpg)
.jpg.bfdb5d205180abf4a3c293d3f2aaa547.jpg)
.jpg.c75ecc4ef988e3519a8b053ccbd0058d.jpg)
.jpg.71a7def23a660f5c6fc944d93f808c93.jpg)
.jpg.d24dbefb01cdbf091c227f3a0dd8ecb5.jpg)
.jpg.cfd9b90a3c3ce01ef43b57f7b6ea9805.jpg)
.jpg.eb59b19d241e50d2dd4634e2aa8adc01.jpg)
.jpg.8ad31262b4b477efe054e89053072e89.jpg)
.jpg.d05719fa64c71d70aa869a6329a4e3dc.jpg)
.jpg.27f9e64b0a6baaebf3a40022b311b83e.jpg)
.jpg.9c54224b7f1e54965f961239e9653fcf.jpg)
.jpg.bd492bea714ec1575004622a09b4ab82.jpg)
.jpg.ab9204619bbb470553640c7fbb51f7ae.jpg)
.jpg.5e66c92c56712a8f816ac2ba8f5bb60b.jpg)
.jpg.1c184b0773f4efebf36882251fb155d3.jpg)
.jpg.3a99245c53cea96680bfb793dbd32dea.jpg)
.jpg.41646e317128d589cd75d383f6b69671.jpg)
.jpg.b9ffede69ce0188928d59c98e5504c87.jpg)
.jpg.4c07c02beb014ad20b7ff1ce248a26e5.jpg)
.jpg.294e45feef034ece9a776ae28049f004.jpg)
.jpg.ce494a9aa9cf4e5ed14910cae6b00c4f.jpg)
.jpg.ae3cc1de5dbdb1cf32bc2e0a759d59c7.jpg)
.jpg.d405650c9615589f99108d2ca8be79e6.jpg)
.jpg.07a38d39ea6269b2ec5679c89ebe7432.jpg)
.jpg.31474f88adb7bd41b8fb0af83e1ec9af.jpg)
.jpg.5c729abc209426633385f7b6827539cb.jpg)
.jpg.3b0cc34305c4ff42fa891c7221b2e06c.jpg)
.jpg.46653cdd27f3d9c89d0e42f3be10d43b.jpg)
.jpg.6ffca877706f46dbbd0a666d990ccc95.jpg)
.JPG.be4b61f9a4ced877c46f6128c9be0610.JPG)
.JPG.296c202b6450e5637be109fb13d73586.JPG)
.JPG.18e7472db290f4f8ee2d77e7340eaa99.JPG)
.JPG.96cb308238717f97f32de858f723c0f3.JPG)
.JPG.8ba14dd3e260b53b35a3aa76e69e44fb.JPG)
.JPG.6260114c7bfb04a0027007e3635ff0ae.JPG)
.JPG.e811e9cf9056764f7c835745a4a56a37.JPG)
.JPG.dbb95f1d9e4121ab64f5f41c1203445e.JPG)
.JPG.20210ea7e8833b4d032582453b646e45.JPG)
.JPG.aa9bcb8c66ea0713c7b1c7678f1d0ce6.JPG)
.JPG.77b7dc40a95a4967c547136c71ae633e.JPG)
.JPG.3a87377129f8f4c16124ba1653875f62.JPG)
.JPG.55735c11d5d4aa13c7038f1df5d99dad.JPG)
.JPG.c08b68caa81609828bfdd9c45550c814.JPG)
.JPG.3d1eb82b6033c77e84410298b0ed839f.JPG)
.JPG.2a26afacac63bb5f9ecc8661c4e90696.JPG)
.JPG.e418d5660ea02b52ff9367f85c498987.JPG)
.JPG.d33e35b1f7ca2c709e99be9eecdde057.JPG)
.JPG.cc6c4a0d08dc3ea954e0d91bb2419a96.JPG)
.JPG.e8f5a0dfd910b3dbfa41a4db6a7a0381.JPG)
.JPG.9b8cbbdf81b9f2a49b3e7534a5fdd923.JPG)
.JPG.e18186d7697ed48027ab33f17c8d5b9b.JPG)