MrObsessive
-
Posts
9,785 -
Joined
-
Last visited
Content Type
Profiles
Forums
Events
Gallery
Everything posted by MrObsessive
-

Help on how to post images from links
MrObsessive replied to chunkypeanutbutter's topic in The Off-Topic Lounge
OK, that worked...........I'll try to use that method from here on out till the pic insertion issue gets resolved on this board. -
Help on how to post images from links
MrObsessive replied to chunkypeanutbutter's topic in The Off-Topic Lounge
This is only a test! -
Any word on when this will be hitting the hobby shelves?? This is one I've REALLY been waiting for!
-
Moebius 1965 Plymouth Satellite news
MrObsessive replied to Dave Metzner's topic in Car Kit News & Reviews
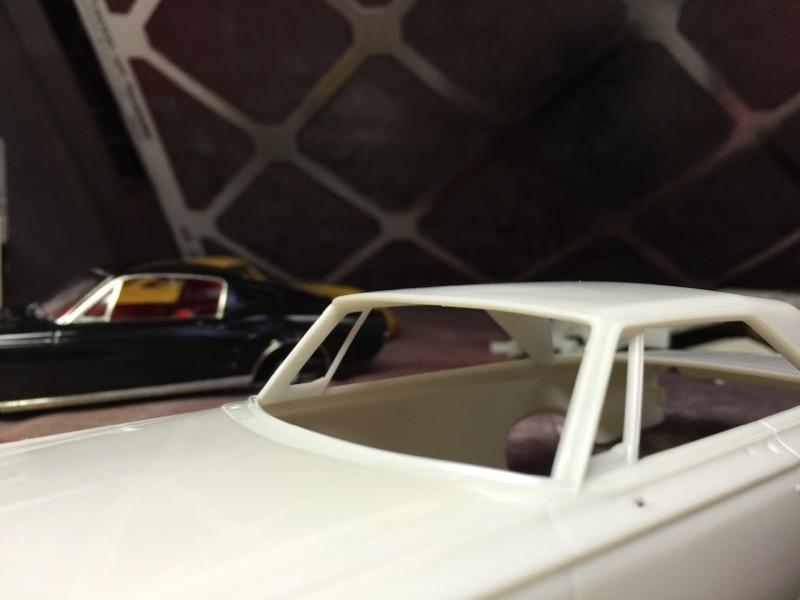
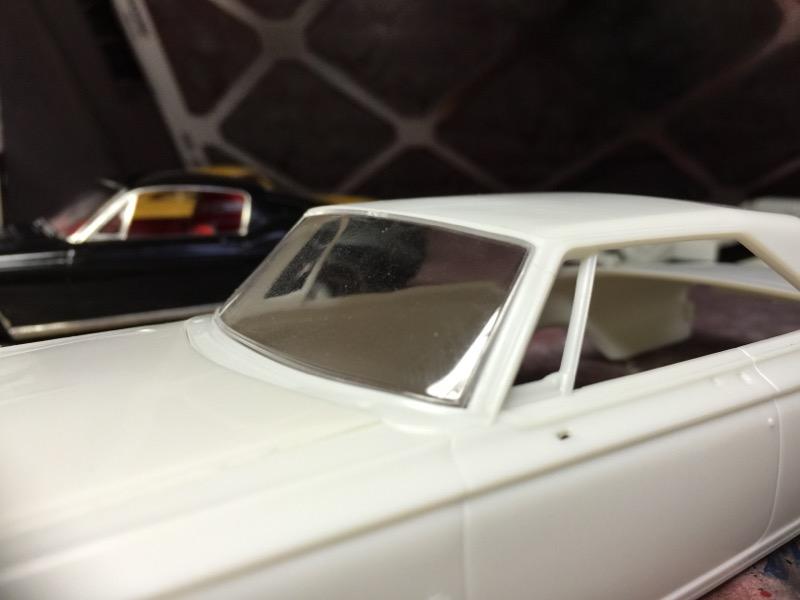
One word of caution if one wants to go the route of heating up the windshield header and flattening it like I did. When the time comes to wash the body, DO NOT wash the body in hot water! The plastic still has the memory of how it was molded, and the arch will return once it's heated up. Better to wash the body in cold to lukewarm water to avoid this. Also, one will have to VERY CAREFULLY file down the windshield itself to get the glass to fit------not much, but enough to get it to fit well. This car has me so intrigued, this might be my next build once cooler weather sets in again, and I can finish the Mustang. Just too dang hot in my model work room lately to do anything! -
1969 chevelle ss convertible top.......
MrObsessive replied to AC Norton's topic in Car Aftermarket / Resin / 3D Printed
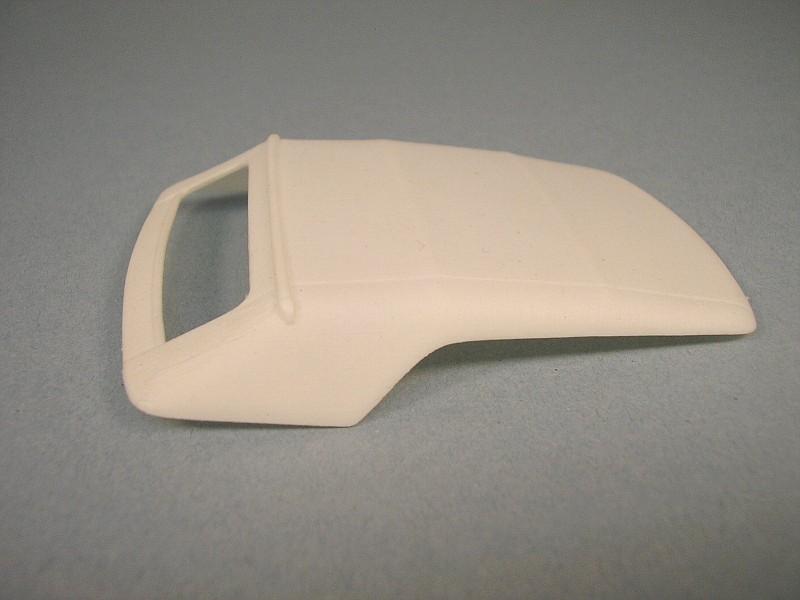
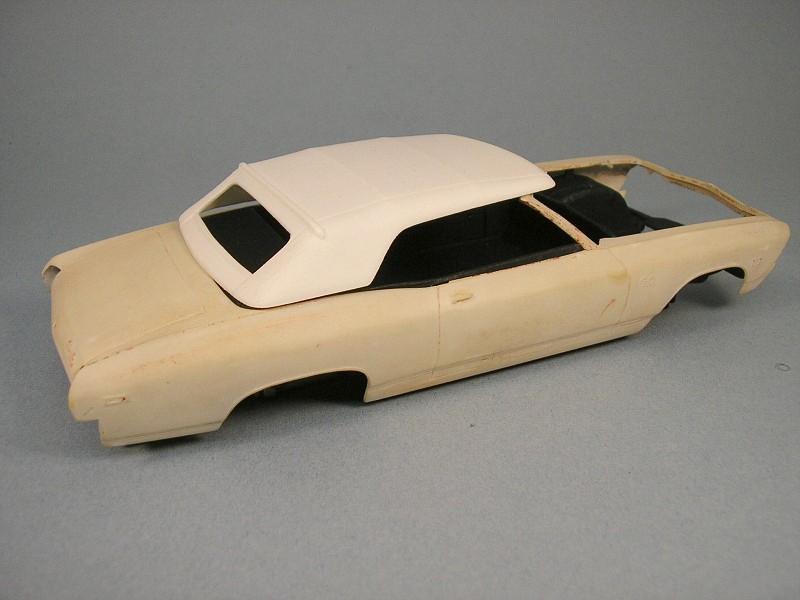
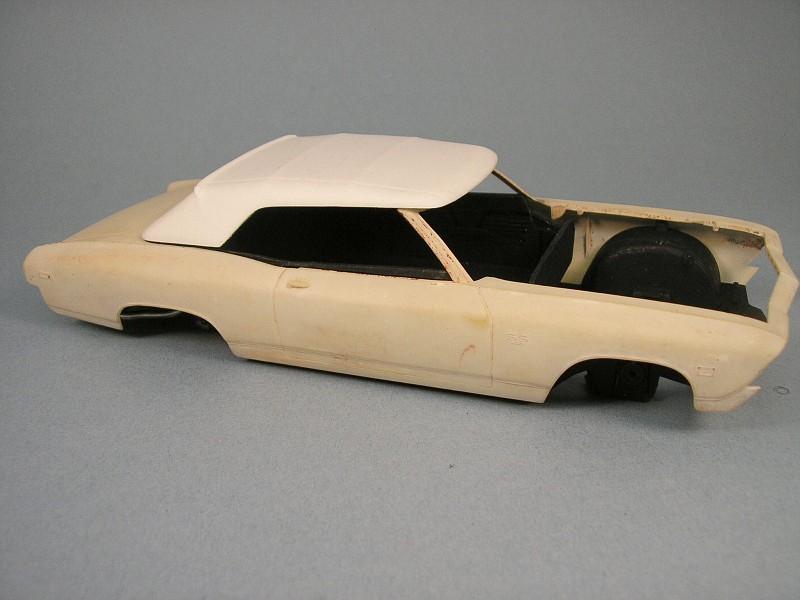
Let me make a correction about the uptop for the '69 Chevelle. I'm not really sure that the one I got came from Missing Link------I may have got it from Time Machine Resins. Here's some pics I have of how it fits on an older issue '69 Chevelle Convertible. Here's a pic of a 1:1 off the 'net of how that top should look in relation to the body...................... This is on my "someday" pile. As you can see the top is too long for the Chevelle body. If the top did indeed come from the '72 Cutlass, either the Chevelle is not quite 1/25, or the Cutlass is a bit larger than 1/25 as in 1:1 these were basically the same car built on the same platform. My apologies as I'm not quite sure where this resin top originates from. I do happen to have the '72 Cutlass uptop, and if I can find the kit and dig it out, I'll see if I can do a comparo and try the top on this body.
-
1969 chevelle ss convertible top.......
MrObsessive replied to AC Norton's topic in Car Aftermarket / Resin / 3D Printed
I have the resin one from Missing Link and it's too big for the 1/25 '69 Chevelle. The one from the '72 Cutlass would be a better bet......might have to do some tweaking with it to make it look correct though. -
Moebius 1965 Plymouth Satellite news
MrObsessive replied to Dave Metzner's topic in Car Kit News & Reviews
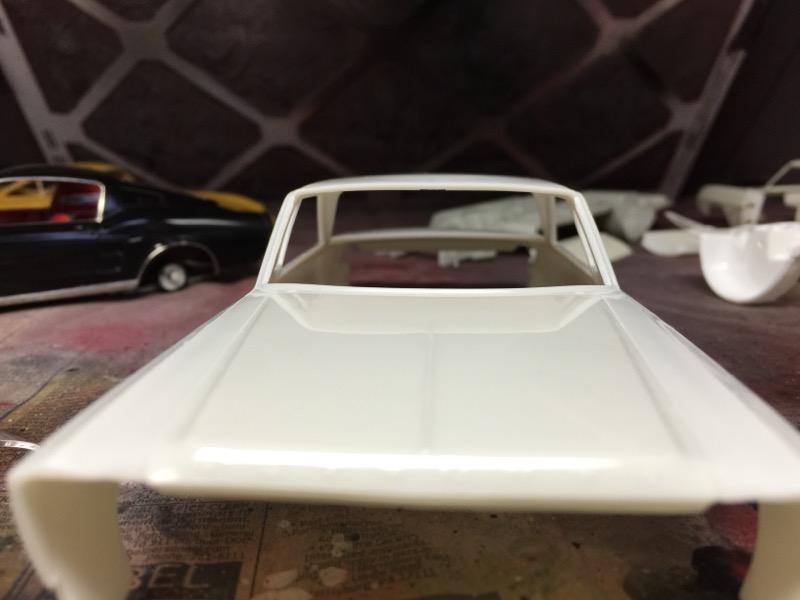
Charlie, this was an "on the fly" moment for me when I did this, so no I didn't video this. Might have been hard to video as what I did was very pinpointed on where I pressed down to flatten the header. I didn't pay much attention to it as Mopar mid '60's B-Bodies are not my thing, but Elvin's comment had me looking particularly now that I have the kit. One reason which might lend itself to the "high arched" look, the windshield header chrome starting at the corners of the windshield should be about even or maybe a scooch lower than the side drip rails on the roof. I did go out and snag this kit as I've always liked this particular body style, and Tim's review and pictures had me go out and get one. This will be a subjective thing for each modeler, but Tim's dead on shot of the windshield shows how the kit definitely has too high of an arch in the header. FWIW, Revell's '55 Chevy hardtop and convertible suffer from the same malady.........too much of a curve in the upper part of the windshield header as opposed to the 1:1. Not a deal breaker IMO in building either kit, and this one is definitely worth buying and building. Don't let what I did sway you either way from buying or building it...........this is just another one of my "obsessive" things, and believe me----when I get around to building this Satellite, it'll get the full boat "Obsessive" treatment! -
Moebius 1965 Plymouth Satellite news
MrObsessive replied to Dave Metzner's topic in Car Kit News & Reviews
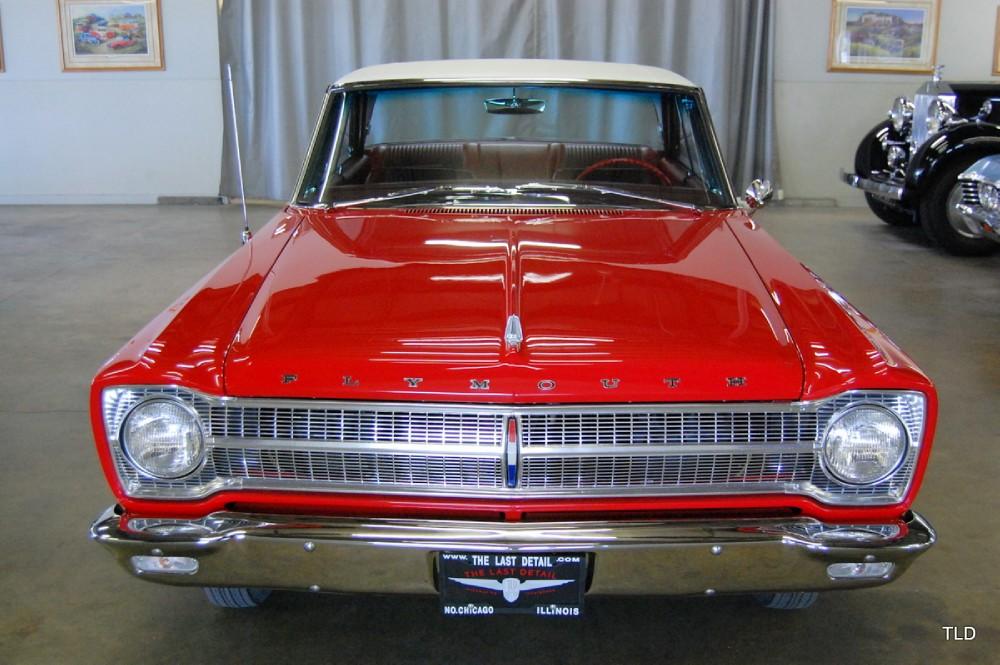
Elvin, this is something I overlooked when I first saw the buildup live and in person...........here's what I did to mine just a bit ago. And here's the 1:1.................... The 1:1 has an ever so slight arch.........what I did to mine was take a heat gun set to 450 degrees, and CAREFULLY pushed down on the center of the windshield header. Now the glass does stick up a bit-----I'll file this down a little and then I can replicate the weatherstripping with a fine bead of epoxy painted black. One thing I would strongly urge when putting on the windshield is to make a more positive location for keeping the glass in place. When I get around to building this, I'll add A pillar material on the inside as well as the header itself. Oh yeah............something has GOT to be done with those vent posts! They seem to be at the wrong angle to me. Easy fix though.............;) I understand that many don't want to go through this trouble, and yes, it would have been nice if Moebius hadn't overlooked this. Somewhere along the line, it may indeed have been noticed but the cost to change it might have been too much, as well as setting the kit intro time back. Personally, it's not that egregious an error------it's just something that for my own tastes, I'd like to change. As far as the overall execution of this Belvedere..............VERY WELL DONE! I'd love to see a convertible version of this down the road, as well as some more MOPAR stuff of this era own the road! Hope this helps!
-
Red oxide primer undercarriage?
MrObsessive replied to ERIK88's topic in Model Building Questions and Answers
Erik, eBay Motors is a great place to find undercarriage shots of a particular vehicle. More than likely, the higher the sale price (especially for older vintage vehicles) the more likely there will be pics of EVERYTHING including the underside. Also, don't overlook completed auctions..........they stay up on eBay for at least 90 days, so it's worthwhile to check those out too. Hope this helps! -
Strange business practices?
MrObsessive replied to Harry P.'s topic in General Automotive Talk (Trucks and Cars)
-
New Site/Forum Look
MrObsessive replied to Gregg's topic in General Automotive Talk (Trucks and Cars)
Yet another test............. Ok, this is interesting------I pasted the URL of this pic into the "choose files" window field, clicked "open" and a thumbnail showed up. This pic is from Fotki, and NOT stored on my hard disc (actually the pic is, but the site didn't pull this from my disc). When you see the thumbnail, you can then insert the pic into the post, or drag it in. One question though...........does this take away from a particular user's maximum file space by doing it this way?? Thanks BTW goes to 935K3 (Dale Beaver) for recommending this tip! Lemme try one more................. Hey this seems to work! And no "smooshed" view on my end!
-
As the owner of an '11, I LIKE those Challengers! Call me crazy (and biased), but in a lot of ways, the newer ones look a lot better than the old ones. Proportions seem to be better, especially in the front, and the roofline on the newer one is not so "heavyhanded". BTW, what your license plate states, I've been told that by others!
-
Mike the '63 Corvette in the Prestige series gives you the hardtop, and the standard '63 'Vette hubcaps as opposed to the aluminum finned wheels found in the other "regular" kits. I have this kit but it's packed away-------I thought it gives you the uptop too, but I can't remember.
-
New Site/Forum Look
MrObsessive replied to Gregg's topic in General Automotive Talk (Trucks and Cars)
Here ya go Bill..............lessee--- https://imageshack.com/i/p5ZcJkiT.jpg Nope, no dice............. -
New Site/Forum Look
MrObsessive replied to Gregg's topic in General Automotive Talk (Trucks and Cars)
The picture I see is of the1/32 Toyota S800 in red. I did see the garbled URL you described-------I had that also the first time I tried Tom's method. I found that you have to right click and get the direct URL image location to get the pic to show. Using Fotki's (and perhaps PB's too) supplied URL's on the page don't seem to work. Here's a pic from PB using the method I did for the other pics.............. 1971 Pontiac Trans Am/P9014040.jpg~original Hmmm-----didn't work that time...........let's try again.......... Ok, with PB, you have to get the URL from the original pic. I tried to get the URL from the standalone larger pic, but it didn't have the JPG suffix at the end. This might be PB's way of reducing their bandwidth costs by not having to link a full scale pic as opposed to the smaller one since my account is "free". -
In '64 I was just starting to notice cars (three years old at the time that was new), I can remember seeing lots and lots of tailfins on the streets as '50's early '60's stuff would have been what was mostly around back then. Model cars would be about 14 years away for me as far as having any big interest. As far as accuracy, I have to give it to AMT as having the most accurate '64 GTO body, with Monogram coming in second. As nice as the Polar Lights GTO may be, it never looked right to me, and it mostly centers around its roofline in relation to the rest of the body. The slight "bow" in the body doesn't help either, but in the end it's all subjective as some may not see what I see wrong in the Polar Lights car.
-
New Site/Forum Look
MrObsessive replied to Gregg's topic in General Automotive Talk (Trucks and Cars)
That pic looks fine to me from where I sit Bill............;) -
New Site/Forum Look
MrObsessive replied to Gregg's topic in General Automotive Talk (Trucks and Cars)
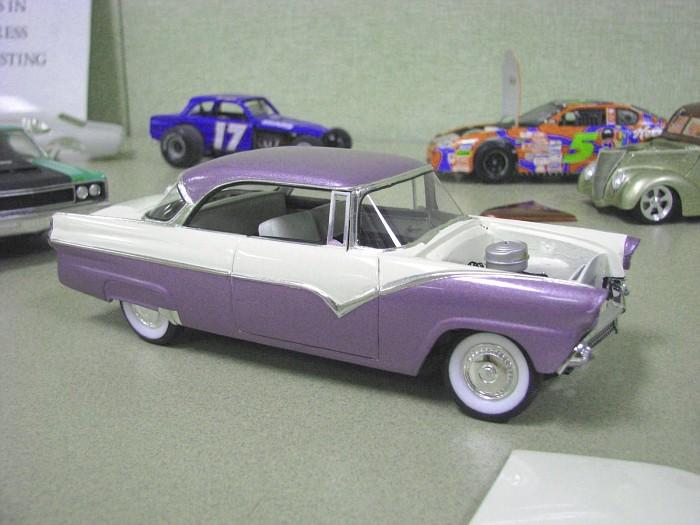
That T-Bird is a long time dream of mine! I built this back in 2000, at a time when I was wondering why there were NEVER any good glue kits of the '55. We had Monogram's '56 (and now another one from RC2), AMT's '57 which has been reissued forever, but no good 1/24-25 '55's. That car is basically Monogram's '56 backdated into a '55. Took about 6-9 months to build it. Let's try another one for good measure..................... One good thing about doing it this way I must say...............you don't take up as much room trying to squeeze pics in and typing in something about it. The text box does expand when you post a pic, but from the looks of things, the pic doesn't have the distortion as the other ones. I'll check on my phone later, but it looks very good viewing this on my PC. -
New Site/Forum Look
MrObsessive replied to Gregg's topic in General Automotive Talk (Trucks and Cars)
Trying again............. Hey that worked! And it don't have that squashed look either! What I did was typed in what Tom mentioned, then right clicked on the pic to get the URL properties (image location). Pasted it here, ended it with the IMG code, and BINGO! Got a pic! This is an instance though where it would be really, really nice to have a PREVIEW button! -
New Site/Forum Look
MrObsessive replied to Gregg's topic in General Automotive Talk (Trucks and Cars)
Ok, I'm raising the white flag! I've tried every which way from Sunday to get this to work as intended. I'll just stick to copying and pasting for the time being till the new version comes along, hopefully bug free. One annoyance doing that way is the pics don't show up well on my iPhone. They look terribly distorted and well, "squashed". -
New Site/Forum Look
MrObsessive replied to Gregg's topic in General Automotive Talk (Trucks and Cars)
Hmmm........Lessee.......... http://images14.fotki.com/v219/photos/2/250280/1134588/PA127608-vi. OK, that works as far as it goes............but most don't want to click to see pics (at least I don't). They should show up here without much trouble. -
Carl your link works...........to get the pic to show on the board, I right clicked on your pic, copied it, and pasted it here.
-
Steve, that looks to be a killer project! I love the sleek "wingless jet" look of those '61 Buicks! As Carl mentioned........I tried to use the direct image code on my end, and it wasn't working. I've gone to right clicking on the pic, hit copy image, and then paste it in your text box. The pic should show up like this one from my Photobucket album............. That's what'll have to work for me for the time being..........at least till some of the other bugs can be worked out.
-
New Site/Forum Look
MrObsessive replied to Gregg's topic in General Automotive Talk (Trucks and Cars)
Alright, let's see if this works.................... Looks like I still have to "right click" and copy the image........then I can paste it here. I'm going to stay with that method for me as it's the least crazy making. I still get the endless "swirly ball" if I try to insert the URL into the "Insert Image From URL"................. -
New Site/Forum Look
MrObsessive replied to Gregg's topic in General Automotive Talk (Trucks and Cars)
Kevin, the squashed view went away after I adjusted my screen resolution a bit. Lately as the 'ol eyes get older, I have to "blow things up" so I can see them. The 'Vette appeared squashed too at first. but once I backed off on the resolution, it looked normal as I originally uploaded it. Here's a pic from Photobucket............... No I didn't build this! This is a Danbury Mint I once had but sold a few years ago. Seems to work with them also!