
LAone
-
Posts
1,553 -
Joined
-
Last visited
Content Type
Profiles
Forums
Events
Gallery
Everything posted by LAone
-
it's coming along great. i like where the story is headed. keep up the great work. as for primer. i have heard a lot of good things about the plastikote. i am going to give it a try myself. but, if you really want some tamiya primer you can try ebay. i have seen it on there, but have not bought any myself.
-
this is one tall order of awesome-sauce bro. i like this a lot. 2 thumbs up!
-
story sounds great. looking forward to the build and to some more story.
-
thats a sweet looking nomad. great work and looking forward to the next build.
-
thanks justin. got some parts made up. a new radiator, fuel line with pump. sprayed the one of the final coats of wooden deck tan. its uneven, but thats the way its suppose to be.. more on that later. thanks for looking.
-
that's a sweet pick up gasser. i like the choice in color, suits it very well.
-
now thats a serious honda city. boosted sleeper wouldnt know what hit them. keep up the good work. very nice engine set up.
-
hey bud, your 65 is looking good. looking forward to the paint scheme you come up with. all 3 colors look great and all of them would look pretty ###### sweet together.
-
slick looking merc. i like the the overall look.
-
JEZUZ! i cant seem to stop looking at this. there is something about it that makes me think, is he really human?? awesome work all around.
-
great looking nomad. im loving everthing about it. one question: on the headers, is that suppose to be header wrap and the ends? if so, what do you use to replicate it? thanks
-
cruz, i gotta say that the engine work looks great your method of washes comes out pretty close to what it would look like. keep up the great work.
-
great to have this place back! hey bud, no problem on the heads up. the corolla is a aoshima kit. some what harder to find now. but they are out there. it's a 4 door with square lights. it's a nice kit. the chassi is motorized type, but still workable.. so here is another update. go some paint on some suspension parts and the body got a few rough coats of paints. the final color is not decided yet.
-
heres my chassis, cut and scraped off the one on mine. took some time, but it came off. the exhaust is not what i wanted, but i ran out of time when i built it for a forum contest.
-
thanks bud. if its a 82 corolla your looking for, there is a kit out there already made. you have a TE72 right? a sedan?
-
haha, im on 5 different modeling forums. the one that loves j-tin of any kind is SPC forum.spc.org.uk you have to register to view the forum. but your build will fit right in. if you happen to go there, im rollin80s on there.
-
welcome to the forum. i love what you have done with this TE72. one of the cleanest i have seen in a while.
-
nice, your on here too. i actually replied to your thread on scale mag forum. but i like where this i going, so i have to compliment here too. looks great bud.
-
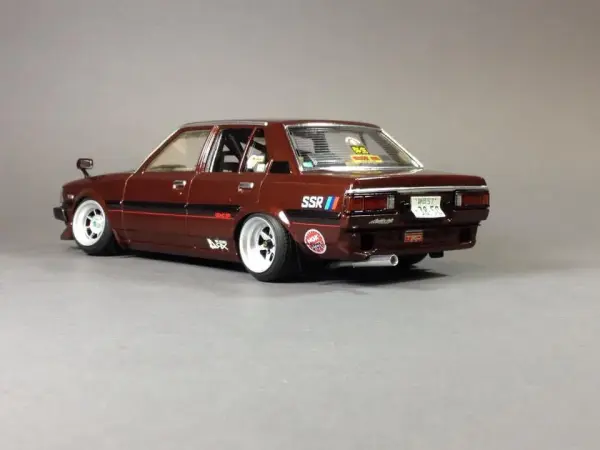
thanks guys. kanedge: the wheels are made by aoshima, these are the Techno TVR. they have several other kinds, like SSR MKI, MKII, MKII, long champs, reverse mesh, and so and so on. i get them through www.hwjapan.com i have a bunch of j-tin classics that will pop up during the year. might not finish them, but they'll be around..
-
thanks nick so, i haven't really done a lot to it. xmas weekend was just lazy! went to sleep late and woke up late, like half the day late. so i just did some prepping for details. like lines and fittings. the engine bay is pissing me off again. but it's coming along ok. i got the wheels to stop wiggling around so they are set. made glued the strut arms to the control arms, made a rear sway bar, seperated the tranny from the L16 for the MAII, made a collector for the header , an adaptor sandwich for the oil cooler with return line fittin on oil pan, ill be using the "race" style pan on it and just some putty filling and sanding on the chassis.
-
hey bud, i have had this happen to me a couple times. the longest i have gone is 5 years and the last time it happened was earlier this year after i had my appendix taken out. that one lasted almost 3 months. for the longer period, i discovered model car forums. saw everyones work and the detail that has gone into them and it sparked that flame again. for the almost 3 month period, which was may 13th-aug 3rd. add 5 days in the hospital and about 1 month of not being able to sit for long periods of time equaled to me loosing motivation. but i just had to get back at it, so what i did was get my ass back to the desk. even if i just sat there looking at my project. i sat there for hours, thinking and thinking. till finally i got my thoughts into motion and started up again. if a project is getting to you, which happens to all of us, just do what the other recommend, start something simpler. not much detail, a quick build. it does help if a project is getting to you. hope this helps.
-
the only time i have seen yellowing on any builds, are parts that are not painted, bare plastic. my revel datsun was sitting for about 9-10 years with some parts glued together with testors glue. the one in the black triangle bottle, and it's yellow along where the glue is and easily came apart. but it was not painted. anyways, what i have learned over the years and moving 3 times, is that for parts like mirrors, antennas, and wippers. is that you need to use white glue. this gives it a chance to come off clean if nuged. no broken pieces left behind and no paint damage. you can glue back into place. for parts that are suppose to stay in place and not come off. if they have a hole on the body or chassis, i put the part on and glue it from the back, where it wont be seen, with crazy glue or insta-cure. this way the paint isn't damaged or no smear. if you look at my celica build, on the hood. the chrome vents, they have a small pin hole and a longer square hole on the hood. those parts are glue from behind the hood. along with the side marker lights, turn signals, reverse lights, and center garnish. for any chance you have to drill a small hole and put a pin/dowl in it, do it. itll make assembly with out damaging your paint work. like mirrors that have no hole or indentaion on the body, drill a hole on the body and behind the mirror, put a dowl to guide it and glue it from the back. hope this helps.
-

What are your Projects for 2011
LAone replied to Clay's topic in General Automotive Talk (Trucks and Cars)
wow, for 2011....i going to finish my datsun 510, im in the historic racing CB with a toyota corolla N2, and possibly join in on a tamiya ferrari 360 group build on another forum. other than that, ill probably also pick up and contitnue with a couple of other older projects. an 85 corolla levin flared out with body kit and drift damage. calling it "down-n-out" and a fantasy racer corona MarkII -
thanks guys, i know for sure that there will be positive and negative vibes about this build. im not a softy, so the negative wont get me down.. so heres a small update. stripped the chrome off. kinda got the look im going for. just not so gray. gonna give it used look. rear and front brakes, from an R33 kit started on the header, runner one and two. there are not that many pics of it, so i made what kinda looked like the one i saw. re-worked the exhaust to a more subtle type then this came to mind. it's like a diffuser type of thing that is used on some shakotan style cars. pretty much like an upside down wing.
-
thanks everyone. its done now http://www.modelcarsmag.com/forums/index.php?showtopic=39094