
Trae
-
Posts
155 -
Joined
-
Last visited
Content Type
Profiles
Forums
Events
Gallery
Everything posted by Trae
-
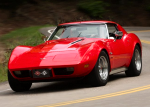
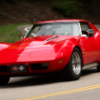
Thanks all! I actually thought about removing the skirts and adding flares, but thought it might lose too much of its character. Would still like to see it done though. I took the chassis and interior from the AMT '70 Corvette LT-1/ZR-1 kit. The interior is basically stock, but I've made some mods to the suspension to lower the stance a bit. I took the valve covers, intake, carbs, and air cleaner from the Revell Baldwin Motion '69 Corvette. I really don't recall what kit donated the engine block, heads, exhaust manifolds, and tranny. I know it doesn't make any sense that I didn't use the whole engine setup from the BM '69 kit, but by the time I decided to go with the BM theme, I already had that engine ready to go, so I left it.
-
Thanks guys!
-
The day-to-day calendars are great for reference pics. I've collected a stack of pages from the past several years - just further proof I'm certifiably nuts.
-
Well, your friend is talented . . . kind of twisted, but talented nonetheless. And very nice paint work!
-
I started this project several years ago, and this will be my third attempt at finishing it. The body is an old resin, I believe from Freeman Cars. I stole the hood, sidepipes, and several engine components from a Revell BM '69 Vette. The interior, frame, and suspension are AMT. The windshield shown is from an old salvaged build-up, but I'll only be using it as a vacuform master. Hopefully the finished piece won't be a scale 2" thick. I know I'm pretty far along already, but I'll try to post some updates soon. On to the pics ...
-
I lived between Ann Arbor and Ypsilanti from October 2000 to April 2001, and attended a few gatherings of the Huron Valley Model Builders. Still have an award from the 2001 DAAM show.
-
Welcome Tony! When you say "raised decals molded onto the body", are you referring to the scripts, emblems, etc.? If so, another option would be to get a photoetch kit like this one from Model Car Garage. With this, you would first do as you mention to remove the emblems. Then attach the photoetch pieces after you've completed the paint work. They are metal and have "depth", but require some type of adhesive to attach to the body. Hope this helps.
-
The incredible shrinking resin Pontiac!
Trae replied to Chuck Most's topic in Car Aftermarket / Resin / 3D Printed
Cool, I learned something new today! Now I just have to learn how to shop for resin by smell. -
The incredible shrinking resin Pontiac!
Trae replied to Chuck Most's topic in Car Aftermarket / Resin / 3D Printed
Hmm, I've never heard of shrinking resin, but I wonder if its possible for the mold to shrink. -
I like it with the rallys!
-
Nice work, Kenny! Interesting exhaust too.
-
Looking fantastic!
-
Very cool! Are those JPS wheels? Haven't seen those in years . . . or maybe I've just been out of touch for too long.
-
Very cool subject, I look forward to seeing this progress!
-
Wow, I thought I was the only person crazy enough to do decal artwork in AutoCAD. Very nice!
-
Nicely done!
-
A few of the more interesting vehicles I've seen around here:
-
-
Fantastic work, Lyle!
-
I'll second this. A good friend in AL showed me this little trick, been doing it for years. They are the correct color and material, and have a rounded end. And if you want, you can even add a touch of clear or gloss black to the tip to simulate the cap.
-
Very nice build, the color combo is perfect. And I really like the looks of those lenses for the taillights.
-
I really like the '72, and that color is eye-popping! Very nice!
-
As these guys have mentioned, a double-action from a "name" manufacturer should work fine. I've had my Paasche VL for 20 years, and I've never needed another.
-
Very nice build! And yes, that is a great commercial.
-
Thanks Tom!