futurattraction
-
Posts
1,647 -
Joined
-
Last visited
Content Type
Profiles
Forums
Events
Gallery
Everything posted by futurattraction
-
 Gabriel, I'll PM you so we can get in touch off the board. Scott
 -
The weathering and paint you did on the early pictures of your Willys were so realistic that if it was set up with a realistic background/diorama, it could have easily passed for a 1:1. It looks very cool in the newer pic, too...
-
Digging up Bones ...
futurattraction replied to camaroman's topic in General Automotive Talk (Trucks and Cars)
The way some projects get put on hold for months or sometimes even years, who knows when maybe a suggestion isn't so out of line, even on an old thread? I say that mostly in fun, but ya never know... -
Fred, they're both coming along great! I love what you're doing and thanks for the update... Gabriel and Terry. I want to jump in here and make some clarification. The very simple website I have up right now lists a stock body. Those aren't actually available at this point in time. My plan is to rework this body into a stock version. The rear wheel well openings will be returned to stock length, bumpers will be separate and stock width, a valance panel will be added at the rear, the cowl vent panel will be incorporated back into the body with a stock length hood and I'll add the fuel filler door. Unfortunately, there are only 24 hours in a day and I'm still working 40 hrs a week. Too many things to do and not enough time. Scott
-
More scratch building
futurattraction replied to Alan's topic in Car Aftermarket / Resin / 3D Printed
Ahhh, how well I know the feeling... :-) -
Hey, thanks Rob. I appreciate the update...
-
Super job! Very clean build... '34 5-windows are one of my favorite old Ford of all time.
-
Very nice job on your conversion. Looks really sharp, and I like the simple look too. Any new word on when the Revell piece will be out? The last I saw it was this year, but am hoping maybe there's a more specific time frame by now.
-
It's looking great, O-H... I really like what you've done so far. The flatty is an excellent choice and looks great.
-
1/16 Scale Army Vega Funny Car - Finished 10/14/2018
futurattraction replied to Mooneyzs's topic in WIP: Drag Racing Models
Nice progress, Chris. You're so methodical with this that it's amazing. And I love your headers! Those looks soooo nice... -
Glad to see you back, Jeff. So... this is what you were talking about! I love it! Very cool!
-
Thanks for the excellent reference pictures, Dave. Can't get any better than those!
-
78 Z28 In Memory Updated pics
futurattraction replied to dimebolt's topic in WIP: Drag Racing Models
Nice looking build of your friend's Camaro, Corey. Thanks for sharing... -
Thanks for your input and encouragement, Bart and Joe! Dave: The 2-fer bezel suggestion is a great one. If a part can have multiple uses, that's all the better. Thanks, too, for elaborating on the brake rules in the NHRA and other sanctions. I've been meaning to e-mail you... What kind of material thickness is typical of that window mounting tab you drew up? I'm not sure what thickness material I need to lay that out on when the time comes. Are those mild steel, chrome-moly, or what on 1:1s?
-
Just out of curiosity, are there fenders and/or other peripheral body parts that either are, or will be, produced?
-
1/16 Scale Army Vega Funny Car - Finished 10/14/2018
futurattraction replied to Mooneyzs's topic in WIP: Drag Racing Models
Hey Chris, Totally unmodel-related but I'm curious, what do you listen to on the radio when you're modeling? -
57 chevy pro mod w.i.p (updates 11/11/12)
futurattraction replied to tyrone's topic in WIP: Drag Racing Models
Man, your 5-7 is coming along nicely, Tyrone. Great job on the doors (and everything else)!!! -
1/16th 69 Camaro ProMod 7/22/14 motor painted
futurattraction replied to Romell R's topic in WIP: Drag Racing Models
Thanks for the hard work and stick-to-it-iveness, Rom. Things are shaping up, bud. I, for one, admire what you're doing, working in brass. It's not my particular cup of tea at this point, but I can certainly appreciate the effort and experience you're putting into this and gaining from it. The other thing I want to pat you on the back for is your community-mindedness. You should be admired for that above all else. -
Oh, another thing I failed to mention earlier is that Dave (comp1839) told me that the most accurate brake rotor diameters, as used on most 1:1 Pro Mod teams, is either a 9.5" or 10" front. He also suggested, for the sake of fitting with the least amount of hassle when it comes to adapting to rear wheels in our scale models, that an 11" rear diameter would be the safest size, to which I agree completely. As an aside, he mentioned that all NHRA pro classes, i.e., P/S, P/M, F/C, and dragsters are required to run CF rotors and pads, which don't have any venting in them and may actually be considerably thicker than 1/4" - even up into the area of 1/2"! I like the appearance of the drilled holes or slotted rotors, but IF we want to do "high end" builds we may have resign ourselves to using plain rotors. What is anybody's view on that rotor details, such as drilled or slotted vents?
-
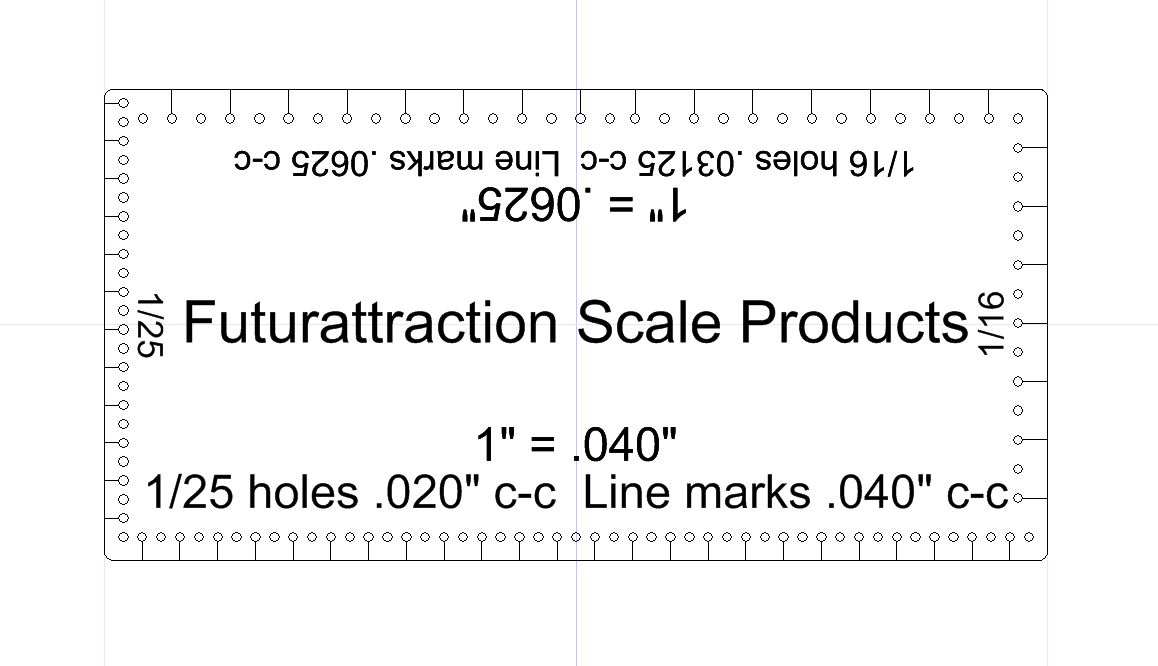
Thanks for your encouragement, guys. I really appreciate it. Bart - My thoughts right now on the multi-media idea is this. I trust you saw that I've included grips for the hand brake and butterfly wheels - just not in resin. The modern examples that these parts are more or less modeled after all appear to have anodized finishes for the detail pieces. Believe me, after casting as many sets of small resin parts for 1/25th as I have, even with the relatively young "age" of my business, fiddling with those pieces to clean them up so edges are crisp, can be a challenge. So, anything that can be done to create realistic parts, whether in resin or PE, is what I'm going after right now. If they're painted, I'd think you shouldn't be able to tell the difference. The PE will be perfectly clean and sharp with no cleanup on anyone's part. The other thing is, I would have made the grips in PE, then made molds off them anyway, so this is actually quicker, simpler, and cheaper (in terms of my time) packaging the PE grips with the main piece. If a builder wants to create the appearance of something a bit more old school, I'd imagine the grips could be painted in black to replicate a black resin-type of grip. Anyway, those are my thoughts on that particular subject. I can certainly make a longer ruler that would work for your wheelbase and/or larger dimensions idea. The main reason I did such a compact version is simply because it'll be less cumbersome to work with for small parts. There may be times when smaller is better, however IF your desk is anything like mine, a small one will also be much easier to misplace! LOL Yes - the hole spacing/drilling idea was something someone else had suggested and I thought it made lots of sense to have some type of hole guide. The hole spacing is a scale half-inch and the holes with alternating lines drawn to the edge are obviously one scale inch. The centerline of the holes is also one scale half-inch off the edge. I'll draw something up that is eight inches in length and it can be marked like the small example above with emphasis marks every 5 or 10 scale inches, and a special notation at the 115" mark. Here's a new question: would you mark the other side in 1/25th, like what I've done above, or go with 1/12th, or what? Let me know.
-
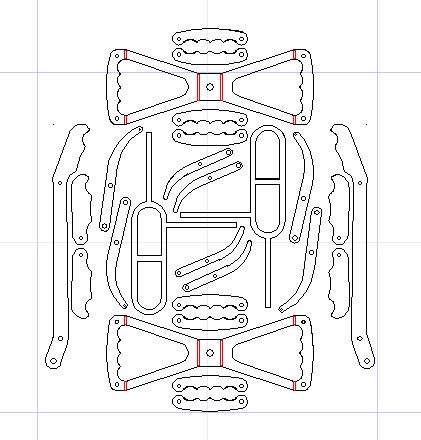
Hey Bart, Sorry I didn't get a response a bit sooner, but you've already said why... LOL I've got a bit of news to report. As you know from talking off the board in the past, I've got some stuff drawn up. I'm in the process of getting many of those pieces laid out in the dimension format that my PE folks do. I'm hoping to get a couple of separate orders submitted very shortly. The first, I'm hoping to do this week or early next. For the larger scale builders, the things of interest will be 1/16th and 1/12th scale stainless steel Dzus self-ejecting fasteners. The stainless will be .004" and everything is rubber-backed so it'll be easy to get them ready to apply. Also in that same order will be window bezels, such as you've seen drawn up already. Also in that order will be a ruler/center-to-center guide for 1/25th and 1/16th scale. It can be used as a ruler and/or as a center-to-center hole marking template. My plan is for it to have overall dimensions of 1"x.5" and will be marked on each side. If somebody thinks there is a better way to do this, I'm more than willing to entertain thoughts. I suppose I could do a 1" square ruler and have 1/25, 1/16, 1/12 and 1/8 on each side. Anyways, I'll see what anybody thinks of this and go from there. I plan to then work on a .016" nickel-silver plate which will be entirely made up of pieces that in 1:1 scale would be 1/4" thick stuff, like hand brake levers, butterly steering wheels, pedals, parachute and fuel shut-off levers. Also in the works will be disc brake rotors, which could get added onto the .016 order possibly. Let me know what you guys/gals think, especially on the ruler/hole guide. Scott

-
57 chevy pro mod w.i.p (updates 11/11/12)
futurattraction replied to tyrone's topic in WIP: Drag Racing Models
Shimming your door lines with strip is really going to make that body stand out when she's all painted up, Tyrone. That is just one killer build you've got going there! Your firewall turned out really nice and the motor is only icing on the cake at this point. Too bad about the Mustang (since I'm a Ford guy at heart), but it looks right at home in there... -
It's looking really good Bart! Glad to see an update on it...!
-
1/16 Scale Army Vega Funny Car - Finished 10/14/2018
futurattraction replied to Mooneyzs's topic in WIP: Drag Racing Models
It's looking great, Chris. And you know what? For all the work you've done on it, one of the most subtle things you've done really catches my eye in the above pic - the bead rolling you added to your side tins. The whole thing, as others have said already, is a work-of-art... -
Your chassis is looking first-class all the way, Greg. You've definitely got a knack for doing this, even if you do have "snow" in your hair! LOL