
JasonFL
-
Posts
966 -
Joined
-
Last visited
Content Type
Profiles
Forums
Events
Gallery
Everything posted by JasonFL
-
Project: "Inferno" 49 Merc - *Update p17* 3/13/15
JasonFL replied to JasonFL's topic in WIP: Model Cars
Thanks Bill. Glad your liking it, hopefully you'll like what I do next to it. Haha thanks Robert, means a lot. Thanks Rich -
Project: "Inferno" 49 Merc - *Update p17* 3/13/15
JasonFL replied to JasonFL's topic in WIP: Model Cars
Thanks Andy. I'd like to see your take on some of the techniques, post up a link if you ever do any. I definitely have to check out that 55/57 project you got going on. Thanks buddy Thanks Ray -
Project: "Inferno" 49 Merc - *Update p17* 3/13/15
JasonFL replied to JasonFL's topic in WIP: Model Cars
Thanks Ben, appreciate that. Thanks a lot Martin. That's just what I didn't want, another Merc build. Mission accomplished. I'm still not sure about the motor, I might switch it up. At first I planned on going more modern but the only wheels I had at the time that allowed me to lay it out were the stock ones. As for the interior, I have an idea for what I want but haven't touched it yet. -
Project: "Inferno" 49 Merc - *Update p17* 3/13/15
JasonFL replied to JasonFL's topic in WIP: Model Cars
Starting to come together. Not much of an update but something's better then nothing. Opinions always welcomed. -
Project: "Inferno" 49 Merc - *Update p17* 3/13/15
JasonFL replied to JasonFL's topic in WIP: Model Cars
I filled the radiator mounting holes and made new hidden brackets for it. Then I made 2 pieces on the sides to sit on top of the fender wells and a piece in the middle to bring it together. I pulled the middle piece back off, added another piece to level the motor cover out then cut the hole for function. I also finished off the end pieces for the radiator and glued them on. -
Project: "Inferno" 49 Merc - *Update p17* 3/13/15
JasonFL replied to JasonFL's topic in WIP: Model Cars
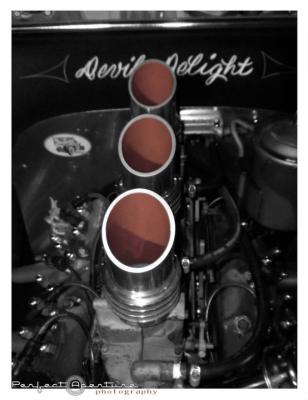
I left you off with the motor compartment. To clean the radiator up I found this cover off a bumper I got in a trade. Not sure what the bumper is off of, maybe a TBird? I cut the cover off then cut the middle out. The last photo is a rough idea on how I want it to look. -
Project: "Inferno" 49 Merc - *Update p17* 3/13/15
JasonFL replied to JasonFL's topic in WIP: Model Cars
While away from the bench, I came back to a nice little message from the wife. Nice way to get started up again. Love her -
Project: "Inferno" 49 Merc - *Update p17* 3/13/15
JasonFL replied to JasonFL's topic in WIP: Model Cars
Thanks Anthony. Hopefully I can get more done soon. Wow! Thanks Rick,appreciate that. More updates coming Renato, thanks for hanging in there. -
Project: "Inferno" 49 Merc - *Update p17* 3/13/15
JasonFL replied to JasonFL's topic in WIP: Model Cars
Thanks Bill. Appreciate that, your work is always giving me ideas. Haha no problem Glenn. More updates coming soon. -
Project: "Inferno" 49 Merc - *Update p17* 3/13/15
JasonFL replied to JasonFL's topic in WIP: Model Cars
Thanks Albie. Always good hearing from you. Any new projects going on? Thanks Bruce, I appreciate that. -
Project: "Inferno" 49 Merc - *Update p17* 3/13/15
JasonFL replied to JasonFL's topic in WIP: Model Cars
Thanks Mike, Richard, and Jonathan. Glad your liking the work to the hood, more photos coming soon. -
Project: "Inferno" 49 Merc - *Update p17* 3/13/15
JasonFL replied to JasonFL's topic in WIP: Model Cars
Thank you for all the comments. I apologize for the delay on my responses. I have to do better at keeping up. Thanks Robert, glad your liking it. Thanks Andy. -
Project: "Inferno" 49 Merc - *Update p17* 3/13/15
JasonFL replied to JasonFL's topic in WIP: Model Cars
Figured if I'm gonna make the motor cover realistic and functional I mine as well add a screen so nothing gets in the carbs. Found an old pair of headphones with a screen so I took one apart, shaped it, and cut it out. Then made another bottom piece with beveled edges on the inside so the screen sits flush and on the outside for looks. Just about finished. Still needs some cleaning up. That's it for now. Opinions welcomed. -
Project: "Inferno" 49 Merc - *Update p17* 3/13/15
JasonFL replied to JasonFL's topic in WIP: Model Cars
Had to drop the radiator down as much as possible to make everything fit for future plans. I really wanted to attempt to make the motor cover functional not just show. I'm gonna use one of the many plastic spoons I hoarder that my wife says I'll never use to help me achieve this. I took some vice grips, old tree scrap, and cut right down the middle to give the motor cover a better edge. Also added a piece to the bottom with a hole. -
Project: "Inferno" 49 Merc - *Update p17* 3/13/15
JasonFL replied to JasonFL's topic in WIP: Model Cars
Before I smoothed the motor compartment I thought it'd be cool to make a motor cover out of the first hood that I tried to alter for new body lines. I wanted to make it a similar shape as the hood ornament First mock up shot -
Project: "Inferno" 49 Merc - *Update p17* 3/13/15
JasonFL replied to JasonFL's topic in WIP: Model Cars
Thanks Rich. Means a lot coming from you. Thanks Jon -
Project: "Inferno" 49 Merc - *Update p17* 3/13/15
JasonFL replied to JasonFL's topic in WIP: Model Cars
Haha..Why the unsure face? Thanks Andy -
Project: "Inferno" 49 Merc - *Update p17* 3/13/15
JasonFL replied to JasonFL's topic in WIP: Model Cars
Thanks Billy -
Project: "Inferno" 49 Merc - *Update p17* 3/13/15
JasonFL replied to JasonFL's topic in WIP: Model Cars
Here's an underneath shot Wanted to incorporate some of the dimples to the motor compartment. Plan A was to drill holes from the back of the motor compartment and put plates there but every hole drilled got worse so I filled them. Plan B I decided to make plates to put in the motor compartment instead of on the outside. -
Project: "Inferno" 49 Merc - *Update p17* 3/13/15
JasonFL replied to JasonFL's topic in WIP: Model Cars
Haha thanks man, I appreciate that. Glad you enjoyed it, hopefully I'll have some more for you soon. Stay tuned. -
Project: "Inferno" 49 Merc - *Update p17* 3/13/15
JasonFL replied to JasonFL's topic in WIP: Model Cars
Thanks Glenn. I really appreciate it. The family stuff is starting to finally smooth out. I'm gonna try and really get back to the bench this week or next. We'll see. Throw me the link to your 36 build, I'd love to check it out. It's people like you on this forum that keep me wanting to get back to the bench. So thank you for the inspiration. -
Project: "Inferno" 49 Merc - *Update p17* 3/13/15
JasonFL replied to JasonFL's topic in WIP: Model Cars
Made support brackets for the new pieces. Mounted the pieces higher then they have to be so I could just shave them down and shape them. Saves on body work. Finished, body work and all. -
Project: "Inferno" 49 Merc - *Update p17* 3/13/15
JasonFL replied to JasonFL's topic in WIP: Model Cars
First off I wanted to apologize to everyone for the lack of post and photos. Everything's been on the back burner for a while due to family stuff. I also wanted to thank everyone for all the inspirational comments. I'm blown away! Hopefully I can get back at it soon. Very soon. Here's some work I did before I stopped that I never posted Had to cut out the floating battery. Made a replacement piece and also made some pieces to smooth out the rest of the motor compartment. -
Hey Jack, Always loved this car. It's a 49 Ford Tudor. The guy lives not to far from me in south florida. His name is Bob and he owns a shop called Mad Mods. If you google him you should be able to come up with some reference photos. If you have trouble or need more photos let me know. I have a ton of photos of everything I could dig out. Good luck with the build. Love the concept, can't wait to see more progress.
-
Jesse, the only tool I use for scribing lines is my exacto knife. Just use the back of the blades. Use tape as a guide and take your time.