

jmpsebring
-
Posts
236 -
Joined
-
Last visited
Content Type
Profiles
Forums
Events
Gallery
Everything posted by jmpsebring
-
 The final turbo angle looks great. Sunday I copied you wheelie bar...I feel no guilt! Saved me lots of time.
 -
Saving me alot of time by finishing these parts. I plan on copying most of your steps. An amazing job!
-
Lets see your trailers or car haulers!
jmpsebring replied to fishdatty's topic in WIP: Drag Racing Models
I built that back then as well. First I've seen this kit in 30+ years! -
57 chevy pro mod w.i.p (updates 11/11/12)
jmpsebring replied to tyrone's topic in WIP: Drag Racing Models
Such a great shape! You will do it justice for sure. -
1/16 Scale Army Vega Funny Car - Finished 10/14/2018
jmpsebring replied to Mooneyzs's topic in WIP: Drag Racing Models
Been watching every step. Your getting close! Continues to be like a little show for our visiting enjoyment. -
So many incredible projects! This is so realistic and so well executed!
-
Sometimes you just don't want to deal with "the next step"whatever it is. For me it was trying to trim down the wheel tubs. Lot's of slow fitting, knowing you can't go back once you cut things up. Also needed to make returns on the inside door edges to meet up with the frame. Started on a fill panel between the windshield and firewall area. Finally primed the tubs so paint has plenty of time to dry and shrink before decalling and clear.
-
A few years ago...my glory job! I'm on the left (or in the way) Our 'star' drivers...a guy with a pony tail and a guy that makes salad dressing (RIP) Our car on the track.
-
Lets see your trailers or car haulers!
jmpsebring replied to fishdatty's topic in WIP: Drag Racing Models
I like this kind of project as much as high-detail builds. Great job! -
Lets see your trailers or car haulers!
jmpsebring replied to fishdatty's topic in WIP: Drag Racing Models
I'm going to use a '51 White COE custom truck to make a hauler. Right now I have too many projects going to build this. But in time..... -
-
Because this is not the Andy McCoy duster body, It is not really a proportional copy of the Duster's body or frame. This is the Demon body off the Revelloution funny car with the front wheelwells pulled back. Pulling the wheelbase back to 114" had no effect on my timeslips I don't have 2" forward of the block to the end of the frame, I have only 1.8" between the frt.wheel centerline to the front of the bumper or only 2" from the front of the nose to the front of the engine block. That extra 1/2" of space would have been nice. Others using modern promod bodies, build everything in front of the motor, and still have room to build the nose's framework to mount the front of the nose to the chassis. And of course I could add length to the nose... but that's alot of extra work. The nose and doors will never be on the car. So I can make do, and proceed. I posted the comments in case anyone in the future thinks about using the Demon body as a starting point. It will be a kool car...but it's not really in Pomod proprtions. Someday maybe we will have a 53 vette or other older type of body from TDR. In real life I wish they would outlaw any body style later than 1960. To me, these are modern day alterds/gassers. This is going in a 19" case, up on Jacks, doors on door racks and nose off. I'm back to thinking about a carb motor. I spent alot of time copying your NOS mount Bart. This will have tanks!! Plus, tanks for the measurements! They are helpful for sure.
-
Agreed, it is a cool view. Great job!
-
The Jacks are temp Jacks. It gives me a feel for overall height. This is going under a lit canopy so space is critical. I need the canopy to hide the lights. I can't make it "full size" because the case would dwarf the car. It is possible I'll have to increase the size of the case already. ( I can use the case for other projects) Plus the trick is to compress the scene as much as possible to frame the car. The length of bodywork fwd of the front wheels is where it's too short. (and I'm not about to lengthen it.) It's only 2" from engine block to the outside of the nose. ( it's over 4" from the firewall to the inside of the Willy's front nose.) I pulled the front wheels back to a scale 115" then another 1/16th" just to give me more space from the engine to the backside of the front grill for pumps, tanks, bottles.etc. I could have bought another bit of space by moving the firewall back....but the firewall is one of the reasons I built this. I love Promod firewalls. Overall I wish the nose was 1/2" longer. This is another reason to display this minus the nose and doors. A stock 70's funny car is not the same as a modern Promod...close but not quite as radical. Anyway, it's the paint and detail one will see and I'm falling asleep writing this so enough....
-
That pesky job has been getting in the way. Good thing I get paid..otherwise....... I'm running into a few minor problems with this funnycar body. It's not long enough in front. But the nose will be off and it's still going to be a nice model. Also decided to cut up the body. No real reason not to since it will also be without doors. Also started on my back wall and base. More photos soon. I need to study some more tonight. (One needs to be smarter than their students) Thanks for the comments..I too was inspired. By the talent here and the talent of those that make it possible. Dirtmodeler, RBMotion, Slixx, Flashpoint, Compresins, Micronitro, Proline, TDR....for starters. Wish I had a small "thanks to" black decal with there names. It would be a nice way to pay tribute to those that made this era of dragcars possible.
-
be aware this is not the mini sandblast tool. I happen to have a friend thats got a bead blaster(full size) in his shop. The reason I keep lightly blasting the frame is because it's great fun! Plus it's just amazing how clean and how smooth it makes everything. The mini one might work better or be worthless. I have no idea. BTW, the Dirtmodeler parts have saved dozens of hours. A great product. This was a lucky time for me to get in to promods.
-
That makes sense. On the front it's over silver met. on the rear it's over white.
-
thanks guys, I'm using .015 sheet to wallpaper the firewall and .020x1/8" strip for the framing.
-
Clever layout again! That's a very pretty blue. Earlier you wrote Orian Blue....I'm not seeing that anywhere. (or Orion Blue). Is it a HOK color? Google came up with a 50'S CADDY COLOR...???
-
Thank You and thanks to anyone who has had a kind word to say. You can get so wrapped up building..trying to just get the next part built that you forget to take the time to thank those who took the time....
-
First coat of primer shows the flaws, but overall it's clean, crisp and pretty even. I liked the result. Plus with some debonder, I was able to pop the part off the chassis. More x-bracing and more tabs added. Seems like I've slowed way down, but some of this stuff takes much longer to produce. Still less than two weeks.
-
That little band of blue around the windshield top turned out to be critical. JUST AWESOME!! The koolest cars in Dragracing for sure. You did the class proud. If we end up actually finishing these models, we need to get them all together in the future to display.
-
-
I placed a little ball of APOXIE clay(very much like extra fine white milliput) into the sharp angles. Took a large brass roller and kept it wet while smoothing, removing extra clay. Once it was flat and even with the top layer strips, I used a thinned out piece of tubing to 'stab' or take a bite of the puttied joint, ensuring the leftover was a perfect radius that I could repeat over and over on the other corners. Once finished, I used a q-tip to clean the area, and will set this aside overnight.
-
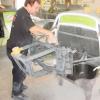
One of my fave parts! The firewall has been covered with .010 sheet plastic. It's barely tacked in place with some superglue. If I can't remove it, I'm......in deep trouble.. I plan on cutting layer #2 but I wonder how hard it will be to get all of the lines 'perfect' or even close..? So at the last second I decided to frame everything in strips instead of cutting panles with holes. I think it was far faster in the long run. I was going to need putty anyway.