

jmpsebring
-
Posts
236 -
Joined
-
Last visited
Content Type
Profiles
Forums
Events
Gallery
Everything posted by jmpsebring
-
The photos for the above.....i'm having trouble ..not sure why http://i1161.photobucket.com/albums/q519/jmpvapb/CIMG6767.jpg
-
Back to my Sonny's style engine. I glued the heads,flanges,rivets lightly together to set up all the spacing. Used a section of Square tubing to bridge the gap. Also drill some holes for future NOS. Used some rectangular stock spaced by a piece of aluminum stock to ensure they would not stick together'there'. Bridged that gap with a temp piece of tubing to set my width. Used my calipers to ensure the 'top' was level then tacked it in place. Next I cut everything to length then added the front/rear panels, then trimmed everything down. Finally added a top plate making it narrower to create a groove. Soldered my spiral bead wire around to simulate welds.
-
Dave, I know this is jumping the gun somewhat...but I'd like to play with some intake manifold construction techniques. Aprox how wide is the base of the carb main body? I just want to make sure my top base plate is a little larger/wider than the carbs-to-be. I figure with that width, everything else can be eye-balled. thanks!
-
 Awesome idea for the linkage! Those little victories are just as impressive as the big parts. Also did a great job with the bending of the floor. The angled fuel lines coming off the hat is another fave part for me. It's going to take some time to dig out from that work area!! Edited to change pig parts to big parts!!
 -
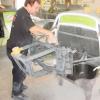
I need a way to get to the track. The first time I went to a NSRA event, I saw a slammed 39 Ford cab-over ramp truck. Fell in love with them. Started to research and I discovered the White COE truck. I've wanted one ever since. Yesterday It came. This will be a full custom art deco transporter truck of some kind. I only had to raise the fenders 1/8th". I opened up the windscreen and that transformed it.
-
Such finesse...
-
1/16th TDR 69 Camaro Pro Mod arrives today 3/09/12
jmpsebring replied to Romell R's topic in WIP: Drag Racing Models
Well I'm not trying to put out any negative vibes out there...Thank You for drawing this up and giving us a choice. Perhaps I'm tryin to rationalize the pro & cons before I buy one anyway. It allows me to pretend like I'm a reasonsible adult. -
1/16th TDR 69 Camaro Pro Mod arrives today 3/09/12
jmpsebring replied to Romell R's topic in WIP: Drag Racing Models
Are you sure you want to put that in writing?? Plausible deniability is a good thing...... -
1/16th TDR 69 Camaro Pro Mod arrives today 3/09/12
jmpsebring replied to Romell R's topic in WIP: Drag Racing Models
Congrats!! First one on your block I'm sure. Thanks for the honest apprasial. It's a tough call for me. I like it for the technology, thinness, bodycut lines,symmetry, etc, but it's also my least fave real life Promod body along with the Mustang. Too modern for me. I love it but don't crave it. There dosen't seem to be any recess perimeter for window glass..... is there? Decals for the front grill will be a challenge. I've got a few hundred at least already invested. This body will put it over$500!! I look forward to seeing it's footprint/outline on graph paper and your talent as a builder. -
The nicest dragster ever built??? could be! Plus only about two hours ago I discovered the 1/8 camaro. I need to look around more
-
trying to make a sheet aluminum intake manifold out of brass. Sonny and others make these manifolds and they leave all the welds visible like artwork as opposed to grinding down the welds and polishing to a shine. I tried to post photos with the reply above them. Something happened and I lost the images. So I posted the photos again. I'm too tired to worry about it tonight.
-
-
Lot's of hours working on various things. I started on the rollbar, it will be glued to the plastic frame. I closed the gap around the firewall by rolling a bead of APOXIE sulpt and pushed it in place around the body. Then I push the body down over the firewall and the extra putty squished out. Once it half set up, I trimmed off the extra and allowed it to dry. One of my favorite tools is this 1x2x3" iron block. It's very heavy, dead on for being Square. It's impossible to hurt. Plus it's not alot of money. I use it constantly as a 3rd hand, a quick height gauge to transfer graph paper lines vertically. I solder with it. etc. Highly recomended! I soldered up some brass as I try to make an intake manifold. The same company that makes the little tubing pieces also makes this very small silver-plated spiral wire. All of this is to make perfectly spaced welds around the intake. I coated the parts with acid then floated solder over it's suface. Finally soldered the wire along the tiny channel I developed when I soldered the brass stock together allowing me to countersink the wire slightly keeping the wire very straight. It's just an experiment to see if it's an effective way to make highly visable welds. I've tried putty too.
-
I have, quite a few times. Opening a box to see a brand new model never released before. Even down to the tree's themselves. Looking for flaws, what they got right, what they got wrong. How parts are attached to the tree, etc. When I wake up ...some time later, I amazed how detailed the images were. I guess 40+ years of building will do things to your head.
-
Joe, did you ever resolve the turbo size issue? Shapeways website shows all the choices, but I'm at a lost if they have made changes or just sent you the wrong scale. Their blower and Lenco is quite amazing. I also bought a 1/1800 warship... .
-
If Dave makes two of them ...he wont need to send them to TDR... OH NO!!!
-
If I am only going to build one dragster
jmpsebring replied to jaydar's topic in WIP: Drag Racing Models
Personally, I'd start by looking at decals. If your making a car from the past, you have to get both decals and paint. -
Lets see pics of your altered wheelbase mopars
jmpsebring replied to nitro_force_fan's topic in WIP: Drag Racing Models
Well it's four days later and in my hand is a long-nose Dart from Speedcity Resin. Many like myself, get interested in a model or build while looking here on the various threads. Even if they are old threads. Then we go looking for products having no real clue about their quality. This product gets an "A" for sure. Top quality in every way including service. Have no Fear! -
Lets see pics of your altered wheelbase mopars
jmpsebring replied to nitro_force_fan's topic in WIP: Drag Racing Models
So I ordered the Speed City long nose dart like the Landy car shown here. It comes with a box frame. It says to use an AMT funny car for axles. Do I assume.... they mean look for the earliest style of funny car chassis only and that's only an AMT model? It's been since the early 70's that I owned one of those. I dont remeber the parts truthfully. I see some STP Cougers that appear to be early. Is that the style? Dave Decoster, those two models are very nice! On the Altered States site, there's a long nosed Dart called "Dixie Dart 2" by Jay Moody. Very nice model, fantastic paint, everything about it is done well. Was there ever a Dixie Dart? If not, then even the decals are one offs. -
Lets see pics of your altered wheelbase mopars
jmpsebring replied to nitro_force_fan's topic in WIP: Drag Racing Models
I liked the Landy's Dart so much I ordered one last night. I really like that thicker rear roof line. -
if you want to make the runners and the machined manifold top part along with the split carbs...that's ok too. just saying... great pics!
-
just to open this think tank up some..... Let's talk hole sizes for example. Whatever is real in 1/1 scale, has a real part that fits it. In scale, we need to have parts that fit RB/Proline/Scale Hardware/etc stuff. We need a blower hold down plate for the flashpoint engine. Plus the slots must be big enough for the straps we use to pass through. If they are too narrow the plate is useless. If we take our time, and think ..we can design parts for joining/improving existing parts. Dzus fasteners in multi parts are fine, but little mounting tabs we can put on frames that have a larger center hole with two tiny holes on either side woulds make your Dzus fasteners and matching tabs the must have version.Pop in a couple of scale hardware rivets....! You need to put 50 on a sheet, not 10. Thickness can be done more than one way. You can use the P/E part as a perfect pattern or glue it to a thicker part allowing one to quickly cut down to a perfect shape. P/e parts can stack to make the right thickess. You could also make a thin and thicker sheet. The window rivet spacing strip can be a tool instead of the part itself. Tameo 1/43rds would cut slots in their P/E "trees" sections so you would have perfect folding guides for parts. If the parts bent fit through the slots..you know it's the right shape. If this is all too "wordy" then sorry. I'm an instructor and technical writer.(who can't spell well) I overstate everything. But I'm not saying anything new here that's not already being thought of as we build cars in this scale. Now that I've scanned many of the projects, there are clearly those builder's light years more talented than I. Romell having to cut and solder tiny tabs to a window frame is tedious to say the least! that's exactly where P/E shines. Some have built chassis and cars. I have not built anything. In fact I just discovered 1/16th drag cars a few weeks ago. I'm just seeing their obstacles as I go through their builds. We need input from those people. From what I can see right now, this could be done right the first time if we pool our knowlege together part-by-part.
-
Thank You Gentleman. One of my fave 'finds' are these Hi qual little plated brass tubing sizes in the beads area of the craft stores. They can save so much time when you need 6 equal little sections all held to a tight dimension. Just use them when you deem them necessary. Because the frame is brass, I can dip it in Lacquer thinner right now. I don't even know what decade this will be in so I sure don't know what colors I'll use. This is Brilliant Blue Tamiya spray. If I go modern, a blue frame with yellow engine blocks white headers and a yellow/blue/black or white combo might get the nod. If I go period correct, then the same old colors will come up again. In the end, it's the decals I'm held to design around. Like many ...When I get my Slixx order, I'll have to choose parts from what's been printed. One pic shows some of the detail of the 392 hemi. I figured some would like to see the motor before it's been cleaned up.
-
I'll just say thank you right now!
-
I would love to use the Fords, but their distributor driven off the front makes the inline coupling diificult. It will go in an altered or possibly a saltflats car. Lots of work last night. I put in most of the remaining sections. At this point I can start building frame detail and locating major components. This morning I went off to my friends house who just happens to have a bead blaster. It leaves the frame incredibly clean and smooth with a uniform sanded surface. After the pre-build, it's one more trip to the blaster then primer.