jmpsebring
-
Posts
236 -
Joined
-
Last visited
Content Type
Profiles
Forums
Events
Gallery
Everything posted by jmpsebring
-
Custom 50 Ford F-1
jmpsebring replied to Roncla's topic in WIP: Model Trucks: Pickups, Vans, SUVs, Light Commercial
You knew right when to pick up the pen. Nothing overdone. -
Before I saw all of the promod builds I was ready to do a whole frame. But I'm already itch'n to make a Promod chassis. Plus when I put the (perfect) comp resin's body on the frame , I realized you wouldn't see anything. the seat, body and floor will hide almost all of it. The upper rollbar is very visual so I chopped it off. It didn't take too long to scrape and sand the rear frame area. I used Tamiya spray primer to "round out" & resurface the frame.
-
Thanks for the info. Nice car! I can't think of a more fitting subject. I don't want to build a dozen cars. it would be nice to build one dual-engine large-scale model. Plus when you start with quality parts and build an older style car, you realize they are not very complicated cars. I do think that matching headers will make or break the final look.
-
Best place to get resin promod parts and motor parts
jmpsebring replied to nitro_force_fan's topic in WIP: Drag Racing Models
I recieved my engines today. Both a 392 and the Ford. Not only are they nice, but the joining surfaces have been nicely sanded flat and even. Plus he countersinks into the hemi, pins to hold things together. The pins are a tight fit. In minutes you can put most of the major sections together and they hold. when I saw photos blown up 3x's or more, I noticd some flaws here and there. When I look at the actual parts in my hand I had to laugh. They were better than I thought they would be and are very well done. One thing to remember though. Most everyone I've delt with here, are guys making parts to order. Most have fulltime jobs. Plus you may not be next in line. Don't count on getting things in your hand in 48 hours. I paid and recieved a quality product. I have no regrets at all. -
I just might change my mind. I was going to build a current nostalgic car so I could use a mixure of parts and more modern paint schemes and colors. Now I just might add another 2" to my frame. If anyone saw the last Hot Rod deluxe magazine cover, you'll know why.... I'm not 3 weeks ahead and posting everyday. This thread will have down time as I bounce around. But I do need to get it going.
-
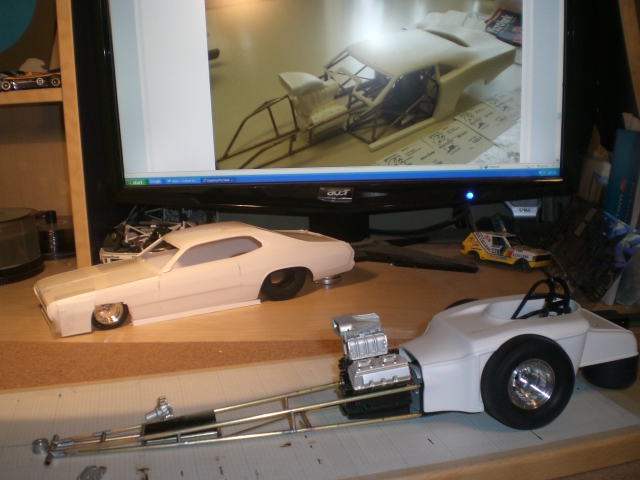
Time to get this started here instead of my other 1/25 comp coupe thread. I have a comp resins 23T body. A Don Prudhomme front engine dragster. Power will be from a 392 hemi or SOHC Ford. I've started on the frame using 3/32nds brass rod and tubing.

-
The starter mounting plate with slots for the front of blower pulleys. Suspension mounts and D-shaped mounting tabs to attach to frame rails for various applications. The rear frame mounts for the rear axle. If you need to double up to make the correct thickness, put two sets or design with gluing to sheet plastic for easy shaping and drilling. A fold up wheelie bar wheel-holder. Various links for throttles. Strips with 5/32? holes and bolt holes used to make header/intake flanges. Buyer cuts to length as needed. Wire loom strips. A thin straight maybe 2mm strip with perfect spaced holes one could use for window trim or as a drilling guide for perfectly spaced drilling. A narrow strip of timing marks one could wrap around a pulley. Round drilled circles one use on the back of many blowers. I hope this helps We are scratch builders more than model builders. things like this save time.
-
What a nice friday surprise! well done indeed!
-
Perhaps a thread could be started where those building a 1/16th cars (aka the buyer) could pool together their knowledge and suggest things needed. For example, a blower hold down plate to fit the PSI blower/hat . Window frame strips with tabs. P/E plate for the top of a MSD dist/Mag, etc. People are spending big money for bodies, engines, hubs, wheels, rod ends,etc. The only thing missing is a modern sheet of P/E. Sorry to put this in this thread, but anyone (aka buyers) reading this thread is a possible 1/16th builder.
-
Another great build and all new for some of us newbies on the site. If i could get you to back up to page one ...... for a minute, could you tell me what the main rail spacing width along the engine was on you car? I saw an older thread with a (perhaps older) Pro mod chassis drawing and it showed a 24" spacing. It looks all wrong. Is everyone just using the bell housing width +frame rails to set the width? Hope you or others understand the question. I'm trying to start a chassis layout on paper for a future build.
-
What a great point to reach. Chassis looks great with the body wrapped around it.
-
Honestly I don't know who Dave Mikut is..... I saw a photo on Facebook of a comp coupe and it is to blame for my sudden shift back into drag racing models. If I was unable to find good quality aftermarket items, I would not have started anything. The FB photo is earlier in this thread.
-
Very nice! Are the rear wells from the same kit? Are the outside bare aluminum rims painted?
-
Maybe a touch less body length in front of the rear wheels? I think it works just fine!
-
Thank You! The jet drives for the ski boats are cool... There were 6 or 7 items that looked like a good value so i ordered them..including the jet drive.
-
Romell, have you been playing or reading or searching for forums on how to use your new mill? Are you starting from day 1 to learn as you go?
-
I wasn't liking the color. Too bright of a red. It was Zero's Ferrari red. I added a couple drops of purple to darken and shift the color towards a brick red. I think it's an older looking red. Also used a p/e bender to put in a micro edge on the side panels. It's 10x stiffer now.
-
Two ways I've used. One; precut all the parts using masking tape to cover various areas, trimming.. then removing the tape for a pattern. Two: apply sections by section and let it conform. After it's pretty much settles, come in with a new blade and trim carefully freehand around the part. Sometimes it works, but it's stressfull! BTW, often even if I make a pattern, I have to trim a little once it conforms, but before it completely dries. I might need some water and a brush to get under a decal section to lift it back off the part, after minor trimming. Good news is that carbon fiber looks good even when it changes direction. most important thing is to cut nice even straight edges and curves. It can overlap a little. Try to keep lines on one side to the other the same. For a hat, I'd paint it gloss black, do the under front strip first, let dry, do the two sides then finally the top area with a symetrical pre-trimmed piece to slightly overlap the side pieces. Got that????
-
Alot of talented people on this site
-
1/16 Scale Army Vega Funny Car - Finished 10/14/2018
jmpsebring replied to Mooneyzs's topic in WIP: Drag Racing Models
OTB= off the board...or PM -
Thanks! The frame will look alot tidier I need to FOCUS Would this be a AA/CP? I need someone who knows old school designations.
-
Why did my writing appear in the middle of my photo ?
-
Well...that comes out to 1/16th" . I thought it would be more. I won't have much room in front of the motor either way.
-
Thank you !! I kept the front wheel well on the small side so I could adjust them. That also gives me a touch more length between the back of the motor and A-pillar. So if I determine the front wheel center, I can line up the motor with the front of the block/timing gear cover?
-
Sorry about the first attempt to post anything from photobucket anywhere. I used a disposible aluminum baking pan to cut panels for the sides and floor of the body. It's a great hi-quality aluminum with a nice grain. Side panels will run from the firewall.. forward past the front of the engine. That's where most of the decals will go. Also have the first primer/ color coat on the plastic part of the frame so it can throughly dry. Next is the new roll bar and little left over things, then another coat of paint over the whole frame. The brass section needs the fuel tank mounting started. The engine has been started, but I'm waiting on parts.