chaves pah
-
Posts
56 -
Joined
-
Last visited
Content Type
Profiles
Forums
Events
Gallery
Everything posted by chaves pah
-
Well, I´m afraid I have no good news about we all that expect to have a 1/24 MGA model in our shelves... this is the answer from Squirestools, the new owners of SEFCast I got two days ago: "The A211 MGA 1500 is currently marked as N/A on the price list, meaning that it is currently not in production, I believe that it requires new moulds. We are working on getting our existing stocks back up to level. Once this is complete we will start working on getting obsolete kits back into production. However due to the fact that this will require a full set of new moulds (assuming that we have all suitable masters to do this) this may still take years to complete. I realise that this is not what you are wanting to hear, however the kit that you are enquiring about unfortunately has not been in production for several years do to the previous owner of South Eastern Finecast having limited interest in the model Car kits. We will be aiming to get these kits back on sale, however please appreciate that this may not be as simple as it appears." CASE CLOSED...
-
What happened to Revell of Gemany Ferrari 250 SWB
chaves pah replied to Phildaupho's topic in Car Kit News & Reviews
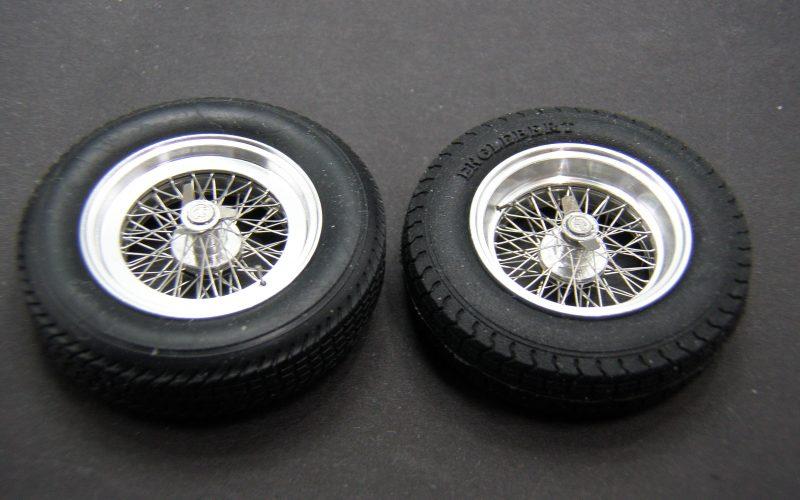
Hey, you do keep your eye on the money! well, I was asking about wheels, not wells ( a place where I would plunge if I where definitively forbidden to build any model kit...), Wheels and tires is for me DE most difficult difficulty to overcome! if you put your SWB over a 120 grit metal sanding paper, I am sure you will get that magic sensation you are just looking for a real car but, if the wheels are not convincing at all... On the other hand, I might say that, for once, some fantastic plastic wire wheels have been maid, the PROTAR Ferrari 250 GTO ones! more recent Revell copies are not as good, as they are chromed, not painted as Protar's... Protar/Revell tires are kept for some eventual Jeep... in my unfinished 250 GTO '64, tires came from an Academy 250 LM, it's as they where made for these wheels!...
-
What happened to Revell of Gemany Ferrari 250 SWB
chaves pah replied to Phildaupho's topic in Car Kit News & Reviews
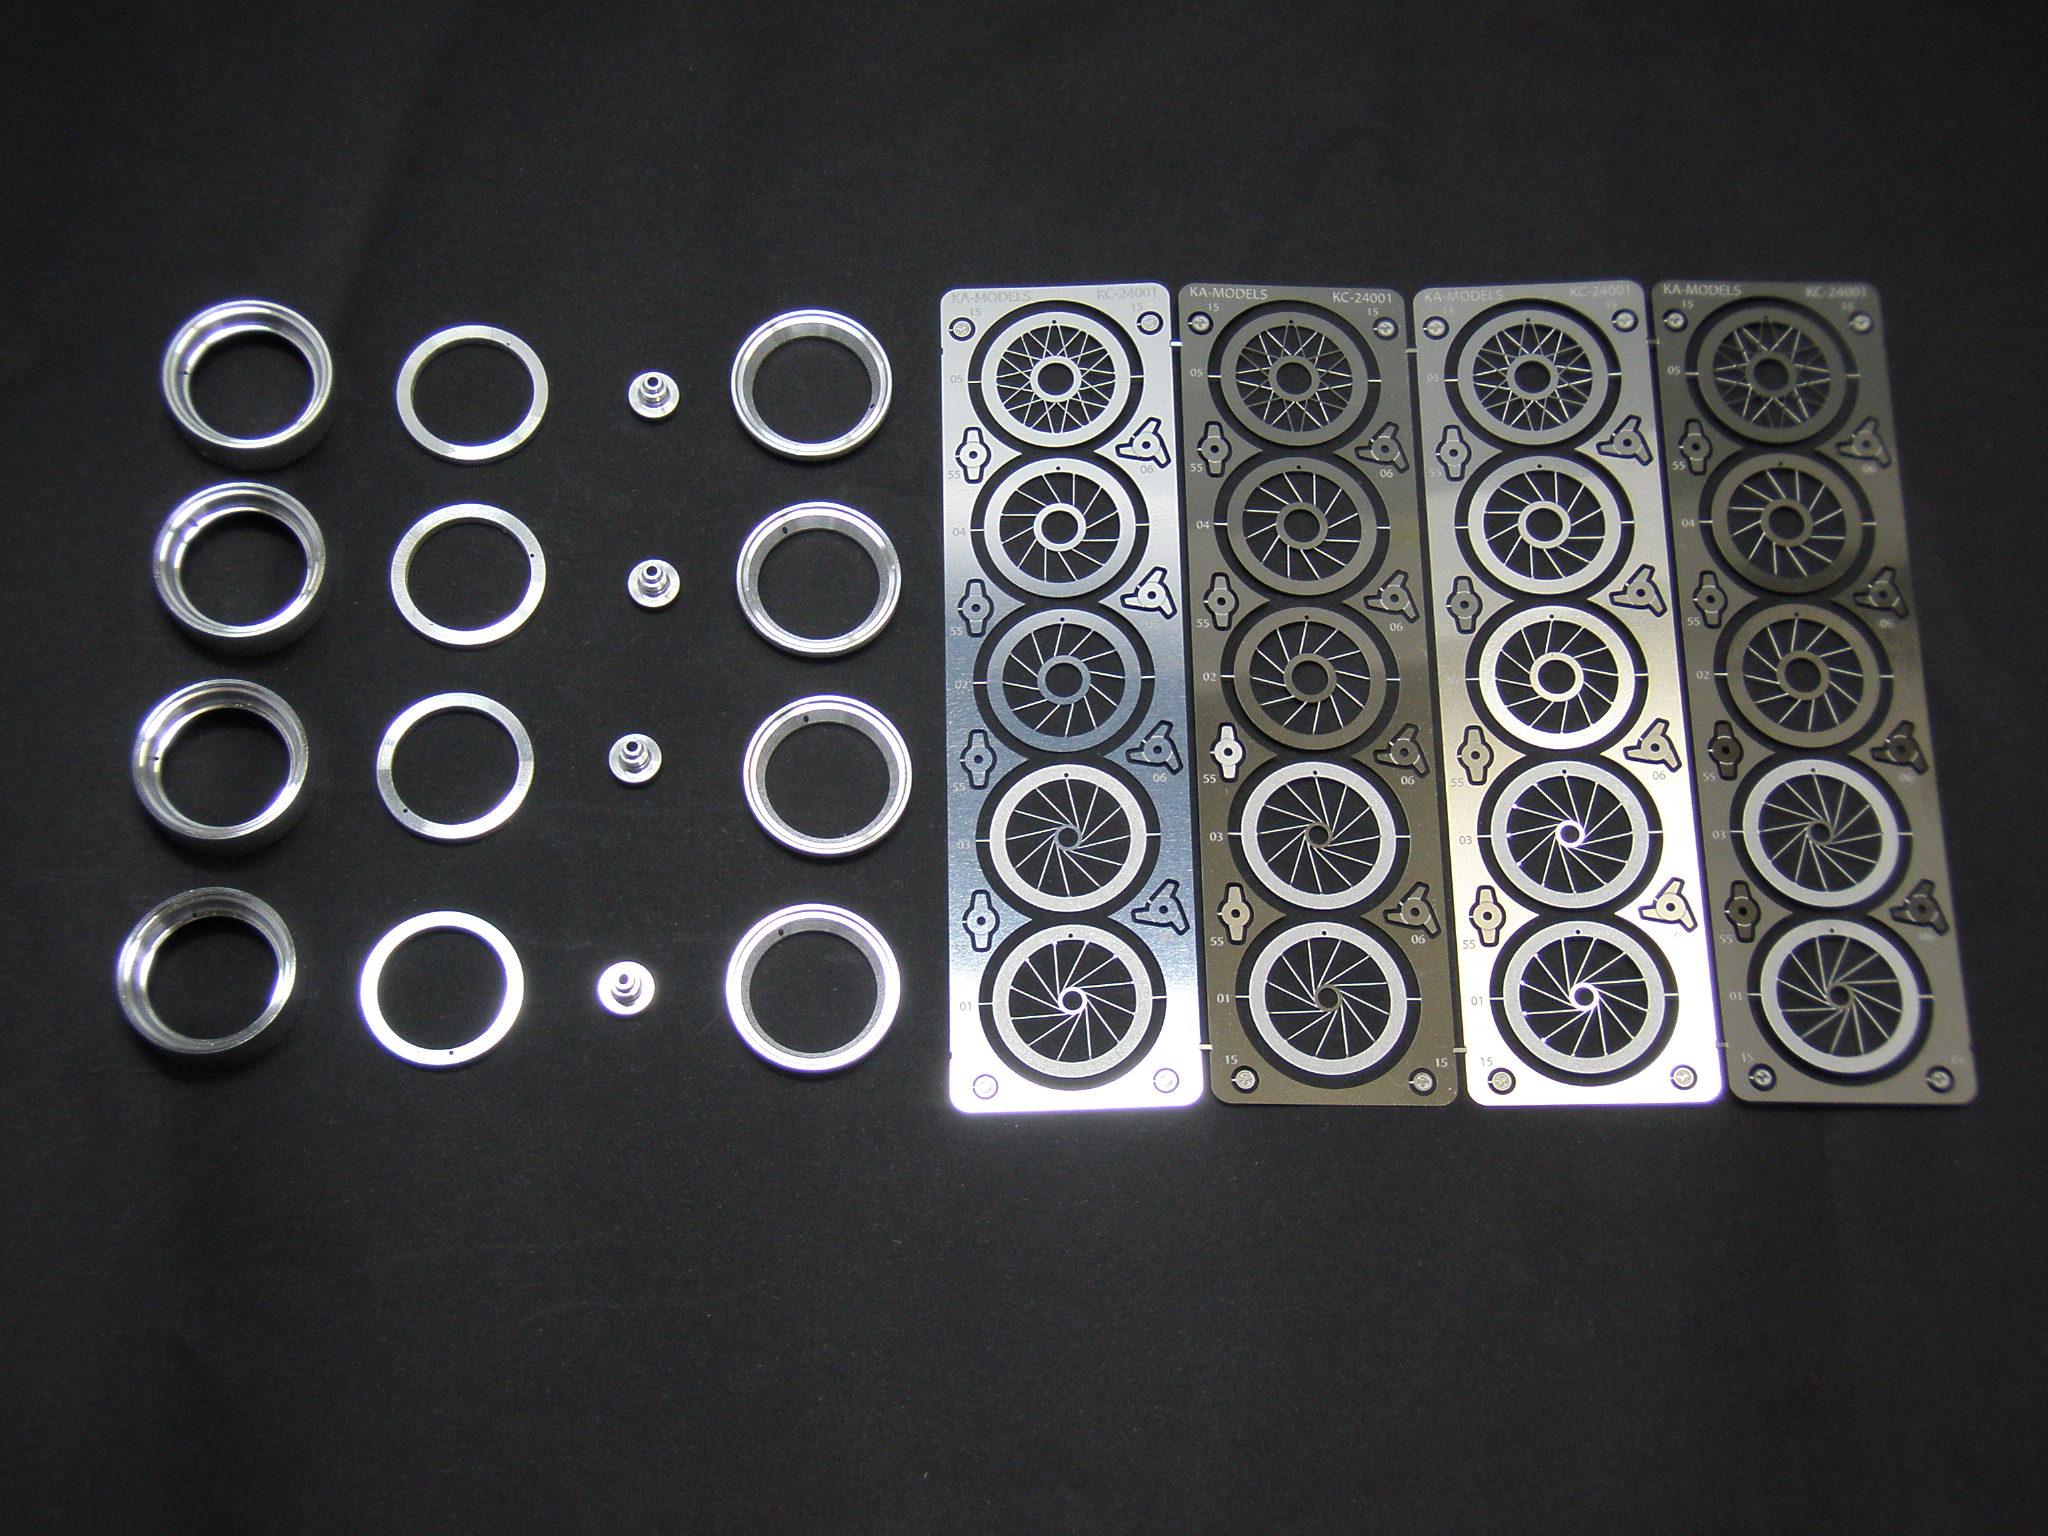
What a Great Model, Bill! I have to emphasise though that this is perhaps the only model (and modeller) where we can find the correct (all four) SWB wheels and tires… usually we find SWB models with 250 GTO (big (and deeper) rears and littles on the front), or 250 GTOs with all four identical wheels… this might possibly be a consequence of the attention paid by kit manufacturers: 250 GTO Fujimi with 4 equal wheels, only rear tires differ just some 0,8 mm… Italeri’s SWB, California, 250 GTO and 275 GTB have the same four identical wheels and tires (as other identical interior parts too)!... Hasegawa’s 250 TR57 has correct tires, but rear wheels should be identical on the outer side and enlarged just on the inner side… AND, aftermarket makers usually do not help too… Except MFH, if you visit KA Models, they have a 250 WIRE WHEEL for Hasegawa Image01 (TR 57,but with some Englebert rear tires, NOT IN THE KIT!) where the outer side of the wheels would be correct for a 250 GTO (front on the left, deeper for rear on the right) BUT the rear wheel would have to be also larger in the inside (and would need correct tires for it…); they also have a 250 WIRE WHEEL for Italeri Image02 where all four wheels seem to be identical and may fit the California, SWB and 275GTB models tires, and also a 250 WIRE WHEEL for Revell Images03 and 04, I suppose being proposed to fit the 250 GTO but… by the images provided ( 02 and 04) they seem to be also identical all four… even if the photoetches are not the same… By the way, what wells did you use on your gorgeous SWB, MFH?
-
Hi Yad', as I am trying to start wiring my 1/24 and 1/25 models wheels, I found that, judging by your MG TC absolutely superb photos, I think it will be an absolute must but, never the less I have some questions for you: Why is that central inner part (with all these concentric circles) separated of the main gig, and what is it for? Do the concentric circles refer to specific wheels diameters? What are the wiring sequences you use in each spokes side? The rear spokes are flat (horizontal), but should they not be also “dished” as the front ones? How do you center the rear rim to the gig stretched spokes before gluing it? In photo 5, the 2 aluminum tubes (the new wheel Hubs where the outside spokes will rest) are secured on a temporary “axle” making part of the Gig, is that correct? And the gap between the main Gig and that circular inside part is “virtual”, isn’t it? Shouldn’t the outer rim (after being glued to rear spokes) be kept secure in place before threading the outer dished spokes? What is that white inner rim in photos 4, 5, 6 and 7, are they part of the kit rims, or is it a new rim made by you?
-
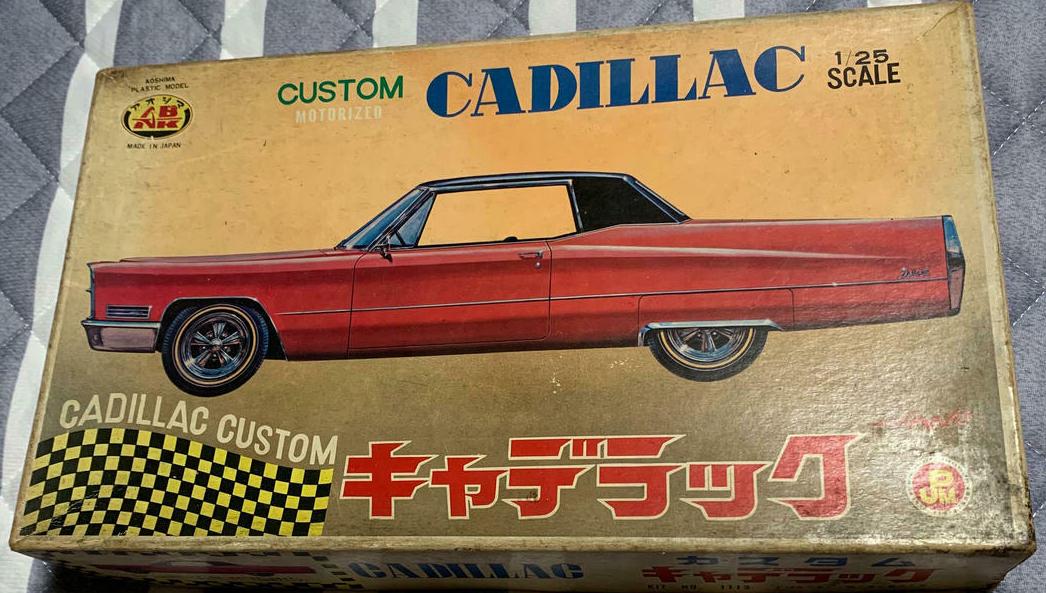
1/25 1955 Cadillac sombrero hubcaps
chaves pah replied to chaves pah's topic in Model Building Questions and Answers
Yes, you are right... But I did not notice the sombreros where used also on 1949 models, so the 1949 Franklin Mint model is the only "source" for it, the 1953 model use the optional wire wheels (Dayton)... The JADA model is most probably a copy of the WELLY Cadillac, in 1/26 or 1/27 scale, and on that it uses some Tunning "21 or "22 wheels... Well... pardon me Mike, but my house is not so big, so I have several models waiting for a new shelf to emerge from the vaults and, believe it or not, I went there to take a "peep" on the "waiting boxes" and I found I do have have 1949 Cady, not a 1948 Buick Roadmaster Coupe... my memory is fading... I did take a look on the spare wheel in the trunk, but unfortunately it has no hubcap, so I would have to take one of the wheels out of the car to make some resin copies, but most probably I would eventually destroy it... I will not take the risk to do it... The solution is trying to find a damaged model for sale in the net... Thank you very much for your help, Michael!
-
Where can I find 1955 Cadillac sombrero hubcaps for my resin R&R '55 Coupe DeVille model?
-
Hello, Randy, I saw recently your post about your marvellous Revell 1957 Eldorado Brougham and added some comments about this wonderful car, but also some questions about another fantastic Cadillac, the 1955 Coupe DeVille, hoping you could share your knowledge I have noticed in some other posts made by you, might be of some help for my 1955 model problems... this message goes as I don't know how often you visit your old posts...
thank you very much
-
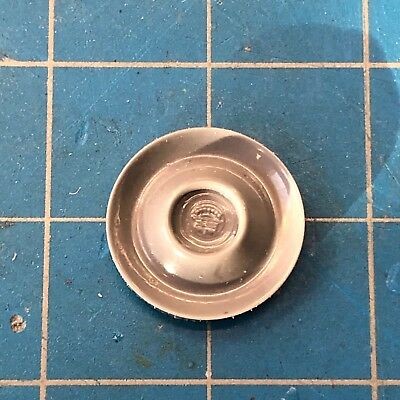
Knowing by misterNNL you have a little encyclopedia in your head, just may be you could "save" me... I bought recently an R&R resin '55 Cadillac Coupe DeVille kit, but without wheels; the BIG PROBLEM now is finding correct wheels for the beast, mainly these Sombrero hubcaps I don't see in any 1/25 model Cadillac or other similar car... since I live in Europe, my knowledge about American modelling stuff and so on is very weak... can you help me? I found these resin hubcaps made in the USA, but now they appear in a chinese (or alike) site you can not contact as the mail adress is a fake... but they must have found this image in an American site!...
-
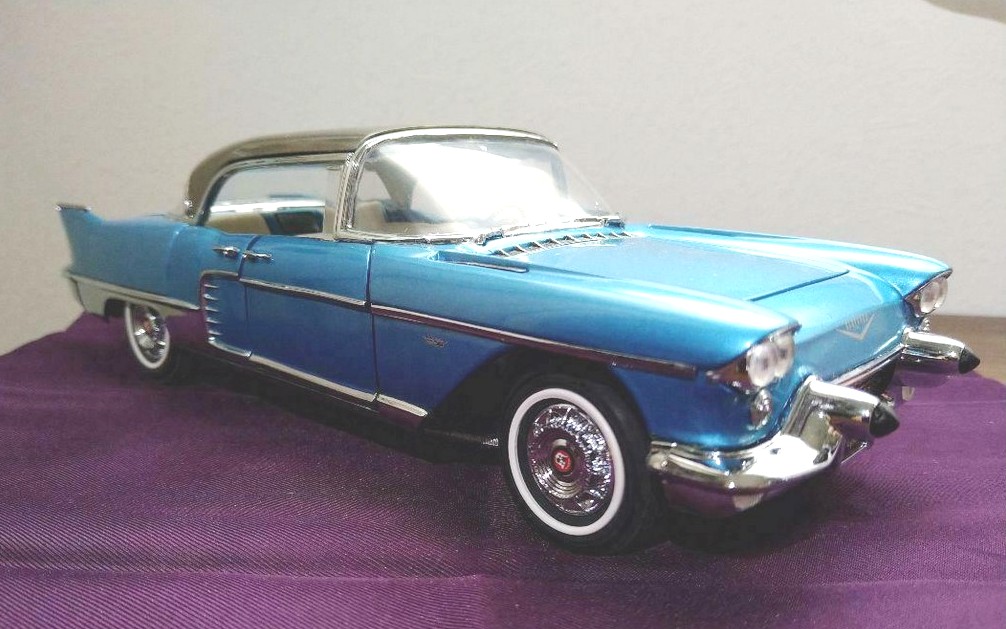
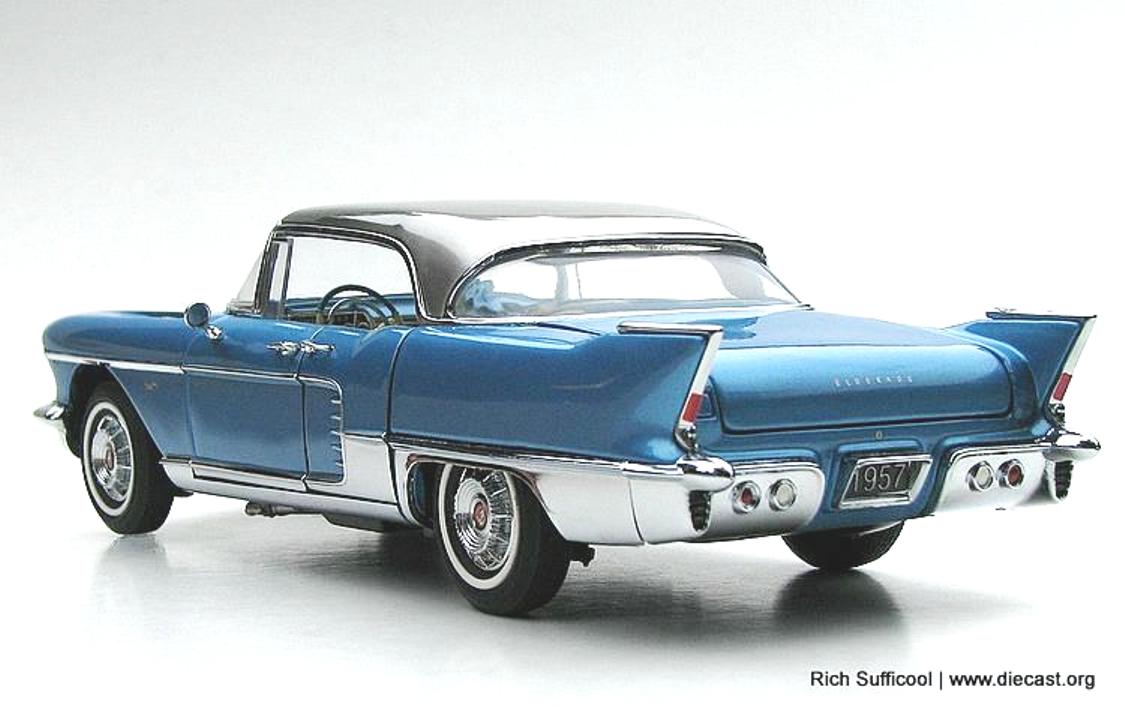
Revell 1957 Cadillac Eldorado Brougham - Finished
chaves pah replied to RandyB.'s topic in Model Cars
Continuing what I was talking about, in this case the 1955 Coupe DeVille wheels, I found this resin Sombrero Hubcaps in the net again (I had it in my eBay "watching list", but the page where it used to be just desapeared... Well, I found this image again, but now it is in a dangerous page, MES Raja Residencial School that leads you to a FNAJVA page where you find this “eMail”: SUUY2020”MSN.COM on ”Contact us”… unfortunately I bought some kits and spares in a similar site two months ago and had to claim trough Paypal the refund of the money I paid them, as the pack that arrived in the end WAS NOT for me, but for some Chinese store in the other side of the city where I live !... BE CAREFULL, as this kind of sites are becoming "plenty"... Does anybody know how to find the AMERICAN modeller who made these Sombrero Hubcaps in the beginning? or where to find simillar ones around?
-
Revell 1957 Cadillac Eldorado Brougham - Finished
chaves pah replied to RandyB.'s topic in Model Cars
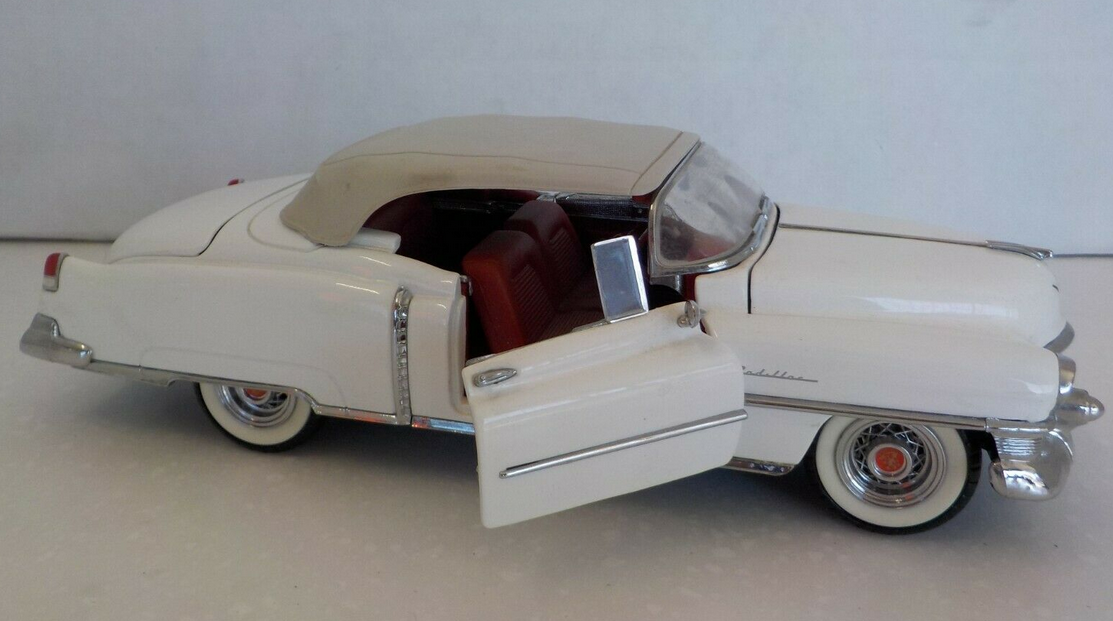
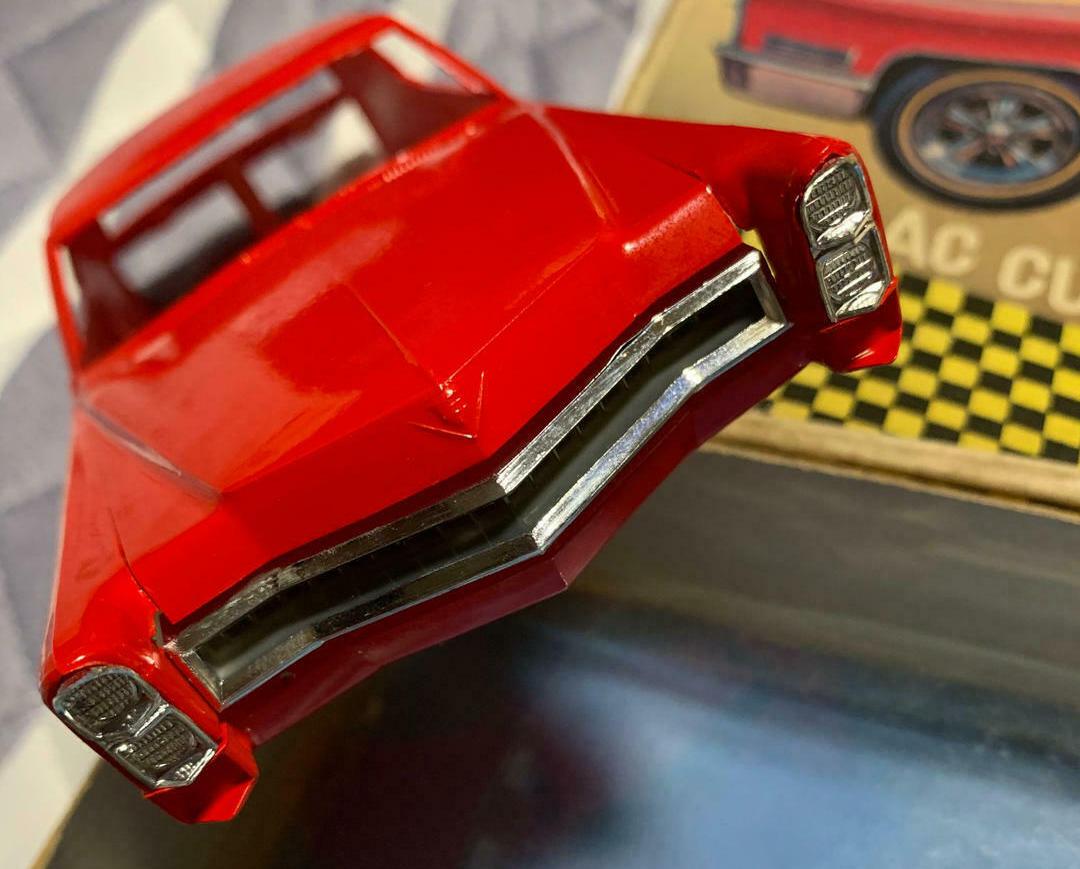
Hi RandyB, in fact this kit is soo poor/old that I decided to put it apart... after all it has one Hubcap (or should I say wheel) missing... and sometimes later I found one Franklin Mint Brougham (almost perfect, that's what they are, almost...) but, in the shelf you don't notice it at all... and mid blue with steel roof, my perfect combination for the most wonderfull modern classic car ever made by humans... But, after reading this thread I decided to compare both models and what did I find: measuring the bodys over the front wheels arches the 1/24 F Mint car is 80.94 mm and the Revell measures 79.22mm; from the front headlights cover to the point of the tail there is a 2mm difference (almost three mm with the chrome part in the F Mint) bigger model, so the Revell car proportions are in fact almost correct, BUT in 1/24 SCALE... the biggest flaw in the kit is, for me, the wheels... If the F Mint wheel diameter is 17,54mm, with a total of 30,43 mm for the tyre (witch I consider to be a correct wheel dimension for the Mint model, comparing it with real cars images, the Revell wheel is bigger, 17,83 mm with a 32,22 mm tyre diameter, clearly oversized when we look for your model side view and compare it with the 3/4 photo above... Now: if you ever find a F. Mint model and put it side by side with your Cadillac, I dare anyone who might have the guts to say the F. Mint is better, or even more perfect that your model ! All we can do is drool when looking to your model's images... Now I wonder if you can help me to find some proper wheels for a R&R 1/25 resin 1955 Cadillac Coupe DeVille I bought some years ago to an old friend... It needs a styrene platform to fix the MISSING wheels and axes; a steering wheel has also to be found... and a CADILLAC Logos decal sheet is also VERY IMPORTANT... As I live in Europe, I need to find your USA Ali Ba Ba caves with your modellers treasures... and I also have a 1967 Customized Coupe DeVille I bouhgt him (already built) that I would like to "backdate" to its standard version... after some digging in the net I am almost sure it is not a JoHan kit but an AOSHIMA Costumized version, with very different chromed front and rear parts and with Cragar Mags... where could I find the standard front grille and fenders? ( I suppose the Aoshima kit is JoHan copy or borroughed molds) PS: the F. Mint car in the photos is form internet Thank you very much
-
Hi, "Mr." Zoom Zoom, this Z3 M Coupe would be my buying choice if I was reach enough, but definitively not this colour!, I have to repaint mine also, so I will need to remove what I think is a varnish, as I scratched a little in the inside body and found that the plastic has that blue colour also... what do you mean with "rubbing alcohol", is it Isopropyl Alcohol? and how did you unglue the clear windows parts? breaking it is of a Very Probable risk...
-
Lancia Beta Montecarlo
chaves pah replied to afx's topic in WIP: Other Racing: Road Racing, Land Speed Racers
Hi, afx, yes, at the moment I "unburied" the Alitalia car, the only car with that extra NACAs... I have other long tail Betas waiting for decals to move on", as the LM Martini, the White and Blue LM car and the CARMAff LM '81 car, for whom I did make the decals, as you can see in this image (where I made some other unobtainable decals, as the LM 1972 246 GT Dino (except BP logos, available), a 1981 IMSA "Le Car" Renault Turbo (side black outlined white patches still have to be corrected as I will have to convert to 2D it's 3D shape), and a Pedro Rodriguez '65 Sebring 330P Ferrari); this image was made in Autocad, where I added most of the logos, so it would have to be printed on a white decal sheet, but I tried once with a A4 sheet I got from somebody but, that shop printer and the guys there where not trained to print on that type of paper, and the machine almost caught on fire, so I stopped making these experiences for a while... all these cars are almost done, so decals would be the final kick on... Except the Ferrari, where proper wheels are still an unsolved problem... Academy tires are WONDERFUL for a wide lot of cars, so I will need to get a large amount of copies; but wheels are much difficult, I will need to combine HRM Ferrari Borranis (that would have to be widened) for the rear wheels, and MBW 3D printed Borranis to the front, if I get the tire copies before...
-
Lancia Beta Montecarlo
chaves pah replied to afx's topic in WIP: Other Racing: Road Racing, Land Speed Racers
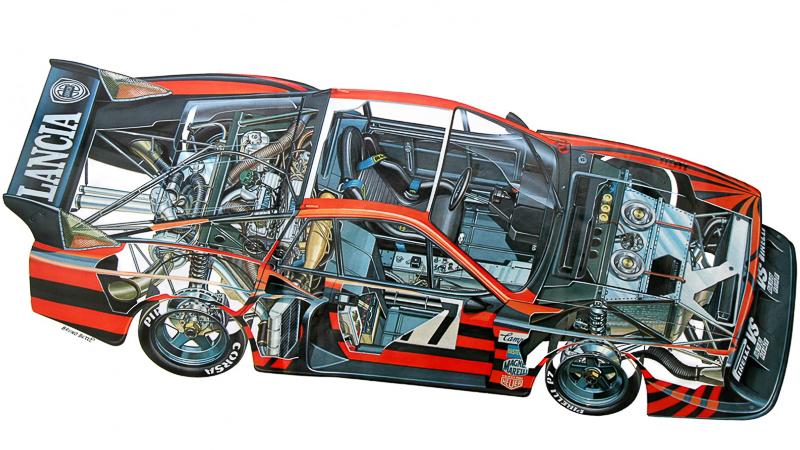
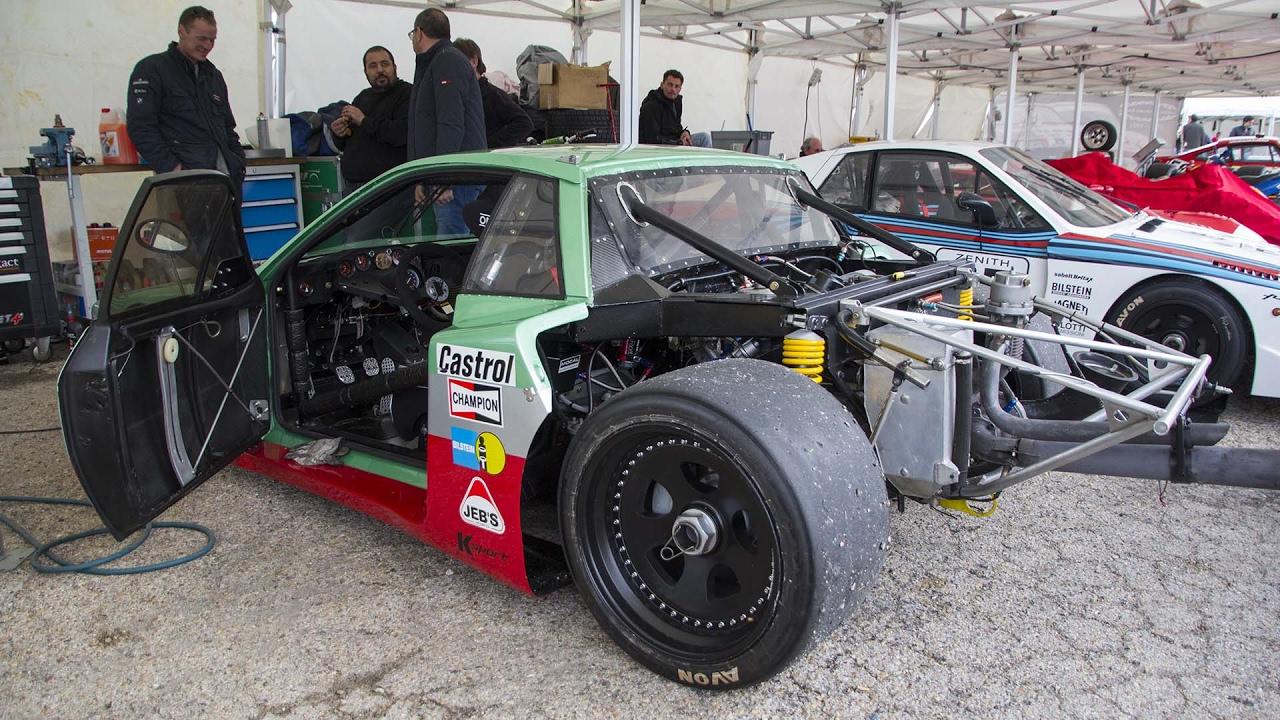
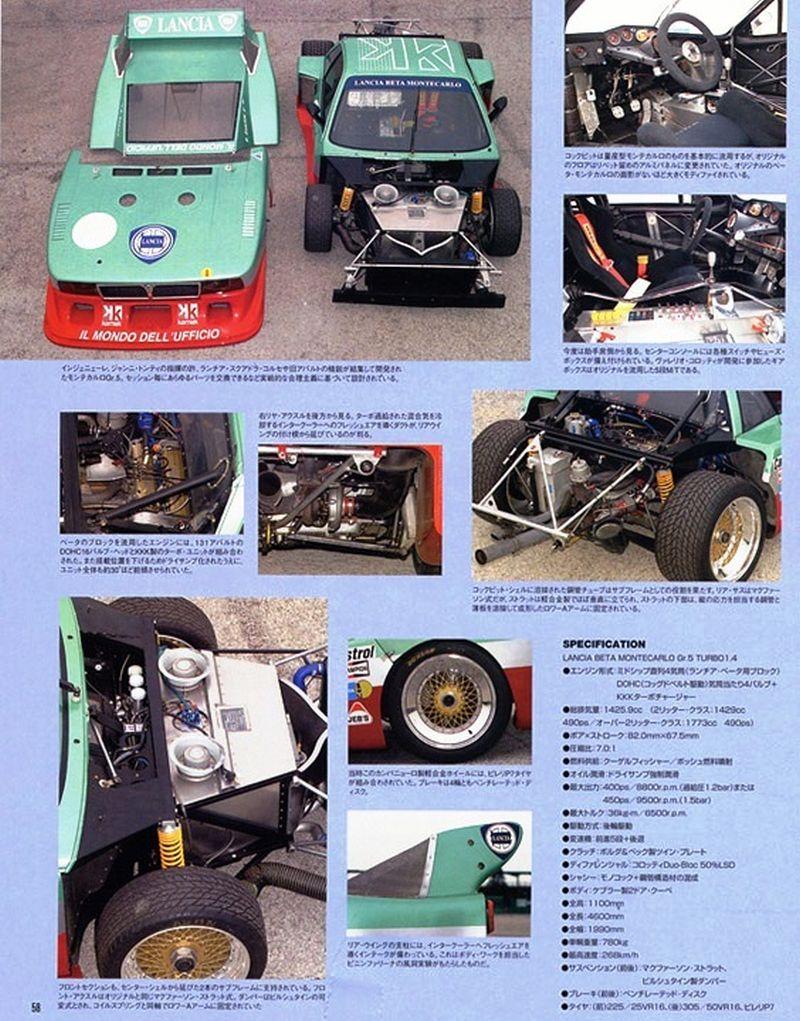
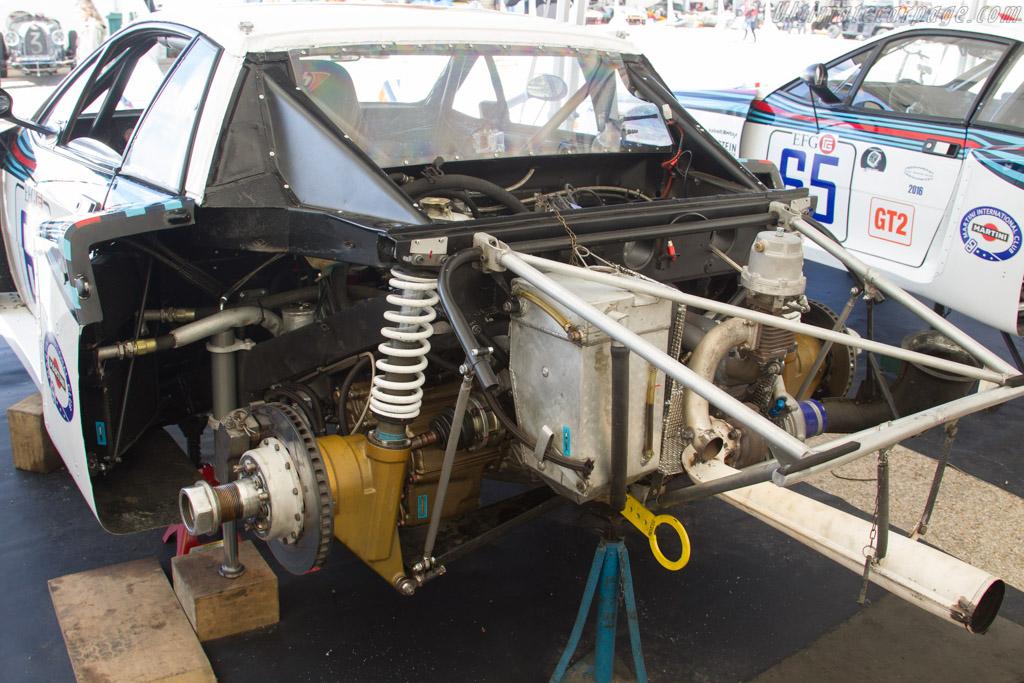
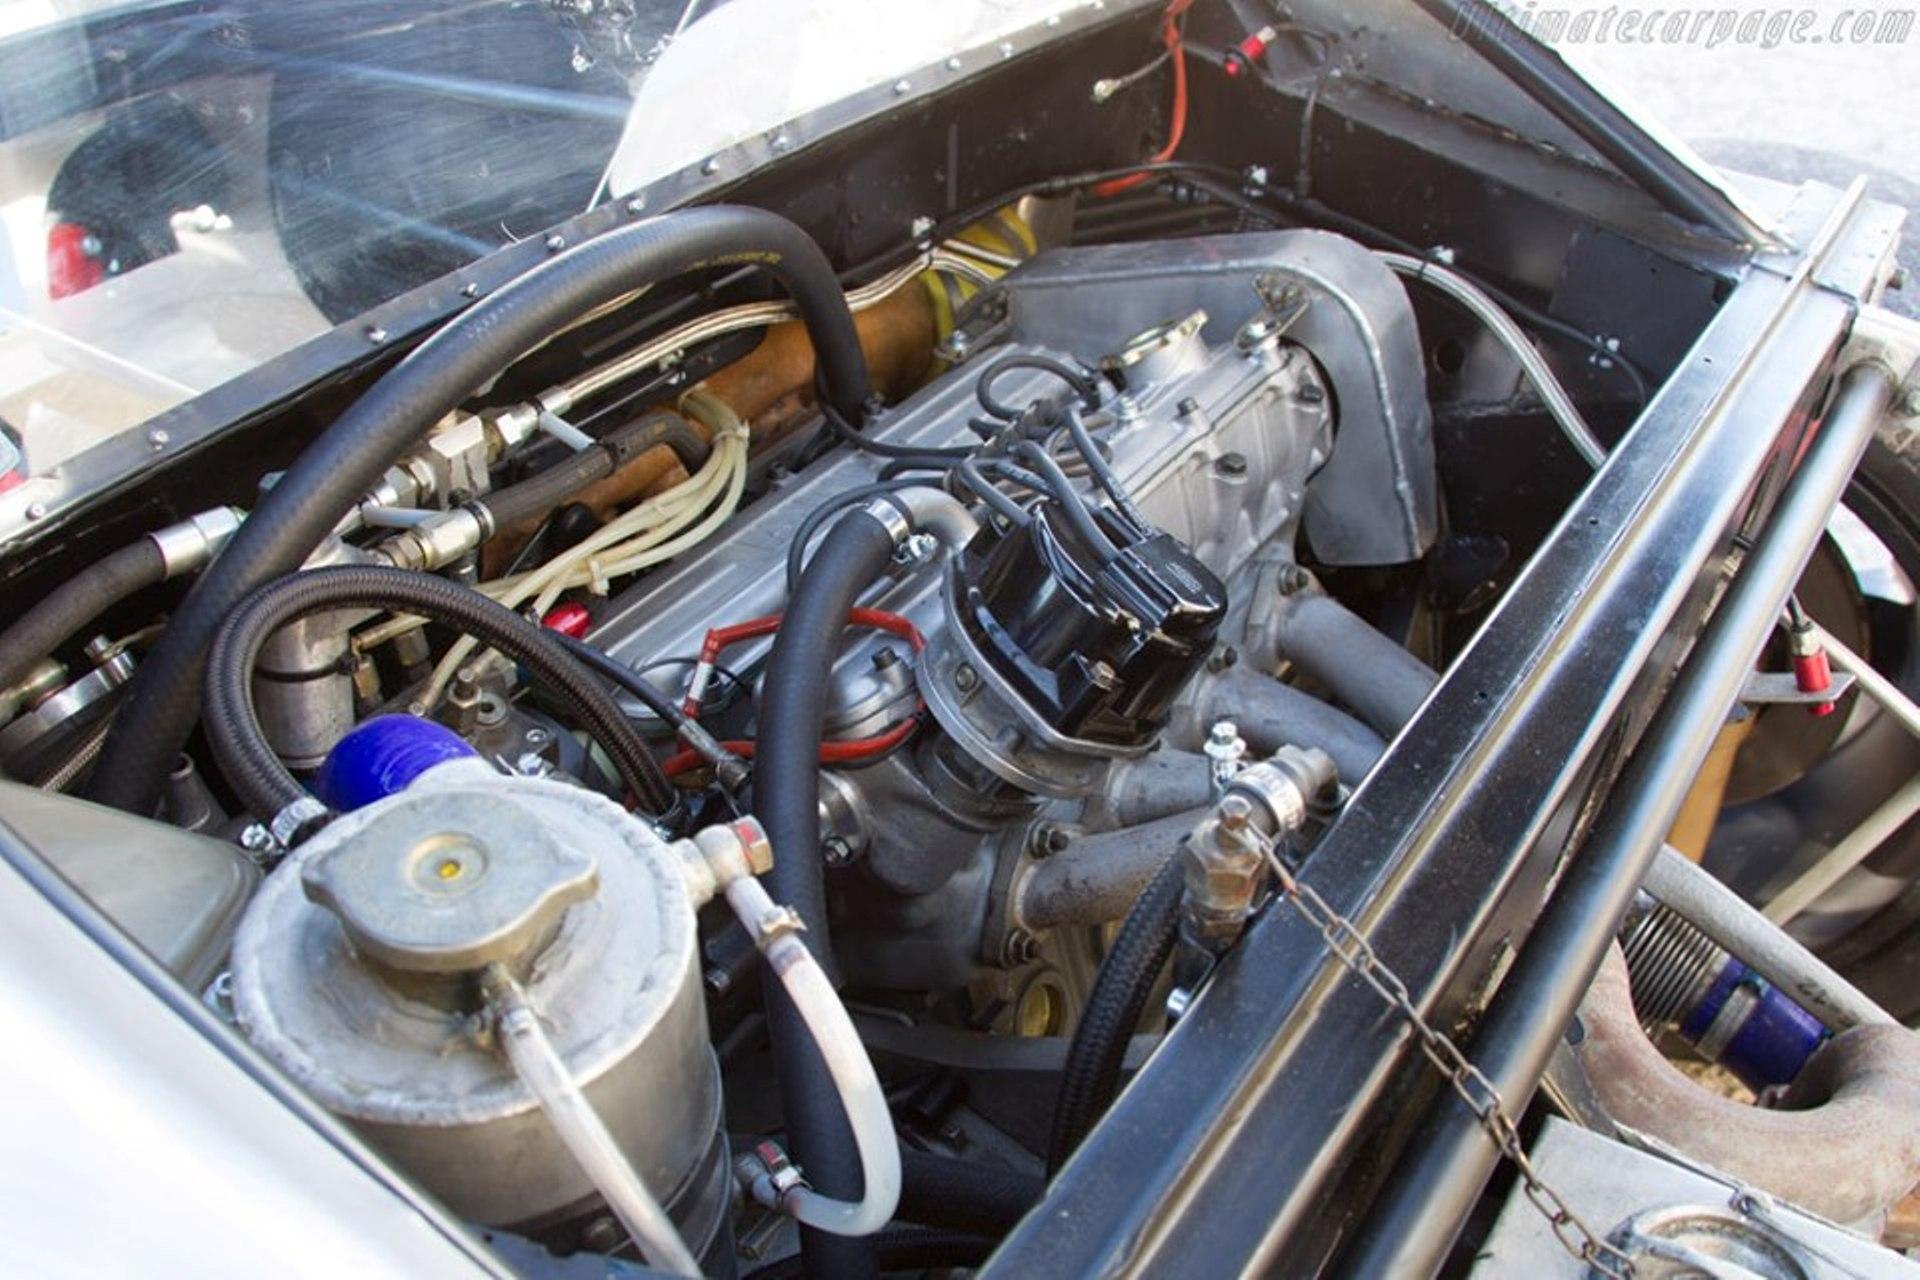
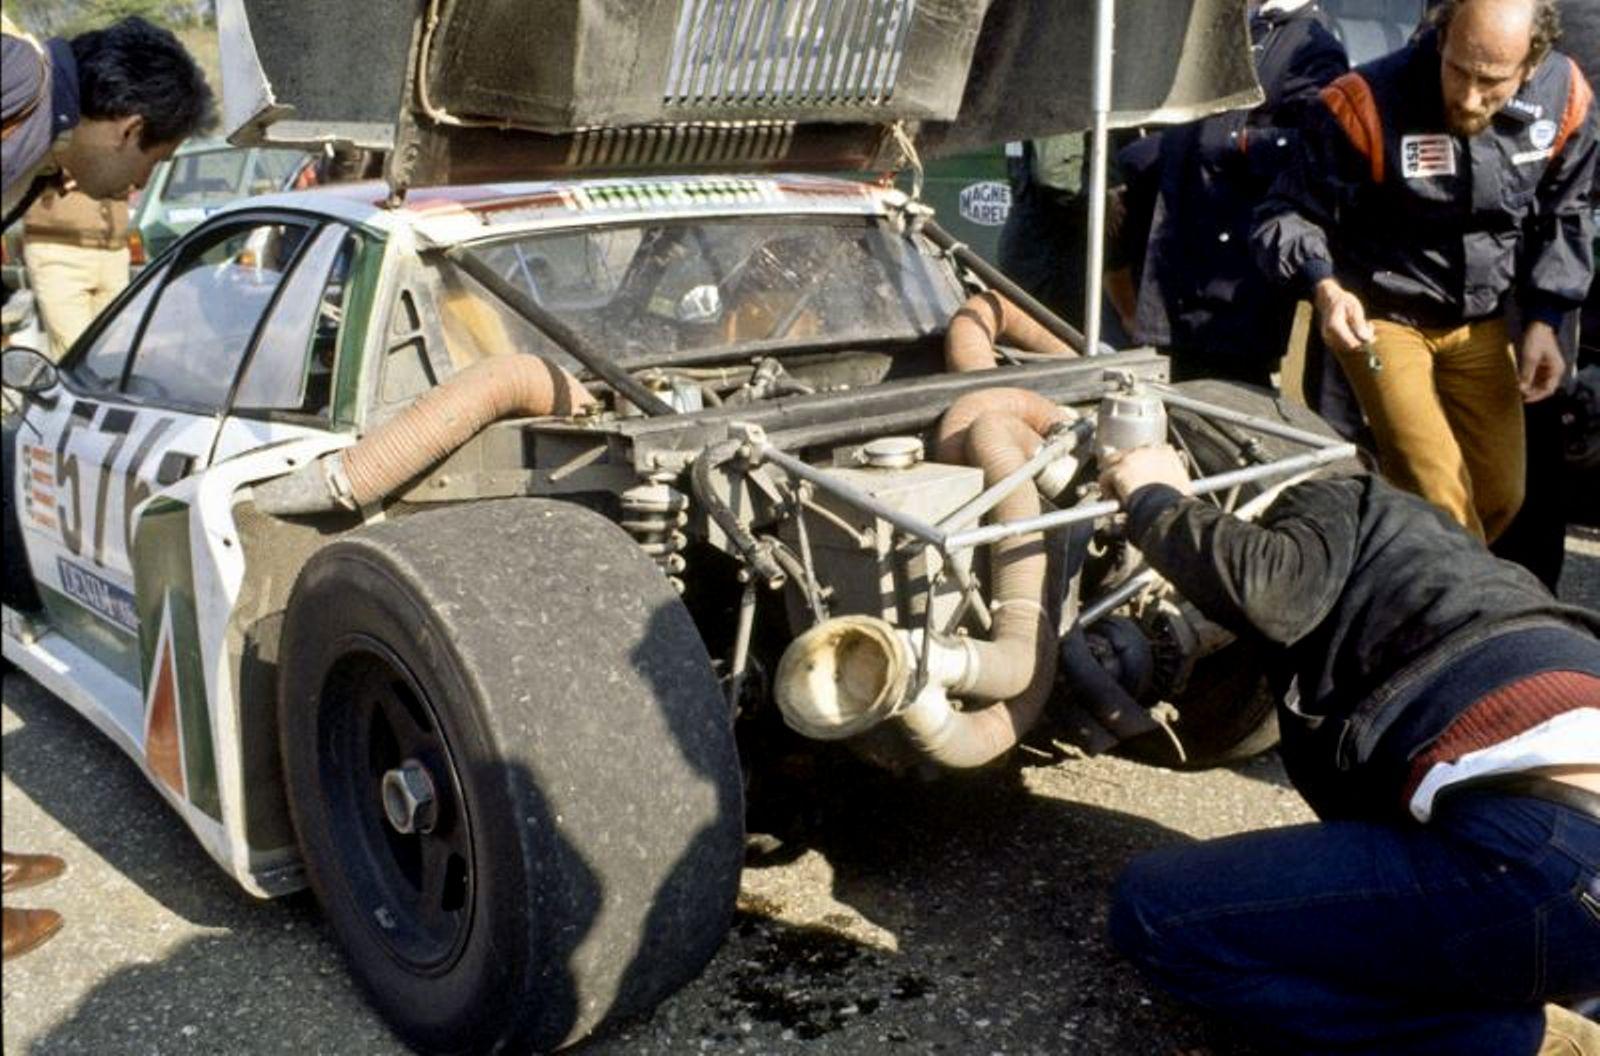
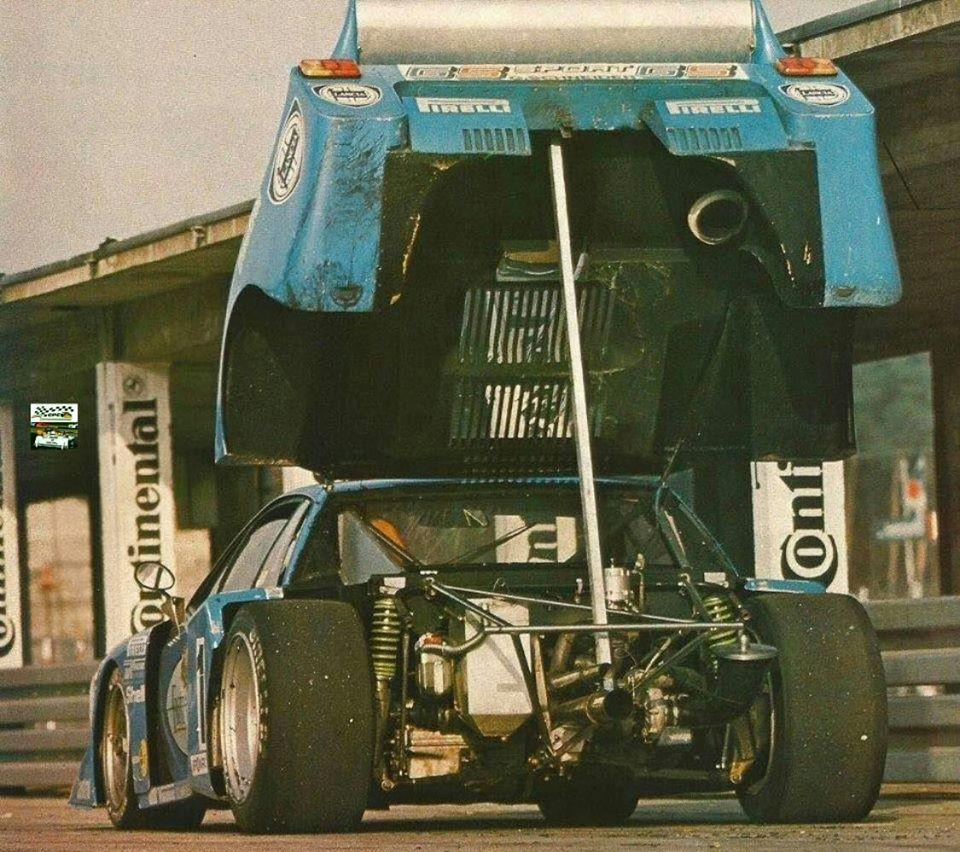
I forgot to post two interesting diagrams that help understanding this car mechanics design, so here they are; and also some images of the Finotto/Facetti car today ( the same car/chassis?) , without that inside engine cover (could it be a climate change consequence?)... and the inner kicker braces with the oblong holes in the rear window...
-
Lancia Beta Montecarlo
chaves pah replied to afx's topic in WIP: Other Racing: Road Racing, Land Speed Racers
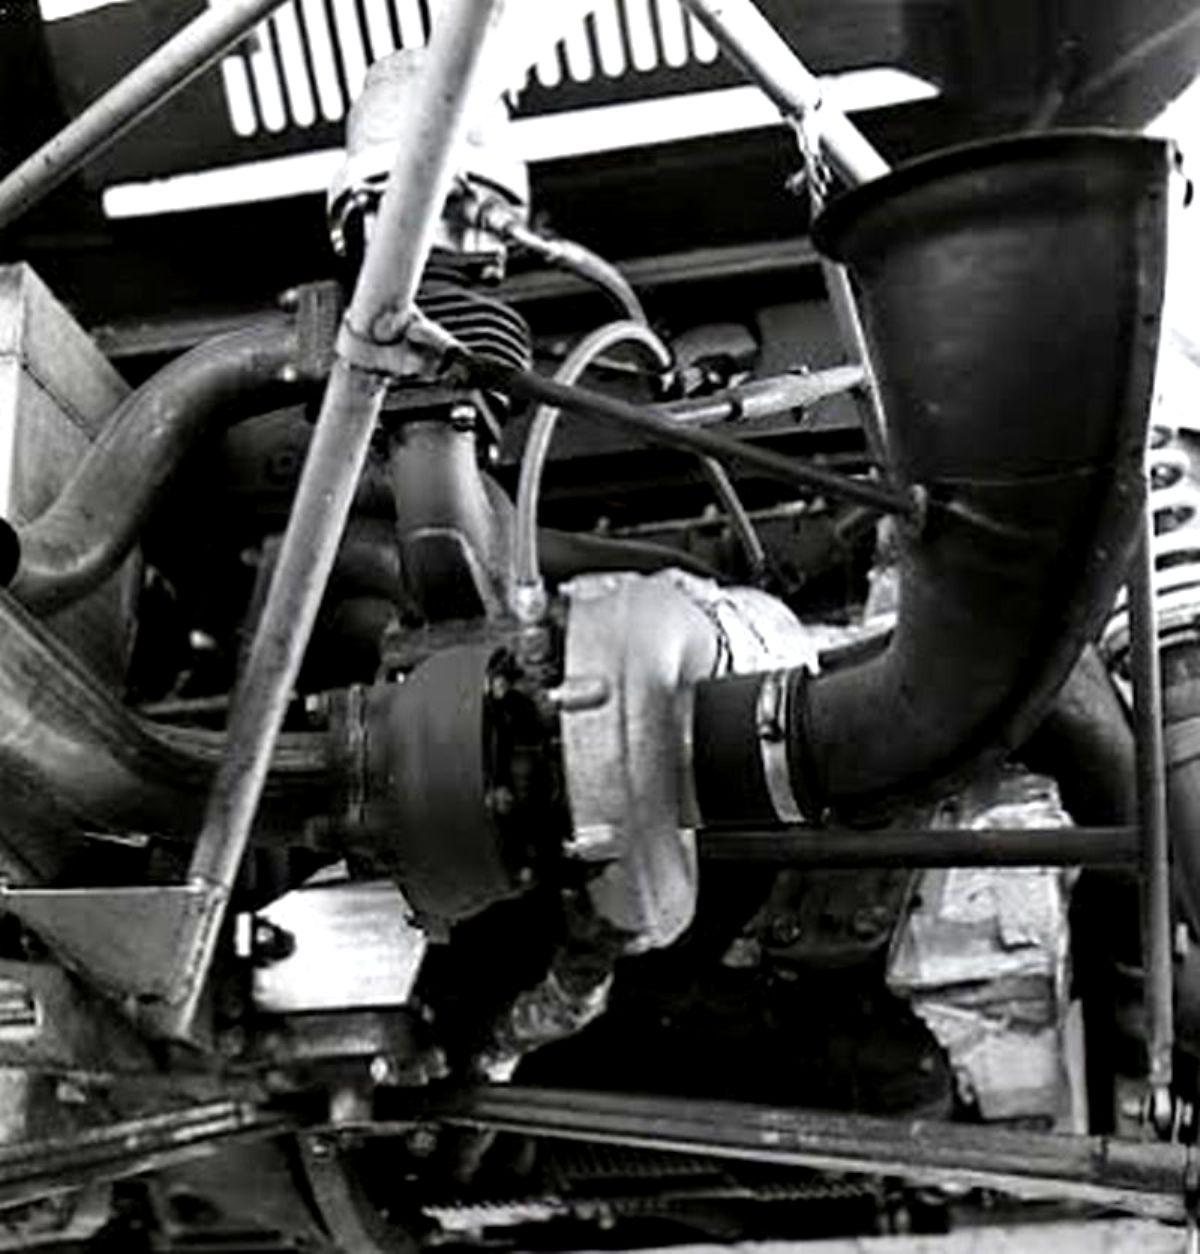
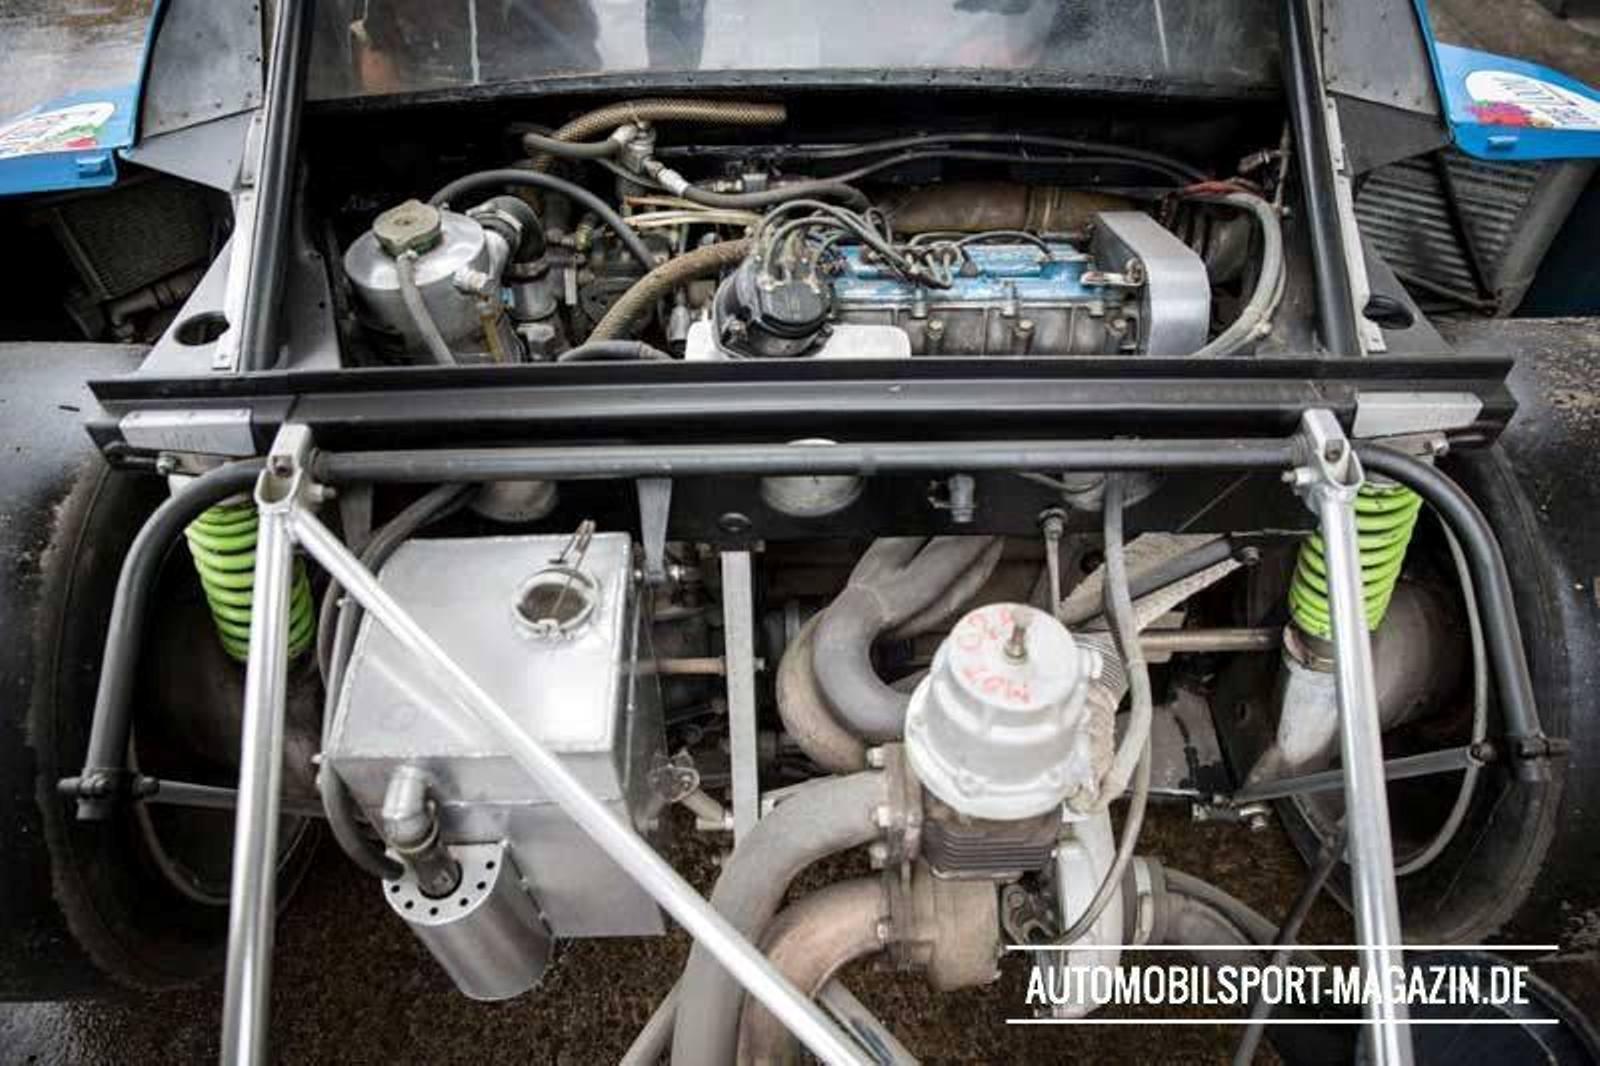
Hi, afx, yes that is the trick, when the hole is an oblong circle it is just opening it... we will have to study each specific car, as they may all be different... I have been working on all the engine details, as I will let this Alitalia car with the hood open, so I did the "slunt" parts that connect the NACAs over the side oil coolers with the orange ducts for engine cooling (these lips on the down sides will help fixing these parts to the NACAs)... now I am trying to bend some 2.19 mm copper wire (3,74 mm outer diameter) that will be covered with heat retractable hose(?) and finally covered with 0.3 copper wire to simulate the big thing (hope it works...)... rear shock absorbers are more or less rebuilt usinf 0.5 solder wire, I will post some images when completed... I found a strange 2 to 3 mm gap between the engine cover and the rear window base, from side to side, in all Beta kits variants, that I was not able to confirm in ALL my Lancia Beta photos!... not one taken from the outside of the car with the hood closed to show that kind of grille conducting the air from that huge rear outer window NACA to the engine compartment! and it's colour might vary from car to car... if the Alitalia one is painted with the large red, white and green strip, the others... The Martini car has it matt black, the Fruit of.. has it also matt black... the Finotto/Facetti might also have it black, although I have a recent photo of this car (if it is the same chassis) without it... I have some images of an Esci White striped Red car with #19, a very good work OOB in ALPHAmodelismo.pt, where it is painted also in red... the White striped Blue car... Regarding your Wonderfull work, as usual I must say, I noticed that these triangular little panels where the rear window ends, after the kicker braces, seem to be a bit undersized, the Alitalia car has two grilled holes (?) for cockpit air to come out (?), as in the other cars, although the shape varies from one car to another... I will glue a 1mm plastic strip on each side and resize the window... I think that the notches you took from the rear window might be more as upside rectangles with a round corner when it is near the kicker braces...
-
Lancia Beta Montecarlo
chaves pah replied to afx's topic in WIP: Other Racing: Road Racing, Land Speed Racers
Well, there seem to be very different “crossing” ways as we can see in these images, probably because I suppose every car was more or less hand made by different Tuners… in Beta 14 and Engine 16, an oblong and low(ish) hole was made, reinforced by a metal ring probably to avoid Polycarbonate glass to crack and tear with extreme vibrations that certainly occur… in Lancia Beta…, they might have just cut the Polycarbonate glass corners, as the kickers seem to be located nearer to the end, although there may exist a reinforcement partial ring… in the Alitalia '79 car, it seems the kickers enter the “cockpit“ in a very upper location so the glass has only some U cuts to allow it to enter… if you can remove the kickers again, you will be able to test fit the interior base under the central body part and 3D locate the place where the oblong hole will be located… (if 3D locating is your problem…) My Viper is in a temporary “coma” state… Finding the correct wheels was a very hard battle, I made more than one attempt, and these final ones had to be sort of “machined” with a Minicraft rotating machine on one hand and the X-acto on the other… and spacer rings to locate correctly the inserts…( these are long out of production Scale Production Le Mans BBSs I found in one awaiting project box, a 1994 Le Mans EB 110 Bugatti that, luckily, will be much better with the more recent (and much perfectly crafted) Scale Production Le Mans BBSs!)… not to speak about the years spen ton finding a very rare Scale Designs decal sheet... and the roll bars (specially the front one), as I already told you, where another huge enterprise… and the very small door hinges with these non-parallel arms so they could fit in that narrow place… and the aluminium window frames and the interior door parts to hold it in place… and the famous three holes in the side windows ( I found a special new and very sharp tool to open holes in RC clear bodies), but even with that tool the holes are still not perfect to me… and THE STRUGGLE to find images of the car I want to render, one of the two 1994 RT-10 private Luigi prepared Vipers, the shocking orange one known as “L’orange” that finished 12th overall, (the other was shocking yellow and was nicknamed !Le Canari” but DNF)… I still have to build a box that cover the standard Intake Plenum, this by the photos of the yellow car, easier to find as this car has been recently refurbished as it is now for sale, assuming that both cars did have identical preparation options… and finding the correct paint Zero Paints… what a long story it is!... So I took some vacations on him!
-
Lancia Beta Montecarlo
chaves pah replied to afx's topic in WIP: Other Racing: Road Racing, Land Speed Racers
Hi, afx, the way I'll do it will be inserting a small metal pin in the roll bar for each kicker and, when the car is almost done, and after the rear window glass is in it's place, I will insert the kickers through previous made holes and glue it in these pins... each kicker will have, in the outer extremity, another metal bent in a 30 degrees angle pin, already glued, that will enter some little holes in the chassis where they are supposed to be fixed... you will have to remove your kickers again... this pins solution worked very well in a a RT-10 Viper metal roll bar I made (it's shape is so difficult to obtain, I had to do it by bending 3,2mm gauge steel wire (had to heat it until turning red then to cold water to brake the temper)... I decided to take a break as making the three little ventilation holes in both acetate door windows without these annoying drilling "debris", it is so difficult to clean it... is sooo painfull!.... I lost the two horizontal kickers that go along the side windows and "close" the front and rear roll bars but in Viper 14 image you can see the holes where they fix; the hinges to the hood are so small that to scratch it is almost impossible... I may try to make small arch hinges as these I made to the Viper doors, with some 4 mm diameter loops, or just keep the hood open, hold by two small hinge-like steel wires, with that long broomstick they used to keep it up for engine maintenance as this particular "short tail" type has a much "richer" engine compartment door for us to enjoy... these redish ventilation hoses are a chalenge... Renaissence used to make some 4mm dia ones, but are now long out of production, so I will have to "improvise"... and besides in this case they would have to be thicker, about 5mm dia, I did make some dry tests but will have to make some "cheating" when they overcross the chassis and plunge to the back of the engine, as if you close the hood they are a little large and don't let it close... some monofilament electric wire bent to get the shape and then"wrapped" with thin copper wire to simulate the shape? resin copies of threaded rod heated to bend it in the correct shapes?... In "long tails" it is better to keep the hood down so we can admire the sleek and beautiful shape of this fantastic beast... I hope this will be useful for you.... and for any happy Lancia Beta Alitalia owner of corse!
-
Lancia Beta Montecarlo
chaves pah replied to afx's topic in WIP: Other Racing: Road Racing, Land Speed Racers
Hi Tech!, I must say... -
Lancia Beta Montecarlo
chaves pah replied to afx's topic in WIP: Other Racing: Road Racing, Land Speed Racers
And don't forget that huge broom stick to keep the engine cover open! crazy times then... -
Lancia Beta Montecarlo
chaves pah replied to afx's topic in WIP: Other Racing: Road Racing, Land Speed Racers
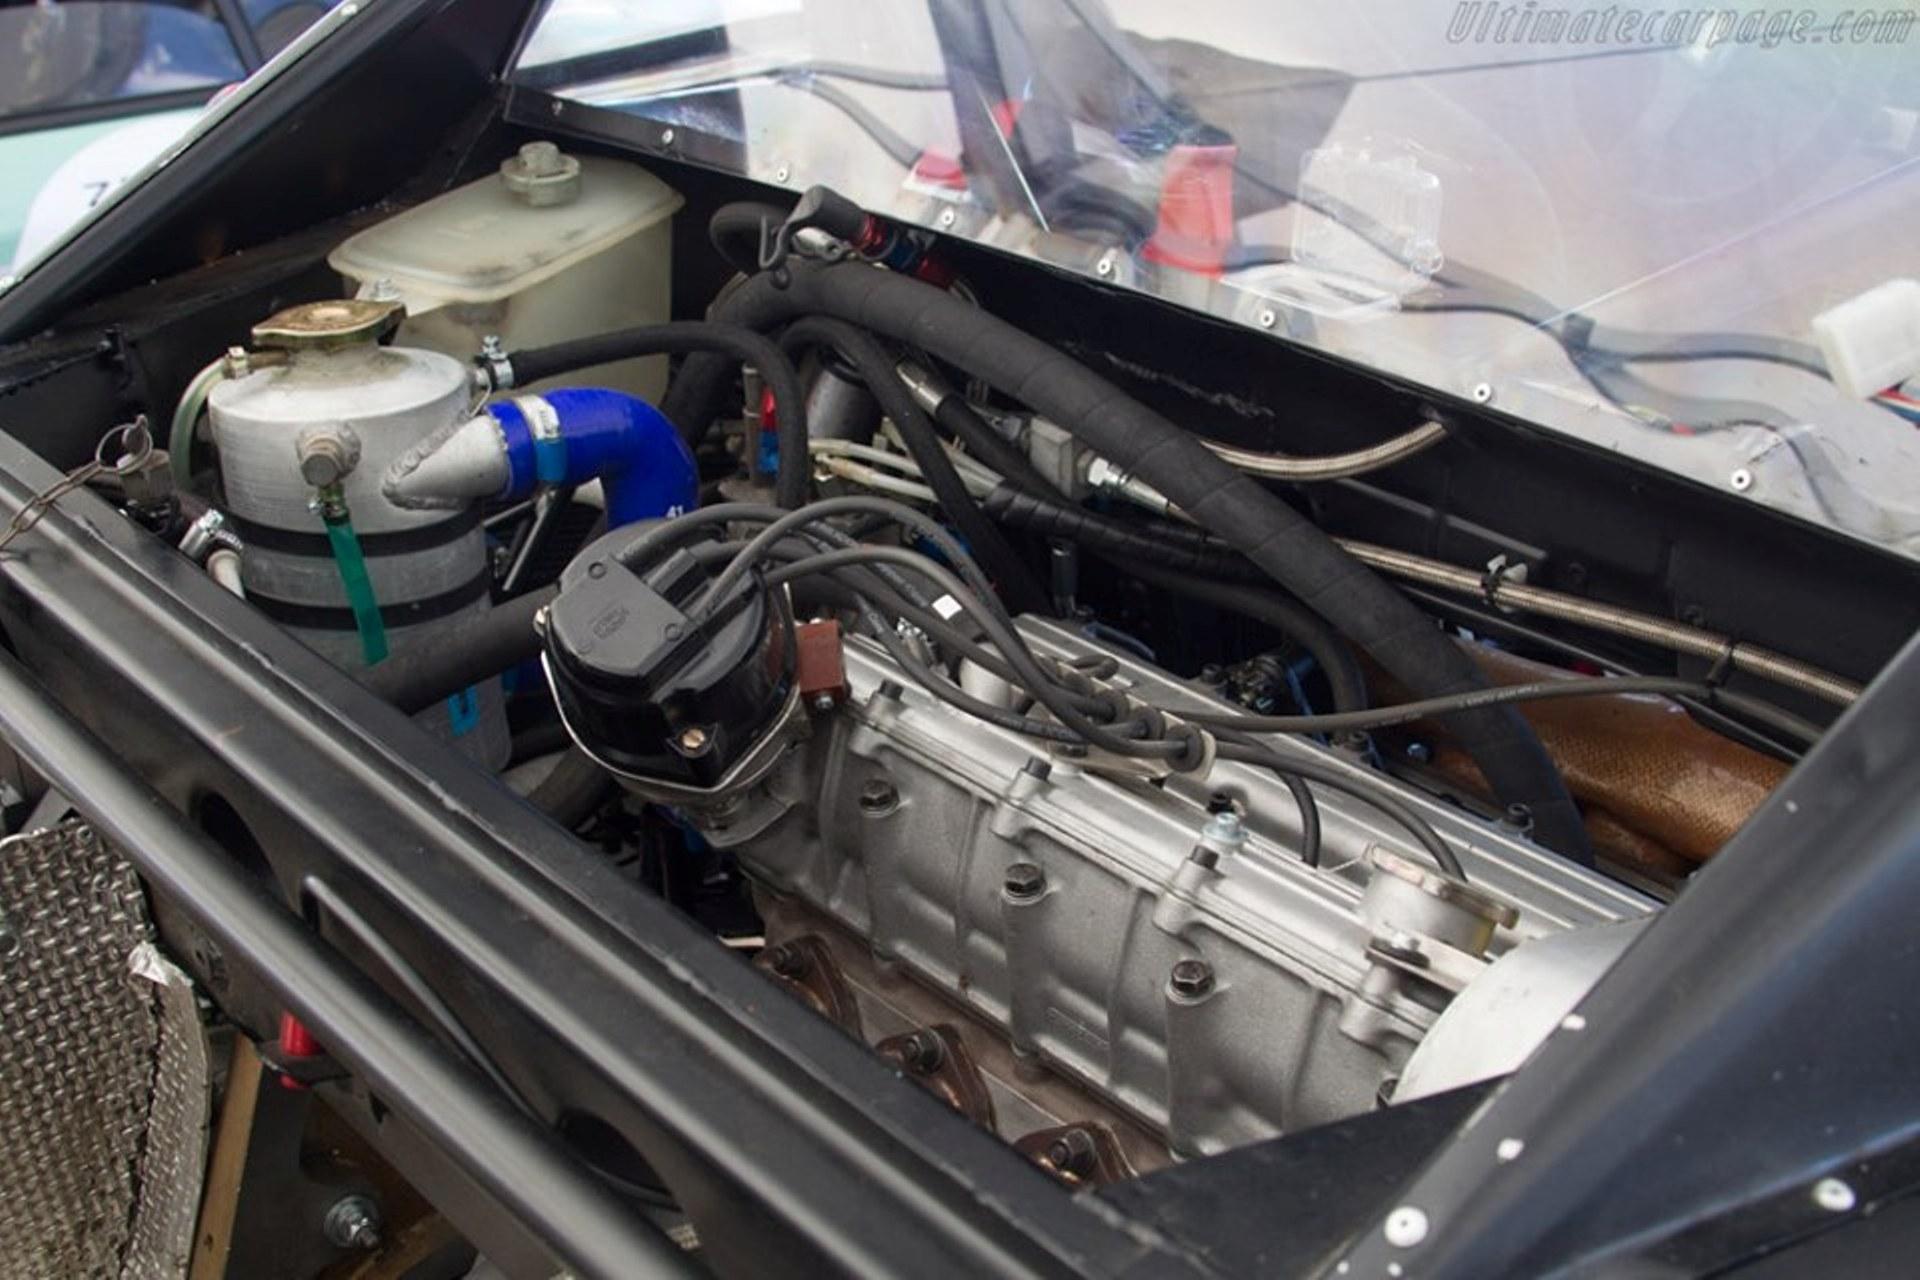
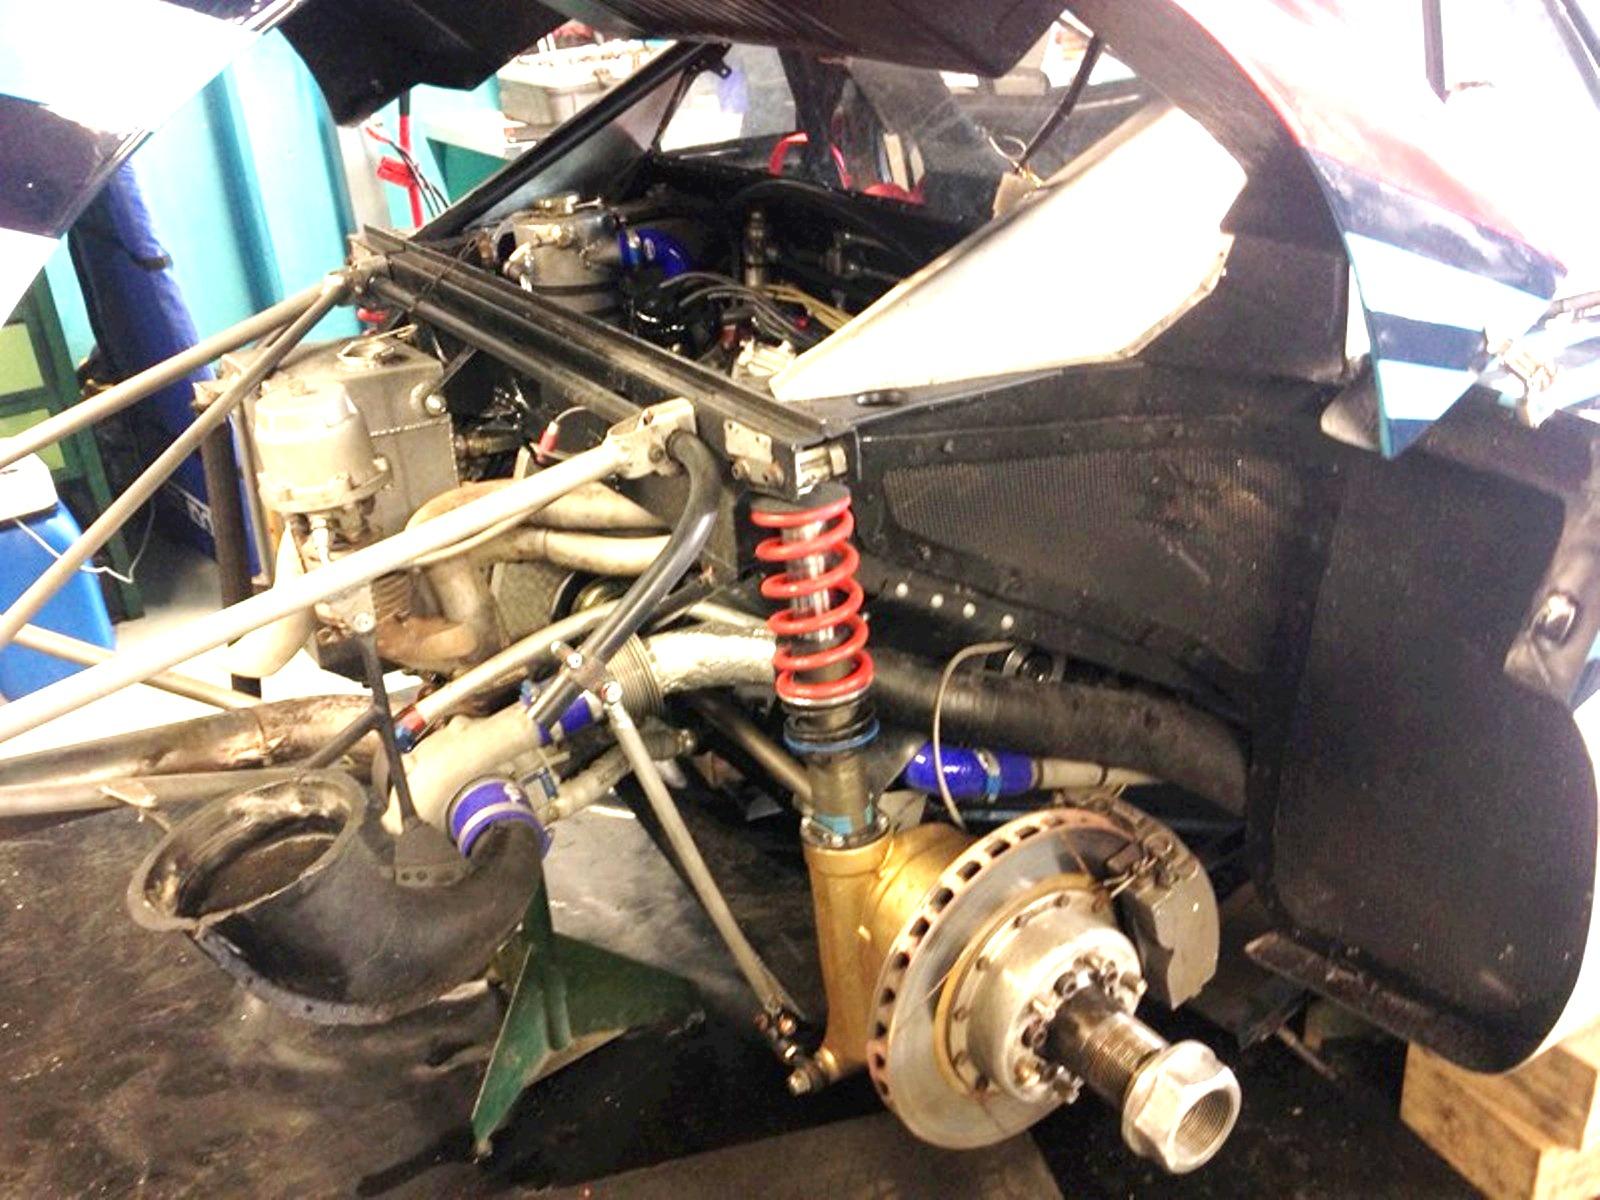
Well, at last I found one photo taken from the right side, it was in the middle of a bunch of images I downloaded from the net, wich I had not edited yet... it is from one Martini car, and that triangular aperture made by the chassis where in the MFH we can clearly see the pulleys and the belts, in this particular car, if not in all others, is totally closed with a metal sheet, as you can see in photo engine11!... probably to get more rigidity to the chassis frame... most probably these chains have no cover, as it will be easier to replace, but it is clearly impossible for it to be seen behind all that tubing and... and we can clearly see that the MFH engine is different of the engine in our kit (earlier version?) at least the Martini, the Fruit of the Loom and the Alitalia use the same engine version, with an oil cap on the valve cover and that black pipe entering on the oposite side, near the distributor (which is also of a diffrent type)... and that pipe-like air admission has a little cap when the engine is not in use... uor car has a diffrent type of air admission type, pointing to the left side, but horizontally, so no need for the cap... and look at these orange very large pipes coming from both side radiators... great photo!
-
Lancia Beta Montecarlo
chaves pah replied to afx's topic in WIP: Other Racing: Road Racing, Land Speed Racers
Hi, AFX, I already new about his decal sheet, but did forget the producer name, I did try to find it these last days, but in vane... I thought it was Shunko... but I did find a new alternative, a new brand that also make this white striped decals but specialy it was expected to make THESE ONES, the Martini, but unfortunately I already contacted them and Andrea, one of two the partners, explained me that this decal sheet was drawm based on a Heller 1/43 Martini Beta decal sheet they did multiply by 24, but the result was not good enough for some buyers, so they decided to stop making it for now... they are now working in a 1/24 LC1 Lancia full kit that will lid to make a new LC2, and may be they make new correct Beta decals again at the same time... this one was a transkit and did also have these two small extra panels that in Le Mans did close about 50% of the engine aperture, on bot sides of the exausts... they are 3D experts and already have lots of interesting 1/24 stuff! I started my "short tail" again and, regarding the tires, I found a Revell 934 Porsche set in the junk box, I replaced all the kit wheels with Scale Production great and correct ones, as these Revells do have the correct dimensions for the Beta car... I only have to add an extra rim to enlarge the rear wheels; the engine, as the instructions images are a little vague... that drive chains box!... judging by the MFH 1/12 Beta engine, the should chains face the right side of the car, as the pulleys are in this side of the engine, so all the details this part has will desapear when it is glued to the engine block... is the right side of the drive chains covered? I could not find, not one, image of this part in the real cars photographers for some obscure reason are always on the left side! and I decided to draw some hinges to allow the engine cover to open, it would be GREAT to make it in photoetch, so I will try to make it in beer can tin,,, PS: Well, this "tunned" red street Lancia Beta you show manages to be very good to the eye...
-
Lancia Beta Montecarlo
chaves pah replied to afx's topic in WIP: Other Racing: Road Racing, Land Speed Racers
Great work you are doing, as usual, AFX! I follow your AC COBRAs building articles here, and I am amazed to see you are dealing with this Lancia Beta Monte Carlo model! I have to agree with Gramps46: it is amazing how a really ugly car became such a wonderful racing car! Now, returning to this kit, as you are American, you might not be very familiar with ESCI kits AND IT'S DECALS... most of times, when you put it the water, in a few seconds they use to "spread in little parts" like a plague... I bought one of my Betas completely painted in white, but almost half of two MARTINI Le Mans decal sheets where wondering inside the kit box, lots of these tiny little decal parts all around! I found a new decal sheet in Patto's Place, but I am not very pleased with it, the contours of the images are a little vague, so I did not try to decal the car yet... and you may not know that an Italian modeller, gionc 01 made a great photoetch set for this kit some years ago, but although some modellers asked him to make some new copies, he was/is not in the mood to do it... what a pitty... I have been expecting to see if MFH's 1/24 photoetch set shows around... I did not notice that rear wheels size "trick"... I do have some spare front wheels to correct it, but what is the Scale Production reference of the tyres you will use in your car? Thank you very much!
-
Lancia Beta Montecarlo
chaves pah replied to afx's topic in WIP: Other Racing: Road Racing, Land Speed Racers
Hi Dale, I am a LUCKY owner of both versions of these kits, and can confirm they are really difficult to find... specially the short tail version! Being just a "tale" I heard from two sources now, in some particular time, the moulds of this Lancia Beta Monte Carlo (that travelled to Revell and Heller) and other moulds(?) have been lost for ever (sunk in the sea) in an accident the carrier had, don't remember if it was a pane or a boat... I have two long tales from ESCI, one long tale from HELLER/HUMBROL (made in France - kit nº80741), being that the short tailed one, that I "tracked" may be for two years, show both brands, ESCI and REVELL, and was made in Italy, kit nº H-2371; If this story is true, we can not expect to see another one "made" by Italeri... it will be better if you start "digging" in the net... -
Hi, how can I mount a 1/24 Hightech Ferrari 250 SWB photoetch grille!
-
Hi all, if you like Mercedes reliability, take a peep in this video, and just watch how STRONG the BOSS Mercedes is... it starts at minute 0.49...
-
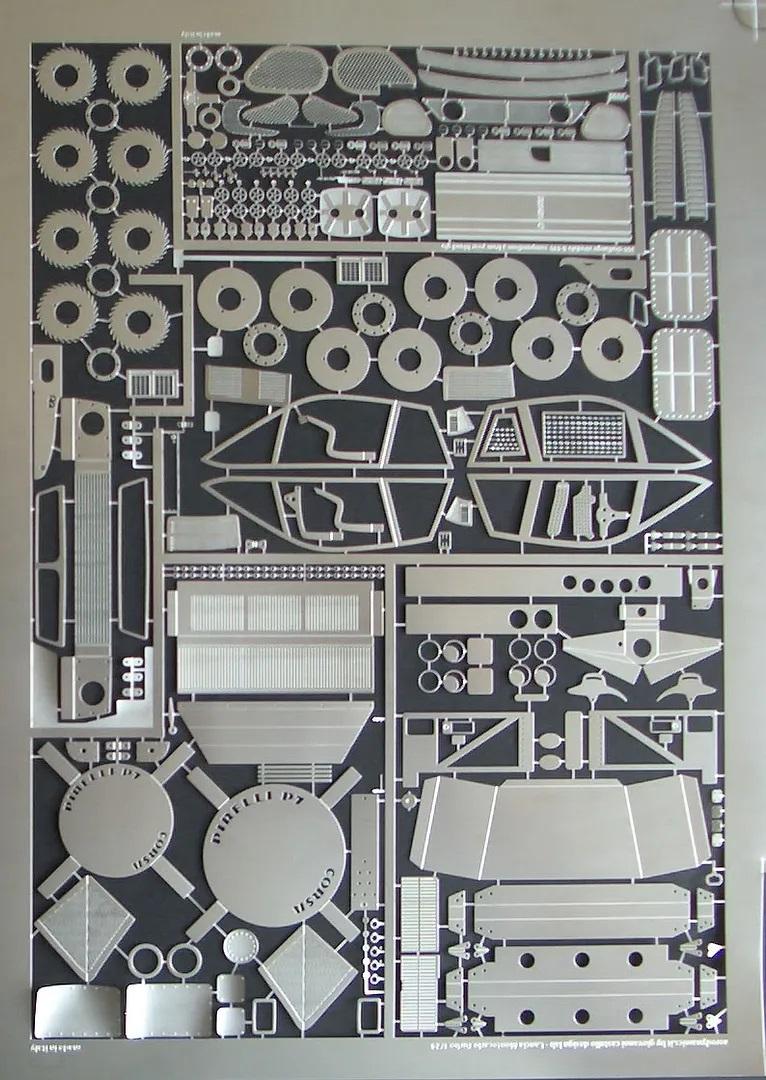
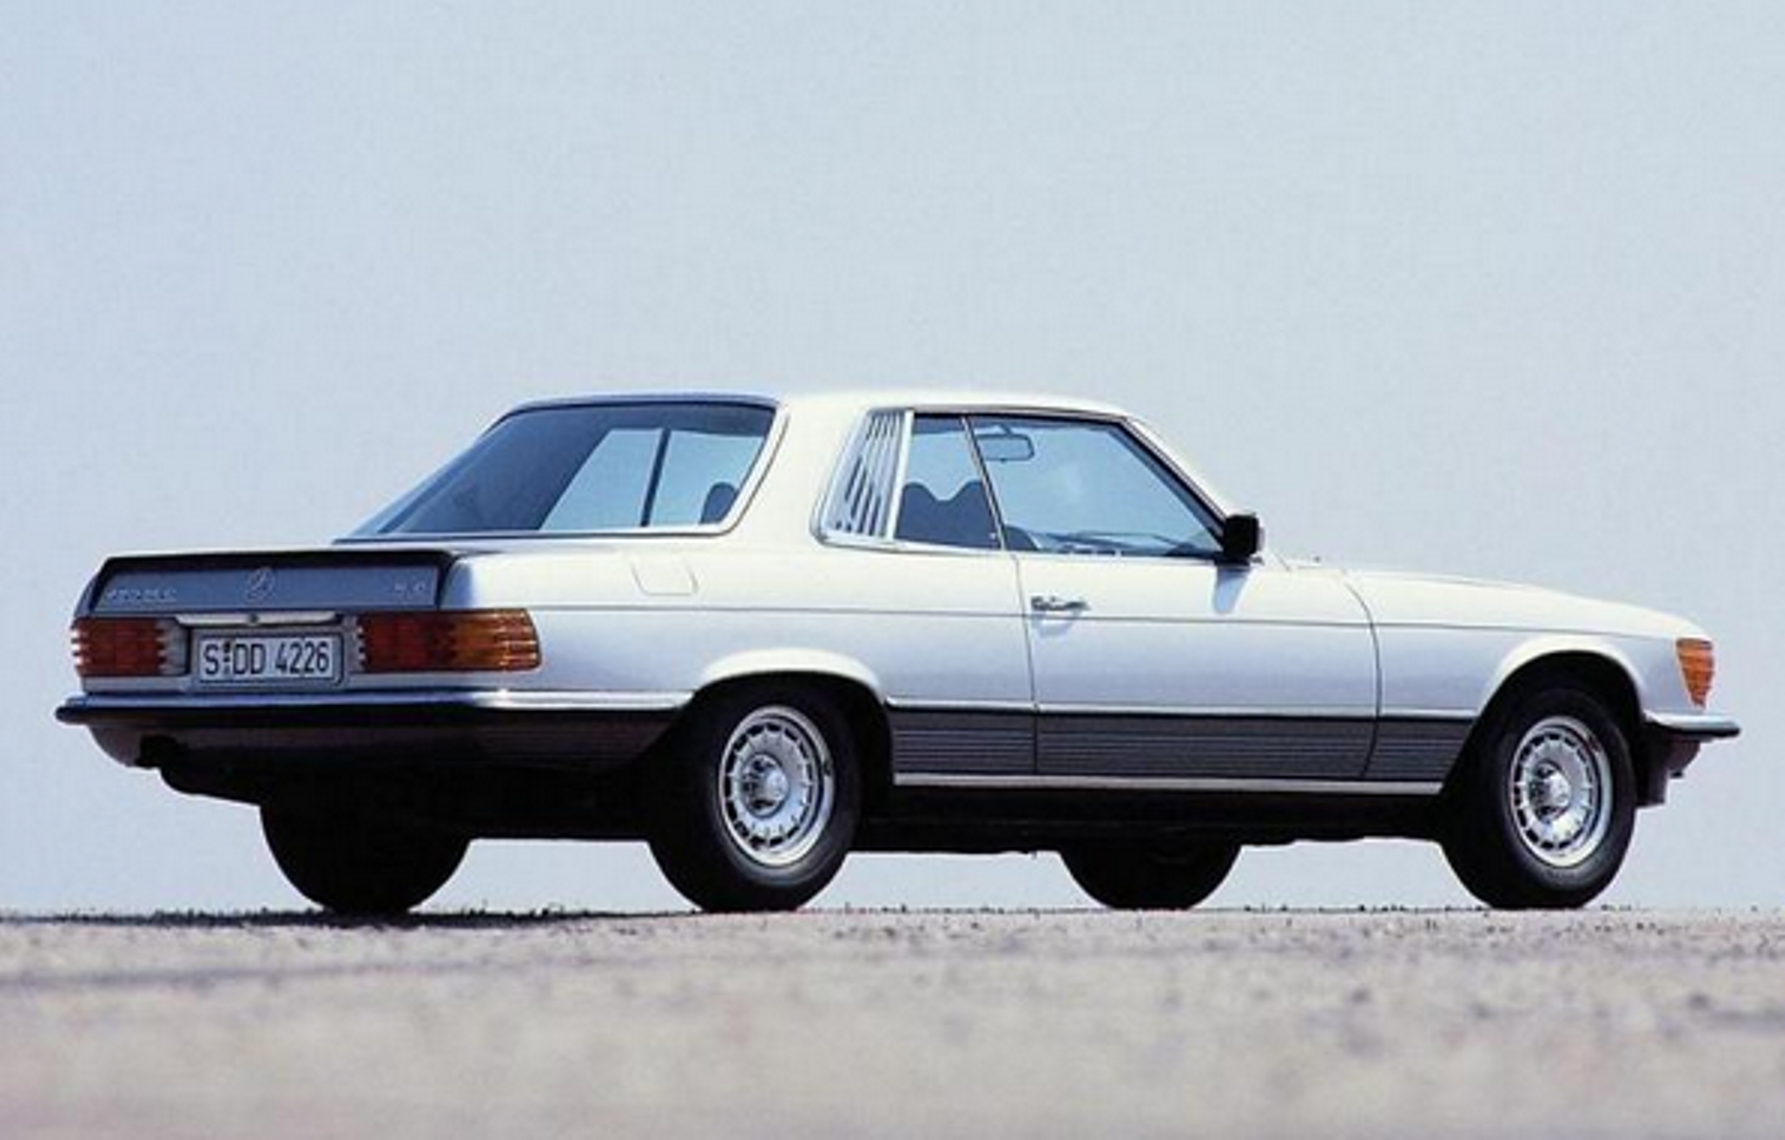
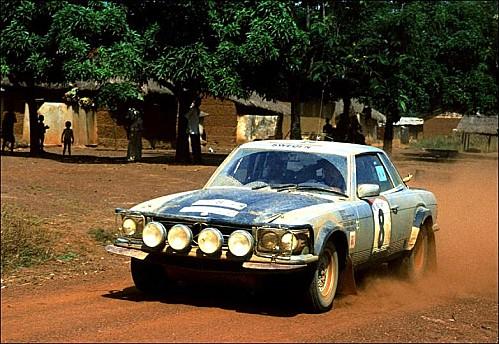
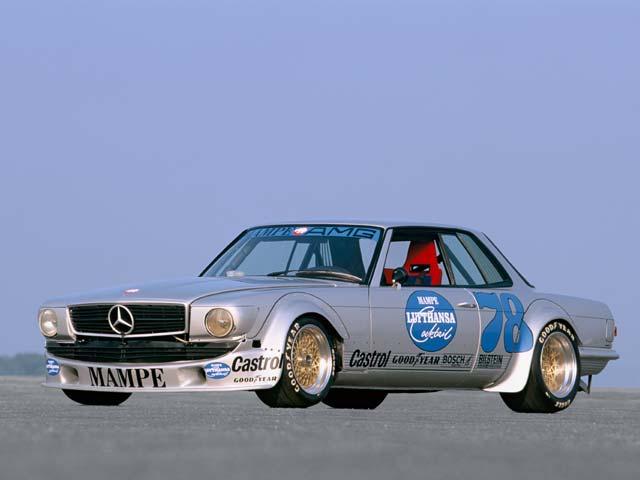
Esci/Revell Mercedes 500 SLC
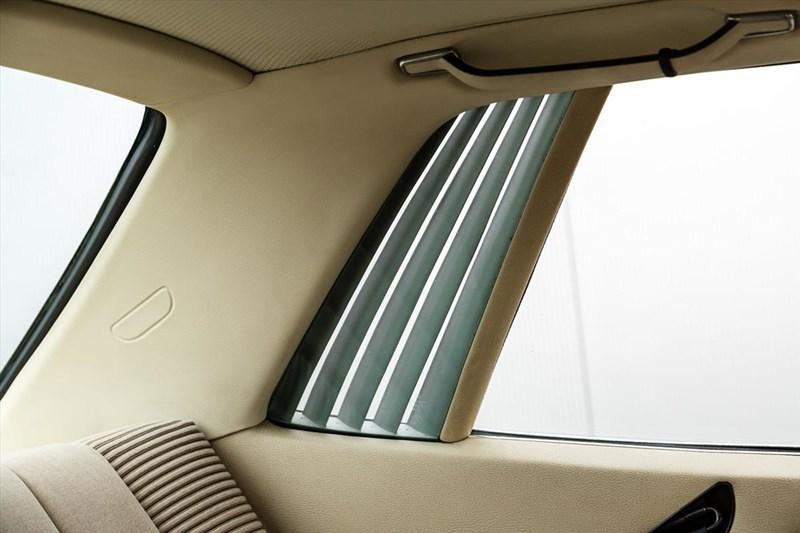
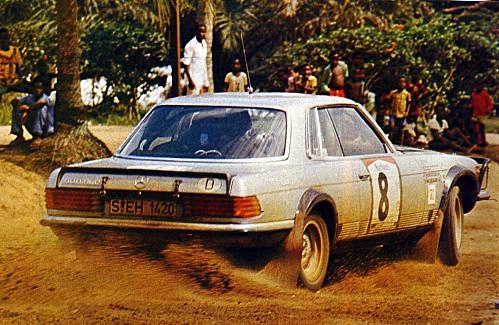
chaves pah replied to PowerPlant's topic in General Automotive Talk (Trucks and Cars)
Hi, "peteski", I also have five of this kits, for several projects, one orange street version (ODB), one Dakkar BOSS blue car, one for the Bandama Rally (ODB), one already chopped to mix with a Monogram 350 "Pagoda" hardtop to make the closed short wheel base 350, and another one to build the Hans Heyer MAMPE Lufthansa #78 car; all of them however need some corrections or extra parts: except the "SLB" car, all the others have a wrong rendition of that small rear side window with some sort of "flip blinds" (?) is this the correct name? that are not deep enough to be covered with a window... well, about the kit wheels, I was also deeply convinced that they where undersized, so I was very happy to find a brand, USCP from Ukraine that are making gorgeous 1/24 wheels, like these 450 SLCs 14" Barocks but, while trying to find proper rally tires, I had to measure both wheels, USCP and ESCIs and... the USCP 14" in 1/24 scale have 14,8mm, while ESCIs have 15,28 mm... HOW ABOUT THAT! whell, if I accept the kit tires, that do not look that much as rally/mud tires (and show Pirelli Cinturato P3 and also a 205/70 SR 14 size logos...)... don't forget sometimes cars use different wheel/tires in the various parts of rallies... in the Jean Todt photo the car has kit's wheels... on the others they use 15" BBSs ( RENAISSANCE 24BBS15) with All- Terrain big tires (Fireball ModelWorks FMR-027-25 rubber BFG All-Terrain TA 1/25 tires set) will be very good; you will need to widen a bit the tires to fit the BBSs... PS: Somebody said there is somebody thinking about 3D printing these rear window blinds, I really hope he will do it, it is very important to a model in this scale! I hope I helped you in some way...