Search the Community
Showing results for tags '1/25 scale'.
Found 11 results
-
 these are 1/25 scale early 20th century European made motorcycles I 3d resin printed and painted with paint brushes and acrylic craft paints and used a ultra fine tip molotow pen and a silver sharpie I had printed 4 but one broke when removing the supports from the fame which was definitely to thin at 1/25 scale so I used the gas tank and handlebars and front wheel and kitbashed a custom 1930's nimbus motorcycle which is the blue one the red one is a 1928 gillet touring motorcycle and the Grey one is a normal 1930's nimbus motorcycle 3 antique motorcycles.mp4
 -
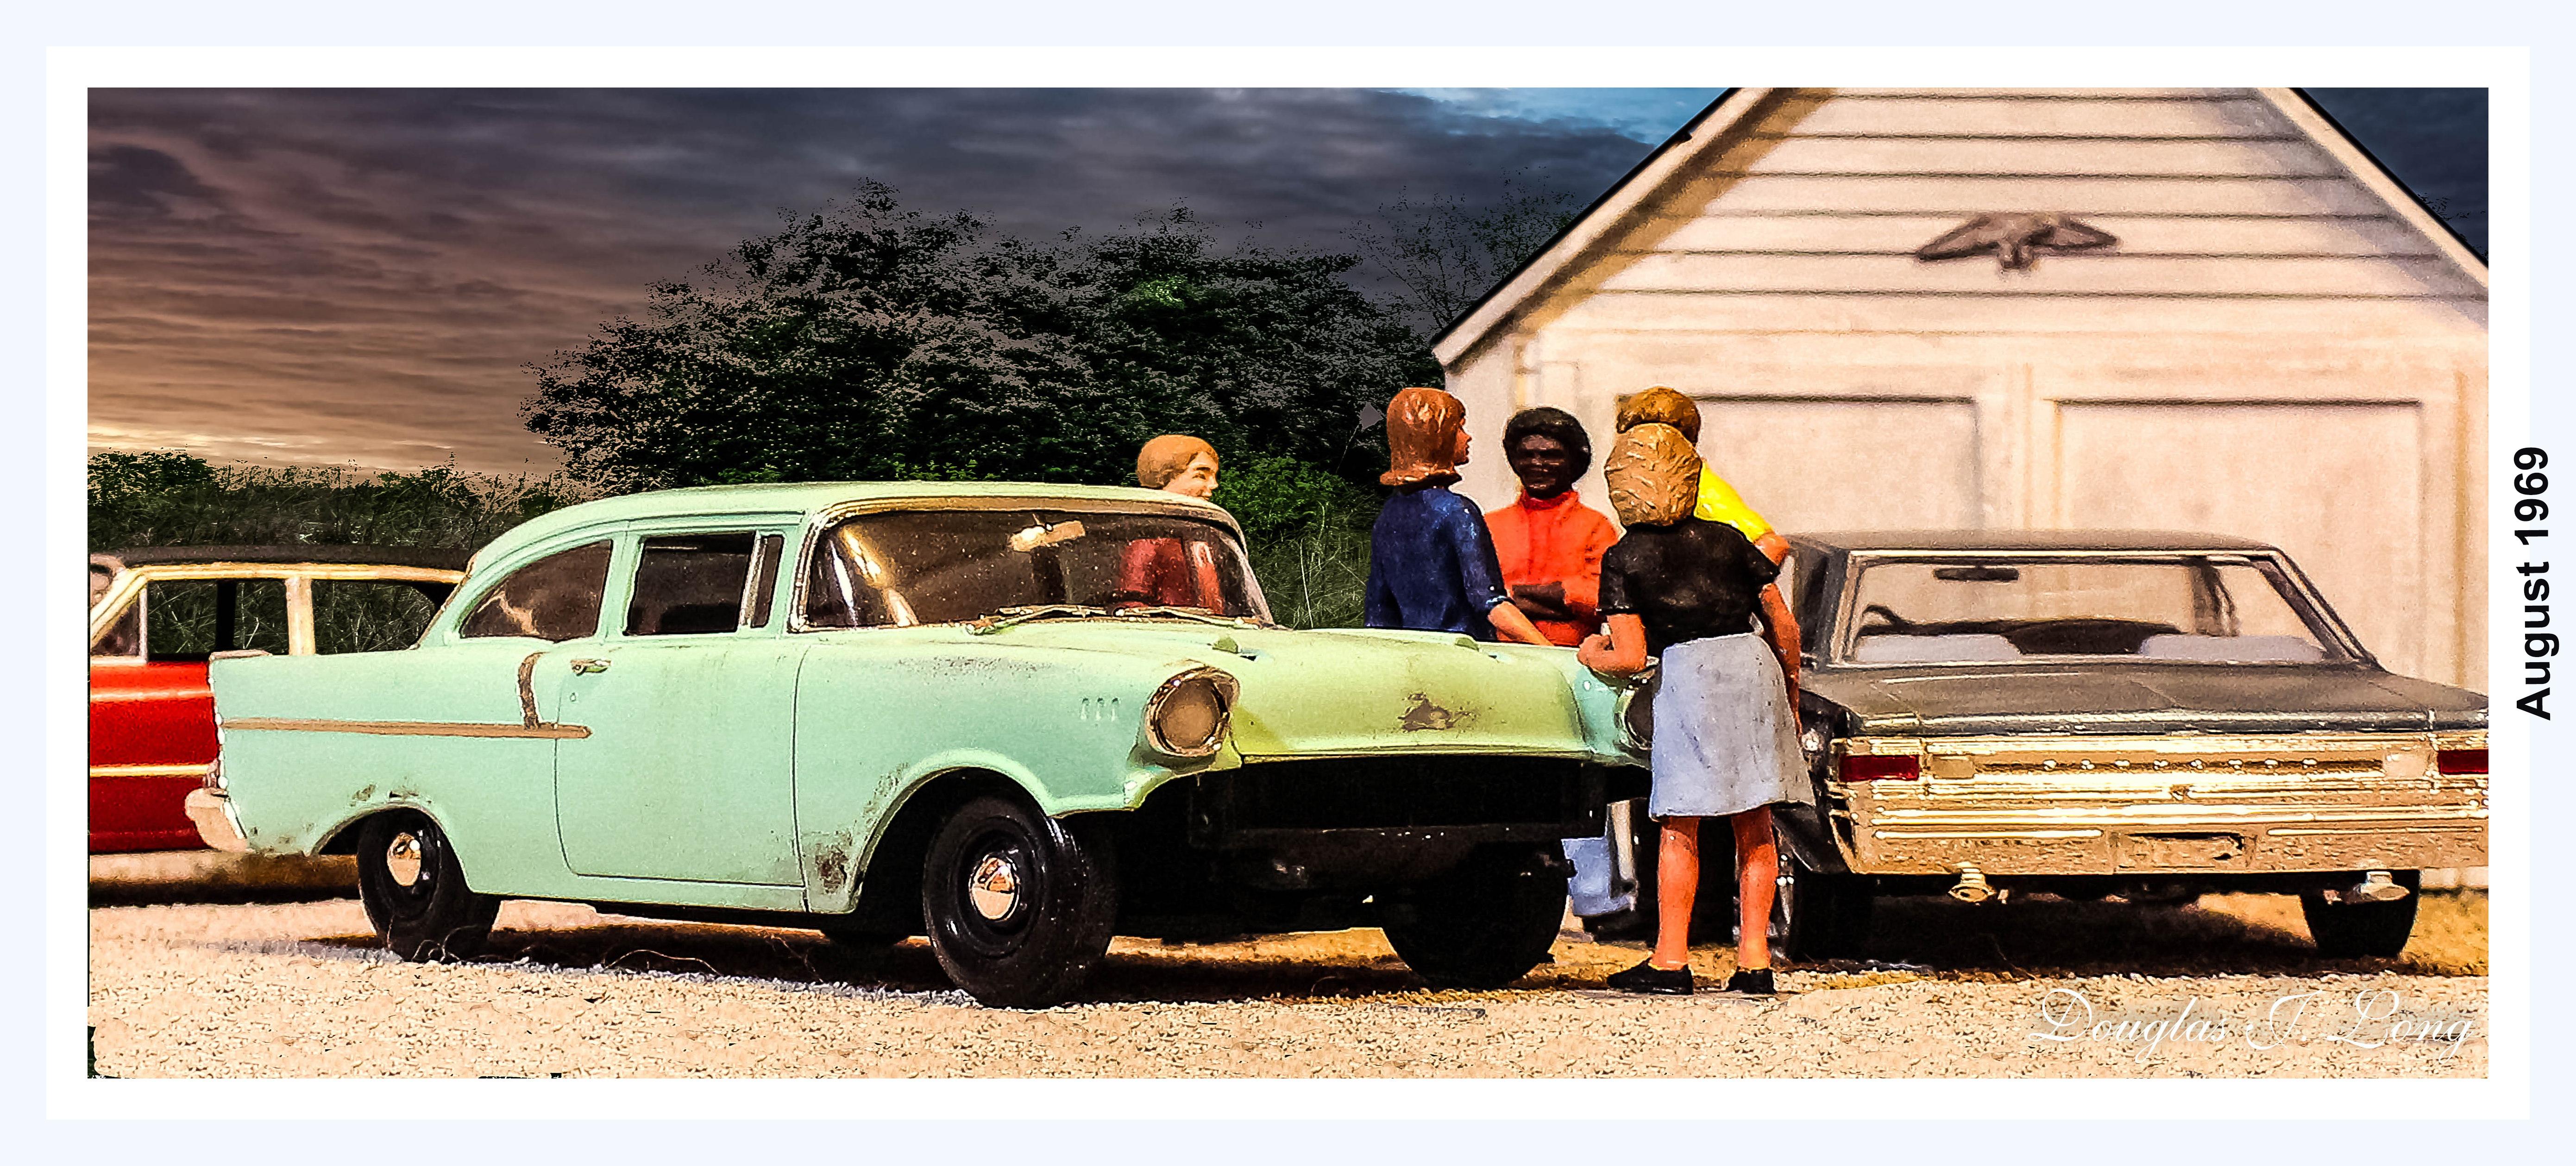
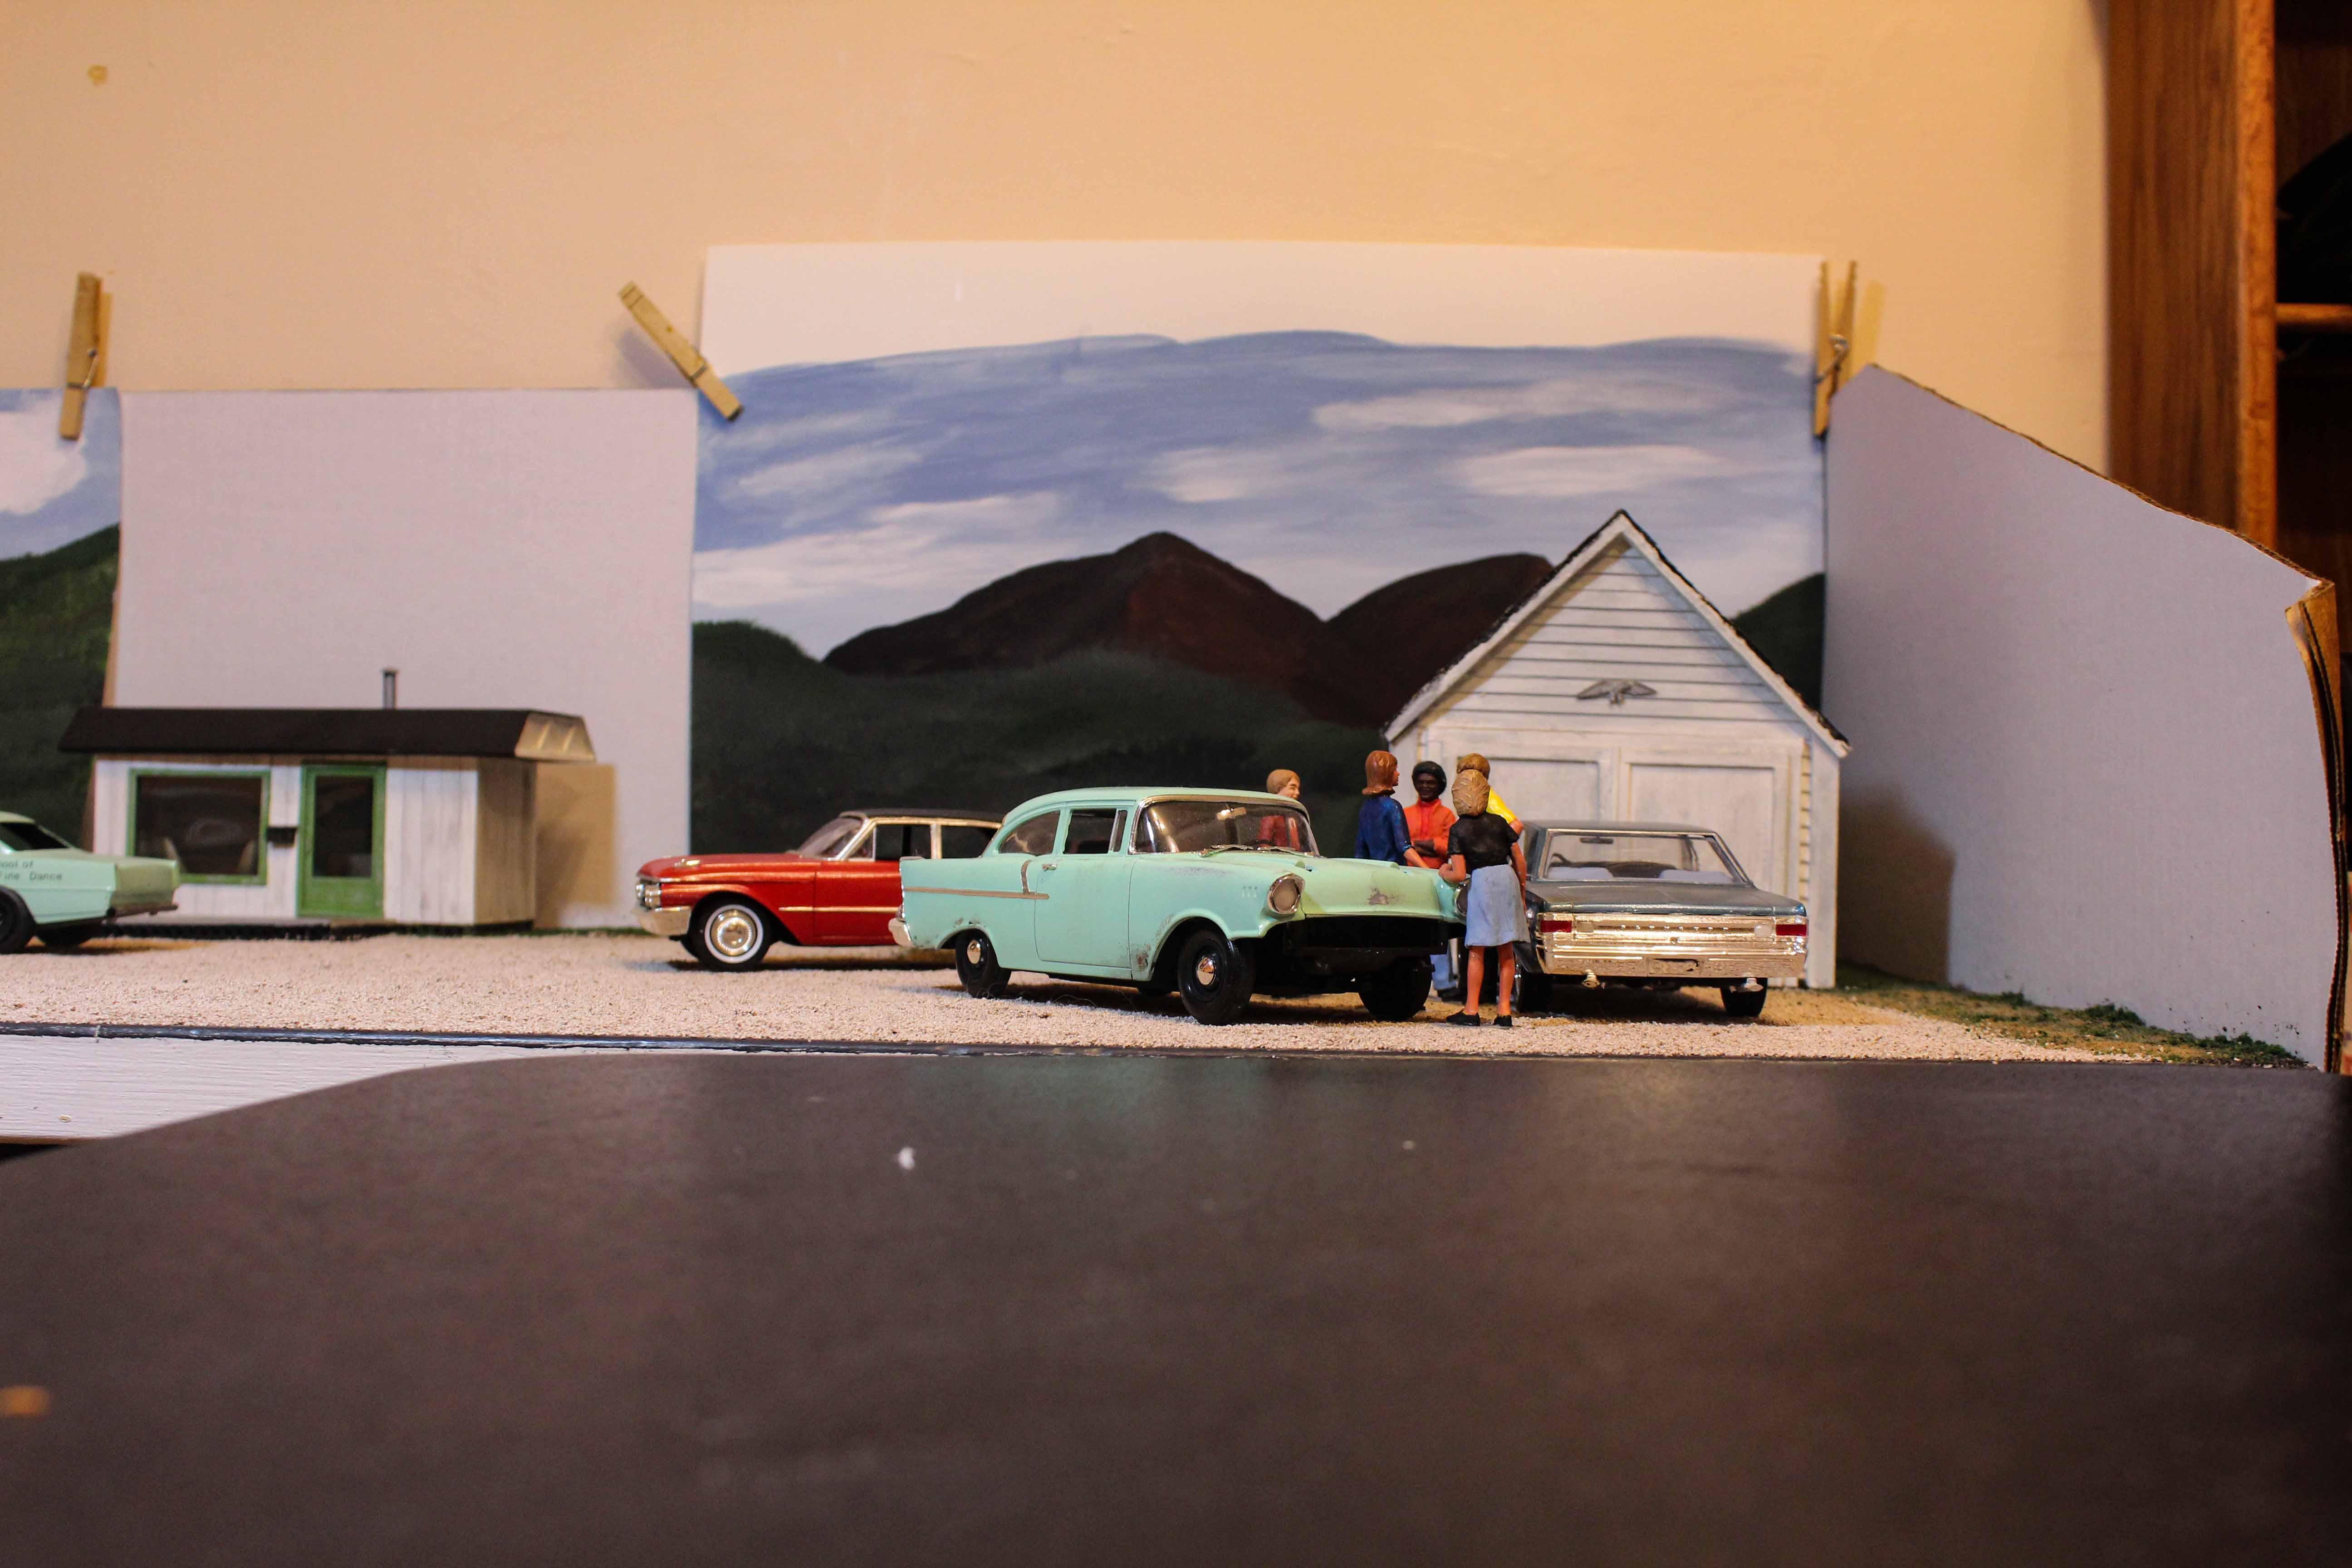
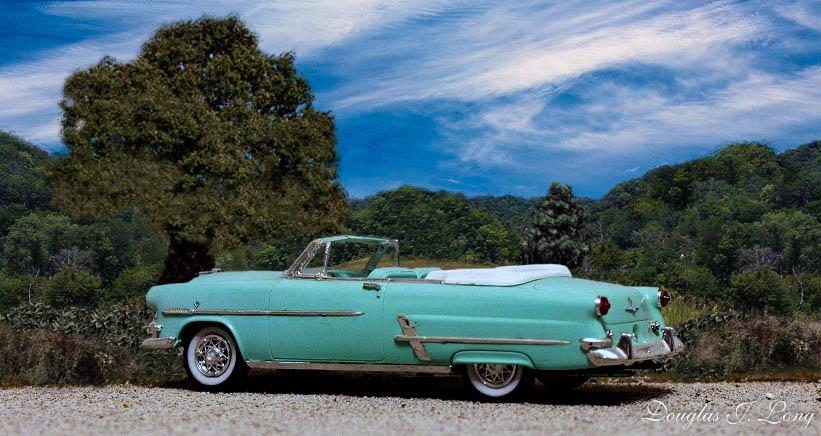
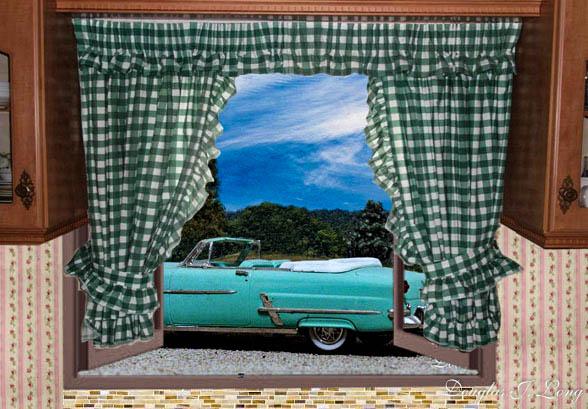
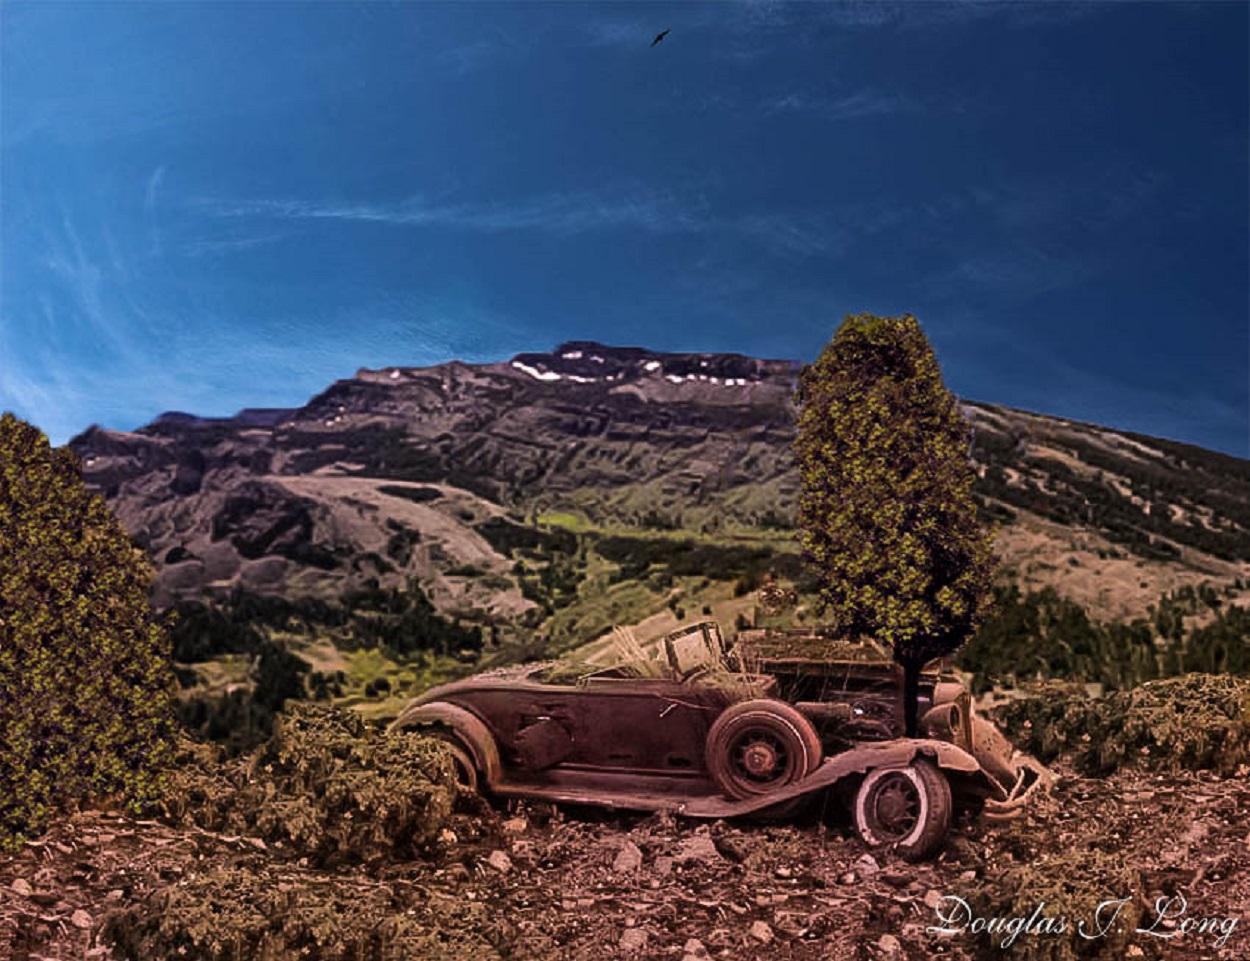
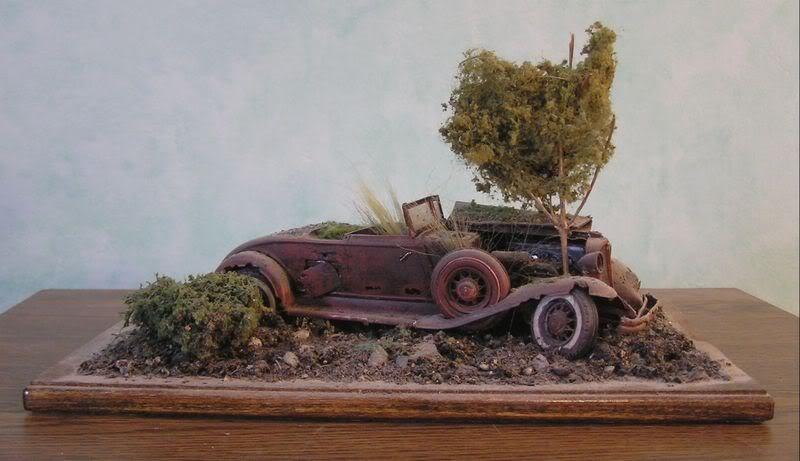
There are many who view dioramas with awe and wonderment, wishing that they could create works of art like that. Often, they lack the space for a diorama, or even the space for a model. I know several model builders that have to place their models back in the box when completed because they have no place to display their creations. For this reason, I am introducing you to the world of the cyber-diorama. You may still lack tangible display room, but you now have alternatives. The 'August 1969' diorama was a cyber-diorama. The base for it was 2 foot by 4 foot 1/2 inch plywood. It had fine gravel from Woodland Scenics glued to it. Everything else was extra to be placed when needed. In this case there were five figures, three cars, and a garage. The scene represents a group of young friends just enjoying being together on an August day. The second picture displays what I actually took a picture of. I then went to Photoshop to remove all the elements that I didn't want in the photo. From that I added trees, background, and sky, to be blended to form the first picture. There are many miniaturists that just don't have the room to keep their works of art on display. Building cyber-displays around them allows them a way to be able to see their treasures, even when tucked away in boxes. Using the figures, presents them in real life settings, or as in the case of 'August 1969', a 'Polaroid' picture. So you like working with photo-editing, well, here is something that you can do with any photo to personalize it. In this case, I used a model car photo, but don't let that limit you. This is a cyber-diorama that I created from a cyber-diorama. In the first one, the base and gravel on it, along with the car are tangible. Everything else was photo-edited in to create a scene. In the second picture, we are looking out of a window to see the car. Each element in that kitchen scene is separate. The wall paper, curtains, cupboards, window frames; each one had to be grafted in to give the impression that one is looking out the kitchen window to see the scene. How hard is it to create a diorama? This one consists of just four elements; the model, a metal table, a calendar picture, and a cereal box. The model was set on the metal table, a full cereal box (full for stability) was placed behind the model, and then the calendar picture was placed against the box. Admittedly, is is a very temporary diorama, but you can easily remember it by taking a picture. What would it take to make it a permanent diorama? A couple of pieces of sturdy plastic, one for the base and one for the back would be your start. Paint the base flat gray or flat black. Glue the back to the base, and then the calendar picture to the back. Place the car on the base, and with the exception of some bracing, you have a diorama. Don't be intimidated by all the fabulous dioramas that you see the miniaturists display. We all had to start somewhere, and we place our work here, not to gloat, but to encourage others. In the second picture, you see a small diorama that my late wife built. As a tribute to her, in her last days, I created an acrylic painting involving the model. However, the disclaimer would be that the painting doesn't exist outside of the cyber world. The work was all done using Photoshop. It consisted of a picture taken of the model and the diorama base. Once brought to Photoshop, the ground and trees were altered to reflect that which is found in much of Alaska. The bush was made to look like the Salmonberry bush that was so common around Kodiak. The sapling tree was given growth and a friend. Behind the car are multiple layers of mountain pictures, followed by the sky. All of that was blended together, and then further reworked to reflect an acrylic painting. You now get an idea of just what you can accomplish in the cyber-world, but I have more. As your skills evolve, and note the word 'evolve'... ...you will find yourself adjusting the adjustments... This picture, although generally rather simple in most terms, does require another skill. To begin, the rock, figures, car, and buildings are all tangible. The backdrop is a calendar picture. To this point it would follow the same procedure as the 1961 Cadillac, shown earlier. The trick is that this car was photographed in front of a gray screen. The photo was added in photo-editing. The reason is that the photo had to have a mirror image made from it. The left side is original, with the right being the mirror image, which then had to have work done to it. What one is left with is a very New England setting. We return to layers in photo-editing. In this example, the car and the gravel close to it are tangible. Everything else is edited in. Each tree, bush, area of grass, sky, and building, are separate layers. Each layer then receives detailing, and attention to such things as lighting and shadow direction. You can also rework the car. In this case I made a Series 62 from an Eldorado. Just how elaborate can one get? Once again, all that is tangible is the automobile and some gravel. Everything else that you see is cyber generated. This one was constructed with a purpose. That purpose was to move the viewer's eye from the front to the rear of the picture. For those who were around in the 80s & 90s, you might remember an art show with a Mr. Bob Ross. I followed his guidelines in this work. The front trees help to frame the photo, while at the same time working to 'move' the scene back. In order to do this, construction began at the rear and moved to the front. This is where things can get difficult, not so much from the work, but in hiding objects. Many of those objects are very interesting, such as the house to the left. Note the 'steeple' on the house behind it. These work to add depth. That depth is gained by hiding said houses, and also much of the trees seen behind the hedge. The hedge plays a key role. It adds a backdrop for the vehicle, while at the same time creating depth. Surprisingly, is how much the small grassy area between the car and the hedge also add to the depth. As we move foreword from the car and the rock, we encounter another grassy and bushy area, along with the aforementioned, trees. These all work together to create a scene that looks quite deep, but what helps to really convey the depth impression, is the simple jet stream, which tells the viewer that there is more world behind the photo. Remember to start off simple, as in the 1961 Cadillac picture. As you gain experience, you will find yourself taking pictures of every model you have, and giving it a cyber-world. When you get to the level of the last picture, it won't be work nor difficult, it will be a blast. I am thankful that I did make all of these pictures. With my wife contracting terminal Cancer, we had to move from Alaska, and she passed shortly thereafter. I had to let my collection go to a friend there. Those models are still in my collection, although only on cyber form. So whether you have room for a model collection or just want to back up your collection, give cyber-dioramas a try.

- 1 reply
-
- 3
-

-
- diorama
- 1/25 scale
- (and 1 more)
-
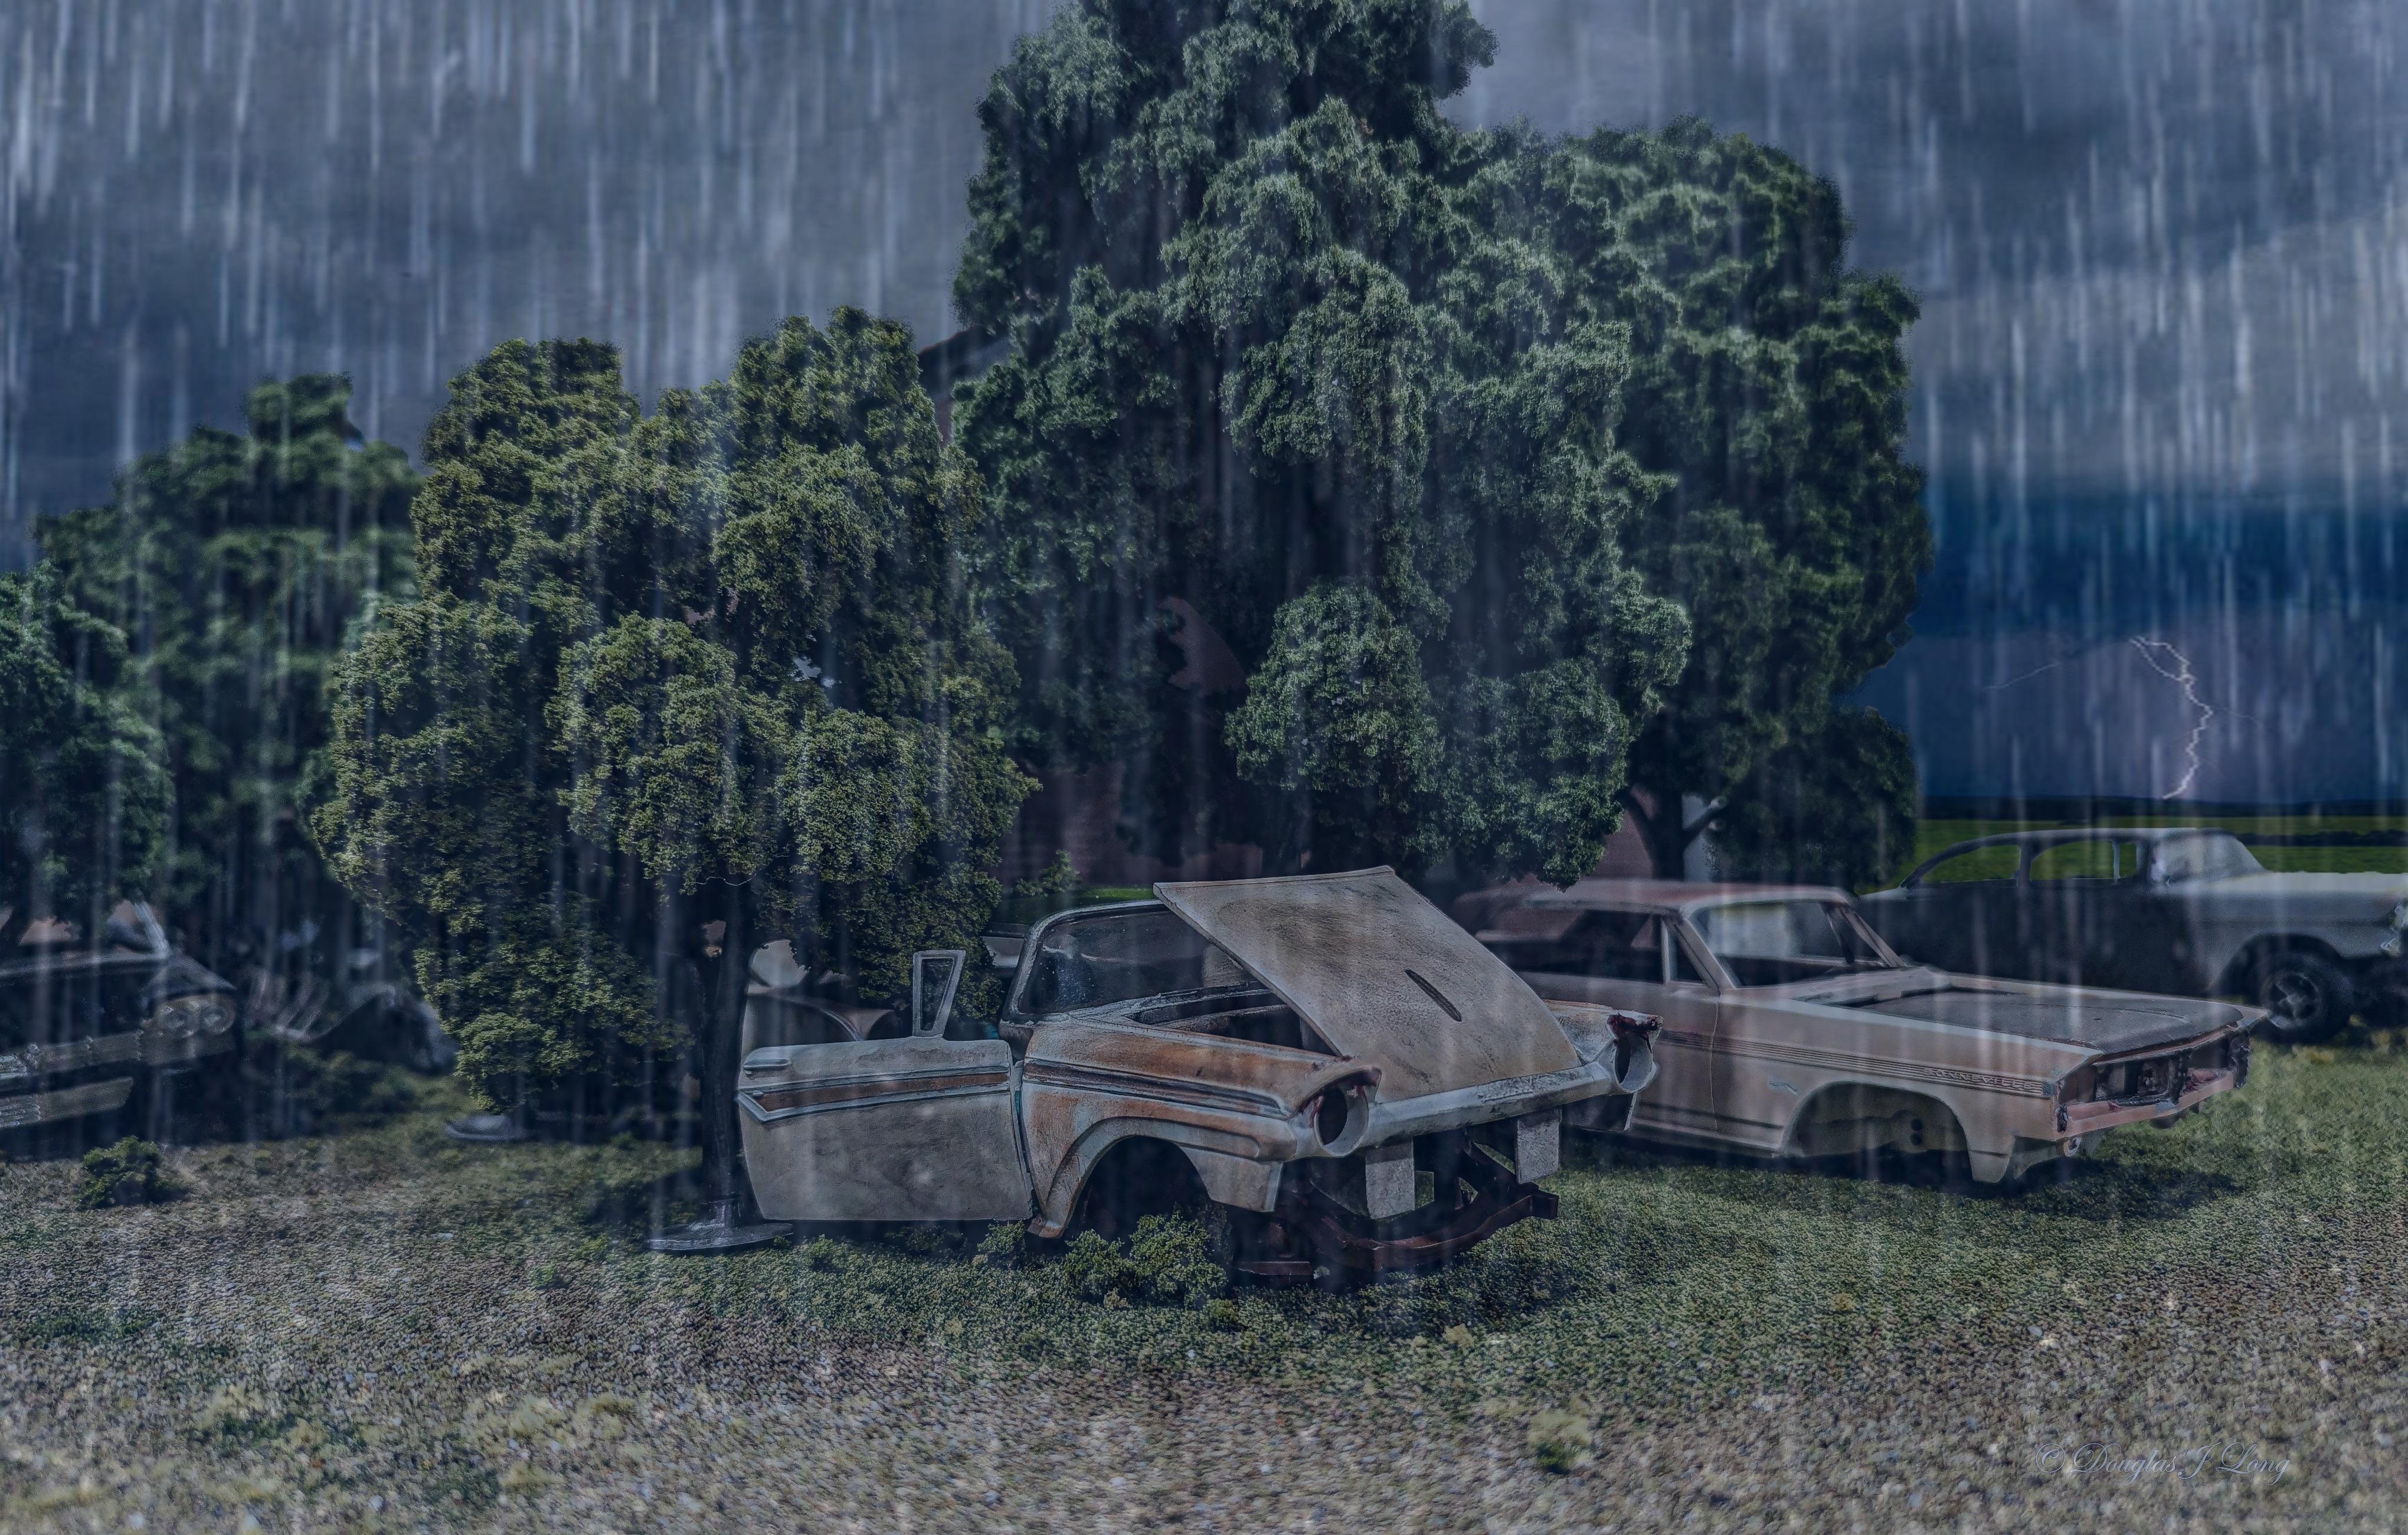
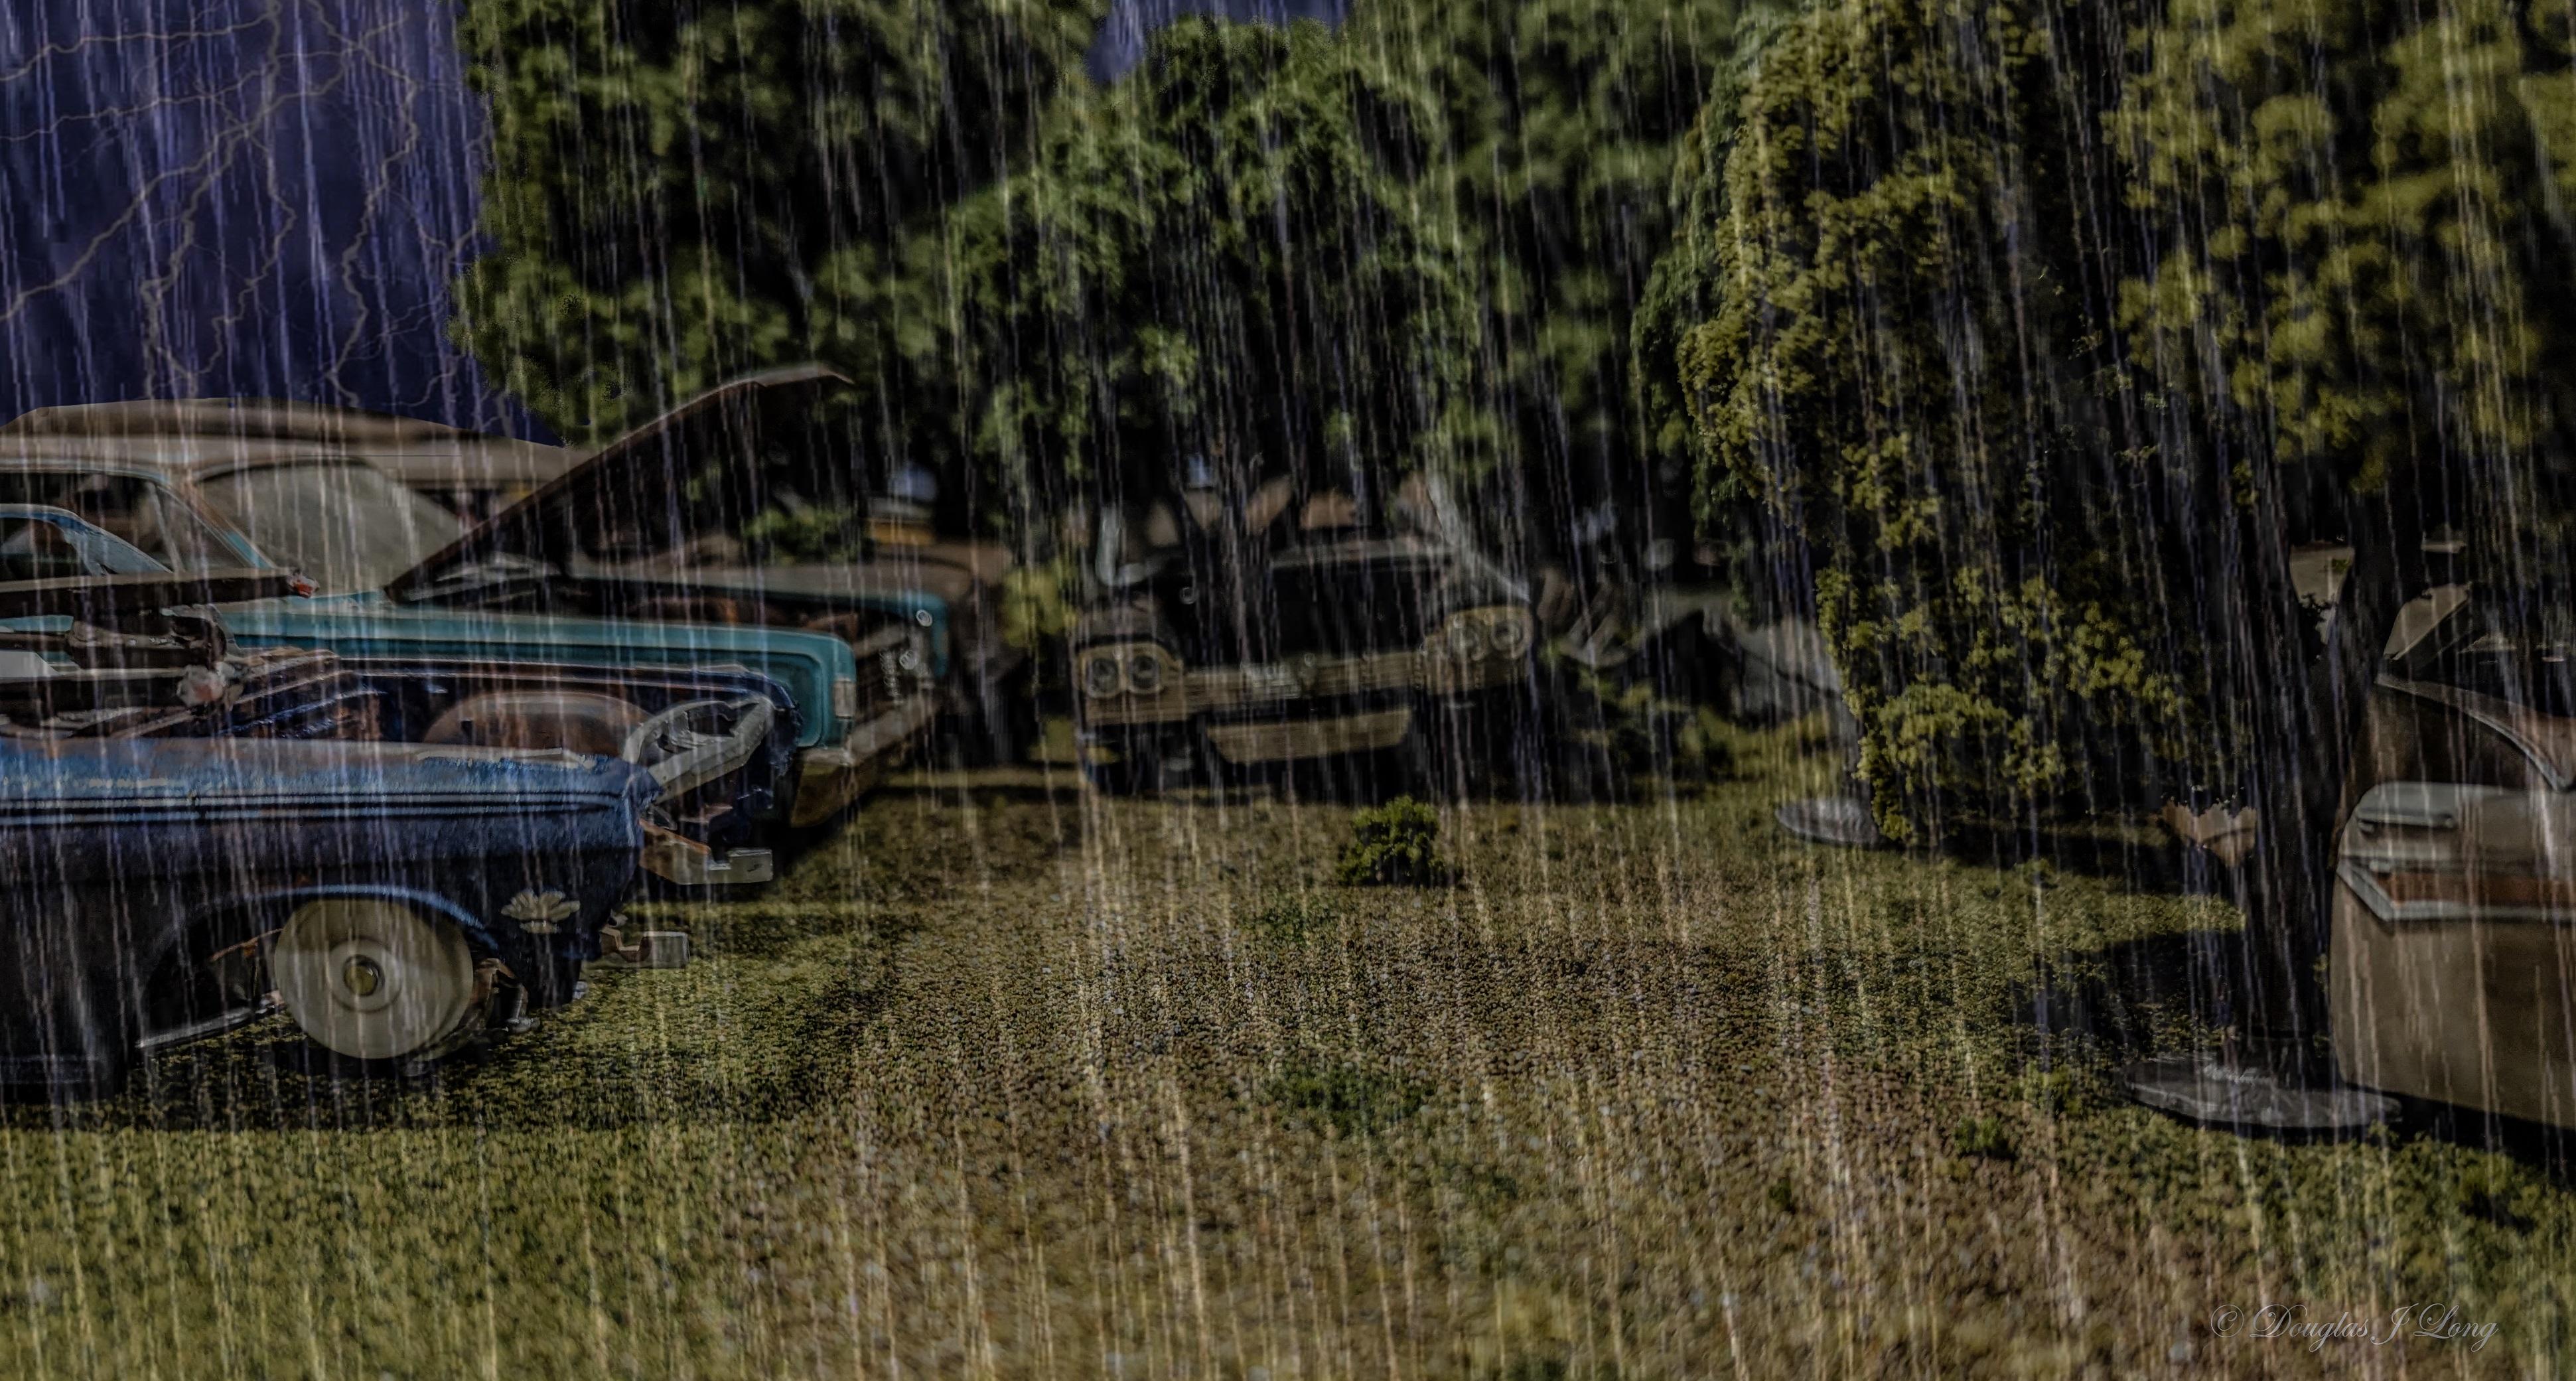
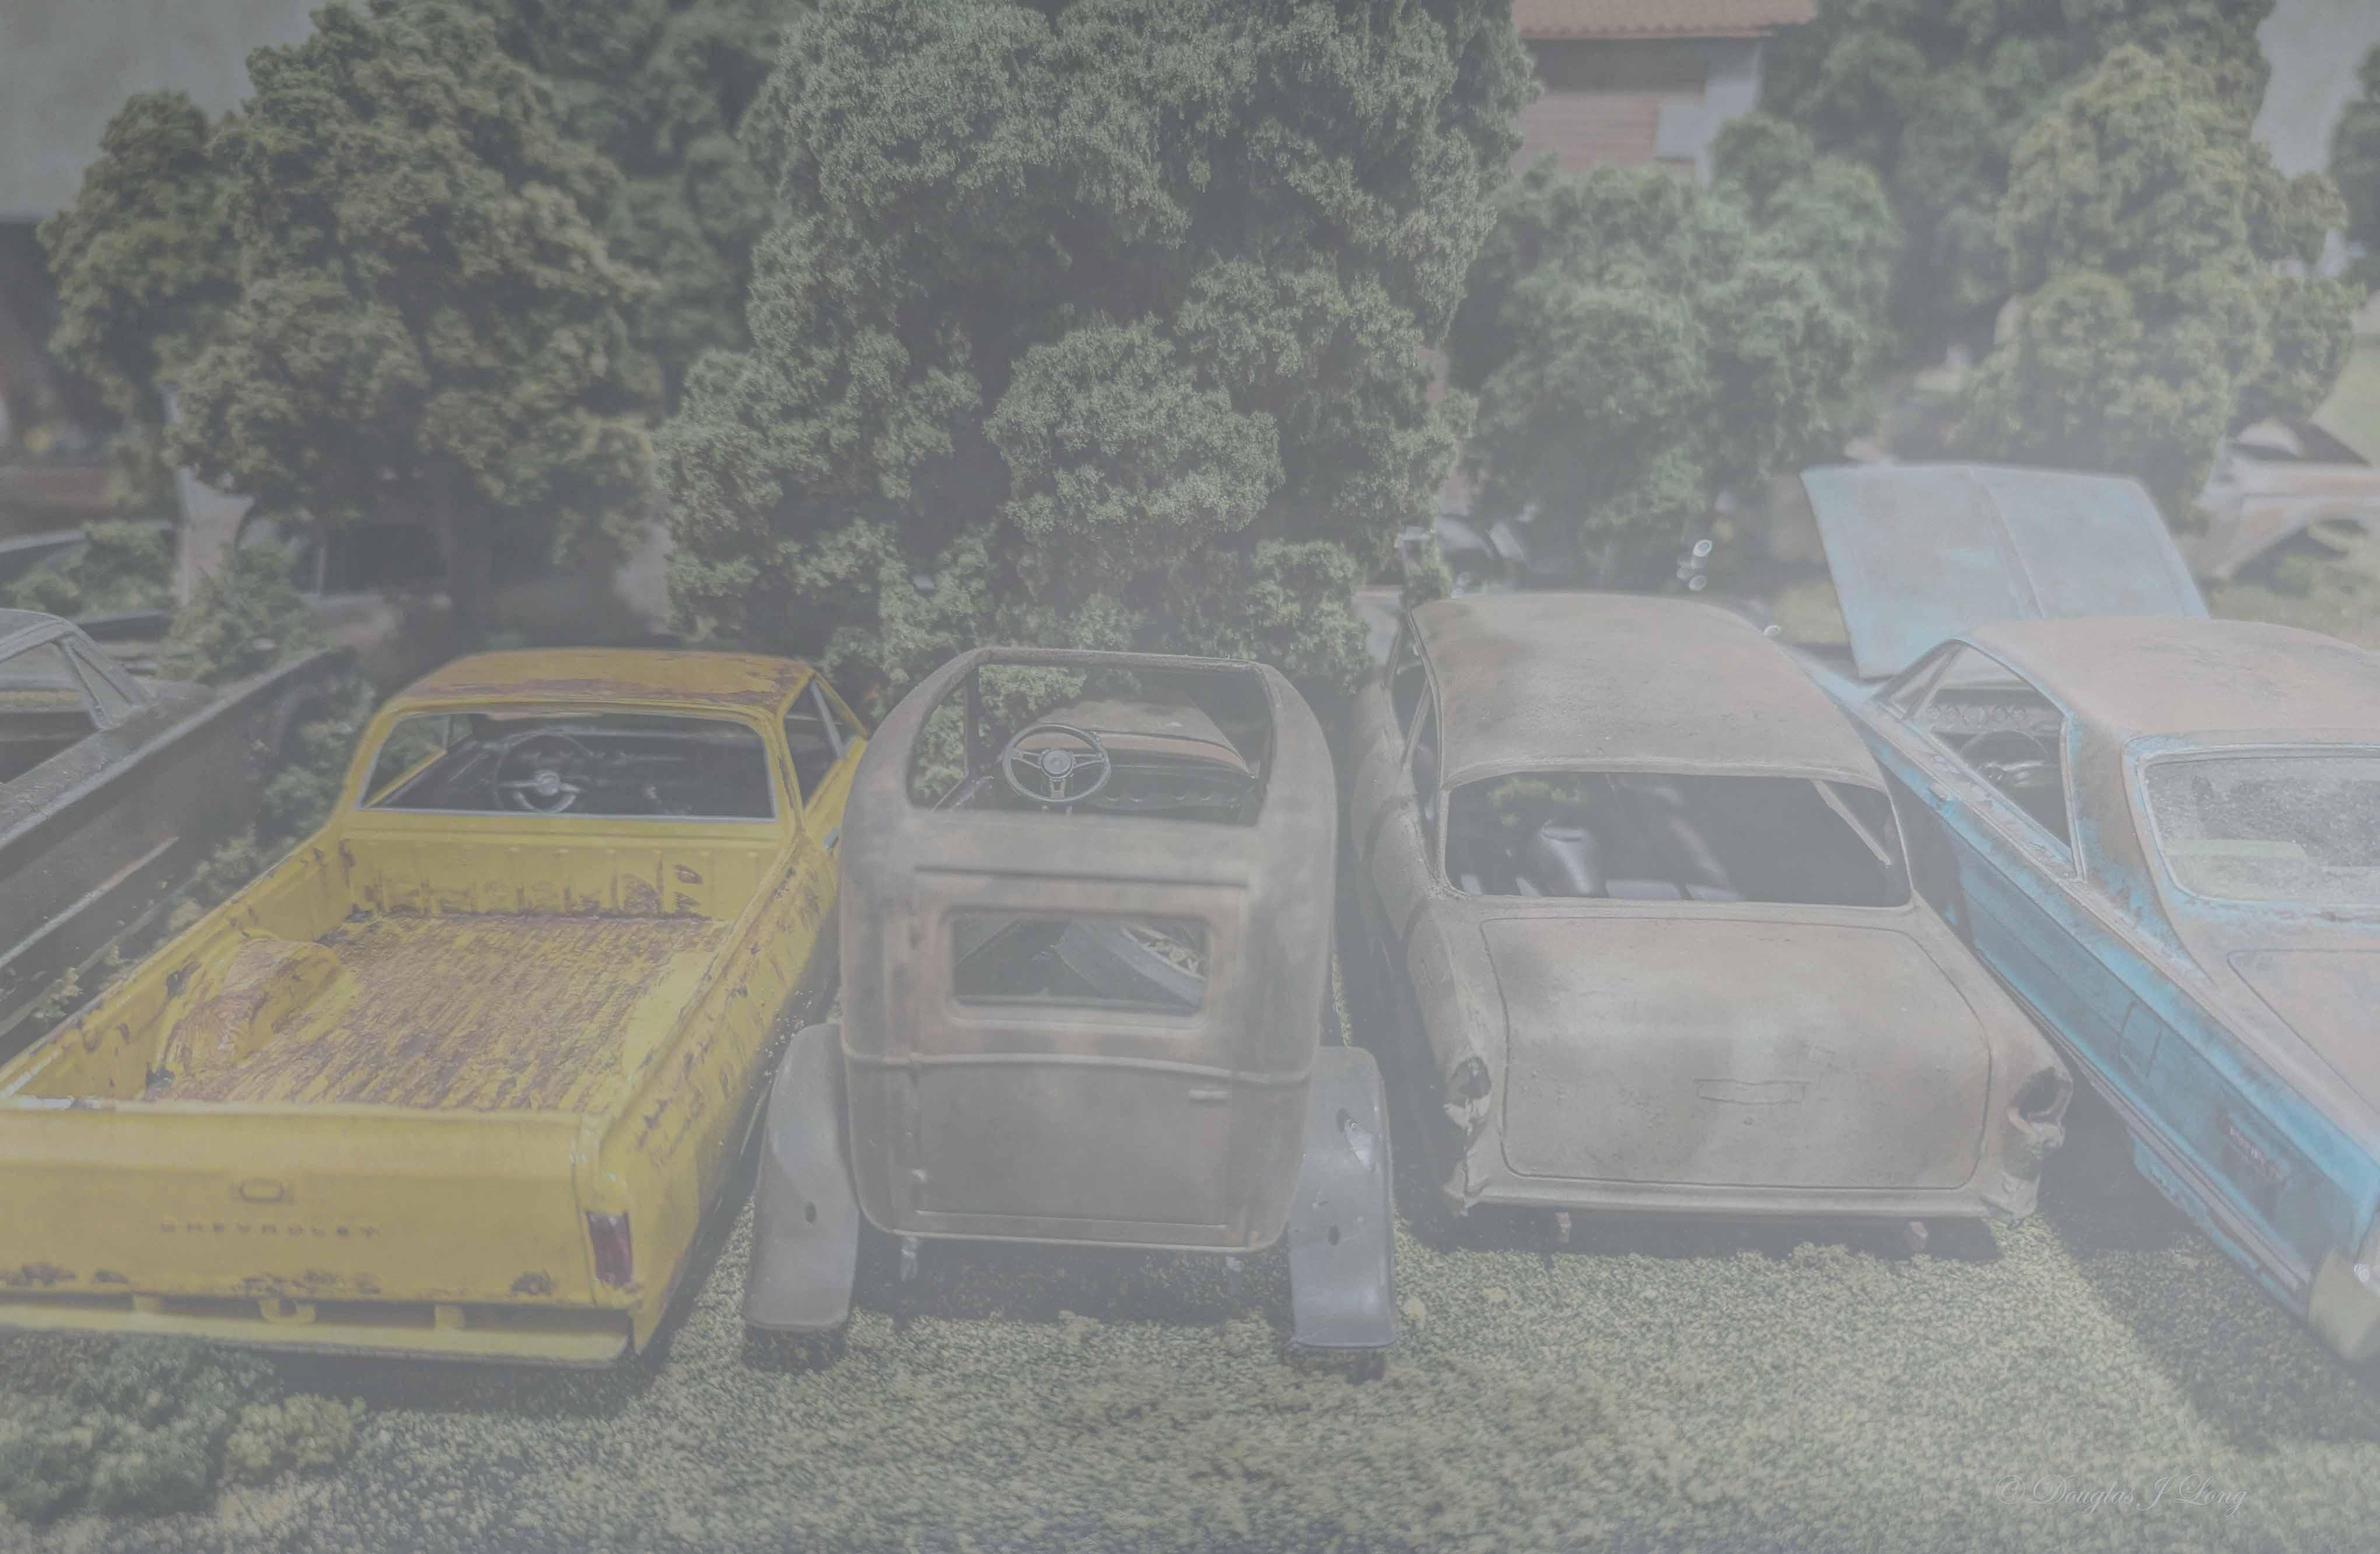
One day it rains so hard that you can't work in the junkyard. The next day it's so foggy that you can't find the junkyard. At least when it clears up, everything will be nice and clean to work on.
-
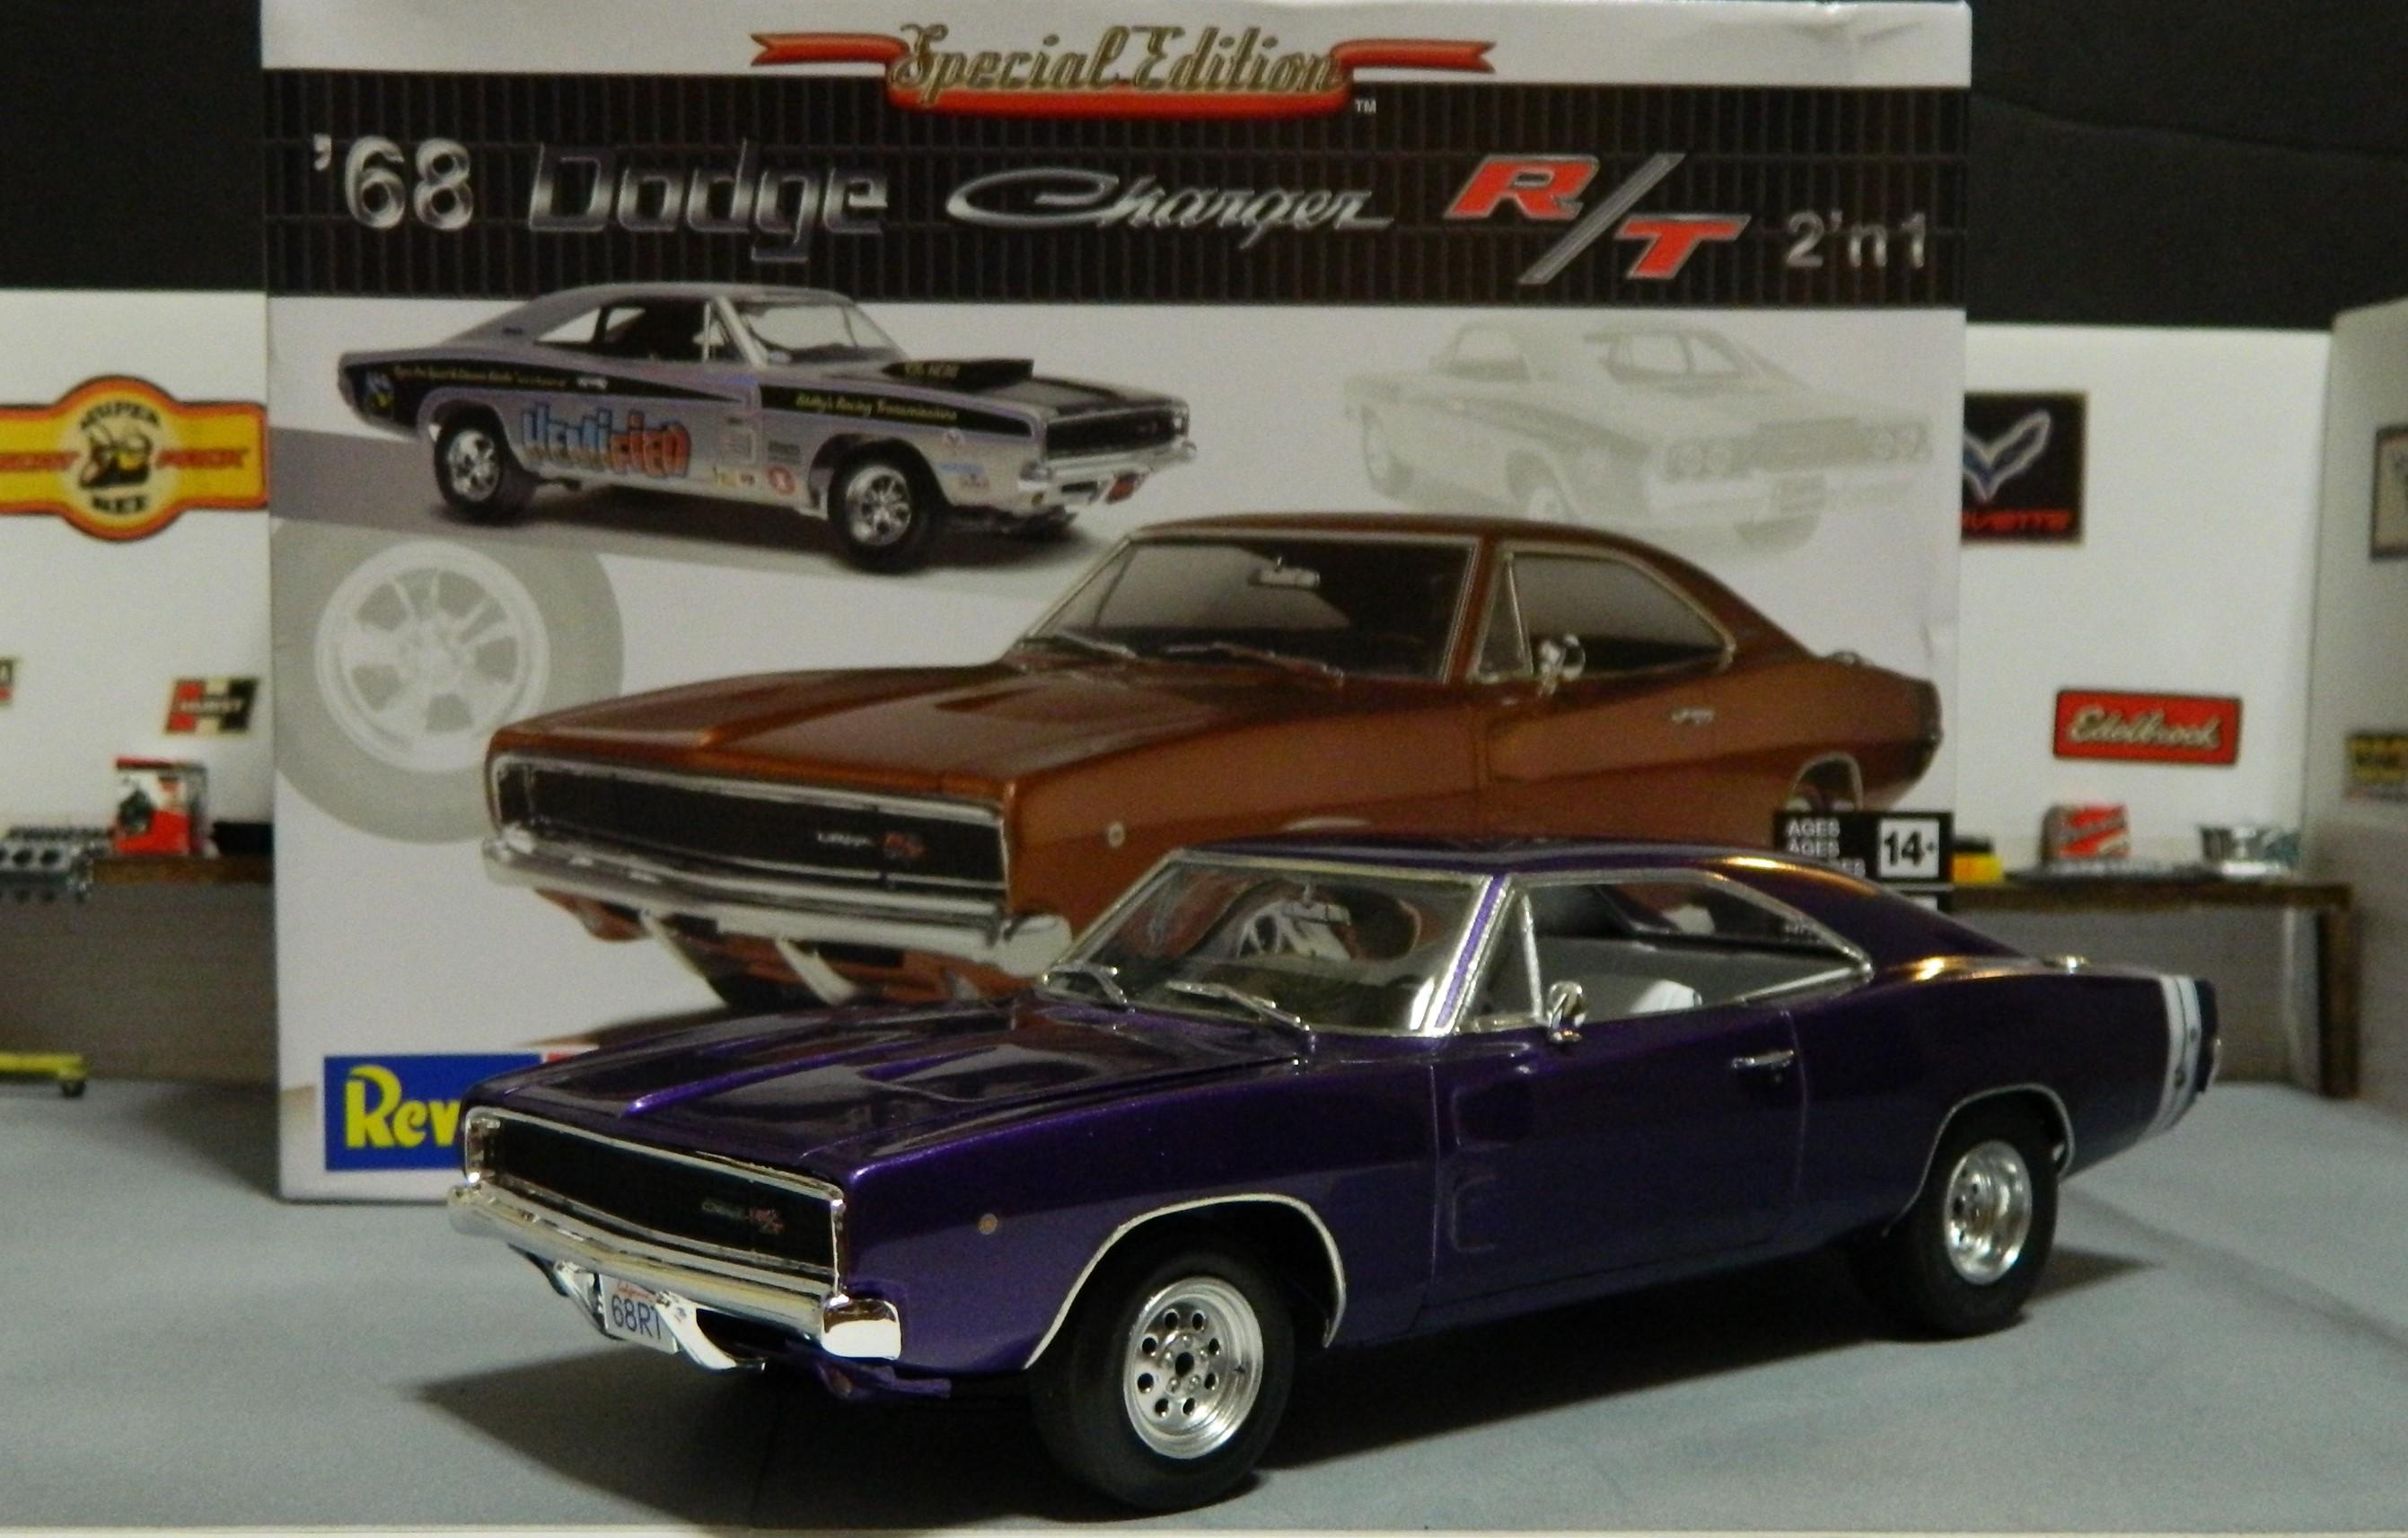
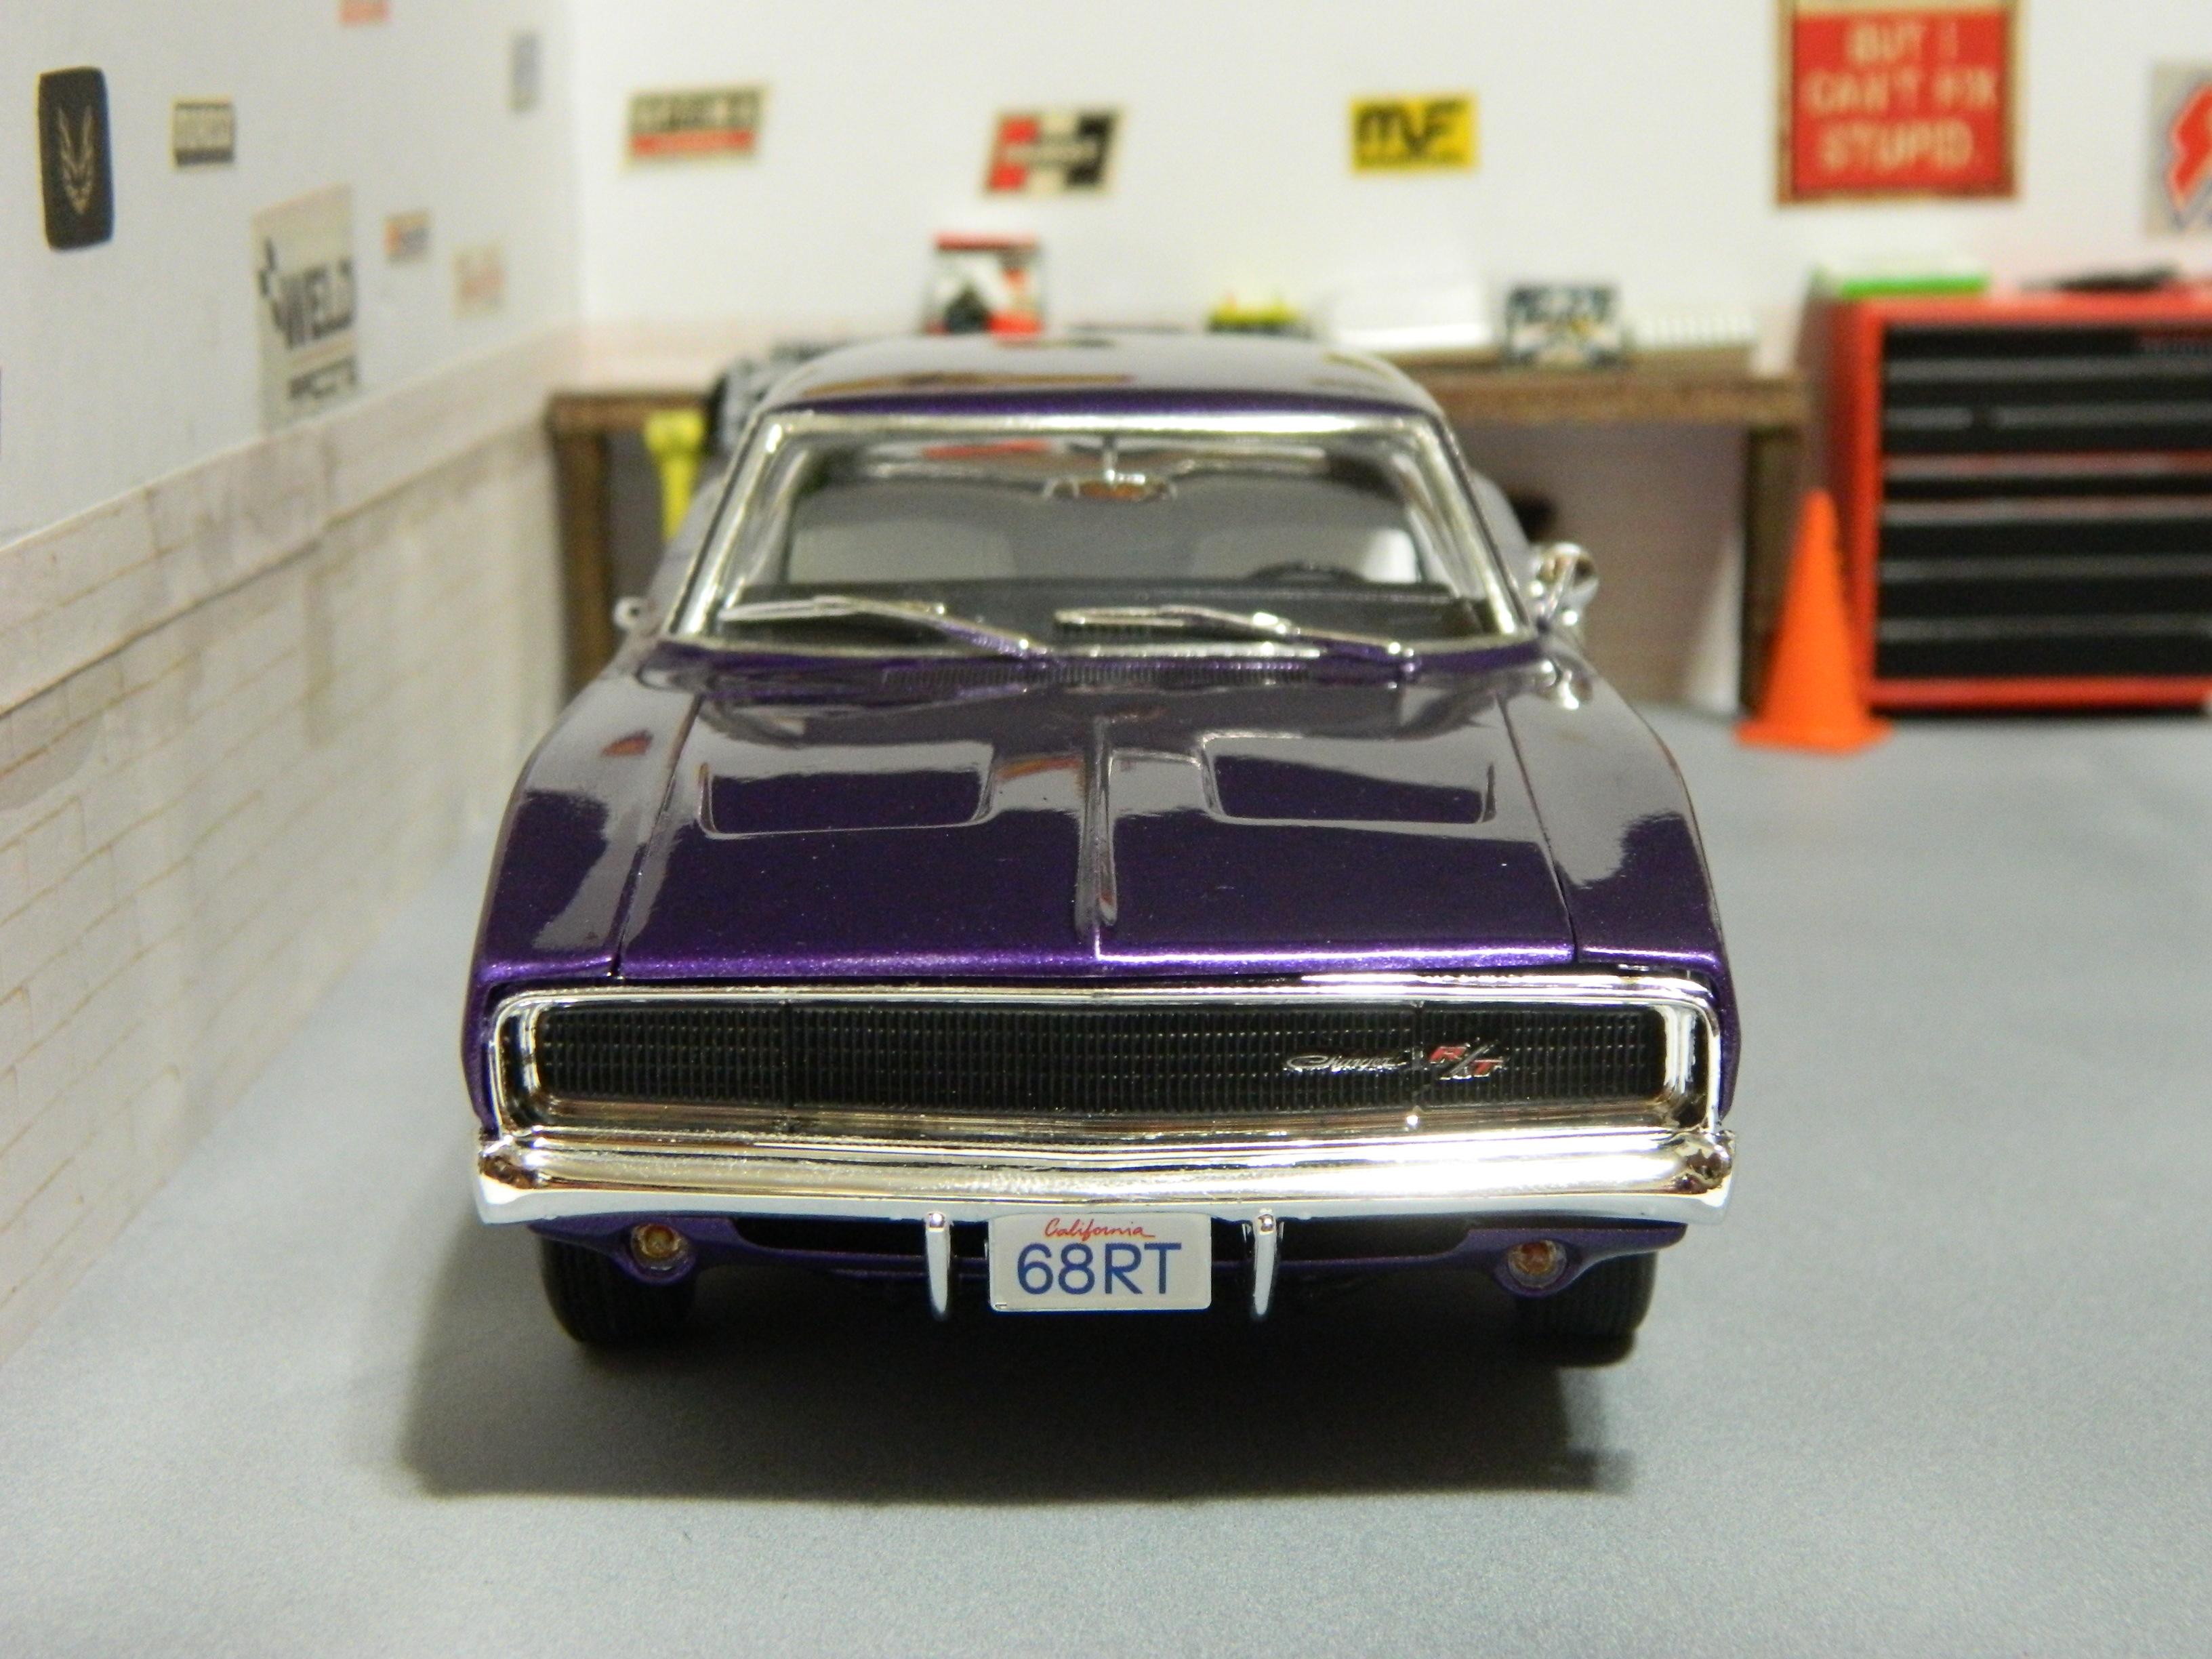
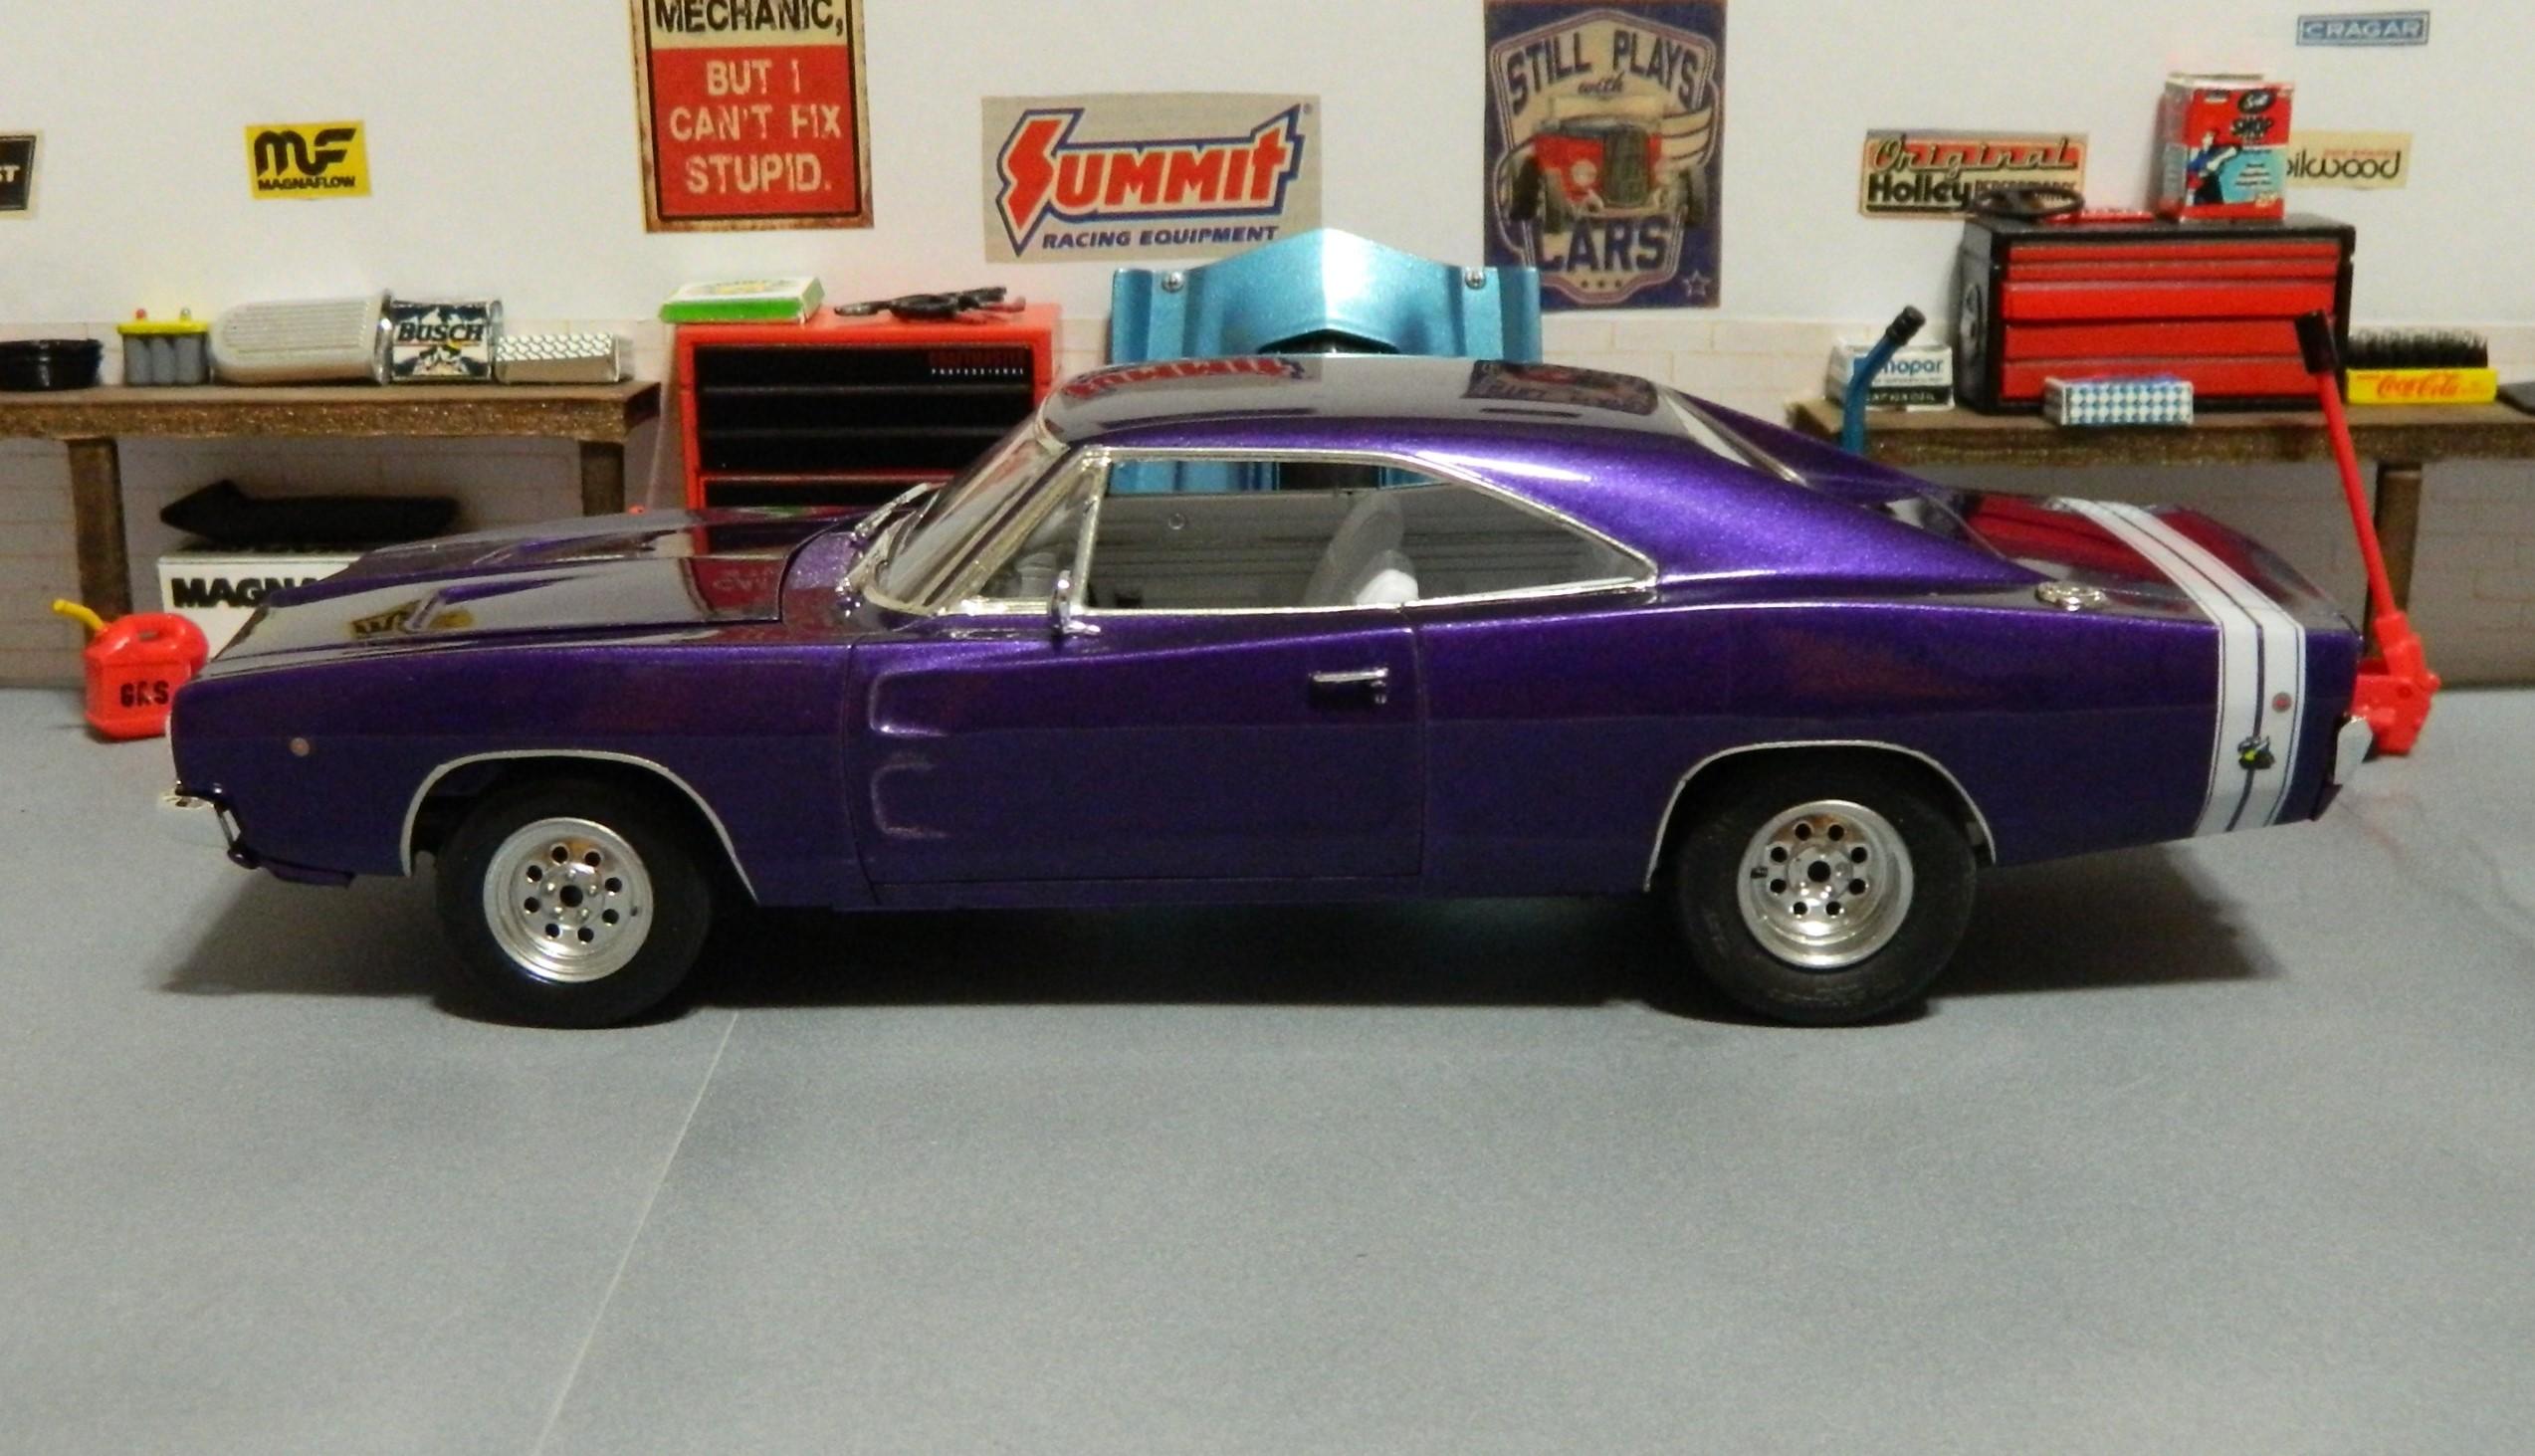
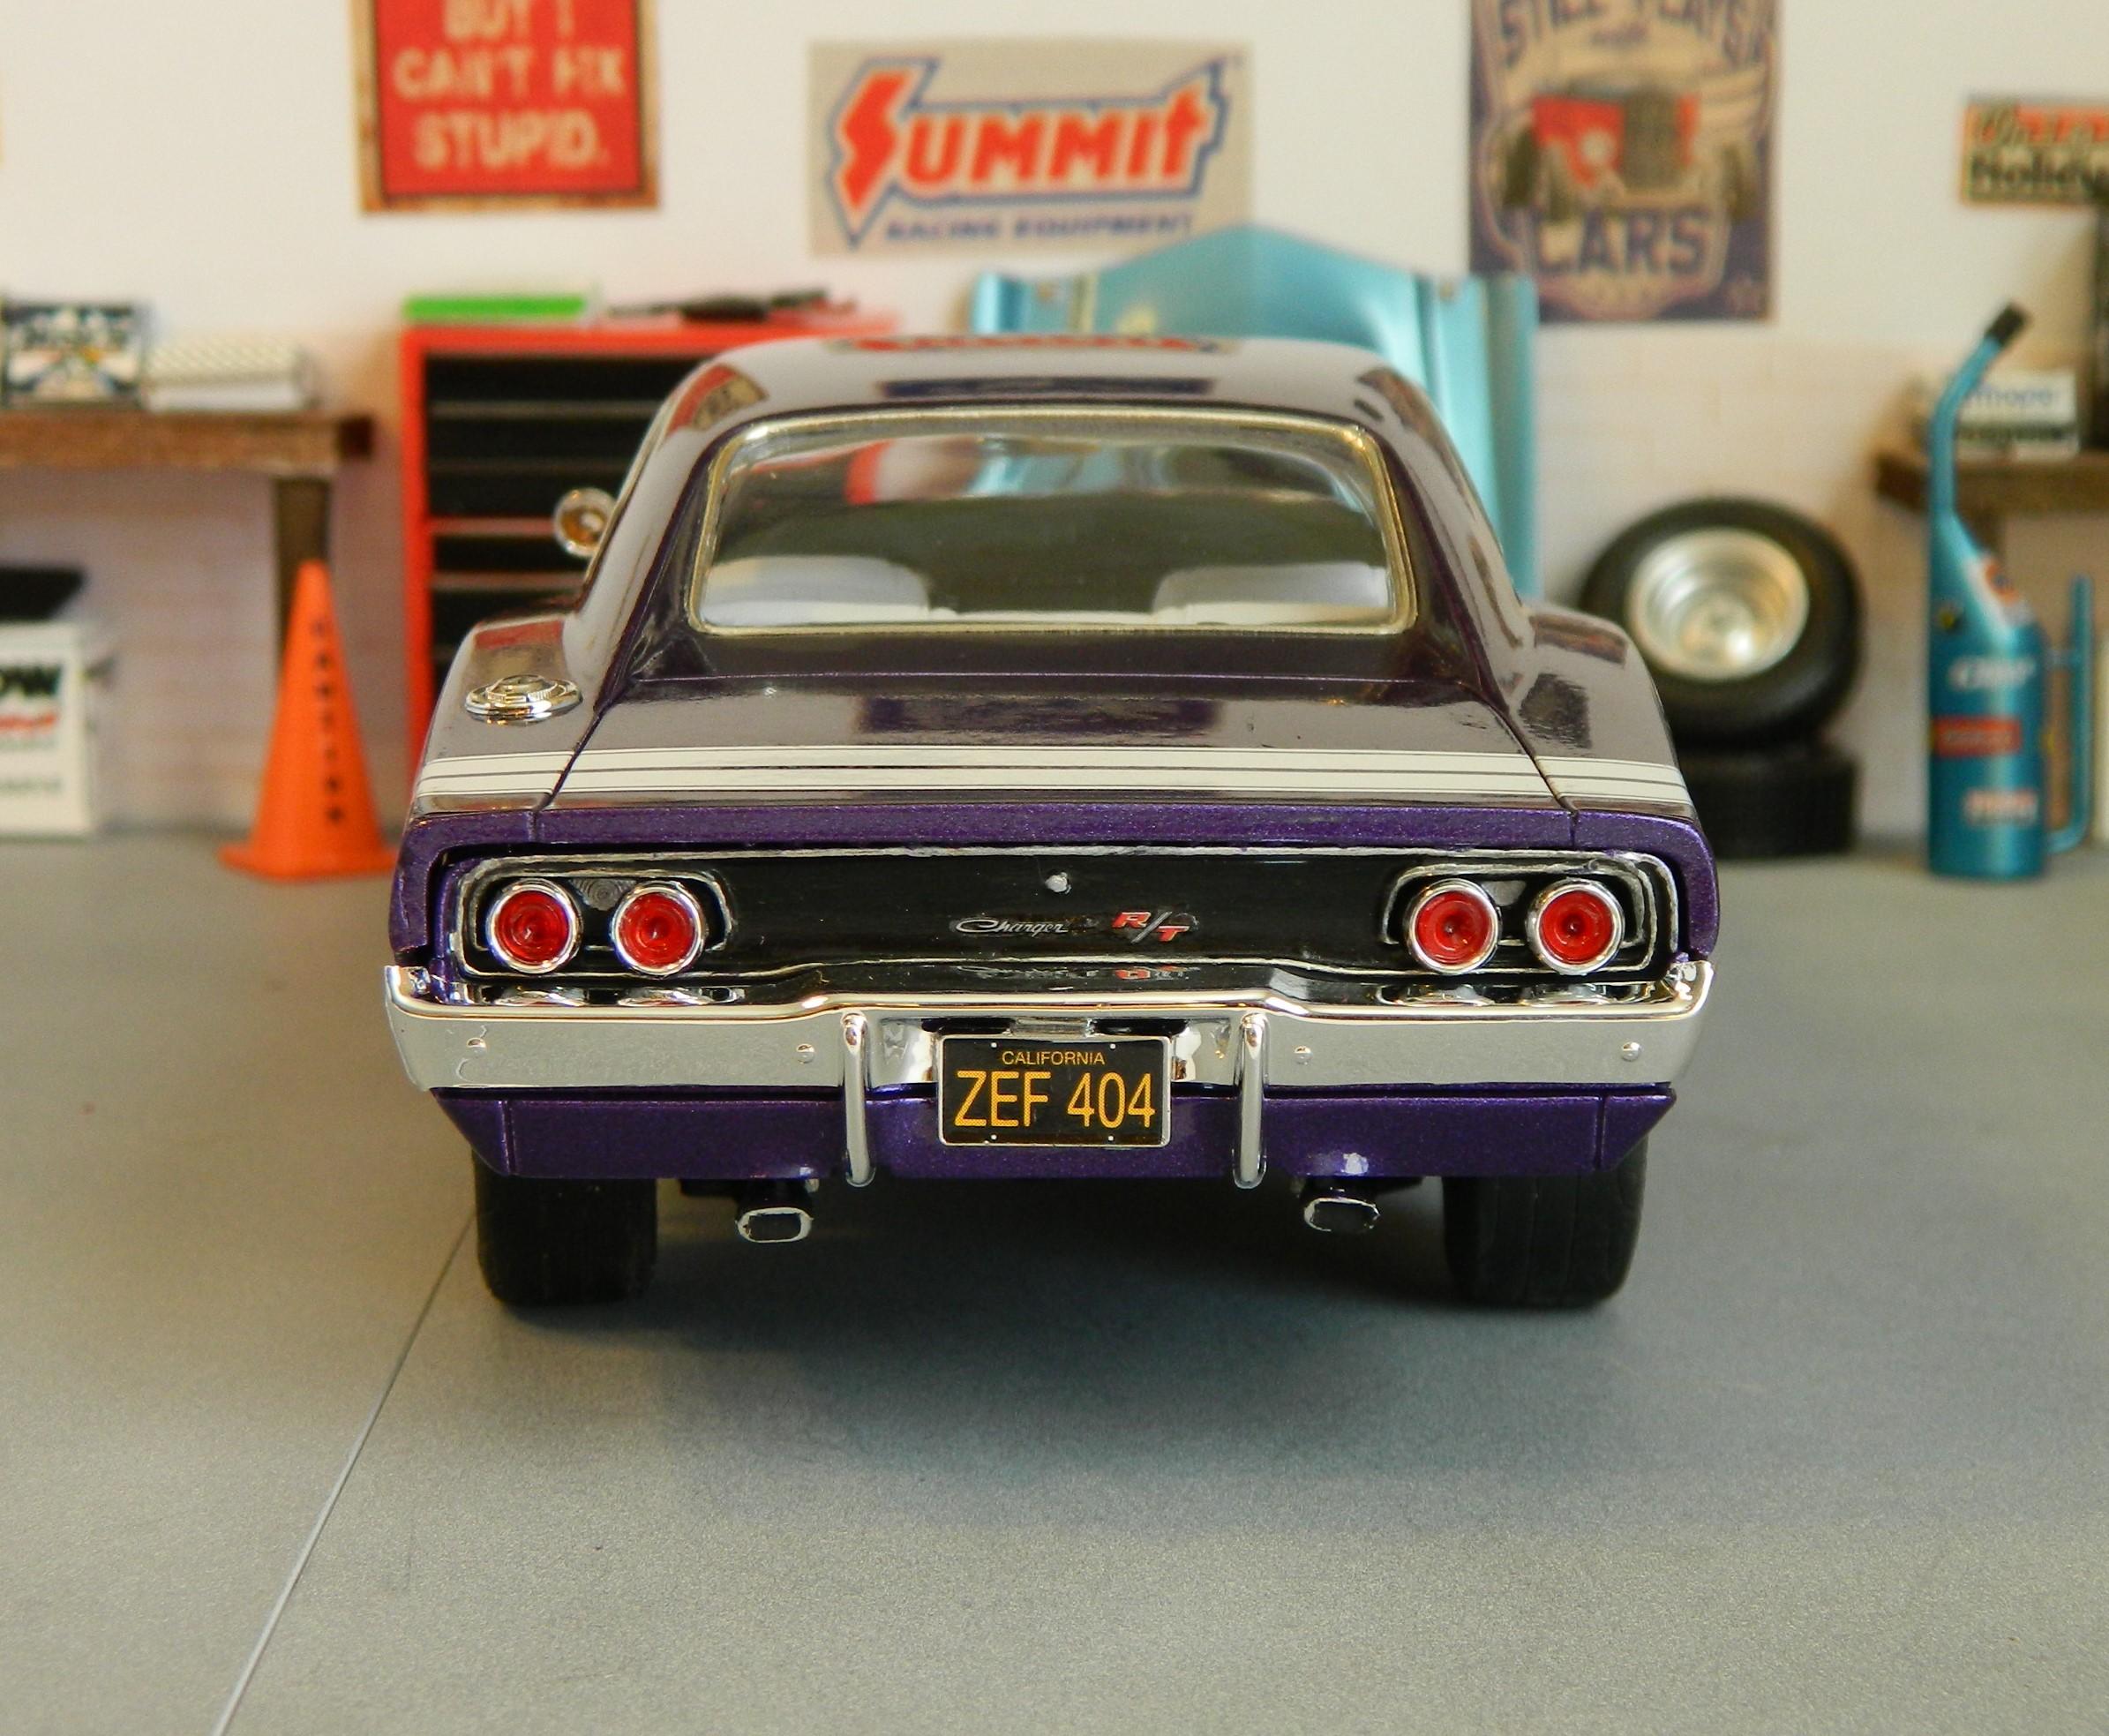
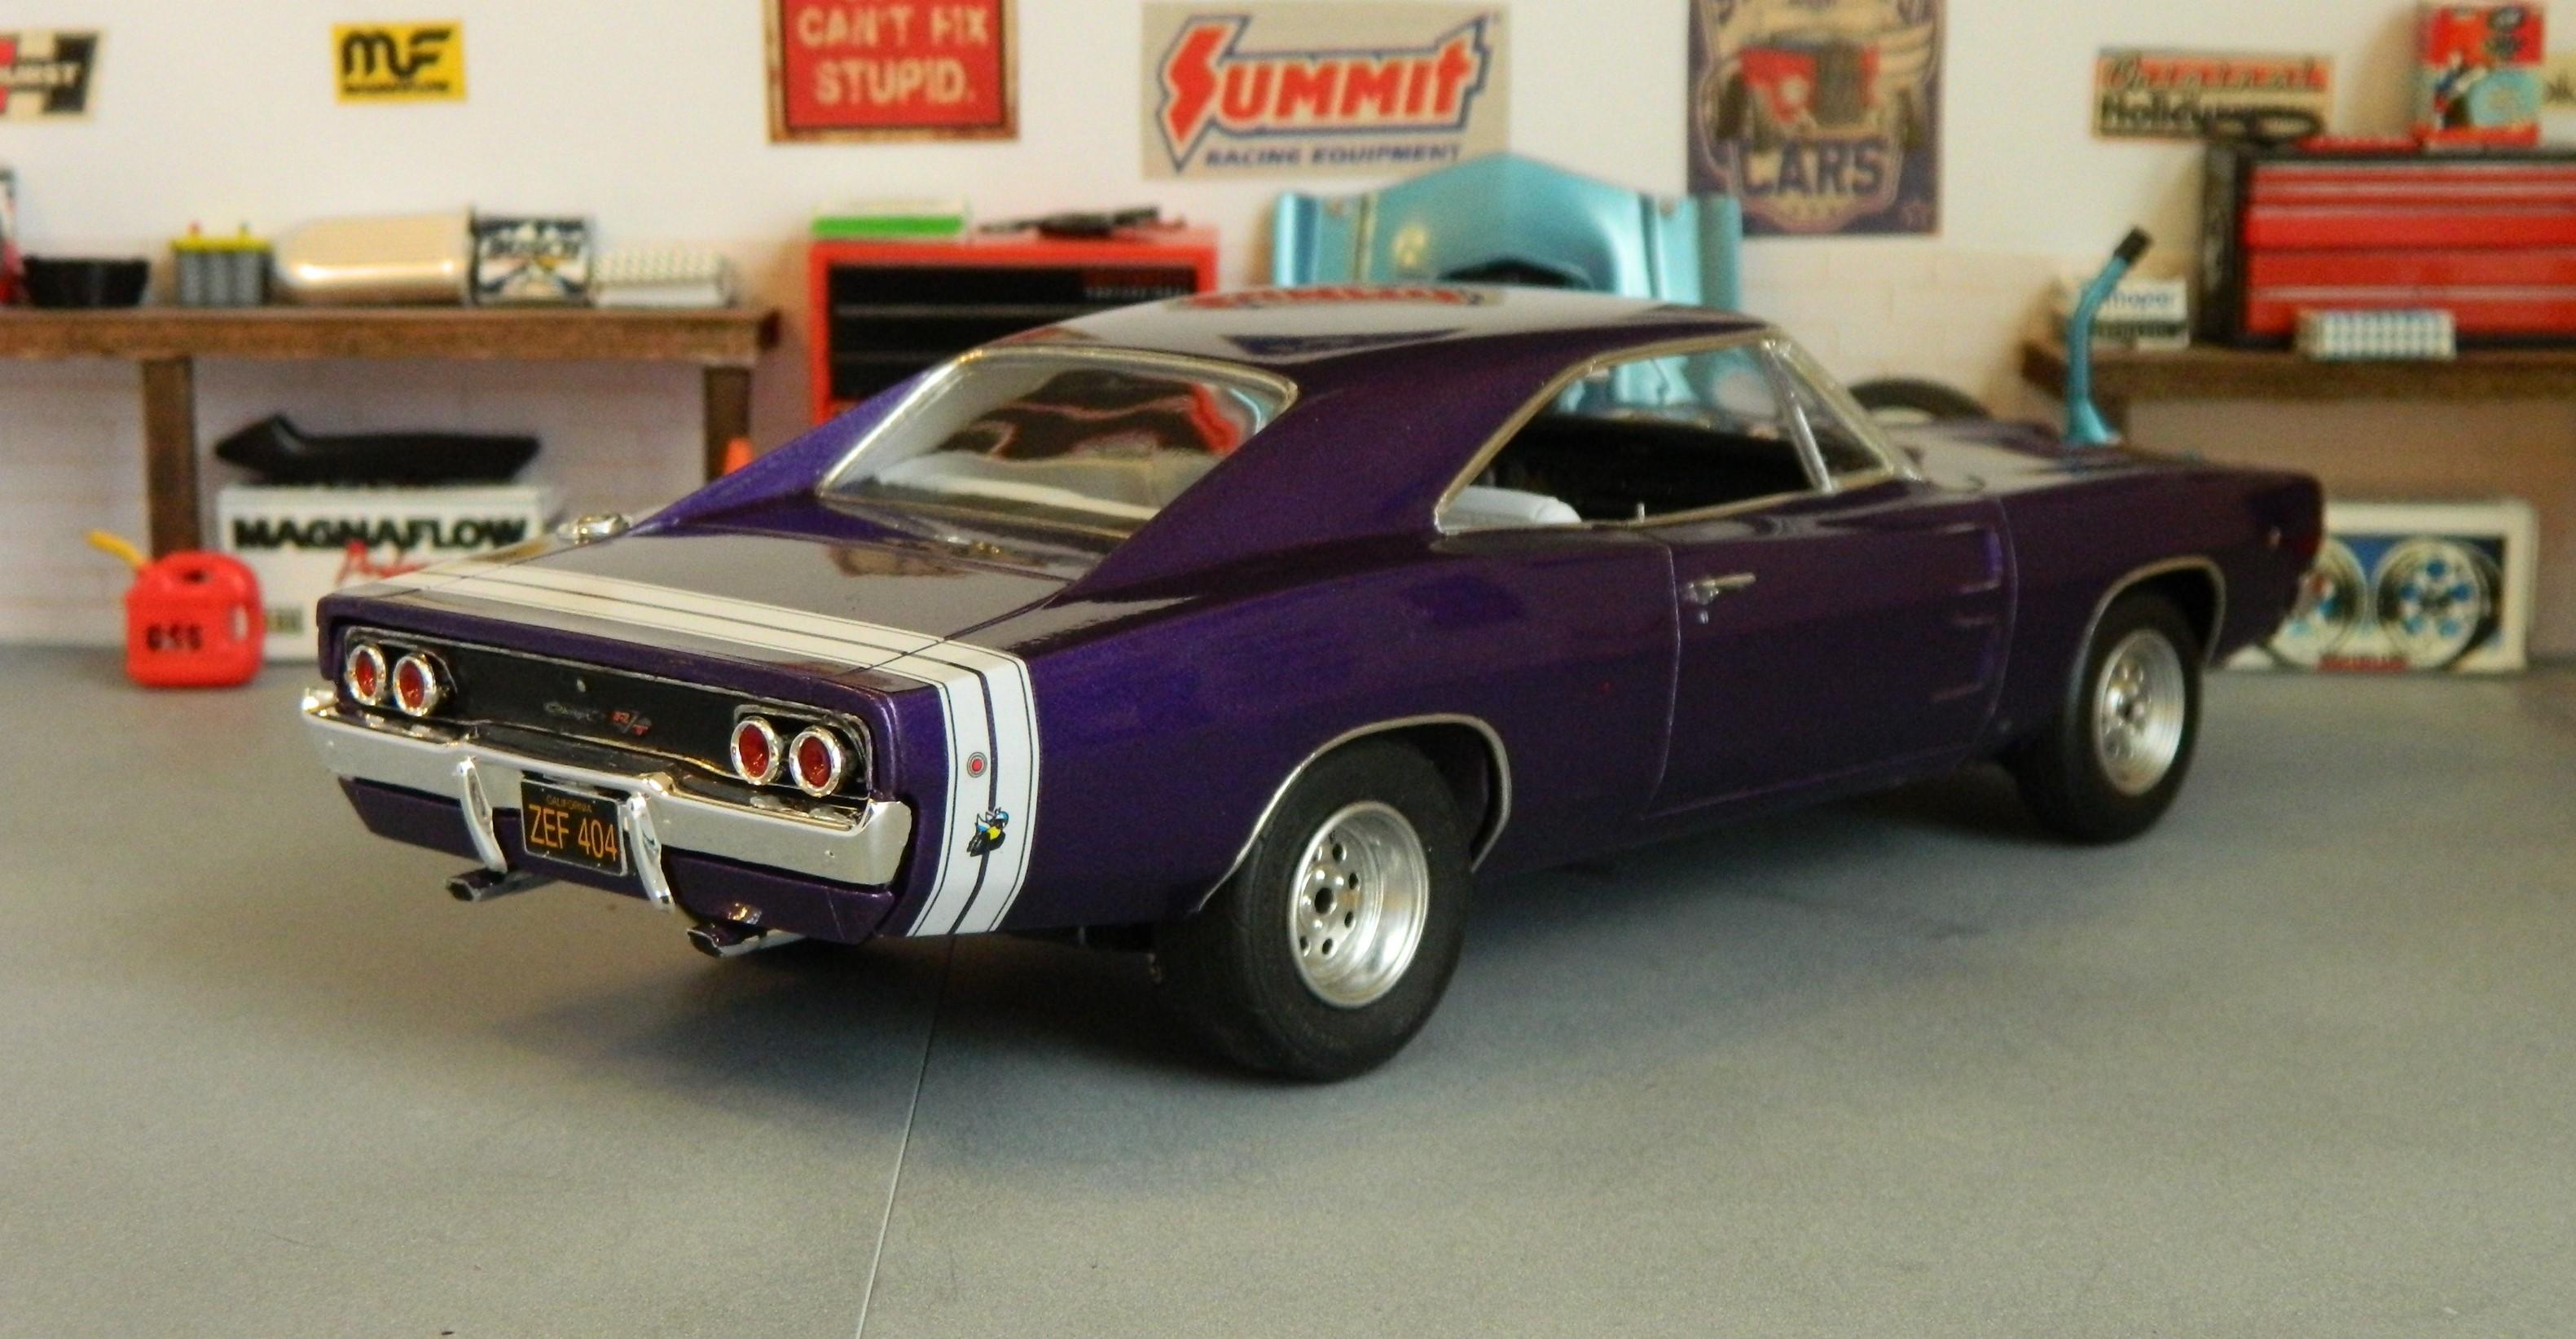
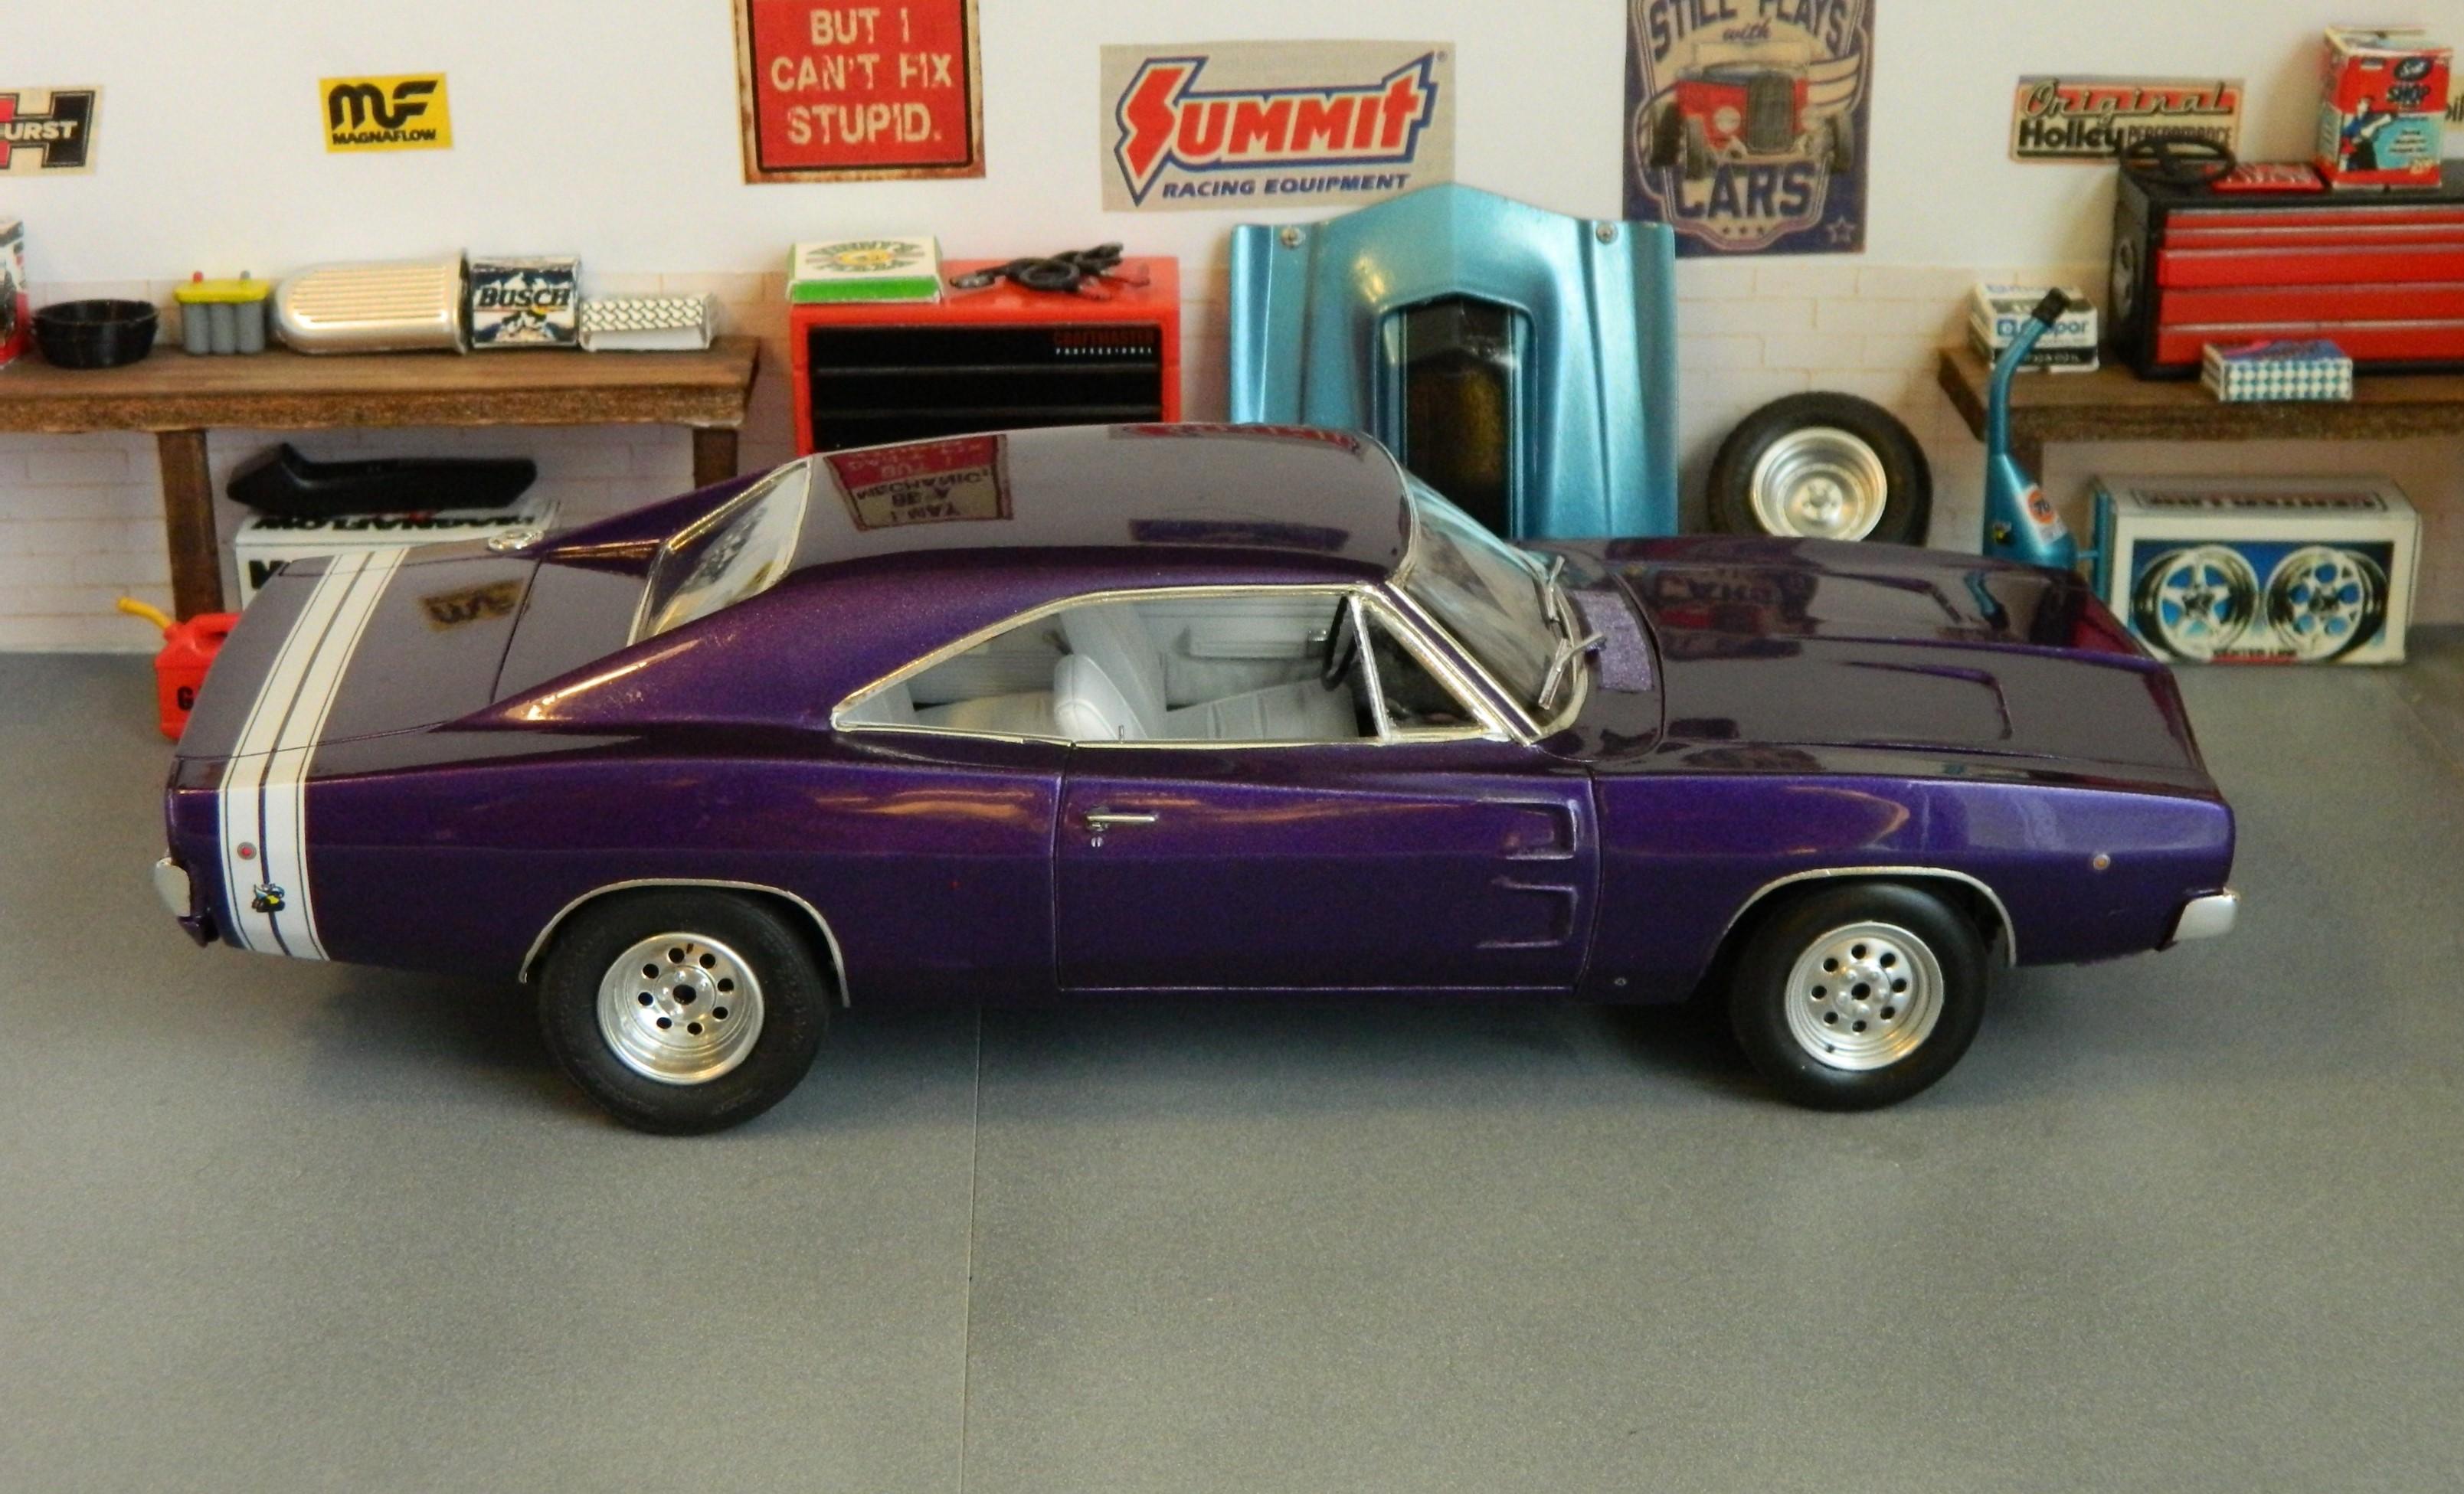
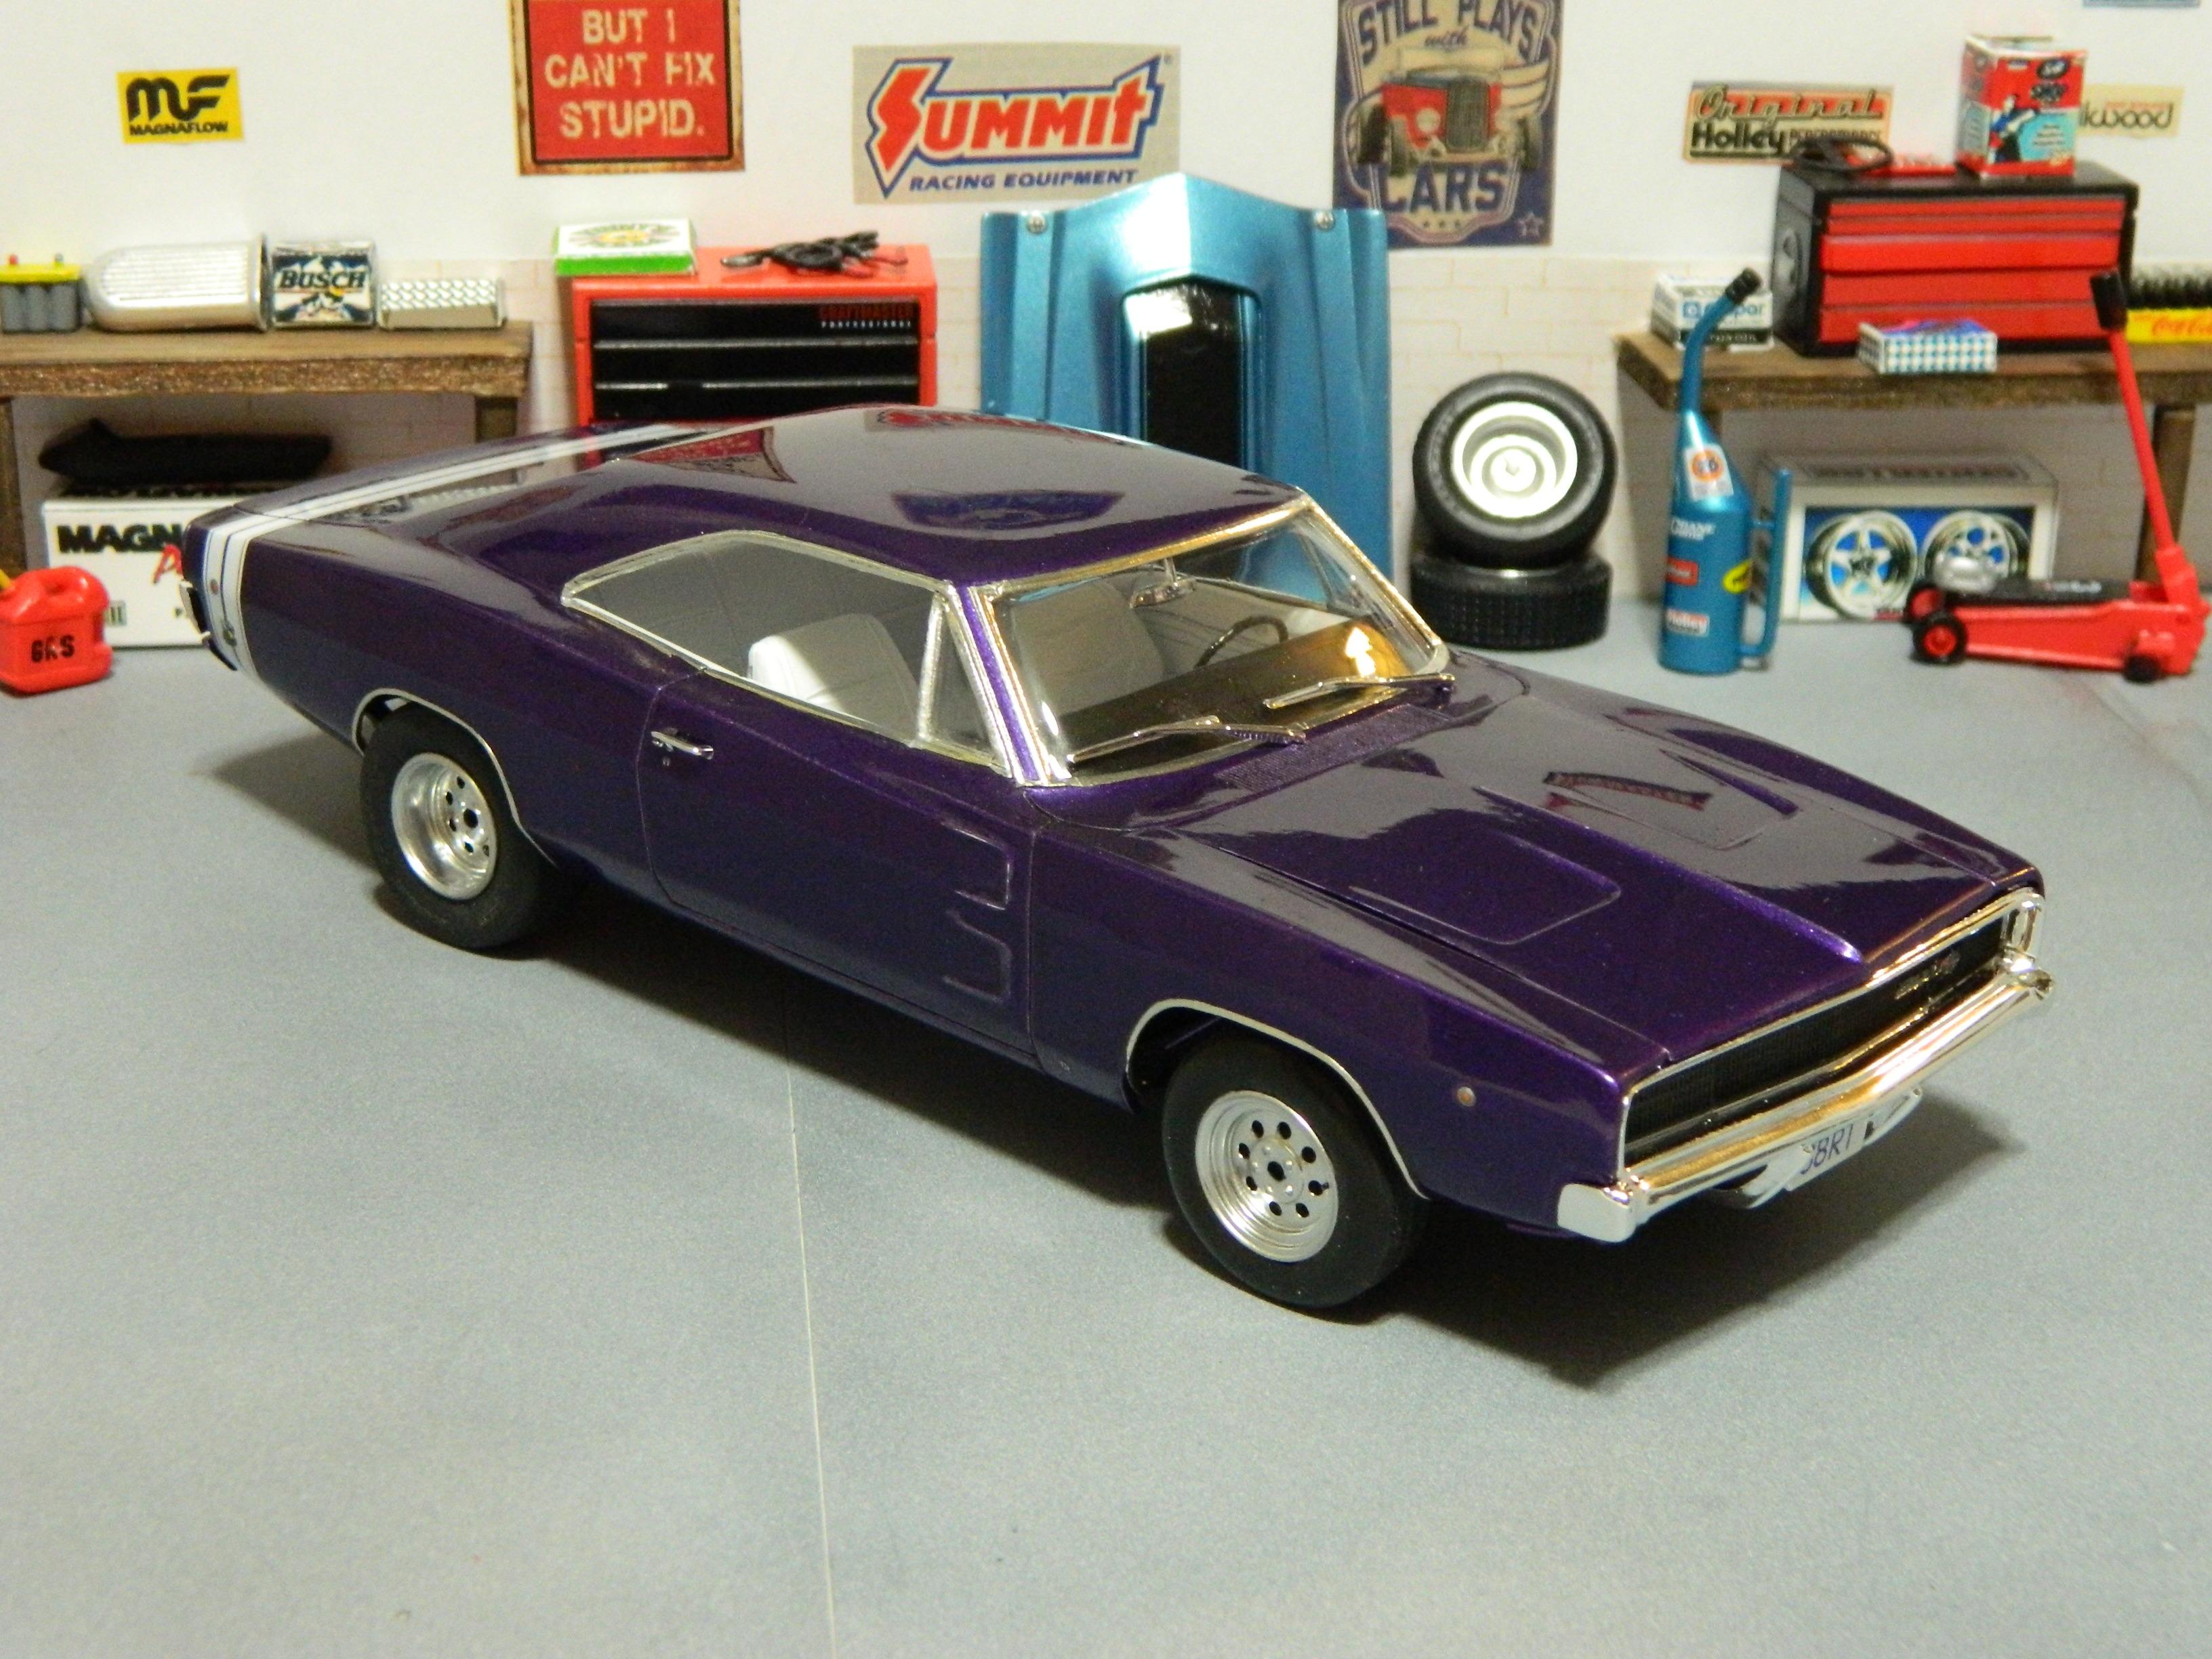
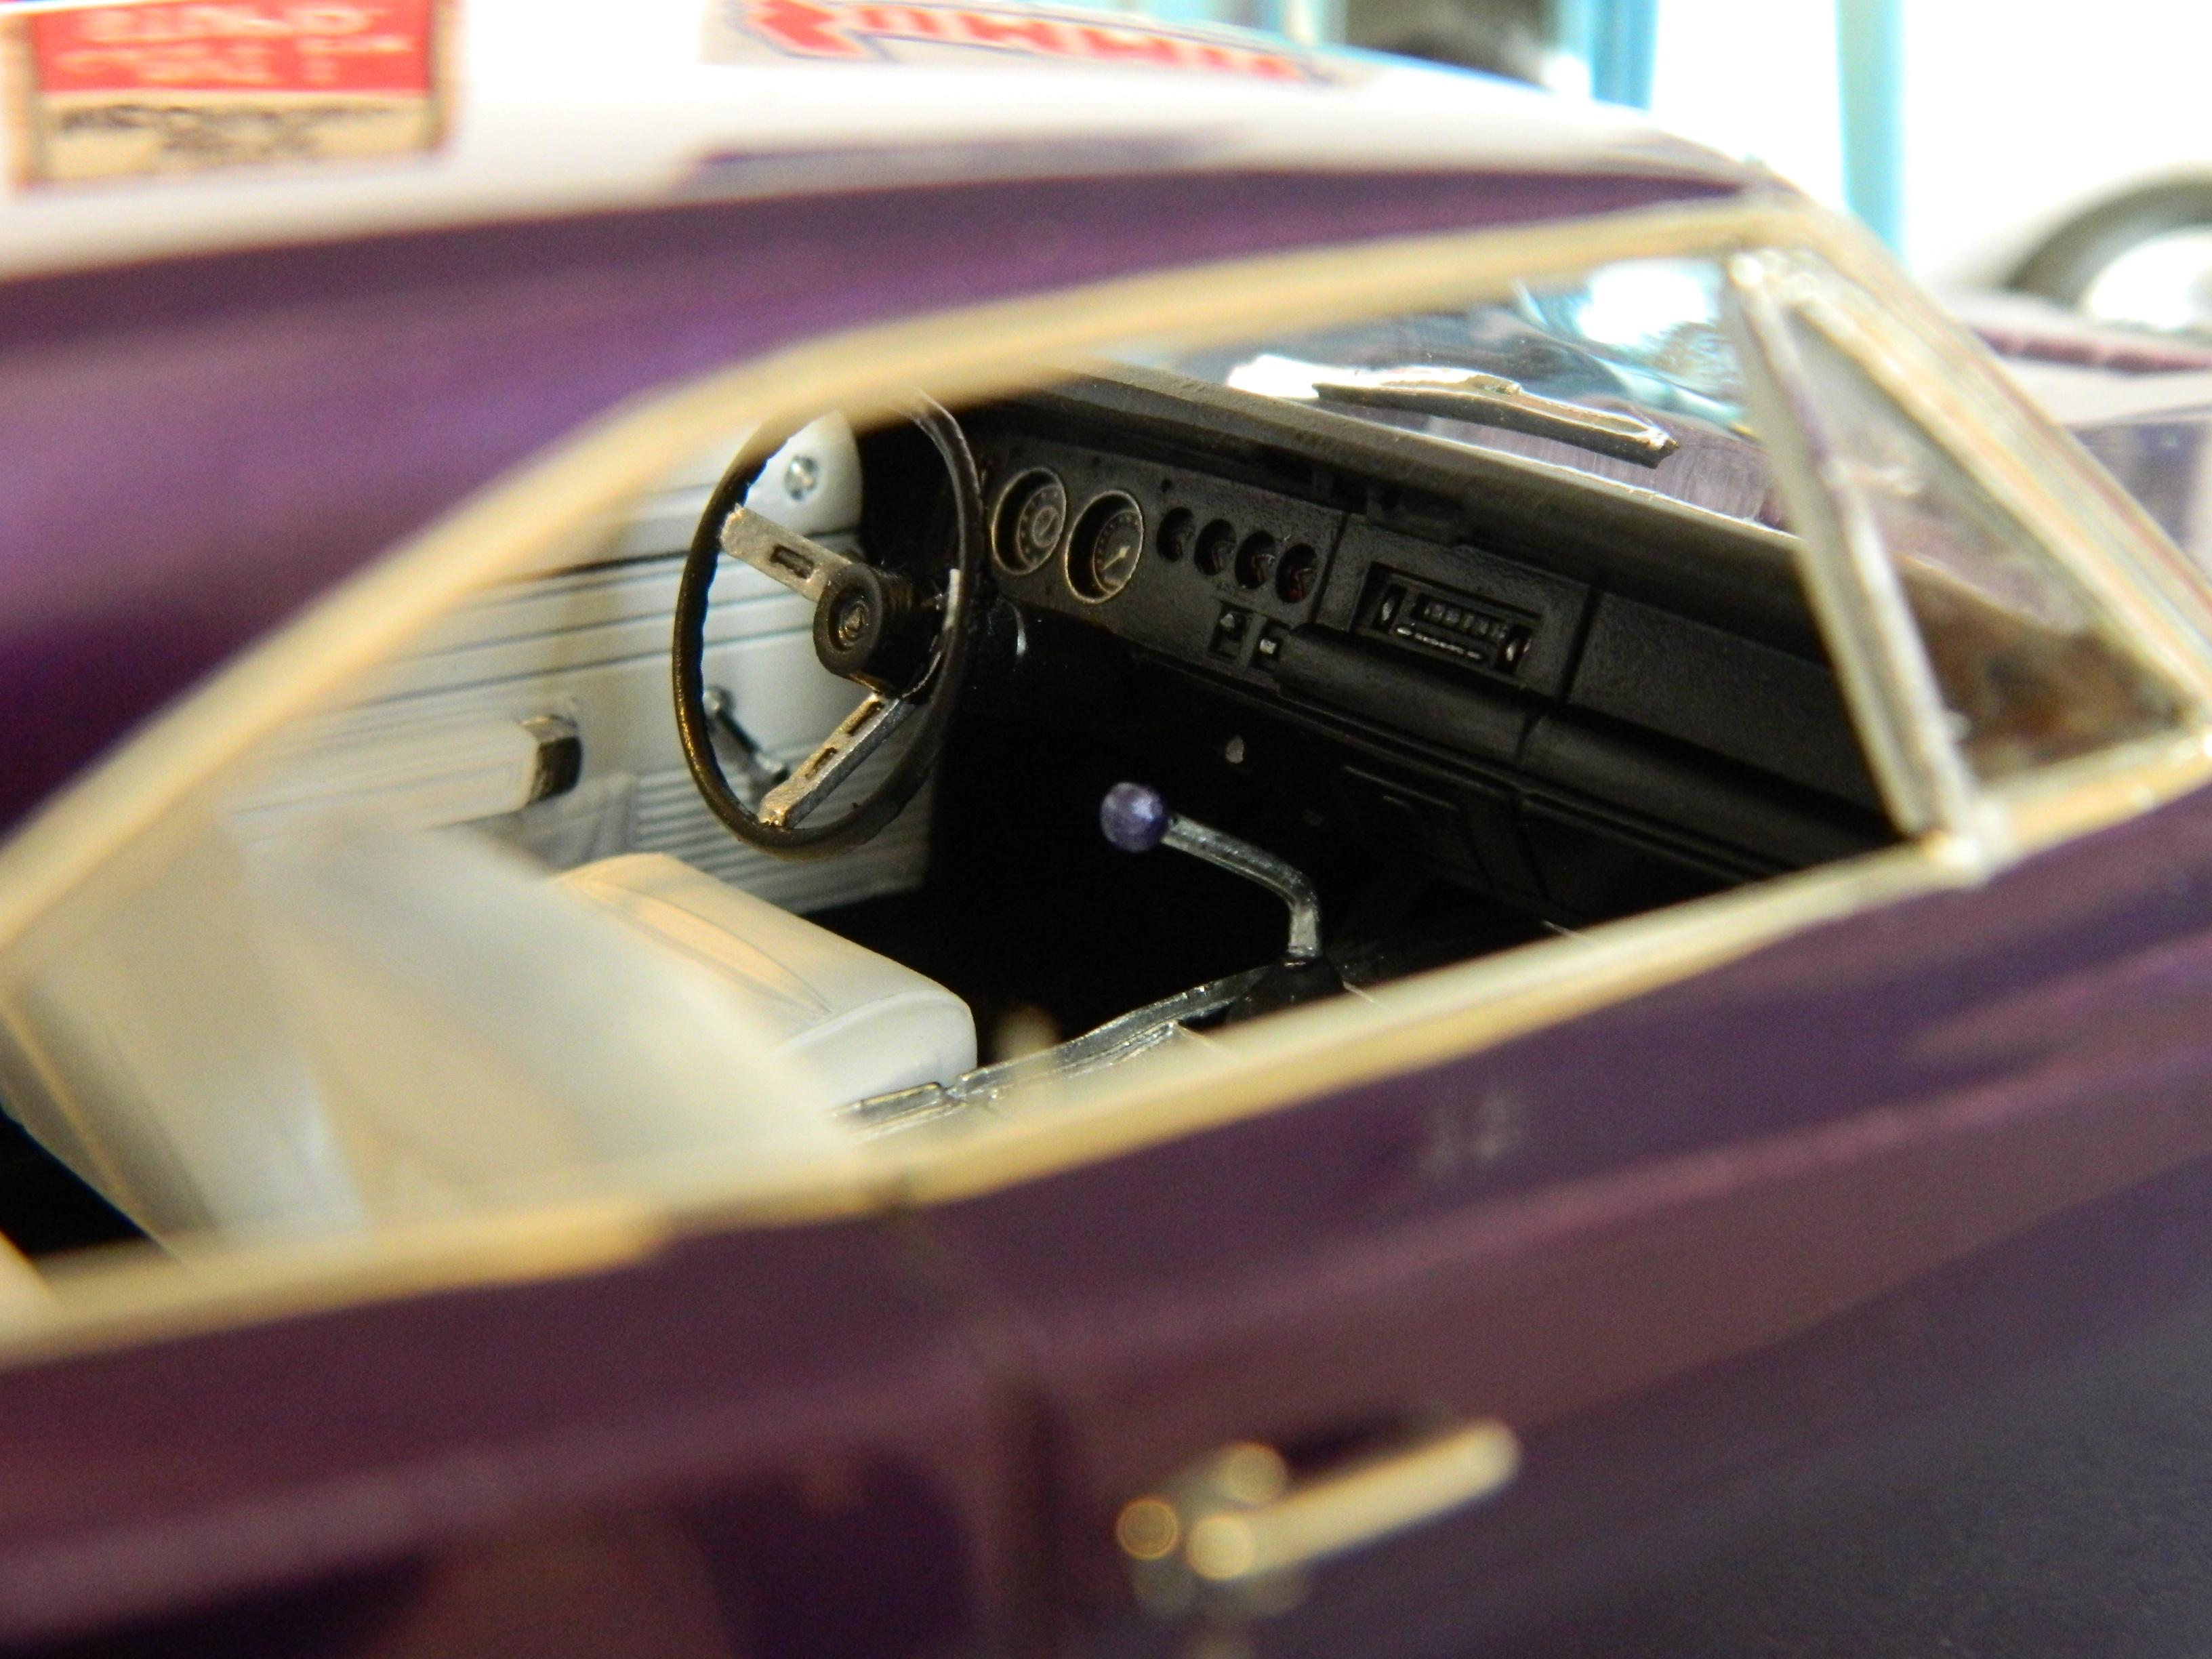
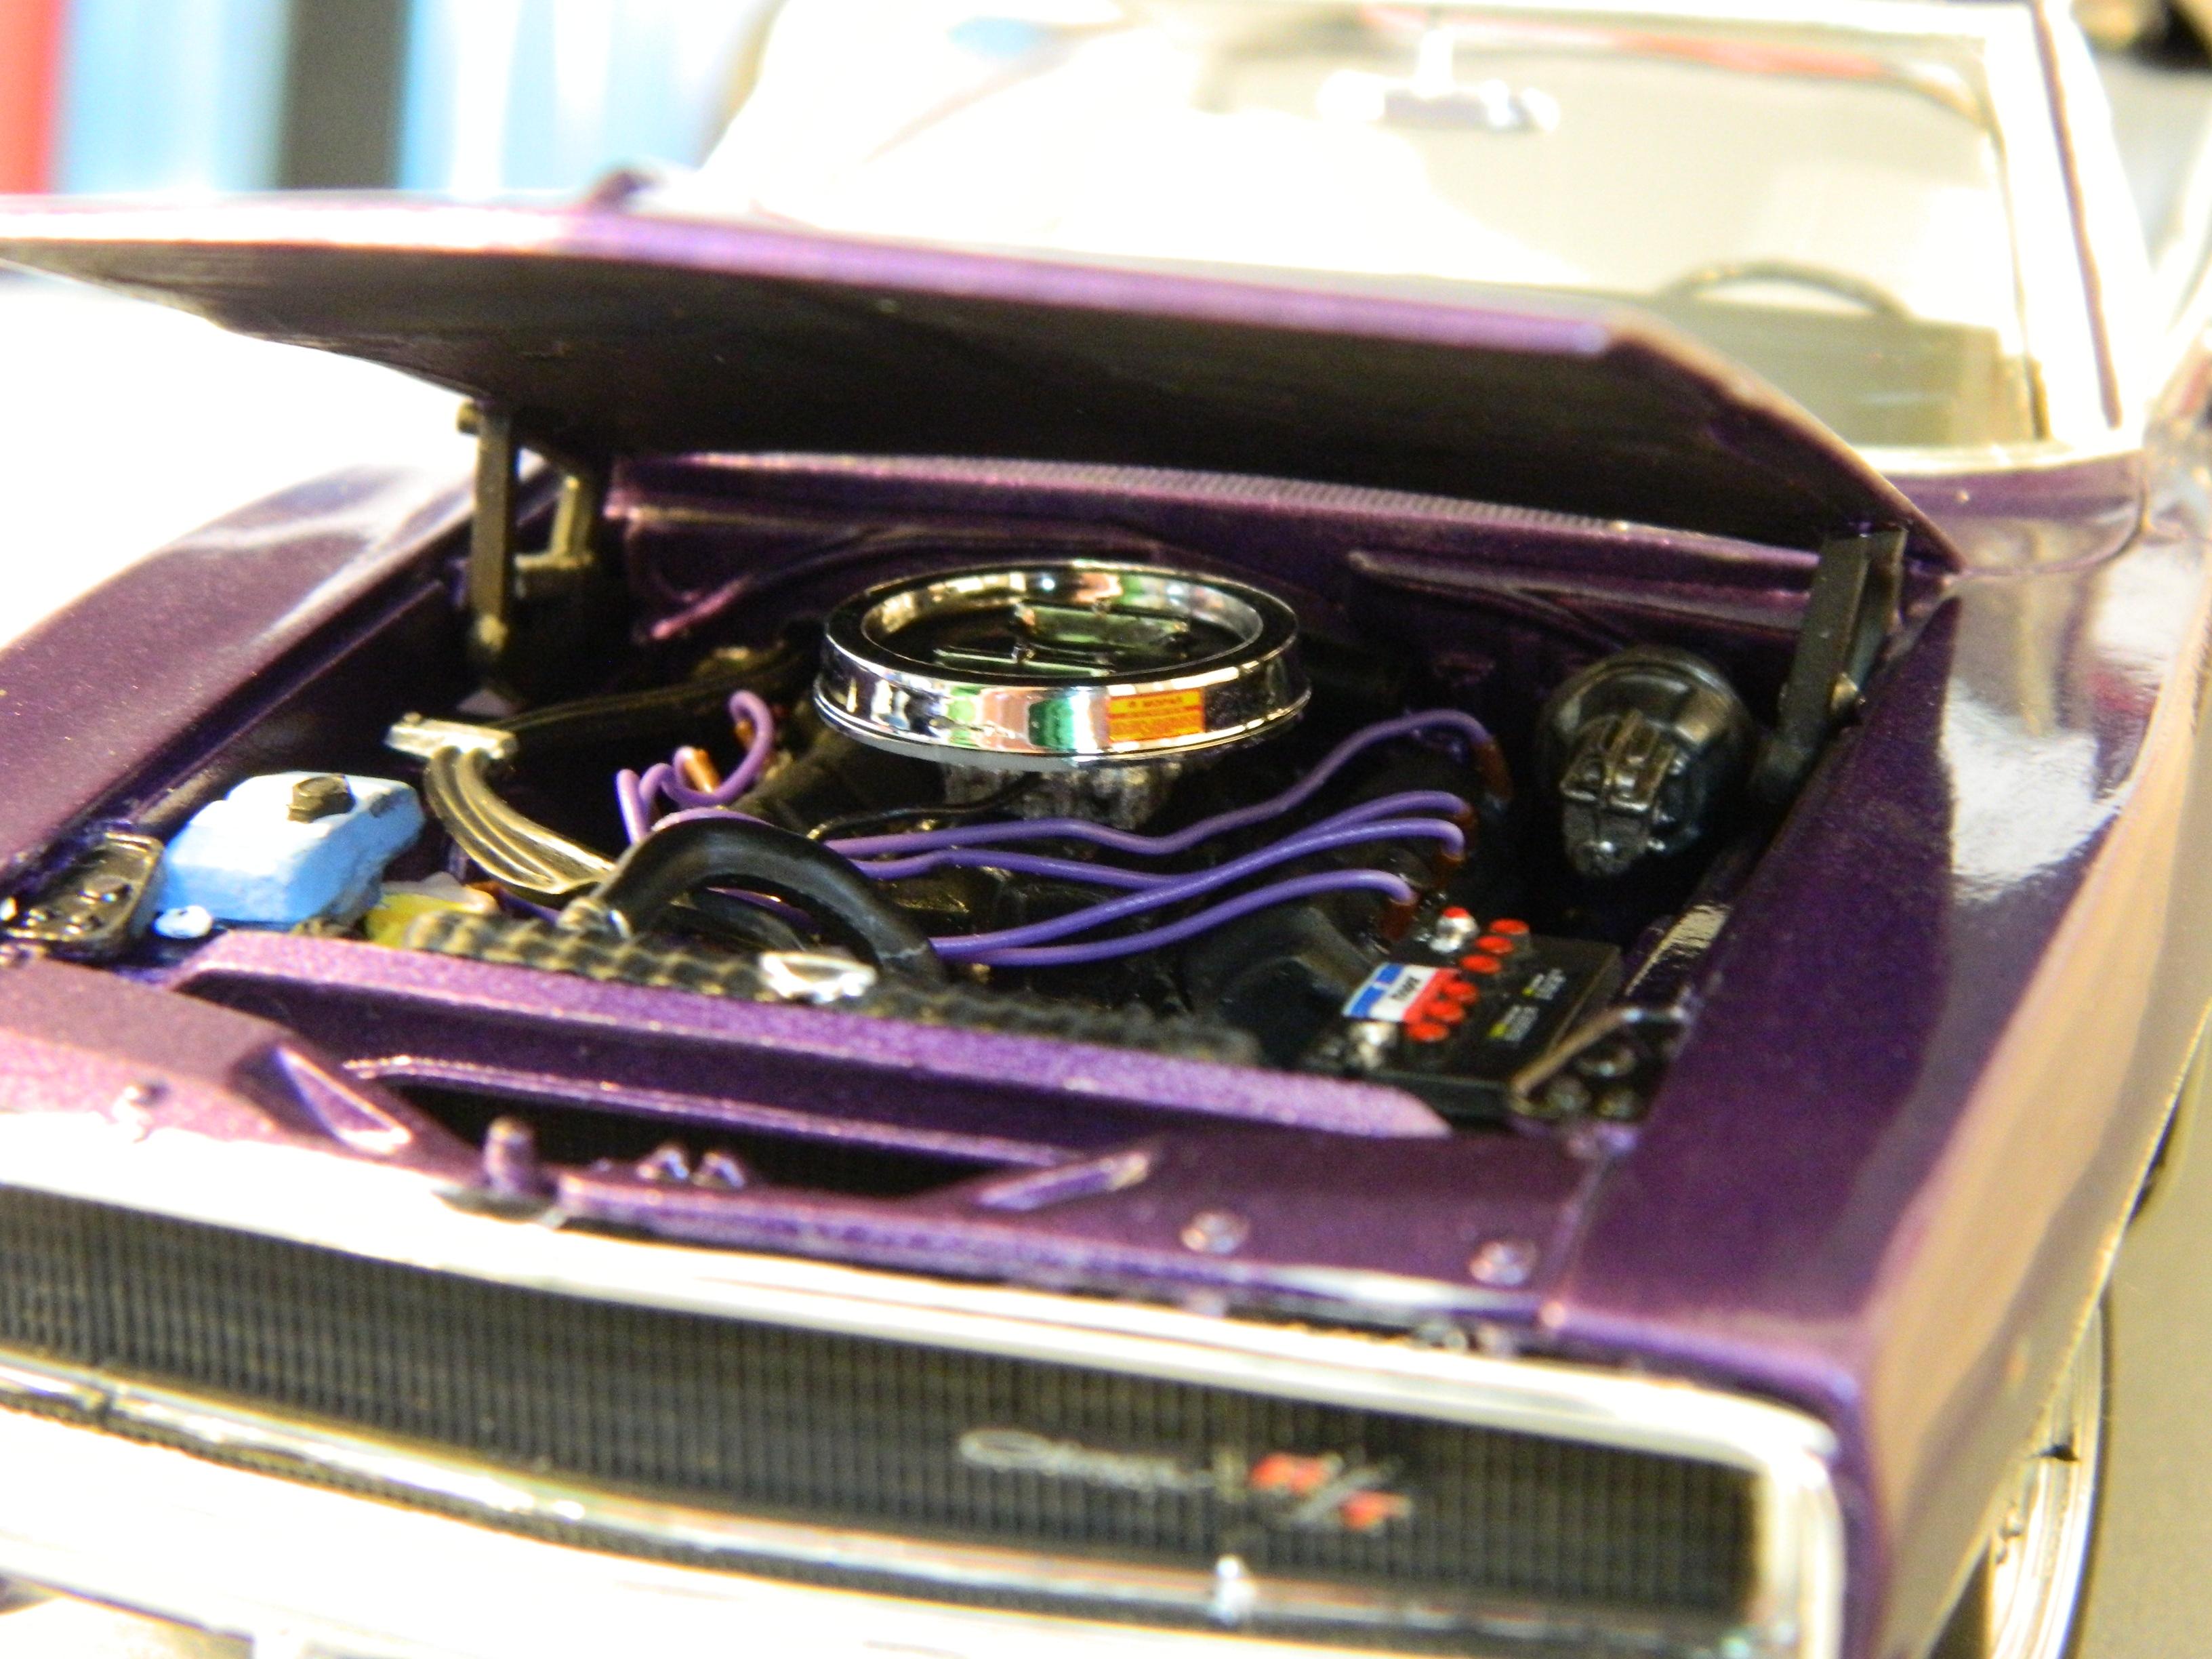
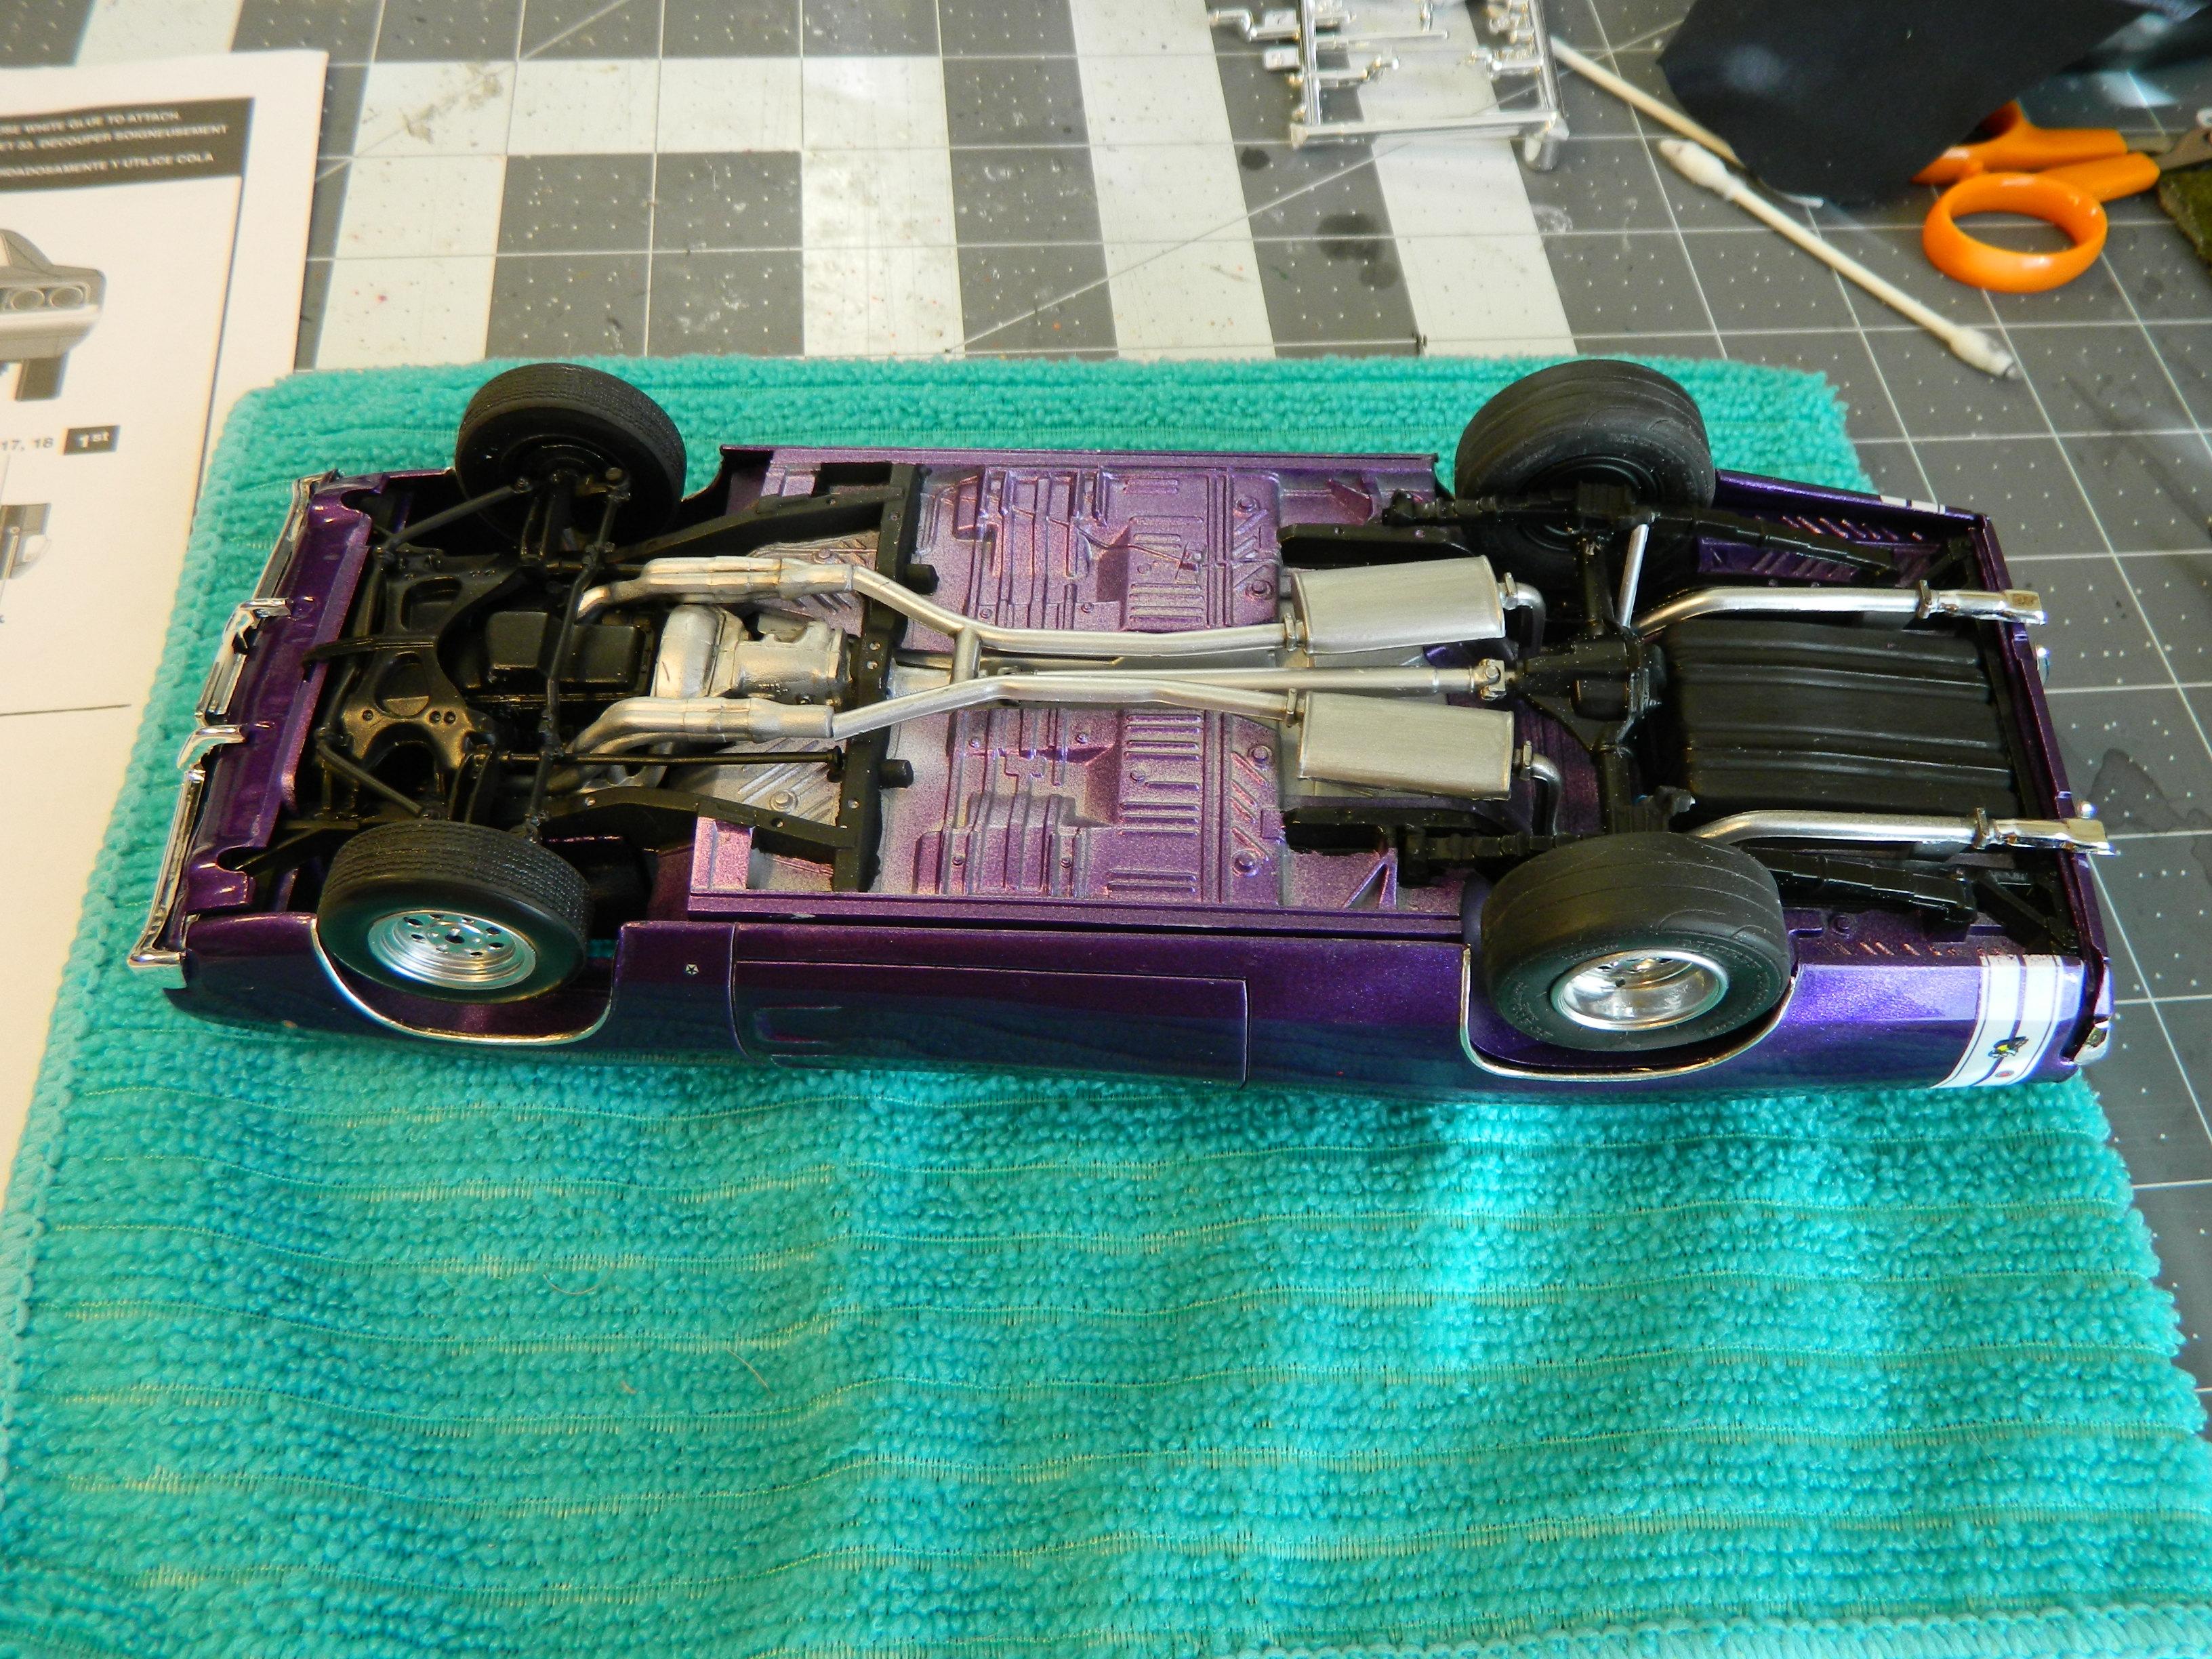
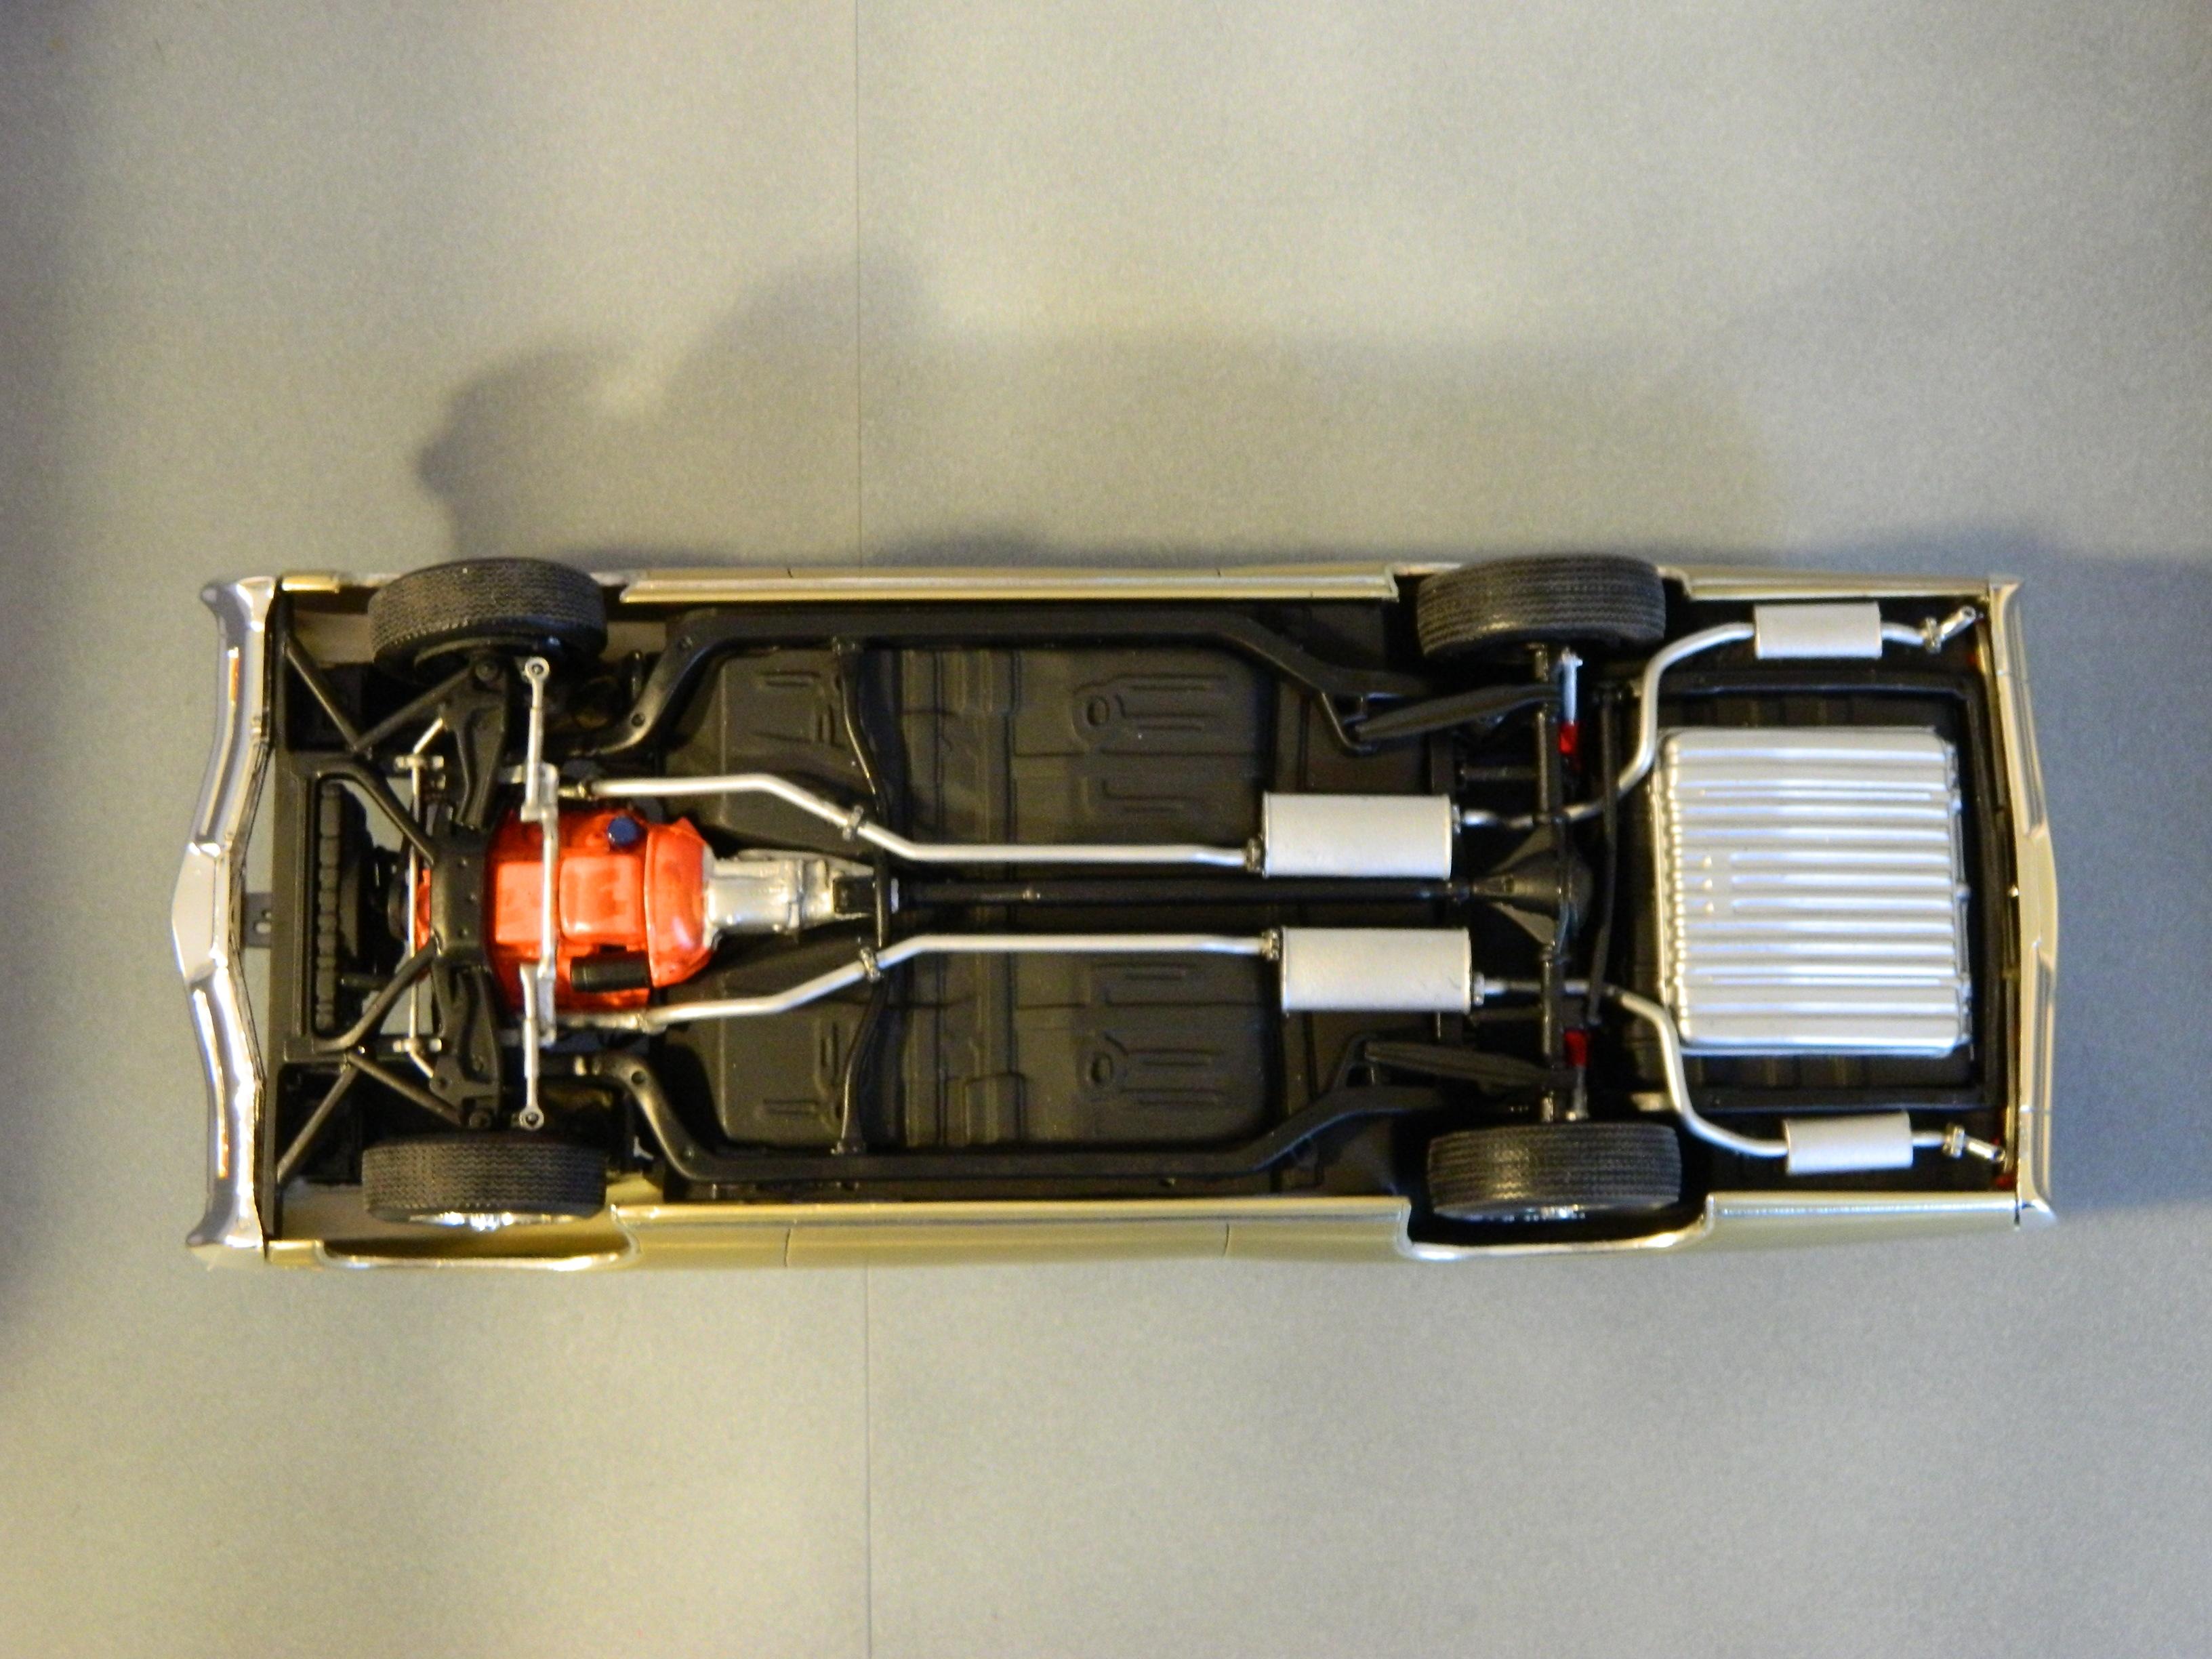
 I finished up the Revell 1968 Dodge Charger R/T yesterday. The paint is Model Master Plum Crazy Metallic Lacquer with Model Master Clear Gloss. The wheels were airbrushed with Molotow Chrome and are from Mad Modeling, while the front tires are from the kit, and the rears from Fireball Modelworks. The interior is a combination of Apple Barrel Gloss White for the seats and door panels, Stynylrez White Primer for the headliner, Stynylrez Black Primer for the carpet and rear shelf, and Apple Barrel Gloss Black for the dash. I used the optional 426 Hemi and cut and bent the exhaust to mate with the headers. I used BMF for the window and fender trim, and hand painted Molotow for the taillight panel trim. I added valve stems, door locks, and ignition wires for extra detail. This is an excellent kit with lots of extra parts, including an engine stand, to build the stock, custom, or drag version. I can definitely see myself grabbing another 1 or 2 of these in the future. Thanks for looking!
- 28 replies
-
- 3
-
-
- revell
- charger r/t
- (and 1 more)
-
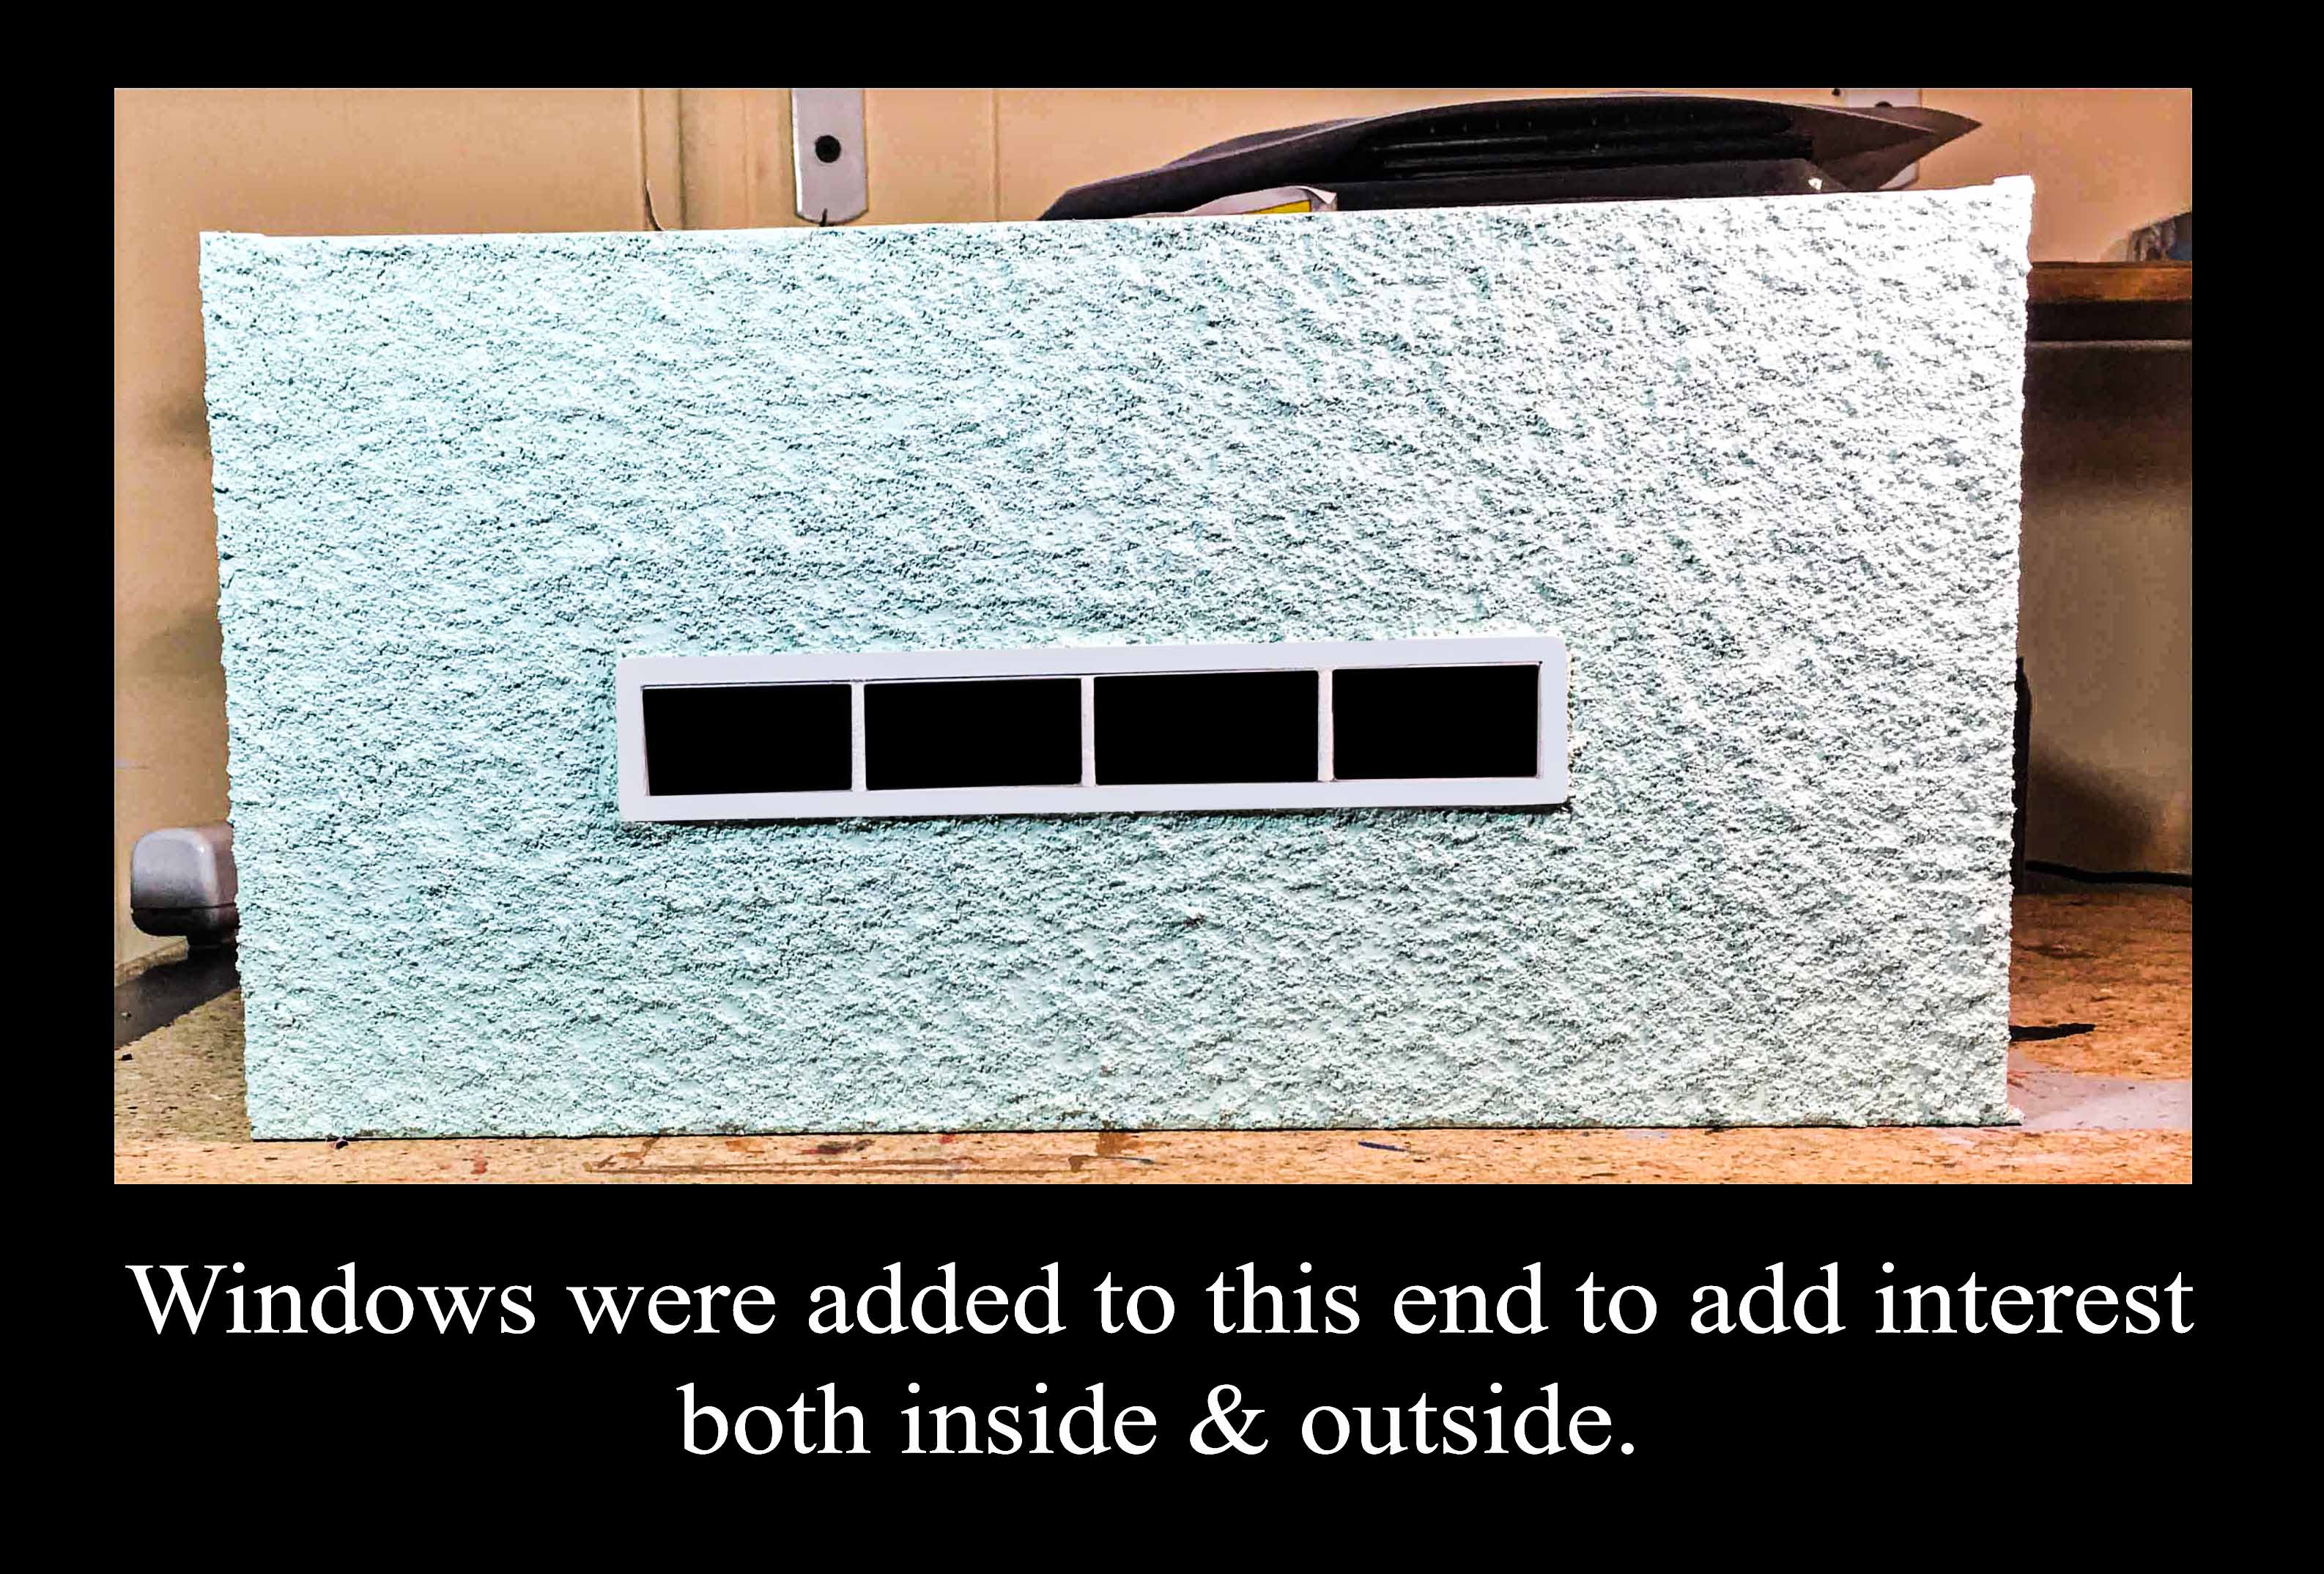
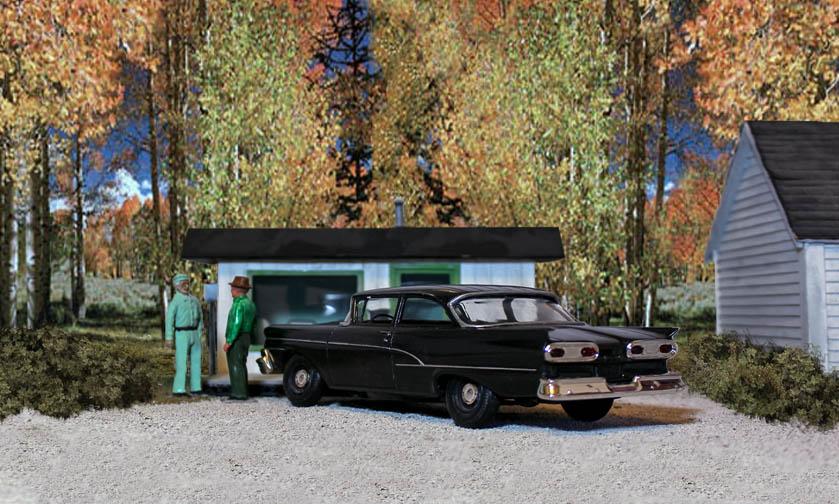
This is what I call a photo diorama, as it's purpose is to be able to photograph different models, generally for publication. The scale on this is 1/25 with the size being 12 inches X 12inches footprint and 7 inches in height.
- 5 replies
-
- 1
-
-
- garage diorama
- diorama
- (and 1 more)
-
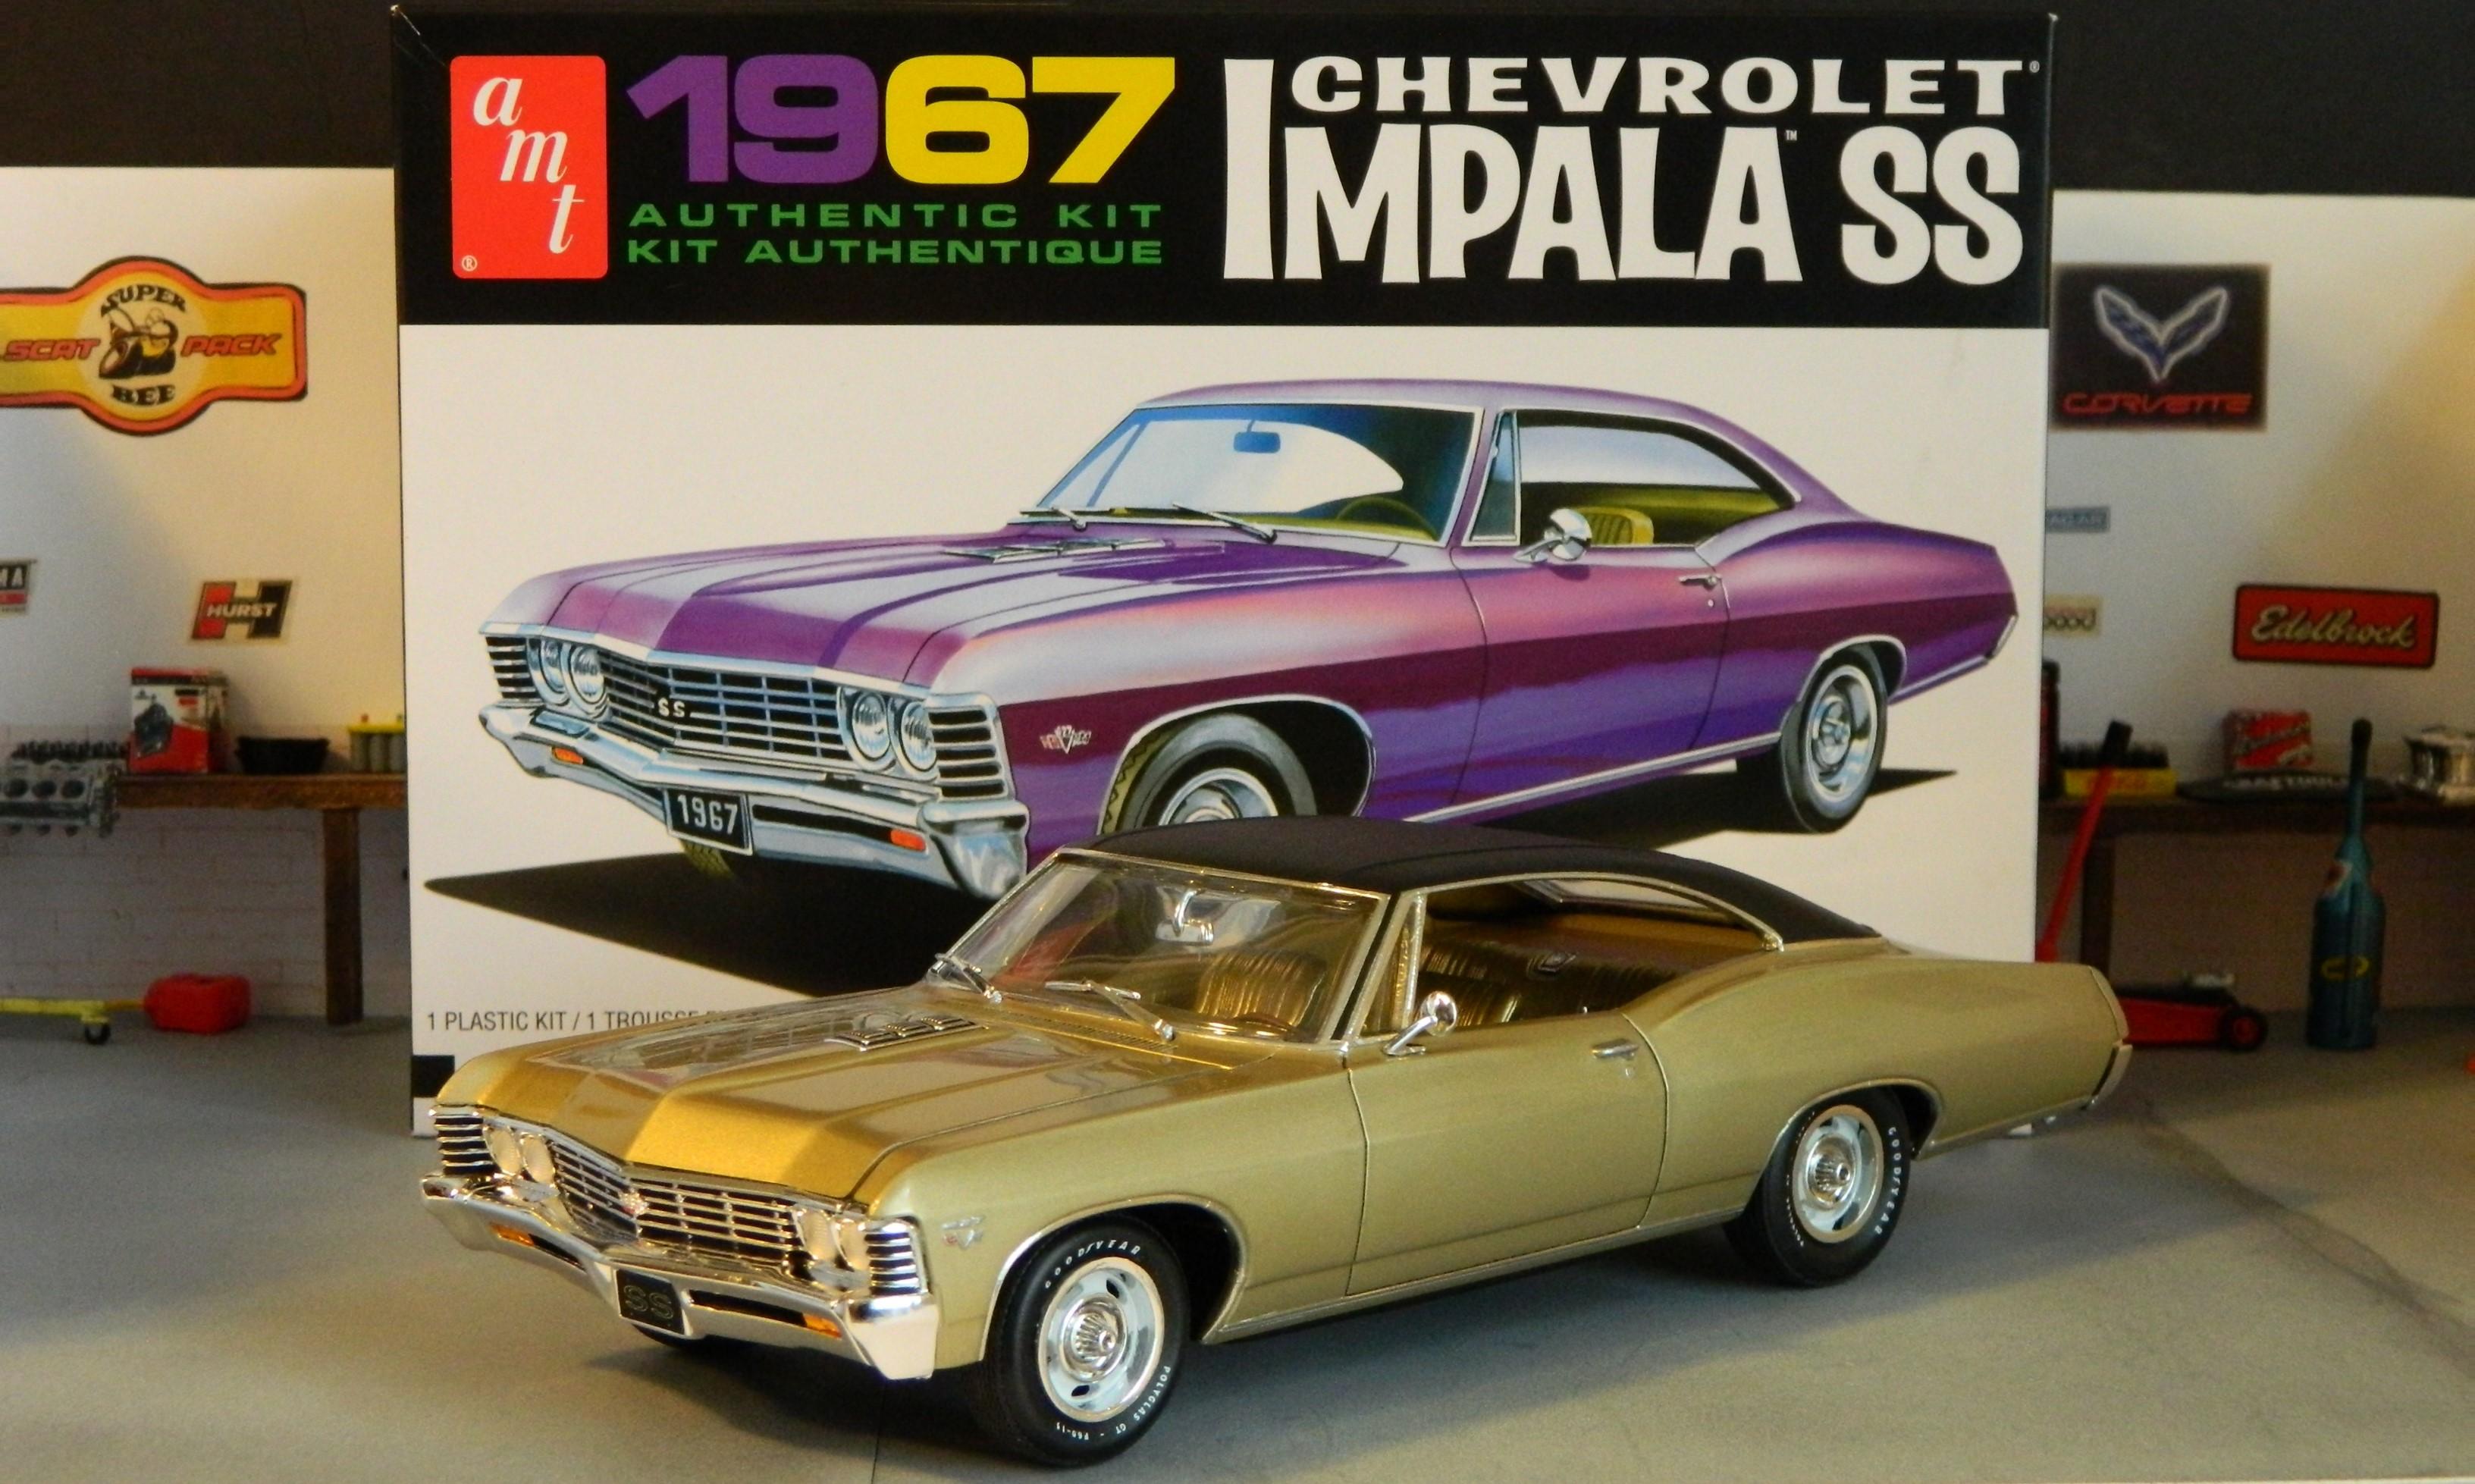
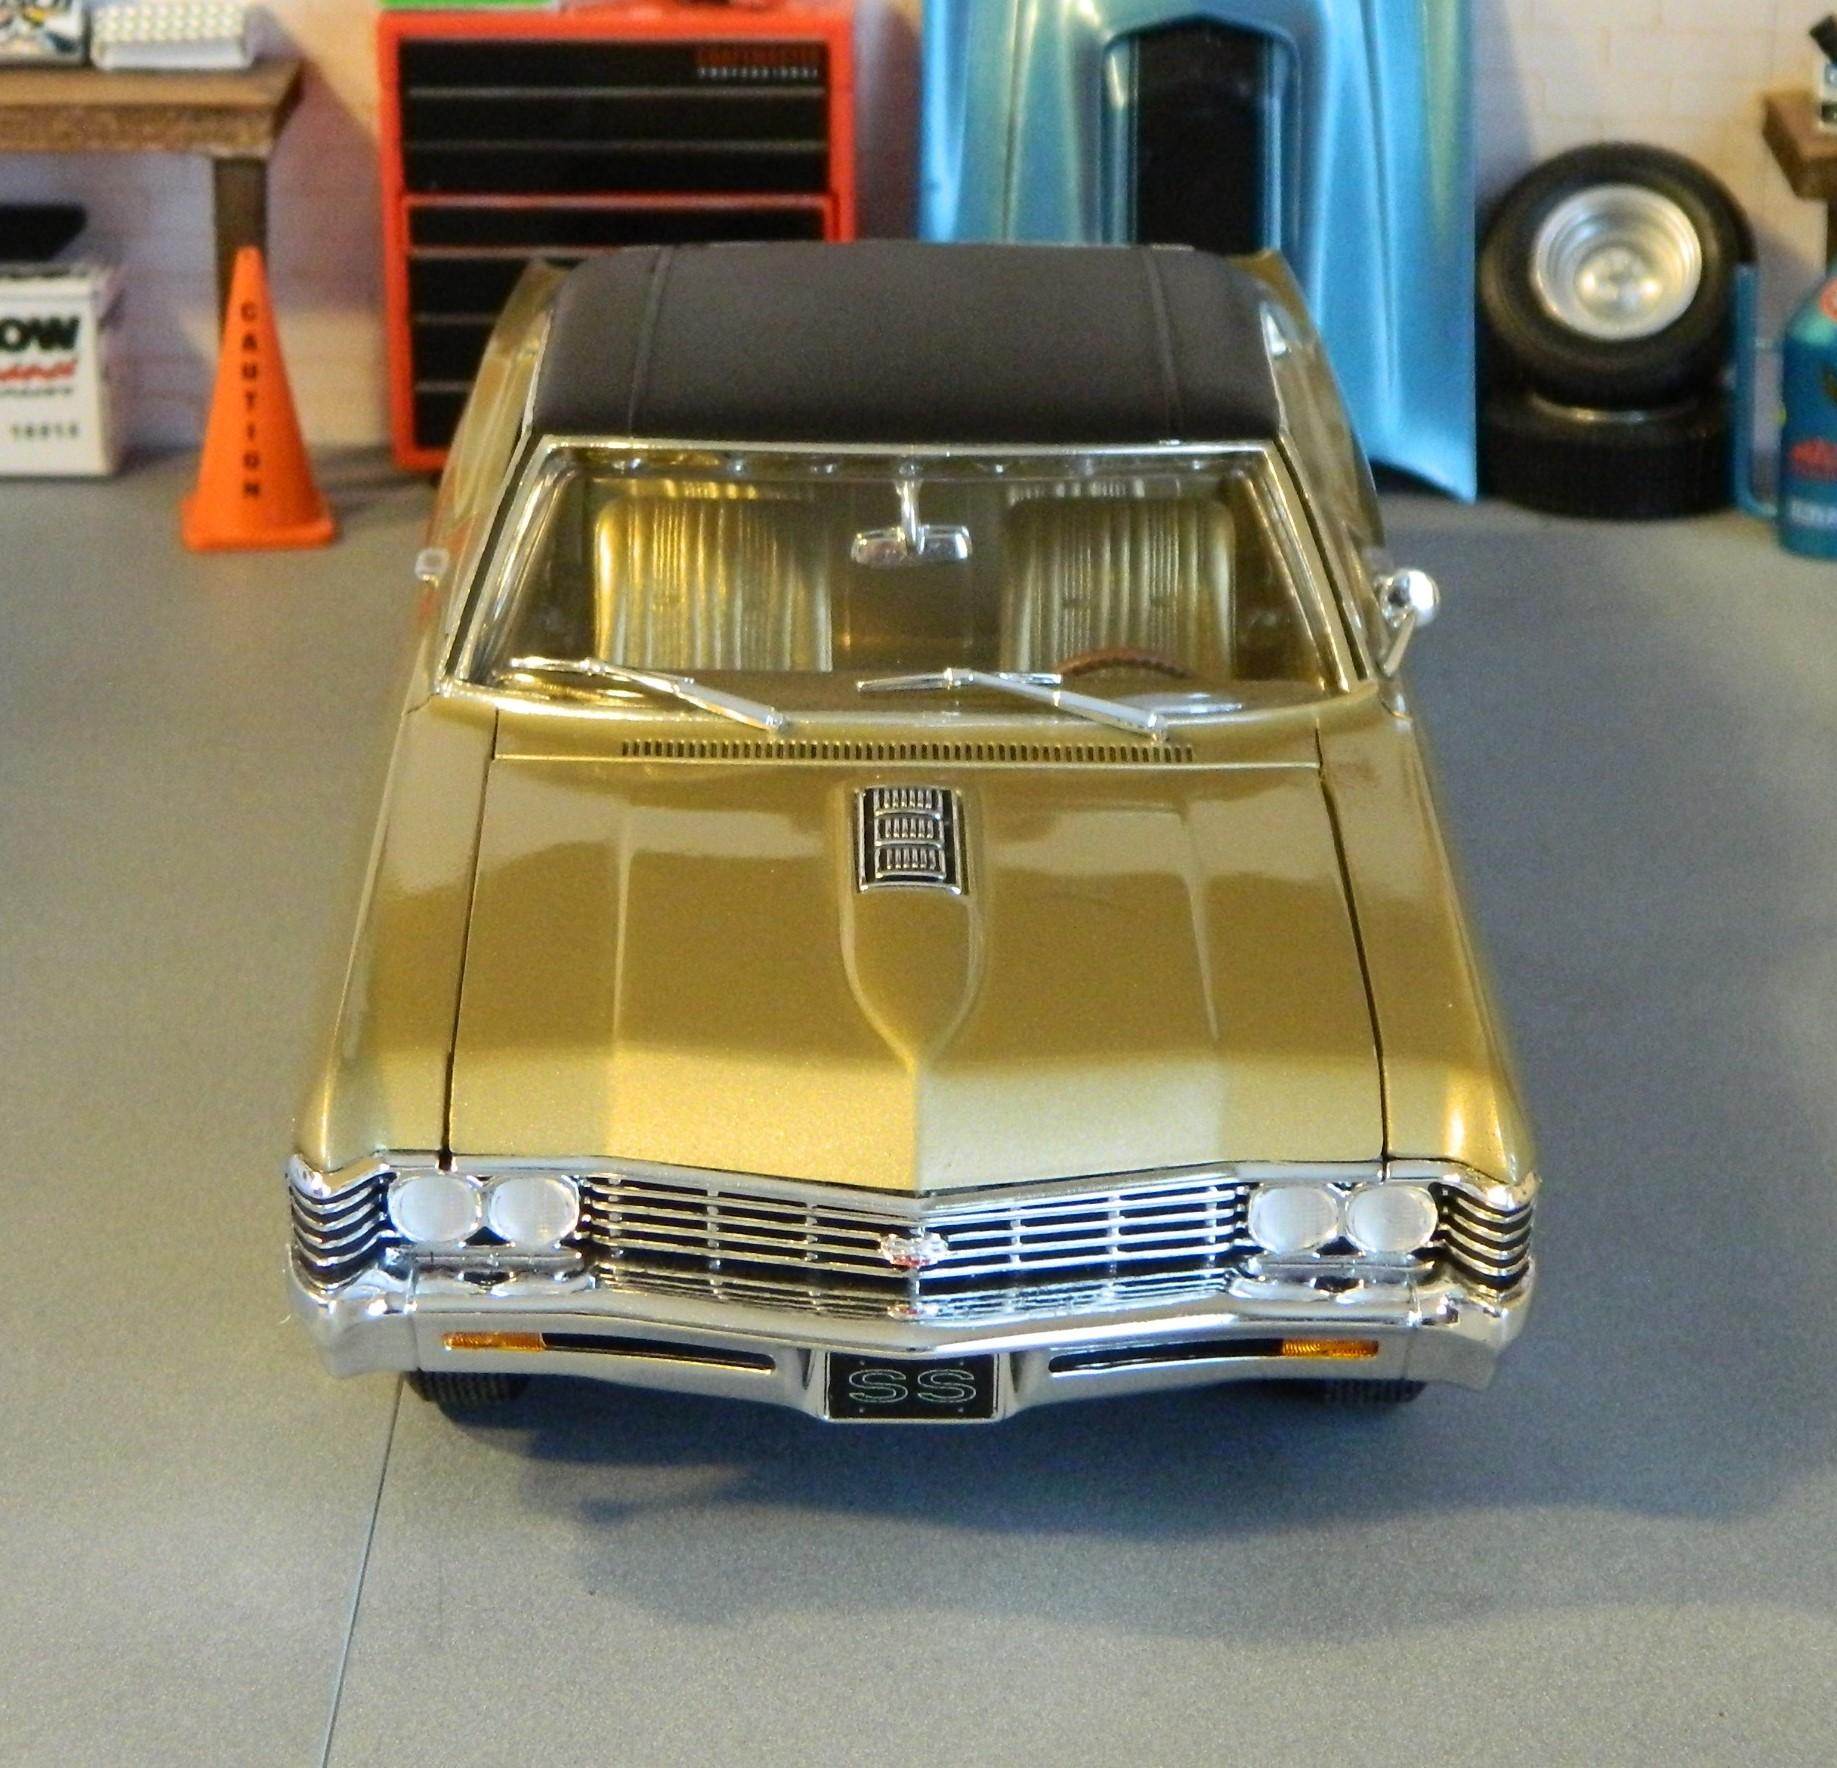
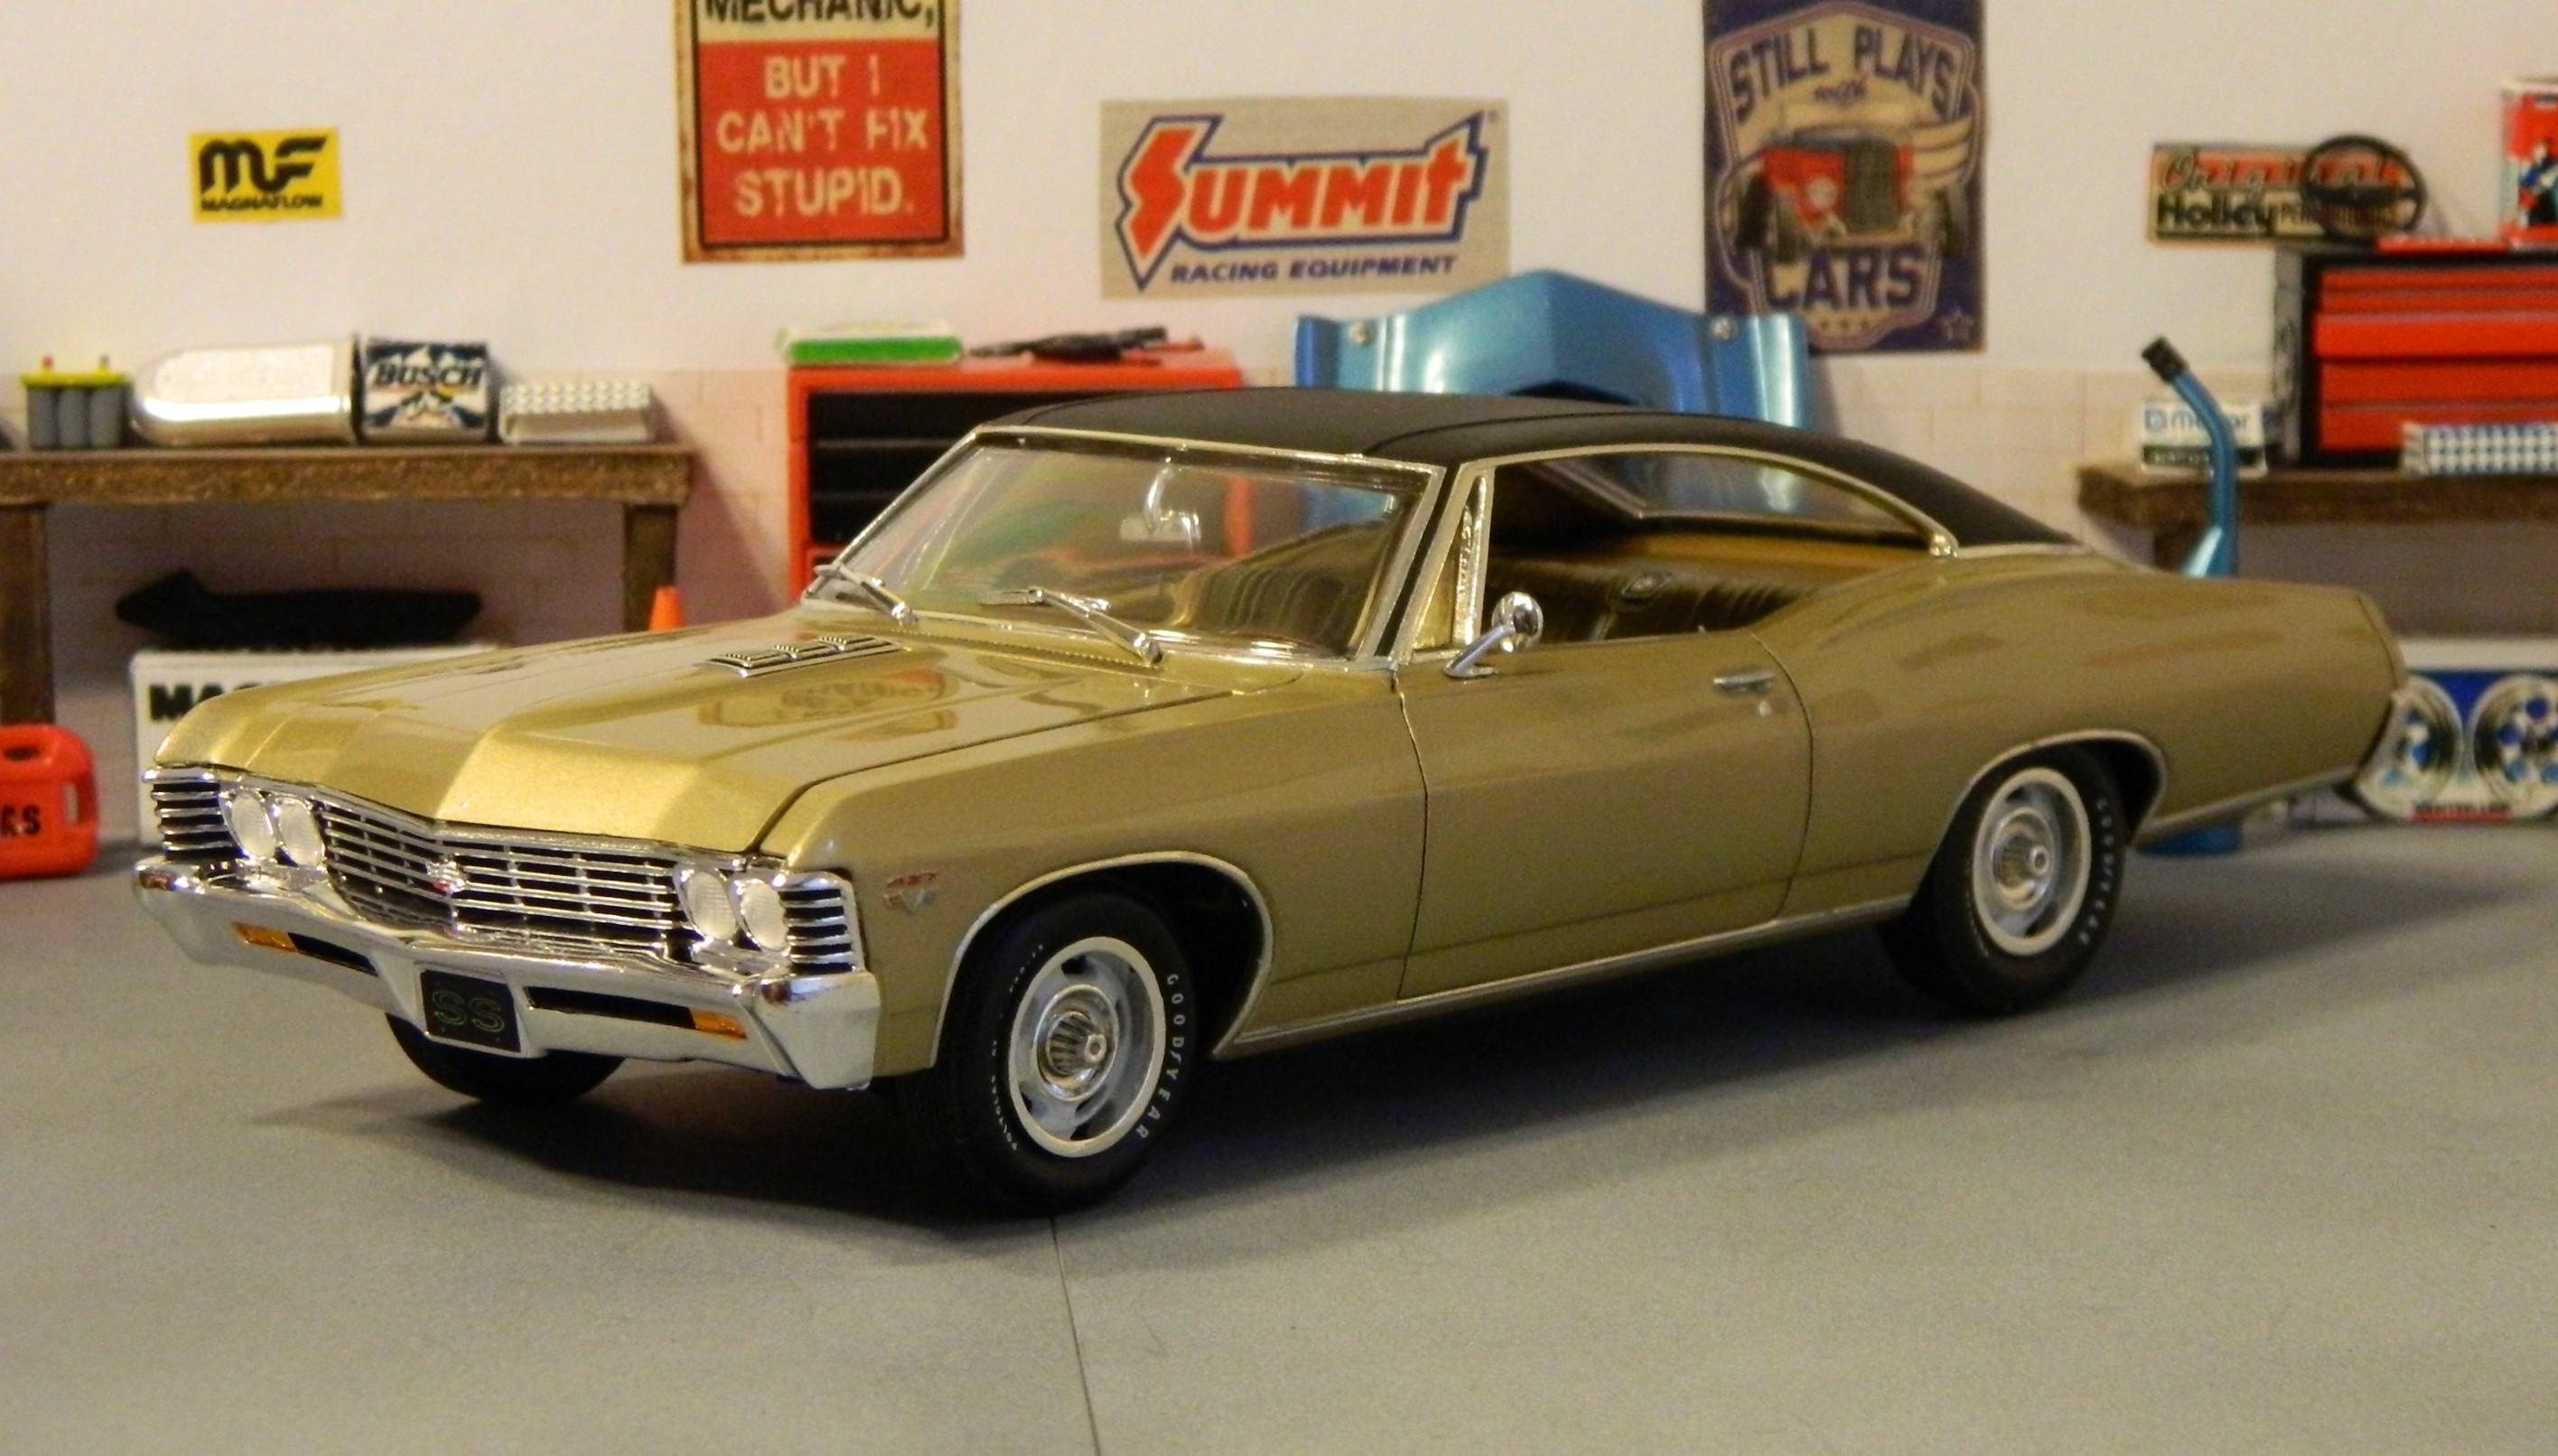
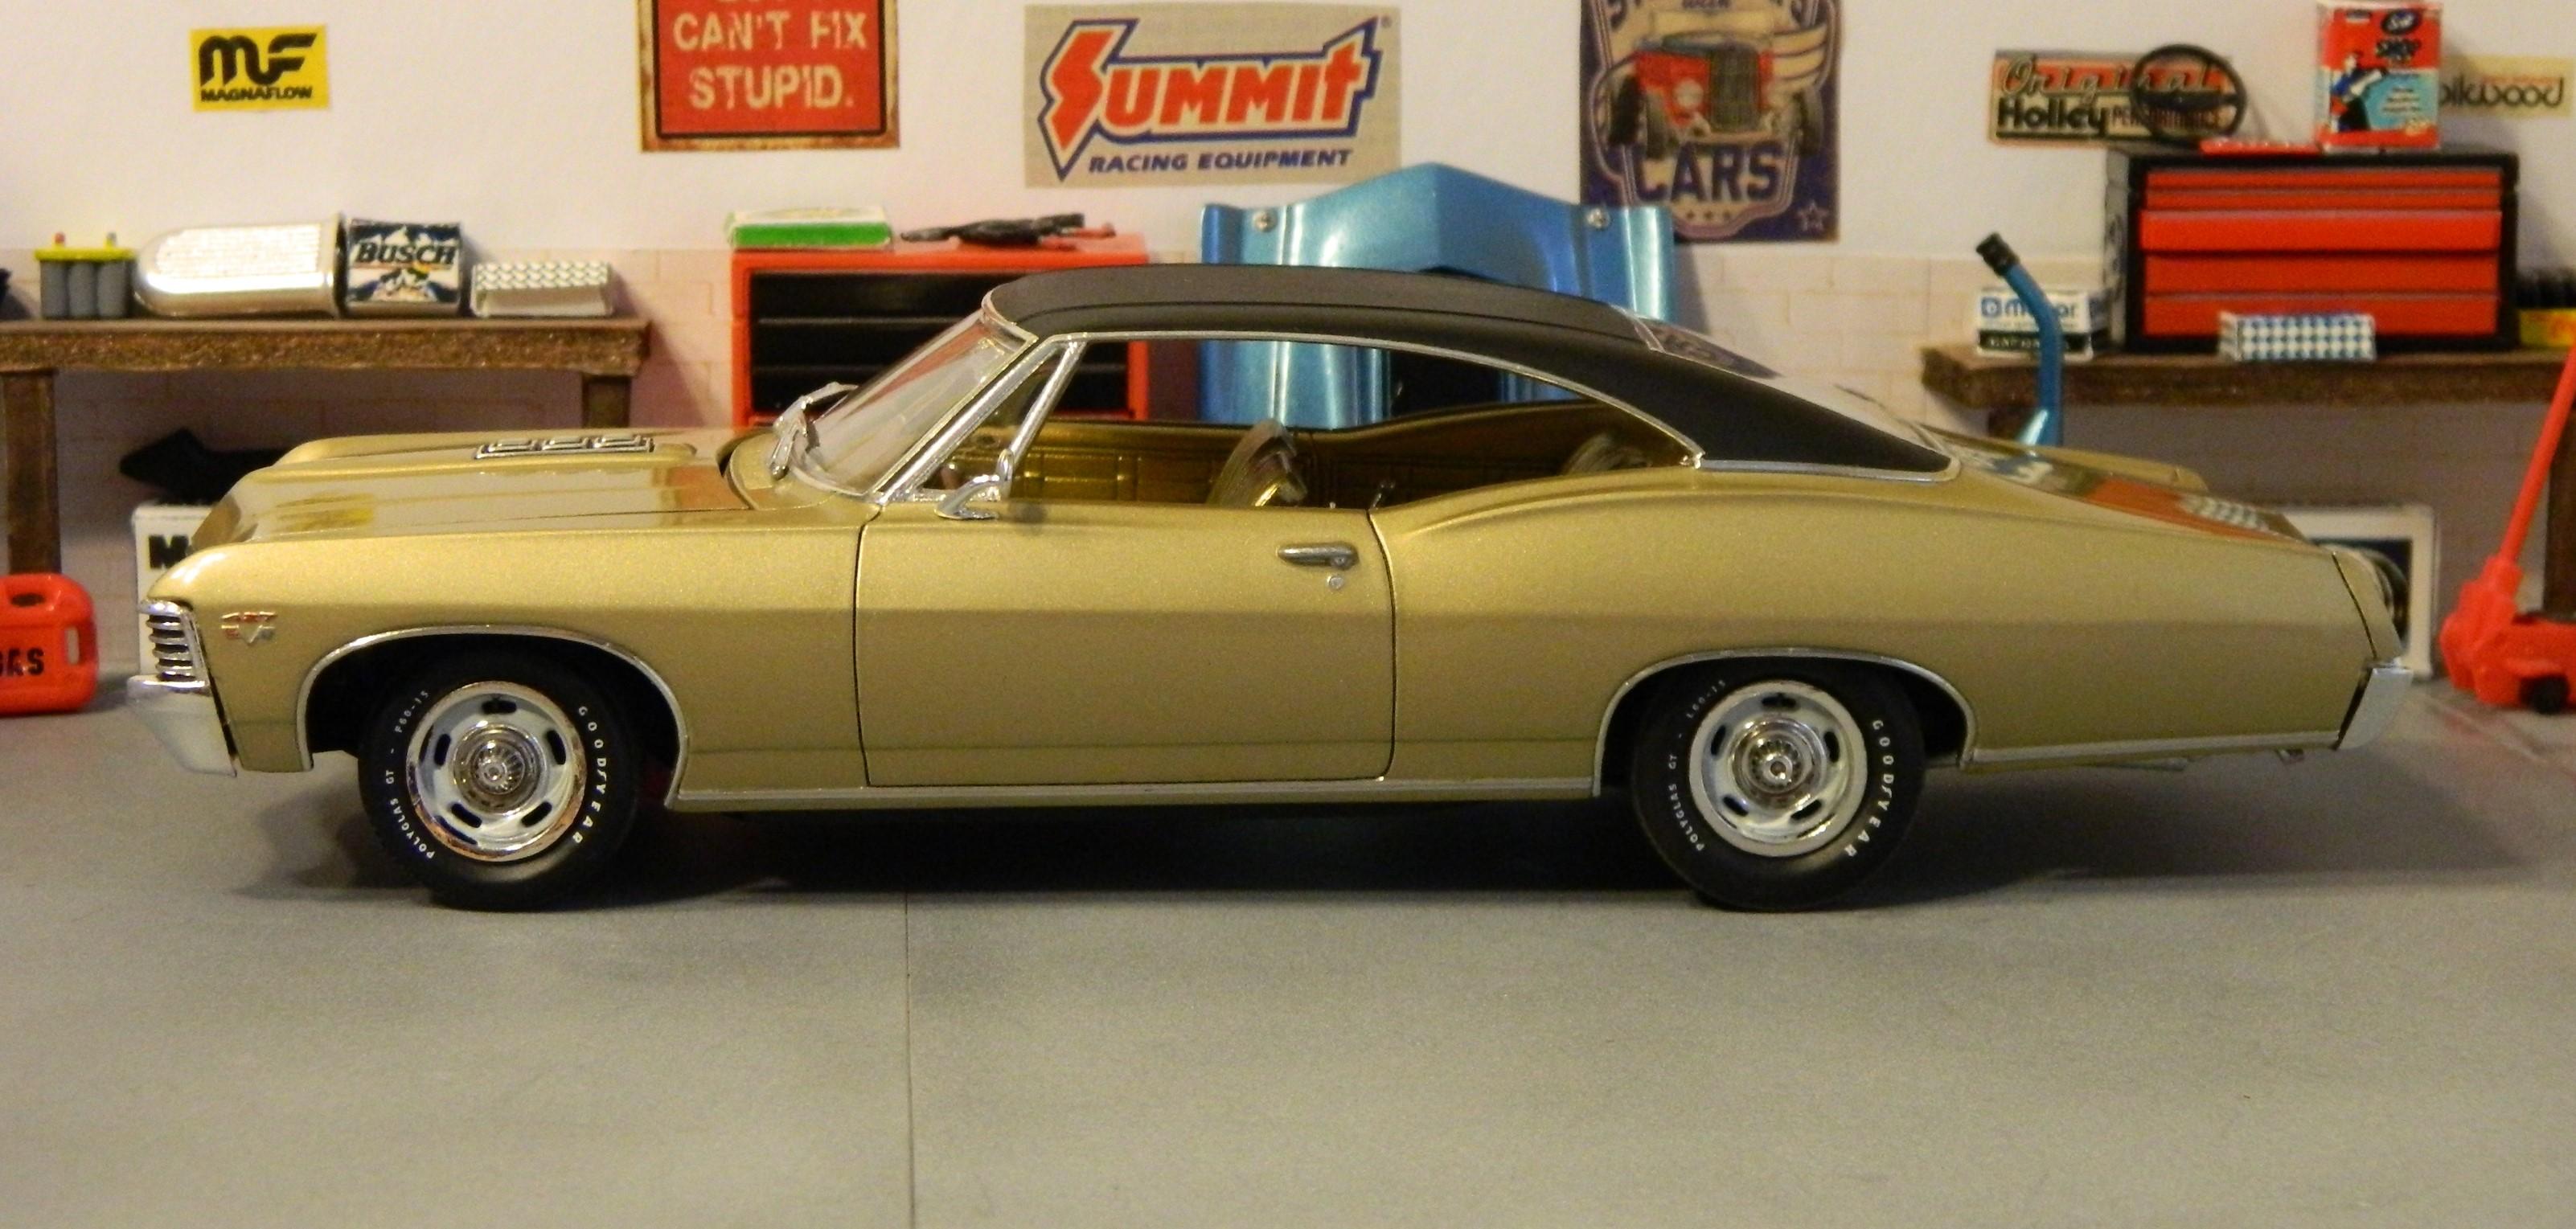
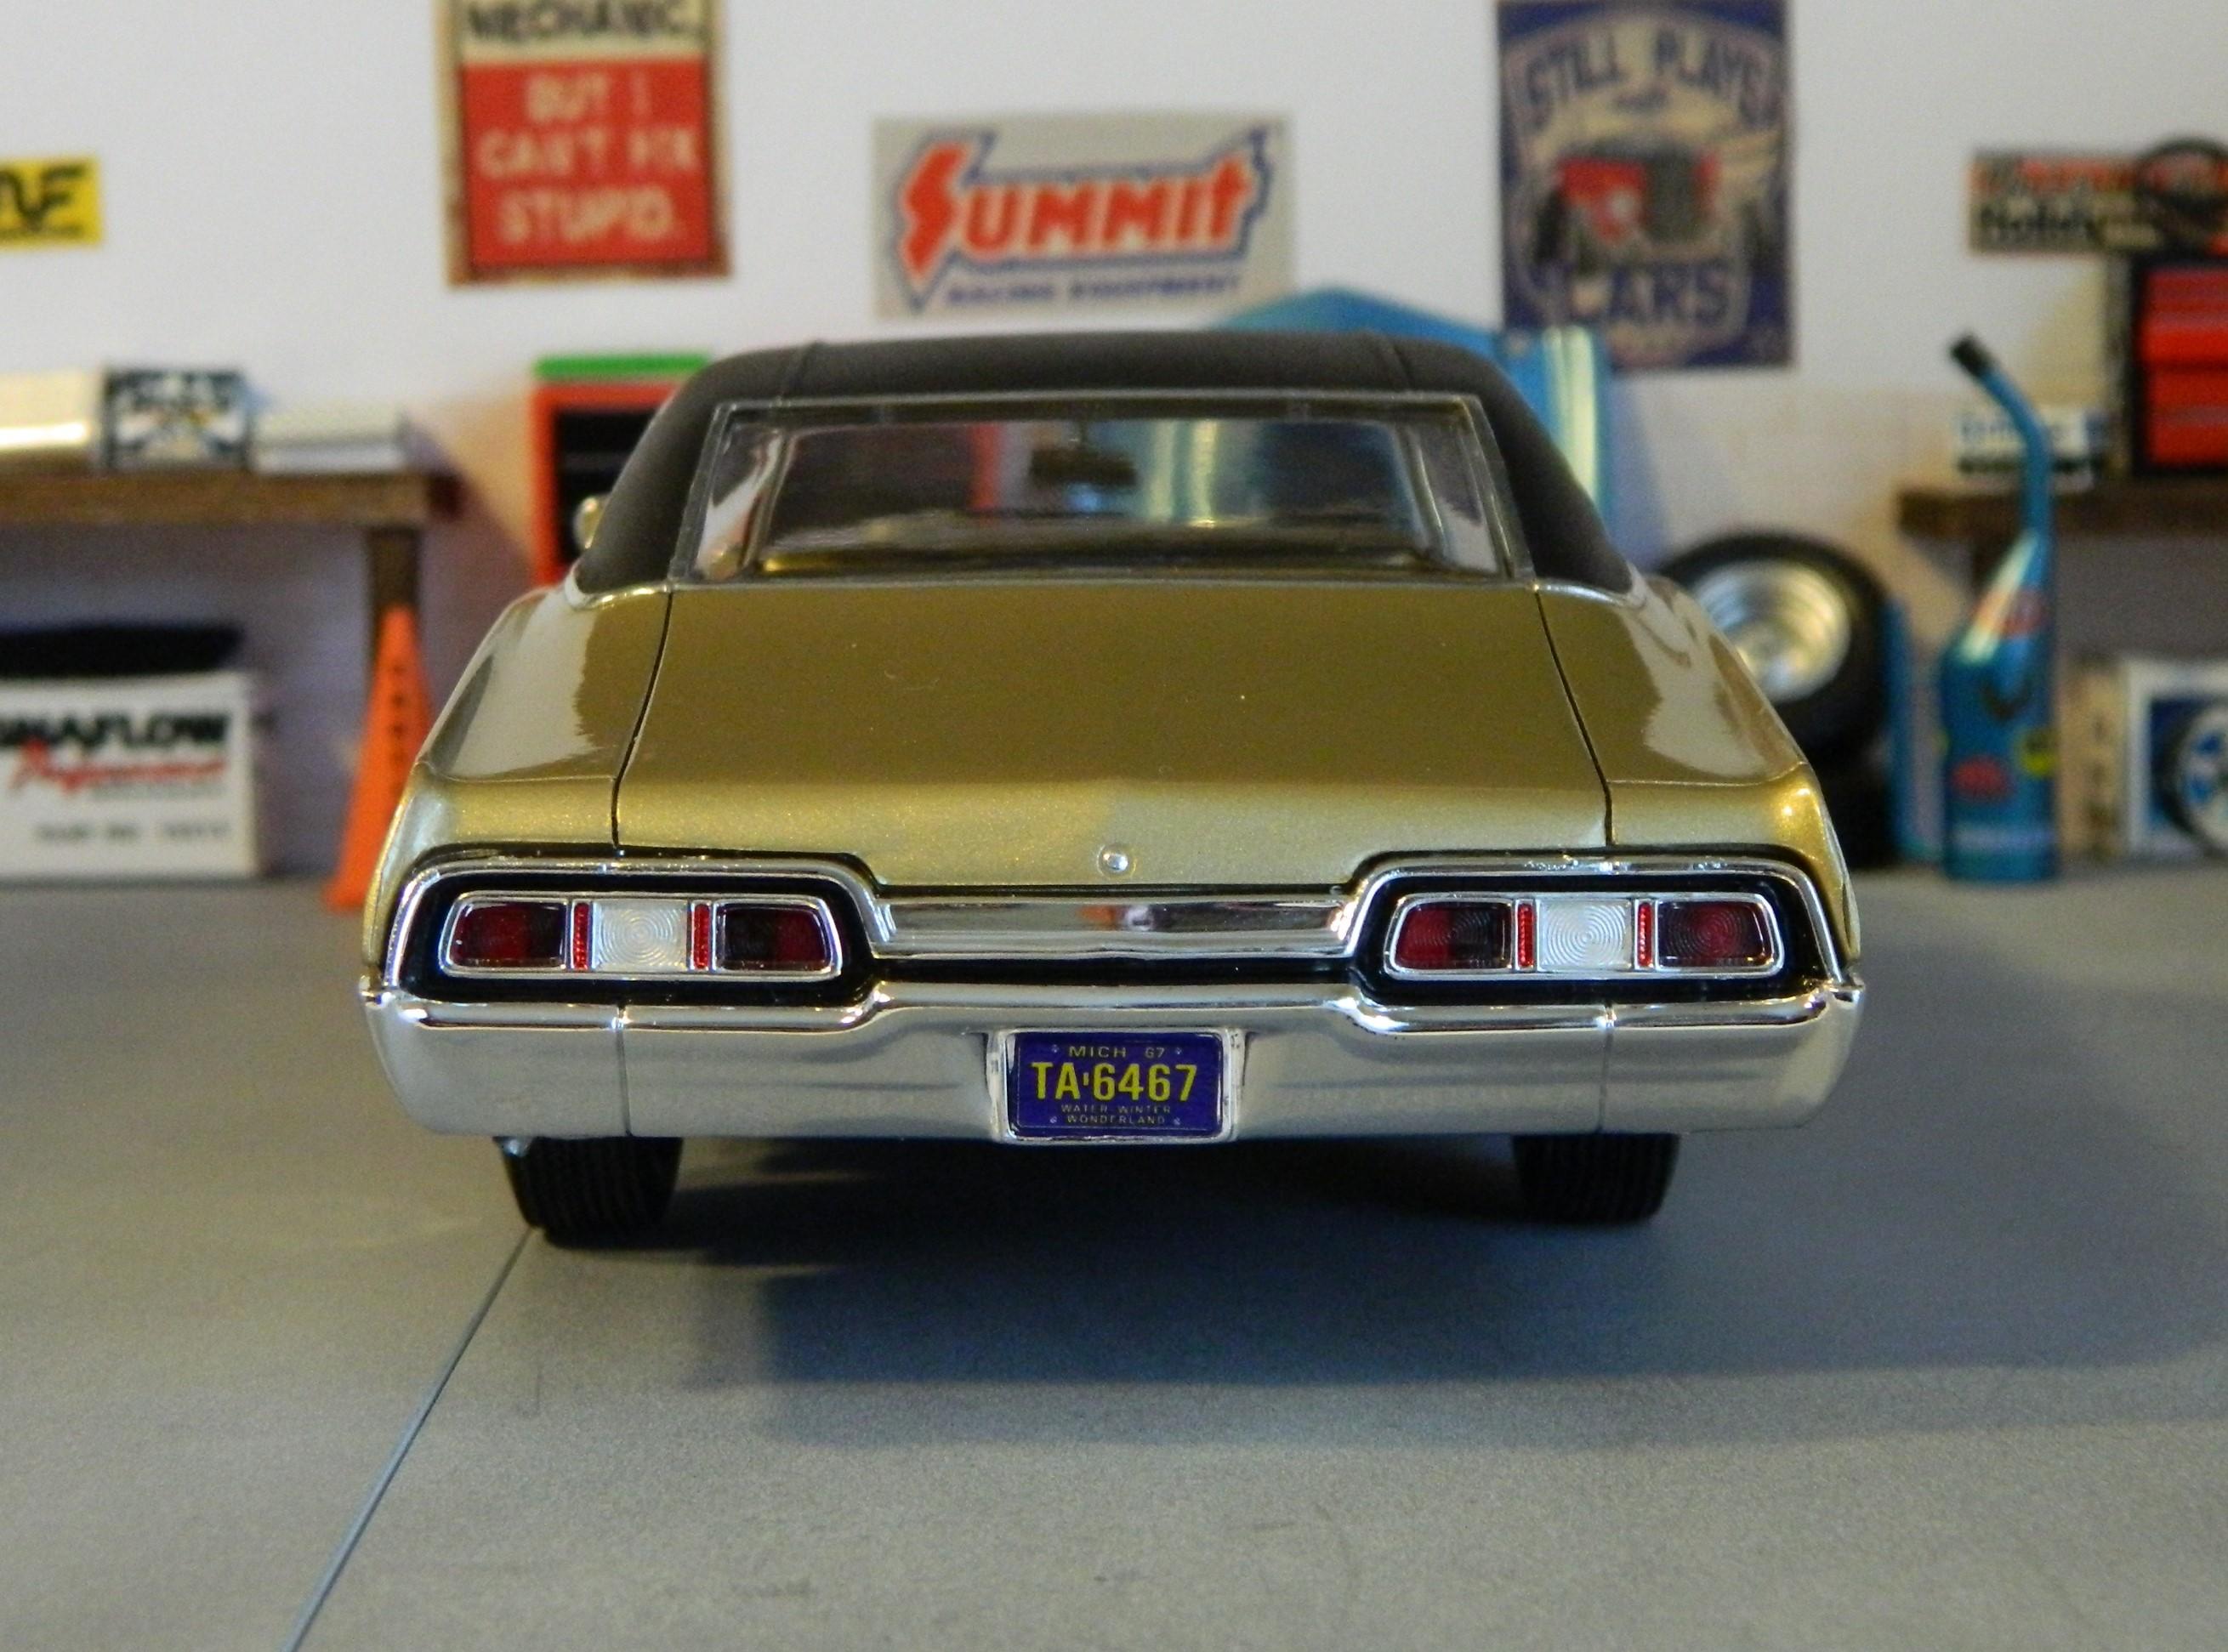
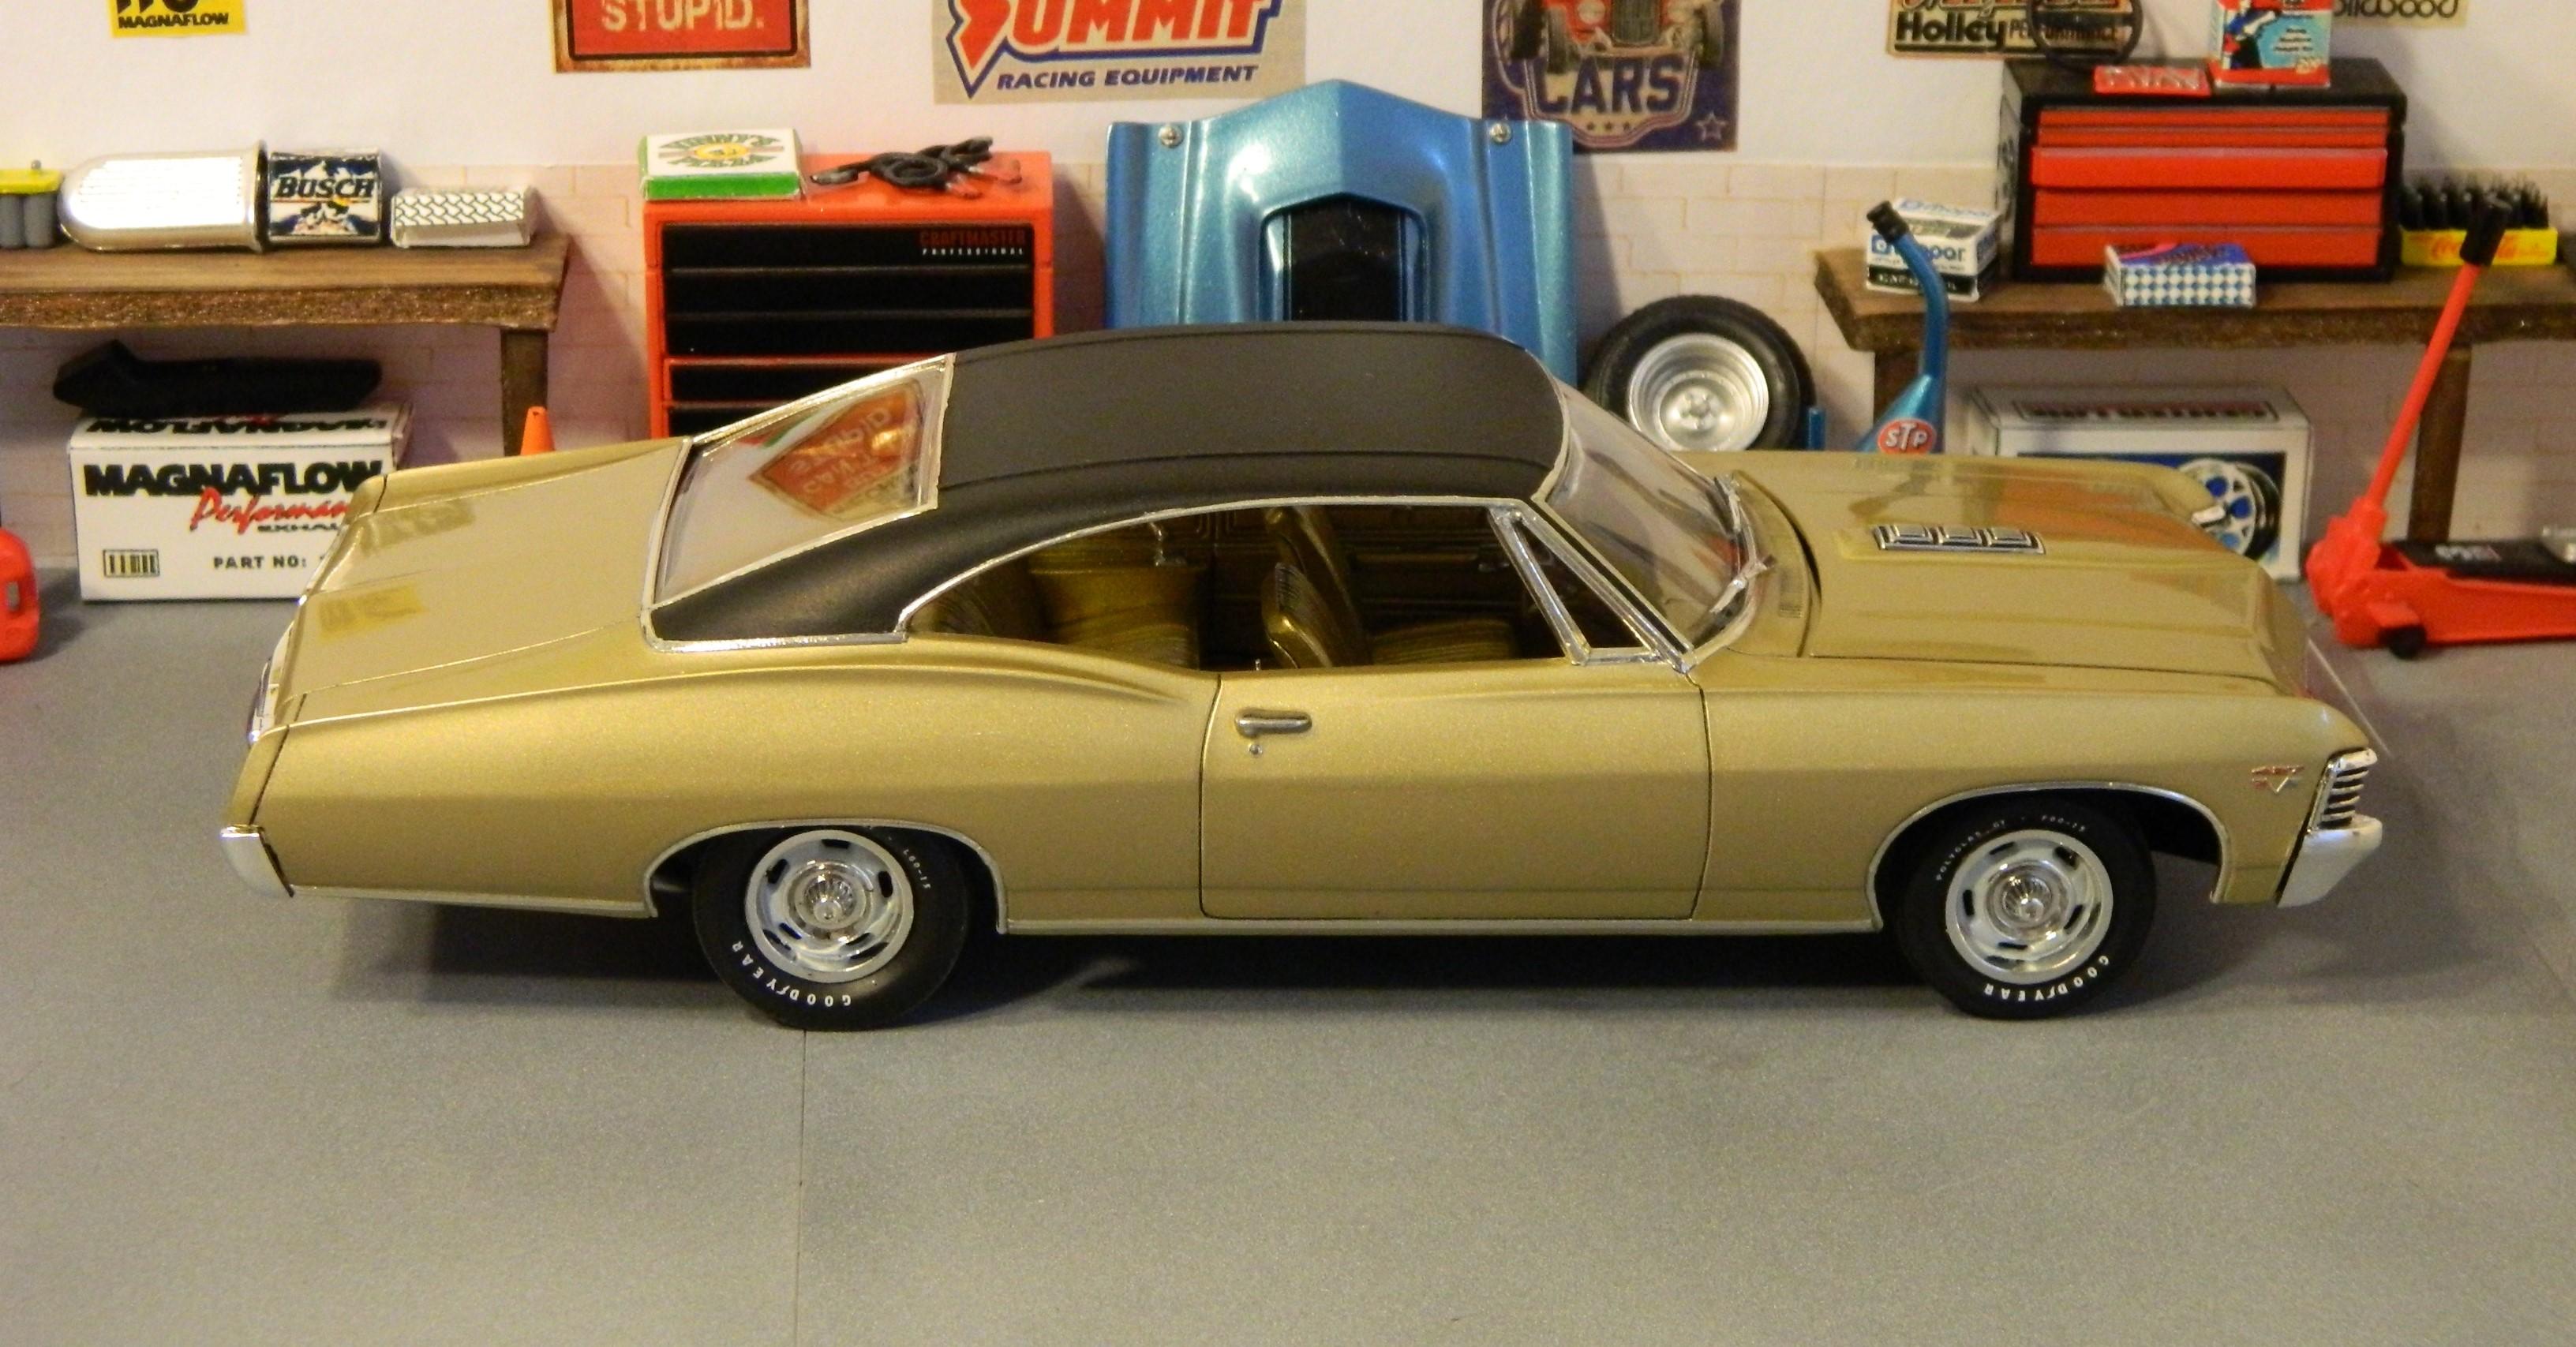
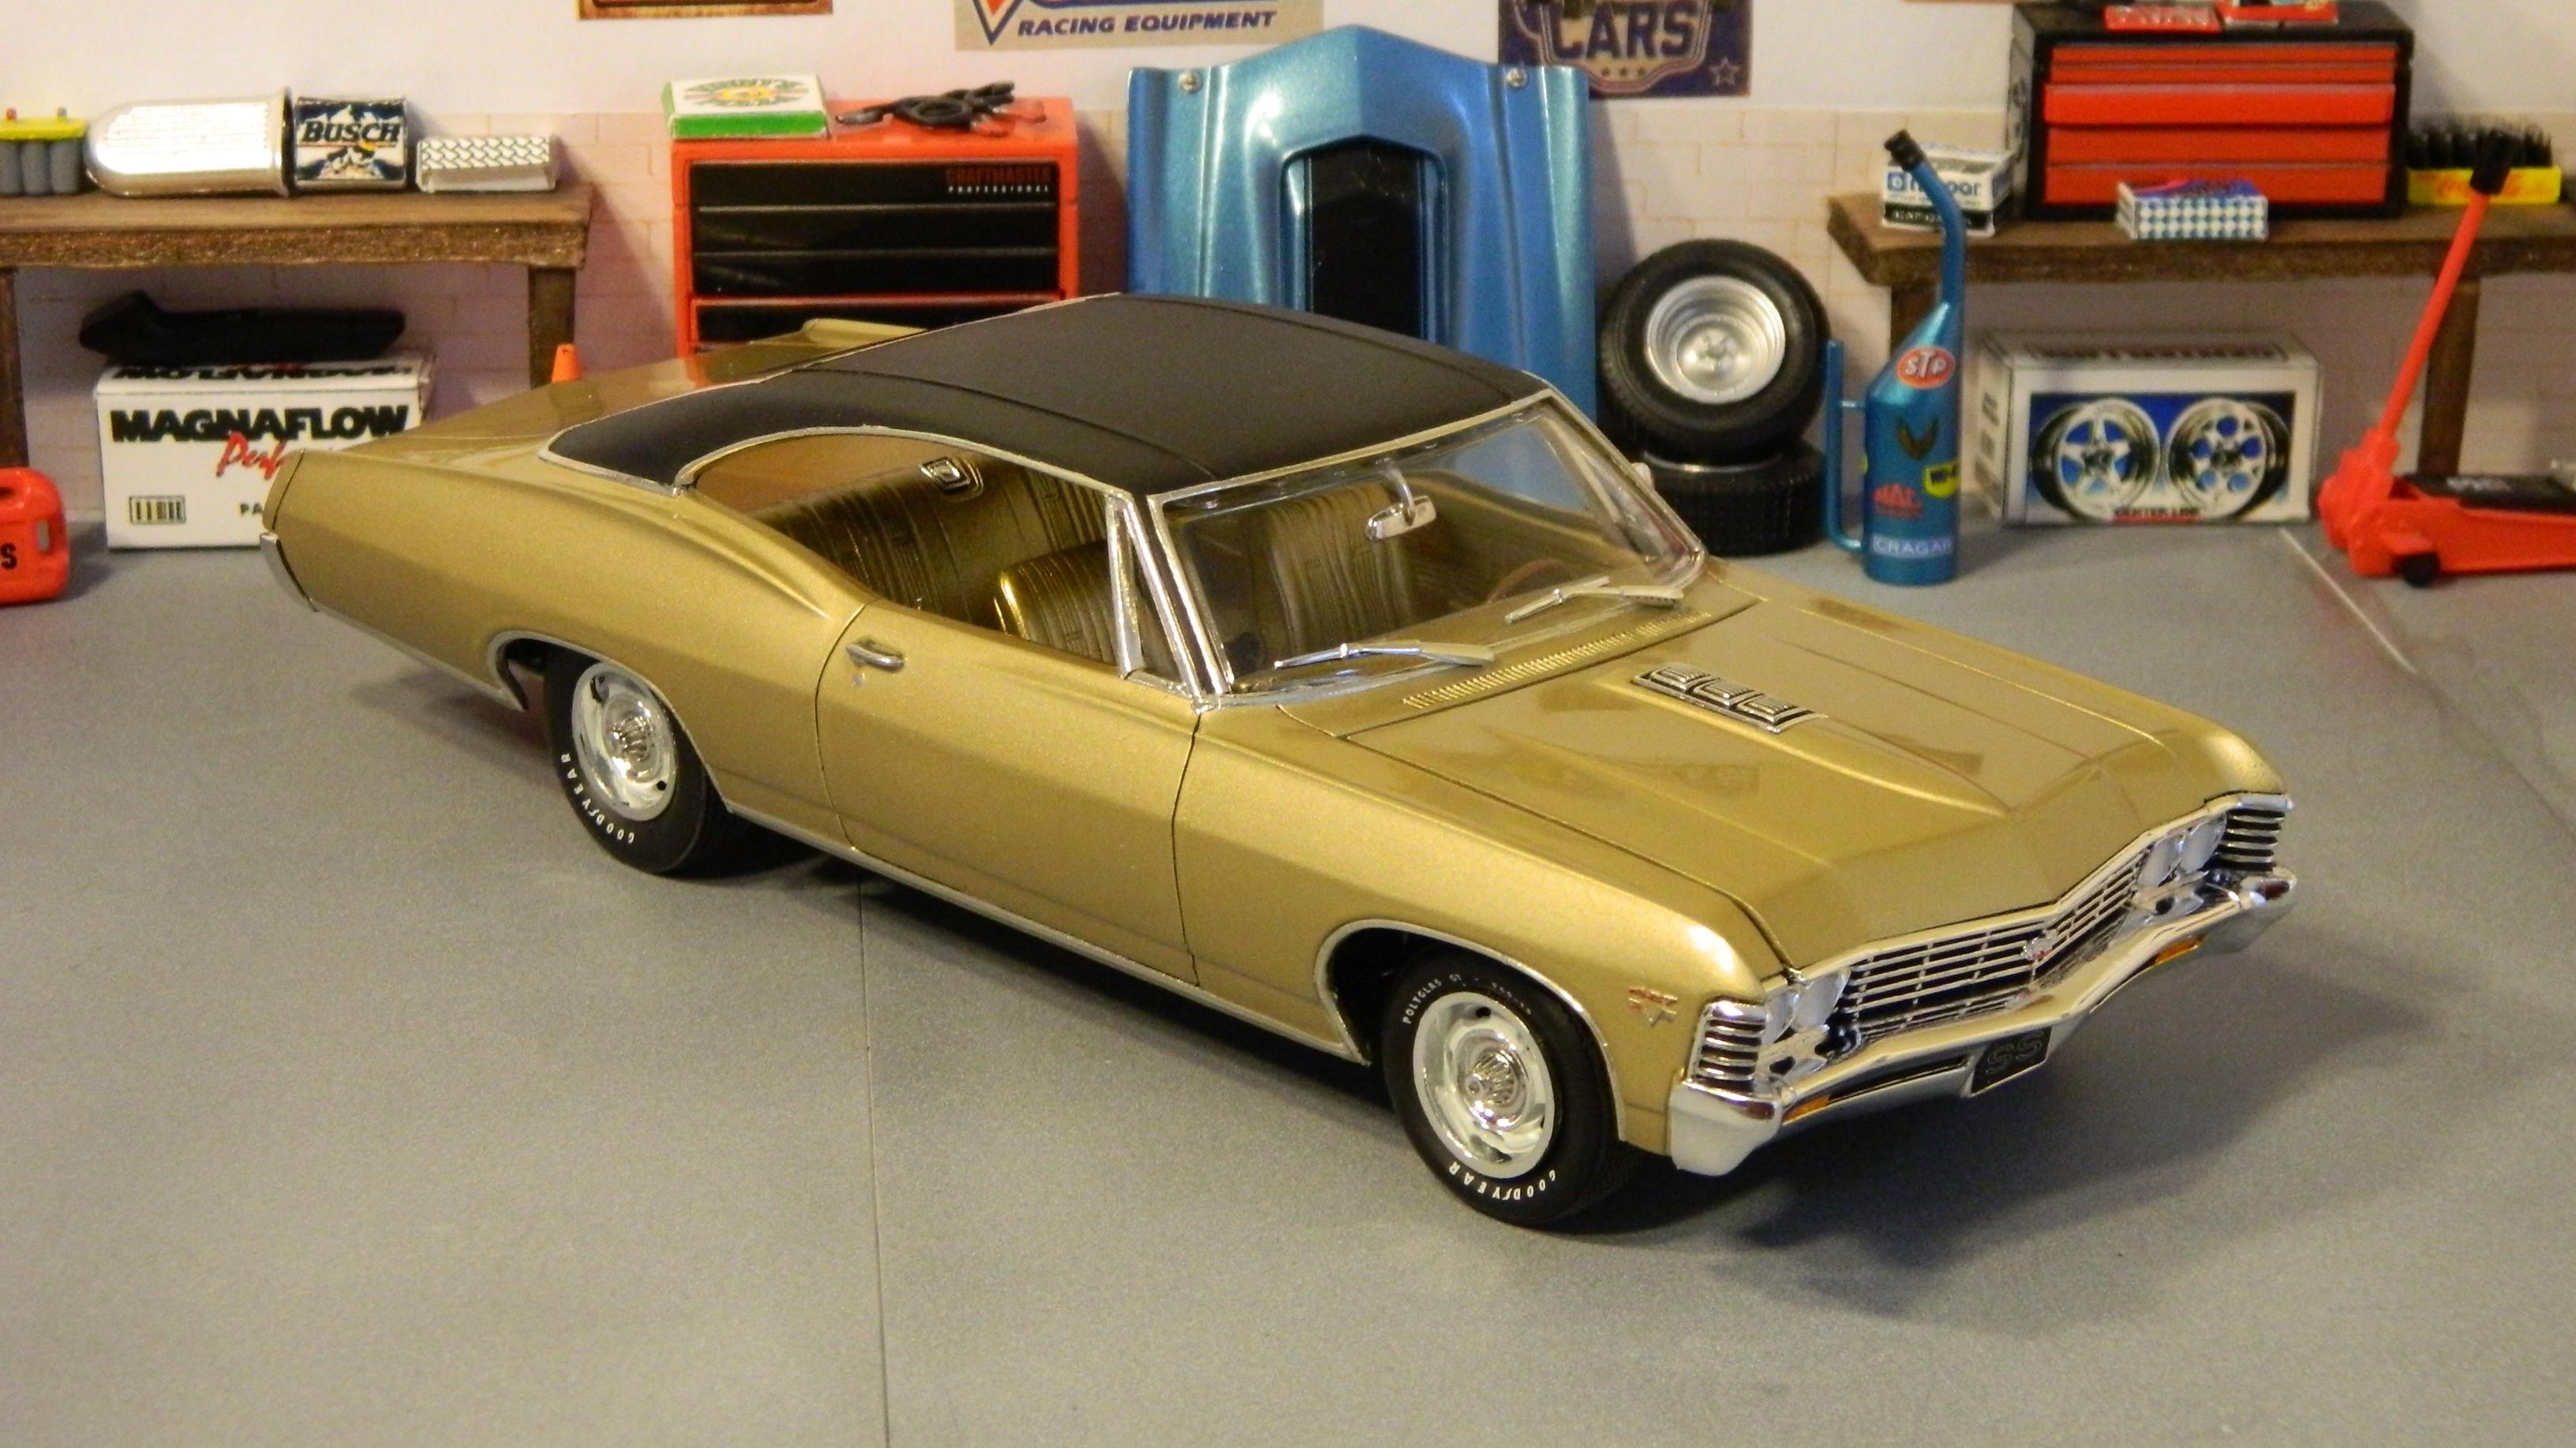
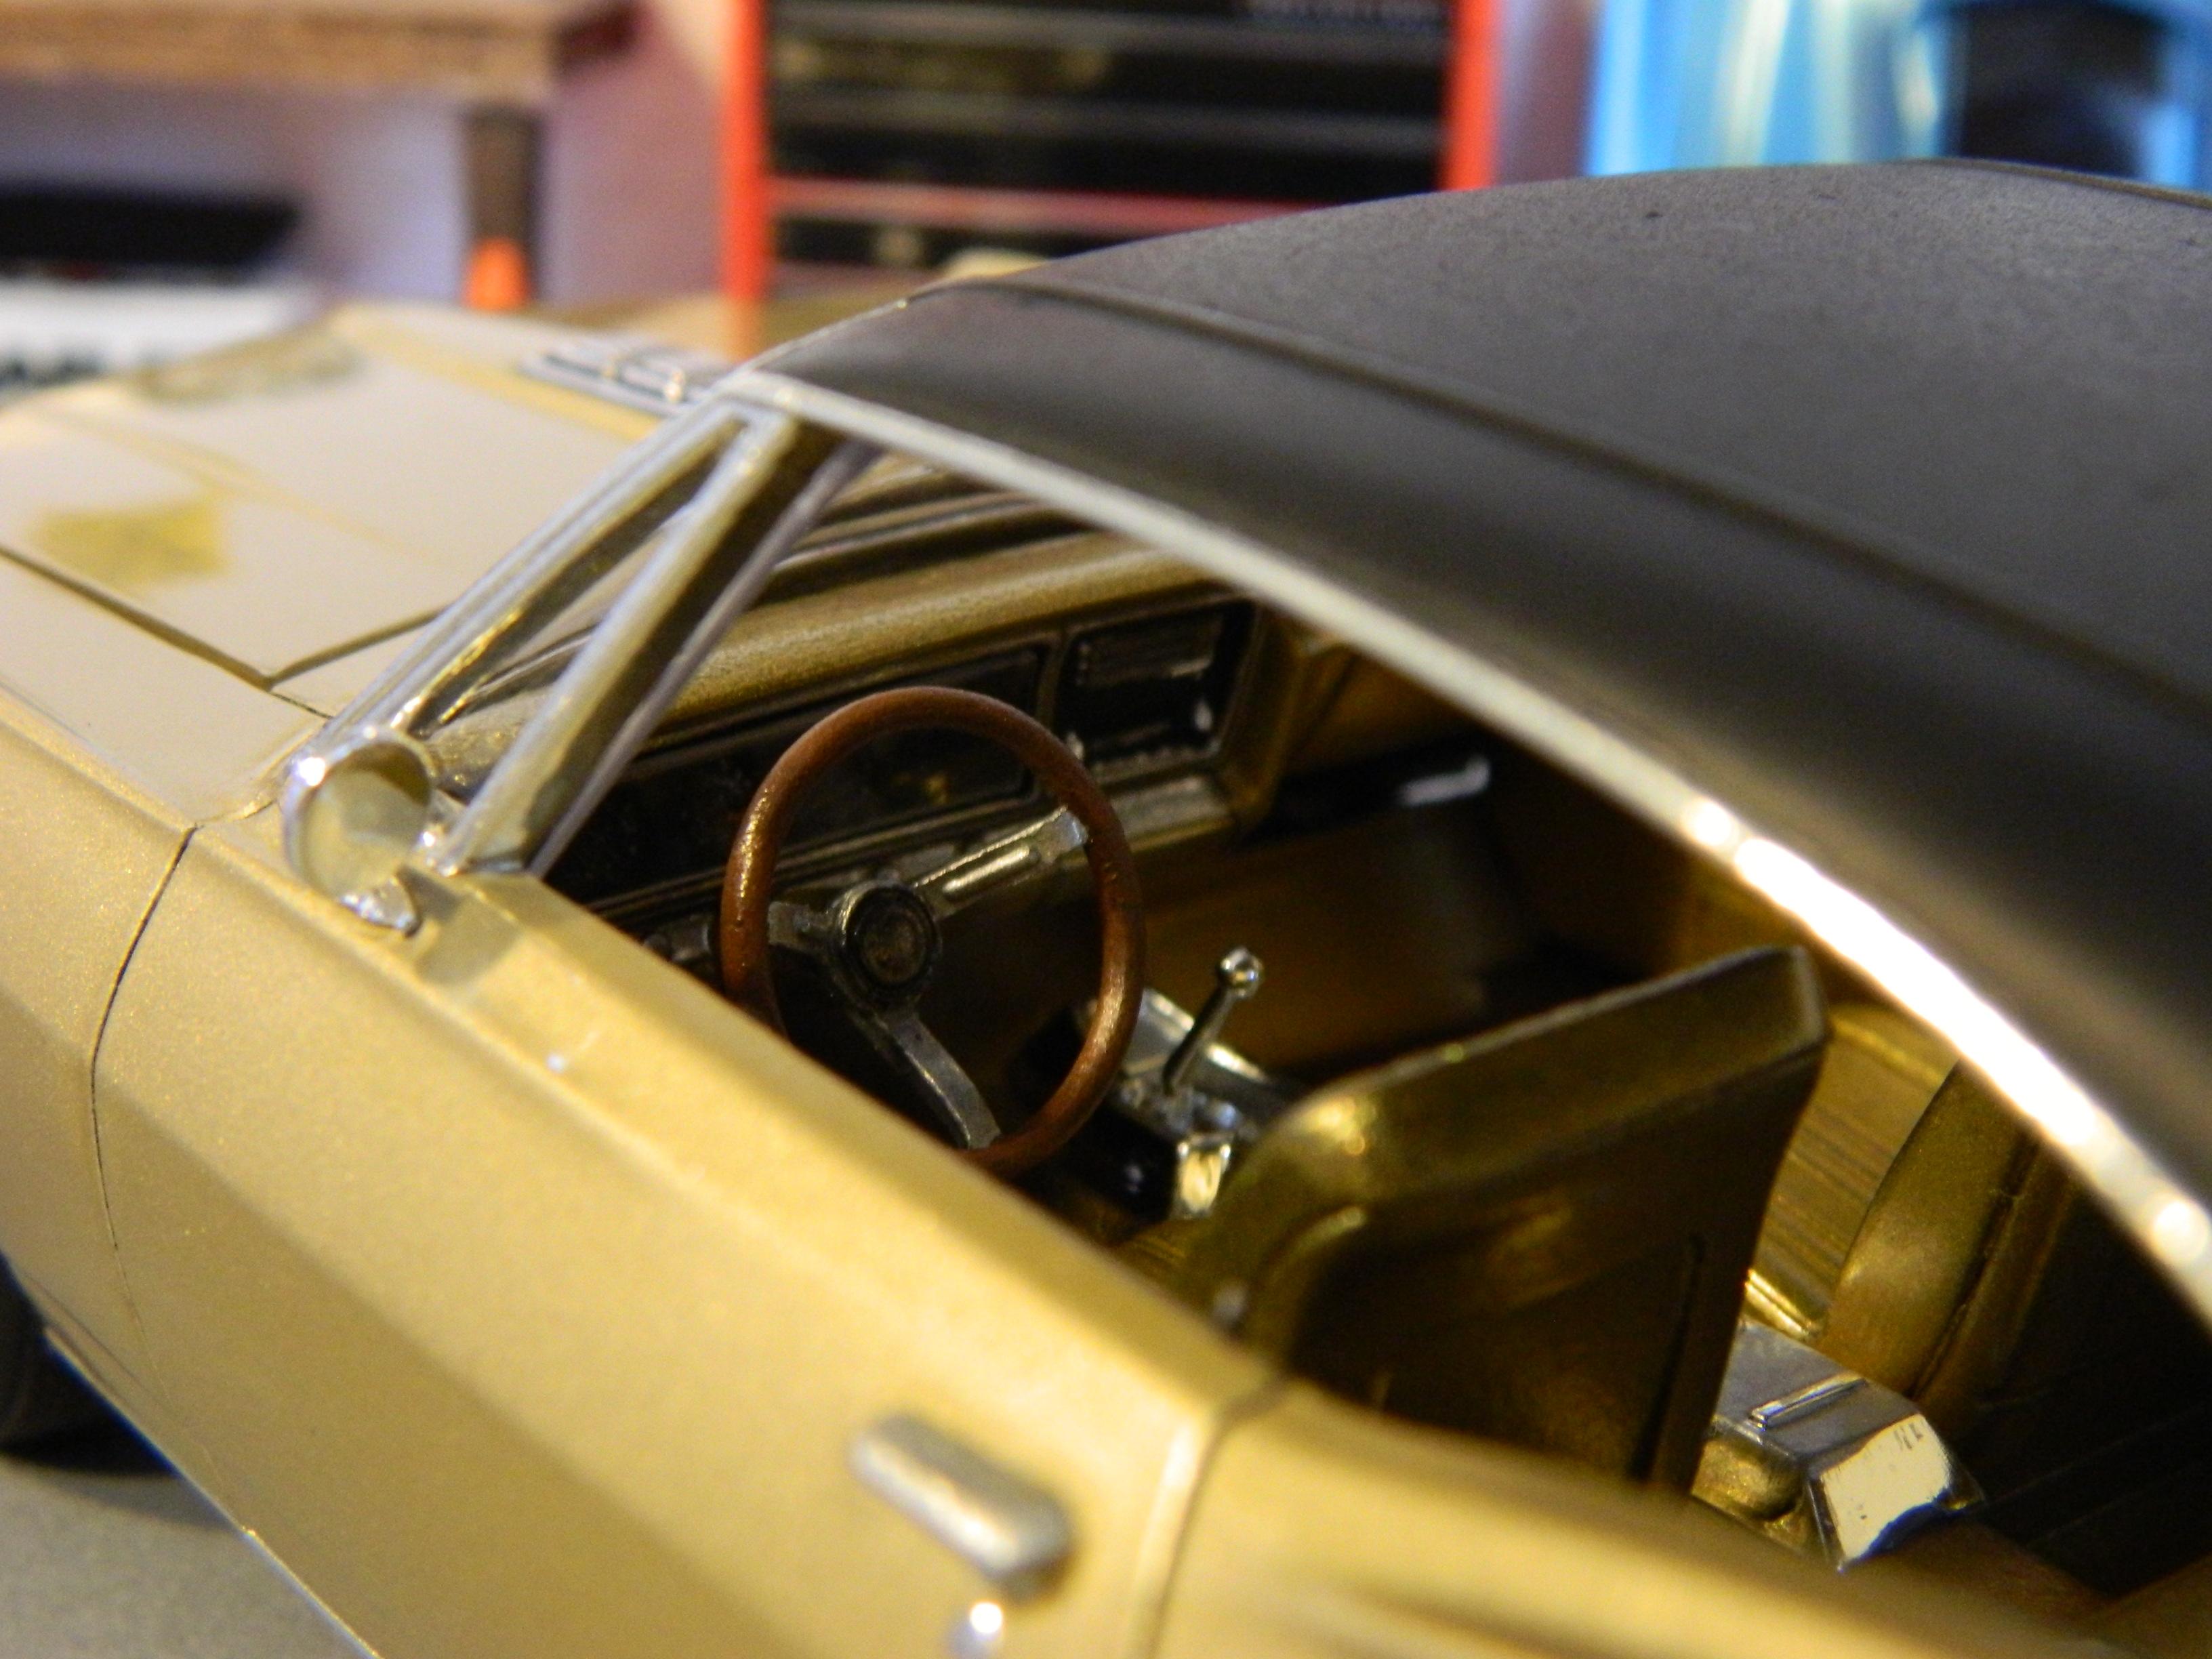
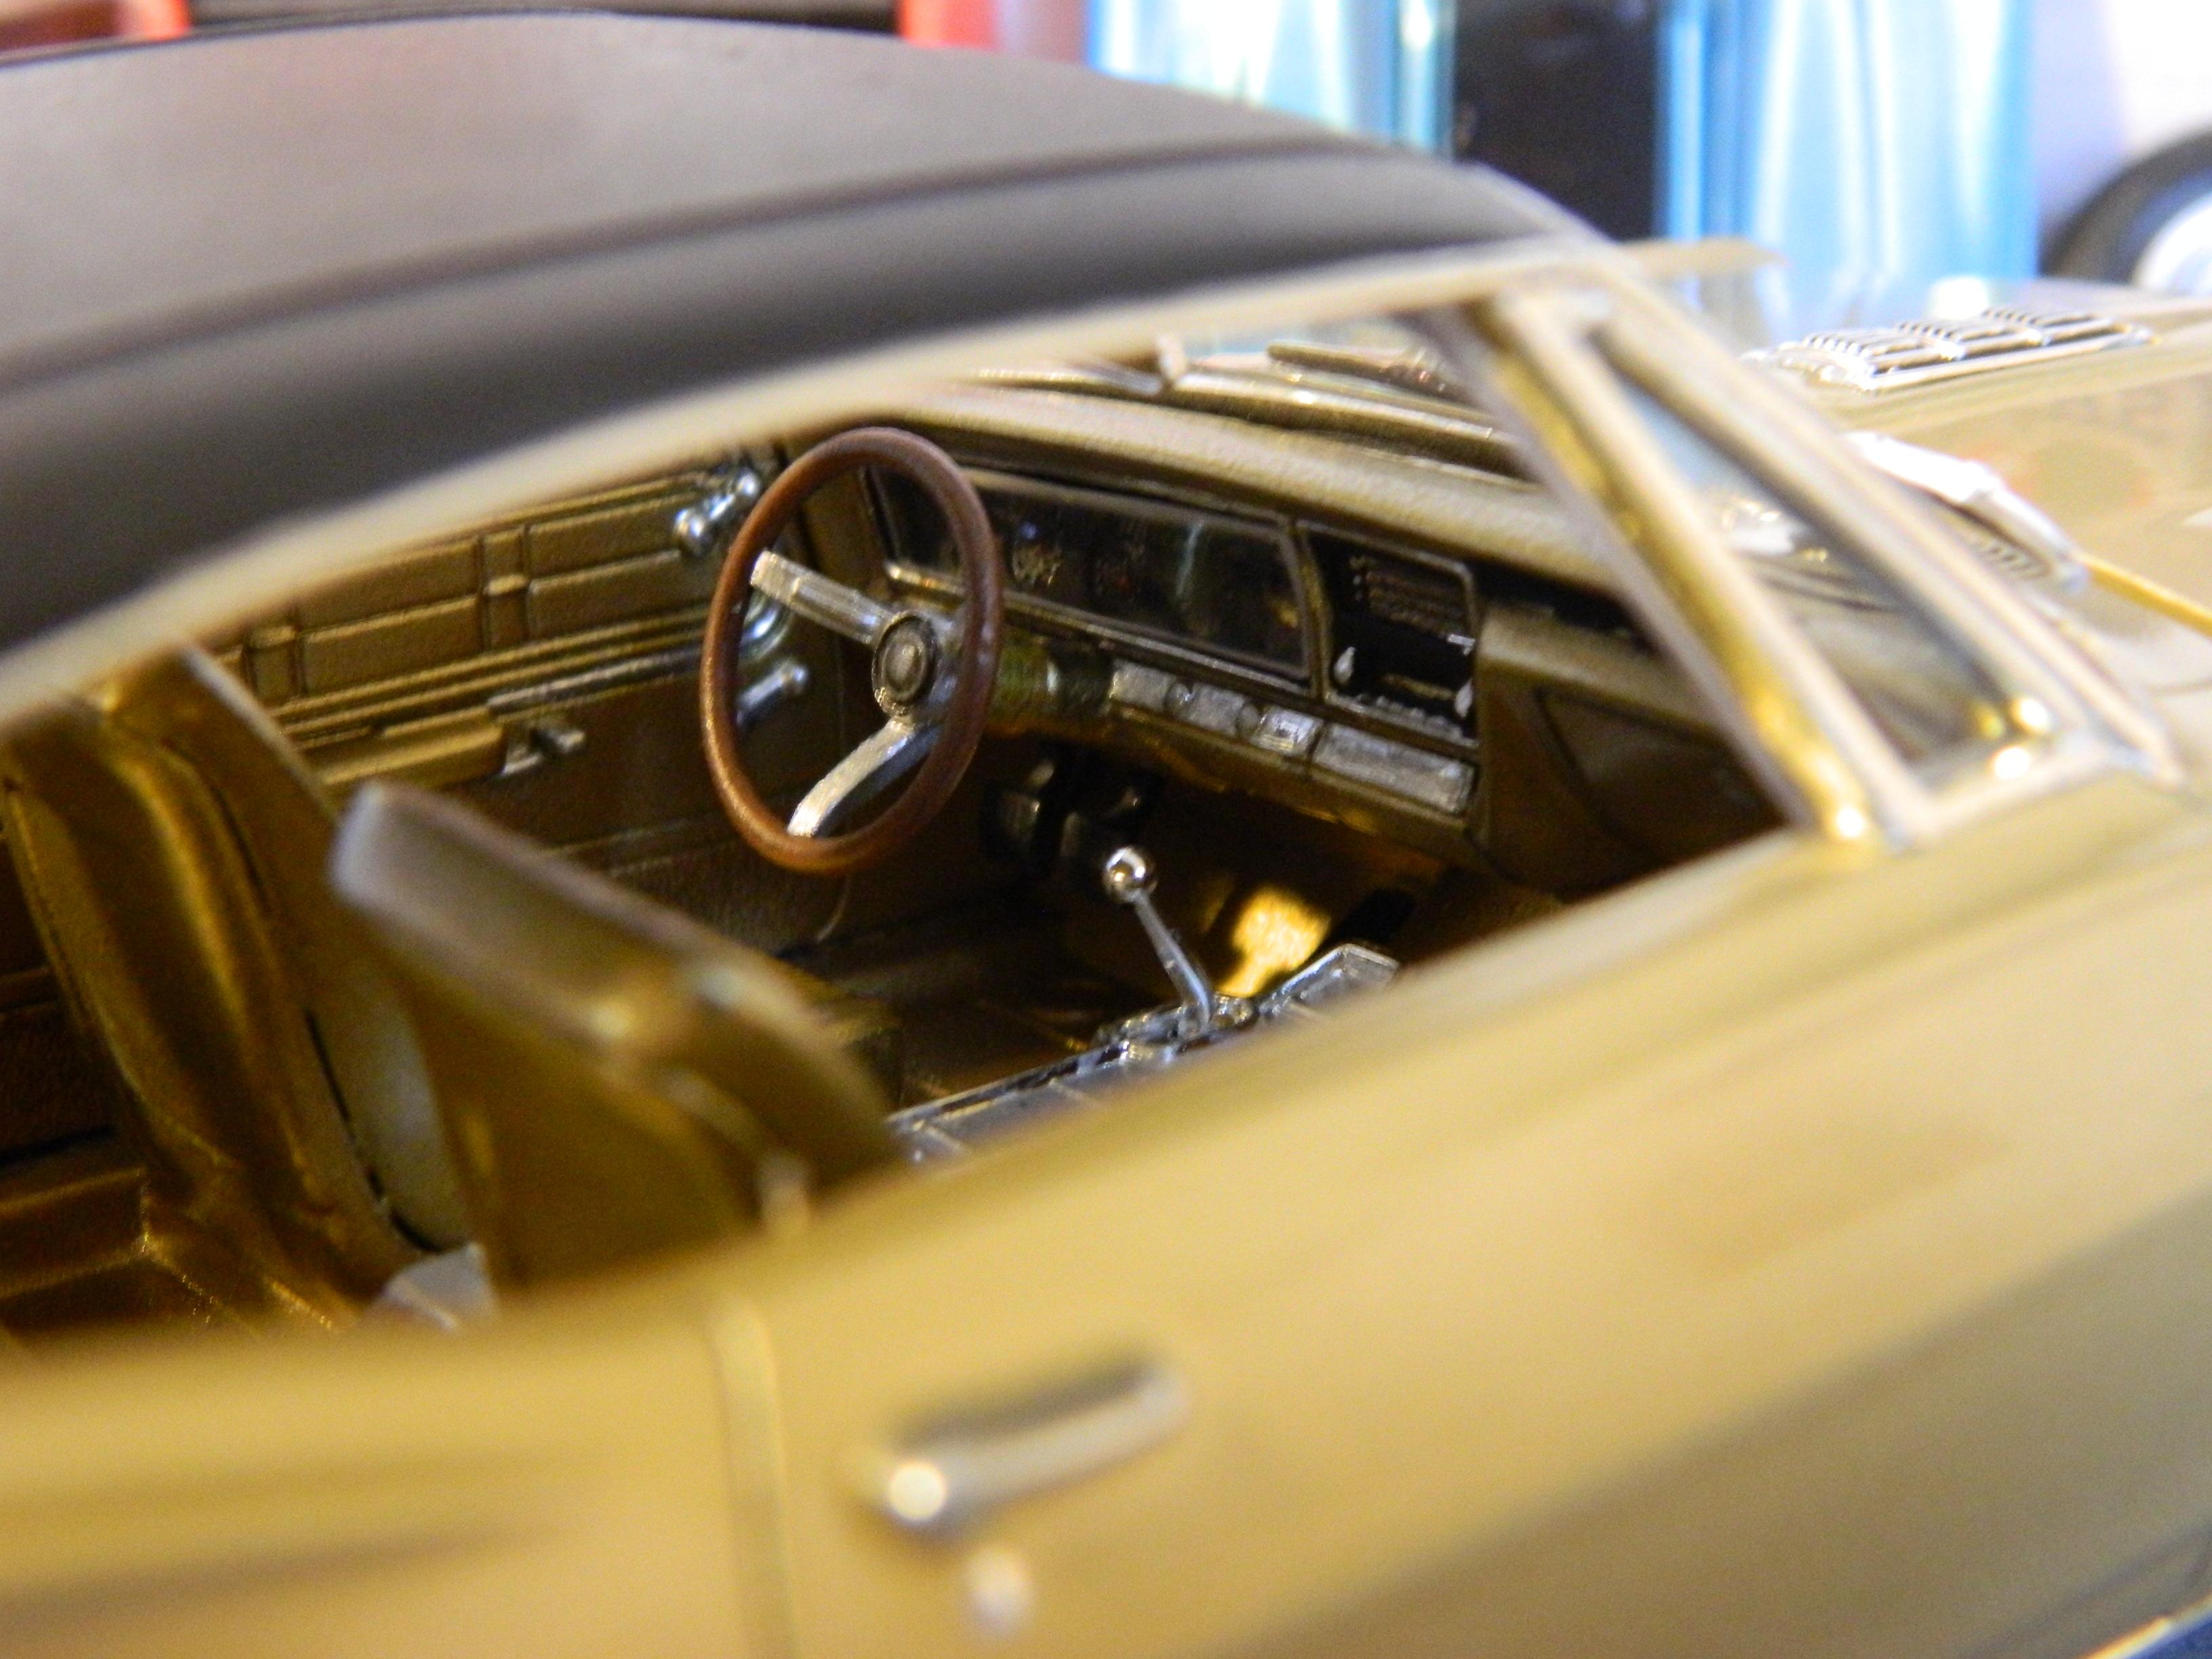
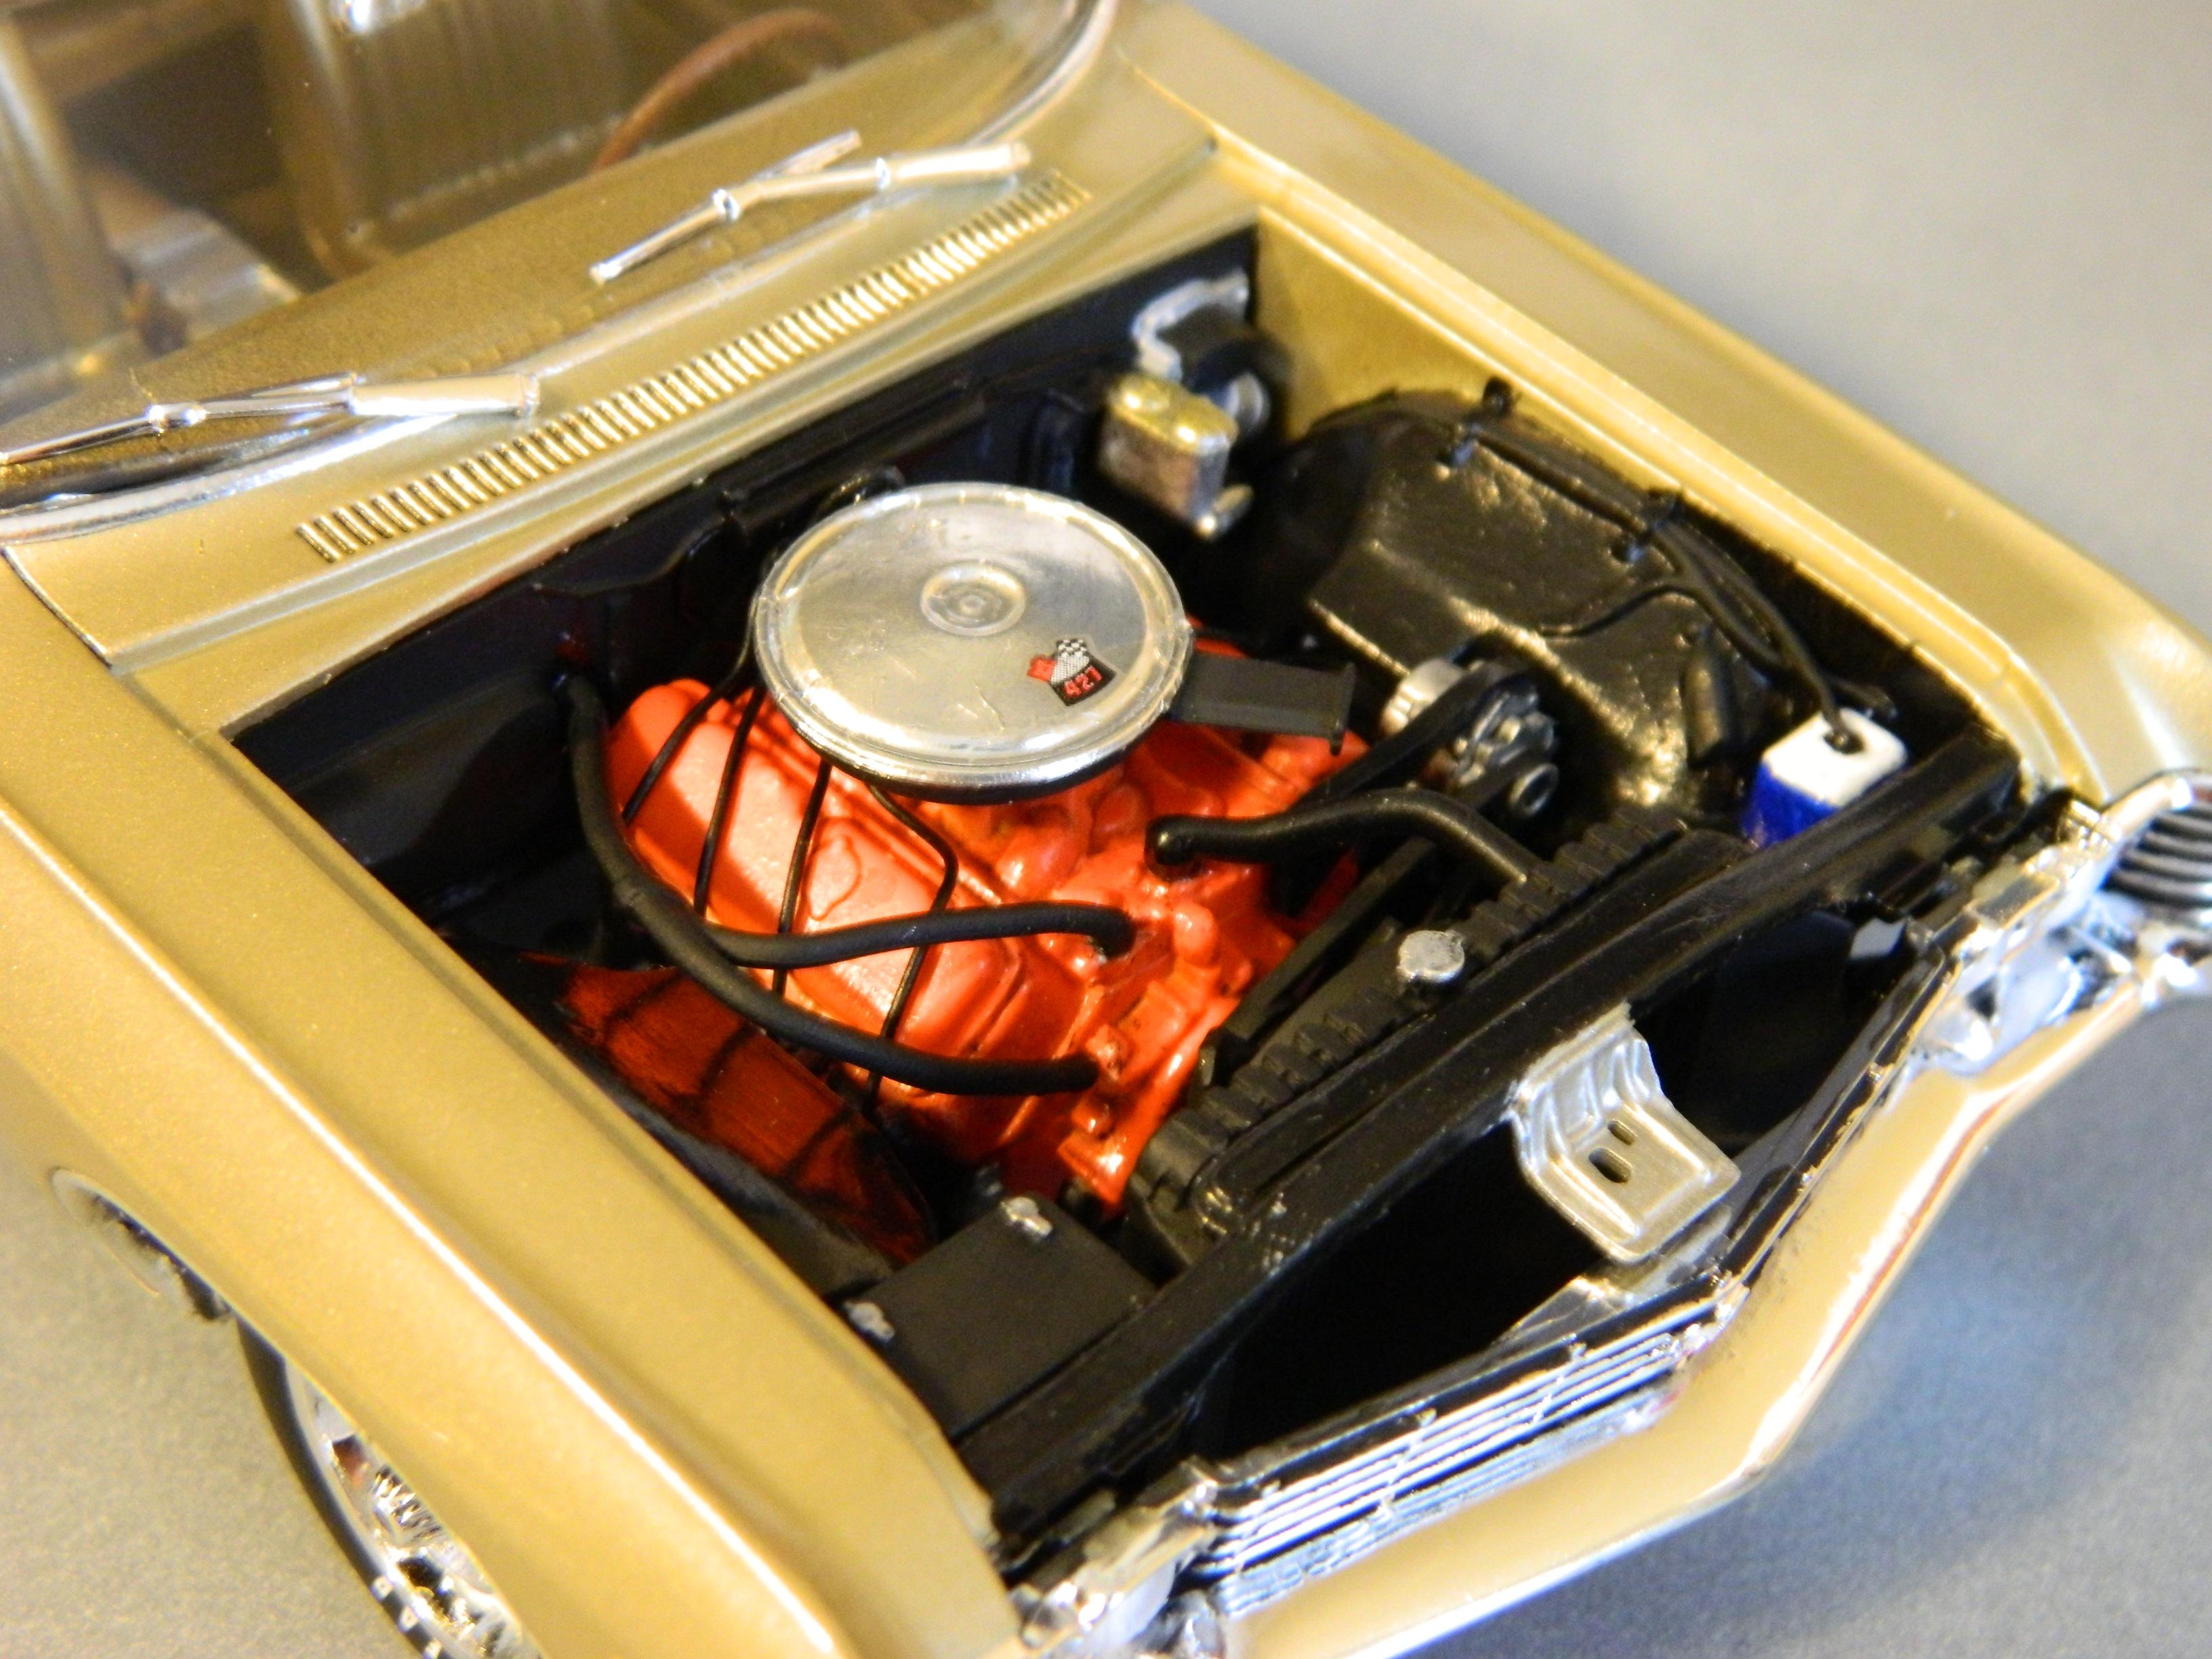
Here's the AMT 1967 Chevrolet Impala SS427. It's done in Tamiya TS-87 Titanium Gold and cleared with Tamiya TS-13. I used Evergreen .010 x .030 styrene strips to trim in the vinyl top, and just used Apple Barrel Black craft paint airbrushed from a distance to get a bit of texture before moving in closer for the final cover coat. The interior is a mixture of craft paints as well, and so is the engine. I wasn't too keen on the tires from the kit, so I used the extra set from the AMT '68 Camaro Z28 kit. The trim is all Bare Metal Foil, and I added valve stems, door locks, and ignition wires for extra details. This seems like one of AMT's nicer kits, and it was a really fun build. Thanks for looking!
-
 Mary, Curls, & Flo found a 1955 Chevrolet 150 2 door sedan in an old rickety garage. It had once been a teenager's school car, but sat for nearly 1/2 a century. It needed a lot of work, and was missing a lot of pieces. Thankfully their grandfather had raced tri-five Chevies back in the 60s and had a lot of parts stashed in the loft of his garage. The ladies got into those parts and were able to put this beast back on the road. They also were able to use his stash to upgrade the looks to the top level Bel Air.
-
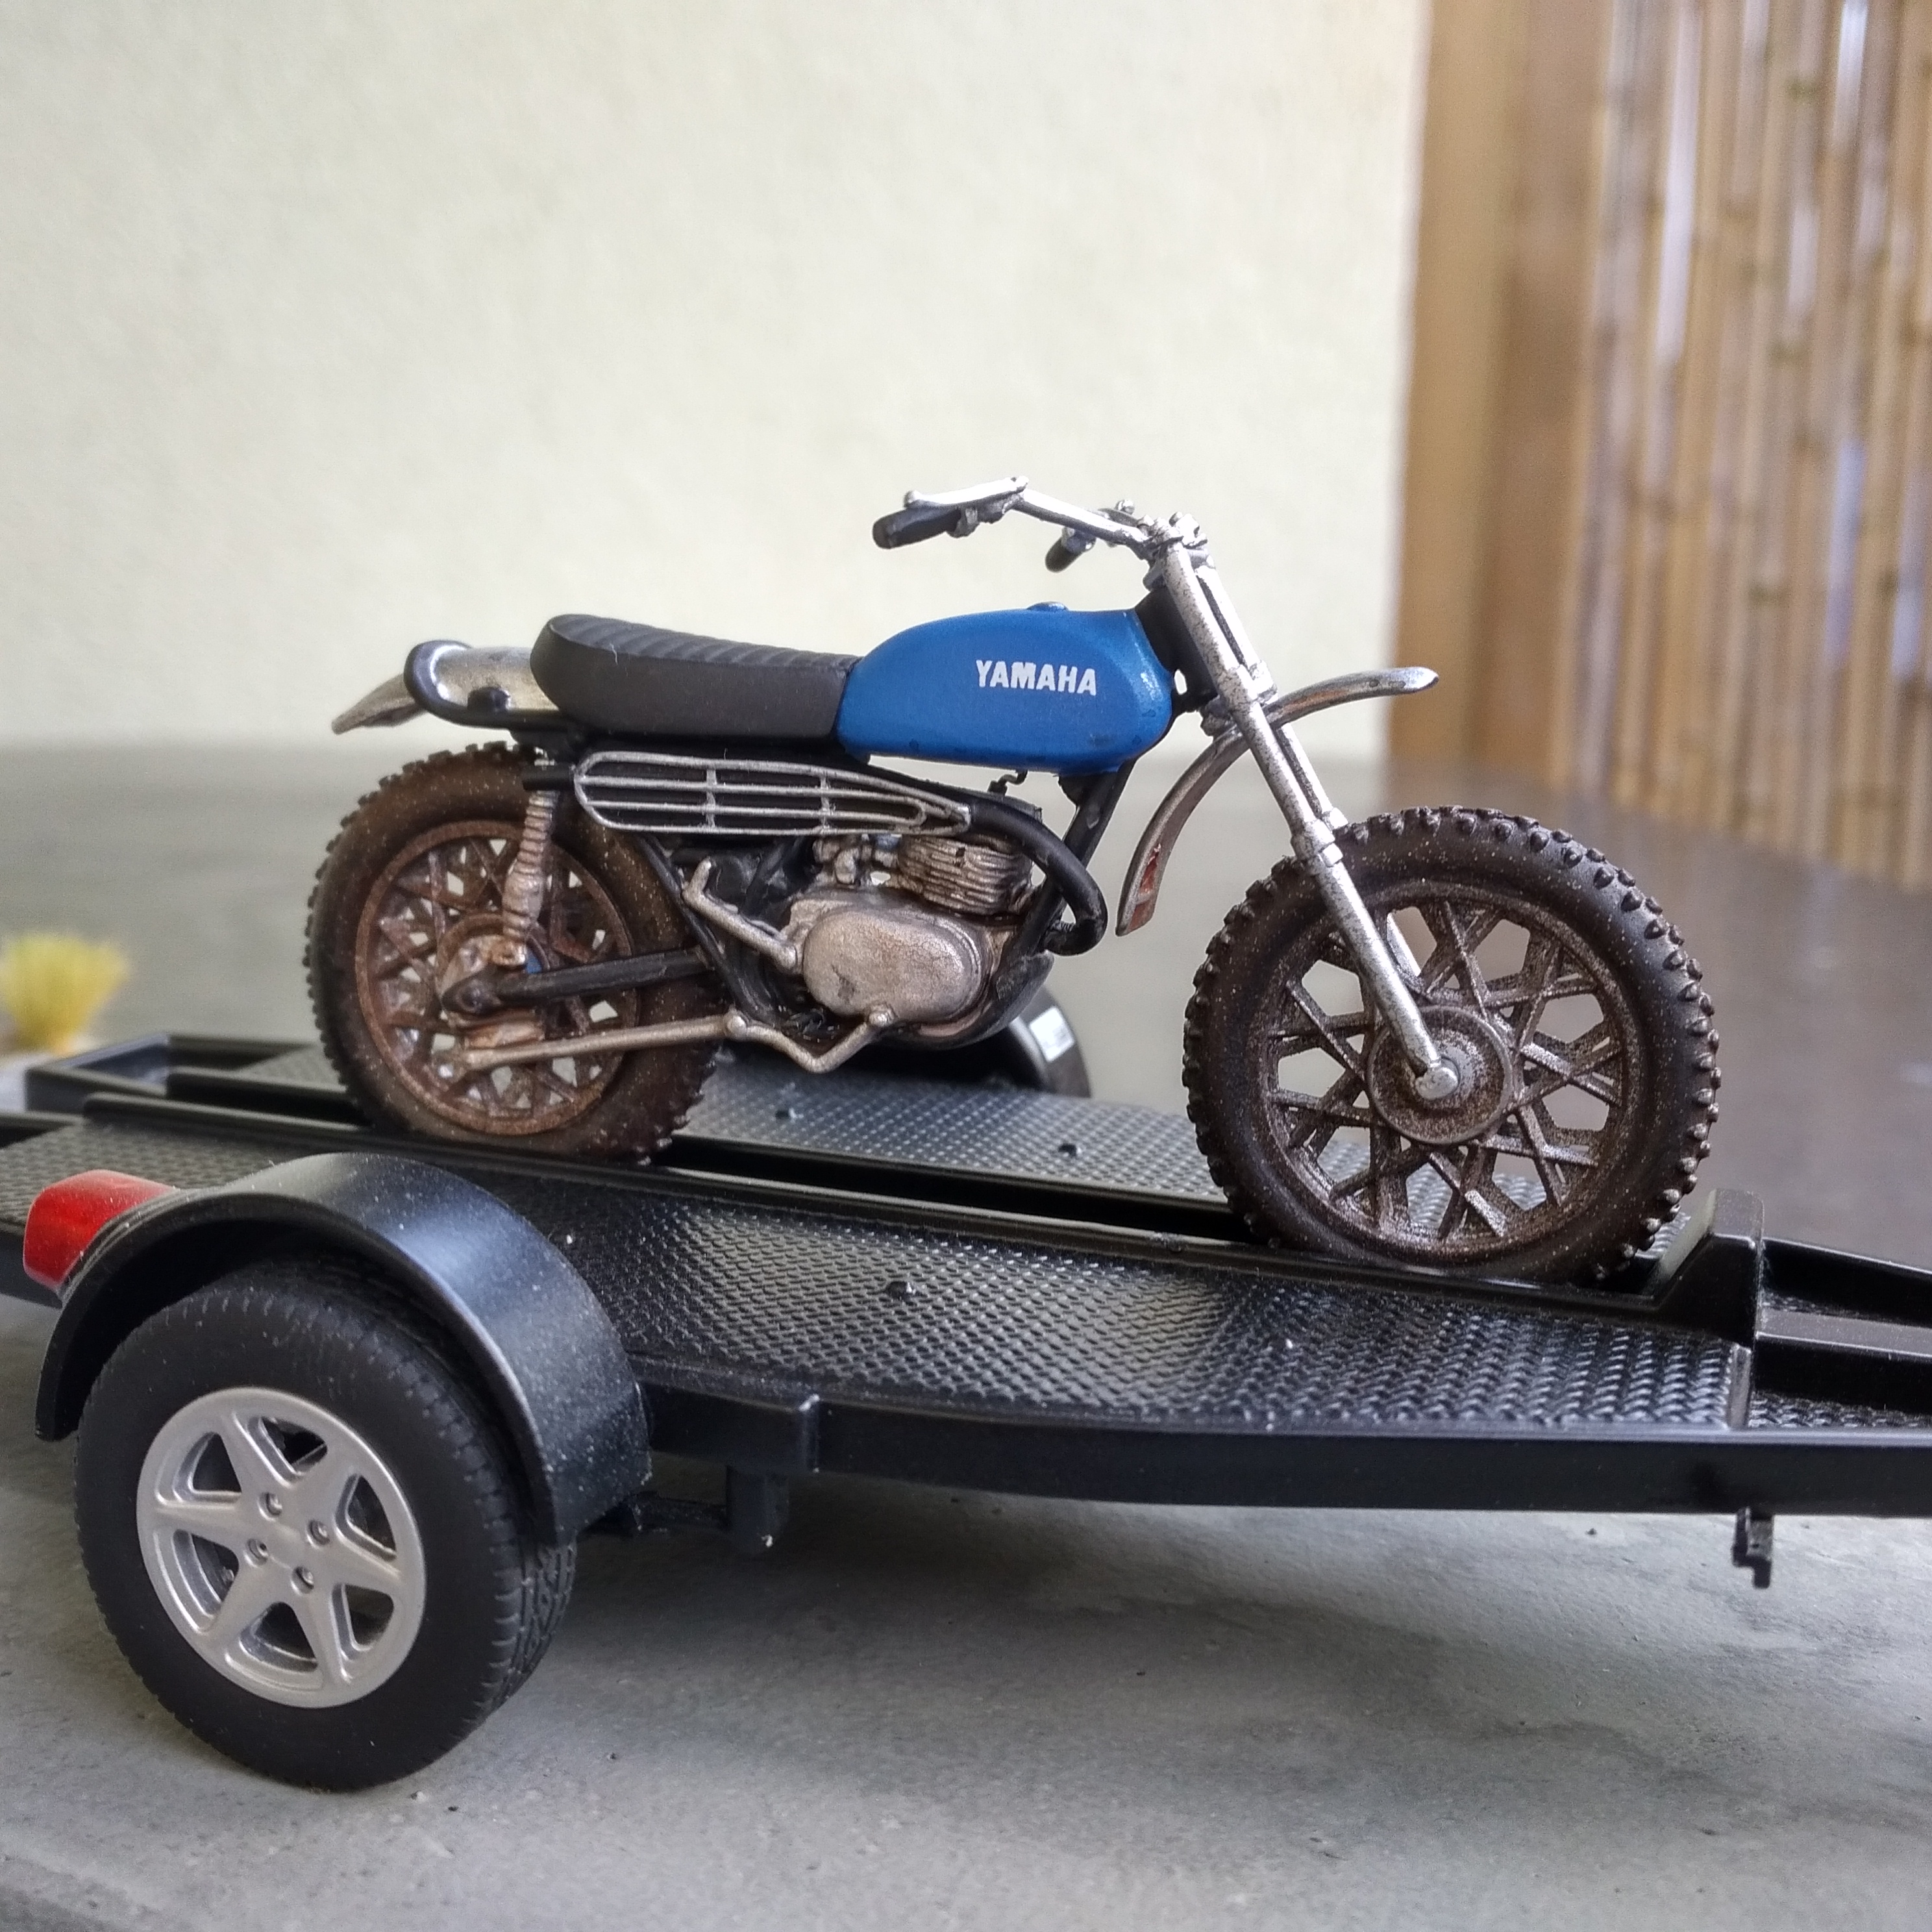
 Hey everybody, Here's my Yamaha 250 DT1 that I build from the AMT 70s Era Dirtbikes Kit. I build it to be unrestored but still in use. Thx for looking
-
I am looking for a way to create 1/25 window blinds for my current project.I am considering using .125" half round evergreen stock as the ends will not be visible.Any suggestions?Thanks for your help!
-
Has anyone heard anything from Rick? He is really good about answering emails and I have not heard from him about a small issue I had on an order and was hoping he is ok. It has been several months and that is just not like him. He has really nice decals and normally great customer service. I would like to order more if I know everything is alright. Thanks
-
Here's my finished AMT 1/25 Ford Fairlane 427 in all her glory. BTW, this is the first kit I've built in 20 years.
.jpg.6696236dd7735eb1334ca6553538761e.jpg)
.jpg.73377bfb60d0f98b138047162c8f12ef.jpg)
.jpg.1d0dfd1c49b4f9f05197077018aa67ff.jpg)