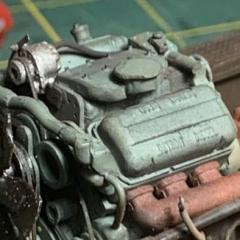
DRIPTROIT 71 Posted June 8, 2015 Posted June 8, 2015 I have been on a short hood kick lately. Here some progress pictures of my latest project. This is just a mock up Tight squeeze for the 8v-71
Guest Posted June 8, 2015 Posted June 8, 2015 Nice work Brian, I personally like short hood conventionals
Mackvision Posted June 8, 2015 Posted June 8, 2015 Very nice work! been looking over your recent posted trucks and I'm impressed with how realistic they look!............................................Mark
Old Buckaroo Posted June 8, 2015 Posted June 8, 2015 This is a very nice looking truck. Where did you source the stripe from ?
DRIPTROIT 71 Posted June 9, 2015 Author Posted June 9, 2015 Decals came from modeltruckin.com (stripes and fuel decals). I had some trouble with color bleed with this batch, but they usually work great. Oh well, my builds are never perfect. The door decals came from a supplier on Ebay.
gatorincebu Posted June 9, 2015 Posted June 9, 2015 Cool build. I admire your craftsmanship.. Be Well Gator
kilrathy10 Posted June 18, 2015 Posted June 18, 2015 Very nice looking project you got going, here.....Love the way you always open the doors.....I may have to follow suit on one of mine, this year.....Great job....
olsbooks Posted June 18, 2015 Posted June 18, 2015 Very well done! Kind off topic but what color is that you used for the seat cushions? It is spot on. The detail on the suspension is great too. Peace.
Truck parts Posted June 20, 2015 Posted June 20, 2015 That is a great build and cool colors. love the short hood
DRIPTROIT 71 Posted June 20, 2015 Author Posted June 20, 2015 Thanks for all the comments, I hope to have more photos soon. This is actually my first attempt at opening doors. Like most of my building lately, this whole build seems to have been an experiment. The seat actually is only in primer, the same as the hood was primed with, but the color has grown on me. I do need some reference photos of the Frigiking rooftop a/c unit that comes in this kit if anyone could help. Thanks again.....Brian
DRIPTROIT 71 Posted July 8, 2015 Author Posted July 8, 2015 A little more done on the interior. Doghouse finished. Seats, dash, A/C and CB installed. Floor boards, pedals, heater box, and door panels installed. Interior panels installed. Scraped the interior bucket and started from scratch. All the clearances for the engine complete.
guitarsam326 Posted July 8, 2015 Posted July 8, 2015 Lookin good! I cant get over the color, love it!
DRIPTROIT 71 Posted August 8, 2015 Author Posted August 8, 2015 Well the cab and sleeper are finally mounted for good, some pluming done on the engine, air cleaner added. I decided to add an air deflector, I really like the workhorse look. It's not perfect, but it's coming along.
Christopher J Posted August 8, 2015 Posted August 8, 2015 Fantastic looking build. I love the amount of detail being put in. Out of curiousity, how are you hinging your doors?
19nova72 Posted August 8, 2015 Posted August 8, 2015 Excellent job. That is one sharp lookin' short nose?.
DRIPTROIT 71 Posted August 8, 2015 Author Posted August 8, 2015 Fantastic looking build. I love the amount of detail being put in. Out of curiousity, how are you hinging your doors?This is actually my first try at hinging doors. I've been out of modeling for over 13 years, and just got the bug again last year. I had some old doll house piano hinges that I was going to try years ago. There are two of these type hinges on each door, with plastic rod cut to match the hinges between them to look like one continuous long hinge. I am not completely happy with the results, though they function well. Most of my models are learning experiences by trial and error. The Paystar that Sam is building has a good example of a first class hinge job, I will be trying that method the next time that I open doors. As most of you have noticed the sleeper is from the Ertl 4300 International, which already had opening doors on the left side. Thanks for the comments..Brian
Recommended Posts
Create an account or sign in to comment
You need to be a member in order to leave a comment
Create an account
Sign up for a new account in our community. It's easy!
Register a new accountSign in
Already have an account? Sign in here.
Sign In Now