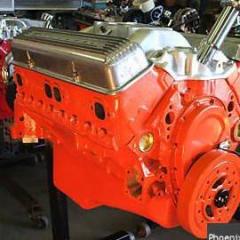
NoobModeller Posted August 16, 2016 Share Posted August 16, 2016 So I've decided to get the new retooled kit of AMT 1966 Chevy Nova (Grumpy's toy) and wanting to build it with a factory stock look, so no racing decals etc (anyway that is the plan), just starting on the interior and engine paint and assembly, any here is the work so far; The Imgur gallery is here: http://imgur.com/a/q6LDdHope that is OK. I couldn't figure out, why no matter what size of images I uploaded it always complained I was over the 24mb limit. Quote Link to comment Share on other sites More sharing options...
Lizard Racing Posted August 16, 2016 Share Posted August 16, 2016 Nice start! I think you may have the oil pan reversed. Chevy engines had their oil sump/pickups at the rear of the engine. Check the instructions, there will be a fit problem. Quote Link to comment Share on other sites More sharing options...
berr13 Posted August 16, 2016 Share Posted August 16, 2016 (edited) Think the pan is correct--early Novas with V8s had a unique oil pan for clearance. Edited August 16, 2016 by berr13 Quote Link to comment Share on other sites More sharing options...
NoobModeller Posted August 16, 2016 Author Share Posted August 16, 2016 Thanks guys, yeah I actually thought about that for the pan and then had a good google search for 1966 Nova engines for reference and checked the instructions, that is the way it's meant to go on Quote Link to comment Share on other sites More sharing options...
NoobModeller Posted August 17, 2016 Author Share Posted August 17, 2016 (edited) Hi all, Thought I'd post an update, managed to get some more paints couple of days ago. Got around to painting the battery and the terminals. Painted a colour scheme with the interior dash (but I am not quite happy how it's turned out, might scratch that and prime the dash and start again). And some extra things like intake manifold, carburetor etc. Edited August 17, 2016 by NoobModeller Quote Link to comment Share on other sites More sharing options...
NoobModeller Posted August 17, 2016 Author Share Posted August 17, 2016 And a just a wipers fluid (tried to get a half full thing going on with half white and half blue.. lol)http://imgur.com/FopDhJAAnd one more of the partial assembled (minus the carburetor because I accidentally sanded the bottom of the plastic holder too much and now won't sit above the intake manifold nicely, so I added an extra piece of plastic waiting for that to harden and try again... lol)http://imgur.com/BOrXvON Quote Link to comment Share on other sites More sharing options...
Snake45 Posted August 18, 2016 Share Posted August 18, 2016 And a just a wipers fluid (tried to get a half full thing going on with half white and half blue.. lol)http://imgur.com/FopDhJAAnd one more of the partial assembled (minus the carburetor because I accidentally sanded the bottom of the plastic holder too much and now won't sit above the intake manifold nicely, so I added an extra piece of plastic waiting for that to harden and try again... lol)http://imgur.com/BOrXvON That might have been a good thing. I remember when I built mine I couldn't put the air cleaner on AND close the hood. Quote Link to comment Share on other sites More sharing options...
NoobModeller Posted August 18, 2016 Author Share Posted August 18, 2016 So I managed to get the carburetor on there. Next step is to attempt my first ever distributor setup. Planning to use the existing distributor from the kit and hand drill a hole on top to add the ignition wires in. Does anyone have any tips on doing it this way or any other better ways? Quote Link to comment Share on other sites More sharing options...
Snake45 Posted August 19, 2016 Share Posted August 19, 2016 So I managed to get the carburetor on there. Next step is to attempt my first ever distributor setup. Planning to use the existing distributor from the kit and hand drill a hole on top to add the ignition wires in. Does anyone have any tips on doing it this way or any other better ways? Yes. DON'T go for the "parted hair" look. Correct firing order is 1-8-4-3-6-5-7-2. Quote Link to comment Share on other sites More sharing options...
NoobModeller Posted August 25, 2016 Author Share Posted August 25, 2016 So I attempted to use the existing distributor and used a pin vice to drill in to try and free up space for 8 separate pieces of wire, but was only able to get 4 in, perhaps once the glue dries, I might attempt to drill again and squeeze the other 4 in. So far only managed to get one side of the engine block done (kind of, didn't include boots). First time attempting a distro lol. I am a little unsure on how it sits though... Quote Link to comment Share on other sites More sharing options...
slusher Posted August 26, 2016 Share Posted August 26, 2016 Very nice work so far... Quote Link to comment Share on other sites More sharing options...
NoobModeller Posted August 26, 2016 Author Share Posted August 26, 2016 Thanks. So I didn't succeed with the distributor that came with the kit. Ended up using the metal distributor from Scale Productions. Because it was already prehold I only needed to drill them with the pin Vice and was able to feed the wires through. Think it turned out better this way. Quote Link to comment Share on other sites More sharing options...
randyc Posted August 26, 2016 Share Posted August 26, 2016 It's tough to drill all 9 holes in a distibutor. Have to use a really small bit of course. I found that filing the nibs off completely or leaving just a bit of them sticking up was the easiest. They need to be flat so the bit doesn't wander. And it is really hard to get them all spaced right. A bit of insulation from a larger wire (phone cable?) will make boots at the distributor and the plugs. Might want to shorten your wires up a little more prototypically as well. And thte distibutor is more or less what you have - it will be straight up from the block on a SBC. You can google different images to see how the wires run, but making them lay right is also part of it. I see models with wires running ni a nice arch, but I have never seen real ignition wiring so stiff it held a perfect arch. The wires tend to sag as they run. And may run behind the exhaust pipes instaed of in front as you have them here. It can go about anyway you want, I guess though. On a real engine, you would not want them touching the hot exhaust as they might melt and short out. Just a thought to keep in mind as you are running the wires. And the 9th wire goes from the center of distributor cap to the coil which is the plastic piece beside the distibutor. Nice work so far. Good luck as you go - this is an excellent kit and was miles beyond anything when it was first released, even with the mirror weirdly molded into the windshield. What was that - 30 years ago?Randyc Quote Link to comment Share on other sites More sharing options...
NoobModeller Posted August 28, 2016 Author Share Posted August 28, 2016 Wow thanks for the advice. That really helps a lot. Sorry guys haven't made much progress on this as I would have liked in the last couple of days (kids and work) lol. I redid the distributor wires and managed to get them a little shorter, did a dry fit into the engine bay and chassis. Looks OK. Just waiting on a few supplies like matte black paint and flocking powder and I can continue lol. More photos to come soon. Quote Link to comment Share on other sites More sharing options...
Brutalform Posted August 29, 2016 Share Posted August 29, 2016 Looking great. Always loved these cars. I usually use the pre wired distributors from Morgan Automotive Detail (MAD). This kit is going on my wish list. Quote Link to comment Share on other sites More sharing options...
NoobModeller Posted August 30, 2016 Author Share Posted August 30, 2016 Thanks! Bit hard to source MAD stuff here in Australia, usually the postage makes it not worthwhile. I've now gone and done a rookie mistake, late night wasn't thinking and just wanted to quickly do something on the kit and ended up spray painting matt black on the under carriage without any primer. Would there be any adverse effects if I just prime it over the top and sand it down necessary and spray again? Quote Link to comment Share on other sites More sharing options...
randyc Posted August 30, 2016 Share Posted August 30, 2016 What happened that you need to go back and prime? My experience is usually that Matte black works fine straight out of the can on the plastic. Did the plastic do something weird? Undercarriages have lots of textured details and take a long time to sand. If it looks okay (matte black is not shiny), leave it as is and keep building. randyc Quote Link to comment Share on other sites More sharing options...
NoobModeller Posted August 31, 2016 Author Share Posted August 31, 2016 (edited) Looks ok, just in some areas, spray didn't quite get to, so I went over with a brush with Tamiya matt black acrylic and you can notice the different in layers of paint, I might leave it and try to weather it slightly with some dirt etc, see how it turns out. Any made some more progress; first time applying alot of these techniques, i.e. flocking, distributor wire, panel line using washers, all in good fun and a learning experience I've decided on a colour scheme, I am going to go metallic blue exterior and interior use the stock one seat piece for both front and back seats and go with a blue and grey upholstery. Taking my inspiration from here: http://www.hotrod.com/articles/readers-ride-1966-chevrolet-nova/ Edited August 31, 2016 by NoobModeller Quote Link to comment Share on other sites More sharing options...
espo Posted August 31, 2016 Share Posted August 31, 2016 ARE YOU GOING TO PAINT THE FLOCKING BLUE TO MATCH THE INTERIOR ? Quote Link to comment Share on other sites More sharing options...
randyc Posted August 31, 2016 Share Posted August 31, 2016 Looking good. I thought you were building the Grumpy's Toy version. Keep building. Quote Link to comment Share on other sites More sharing options...
NoobModeller Posted August 31, 2016 Author Share Posted August 31, 2016 I was thinking about it, but was going to see how the colours play out. I was planning on building Grumpy's Toy, but decided I wanted to build it semi-drag. Quote Link to comment Share on other sites More sharing options...
randyc Posted September 1, 2016 Share Posted September 1, 2016 Works for me. GReat thing abou thte hobby is you can change things up as you go. Build it the way you want it and have fun with it. Quote Link to comment Share on other sites More sharing options...
NoobModeller Posted September 5, 2016 Author Share Posted September 5, 2016 (edited) So I screwed up (again) on the dashboard as I wanted to change colour scheme and left the plastic for a little too long trying to get paint off it and affected the hardness of the plastic, so anyhow ordered a replacement off eBay and ordered the gauges from Best Model Car Parts as well while I was it and they both arrived today. So yeah, will be busy in next couple of days Also decided to just do a bit of dry fitting to decide whether I wanted it lowered or not lol Edited September 5, 2016 by NoobModeller Quote Link to comment Share on other sites More sharing options...
KWT Posted September 5, 2016 Share Posted September 5, 2016 Looking good.. diggin that stance Quote Link to comment Share on other sites More sharing options...
NoobModeller Posted September 6, 2016 Author Share Posted September 6, 2016 (edited) Some more progress for you guys, annoyingly though the 1mm metal rod provided to couple the back wheels together is too short which makes it impossible to add either the drag or stock tyre for the back. But any here some more photos Edited September 6, 2016 by NoobModeller Quote Link to comment Share on other sites More sharing options...
Recommended Posts
Join the conversation
You can post now and register later. If you have an account, sign in now to post with your account.
Note: Your post will require moderator approval before it will be visible.