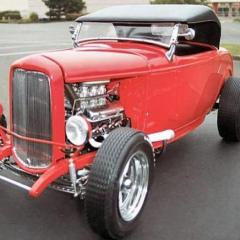
Steve Osbourne Posted November 10, 2017 Share Posted November 10, 2017 I'm getting close to completing this build. Here are a few photos of the sub-assemblies. Frame rails were boxed and cross-members were reinforced. Firestone bigs & littles are from Big Deuce kit. Fender brackets had to be modified to allow for the larger tires. Chopped windshield is scratch built. Moon tank was made from PVC tubing. Roll bar is made from Plastruct tubing and fittings. I ruined the kit banjo rear end so I used a Pontiac Trans Am unit from the spare parts box. Dash is wood veneer that has been decopauged and drilled out. Gauge bezels are aluminum tube. Quote Link to comment Share on other sites More sharing options...
iBorg Posted November 10, 2017 Share Posted November 10, 2017 This is the Lindberg 1/8 kit? Seriously? The box art looked so bad, I saw no potential in it. Your build shows that as a mistake in judgement. Great build! Quote Link to comment Share on other sites More sharing options...
Steve Osbourne Posted November 10, 2017 Author Share Posted November 10, 2017 Interior panels are velour Contac paper. Carpet is adhesive-backed felt. Steering wheel is made from Model T outer rim (due to its smaller size) and the center spoke part from the kit's custom steering wheel. Moon gas pedal (trimmed down) is from Big Deuce. Steering wheel drop is scratch built. Kit pedal pads were made from pipe screens. Gear shift lever is 1/16" aluminum tube. Knob is a sewing (dress?) pin. Seats are from the Lindberg Tall T. Console between the seats was made to represent where the battery is (no battery in there though). Engine is kit Ford Y-block with a few additions from the spare parts box. Quote Link to comment Share on other sites More sharing options...
Steve Osbourne Posted November 10, 2017 Author Share Posted November 10, 2017 I added a bracket to the frame (made from Evergreen square tubing) so I can mount the interior bucket easier during final assembly. It will mount with screws that will be hidden under a false floor covered with felt. Transmission is from the kit. Pinion yoke and driveshaft use 3-D parts from TDR specialties. Quote Link to comment Share on other sites More sharing options...
Steve Osbourne Posted November 10, 2017 Author Share Posted November 10, 2017 This is the Lindberg 1/8 kit? Seriously? The box art looked so bad, I saw no potential in it. Your build shows that as a mistake in judgement. Great build! Thanks Mike. I've used this kit for parts on other builds before but never did a build up until now. I think it's under-rated. Note that I used very little chrome. The gas cap is most notable. It's a knock-off hub cap from the parts box. Quote Link to comment Share on other sites More sharing options...
Steve Osbourne Posted November 10, 2017 Author Share Posted November 10, 2017 more sub-assemblies. License plate is from MINIPL8S. License rim is made from Evergreen sheet. Taillights are from the Big Deuce. Quote Link to comment Share on other sites More sharing options...
Mr mopar Posted November 10, 2017 Share Posted November 10, 2017 looki'n good that dashboard look so real nice work ! Quote Link to comment Share on other sites More sharing options...
Steve Osbourne Posted November 10, 2017 Author Share Posted November 10, 2017 more subs. Right now I'm working on the firewall and wiring. I'm doing only basic wiring - starter solenoid, voltage regulator, generator, ignition, starter, etc. Also working on the intake manifold with six Stromberg 97's. Quote Link to comment Share on other sites More sharing options...
Ace-Garageguy Posted November 10, 2017 Share Posted November 10, 2017 Very fine work on replacing all the molded hardware with actual threaded fasteners, scratch-built springs, etc. You're bringing this up to the level of a Pocher kit...possibly beyond.I see you've modified the trans output shaft to incorporate the correct style universal-joint yoke to work with the open driveline you'll need with the Poncho diff. A+ for engineering. Quote Link to comment Share on other sites More sharing options...
Steve Osbourne Posted November 10, 2017 Author Share Posted November 10, 2017 Very fine work on replacing all the molded hardware with actual threaded fasteners, scratch-built springs, etc. You're bringing this up to the level of a Pocher kit...possibly beyond.I see you've modified the trans output shaft to incorporate the correct style universal-joint yoke to work with the open driveline you'll need with the Poncho diff. A+ for engineering.Thanks Bill! Quote Link to comment Share on other sites More sharing options...
Dave Van Posted November 10, 2017 Share Posted November 10, 2017 My favorite......super clean building!!!! Glad I picked up 2 when Pllies had them! Quote Link to comment Share on other sites More sharing options...
Steve Osbourne Posted November 10, 2017 Author Share Posted November 10, 2017 I had to modify the wheels since the kit wheels didn't fit the Firestone tires. So I used the inner part of the kit wheels, drilled out for lugs, and the outer wheel from the Big T kit. Anyone that has used these tires probably know that they are a bit flimsy. This is easily fixed by making a "donut" from 1" thick foam rubber from the craft store. The wheels were sprayed with Tamiya Titanium Silver. Quote Link to comment Share on other sites More sharing options...
Steve Osbourne Posted November 10, 2017 Author Share Posted November 10, 2017 this is as far as I've gotten with the firewall. I moved the coil and master cylinder down from where the kit wants them installed. I need to add hardware to the voltage regulator and run wires. All wires entering the firewall will be hidden from the rear (interior side) by a panel covered with the black felt carpet. Also note that the pedals are mounted using a piece of threaded rod which allows me to adjust their location slightly. The clutch pedal in the previous photos will be moved a little to the left during final assembly. It was too close to the steering column. Quote Link to comment Share on other sites More sharing options...
1930fordpickup Posted November 10, 2017 Share Posted November 10, 2017 Very nice. I am glad you are sharing. Quote Link to comment Share on other sites More sharing options...
Lovefordgalaxie Posted November 10, 2017 Share Posted November 10, 2017 Is the Y-Block V8 from the kit? Quote Link to comment Share on other sites More sharing options...
Draggon Posted November 10, 2017 Share Posted November 10, 2017 This has got to be the most detailed build up of this kit, ever. Great work! Quote Link to comment Share on other sites More sharing options...
Steve Osbourne Posted November 10, 2017 Author Share Posted November 10, 2017 Is the Y-Block V8 from the kit? Yes. It's the kit engine. One small drawback which was easily overcome is that the engine was designed to add a small electric motor which when not used requires the builder to add internal bracing to aid the assembly since the electric motor mounts are not used and would normally provide that bracing. Note that I treated the engine-to-frame mount piece as more of a cross-member and painted it the same color as the frame, bucket, truck bed, etc. Here is a picture of the engine front sub-assembly. Using the sub-assembly approach allowed for test-fitting the engine mounts to the frame before final assembly. You can see in the photo where I have scraped off the paint until I got a nice fit. Quote Link to comment Share on other sites More sharing options...
Davewilly Posted November 10, 2017 Share Posted November 10, 2017 Nice looking big T Some nice details on it. Quote Link to comment Share on other sites More sharing options...
oldnslow Posted November 10, 2017 Share Posted November 10, 2017 Nice looking T Quote Link to comment Share on other sites More sharing options...
TooOld Posted November 10, 2017 Share Posted November 10, 2017 Great detailing on a very overlooked kit ! I've always thought this kit had some potential and it's great to see one being done right ! Quote Link to comment Share on other sites More sharing options...
Dave Van Posted November 10, 2017 Share Posted November 10, 2017 That fire wall looks more real than my 1/1 46 Ford!!!! Quote Link to comment Share on other sites More sharing options...
dino246gt Posted November 12, 2017 Share Posted November 12, 2017 Wow, this is a great build, so much detail, I love it. Can't wait to see more, looks totally real! Quote Link to comment Share on other sites More sharing options...
Steve Osbourne Posted November 12, 2017 Author Share Posted November 12, 2017 Thanks for the comments guys. I really appreciate it. I finished wiring the firewall today. Please note that my wiring is basic and representative at best and not meant to exactly replicate a particular car. I've included close-up photos of the starter and generator to show where the wires from the firewall will be inserted during final assembly. I used a small brass "eye pin" to attach the starter wire. The one wire already on the generator will be inserted into the "ignition" hole on the firewall. The fuel lines shown are place holders for now. The actual fuel lines will commence at the carbs and be cut to length. Coil wire from distributor will also just be inserted during final assembly. I've also included my wiring diagram. Quote Link to comment Share on other sites More sharing options...
Steve Osbourne Posted November 13, 2017 Author Share Posted November 13, 2017 I wanted to mention a few modifications I made to aid assembly. The kit design expects you to glue the steering box to a semi-circle flange on the frame rail. That didn't make sense to me but also since my steering modifications would require me to cut a new hole in the floorboard kick panel and I wanted to be able to make minor adjustments during final assembly - if required. I ended up adding a small piece of Evergreen tube to the frame mount. The photos should explain it better. I just had to fill the original hole. I used two more pieces of telescoping tube for the upper part of the steering column. One piece which slides on above the steering wheel drop and another smaller piece that matches the diameter of the steering wheel hub. I also added a turn signal lever made from a ball-head pin. I know that's weird since purposely omitted other items like mirrors, windshield wipers, etc. Quote Link to comment Share on other sites More sharing options...
Steve Osbourne Posted November 13, 2017 Author Share Posted November 13, 2017 I treated the seats and center console cover as a separate assembly. That made the addition of other details much easier and the entire assembly just pops in. Quote Link to comment Share on other sites More sharing options...
Recommended Posts
Join the conversation
You can post now and register later. If you have an account, sign in now to post with your account.
Note: Your post will require moderator approval before it will be visible.