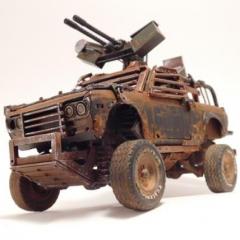
Daxman Posted January 19, 2018 Posted January 19, 2018 (edited) I'm working on 2 VW beetles. Both are hover cars. They'll be completely different from each other. I stopped working on the first one because I'm really excited about this one. I cut the bug in half down the middle. Then sanded off more than 1/3. Making the turbines from scratch. All from styrene rod and some Ford Raptor rims. When it's complete, I don't believe you'll see the face of the Raptor rims. I only used them for the details that are usually covered by the tires. The backside of the rim. Some moveable rear thrusters for vertical take off and high speed turns. Covering up the old passenger door. I had visions of the Return of the Jedi Speeder bikes. I made the front wings for flight control from the 2 front seats. Edited January 19, 2018 by Daxman removed photo
DumpyDan Posted January 19, 2018 Posted January 19, 2018 Impressive stuff you got going on, gonna keep watching I like it alot
restoman Posted January 19, 2018 Posted January 19, 2018 I'm liking this much more than I thought I would. Keep the pics coming!
Modelbuilder Mark Posted January 21, 2018 Posted January 21, 2018 Really looking forward to seeing more on this. I really enjoy your creativity.
Daxman Posted January 22, 2018 Author Posted January 22, 2018 Thanks guys! I changed out the rear side turbines for a better set. Scratch built these this weekend. It's only going to have the driver's seat. The rear seat area will be separated by a firewall. The back seat will be crammed with all kinds of engine parts. Intakes, pipes, wires... The plan is to have the two rear side windows as intakes. Possibly the rear window as well.
misterNNL Posted January 24, 2018 Posted January 24, 2018 I particularly like that last photo.The hood piece gives it a "bird of prey" look that is very cool.
Daxman Posted January 26, 2018 Author Posted January 26, 2018 I added these intakes to feed the rear turbines. Still not sure where this is going. I'm imagining a future, retro, race car. Racing numbers on the side, with some sponsors. Not sure if I want to do a vintage style or a more futuristic look. I haven't used decals since I was first building models. This is going to be my biggest problem after finding a paint scheme that matches the car.
Eric Macleod Posted January 26, 2018 Posted January 26, 2018 I have no idea where its going either, but like what I see so far. Your workmanship is top notch. I like what I see here.
misterNNL Posted January 26, 2018 Posted January 26, 2018 If this were my project I would be planning a metallic finish in differing shades with some signs of abrasion from contact with debris while in use. For decals or markings how about a futuristic rental car theme such as "Rent-A-Rocket" or something like that. The only limits here are your imagination.
GerN Posted January 26, 2018 Posted January 26, 2018 Fantastic! Don't forget decals need a glossy surface (not matte) to avoid silvering.
Mr Dedo Posted January 26, 2018 Posted January 26, 2018 Maybe it doesn't need decals. How about more washes and detail painting...
vintagercr Posted January 27, 2018 Posted January 27, 2018 You sure do luv dem rocket builds. I enjoy seeing your work
Daxman Posted January 28, 2018 Author Posted January 28, 2018 I added a small strip of styrene for the front fenders. Experimented with the headlight placement. I'll have to make some kind of a cool fixture to hold the headlamps. The front wings are now linked and turn together.
misterNNL Posted January 28, 2018 Posted January 28, 2018 Those lights need some help my friend. Being in that location might be OK but the mounts look too weak. Something more mechanical or possibly even retractable on cylinders so they could be tucked away when not in use. The rest of your design works really well.
Daxman Posted February 8, 2018 Author Posted February 8, 2018 On 1/28/2018 at 5:35 PM, misterNNL said: Those lights need some help my friend. Being in that location might be OK but the mounts look too weak. Something more mechanical or possibly even retractable on cylinders so they could be tucked away when not in use. The rest of your design works really well. Yes, I was just trying to get the correct placement for the headlights. I need to make a bracket of some sort that fits the character if the car. I painted the turbines. They'll be weathered of course. The 2 intakes on top of the turbines are made from the grill of a 70 Camaro cut in half. If you look close, you can see the "454" badge peeking out from under the divider. I hope to add more cool interior gadgets. A second gauge cluster behind the one shown. Lots of control sticks and buttons! The plan for now is to paint a two-tone baby blue and white combo. Blue on the top and fenders, white on the door areas. I think that I'll use those colors on the little extras like the wings and the side thrusters. I have not decided what to do with the side window vents. Aluminum or body color?
misterNNL Posted February 8, 2018 Posted February 8, 2018 Those side windows might look very cool in a reflective glass like a lot of modern day windows with a reflective outer surface but clear from the inside.Over all a great use of "gizmology"by scrapping out outdated internal combustion era parts to build a sustainable mode of transportation.
ismaelg Posted February 11, 2018 Posted February 11, 2018 Really really enjoying this! And I only build replica and factory stock.
Daxman Posted February 17, 2018 Author Posted February 17, 2018 Added some color and started weathering last night. I'm loving the color!
Recommended Posts
Create an account or sign in to comment
You need to be a member in order to leave a comment
Create an account
Sign up for a new account in our community. It's easy!
Register a new accountSign in
Already have an account? Sign in here.
Sign In Now