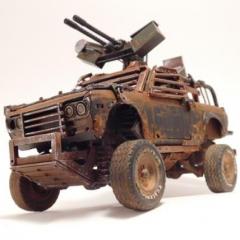
Daxman Posted November 16, 2018 Posted November 16, 2018 I started this model about a week ago. It's moving along fast and I'm really excited about it. I went to the local small hobby store looking for anything that I could turn into a hover car. I ran across this 47 Chevy Fleetmaster and I couldn't resist. The huge front fenders that extend past the door hinges look like they were meant to hold turbines. It's perfect for a Diesel Punk style hover car. The kit is by Galaxie and it appears to be very well made although it cost around twice what I would normally pay for a model. The photos below are what I've mocked up so far. I've removed the rear fenders from the body and made a hinged assembly that will hold the main thrust turbine. It pivots for take off and flight. Similar to the 1st jet car I built a few years ago. The segmented hose under the car is from a donated Gundam kit. My son gave me 2 complete kits to use for scrap parts. He also gave me the base. Yay me. Hydraulic lines, hoses and wires will be abundant. Along with some grease and weathering. The front and rear fenders have a much wider stance. I plan to add more mechanical parts in between the new spaces created. I may cover the wheel wells. I made the trunk lid removable so that you can see the inner workings. Thank you for looking!
Daxman Posted November 17, 2018 Author Posted November 17, 2018 On 11/16/2018 at 5:19 AM, afx said: Always enjoy your builds Dax. Thanks JC! I appreciate the support! This build really has me motivated. I have 2 other models at 90% complete that are now put on hold. I couldn't resist putting on some steel highlights. It now shows how far the fenders stick out from the body. I really like the look of the rear wheel well covers. Might have to make some for the front. Going to drop the fuel tank under the hood. Experimenting with the rear induction assembly. I'll have to add intake vents onto the trunk lid.
Anglia105E Posted November 18, 2018 Posted November 18, 2018 What a great idea Dax...... while this is not my kinda build, I do understand your thinking behind this project. It is a nice scale model car in it's own right, but what you are planning to do to it is intriguing. I shall come back to follow your work in progress, and good luck with it. David
Daxman Posted November 25, 2018 Author Posted November 25, 2018 I made some progress over the Thanksgiving Holiday. I mostly worked on the rear thruster/turbine (I never know what to call it). I need to make front wheel well covers similar to the rear. The intake grill at the trunk...I may lower the louvers slightly. The angle seems too steep. I'd love to make these move, but that's too complicated for me right now. When I widened the front and rear, I had to cut the bumpers to take into account the extra width. I'll need to find a way to hide the gaps or make new bumpers. The rear trubine is hinged under the car at the frame. It'll have 2 stances. The above stance would be cruising speed. Liftoff or acceleration stance, the rear would pivot downward slightly . Here's a better look at the rear turbine. I took the intake fan off of a Peterbilt semi radiator. It gives it a good Dieselpunk feel. I'll try to add more wires, hoses and gadgets as I go. That's the fun part for me. The little extras. There's actually a 3rd stance. The Slow and Low stance. Miscellaneous Gundam parts on the undercarriage. Thanks for looking!! Sorry for the slow updates.
Daxman Posted November 25, 2018 Author Posted November 25, 2018 On 11/18/2018 at 4:54 AM, Anglia105E said: What a great idea Dax...... while this is not my kinda build, I do understand your thinking behind this project. It is a nice scale model car in it's own right, but what you are planning to do to it is intriguing. I shall come back to follow your work in progress, and good luck with it. David Thanks David. I started making hover cars about three years ago. They're great fun to build. I suggest more people try it. I started a community build on these forums a while back. It would be great to see a few more people trying these out. Its a good way to clear out the bin of extra parts. http://www.modelcarsmag.com/forums/topic/129359-jet-rod-community-build/ This model kit is fantastic. As I said earlier, it was a bit expensive. I paid $48 at a local hobby shop. I usually pay around $25 max. It was worth it.
Koellefornia Kid Posted November 25, 2018 Posted November 25, 2018 Wow, there´s some awesome detail work going on here 7 hours ago, Daxman said: Thanks for looking!! Sorry for the slow updates. Don´t worry, Dax! It´s worth the wait!
montelsc Posted November 25, 2018 Posted November 25, 2018 I don't normally get into these early cars im a 60s/70s builder but when I see one getting started I get more and more interested cant wait to see more
Anglia105E Posted November 25, 2018 Posted November 25, 2018 Dax..... That is a very nice looking kit of the '47 Chevy, and I had a look on Ebay to find there is only one listed, which is an Aerosedan. Seems to have wooden panels on the doors and the kit is priced at £31.01, which is around US $. 39.76 and quite rare now. Here is the link for you.... https://www.ebay.co.uk/itm/GALAXIE-13012-1947-CHEVY-FLEETMASTER-AEROSEDAN-1-25-Model-Car-Mountain-FS/142941461718?epid=7023859159&hash=item2147f99cd6:g:MUAAAOSwFpVbUNeb:rk:26:pf:0 David
Daxman Posted November 29, 2018 Author Posted November 29, 2018 I think this model will be a little cleaner than my previous jet cars. Not showroom clean by any means, but used with some soot and grease. I think I'll go light on the rust. I haven't decided on a color yet. I added a little detail under the hood. I needed something to fill the gap. I hope to add a linkage to the exhaust at the front fenders.
Lunajammer Posted November 29, 2018 Posted November 29, 2018 I absolutely admire your grasp and execution of this whole genre, with this and your other builds. I've been working in the steampunk genre in my other hobbies and because I don't have a natural grasp of it, I spend long hours trying to learn and struggle to execute the looks I want. Dieselpunk, which is essentially what you're doing here, is the same. If you get it, it comes naturally and you appear to execute this stuff with ease. Salud.
Daxman Posted November 30, 2018 Author Posted November 30, 2018 12 hours ago, Lunajammer said: I absolutely admire your grasp and execution of this whole genre, with this and your other builds. I've been working in the steampunk genre in my other hobbies and because I don't have a natural grasp of it, I spend long hours trying to learn and struggle to execute the looks I want. Dieselpunk, which is essentially what you're doing here, is the same. If you get it, it comes naturally and you appear to execute this stuff with ease. Salud. Thank you Mike, I appreciate it! One of the ideas that I try to stick to when I build one of these, is making them somewhat "realistic".....Using that term very, lightly here! Of course we will never have vintage flying cars with huge turbines spewing flames feet away from the pilot. It's absurd and highly impractical, but they sure look cool! There are little details that I try to put in, to make them appear as if they actually could fly. With 3+ turbines per vehicle, you need a ton of fuel for even a short flight. All of my jet cars have huge fuel tanks mounted under the hood. And to add to the Deiselpunk look, I usually make the fuel filler cap stick up thru the hood. They also have blast plates behind the front turbines. I figured that so much heat would melt the car body. They have heat deflectors or thick plates to help dissipate the heat. For the dieselpunk look, I try to add lots of thick and unnecessary steel pieces. I add visible hoses and plumbing under the car. I cut hexagonal styrene rod to make visible bolt heads. I like the bolt heads to show, so I use them generously. I will usually try to over-exaggerate the intake vents. Each of the jet cars have a unique intake for the rear turbine. I also try to keep the body lines and shapes to the original car.
mod3l Lover Posted November 30, 2018 Posted November 30, 2018 I too just love the things you come up with Dax!! Following along on your 32 Ford coupe (if I remember right) was a lot fun. Some of those pics I even saved for inspiration to hopefully try something fun myself!! Your imagination on these cool little builds is up there with the old school movie prop builders!!! You need to do a "Heavy Metal" style animated short flick and use those little gems. I would watch it for sure!! Maybe with the Lego super heros or something. Or Wallace and Grommet!?! LOL!! Build happy, David S.
mod3l Lover Posted November 30, 2018 Posted November 30, 2018 Oh yeah, also I love the Flight-Master name too!! Cool play on words!!! David S.
Daxman Posted December 6, 2018 Author Posted December 6, 2018 On 11/30/2018 at 10:25 AM, mod3l Lover said: I too just love the things you come up with Dax!! Following along on your 32 Ford coupe (if I remember right) was a lot fun. Some of those pics I even saved for inspiration to hopefully try something fun myself!! Your imagination on these cool little builds is up there with the old school movie prop builders!!! You need to do a "Heavy Metal" style animated short flick and use those little gems. I would watch it for sure!! Maybe with the Lego super heros or something. Or Wallace and Grommet!?! LOL!! Build happy, David S. David, That 32 Ford coupe that I made last year really surprised me. I had a vision of what it would look like from the start, but I kept changing the model as I went. It turned out much better than I could have imagined. Definitely my favorite model I've ever built. It got me a first place trophy in the miscellaneous class at the Kansas City model show this year. Thank you for the kind words!!! I carved out the opening for a new grill. In the photos below, I added an experimental grill. I like the look. I'll need to clean it up and figure out how the headlights and turn signals will mount. I also made some front wheel well covers. There's a gap between the front fenders and the body where the metal slats end. I would like to put some hydraulics and plumbing lines in that space. There will also be mechanical parts hanging low from under the front fenders. I'm still not sure where I'm going with this car as far as color and weathering. I keep imagining the body as black with dark metallic bits and pieces. I added bolt heads to the metal slats. I think this area will be a good spot for weathering. Since I had to widen the body, I had to widen the bumpers front and rear. Working on the rear bumper tonight. Not a very good photo. It looks better directly from the rear. I think it'll look good after I clean it up. I need to remove some of the point at the very end of the hood. Then I'll continue the hood down to the bumper, splitting the grill.
DumpyDan Posted December 7, 2018 Posted December 7, 2018 Interesting build, wild thinking really great especially the detailing.
misterNNL Posted December 7, 2018 Posted December 7, 2018 On 11/24/2018 at 10:18 PM, Daxman said: I made some progress over the Thanksgiving Holiday. I mostly worked on the rear thruster/turbine (I never know what to call it). I need to make front wheel well covers similar to the rear. The intake grill at the trunk...I may lower the louvers slightly. The angle seems too steep. I'd love to make these move, but that's too complicated for me right now. When I widened the front and rear, I had to cut the bumpers to take into account the extra width. I'll need to find a way to hide the gaps or make new bumpers. The rear trubine is hinged under the car at the frame. It'll have 2 stances. The above stance would be cruising speed. Liftoff or acceleration stance, the rear would pivot downward slightly . Here's a better look at the rear turbine. I took the intake fan off of a Peterbilt semi radiator. It gives it a good Dieselpunk feel. I'll try to add more wires, hoses and gadgets as I go. That's the fun part for me. The little extras. There's actually a 3rd stance. The Slow and Low stance. Miscellaneous Gundam parts on the undercarriage. Thanks for looking!! Sorry for the slow updates. Rather than changing the angle of the truck lid louvers you might possibly add some aerodynamic device to the roof to direct air flow over that section and into those vents and possibly an injector system for the new section to add more fuel or "power-up" fluid prior to the intake. See now you've got me talking in jet car speak!
Daxman Posted December 20, 2018 Author Posted December 20, 2018 I painted the body with Fifties Aqua. I plan to paint the white on the roof over with a light cream color. I'll make the interior light cream as well. I love the aqua color. Unfortunately I'm not a professional with shiny paint jobs. There's a few flaws including a fingerprint. I can cover the flaws with some light sanding and weathering. I lowered the rear louvers slightly.
FabbricaP Posted December 20, 2018 Posted December 20, 2018 Wow awesome start I really like your color choice! This looks like a great base kit for a hover car
Ich_Will Posted December 20, 2018 Posted December 20, 2018 Holy cats, that's super cool. I wish I was creative like this... will be following along on this one.
Anglia105E Posted December 20, 2018 Posted December 20, 2018 Dax...... I think this is a very brave thing to do...... because done badly, this idea could look silly, but done brilliantly ( as in your case ) the whole concept is absolutely convincing. Even in the red primer sort of colour this car looks marvellous, but now you are applying the '50's aqua paint colour and also the light cream colour the car is coming alive. You are clearly having a lot of fun with the detail. Good luck when you take this model to a show or competition Dax. David
espo Posted December 20, 2018 Posted December 20, 2018 I was just getting to like the gritty look of the red oxide primer, and then you come along with a timely tutone color combo. Nice colors, are you going to have exhaust stains on the exterior or stay with the clean look ?
misterNNL Posted December 22, 2018 Posted December 22, 2018 (edited) I am not sure about the two tone body color scheme. You have essentially blown the body apart into sections.The rust primer along with the new parts spanning the gaps between the fenders and main body were holding it together but new the two tone paint separates it again. I await the finished product with final details and weathering in place to see where it finishes. Great overall concept and the execution renders it all very believable. These are of course only my humble opinion. To see more ideas for hover vehicles there are a lot on Pintrest. Simply go there and type in Hover cars to see some thought provoking ideas for your own future projects. Edited December 22, 2018 by misterNNL
Daxman Posted December 24, 2018 Author Posted December 24, 2018 Thanks for the comments! On 12/20/2018 at 8:19 AM, espo said: I was just getting to like the gritty look of the red oxide primer, and then you come along with a timely tutone color combo. Nice colors, are you going to have exhaust stains on the exterior or stay with the clean look ? It's going to be weathered. It's something I really enjoy doing. Plus I think it tells a story as well as gives it a little character. On 12/20/2018 at 6:23 AM, FabbricaP said: Wow awesome start I really like your color choice! This looks like a great base kit for a hover car Thank you! Another kit that I've been eyeballing at the model shop is a 53 Hudson Hornet. It has nice lines for a hover car. I'm thinking about getting it next time I go. On 12/21/2018 at 8:37 PM, misterNNL said: I am not sure about the two tone body color scheme. You have essentially blown the body apart into sections.The rust primer along with the new parts spanning the gaps between the fenders and main body were holding it together but new the two tone paint separates it again. I await the finished product with final details and weathering in place to see where it finishes. Great overall concept and the execution renders it all very believable. These are of course only my humble opinion. To see more ideas for hover vehicles there are a lot on Pintrest. Simply go there and type in Hover cars to see some thought provoking ideas for your own future projects. I'm in the process of stripping the paint and starting over. I had way too many flaws in the paint and that was really just a test to see what it was going to look like. It'll be the same blue on the body with a light cream color on the interior and the roof. I may do some other highlights with the cream color. The rust color inner workings will probably be a little lighter in color than the last photos. I hope to tie the whole car together with the weathering. I'm going to try to use the chipping technique for weathering on this one. I've tried it before without much luck. I just watched another video yesterday and I'm hopeful to try it again.
Recommended Posts
Create an account or sign in to comment
You need to be a member in order to leave a comment
Create an account
Sign up for a new account in our community. It's easy!
Register a new accountSign in
Already have an account? Sign in here.
Sign In Now