slusher Posted March 15, 2020 Posted March 15, 2020 Looking really awesome Matt, enjoying your build....
Rotorbolt73 Posted March 15, 2020 Author Posted March 15, 2020 (edited) Thanks. Here's the painted body, hood and rear valance . Decided to build it like the box art. Primer used is Rust-Oleum red oxide , paint color is Testors 1831m fiery orange lacquer with Testors 2936 clear coat. Not the best pic cause it is still cloudy outside. Edited March 15, 2020 by Rotorbolt73
Scott8950 Posted March 15, 2020 Posted March 15, 2020 Nice job on this build, testors fiery orange is an absolutely beautiful color and looks great on the gto.
Rotorbolt73 Posted March 20, 2020 Author Posted March 20, 2020 Painted the headliner area. Progress has been slow this week due to this craziness going on.
slusher Posted March 20, 2020 Posted March 20, 2020 I like the color a lot. How did you do the body chrome?
Kit Karson Posted March 20, 2020 Posted March 20, 2020 On 3/15/2020 at 1:24 AM, slusher said: Looking really awesome Matt, enjoying your build.... Ditto! -KK
Rotorbolt73 Posted March 20, 2020 Author Posted March 20, 2020 Thanks, body chrome is done with good old fashioned testors 1146 argent silver bottle paint applied by brush in the old school way....my molotow pen is dead and nothing more than a silver marker now. Got the main sub assemblies together and now putting on all the small exterior and engine bay details. One thing I found out is you will have to notch the battery to fit as shown. Note the parts box radiator hose..kit does not come with one.
Rotorbolt73 Posted March 21, 2020 Author Posted March 21, 2020 Wired up the engine , added upper an lower radiator hoses, heater hoses and battery cables to make the engine bay a bit less bland.
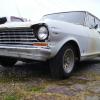
Rotorbolt73 Posted March 21, 2020 Author Posted March 21, 2020 Well it's finished..proving this kit CAN be built.
Scott8950 Posted March 22, 2020 Posted March 22, 2020 Probably the best I've seen this kit built! Nice job for sure
Rotorbolt73 Posted March 22, 2020 Author Posted March 22, 2020 Thanks guys, I have more pics of it over in the under glass section.
SSNJim Posted May 2, 2020 Posted May 2, 2020 On 1/28/2020 at 2:43 PM, Oldcarfan27 said: Here's how I resolved that issue, The quarter panels are too narrow and the trunk ends at too much of a point. So I sliced the fenders and bent the trunk upwards and filled the spaces with plastic. I also slightly widened the fenders at the same time. How much did you raise the trunk to resolve the point issue? I didn't realize how bad that was until I saw the green GTO. I'm now working on the orange Ollie's GTO and have the width issue taken care of, so the rear bumper fits like it should. After this, I need to figure out how to fix the headlights, and I'll be golden.
Oldcarfan27 Posted May 4, 2020 Posted May 4, 2020 On 5/2/2020 at 3:31 PM, SSNJim said: How much did you raise the trunk to resolve the point issue? I didn't realize how bad that was until I saw the green GTO. I'm now working on the orange Ollie's GTO and have the width issue taken care of, so the rear bumper fits like it should. After this, I need to figure out how to fix the headlights, and I'll be golden. I just used eyeball engineering to match the pictures. At this point, I don't remember how much it was. I think the plastic I used was .040 thick and I used two pieces on the back end. I cut the quarter panels all the way up to just under the rear window area and carefully bent the trunk up. I filled the voids with a wedge of .040 plastic and sanded the area smooth. Add salt to taste! ?
Oldcarfan27 Posted May 4, 2020 Posted May 4, 2020 On 3/21/2020 at 11:22 AM, Rotorbolt73 said: Well it's finished..proving this kit CAN be built. Great job, and very inspiring to see a finished kit of this model!
NOBLNG Posted May 4, 2020 Posted May 4, 2020 Wow this really looks great. Amazing considering what you Started with! Great job.
SSNJim Posted May 4, 2020 Posted May 4, 2020 6 hours ago, Oldcarfan27 said: I just used eyeball engineering to match the pictures. At this point, I don't remember how much it was. I think the plastic I used was .040 thick and I used two pieces on the back end. I cut the quarter panels all the way up to just under the rear window area and carefully bent the trunk up. I filled the voids with a wedge of .040 plastic and sanded the area smooth. Add salt to taste! ? Thanks! I ended up measuring the picture and that's what I came up with. I didn't cut all the way to the edge of the rear window, just the forward end of the trunk lid. I appreciate your help.
Recommended Posts
Create an account or sign in to comment
You need to be a member in order to leave a comment
Create an account
Sign up for a new account in our community. It's easy!
Register a new accountSign in
Already have an account? Sign in here.
Sign In Now