vamach1 Posted April 11, 2020 Posted April 11, 2020 16 minutes ago, Gramps46 said: I had always assumed "trans" referred to transformation. You are transforming one body style into another using parts, usually chassis and interior from the original kit, into a different body version. Stay safe ya'll. Car guy transformer.
Gramps46 Posted April 11, 2020 Posted April 11, 2020 1 hour ago, vamach1 said: Car guy transformer. Should have known better. That is not what I had in mind.
IbuildScaleModels Posted April 11, 2020 Author Posted April 11, 2020 GROAN!!! KNEE SLAPPER! Nice one guys!
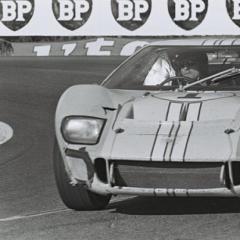
IbuildScaleModels Posted April 12, 2020 Author Posted April 12, 2020 So I noticed a major discrepancy in the engine cover... The edges are slanted and on an angle. I had to cut off my previous modifications and taper the edges. Now it looks like the photo... ? OK à bit of cleaning up to do after the putty dries.
IbuildScaleModels Posted April 13, 2020 Author Posted April 13, 2020 On 4/11/2020 at 7:27 PM, Dann Tier said: This is looking OUTSTANDING!!!!! Thank you Dan! I'm grinding away on this
IbuildScaleModels Posted April 15, 2020 Author Posted April 15, 2020 Side scoop prototype testing. I need to smooth out the scoop holes so that the vents sit better inside. And after looking at other photos I noticed that they are angled. Back to the drawing board.
IbuildScaleModels Posted April 16, 2020 Author Posted April 16, 2020 I hope so Dann. I hope so! I have been looking at Randy Ditton's brass build of the MKI and it is stunning. I hope to do my build just as much justice. Not only that, I am a small fry when compared to the lot of you guys. I am just trying to keep being inspired by all of you. Hopefully my build does the same.
Codi Posted April 19, 2020 Posted April 19, 2020 And I thought I was crazy Justin. Your focus and attention to detail / accuracy are commendable. It shows in the results so far. cheers, tim
IbuildScaleModels Posted April 20, 2020 Author Posted April 20, 2020 (edited) 15 hours ago, Codi said: And I thought I was crazy Justin. Your focus and attention to detail / accuracy are commendable. It shows in the results so far. cheers, tim Thank you Tim! I'm checking out your builds! I like crazy. And thank you again. I don't know if it is my autism or the fact that I get an annoyed feeling when I see so much attention to detail and then on the same build I see my bad paint job. Or vice versa, a great paint job, but the "extras" were omitted. I know it is different to each builder but to me it is like "well if I am going to make the bonnet articulated, then I should do the parts that are seen under the bonnet." but then I get more obsessed and say to myself "dammit, if I can see the parts under the bonnet, then they should be accurate..." ? ? maybe a bit of column a and a bit of column b. Edited April 20, 2020 by IbuildScaleModels
IbuildScaleModels Posted April 20, 2020 Author Posted April 20, 2020 (edited) 15 hours ago, Codi said: And I thought I was crazy Justin. Your focus and attention to detail / accuracy are commendable. It shows in the results so far. cheers, tim Wow... Just wow. I am humbled even further! I'm going to shut up for a while and build so that I can hold weight to your comment Tim. I need to improve. I'll be back with more pictures. Edit: Tim, so.... I am going through your fotki album. I think you are thinking too highly of my skills. I am flabbergasted by guys that have your level of skill. That scratchbuilt engine, the suspension, the pinion, the... EVERYTHING! SWEET BABY JESUS!!! I can only hope to make it to your level one day! Humbled.... Justin Edited April 20, 2020 by IbuildScaleModels more thoughts...
IbuildScaleModels Posted April 21, 2020 Author Posted April 21, 2020 A little update. Correcting the spare tire bonnet length with the curved end. Need to cut into the sides and bend it down a bit to get the correct curve radius as the mold on the fujimi is incorrect.
Codi Posted April 21, 2020 Posted April 21, 2020 Thank you Justin for the kind words and interest in my builds. You have an eye for detail that comes through in your work. Nice to see someone enjoying building as much as you do too! cheers, tim
Ace-Garageguy Posted April 21, 2020 Posted April 21, 2020 Always good to see another intense GT40 build. Inspiring too, to see your commitment to detail.
IbuildScaleModels Posted April 22, 2020 Author Posted April 22, 2020 Tim, thank you thank you! I do enjoy the details. I just want it to look as realistic as possible so that the people who know this car look at it and say 'hey check, there's the correct oil pump. Oh hey look at that...there's a... (finish the sentence)" Bill, thank you also! I have yet to mold/cast the number lights, make a radiator fan, put the ventilation tubes in, build the oil pan, put the wiring in... seems like a lot of stuff to do. I will get there.
AmericanMuscleFan Posted April 22, 2020 Posted April 22, 2020 Well Justin, you just prove to every one that the talent has nothing to do with the tooling used. You're right about the incredible display of skills shown everywhere on this forum and sir; you're part of them! You have the attention to detail and I like that ... If something good can emerge from these hard times (COVID-19), among other it's the incredible work done by all of you guys and it's a blessing for this fantastic hobby. I'll be back to check your next updates, keep your good work! Thanks for sharing Justin and take care of you, Francis
IbuildScaleModels Posted April 22, 2020 Author Posted April 22, 2020 Francis, you are too kind! And thank you guys for believing in me. It humbles me to see how guys like you, who make such fine models and spend so much time doing so, compliment my work. Just an update on the hood... Just need to say oops! I heated up the hood over the stove to get more of a curve in the hood and ended up warping it! ? At least Gramps and Rex sent me some spare parts that I will now have to use. Also at the same time I am slowly cutting away at some brass to make the front upper suspension... I am using Albion Alloys 1mm brass rod for the suspension. I started using the 1.1mm brass tubing as it was the right size but once I put a bend into it, the tube just became completely deformed. So a bit of a compromise needed to happen. I should be able to use the 1.1 tubing for the rear suspension as there are 0 bends and all angles. Just a hell of a lot of cuts to make. Enjoy and keep building! Justin
IbuildScaleModels Posted April 23, 2020 Author Posted April 23, 2020 Ok... Fixed the depth on the hood. Need to add the front curve.
IbuildScaleModels Posted April 23, 2020 Author Posted April 23, 2020 Ok... A bit of drying time and sanding to do... The blue stain on the hood is my plastic cement that I tinted blue with Mr. Hobby blue pigment.
AmericanMuscleFan Posted April 23, 2020 Posted April 23, 2020 On 4/22/2020 at 1:59 PM, IbuildScaleModels said: Just an update on the hood... Just need to say oops! I heated up the hood over the stove to get more of a curve in the hood and ended up warping it! Don't worry Justin, sh... happen sometime but it's often an opportunity to improve the goofed part. Great recover so far my friend!!!
IbuildScaleModels Posted April 23, 2020 Author Posted April 23, 2020 Thanks Francis! Almost there... Just a bit more putty and sanding.
IbuildScaleModels Posted April 24, 2020 Author Posted April 24, 2020 (edited) Hood vent split created and installed... A bit of white putty in place... Waiting for this thing to dry before sanding. Finally feels like it is coming together. Edited April 24, 2020 by IbuildScaleModels
IbuildScaleModels Posted April 25, 2020 Author Posted April 25, 2020 (edited) Just testing a theory out to see if I can make a piston from 3mm diameter brss rod... Yup... I can do... ? I was thinking about this all last night after thinking of what milling machine I would need... Either it doesn't matter or I grab a watchmaker mill. Edited April 25, 2020 by IbuildScaleModels
IbuildScaleModels Posted April 27, 2020 Author Posted April 27, 2020 Making the luggage cases from brass sheet is a little more challenging than I thought. Had to tin the whole sheet to give it that pressed aluminium look of the originals.
Recommended Posts
Create an account or sign in to comment
You need to be a member in order to leave a comment
Create an account
Sign up for a new account in our community. It's easy!
Register a new accountSign in
Already have an account? Sign in here.
Sign In Now