Codi Posted September 4, 2020 Posted September 4, 2020 Wonderful to see how you''re approaching this project Roger. Well thought out for sure. I'll certainly follow along as well. Cheers, Tim
dragcarz Posted September 4, 2020 Author Posted September 4, 2020 I couldn’t bring myself to cut up the bench seat interior, so I found one From the pro stock kit, on eBay. I paid my money and waited. The seller was fast at getting it in the mail but the USPS, was incredibly slow. My thought was to remove the floor from the Maverick, and mate the side panels and rear package shelf to the Mustang floor.
dragcarz Posted September 4, 2020 Author Posted September 4, 2020 I had to trim the interior to fit around the rear wheel wells. My first trial fit looks a little rough. The Maverick interior sits too far forward on the Mustang chassis. I kept trimming and fitting until I was able to get the interior into its tabs in the rear of the body without it pushing the chassis forward.
dragcarz Posted September 4, 2020 Author Posted September 4, 2020 If you want to try this method you want the interior tabs to hang over the back of the Mustang chassis like this.
dragcarz Posted September 4, 2020 Author Posted September 4, 2020 This conversion has been relatively simple so far. The Maverick interior and the Mustang chassis fit really well together. I made filler pieces for the rear interior sides. I was too aggressive when I cut the rear panel, it’s shorter and wavy, but I can fix that.
1972coronet Posted September 6, 2020 Posted September 6, 2020 I'm loving this Maverick ! The conversion work you're performing is fantastic ! M/P is my favourite class --- so many fun possibilities . How much fun is it going to be getting the Maverick's rear seat to fit ?
dragcarz Posted September 8, 2020 Author Posted September 8, 2020 Small update.... I’m trying to fit the fender aprons. Apparently the Mustang engine bay is narrower than the Maverick. I had to reshape the aprons as the Maverick fenders slope forward where the Mustang was flatter. The aprons will have to be installed as part of the final assembly. I added ledges to the fenders but it’s still a little narrow. Need a cup of coffee and some rethinking time......
dragcarz Posted September 8, 2020 Author Posted September 8, 2020 On 9/6/2020 at 12:03 PM, 1972coronet said: I'm loving this Maverick ! The conversion work you're performing is fantastic ! M/P is my favourite class --- so many fun possibilities . How much fun is it going to be getting the Maverick's rear seat to fit ? My 1972 NHRA rule book says rear seat optional, so no back seat. My reference material shows a bolt in Lakewood roll bar instead.
afx Posted September 9, 2020 Posted September 9, 2020 (edited) Roger, sent you a PM with a possible solution for the inner fender fit issue. JC Edited September 9, 2020 by afx
mustang1989 Posted September 9, 2020 Posted September 9, 2020 It's really good to see another Maverick project in the mix. I like how you tackled the interior flooring versus rear of the interior alot better than my take on it. Wished I could re-do mine but there aint no way in HELL I'm going through that mess again. The way I'm going to deal with my inner fender is to use the OOB Jo-Han firewall and radiator core supports. I'll be adding detail to the Jo-Han firewall and tweaking the radiator core support some. This is the exact point that I got stumped at so I'll be watching your methods as well.
dragcarz Posted September 9, 2020 Author Posted September 9, 2020 I don’t have the Johan firewall, and the portions of the aprons attached to the firewall help to strengthen the front frame rails. Adding flanges to the fenders help, but there kind of wide. The right side Apron sat under the flange and the left one was to far to the right. I filed down the edge of the firewall where it’s against the body, and that shifted everything to the left. It’s better but I’m gonna give it some more thought
mustang1989 Posted September 10, 2020 Posted September 10, 2020 (edited) I may have an extra one Roger. Lemme check. I'll see about piecing mine together a little bit more this weekend to give you a better idea of what I'm doing. This one here is looking great so far man. We've both just gotta work past some of the trials of this kit is all. Edited September 10, 2020 by mustang1989
dragcarz Posted September 10, 2020 Author Posted September 10, 2020 It started out so simple and seemed easy.......
mustang1989 Posted September 10, 2020 Posted September 10, 2020 33 minutes ago, dragcarz said: It started out so simple and seemed easy....... LMAO!!!! I sooooo know that feeling!!! Keep at it Roger. This is gonna look sweet when it's done with all the work you're putting into it pal.
dragcarz Posted September 12, 2020 Author Posted September 12, 2020 I thought I was on the right track with adding the fender flanges to make up the space difference in the Mustang engine bay and the opening between the fenders on the Maverick. But the flanges on the fenders looked to be about 5 inches wide in scale. I got on the internet and started looking at pictures of some Maverick’s engine bays and under hood detail. The wide flanges were not going to work so I cut them off and made new ones closer to scale. One of the issues is that with the front aprons glued the the chassis it’s impossible to get it to fit together. The fender aprons have to be installed after the chassis is installed. My thought was to make these look more accurate. There is still a gap, but not as large so I added a flange to the top of the aprons. These will sit under the fender edges when assembled, and be painted semi gloss black along with the aprons. The flanges on the fenders will be Poppy Red, and this should create an illusion that’s acceptable. I added bolt heads to the fender flanges using Plastruct styrene hex rod. I then started filling the cowl area. I try to do as much filling as I can with styrene. I‘m getting closer to paint and working on the final details.
TarheelRick Posted September 13, 2020 Posted September 13, 2020 Really nice work and attention to detail. Just wondering if those bolt heads will interfere with the hood closing properly.
dragcarz Posted September 13, 2020 Author Posted September 13, 2020 5 hours ago, TarheelRick said: Really nice work and attention to detail. Just wondering if those bolt heads will interfere with the hood closing properly. They did a little, I sanded them a little and it fits good.
dragcarz Posted September 17, 2020 Author Posted September 17, 2020 Small update, when I held the rear bumper in place there were large gaps, so I m filling those. I’m really close to having the firewall ready, and I removed the ribs in the transmission bell housing so it looks more like a scatter shield. Paint it red and put a Lakewood decal on it and it should be good to go.
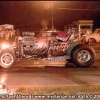
dragcarz Posted September 22, 2020 Author Posted September 22, 2020 (edited) Finally getting to the fun stuff. I re-scribed the panel lines and door gaps, I added the fender lines at the rockers, removed the windshield wipers and added the missing cowl vents, I added the wiper holes as they we’re not filled on the original car. When I was filling the gaps under the rear bumper and realized I was missing a rear bumper. . I had recently scrapped a Revell 68 Mustang and was surprised at how close the rear bumper was to fitting. It would be very easy to make this bumper work, but I did locate a Johan Comet rear bumper that I will use. I cut the hole in the hood and added the hood scoop. i was off work yesterday and it was cool here in Georgia so I waited until he afternoon for the temperature to get warm. I shot the Poppy Red on the body and hood. The first coat looked like it was going to run off the body, so I let it set up and shot the second coat. It looked terrible and I almost threw it into the purple pond. I walked away from it for about an hour, came back and decided to go for broke and put the third coat on it, and it came out very decent, and doable. I’ll let it dry a couple days and do the decals. Edited September 22, 2020 by dragcarz
afx Posted September 22, 2020 Posted September 22, 2020 That bumper does look good and I like the color.
dragcarz Posted September 24, 2020 Author Posted September 24, 2020 Hard week at work.... only got a little done, engine is painted, graphic decals applied, now I need some warm weather for the clear coat. Then the sponsor decals, and chrome trim.
dragcarz Posted September 24, 2020 Author Posted September 24, 2020 (edited) 3 minutes ago, iBorg said: Thank goodness you removed the wipers. I really try and make as accurate replica as I can, those little things make a big difference to me. Edited September 24, 2020 by dragcarz Spelling
AmericanMuscleFan Posted September 25, 2020 Posted September 25, 2020 Nice job Roger, you have another cool project in the works, it looks like the lettering was done by hand directly on the body! Well done sir!
Recommended Posts
Create an account or sign in to comment
You need to be a member in order to leave a comment
Create an account
Sign up for a new account in our community. It's easy!
Register a new accountSign in
Already have an account? Sign in here.
Sign In Now