Claude Thibodeau Posted January 29, 2021 Share Posted January 29, 2021 Hi Mike! The laced wheels (and technique) are a master class, thank you! I'm fond of your bender for the headers. If only we could do it as easily on 1/1 cars... CT Quote Link to comment Share on other sites More sharing options...
Ian McLaren Posted January 29, 2021 Share Posted January 29, 2021 Hi Mike I've just been commissioned to replicate a 215 inch Don Long car. I'm not where I need to be to try a brass chassis so I'm starting with Prudhomme's Wynns Winder 1/16 kit, I will be using some brass because some of his brace tubes are too small to use abs. (.048 on the real car) The one area that has me concerned are the headers. Is there a specific angle to shoot for when bending the tubes, with funny car headers there are variants introduced by the depth and width of the body. Quote Link to comment Share on other sites More sharing options...
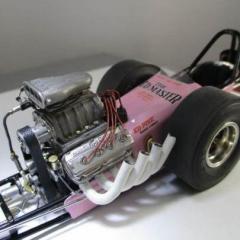
Mike Williams Posted January 30, 2021 Author Share Posted January 30, 2021 (edited) Ian, the angle depends on the motor, specifically the exhaust ports, plus the length you'd like. For zoomies with a Hemi, a tad more than 90° should get you about right. The tubes should point to the middle of the slick. Also, looking directly from the side, I like the pipe ends to be lower than the spark plugs. A good length would be the second pipe should reach to the end of the valve cover. Minimum of 3" to the slick. Great shot here; Mike.. Edited January 30, 2021 by Mike Williams Quote Link to comment Share on other sites More sharing options...
Tortuga Kustomz Posted January 31, 2021 Share Posted January 31, 2021 13 hours ago, Mike Williams said: For zoomies with a Hemi, a tad more than 90° should get you about right. The tubes should point to the middle of the slick. Also, looking directly from the side, I like the pipe ends to be lower than the spark plugs. A good length would be the second pipe should reach to the end of the valve cover. Minimum of 3" to the slick. Great shot here; Awesome info Mike, i didn't know all that, for my next rail dragster will take those into consideration my friend Quote Link to comment Share on other sites More sharing options...
Ian McLaren Posted February 1, 2021 Share Posted February 1, 2021 On 1/30/2021 at 8:12 AM, Mike Williams said: Ian, the angle depends on the motor, specifically the exhaust ports, plus the length you'd like. For zoomies with a Hemi, a tad more than 90° should get you about right. The tubes should point to the middle of the slick. Also, looking directly from the side, I like the pipe ends to be lower than the spark plugs. A good length would be the second pipe should reach to the end of the valve cover. Minimum of 3" to the slick. Great shot here; Mike.. Thank you Mike, lots of great info and perspective on this, the car I'm doing is 392 powered and the motor is quite a ways out, don't have the measurements yet, it currently is running a reverser configured as an in and out box to make it easier for Pro Idle Events. We are back dating the model as a direct drive push start configuration Quote Link to comment Share on other sites More sharing options...
Tortuga Kustomz Posted February 1, 2021 Share Posted February 1, 2021 2 hours ago, Ian McLaren said: Thank you Mike, lots of great info and perspective on this, the car I'm doing is 392 powered and the motor is quite a ways out, don't have the measurements yet, it currently is running a reverser configured as an in and out box to make it easier for Pro Idle Events. We are back dating the model as a direct drive push start configuration Very cool, i build my Don Garlits Wynn's Jammer with the 392 Dodge Hemi that came in the kit, super cool, only thing i did change was the blower hat for a more detail one, looking forward to see how your turns out... Quote Link to comment Share on other sites More sharing options...
Mike Williams Posted February 1, 2021 Author Share Posted February 1, 2021 (edited) @Marcos, thank you. Good that your Garlits car has only chrome on the valve covers, perfect. What paint and finish did you use on the blower and hat, looks good. @Ian, consider the zoomie tubes to be a "J". The last third, towards the ends, would be straight. Only the first half or so will have a bend. Here a shot of 3mm brass tube on a 1:25 build, sliced and soldered up; Thanks for your interest, Mike.. Edited February 1, 2021 by Mike Williams Quote Link to comment Share on other sites More sharing options...
Tortuga Kustomz Posted February 3, 2021 Share Posted February 3, 2021 On 2/1/2021 at 4:19 AM, Mike Williams said: What paint and finish did you use on the blower and hat, looks good. Thanks Mike, well, the blower paint is German Grey from Tamiya, the blower hat is silver with a dull coat clear and Tamiya panel line wash, turns out nice. I love the detail on the injectors man, really cool what sizes is that aluminum and brass tubing? Quote Link to comment Share on other sites More sharing options...
Mike Williams Posted February 3, 2021 Author Share Posted February 3, 2021 Thanks Marcos! The motors for the FEDs will be without much or no chrome. Garlits used darker motors, no bling and I like the look. Some new metalizers on the bench and I'll be trying out some new (to me) methods for metal-like looks. The zoomie pipes are 3mm brass tubes, as are the aluminum port injection tubes. Both were sliced to get the right bend, then the cuts were soldered/filled to make smooth. Here the 1:25 finished motor in an aluminum bodied FED from late 2019. Mike.. Quote Link to comment Share on other sites More sharing options...
Big John Posted February 3, 2021 Share Posted February 3, 2021 Beautiful motor work Mike! and thanks for the wip on lacing the wheels they came out sweet! Wire wheels are always a make or break issue with kit models. Quote Link to comment Share on other sites More sharing options...
Tortuga Kustomz Posted February 5, 2021 Share Posted February 5, 2021 WAW Mike, that engine looks better then i thought my friend, amazing work Quote Link to comment Share on other sites More sharing options...
Claude Thibodeau Posted February 5, 2021 Share Posted February 5, 2021 On 2/3/2021 at 10:32 AM, Mike Williams said: Thanks Marcos! The motors for the FEDs will be without much or no chrome. Garlits used darker motors, no bling and I like the look. Some new metalizers on the bench and I'll be trying out some new (to me) methods for metal-like looks. The zoomie pipes are 3mm brass tubes, as are the aluminum port injection tubes. Both were sliced to get the right bend, then the cuts were soldered/filled to make smooth. Here the 1:25 finished motor in an aluminum bodied FED from late 2019. Mike.. Hi Mike! To your point about Garlits... I had the chance to meet him at the first Grand National ever held at the Sanair track in the Montreal area, back when I was 15 years old. He was working alone on his car, and I dared ask a few questions. I pointed to a spectacular Top Fuel that was pitting next to his, and evoqued all the candy paint, gold leaf and chrome plating on that car, finally asking: " Sir, you are the world champion... How come your car is so stern in comparison"? He laughed, cranked his blower pulley with a big ratchet handle, and looked at me with a stare I will never forget. "Kid, I'm not a flash, I'm a pro". That made my day. And of course, he swept the event, and the showboat dragster from NY did not go past the first round. Lesson learned! CT Quote Link to comment Share on other sites More sharing options...
Mike Williams Posted February 5, 2021 Author Share Posted February 5, 2021 @CT...yes, a wonderful insight! I'd like to add, I was born and raised not far away from where Mr. Garlits resides and hails. My place is close to the Atlantic coast. Just that the man answered you, is for him typical, I do believe he had a gleam in his eye too. He still answers questions in a decent way. Chrome will not make you faster, get rid of it and just be cool. Laughing now! I want a motor without chrome, a race car. Today I received for me a new line of metalizer airbrush paints, I'm going with the AK-Interactive, Xtreme Metal paints. The motors will have little or no chrome, we'll see soon what happens. For know though, I'm happy and excited. Thank you for your insight. Mike.. Quote Link to comment Share on other sites More sharing options...
AmericanMuscleFan Posted February 6, 2021 Share Posted February 6, 2021 You are quite right about all those chrome parts and exceptional paints at a time when tests were often done "live" in the pits on the day of the competition. Don Garlits' contribution to the history of the NHRA has been in his mechanical innovations much more than in the flashy! Quote Link to comment Share on other sites More sharing options...
Mike Williams Posted February 8, 2021 Author Share Posted February 8, 2021 (edited) @Francis and @CT, on now with the new paints, the "AK-Interactive. Xtreme Metal" line. The brass wire wheels are spayed, black metal base till covered, then "Chrome" from the AK line. Not shown here the result after lightly brushing the finish with a cotton swab! More shine! Further along now, here the original Revell blue styrene blower, shot with "Steel" from AK. Hat is "Stainless Steel", valve covers original kit chrome. Here the left is kit styrene, right is white resin....Blower hat is white resin with Black base, Stainless Steel. Front is the blower hat, black base with "stainless steel". Maybe another coat to cover better... This is an ongoing process with a new paint line, more later. Mike.. Edited February 8, 2021 by Mike Williams Quote Link to comment Share on other sites More sharing options...
Mike Williams Posted February 8, 2021 Author Share Posted February 8, 2021 The previous post was not completed. I'm not satisfied with the shade of the blower and manifold, still not dark enough. I do like the AK Xtreme Metal paints. More later.... Mike.. Quote Link to comment Share on other sites More sharing options...
AmericanMuscleFan Posted February 8, 2021 Share Posted February 8, 2021 Seems to be a very good line of products Mike, the chrome effect looks very "in scale" and not too shiny. The wheels are awesome, looks like they were made with metal right from the start. I hope this paint is more durable to wear than Alclad products. Styrene wheels are no match for your laced wheels by the way, that makes all the difference in the world!!! 👌 Quote Link to comment Share on other sites More sharing options...
Claude Thibodeau Posted February 9, 2021 Share Posted February 9, 2021 Hi Mike! Wow, great finishes, barvo! The stainless one is very convincing. I had somehow similar results with a Krylon Chrome spray can, believe it or not! The trick is to go really wet, and let it sit for 2 days before handling. You can see what it produces on the bug catcher in this picture. But yours is better, seems of a finer texture. The wheels are great, totally real! CT Quote Link to comment Share on other sites More sharing options...
Tortuga Kustomz Posted February 9, 2021 Share Posted February 9, 2021 They look amazing Mike Quote Link to comment Share on other sites More sharing options...
Mike Williams Posted February 9, 2021 Author Share Posted February 9, 2021 @Francis, thank you for the support and praise. I have a very good feeling about the durability of the paints, although I have noticed, when applying several coats, at least a 24 hour drying period should be implemented. I have zero luck with Alclad, hardly any shine, then it rubs off easily. As you know Francis, mounting these scratch built assemblies requires lots of hands-on when mounting....Alclad was not my preference. I have a better feeling with this paint, plus the ease in painting, a big difference. @CT, I love the satin finish on the blower hat. I realize a so-called chrome paint was sprayed but I've read where the finish you show is the best result. So difficult to wait for 2 days, but I believe this is the best way for these chrome-like paints. The appearance is like a brushed and polished metal to me, I like! Seems to be very similar to the "Stainless Steel" from AK, which I really like, even better than the chrome. @Marcos, thanks for looking, I'm still experimenting. I ordered the "Jet Exhaust" paint, it's not glossy, so I can mix in a few drops to make the "Steel" shade darker. More later. Mike.. Quote Link to comment Share on other sites More sharing options...
Claude Thibodeau Posted February 11, 2021 Share Posted February 11, 2021 Hi Mike! Have you tried Alclad's MAGNESIUM for the blower case? It is fairly resistant to handling, and pretty close, as the pix of the 36 shows. But beware: don't clearcoat it, or it will get a yellowish hue, even with lacquer clear. Just my two cents... CT Quote Link to comment Share on other sites More sharing options...
Mike Williams Posted February 11, 2021 Author Share Posted February 11, 2021 (edited) 4 hours ago, Claude Thibodeau said: Hi Mike! Have you tried Alclad's MAGNESIUM for the blower case? It is fairly resistant to handling, and pretty close, as the pix of the 36 shows. But beware: don't clearcoat it, or it will get a yellowish hue, even with lacquer clear. Just my two cents... CT Hello CT! The magnesium paints are fascinating and have lots of potential, as did the real metal! Polished, or left to its own weathering, always an interesting view. Rarely shiny, and this is the hard part for model painting. Getting the dull, real metal like finish. I do wish the shops in Germany offered more Alclad, the availability is lacking. After searching all of my files, I found one photo in my opinion that makes a statement. A period correct, close up view of an active FED from back in the day, no chrome! I like too, and this in the meantime satisfies my "dark blower look"....it's just a metal, not shiny. I like this one. Also important with this photo, the front gear cover is apparently a different metal! A wonderful study. What I've learned is important....do it like you want to....it's probably correct enough....just no kit chrome, we can do better. Thanks CT, Mike.. Edited February 11, 2021 by Mike Williams Quote Link to comment Share on other sites More sharing options...
Claude Thibodeau Posted February 11, 2021 Share Posted February 11, 2021 1 hour ago, Mike Williams said: Hello CT! The magnesium paints are fascinating and have lots of potential, as did the real metal! Polished, or left to its own weathering, always an interesting view. Rarely shiny, and this is the hard part for model painting. Getting the dull, real metal like finish. I do wish the shops in Germany offered more Alclad, the availability is lacking. After searching all of my files, I found one photo in my opinion that makes a statement. A period correct, close up view of an active FED from back in the day, no chrome! I like too, and this in the meantime satisfies my "dark blower look"....it's just a metal, not shiny. I like this one. Also important with this photo, the front gear cover is apparently a different metal! A wonderful study. What I've learned is important....do it like you want to....it's probably correct enough....just no kit chrome, we can do better. Thanks CT, Mike.. Hi Mike! Interesting picture, indeed! The polished blower case was a rare occurance back then, mostly the privy of high-end "pro" racers, with BIG sponsors (ex: McEwen and al). Most blower were raw, with sometimes just the ribs polished, since they usually required deburring anyway. The front and rear rotor mounting plates were usually T-56 high end aluminium alloy, to securely locate and hold the bearings at the ends of the rotors. Hence the different "glow" or shade. Not mentionning that magnesium is highly inflamable! And most racers were always trading refurbished units with BDS and others, so, why bother with bling? Sorry to bring back Alclad, but they have a shade called AIRFRAME ALUMINIUM that looks the part of such an alloy. Keep on, and remember that you already master brass. Magnesium can wait... CT Quote Link to comment Share on other sites More sharing options...
foghorn62 Posted February 12, 2021 Share Posted February 12, 2021 Quote Ok guys, I’ve tried to resist putting in my $.02 worth, but I can no longer. Some of you are aware that I’ve taken a little break from my more in depth projects, to build a kit or two. One of which is the Revell 66 Chevy Suburban, which is to become a family truckster toy hauler to take the family out to the islands for Spring Break. Somewhere along the way, I managed to loose the rear bumper for the Suburban, so I made one out of brass C-channel stock. I was going to chrome paint it with Alclad II, but for Christmas my wife gave me one of those Caswell Copy Chrome Plug and Plate kits, so I decided to try that first. I’d had very poor results on my first couple of experiments with this stuff as a dip, so I really had my doubts. This time however I decided to read and follow the instructions, use the wand supplied with the kit, and brush the plating on instead of dipping the part. Who’d a thunk that reading instructions would make that big of a difference? The secret is to have your part spotless and shiny prior to the process. What do you think? Notice in the closeup pic, the reflection of the hitch ball in the bumper. Quote Link to comment Share on other sites More sharing options...
Mike Williams Posted February 13, 2021 Author Share Posted February 13, 2021 (edited) @CT, thanks for the input. Meantime, I've come to the conclusion, blower parts can be about any shade you'd like, the duller finish being the most acceptable and realistic. When the dark rubber fuel lines are attached along with the bolts for the blower/manifold, the "steel" shade should work out. A couple of years ago, I was fascinated by "The Old Master", the blower, intake and top hat all sandblasted, here the original and my project using cast nickel and sandblasted parts for the all metal motor... EDIT! @CT, finally a shop has the Alclad Black Base, also ordered was the Airframe Aluminum! Looks good! @Tim, the bumper looks superb. I'll read up on the Caswell Plating deal. I like your family rides, looks like a fun collection. Mike.. Edited February 13, 2021 by Mike Williams Quote Link to comment Share on other sites More sharing options...
Recommended Posts
Join the conversation
You can post now and register later. If you have an account, sign in now to post with your account.
Note: Your post will require moderator approval before it will be visible.