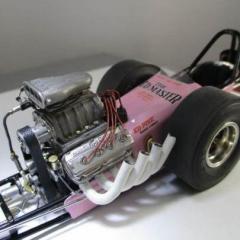
Mike Williams Posted March 14, 2021 Author Share Posted March 14, 2021 (edited) @CT, many thanks. I agree with the very decent description of "slightly worn" warrior race car. I wanted the "dirty" look, learned a lot about the metalizer paints along the way. For chrome though, Alclad is still the king! For the other FED being built alongside this one, White Aluminum was sprayed directly onto the Revell kit chrome....wow, I like it! Looks like plain tin, I'll use it. @Marcos, I suspected it might be a decent motor and am pleased with the results. @Francis, Yes, CT has a talent for eloquent description and I agree the look is plausible. This was not meant to be a showboat, but one as a usual racer from 1965. No chrome except the front wire wheels. I'm pleased as well with the brass chassis. It's painted here with AK Extreme Metal "Gold". No base, just directly onto the clean brass rails. Different, but I like the look. UPDATE: Here the finished motor; Meantime, through intensive manipulation, the zoomie pipes will be re-painted. Perhaps even white this time.... Mike.. EDIT: Yesterday I decided to change the zoomie paint scheme, so the black was washed off (cotton swab with lacquer thinner) and some good old fashioned white satin from a tin was brushed on....I like! Mike.. Edited March 15, 2021 by Mike Williams Quote Link to comment Share on other sites More sharing options...
Claude Thibodeau Posted March 16, 2021 Share Posted March 16, 2021 On 3/14/2021 at 5:52 PM, Mike Williams said: @CT, many thanks. I agree with the very decent description of "slightly worn" warrior race car. I wanted the "dirty" look, learned a lot about the metalizer paints along the way. For chrome though, Alclad is still the king! For the other FED being built alongside this one, White Aluminum was sprayed directly onto the Revell kit chrome....wow, I like it! Looks like plain tin, I'll use it. @Marcos, I suspected it might be a decent motor and am pleased with the results. @Francis, Yes, CT has a talent for eloquent description and I agree the look is plausible. This was not meant to be a showboat, but one as a usual racer from 1965. No chrome except the front wire wheels. I'm pleased as well with the brass chassis. It's painted here with AK Extreme Metal "Gold". No base, just directly onto the clean brass rails. Different, but I like the look. UPDATE: Here the finished motor; Meantime, through intensive manipulation, the zoomie pipes will be re-painted. Perhaps even white this time.... Mike.. EDIT: Yesterday I decided to change the zoomie paint scheme, so the black was washed off (cotton swab with lacquer thinner) and some good old fashioned white satin from a tin was brushed on....I like! Mike.. Hi Mike! The zoomies are mucho better in white, great! Only problem is the nitro fumes make my eyes hurt now... Bravo, masterfull results! CT Quote Link to comment Share on other sites More sharing options...
AmericanMuscleFan Posted March 16, 2021 Share Posted March 16, 2021 I agree with Claude, the zoomies pipes are nicer in white and give a nice contrast with the engine. The frame is absolutely awesome and the gold paint makes it look like you've plated it! 😊 Quote Link to comment Share on other sites More sharing options...
Mike Williams Posted March 23, 2021 Author Share Posted March 23, 2021 @Francis, yes, the new AK Metal paint is a keeper for me. Gold on bare brass, not shiny! I like the look. No primer needed. UPDATE: Body works. I've decide to go with brass sheet for the body panels. Shown here is the 2nd attempt. The first had an excellent uprise at the windshield, but was sadly too long and was chopped for this newer one. I wanted to not use putty/body filler, but a solder bubble and a pit or two would need filling, no way I'll risk filling with solder.....only to have the rest possibly melt away! New also, a chute pack mounted, seat upholstery, oil filter added chassis right side, new oil pump with oil lines attached right side. Fuel tank is finished and mounted up front... Paint, since using brass sheet for the body panels, will be House of Kolors, Candy Apple Red. Might look nice covering a brass body. Mike.. Quote Link to comment Share on other sites More sharing options...
Ian McLaren Posted March 23, 2021 Share Posted March 23, 2021 Oh boy is that pretty! Excellent work I'm going to have to pick your brain regarding building FED bodies. Quote Link to comment Share on other sites More sharing options...
Claude Thibodeau Posted March 24, 2021 Share Posted March 24, 2021 Hi Mike! Great work, bravo! Having shot HOK often on 1/1 bikes and rods, I KNOW it will be great. But on a gold base, it will be a smidge darker, not unlike a glass of wine in the sun. Have fun laying the paint! CT Quote Link to comment Share on other sites More sharing options...
AmericanMuscleFan Posted March 24, 2021 Share Posted March 24, 2021 It's so looking good Mike! HOK candy apple red on a brass body... I'm going to get my sunglasses for the final photos of this work of art... it promises! 😊 Quote Link to comment Share on other sites More sharing options...
foghorn62 Posted March 25, 2021 Share Posted March 25, 2021 On 3/23/2021 at 2:18 PM, Mike Williams said: @Francis, yes, the new AK Metal paint is a keeper for me. Gold on bare brass, not shiny! I like the look. No primer needed. UPDATE: Body works. I've decide to go with brass sheet for the body panels. Shown here is the 2nd attempt. The first had an excellent uprise at the windshield, but was sadly too long and was chopped for this newer one. I wanted to not use putty/body filler, but a solder bubble and a pit or two would need filling, no way I'll risk filling with solder.....only to have the rest possibly melt away! Hi Mike! This thing just keeps getting more and more awesome!!! The body looks gorgeous! I will be interested in seeing how the HOC candy takes to the bare brass. I’ve never tried that before. Your engine looks killer sitting in the frame too! I noticed your statement about reluctance to using solder as a filler, because you don’t want to risk undoing work that you have already put so much time into. Have you ever tried TIX Solder?. It melts at 275 degrees F. I don’t know what you normally use, but the stuff that I usually use melts at more like 360 degrees F or higher. I have a variable temp soldering iron, that I turn down to 275 degrees when I want to use solder as a filler, and I don’t have any problem with melting other solder points. Just a thought. https://www.micromark.com/Tix-Solder-Pkg-of-20-Three-Inch-Sticks Regards, Tim Slesak Quote Link to comment Share on other sites More sharing options...
Claude Thibodeau Posted March 26, 2021 Share Posted March 26, 2021 On 3/24/2021 at 11:08 PM, foghorn62 said: Hi Mike! This thing just keeps getting more and more awesome!!! The body looks gorgeous! I will be interested in seeing how the HOC candy takes to the bare brass. I’ve never tried that before. Your engine looks killer sitting in the frame too! I noticed your statement about reluctance to using solder as a filler, because you don’t want to risk undoing work that you have already put so much time into. Have you ever tried TIX Solder?. It melts at 275 degrees F. I don’t know what you normally use, but the stuff that I usually use melts at more like 360 degrees F or higher. I have a variable temp soldering iron, that I turn down to 275 degrees when I want to use solder as a filler, and I don’t have any problem with melting other solder points. Just a thought. https://www.micromark.com/Tix-Solder-Pkg-of-20-Three-Inch-Sticks Regards, Tim Slesak Hi Mike! To Tim's point about HOK adherence to bare metal... In the 90's, the rage with custom Harleys was buffing the gas tank sides and fenders' top with a coarse sanding disc, to raw metal, and then coat it with HOK's urethane candy, clear, let cure, sand and clear again, until a smooth finish was obtained. The effect after superposed artwork and contrasting solid panels/borders was great, with the coarse sanding marks reflecting the light trough the color coat. The same could happen with the brass surface, in not finely sanded with a scuff pad to get rid of any scratch, notch, hiccup and whatnot. Just my two cents, for what it's worth! CT Quote Link to comment Share on other sites More sharing options...
Mike Williams Posted March 27, 2021 Author Share Posted March 27, 2021 Thanks guys for the encouragement! @Ian, wonderful. There might be something I can add to your knowledge, this is the 3rd dance, I'm learning as things move forward. @CT, I like the thought, "a glass of wine in the sun"....exactly the look I'm after! @Francis, yes. Get the sunglasses out! I've been mixing and painting away on spare brass body panels....I have it! @Tim, you've told me this tip before and no one in Europe has this solder, and the ones I found in the US won't ship to the EU! Two different solders were already used. Meantime a small amount of filler was added and sanded smooth....Ready to go now. @CT....Clear coat urethane as a filler over strongly brushed brass! I can easily visualize the effect, wonderful... Meantime, I've experimented with various shades for the base coat....YES, I'm ready to go forward now....the red wine with the sun rays shining through...right in front of me on my bench now! Got it! Here a teaser. 1st photo shows the red with only solar gold, very similar to the bare brass. The far right shows the new base coat. 2nd photo left is bare brass with H of K "solar gold", which is very, very similar to the bare brass itself, along with 10 (!) coats of candy red....it will not get darker. Not good. The right probe has a base much darker, using 2 parts solar gold, 4 parts candy dark brown, 5 drops of pagan gold intensifier.....bingo! No clear on there yet. This is the candy red tone I was wanting...only 3 coats of red so far. ...another showing the way forward; The real body will get a base coat today... Mike.. Quote Link to comment Share on other sites More sharing options...
Claude Thibodeau Posted March 27, 2021 Share Posted March 27, 2021 Hi Mike! Sweet. I raise a glass of red California Shiraz to you! CT Quote Link to comment Share on other sites More sharing options...
AmericanMuscleFan Posted March 27, 2021 Share Posted March 27, 2021 That's absolutely gorgeous Mike! It looks like red anodized brass...! 😊👌 Quote Link to comment Share on other sites More sharing options...
Tortuga Kustomz Posted March 28, 2021 Share Posted March 28, 2021 love the paint choice Mike Quote Link to comment Share on other sites More sharing options...
Ian McLaren Posted March 28, 2021 Share Posted March 28, 2021 The color you made/picked will suit the car perfectly, Fantastic. Quote Link to comment Share on other sites More sharing options...
gasser59 Posted March 28, 2021 Share Posted March 28, 2021 This dragster is going to sparkle with this color Mike. Nicely done. Quote Link to comment Share on other sites More sharing options...
majel Posted March 29, 2021 Share Posted March 29, 2021 Beautiful brass work, amazing model!! Quote Link to comment Share on other sites More sharing options...
Mike Williams Posted March 30, 2021 Author Share Posted March 30, 2021 Thanks guys, greatly appreciated. The car will be finished today. Just a sneak peek.... Mike.. Quote Link to comment Share on other sites More sharing options...
Tortuga Kustomz Posted April 1, 2021 Share Posted April 1, 2021 WAW, looks even better now in my mind Quote Link to comment Share on other sites More sharing options...
Mike Williams Posted April 1, 2021 Author Share Posted April 1, 2021 (edited) Thanks Marcos! To be honest, the paint came out better than I'd hoped for, haven't figured out yet how to capture the real view in a photograph. UPDATE: The car is 99% finished. A few small things need attention, but the project is now ended. Still working on some light box possibilities, here the current state. Thanks to the modelers that showed interest and commented, as this is truly an incentive to first of all, realize other methods and secondly to possibly enhance your own techniques. A wonderful opportunity! Motivation is the key, momentum the result, improvements are the future. Mike.. Edited April 1, 2021 by Mike Williams Quote Link to comment Share on other sites More sharing options...
Claude Thibodeau Posted April 1, 2021 Share Posted April 1, 2021 3 hours ago, Mike Williams said: Thanks Marcos! To be honest, the paint came out better than I'd hoped for, haven't figured out yet how to capture the real view in a photograph. UPDATE: The car is 99% finished. A few small things need attention, but the project is now ended. Still working on some light box possibilities, here the current state. Thanks to the modelers that showed interest and commented, as this is truly an incentive to first of all, realize other methods and secondly to possibly enhance your own techniques. A wonderful opportunity! Motivation is the key, momentum the result, improvements are the future. Mike.. Hi Mike! Masterfull work, bravo! The third picture, with the raw surface of the right slick, is only lacking the glow of nitro exiting the zoomies, and a Lions Dragstrip banner in the background... I have a question for you, however: what was the purpose, on a FED, of the twin "posts" that we can see under the front xmember? Just curious... CT Quote Link to comment Share on other sites More sharing options...
Tortuga Kustomz Posted April 2, 2021 Share Posted April 2, 2021 You're welcome my friend, amazing work over all, i'm always learning something new, and with this project i really did learn a lot, especially with the exhaust pipes, looking forward to your next project... Quote Link to comment Share on other sites More sharing options...
Mike Williams Posted April 2, 2021 Author Share Posted April 2, 2021 @CT, thank you. The stubs, I forgot to remove the four of them. Two at the very front, two at the firewall. I solder these on as soon as the chassis is together, so the ride height is maintained throughout the build. Just sort of a simple jig. Here the 4 stubs in the beginning days; I just noticed recently on the shelf, a Fiat Altered built years ago still had them on! Gone now, finally. Mike.. Quote Link to comment Share on other sites More sharing options...
AmericanMuscleFan Posted April 3, 2021 Share Posted April 3, 2021 That a great and inspiring build Mike, a superb example of the good use of the right material at the right place. Better lighting would have helped to appreciate the color of the body but I can imagine how beautiful it must be in person. I especially like the steering and your beautiful front wheels, great art! I hope you will continue to treat us with your prowess my friend!!! 👌 Quote Link to comment Share on other sites More sharing options...
Claude Thibodeau Posted April 3, 2021 Share Posted April 3, 2021 On 4/2/2021 at 1:19 AM, Mike Williams said: @CT, thank you. The stubs, I forgot to remove the four of them. Two at the very front, two at the firewall. I solder these on as soon as the chassis is together, so the ride height is maintained throughout the build. Just sort of a simple jig. Here the 4 stubs in the beginning days; I just noticed recently on the shelf, a Fiat Altered built years ago still had them on! Gone now, finally. Mike.. Hi Mike! Oh, I see. Some kind of absolute certainty that the whole enchilada will definetely end up with the stance you engineered in. Brilliant! CT Quote Link to comment Share on other sites More sharing options...
iBorg Posted April 3, 2021 Share Posted April 3, 2021 The stubs are a very clever idea. Quote Link to comment Share on other sites More sharing options...
Recommended Posts
Join the conversation
You can post now and register later. If you have an account, sign in now to post with your account.
Note: Your post will require moderator approval before it will be visible.