Mattilacken Posted January 9, 2023 Author Posted January 9, 2023 (edited) Made some minor progress and allot of planing went on to night. I wanted to finish the front tubular section but I needed to craft a intercooler to work in conjunction with the rest. and since I have more or less decided to have the radiator in the back of the truck tit can use a big part of the available space, might be a bit large but it fills the grill. At least a set of brackets was glued to the tubular bracing. The inspiration for that huge IC, but mine is even bigger.. : I was also reading up on airflow in truck beds and it is as I remember airflow is limited so I might need to try to pull air from the wheels to the radiators.. as it would matter on a static plastic thingy but I kind of like the idea of mailing it plausible. What’s your thoughts on placement on radiators? One in the middle or two on each side? Edited January 10, 2023 by Mattilacken 2
Kit Karson Posted January 10, 2023 Posted January 10, 2023 21 hours ago, Mattilacken said: Thanks! I appreciate you looking in and leaving a comment! It takes allot of time to try to reuse as much as possible of the original kit. That's why we call it modeling! Not something they make plans for and even harder for some to wrap their heads around. Good work on both accounts, Brother!! -KK 2
Mattilacken Posted January 14, 2023 Author Posted January 14, 2023 (edited) So.. I scraped all my work that I had done for engine placement and frame work in the frot of the truck.. Why you might say…?? remember this truck used to have a NA intake that took up the majority of the width of the truck. With the turbo and other intake that did not make any sense to me.. With the stock firewall, that I used for some reason, the engine went far forward because the shape limited the space around the cylinder heads And it also created a ton of problems with exhaust pipes. Well no more. Back to the engineering phase! let’s se how the reconstruction goes? a small comparison C5R vs my C5R ? it’s so small in there! ? Edited January 14, 2023 by Mattilacken 3
Mattilacken Posted May 23, 2024 Author Posted May 23, 2024 I have been jumping between my ongoing projects like a kangaroo, but hey, that’s what I like. Did a new firewall for this one and installed an other set of turbos, also made a new intake pics comes when I have it printed. 2
Mattilacken Posted May 26, 2024 Author Posted May 26, 2024 Made some progress. Started on the dash and the firewall is done. Also reworked part of the cage. 2
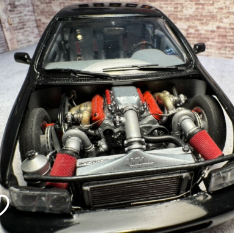
Mattilacken Posted May 27, 2024 Author Posted May 27, 2024 Here is a preview of the turbo system The intake say Silverado in C5 font and the snout say C5R, gave the intake a split look since that apeels to me and makes it more interesting. 2
Mattilacken Posted May 28, 2024 Author Posted May 28, 2024 I got the parts printed and test fitted. Looking good! Also been installing the dash and adjusting the fitment to the cage. I also started the fuel fillers that I am recycling from the C5R. 3
Mattilacken Posted May 29, 2024 Author Posted May 29, 2024 (edited) 22 hours ago, iamsuperdan said: Pretty dang awesome. Thanks Dan! Edited May 29, 2024 by Mattilacken
Mattilacken Posted June 2, 2024 Author Posted June 2, 2024 I have made some progress on the chassis, arms are fixated and fitted as they should. I also made the front part of the cage again and think I managed to make some thing that looks good and should be “functional” and support the IC. But I also noticed a big issue that I have no clue to how to solve.. everything is glued in its correct spots as I recall, but the chassi is shifted to the right. It can be clearly seen on the AArms and how the wheel is attached, you see more of the brake disc. Anny ideas on how to sort it? I have thought about taking out the correct amount in the bottom “plate” and ad on the other side. Would make the bottom to be offset but everything else to be correct. Thoughts? and comments are always appreciated! 3
Steve H Posted June 3, 2024 Posted June 3, 2024 Great progress here my friend! This is a killer looking Chev. LOTS of very nice engineering, scratch building, and 3d printing happening here Anton. Keep at it. 1
Mattilacken Posted June 3, 2024 Author Posted June 3, 2024 3 hours ago, Steve H said: Great progress here my friend! This is a killer looking Chev. LOTS of very nice engineering, scratch building, and 3d printing happening here Anton. Keep at it. Thanks Steve! Nice hearing from you! The 3D printer for sure helps when cad design in some cases is so much easier and quicker for me than doing the scratch building it self But piping is one thing that i prefere to do tradisionaly still
Mattilacken Posted June 3, 2024 Author Posted June 3, 2024 Made some more work on the piping. And I am actually feeling that I am starting to be done with the frame work. I Just need to sort the rear pushrod suspension and then I believe the frame to be done except for finning touches on seems and such. And I sorted my miss alignment, it was a portion of the firewall pushing the body to one side. What’s your thoughts? 3
Mattilacken Posted June 9, 2024 Author Posted June 9, 2024 Have made some progress, I have installed a bunch of magnets for holding the hood as well as the front and to hold the engine in place. i also started with 3mm aluminum rod to make an exhaust from the turbo then drilled the end of the turbo and the pipe and placed a magnet there as well. I also drilled holes for the exhaust in the bedside. i have also made the hole for the front racing high beams, I will be using clear glass later but it looks cool. I also got some more work done on my rear suspension. What do you guys think about the front splitter? Yey or nay? 2
Mattilacken Posted June 10, 2024 Author Posted June 10, 2024 Got an idea at work today, what doy you guys think of this idea? Open upp the lower openings to become larger air inlets. 2
iamsuperdan Posted June 12, 2024 Posted June 12, 2024 So good. And to your previous post. A front splitter totally suits the build. I say keep it. 1
Steve H Posted June 13, 2024 Posted June 13, 2024 Coming along Anton! I bet shooting the primer felt good. That “open” grill is really sharp. I agree with Dan, I think the splitter suits the truck. If it were me, I would keep it parallel with the ground, rather than on an angle, but… it’s not my truck!? I’m in love with the big rear tires on that thing, those are awesome. Keep up the great work.
Mattilacken Posted June 13, 2024 Author Posted June 13, 2024 (edited) 20 hours ago, iamsuperdan said: So good. And to your previous post. A front splitter totally suits the build. I say keep it. Thanks dan! I am also for it so i think i will! 9 hours ago, Steve H said: Coming along Anton! I bet shooting the primer felt good. That “open” grill is really sharp. I agree with Dan, I think the splitter suits the truck. If it were me, I would keep it parallel with the ground, rather than on an angle, but… it’s not my truck!? I’m in love with the big rear tires on that thing, those are awesome. Keep up the great work. It sure did feel good to finally be able to have it one collor instead of al the different ones. Thanks! I agree, it should be flat it suits it better than the old style scoping effect as they had on old TA cars. Hehe they are nice and i like the width but i am leaning on printing a set of new wheels and nwe front tires so i will print these for the rears. Edited June 13, 2024 by Mattilacken 2
Mattilacken Posted June 14, 2024 Author Posted June 14, 2024 Been smoothing out the body after first primer and I also made the splitter permanent. I also decided that Al the cooling air needed for the engine needs to go some where so I made a hood vent. 4
Mattilacken Posted June 18, 2024 Author Posted June 18, 2024 Have been sanding all over this project and things is looking smother. But biggest update is wheels and tires v 2. 3
dino246gt Posted June 19, 2024 Posted June 19, 2024 What a fantastic project! I love it! I love the way you're going about it, this is my favorite way to work also. This truck is amazingly cool! 1
Steve H Posted June 19, 2024 Posted June 19, 2024 Anton! You’re killin it! And in a really good way. The splitter is perfect, love the new wheel tire combo, the hood vent is a great touch, and that stance is all attitude! Looks like it’s really coming together. 1
Recommended Posts
Create an account or sign in to comment
You need to be a member in order to leave a comment
Create an account
Sign up for a new account in our community. It's easy!
Register a new accountSign in
Already have an account? Sign in here.
Sign In Now