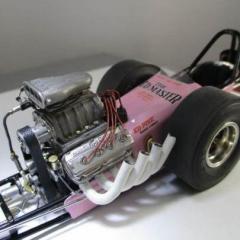
Mike Williams Posted August 28, 2021 Author Posted August 28, 2021 Thanks guys for looking, this is an enjoyable build. I'm satisfied with the results plus lots of new things being learned. @CT, just like in real life, it seems headers are also difficult on models. I've found this technique really secures the pipes, so tugging and pushing the pipes doesn't generally harm the foundation. They never seem to line up perfectly, so often gentle persuasion is needed. UPDATE: Motor works, this time around the injection gets attention. Many ways to get this done, I figured this is close to the real car setup and easy enough to boot. Real car injection nozzles; Here the brass nozzles with adjusting nut. Fuel line is 0.6 mm copper wire. Will be painted black. The other side, just the bare nozzles; Magneto done; Here with the hat, fits nice and snug on top of the brass ports; I like this shot; The real block is painted a 1963 Cadillac blue, so this is all but impossible to get in Germany. Duplicolor Pigeon Blue was chosen, fairly close to the real; I think it will be OK; Next up is the throttle linkage and fuel block. Mike..
Ian McLaren Posted August 28, 2021 Posted August 28, 2021 Mike this just keeps getting better, the injector work is superb. Well done.
AmericanMuscleFan Posted August 29, 2021 Posted August 29, 2021 I really love all those brass added details on the engine Mike, you always make me want to add more of this beautiful metal to my own projects... your fabrication techniques are very inspiring! Another masterpiece in the making! ?
Mike Williams Posted September 5, 2021 Author Posted September 5, 2021 (edited) Thanks Ian, the 392 LPH motor kit is fun to work on. @Francis, yes the build is enjoyable, some of the brass items offer new methods for me, but I do like the results. UPDATE: More motor works is the agenda. Further along with the fuel system, the fuel block is done (except 2 throttle return springs, added later) and the fuel pump is in the works. Also added a few items to the motor front. Gear cover gets tiny bolts, already sleeved. A new crank pulley was fabbed using polished aluminum parts. Idler pulley will get the same treatment, yet unsure of the blower pulley at this time. Here a shot of the real motor, courtesy Scott Snizek; A closer shot of the fuel block, Here the latest additions, fuel lines shown are only mockup, already removed; The fuel pump extension dangles, not attached yet; A few more of the scratched aluminum and brass pulleys; The idler pulley is done in brass, on to the blower drive pulley and the starter bracket. More soon. Mike.. Edited September 6, 2021 by Mike Williams
misterNNL Posted September 6, 2021 Posted September 6, 2021 Great attention to accurately scaled details. There's no substitute for photos of the real thing for inspiration. Thanks for sharing your skills with us.
AmericanMuscleFan Posted September 7, 2021 Posted September 7, 2021 You can't see it of course but there is a big smile on my face... The workmanship and soldering of the small brass parts is very high quality, it's very inspiring for detail lovers! ? Tell me, did you make the grooves on the crankshaft pulley by hand...? ?
Mike Williams Posted September 7, 2021 Author Posted September 7, 2021 @misterNNL, yes, and the photos I've received are excellent quality, too! Blow them up and every detail is clearly visible. A huge benefit. @Francis, the grooves...that bad huh? Laughing...a 0.3mm thin disc and one after the other, took about 2 minutes using my trusty Proxxon handpiece. I figured the belt would eventually hide most of the flaws, it went OK. Great that you're smiling. @dueces wild, glad you approve.
AmericanMuscleFan Posted September 7, 2021 Posted September 7, 2021 3 hours ago, Mike Williams said: @Francis, the grooves...that bad huh? Laughing... This is far from bad Mike! I don't know anyone who can do this by hand...! I should have said I didn't know anyone... now I do!!! There is no machine that can replace talent... ?
Claude Thibodeau Posted September 7, 2021 Posted September 7, 2021 Hi Mike! I agree with Francis: it takes a steady hand/eye coordination to do this. You've got it, obviously. Bravo! CT
Mike Williams Posted September 11, 2021 Author Posted September 11, 2021 Thanks fellows. Things don't go well all of the time. The LPH 392 clutch can was just fine but I slipped and ruined the flange, ripping out a bolt hole and scratching the aluminum motor plate. So, here the new clutch can. The flange just a tad wider. Still works though, lots of holes for bolts and nuts too. Here 2 photos of the can on the real car, courtesy Scott Snizek. Brass can. The can just hangs for now, but should've been placed a bolt hole or two further left; The polished brass will make a fine base for a later Alclad treatment. Mike..
AmericanMuscleFan Posted September 12, 2021 Posted September 12, 2021 Sad to hear about your latest mishap with the resin clutch can but there's no harm in adding more brass to this nice dragster.... ?
Mike Williams Posted September 18, 2021 Author Posted September 18, 2021 (edited) @Francis, yes, a bit more brass never hurt. Plus, an excellent use for all the scrap that accumulates. UPDATE: Moving on to the exhaust pipes. They're always a pita to make, in real life and on our models. I'm using 4mm brass tube of the thinner walled variety. 3mm tubes just slide in, which is the size used for the studs already cemented into the heads earlier. Here a short sequence on how I chose to bend the tubes on this project. The real motor has 2.5" stainless steel pipes, 12" radius at 90°. 4mm brass tubing is a perfect scale match. First off, 12" radius = 24" diameter = 38mm in 1:16 scale. 90° makes an equal 4 segments from a circle. Simple drawing made and marked. Annealing brass tubing. Let it glow then allow to air cool. Luckily a glass paint mixing jar at hand with a perfect 38mm rim. The annealed brass tubing bends easily around the rim using just your fingers. I like to add a solid wire inside the tube to act as leverage, also the reason for not cutting an exact length for the circle. Leave the rest, easier to hold and bend; The last segment not round yet, so the first was cut off to make room around the rim; Here all 4 segments chopped at 90°. Using the same 4mm brass tubing, short pieces were flared. Again, a tube was annealed, the inner lip reduced with a fine bur, then a small, prepped round screwdriver was hammered into the tube. 2 solid raps with a hammer and the flare is good to go. Will be soldered onto the existing bent tubes once they sit perfectly. Here 8 exhaust pipes all bent to an exact angle and proper length. More later on this.... Mike.. Edited September 18, 2021 by Mike Williams 1
AmericanMuscleFan Posted September 19, 2021 Posted September 19, 2021 Great tip Mike! Have you ever had the brass tube collapse on itself while wrapping it around your pattern (in this case the paint jar)? Is the rod you used as a lever only inserted a few millimeters into the end of the tube?
Mike Williams Posted September 19, 2021 Author Posted September 19, 2021 @Francis, with this radius there was no big concern about collapsing. The tubes did however, lose some of the roundness, although not visible to the eye. The 3mm leverage rod wouldn't fit without slightly grinding out the ends. Much tighter though would be a problem. Actually, I'll try a smaller radius soon, but I used the last of my 4mm tubing, the shop I order all brass from has vacation till the end of next week. For a FED for instance, the pipes have a 9" radius, being then significantly smaller. Instead of a 38mm diameter of the glass, it would need only 28.5mm. I do believe the brass tubing will have to be stuffed with a tight fitting solid rod in this case. I could order thicker walled 4mm brass, but feel it wouldn't make much difference, maybe even worse as more material has to be bent. I'll try this as soon as possible and get back to you. Yes, the leverage rod was only in a few millimeters. No noticeable visual change to the tube itself. They appear utterly round. Mike..
sflam123 Posted September 20, 2021 Posted September 20, 2021 Absolutely stunning work sir!! Amazing!!
Mike Williams Posted September 25, 2021 Author Posted September 25, 2021 @sflam123, great to see you here, Steve! I'm not especially active here anymore, only the WIPs. See you on our group! Thanks for looking. UPDATE: Moving forward, motor works is the agenda. Fuel supply, grill and fuel tank. All real car photos by Scott Snizek. Here the radiator shell; Fuel tank. There were several sizes over the years, the largest being for cackle events. I chose a somewhat smaller version but still letting the tank dominate the front view....because I like it and suits the car well. All sub-assemblies are finished. Now the fun really starts, body work. Mike..
Tortuga Kustomz Posted September 27, 2021 Posted September 27, 2021 beautiful work man, love it, so inspiring
Kingslug Posted September 27, 2021 Posted September 27, 2021 This is great..after seeing models like this I bought Ken Forans book. Do you use a lathe or small milling machine?
Mike Williams Posted September 27, 2021 Author Posted September 27, 2021 (edited) @Tortuga Kustomz, Marcos, your enthusiasm is inspiring as well! I can't wait till you get your new workbench area settled, you'll be building some serious scratch projects! @Kingslug, thanks for dropping by. I know of Ken Foran, have also read his book, great insight there! No, personally I have no use for a lathe or milling machine, although I do appreciate the skills. Only machine is a Dremel-type, smaller handpiece and a drill press for drilling holes in brass, using the same handpiece. Good luck, I do hope you'll enjoy the brassworks, but beware! Danger of addiction! Mike.. Edited September 27, 2021 by Mike Williams 1
Ian McLaren Posted September 29, 2021 Posted September 29, 2021 Mike this is an amazing project, every step of the way. Well done!
AmericanMuscleFan Posted October 2, 2021 Posted October 2, 2021 Great job Mike! You are truly an artist with brass and your amazing skills with this bright yellow material come through beautifully (maybe I'm repeating myself and I might do it again...), the gas tank and all the elements surrounding it are simply works of art ! The fuel supply system is absolutely stunning by the way! ?
Mike Williams Posted October 17, 2021 Author Posted October 17, 2021 BODYWORKS. I thought during the planning stages the '23 Ford T was doable at the bench. Having only a couple of touchy areas with compound curves, being the cowl and at the rear of the tub, the rest shows gentle curvature and simple, slight bends. The chute pack molding on the trunk was also touchy, more on this later. Here the right side tub panel; Marked are areas that will need attention; Now for the left side; Here the firewall with motor plate, now the body is getting sturdy; Now the cowl. This short piece has a bowed form at the firewall, then transforms into a curved concave toward the windshield area. I decided at best to use two sheets for this one; I'll play with this for awhile then on to the trunk. Mike.. 1
AmericanMuscleFan Posted October 19, 2021 Posted October 19, 2021 This is really nice bodywork Mike, I wouldn't know where to start but your long experience is quite evident here, impressive! ?
Recommended Posts
Create an account or sign in to comment
You need to be a member in order to leave a comment
Create an account
Sign up for a new account in our community. It's easy!
Register a new accountSign in
Already have an account? Sign in here.
Sign In Now