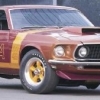
bogger44 Posted January 21, 2023 Posted January 21, 2023 Fresh off the bench, wrestled another of these Polar Lights kits into submission. The first order of attack was pulling the nose down to where it should be, then lots of trimming of various parts to get it all fitting together. Exhaust dump ends are aluminum tubing. Filed the rear window down until it sat flush with the body. The decals were toast and a bear to lay down (and very time consuming), lots of micro sol/set and a hair dryer being used. Got them on the best I could, a few cracked up and some silvered unfortunately. Paint is Tamiya TS-50 Mica Blue, a little too dark but close enough for me. Gold is Tamiya TS-21, same goes for the wheels but with a coat of Tamiya Smoke on them. Tires and wheels are upgraded PPP pieces. Looking at it now, I wish I would have lowered the rear a bit. I'm glad I finally brought this one to the bench and hammered it out as David will always be one of my all-time favorite drivers. Thanks for looking and any comments/questions. 6
Dave Van Posted January 21, 2023 Posted January 21, 2023 Nice neat and clean build!!!!! How did you fix the nose??? The cut at 2:00 on the wheel well up to A pillar area??? I think the stance is perfect for a super speedway car......nose DOWN!! 1
bbowser Posted January 21, 2023 Posted January 21, 2023 1 hour ago, Dave Van said: I think the stance is perfect for a super speedway car......nose DOWN!! I agree, great job! Those Polar Lights kits are definitely not shake and bake. 1
Toys4Don2 Posted January 22, 2023 Posted January 22, 2023 Turned out great. You nailed the front end fix. 1
bogger44 Posted January 22, 2023 Author Posted January 22, 2023 (edited) Thanks guys! Yes these kits sure aren't the best designed, but they sure are a great subject. I've got two more in the stash to tackle. 23 hours ago, Dave Van said: Nice neat and clean build!!!!! How did you fix the nose??? The cut at 2:00 on the wheel well up to A pillar area??? I think the stance is perfect for a super speedway car......nose DOWN!! Thanks Dave! You're right about the super speedway stance, I'm good with it! To adjust the front clip, first I made a cut on the rear portion of the inner fender aprons as a stress reliever (just ahead of the firewall, you can still see it in the pic). Then I heated up some water in a pot, not to boiling though, and dunked the front into the water for 15-20 seconds, then pulled it out and gently pulled down on it. I took it slow and repeated the process a few times until it was good to my eye. Edited January 22, 2023 by bogger44 added text
MarkJ Posted January 23, 2023 Posted January 23, 2023 Excellent build, Tony. I like your attention to detail. You have taken no short cuts with this build, and it is perfectly clean as well. A real joy to look at. 1
sflam123 Posted January 27, 2023 Posted January 27, 2023 Beautifully done! I’ve got one, but it is not nearly as nice as yours. Fantastic effort! 1
Shark Posted January 28, 2023 Posted January 28, 2023 Lots of people poor mouth these kits, but I like them and think you did an excellent job on your build. I didn't notice anything wrong with the decals, but if you haven't cleared them, Mike is coming out with a Pearson sheet for his 68 and up HM cars. 1
TooOld Posted January 28, 2023 Posted January 28, 2023 That's got to be the cleanest and best looking build of this kit I've seen , and it's David Pearson's car ! The colors and decals look great , very nice work ! 1
James2 Posted January 28, 2023 Posted January 28, 2023 Great looking car. I got to meet DP in the pits at Michigan yrs ago, I have a HotPass somewhere that he signed for me. Just a note: the decals on your hood, if you paint it gloss then apply the decals and spray flat clear over everything they won't silver. That's an old amour builder trip. Very nice model...
'70 Grande Posted January 28, 2023 Posted January 28, 2023 Great looking build and your lowered nose adjustment looks just right! My warning to other modeler's intending on using your technique for lowering the front end; I attempted the same approach when starting my build of this kit a few years ago and found the plastic at the A-pillars got soft really, really fast and my roof collapsed on me! Body into the junk box and replacement kit acquired... watch those A-pillars! 1
bogger44 Posted February 3, 2023 Author Posted February 3, 2023 Thanks a lot guys! Yeah these kits do have a bad rap, but with patience can be built into respectable models. On 1/27/2023 at 6:33 PM, Shark said: Lots of people poor mouth these kits, but I like them and think you did an excellent job on your build. I didn't notice anything wrong with the decals, but if you haven't cleared them, Mike is coming out with a Pearson sheet for his 68 and up HM cars. I wish I would have checked his site before I started, I would have waited until he releases those decals. My usual luck hahaha. I didn't clear over them so I probably could get them removed if I feel like it someday. On 1/28/2023 at 6:14 AM, James2 said: Great looking car. I got to meet DP in the pits at Michigan yrs ago, I have a HotPass somewhere that he signed for me. Just a note: the decals on your hood, if you paint it gloss then apply the decals and spray flat clear over everything they won't silver. That's an old amour builder trip. Very nice model... That's awesome you met him. Yeah I totally forgot that trick of using gloss paint instead of flat, thanks for the reminder. ?
Recommended Posts
Create an account or sign in to comment
You need to be a member in order to leave a comment
Create an account
Sign up for a new account in our community. It's easy!
Register a new accountSign in
Already have an account? Sign in here.
Sign In Now