64SS350 Posted April 24, 2023 Posted April 24, 2023 Like in BDSchindler's post, I too started this project around February/March, as a second project. I hesitated starting a post, so as not to jump on his bandwagon. But, they are two builds that won't be the same! Interesting to have the same issues or challenges with the same kit as someone else at the same time! Anyway, here's my progress... started with resin body, using a 2016 kit as a donor. I haven't decided yet to build it plain or customize the body. 1
64SS350 Posted April 24, 2023 Author Posted April 24, 2023 Painted the chassis and interior tub. This is my first flocking/embossing attempt. Decided to finish off the trunk area. 2
BDSchindler Posted April 25, 2023 Posted April 25, 2023 (edited) Interesting approach to the Cargo Area by removing the rear deck of the interior behind the seats and finishing it off. That's one I didn't think of. I assume you put a backing on the rear seats. I will probably steal this idea from you as I really like it! On the body just under the front in the engine bay are 2 tabs that need to be remove and sanded flat. If not, the tub for the engine bay will not fit correctly (see pic below area circled in yellow), It is on the right and left side...TEST FIT EVERYTHING before assembly! I found a lot of things that needed some sort of modification! Nice job! Edited April 25, 2023 by BDSchindler 1
64SS350 Posted April 25, 2023 Author Posted April 25, 2023 10 minutes ago, BDSchindler said: Interesting approach to the Cargo Area by removing the rear deck of the interior behind the seats and finishing it off. That's one I didn't think of. I assume you put a backing on the rear seats. I will probably steal this idea from you as I really like it! On the body just under the front in the engine bay are 2 tabs that need to be remove and sanded flat. If not, the tub for the engine bay will not fit correctly (see pic below area circled in yellow), It is on the right and left side...TEST FIT EVERYTHING before assembly! I found a lot of things that needed some sort of modification! Nice job! I get the....test fit everything. Lots of little stuff as you said, though I don't think I've checked the engine bay for fit yet. Not sure what you did, but in the last pic, you can see I removed the solid area behind the grills, made fitting those much easier and now they set in where they belong. Nice job on your paint
BDSchindler Posted April 25, 2023 Posted April 25, 2023 26 minutes ago, 64SS350 said: I get the....test fit everything. Lots of little stuff as you said, though I don't think I've checked the engine bay for fit yet. Not sure what you did, but in the last pic, you can see I removed the solid area behind the grills, made fitting those much easier and now they set in where they belong. Nice job on your paint I did the same thing with the grill area. I just like having the open grill. 1
64SS350 Posted April 25, 2023 Author Posted April 25, 2023 Really?! Lol....I thought about opening the grill holes, now I may have to , that looks awesome! I just opened the mounting area. Nice work!
Joe Lange Posted April 25, 2023 Posted April 25, 2023 Very interesting 'WIP' Bill. Looking forward to seeing the finished product. It would be cool to see one done as a Factory Concept Car.
BDSchindler Posted April 25, 2023 Posted April 25, 2023 1 hour ago, 64SS350 said: Really?! Lol....I thought about opening the grill holes, now I may have to , that looks awesome! I just opened the mounting area. Nice work! The donor kit I used is the 50th anniversary camaro...it came with a closed grill as well as the open one. so I used the open one as it saved tons of sanding work. I left a small lip in the opening so there was something to mount it to.
64SS350 Posted April 25, 2023 Author Posted April 25, 2023 I have two of those, but chose the 2016 version, no optional grill...darn. I'll figure out something!
64SS350 Posted May 4, 2023 Author Posted May 4, 2023 Update... Chassis, interior, engine bay done( minus two decals). I wanted to trim the seats in red somehow, but what I tried didn't work out, so all gunmetal it is. If I do the custom version in my head on the next one, the interior will be more detailed.(This was after all a go between build..lol). Stole the wheels from the Zl1 kit, look way better for a stock look. Also made aluminum exhaust tips,. didn't care for the chrome ones, or refinishing them. 2
64SS350 Posted June 26, 2023 Author Posted June 26, 2023 Not much to update, I'm going between two builds, like many of us do. I have been experimenting on painting the black edge's of the windows. One more to go, then I'll post some pics.
64SS350 Posted August 22, 2023 Author Posted August 22, 2023 Got back on the Camaro. Body is primed, I will add one more coat before paint. Finally made progress on the front airdam, some touch-up still to be done. I really need to get my spray booth made, I have projects starting to stack up because I would rather wait to get that done before final paint jobs are attempted. Anyway... here's the pics..
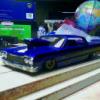
64SS350 Posted September 2, 2023 Author Posted September 2, 2023 Got the body painted, Tamiya Gunmetal Grey and currently two initial coats of Tamiya Pearl Clear. I may add another coat or a straight clear. 5
beeRS Posted September 10, 2023 Posted September 10, 2023 That paint finish looks fantastic. This looks like a really nice resin cast.
64SS350 Posted September 10, 2023 Author Posted September 10, 2023 Thank you, the paint did come out very nice. In that light and angle, it looks very glossy, but in reality it's not. I shot some Tamiya TS-13 clear over the Pearl Clear, then finding out that's only a 1K finish. So I've not perfected my polishing skills and was hesitant to try it. I even spent an hour prepping a Vette body to be my guinea pig for practice, but decided to go for it . So far the hood is done and looks great. The body is in process! And yes, this is a very nice casting, I'm thinking of getting another for a second version. 1
64SS350 Posted September 26, 2023 Author Posted September 26, 2023 Did I mention how much I hate dealing with windows??? Here's pics of final paint and some assembly. A few decals to be added and obviously....new side windows! As BDSchindler mentioned the windshield doesn't fit quite right. A lot of tweaking had to be done because the A pillars are slightly different than on the kit body. Also cracked open the 50th anniversary kit for the open grill, much better! 1
mustang1989 Posted September 26, 2023 Posted September 26, 2023 I gotta hand it to ya bub......you sure know how to build a fine lookin' auto build. That's for dang sure. btw.....The wheels you selected for this look perfect on this.
BDSchindler Posted September 27, 2023 Posted September 27, 2023 Looks great! The rear window that was supplied in my C1 kit was somewhat stiff and flat. I had to shave the top of the window at an angle and glued it with Canopy Glue then clamped it in place for 2 days. Otherwise, it caused the rear wing to not sit tight to the body. Love the color on yours and I agree...the wheels are much better!
64SS350 Posted September 28, 2023 Author Posted September 28, 2023 (edited) Ok, here it is at about 99%, just need a couple small decals and a license plate. You can actually see the carpet through rear glass. I'll do some better pics after that. Edited September 28, 2023 by 64SS350 1
Recommended Posts
Create an account or sign in to comment
You need to be a member in order to leave a comment
Create an account
Sign up for a new account in our community. It's easy!
Register a new accountSign in
Already have an account? Sign in here.
Sign In Now