Nitrozilla Posted October 6, 2011 Posted October 6, 2011 Outstandable !! Now, do that with the butterflies and the throttle linkage and the brake pedal....and the working ignition keyswitch........
W-409 Posted October 7, 2011 Posted October 7, 2011 I can't understand, how you can make that kind of opening door... Amazing talents. I'm in trouble if I have to make opening doors without that kind of door lock... Amazing job on this, I can't wait to see more.
futurattraction Posted October 15, 2011 Posted October 15, 2011 Cool video, Bart. That is an excellent design! Thanks for the video clip...
eviltwincustoms Posted October 16, 2011 Author Posted October 16, 2011 Bart... That is flat out Awesome!! Thank you for the video. I may just have to borrow that idea of your. Great work bud. Yeah, that is awesome the way that it works. Chris and Wayne... Thank you very much for the kind words, it is much appreciated! Chris, I say borrow away and use on your build anyway you can figure it out to work. Especially on your Pro Mod you will soon be working on.
eviltwincustoms Posted October 16, 2011 Author Posted October 16, 2011 Brad, Robert, Derrick and Joe, I appreciate you stopping in and taking a gander at the video. Thanks for the complement! Outstandable !! Now, do that with the butterflies and the throttle linkage and the brake pedal....and the working ignition keyswitch........ Joe, my intentions are to make the butterflies and brake pedal functioning. The throttle linkage will be iffy, depending on how many connections I will need to do. My concern is up around the Hat and getting the brackets sturdy enough to handle movement.
eviltwincustoms Posted October 16, 2011 Author Posted October 16, 2011 I can't understand, how you can make that kind of opening door... Amazing talents. I'm in trouble if I have to make opening doors without that kind of door lock... Amazing job on this, I can't wait to see more. Niko, you have a lot of Talent as well! You work with Brass and do a lot of your own scratch building which is just amazing! So i know you can make the doors, it will just take some concentration and time. Cool video, Bart. That is an excellent design! Thanks for the video clip... Thanks Scott for the complement! Pretty simple and does exactly what I needed it to do. Again Thanks to Wayne for the great suggestion of using the Lock springs.
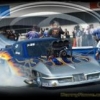
eviltwincustoms Posted October 19, 2011 Author Posted October 19, 2011 Not much of an update, but I thought I would share since it is dark and had to stop working. Now I just have to make the final 3 brackets and 3 T handle's to hold down the top NOS tank bracket. Even added threaded bolts to mount the four brackets. Here is a Little taste of my Rig that will be pulling my Pro Mod. A lot of custom work ahead of me on this one as well. It will be stretched out to the 355" wheelbase. Hood, Cab and Sleeper will be dropped down onto the frame a scale 4" and the Cab will be chopped. For the trailer, I am thinking a semi Stack Trailer just like they use to haul the race cars in.
futurattraction Posted October 19, 2011 Posted October 19, 2011 Sweet pics, above, Bart... Phenomenal work, and even more to boot with the big rig! :-)
Mister Twister Posted October 19, 2011 Posted October 19, 2011 Absolutely fantastic work....Good stuff! Keep it going!
tyrone Posted October 19, 2011 Posted October 19, 2011 Bart, the bottle mounts look sweet as does the rest of your work, cant wait to see the rig....
Mooneyzs Posted October 19, 2011 Posted October 19, 2011 Bart... those Nitrous bottles are looking great and so are all of the brackets that you have fabricated. Great work Bud!! Looks like a great start on the rig. I have a few pics of a rig I saw at the races. Wished I would have gotten more for you. Most of the rigs were parked side by side and tuff to get some good pics of. But I was able to get a few and hope they help.
1320wayne Posted October 19, 2011 Posted October 19, 2011 Awesome work on the tanks. Brackets look spot on. The race rig is a tall order but I'm sure that it will turn heads as well.
eviltwincustoms Posted October 19, 2011 Author Posted October 19, 2011 Scott, Wayne, Joe, Darryl, Tyrone, Chris.... Thank you all for the kind words and words of encouragement! I would love to take credit for the turned aluminum tanks, but Thanks goes out to Jim (MicroNitro). I have just done the small detail of building the NOS bracket that will be used to hold them down in my car. Darryl, when I get closer to wrapping up the car I will be looking for your "How To" on your deployed Chutes, I really would like to add that detail to my project!
Randy D Posted October 19, 2011 Posted October 19, 2011 Hi Bart, The tanks and brackets are looking cool!! Love the bolts Randy
W-409 Posted October 20, 2011 Posted October 20, 2011 Hey, great to see some progress on this!!! Those NOS bottles and brackets look very good. This is very interesting project, in every update there comes something which makes me say WOW!
MicroNitro Posted November 2, 2011 Posted November 2, 2011 Hey Bart, I got the Bell housing and brakes done I am waiting on a 3/32 center cut end mill to finish the bead locks. The bell housing is about .012" thick. I was so happy with the way they turned out I just had to post them.
Red rocket 10 Posted November 2, 2011 Posted November 2, 2011 Wow, Jim when can I place my order , they are beautiful..................
eviltwincustoms Posted November 2, 2011 Author Posted November 2, 2011 Jim... you can't see it right now.. but I have a grin from ear to ear seeing what you have turned out! That bell housing looks nice, I almost hate to cut into it to make the inspection window!
Recommended Posts
Create an account or sign in to comment
You need to be a member in order to leave a comment
Create an account
Sign up for a new account in our community. It's easy!
Register a new accountSign in
Already have an account? Sign in here.
Sign In Now