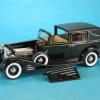
Luis Ayala Posted October 31, 2011 Posted October 31, 2011 (edited) I started this project about a year ago hoping to get it done by November 2011 to show it at our Caribbean Scale Auto annual event, but due to work, family and other duties I have been away from the hobby, so It will continue to be a long term project for November 2012. A few weeks ago I decided to step down a little bit from work and fight some time back for my own health sake to get back to the workbench every other day. I pulled the kit back from the projects shelf and sanded, cleaned & primed all the parts to test fit and look for scratches & flaws. Even though I still have some minor problems with my vision (need a new pair of glasses) I am using a new working light that has made the job more easier. This is the link to the complete album of the build: http://public.fotki....ercury-project/ Below are some pics with the rims & tires installed to a closer stance where I wanted to be. It still needs a ton of work but I am having a lot of fun and I am very happy with the results so far. Hope you like it and thanks for looking !! Edited April 27, 2012 by Luis Ayala
mannyclub Posted October 31, 2011 Posted October 31, 2011 I like the looks of it so far, cant wait to see more of it. The WIP pics are cool also. Manny
Dr. Cranky Posted November 1, 2011 Posted November 1, 2011 Wow, this is very interesting. Keep it going, Luis.
walt francis Posted November 2, 2011 Posted November 2, 2011 Keep it coming I am glued on this build for sure.
sbk Posted November 2, 2011 Posted November 2, 2011 Nice work! You've don't such a great job getting everything accurate, don't forget about those front seats.
Ron Hamilton Posted November 2, 2011 Posted November 2, 2011 Absolutely breathtaking!!! Is it going to be a Replica Stock, or a Custom???
Luis Ayala Posted November 3, 2011 Author Posted November 3, 2011 Thank you all for your comments, I am glad you like it !!!! I will post more progress pics in a few weeks.
Luis Ayala Posted November 3, 2011 Author Posted November 3, 2011 Nice work! You've don't such a great job getting everything accurate, don't forget about those front seats. Hi Steve !!! That seat looks great !!!! I was planning on using a donor front seat from a 53 Victoria to modify it and do somthing like that. I am using reference pics from a full resto I found on the web but your tip will save me a lot of work.
Luis Ayala Posted November 3, 2011 Author Posted November 3, 2011 Absolutely breathtaking!!! Is it going to be a Replica Stock, or a Custom??? Thanks Ron !!! It will be a Replica Stock. I am trying to keep it as close as possible to the real car. It looks like it is going for a custom look since I shaved the trim on the outside because it was uneven and I didn't like it. I am planning on using half round styrene to make it as a separate piece. That is the reason why you can still see the mold line on the body for the cast trim, it will serve as a guide for the height of the new one.
MrObsessive Posted November 3, 2011 Posted November 3, 2011 Luis!! Glad to see you back man! The body work on that Merc is lookin' great! Keep us posted!
Luis Ayala Posted November 4, 2011 Author Posted November 4, 2011 Luis!! Glad to see you back man! The body work on that Merc is lookin' great! Keep us posted! Hi Bill !!!! It’s good to be back, hope everything is well for you buddy. I will post more progress pics next week since I will have one day off due to a holiday.
Ryan S. Posted November 4, 2011 Posted November 4, 2011 I looked through your build photos, you've got a lot of nice stuff going on here. I'll be watching. Can I ask why you separated the front fenders from the body?
Alyn Posted November 4, 2011 Posted November 4, 2011 That body looks great in primer as is. I'd stop now and call her done. The perfect body shop special.
made007 Posted November 4, 2011 Posted November 4, 2011 i saw this project in person, and let me tell you , this is gonna be a sick ride when finished, the amount of detail that luis is putting on this model is crazy
Luis Ayala Posted November 5, 2011 Author Posted November 5, 2011 I looked through your build photos, you've got a lot of nice stuff going on here. I'll be watching. Can I ask why you separated the front fenders from the body? Hi Ryan!! When I started to work on the door hinges I was having trouble to make some decen finish under the fenders so I decided to remove them and redo the whole firewall to a more clean look.
Luis Ayala Posted January 8, 2012 Author Posted January 8, 2012 Hope everyone had a wonderful and blessed holidays and best wishes on the New Year. Last year I wanted to bring this project to our biggest show here in PR, the CSAE and for that I temporarily glued some parts together and applied primer to the whole thing just to place it on the exhibition table and share it with friends. Now after the show is gone, it was time to get back to bench, take it apart again and move forward. Since I had a couple of days off on vacation I grabbed my tools and did some progress I want to share with you. Here is the trunk lid hinges already installed. I still have to test fit and install the pivot inside the trunk, but it looks good so far. I decided to use the ones that came with the kit since I believe it looks better than the round styrene tubing with wire I usually use. I will sand them later to slim them down a little. Here is the gas filler door supported with some “Tamiya” tape underneath. When finished it will open and reveal the gas cap & inside the trunk the hose will be connected to the gas tank. Here some progress on the fire wall & pillars, still a long road ahead but I am having a lot of fun and learning a lot with this build. Alter all this work is done I will start to pin & align the front end. Hope you like it and thanks for looking !!!!!
Modlbldr Posted January 8, 2012 Posted January 8, 2012 Luis- This is looking fantastic. I like the work that you have done so far. You have your work cut out for you on this one. Do you have any links to the restoration work of the 1:1? I am looking for interior shots of a stock 49-50 Mercury. It seems that everything I find is either customized (as most of these have been over the years) or artists drawings of Merc ads from back then. I have yet to find any photos of completely stock 49-50Mercs. Keep it up and I'll be watching your great progress. Later-
Luis Ayala Posted January 8, 2012 Author Posted January 8, 2012 Luis- This is looking fantastic. I like the work that you have done so far. You have your work cut out for you on this one. Do you have any links to the restoration work of the 1:1? I am looking for interior shots of a stock 49-50 Mercury. It seems that everything I find is either customized (as most of these have been over the years) or artists drawings of Merc ads from back then. I have yet to find any photos of completely stock 49-50Mercs. Keep it up and I'll be watching your great progress. Later- Thanks Tom, I am glad you like it !!!! I am using this resto site as reference: http://autorestoration101.com/ I was lucky enough to find this convertible restoration. http://autorestoration101.com/category/1949_mercury_convertible_restoration/page/26/ I have a few pics I have dig from here & there over the internet that I can email you for reference. Send me a PM with your email addres and I will forward them to you.
Luis Ayala Posted April 27, 2012 Author Posted April 27, 2012 (edited) I have been very busy at work so it has been a long time since I worked on this build, but hopefully I will have more time during summer where I will be on vacations. Here are just a few pics of the progress work on the firewall. It still needs a ton of work to be done, but I will get it done just one step at a time until I feel happy with the results. Hope you like it and thanks for looking!! Edited April 27, 2012 by Luis Ayala
TooOld Posted April 27, 2012 Posted April 27, 2012 Luis , That's a pretty nice looking firewall . I missed your build before so I have to go back and find it . Are you going to have a tilt front end ? I really like what you are doing so far . Nice work .
Luis Ayala Posted April 27, 2012 Author Posted April 27, 2012 Luis , That's a pretty nice looking firewall . I missed your build before so I have to go back and find it . Are you going to have a tilt front end ? I really like what you are doing so far . Nice work . Thanks for your comment Bob, I am glad you like it !!! I cut out the front end to rework the firewall and the pillars for the door hinges. Then I had the crazy idea to separate the fenders to rework the engine bay and add more details. The build will be basically a factory stock version but I am still wondering on making the fenders removable or just glue them back in place after finishing the work on the engine bay.
Jantrix Posted April 27, 2012 Posted April 27, 2012 Whoa, I missed this one. Lovely work. I'll be following this.
rmvw guy Posted April 27, 2012 Posted April 27, 2012 (edited) That body looks great in primer as is. I'd stop now and call her done. The perfect body shop special. I was thinking the same thing but, it keeps getting better and better! Edited April 27, 2012 by rmvw guy
Recommended Posts
Create an account or sign in to comment
You need to be a member in order to leave a comment
Create an account
Sign up for a new account in our community. It's easy!
Register a new accountSign in
Already have an account? Sign in here.
Sign In Now