cobraman Posted July 8, 2012 Share Posted July 8, 2012 Killer paint work ! Quote Link to comment Share on other sites More sharing options...
TooOld Posted July 8, 2012 Share Posted July 8, 2012 I've never been a big lowrider fan , but have always admired the craftsmanship that goes into creating them . You have definetly built an incredible looking '62 Chevy ! Your paint work combined with all the chrome is just awesome ! Continuing the paint onto the underside is really cool . First time I've ever seen that done . I'm looking forward to seeing more , so please keep posting here . And WELCOME to the MCM Forum ! Quote Link to comment Share on other sites More sharing options...
cruz Posted July 8, 2012 Share Posted July 8, 2012 That's just awesome man, I can just imagine all the masking work on that thing... :blink: Quote Link to comment Share on other sites More sharing options...
Dr. Cranky Posted July 8, 2012 Share Posted July 8, 2012 HOLY SMOKES that's beautiful. Welcome to the forum and we hope to see more of your amazing builds. Pure eye candy, Chris. Thank you. Quote Link to comment Share on other sites More sharing options...
crazyjim Posted July 8, 2012 Share Posted July 8, 2012 Let me say 3 things - Welcome to the forum, Chris. WOW!! and SHINY :) RULES! Now can you answer a question? When you're laying down all that tape, what do you do when you end a piece of tape at an intersection? Cut it with a razor blade, x-acto? Quote Link to comment Share on other sites More sharing options...
mikemodeler Posted July 8, 2012 Share Posted July 8, 2012 Like others, I am in awe of your paint skills! I am still trying to master the airbrush and know that it is just a matter of practice and patience! Not a big fan of lowriders but have to admit that to do what you did requires some major talent and a lot of patience. Welcome to the forum and keep them coming! Quote Link to comment Share on other sites More sharing options...
Ace-Garageguy Posted July 8, 2012 Share Posted July 8, 2012 Fine fine looking work. Quote Link to comment Share on other sites More sharing options...
Ira Posted July 8, 2012 Share Posted July 8, 2012 AMAZING PAINT & INTERIOR!!! Thanks for sharing... Quote Link to comment Share on other sites More sharing options...
b_lever1 Posted July 8, 2012 Share Posted July 8, 2012 awsome !!!!!!!!!!!!!!!!!!!!!!!!! Quote Link to comment Share on other sites More sharing options...
Albie D Posted July 8, 2012 Share Posted July 8, 2012 Locked up lowriders aint my thing, but man this sled is killin 'em! Wanna share any secret masking techniques? That paint is off the leash to say the least. Quote Link to comment Share on other sites More sharing options...
H.A.K Posted July 8, 2012 Share Posted July 8, 2012 (edited) Dang that looks like ######. Your not even good at this whole model building thing are you. J/K Chris, you know just how much I love that model car. I'd love to own that it one day. Just say the word. Edited July 8, 2012 by H.A.K Quote Link to comment Share on other sites More sharing options...
mickey1938 Posted July 8, 2012 Share Posted July 8, 2012 I'm AMAZED at such a Beautiful Car, Really Really Awesome Job, I'd show that Puppy off as much as I could if I were you!! Great Job, great choice of Colors!! Quote Link to comment Share on other sites More sharing options...
CemetaryAngel81 Posted July 8, 2012 Share Posted July 8, 2012 Man THIS was the build that caused half of the entrants in the summer build off to throw in the towell.....JK I wouldnt blame them,unspeakable perfection in that paint job Chris! Quote Link to comment Share on other sites More sharing options...
deadcylinder Posted July 8, 2012 Share Posted July 8, 2012 That interior is a heck of a trip man! Nailed it el perfecto! Just when I thought there were enough patterns on that bod, There were more! The underside floorpans rocks! The whole color scheme is like taking a 10 roll Life Saver sampler pack and putting all the candies in your mouth at the same time Dangerous but ever so delicious at the same time. The interior could be marketed as an aphrodisiac. (Who needs Shark fin soup?) Total chick magnet! I'm in love with every color and every line. The detail goes beyond expression bro. Keep em bouncin'... Quote Link to comment Share on other sites More sharing options...
Elliot949 Posted July 9, 2012 Share Posted July 9, 2012 Not my Style but Dang the workmanship in this paint work is Fabulous... Quote Link to comment Share on other sites More sharing options...
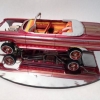
chris_thobe Posted July 9, 2012 Author Share Posted July 9, 2012 WOW, Thanks everyone for all the compliments. It means ALOT to me. I don't even know where to start... the masking of this beast was all done with a hobby knife with 2 blades in it. Took a piece of 2 inch masking tape about 10 in long and stuck it to my cutting mat. Then I took the 2 bladed knife and started cutting strips and laying out the patterns. Each color had to be masked off seperately. I stuck the pattern lines down really good and then when I masked each section off, I stuck all of the tape on my hand or tee shirt before sticking it on the car to make it not very sticky. This is so when I untape each section, my thin pattern lines stay stuck to the car. Thanks again everyone for making me feel so welcome! Quote Link to comment Share on other sites More sharing options...
LAone Posted July 9, 2012 Share Posted July 9, 2012 once again welcome and dang, you got down on this one. awesome paint job and detail. Quote Link to comment Share on other sites More sharing options...
AUGIEDOGGIE Posted July 9, 2012 Share Posted July 9, 2012 dang just awsome workmanship love the colors!! and welcome once agian..... Quote Link to comment Share on other sites More sharing options...
Timeline Posted July 9, 2012 Share Posted July 9, 2012 Looking nice Chris, I have a '62 Impala in the progress too, how's the P-E set, anything to look out for while building? Quote Link to comment Share on other sites More sharing options...
chris_thobe Posted July 9, 2012 Author Share Posted July 9, 2012 Thanks! I bought the PE kit for this but because of the amount of Customizing I didn't get to use any of it for the interior. I mainly just got to use the emblems and the grille. The kit looks like it would give a ton of detail to the stock interior though! Quote Link to comment Share on other sites More sharing options...
Mazdat Posted July 10, 2012 Share Posted July 10, 2012 (edited) What's up Chris, Nice job on the deuce bro, I need to start with the patterns too I have a question, when you lay the small strips of tape to make your patterns, then you paint each pattern individually, to mask off each one, what tape to you use? What I mean is that you can't just mask off each pattern without putting tape over next set of patterns. Its a little confusing the way I'm asking I think. Edited July 10, 2012 by Mazdat Quote Link to comment Share on other sites More sharing options...
chris_thobe Posted July 11, 2012 Author Share Posted July 11, 2012 What's up Chris, Nice job on the deuce bro, I need to start with the patterns too I have a question, when you lay the small strips of tape to make your patterns, then you paint each pattern individually, to mask off each one, what tape to you use? What I mean is that you can't just mask off each pattern without putting tape over next set of patterns. Its a little confusing the way I'm asking I think. I use a piece of 2 inch masking tape and stick it to my cutting mat then take a hobby knife with 2 blades in it and cut real thin strips. Lay down ALL patterns first. Then tape up one section and lay down a thin layer of kandy, untape and tape another section off, and keep repeating til all sections are finished, then pull off all the pattern lines and you will be left with basecolor lines between all the kandy colors. Quote Link to comment Share on other sites More sharing options...
Recommended Posts
Join the conversation
You can post now and register later. If you have an account, sign in now to post with your account.
Note: Your post will require moderator approval before it will be visible.